HOLIDAY DONATION DRIVE - SUPPORT MSW - DO YOUR PART TO KEEP THIS GREAT FORUM GOING! (Only 44 donations so far out of 49,000 members - C'mon guys!)
×


Louie da fly
-
Posts
7,987 -
Joined
-
Last visited
Content Type
Profiles
Forums
Gallery
Events
Everything posted by Louie da fly
-
Very true. Have you ever seen the movie "The Witches of Eastwick"? Jack Nicholson explaining to Susan Sarandon that the problem with her cello playing is not the intonation (left hand) but that she's too timid with the bow. Wonderful scene. To play an instrument from the violin family you have to be prepared to go nuts with the bow or it will always sound insipid. (A case of "do as I say" rather than "do as I do", I'm afraid). Steven
-
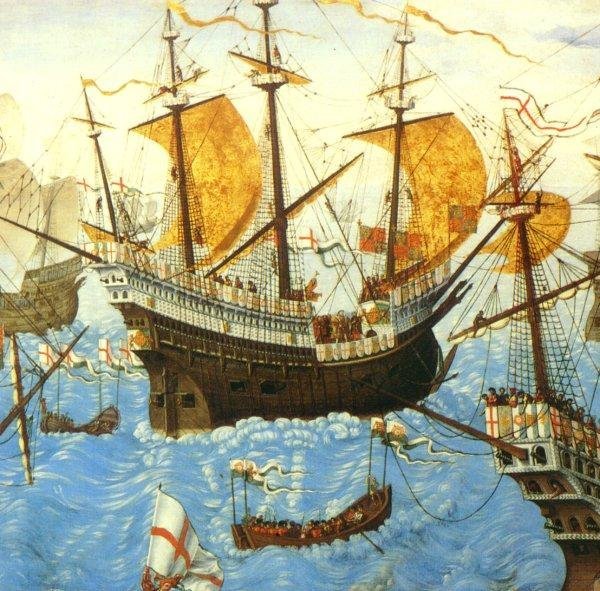
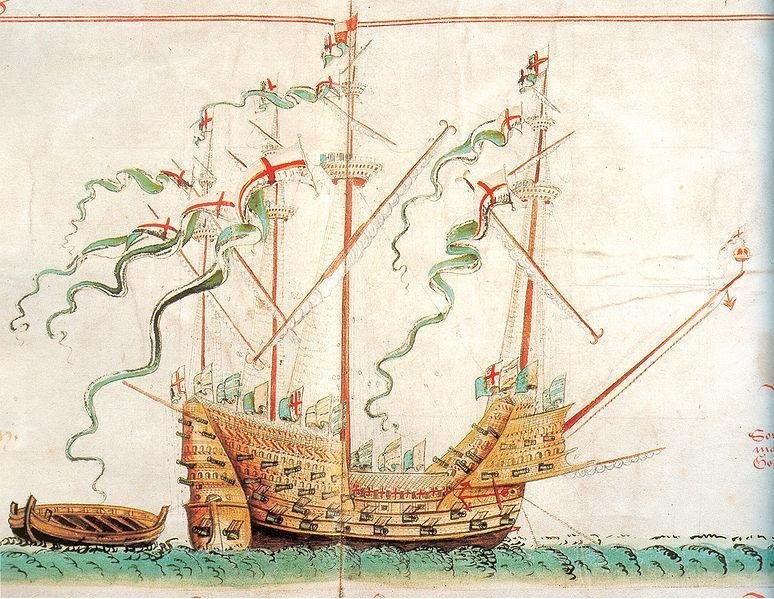
 Yes, it's not a dazzling white. But hey, these flags would be brand-new; the ship's on display for the king! Steven
- 740 replies
-
- 3
-

-

-
- Tudor
- restoration
- (and 4 more)
-
Yes, it's a nice surprise to discover that (I still remember my first time). It's amazing how sturdy they get - much stronger than one would expect from looking at them. One of the drawbacks of plywood keels. I prefer solid wood. Still, most people seem to manage. Steven
-
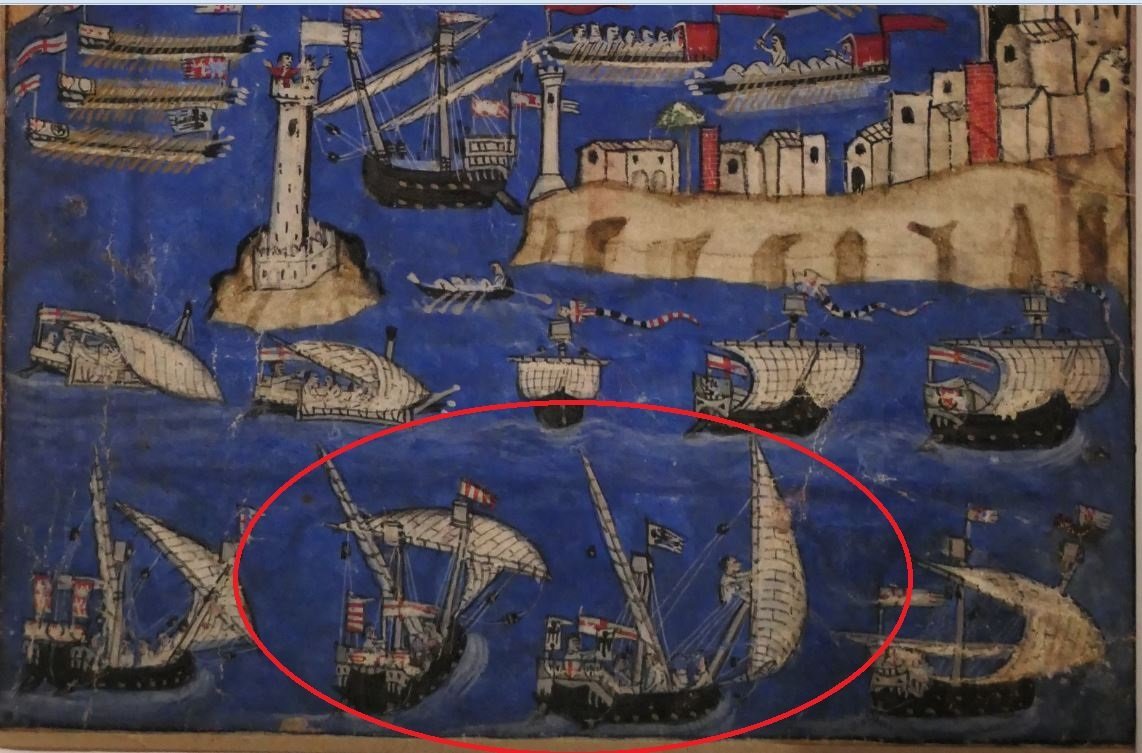
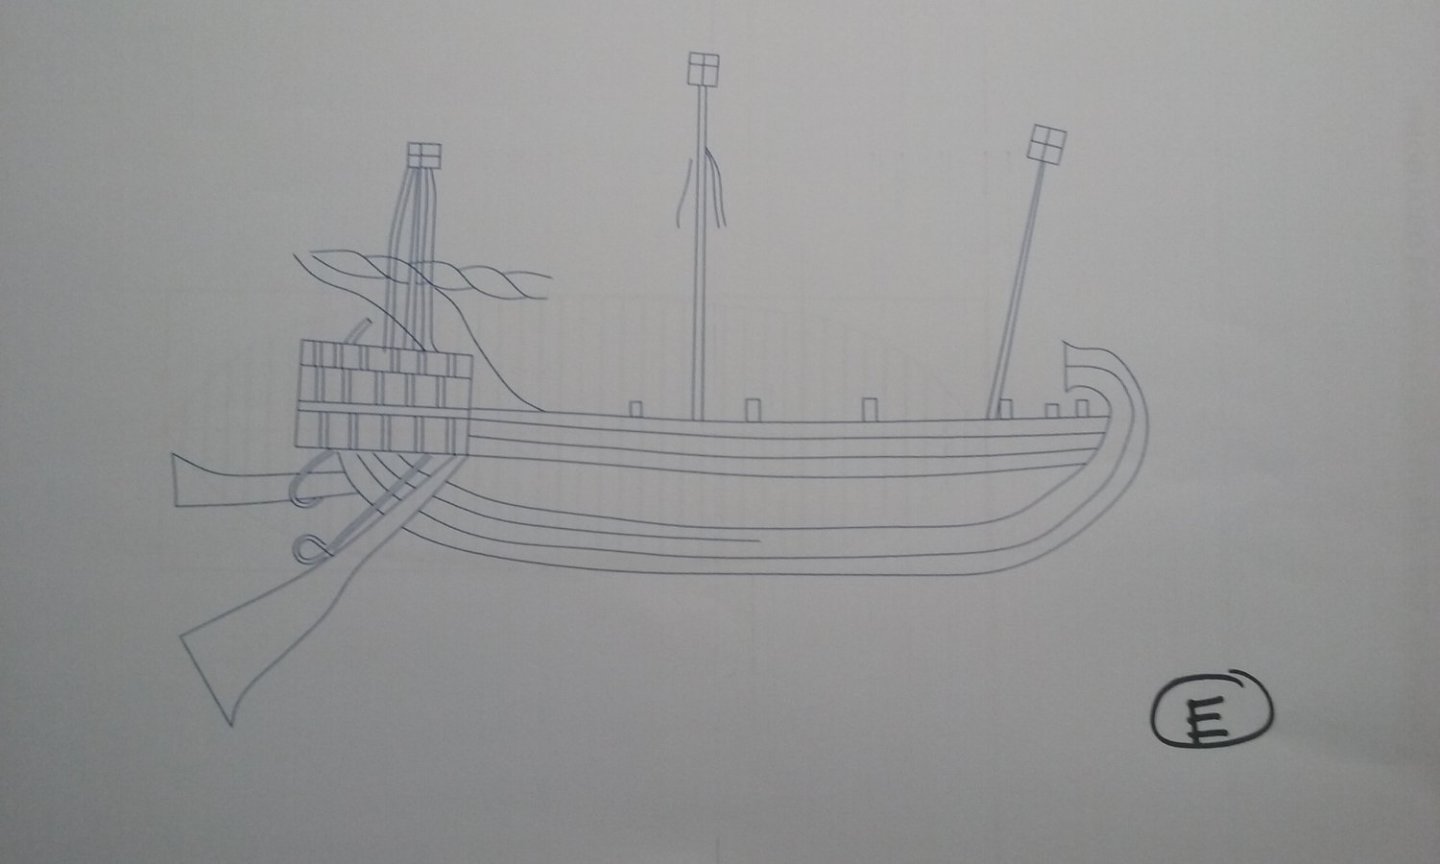
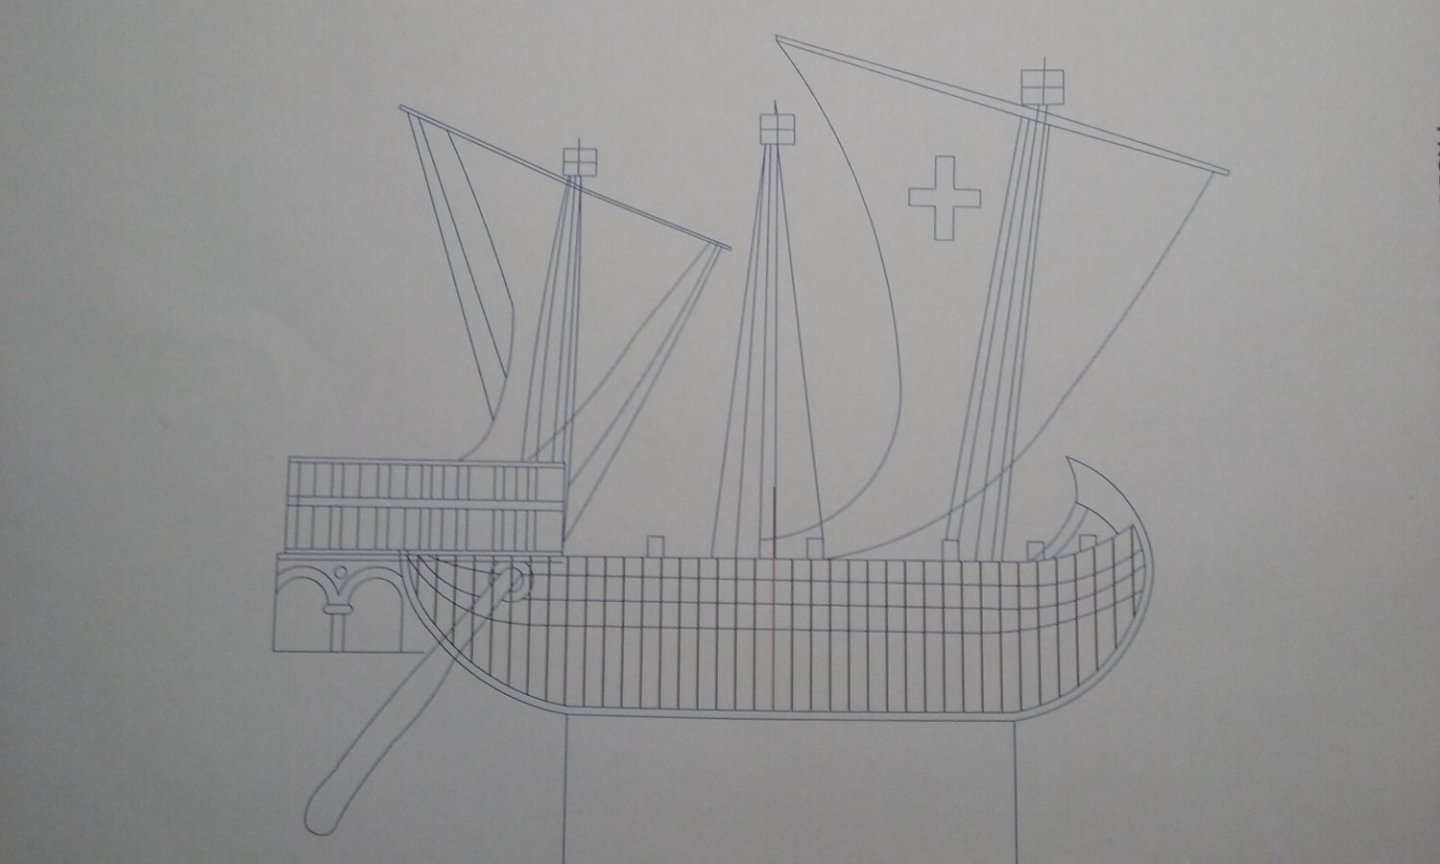
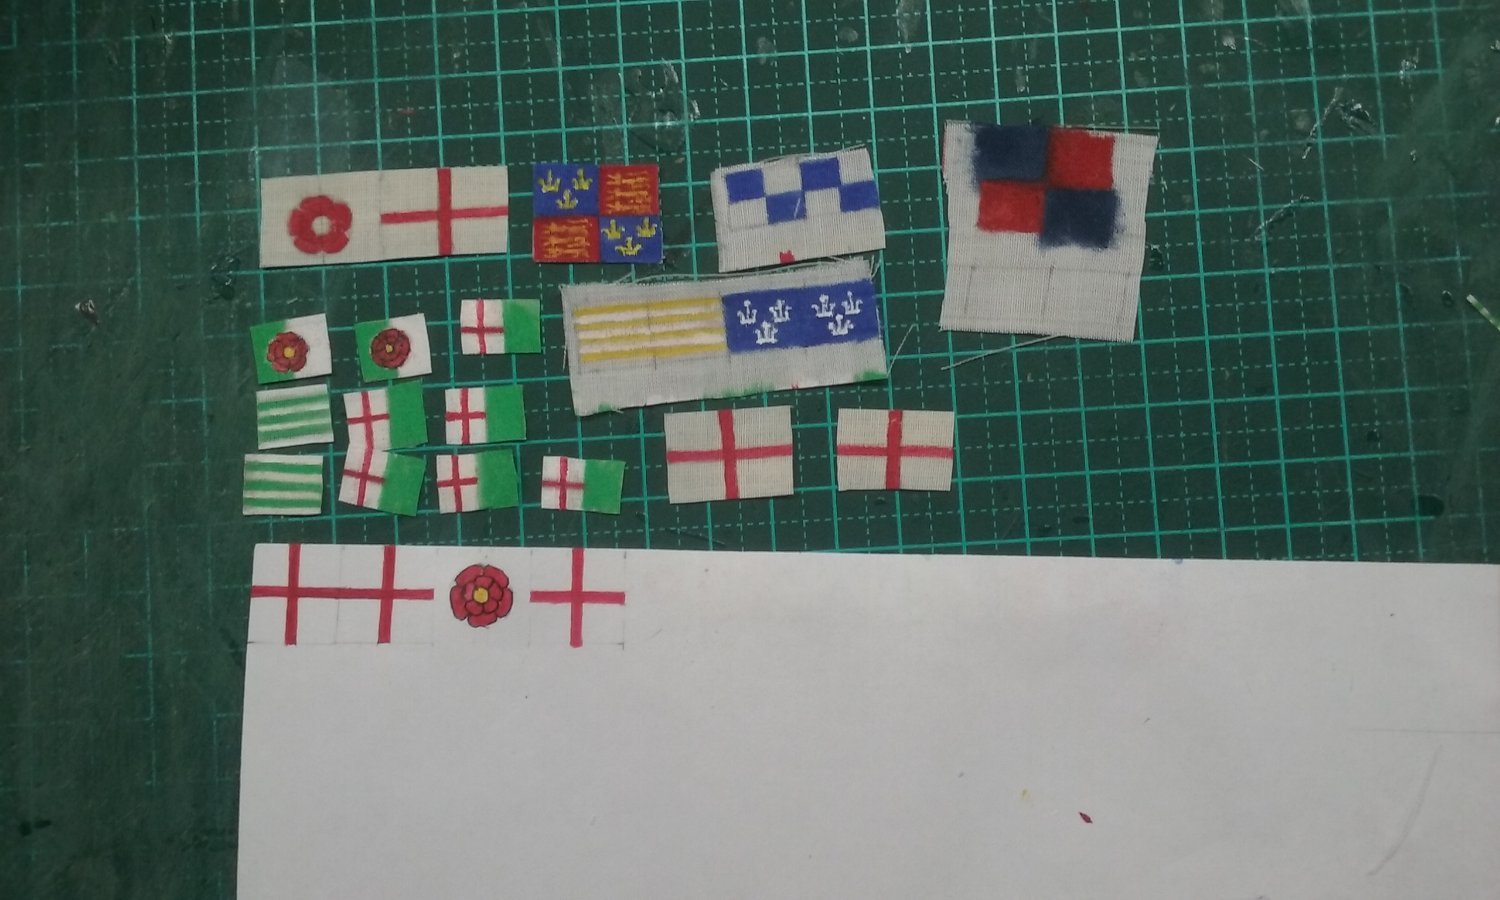
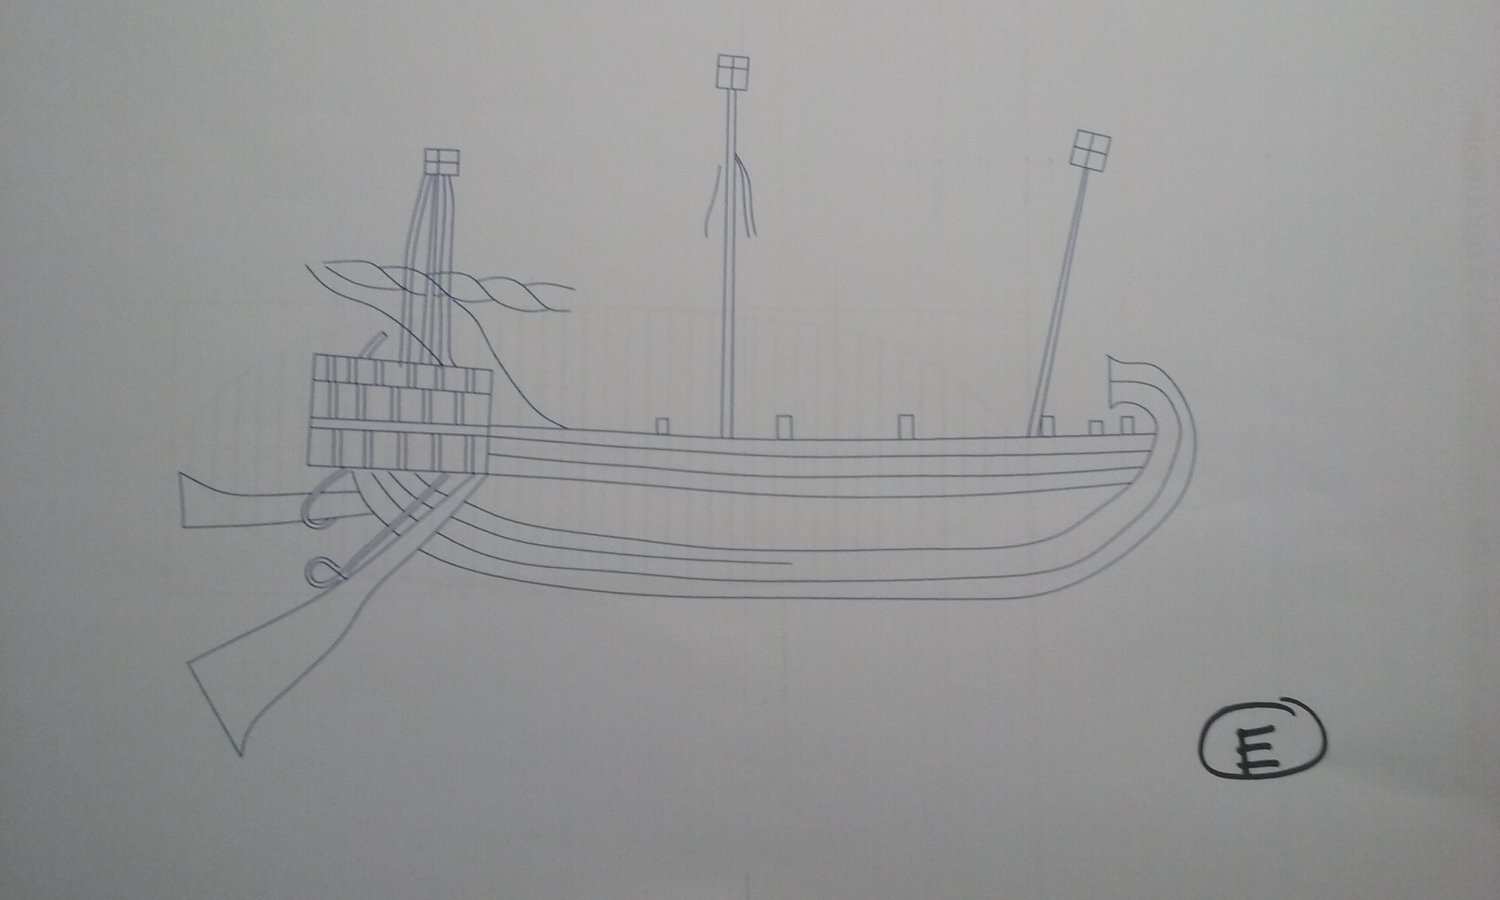
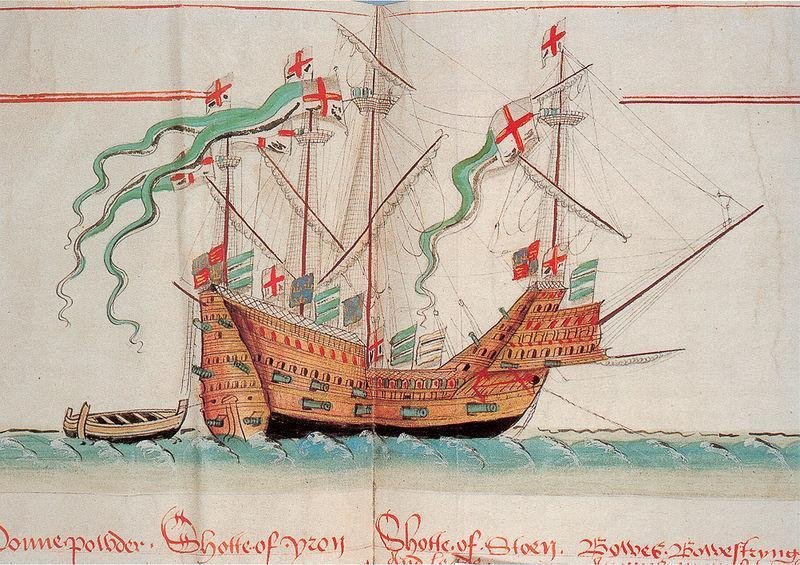
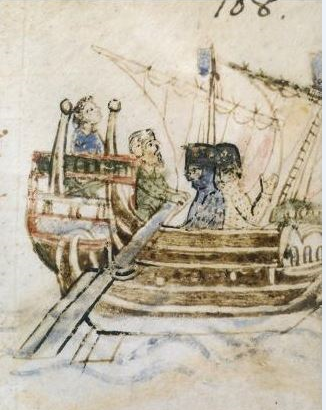
The deadeyes have arrived. Now I have to work out how to attach them. I tried CA (no good) and an Oz brand of glue called Tarzan's Grip (too gooey). I went back to PVA and discovered that it was good enough to hold the rope and the deadeye together for long enough for me to wrap the rope around it and glue the rope back on itself. We'll see if that's a good long-term solution. I might have to back it up with a dab of CA. And I've started on the flags. Though in almost everything I've been following Landström closely, in this case I won't be. I started out doing so, but though I have the greatest respect for him and almost always agree with his interpretations, on more investigation I became aware that his flags for the Great Harry bore almost no relation to those either in the Anthony Roll or The Embarkation at Dover (painted about the same time) In fact, apart from the long banners and the royal standard at the top of the main mast, none of them correspond to either picture. He's got the cross of St George (symbolising England) a castle (for Castile, home of Henry's first wife? which would be a bit weird as he divorced her), the Prince of Wales feathers, a (single) fleur-de-lis (symbolising Henry's claim to the throne of France), and what appears to be the Cinque Ports flag. Plus what I suppose is meant to be a Tudor rose (it isn't - it's the red rose of the Lancastrian house in the War of the Roses, as the White Rose symbolised the house of York - the Tudor rose has red outer petals and white inner, signifying the joining of the houses at the end of the war, when Henry Tudor of Lancaster, after having defeated and killed the Yorkist king Richard III in battle to become Henry VII, married Richard's niece) and what might be the Sun in Splendour (the badge of Edward IV - again a bit strange because he was of the house of York). On the Anthony Roll, there are horizontal stripes in green and white and in yellow and white, and flags divided vertically into half green and half white. The cross of St George is only half the flag - the other half is a vertical green band (Tudor colours) and none of them correspond to Landström's flags at all. The Mathew does have fleurs de lis, but there are three of them on the flag, not one (4th and 6th flag from the left). It does also have the plain cross of St George and the red and blue English royal standard of lions and lilies. So, what to do? After starting out on the Landström flags I've ended up going with the Anthony Roll. I've also waffled a bit about the sizes of the flags. At first I thought Landström's were too big and made smaller ones, but I changed my mind and went back to the original size. Then I had to work out where the flags were supposed to go, and how many I should show. Does Anthony show all the flags on the ship, or only the flags on one side? He seems to have been a bit careless - he's just sketched in the lower ends of the flagstaffs so it's really impossible to work out where they sit. Some are at the gunwales, others appear to be on the top of the beam that supports the boarding nettings (which would be very impractical). Landström puts them on the gunwales, but has left off the ones Anthony shows at the weather deck. I finally decided that Anthony seems to have shown all the flags, from a three-quarter view, and that I don't have to add more. An the Embarkation painting shows the fixings of the flagstaffs in a way which makes sense to me. There's a lot of speculation in all this, and I'm aware that neither painting can be regarded as perfectly reliable, but I'm fairly satisfied now with what flags to use. I haven't done them all by any means, and I had to do some experimenting to get the effect I wanted. I first did them on paper with acrylic paint, but it really didn't work when it came to solid bands of colour. I tried enamel on fabric - no good. Finally, acrylic on fabric, which gives a very stiff flag, but enables me to get the "look" I want. I will be mostly following the Great Harry but taking a couple of the Mathew's flags to add interest. Here are all the flags I've made so far, including some incomplete ones and the ones I'll be discarding as no longer appropriate - either the wrong design or too small. You can even see the ones I did on paper at the bottom. Steven


- 740 replies
-
- 9
-
-
- Tudor
- restoration
- (and 4 more)
-
Welcome to MSW, SUBaron. Yes, I was guilty of blowing up my models when young (one ship I floated in a concrete tub in the laundry and set off a firework that looks much like an M-80 - nearly deafened myself!). I played violin in my teens and still have my grandfather's fiddle made in 1900 in a beautiful inlaid wooden case that looks more like a coffin than a violin case. I sometimes think I should get back into playing, but - too many other things to do (including ship modelling). Steven
-
Welcome to MSW, Michele. I'd second Keith's recommendation that you start a build log. The instructions are at https://modelshipworld.com/topic/24707-before-you-post-your-build-log-please-read-this-starting-and-naming-your-build-log/ You'll find this a great way to get help, advice and encouragement. It's quite likely that others have already built this kit and will be able to help you if you hit problems. The other thing you should probably do is to do a search (top right hand corner of this page) for your own model and see if anyone else has built it. Good luck with the build! Steven
-
Of course you could take the top plank off, make a new, slightly wider one for each side and do it all over again. But why? Who's going to look to see how much overlap there is? Apart from anything else, it's invisible - the only way you can check is to measure the distance from the top to the bottom of the top plank both inside and outside and compare the two. The model is looking good. You're doing fine. Steven
-
Aha! Yes, I'd come across this before but not taken too much notice because it's earlier than my main period of interest. Let that be a lesion (sic) to me . . . Steven
-
Thanks, I'll take your advice on board. Certainly, I think I've both been having the revs too high (not sure if I can adjust them to be lower) and pushing too hard. No carving on the agenda for the moment anyway, but I'll keep this in mind. Steven
- 208 replies
-
- 2
-
-
- kitbashing
- Woodcarving
- (and 4 more)
-
That's beautiful carving, Pete. I've tried doing it with a drill but I haven't had a lot of joy with it. Partly because my bits keep going blunt. I think this is probably a combination of inferior bits, lack of experience with these drills, and trying to take off too much wood with the drill, rather than remove a lot by other means first. Possibly also because I'm making 3 dimensional figures rather than "friezes" (again, trying to take off a lot of wood at once). I find I end up going back to the old standard No. 11 scalpel blade. But it does show the facets from the blade if you look carefully enough. Steven
- 208 replies
-
- 6
-
-
- kitbashing
- Woodcarving
- (and 4 more)
-
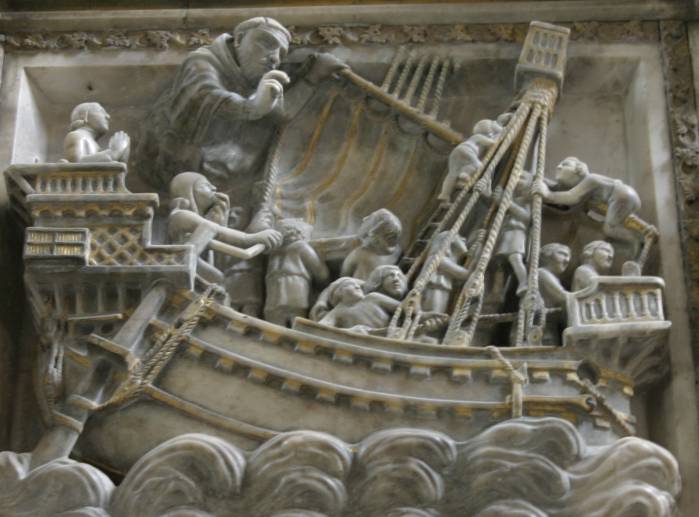
Very nice work, Dick. I agree, the simpler housing looks more appropriate. That's a beautifully detailed bas-relief - it shows the way the shrouds are fixed with pairs of hearts and even how the hearts are led down to the sides of the ship, plus how the control lines for the rudder are attached to the shaft. I've never seen this one before. Where and when is it from? And do you have a pic of the whole relief? Steven
-
Ancient anchor found in Yucatan.
Louie da fly replied to Eugenio Treviño's topic in Nautical/Naval History
Sample prayer to Anoia: "It got INTO the drawer, why the XXX won't it come OUT???" Steven -
Very interesting indeed. This was a period of great change politically, though not so much in ship construction. I note that " One particular shipwreck out of a total of 58 was selected as the most scientifically interesting due to its integrity" so I'm assuming a fair bit of the hull has survived. When the archaeological reports come out we'll probably find the hull remains are closely parallelled by the earlier wrecks from the Yenikapi finds, though if it turns out to be very different that would be even better. Steven
-
Ancient anchor found in Yucatan.
Louie da fly replied to Eugenio Treviño's topic in Nautical/Naval History
That's rather like the fact that if the household contains the "good scissors" it must also contain the evil scissors . . . Steven -
Ancient anchor found in Yucatan.
Louie da fly replied to Eugenio Treviño's topic in Nautical/Naval History
That's mediaeval, not ancient! -
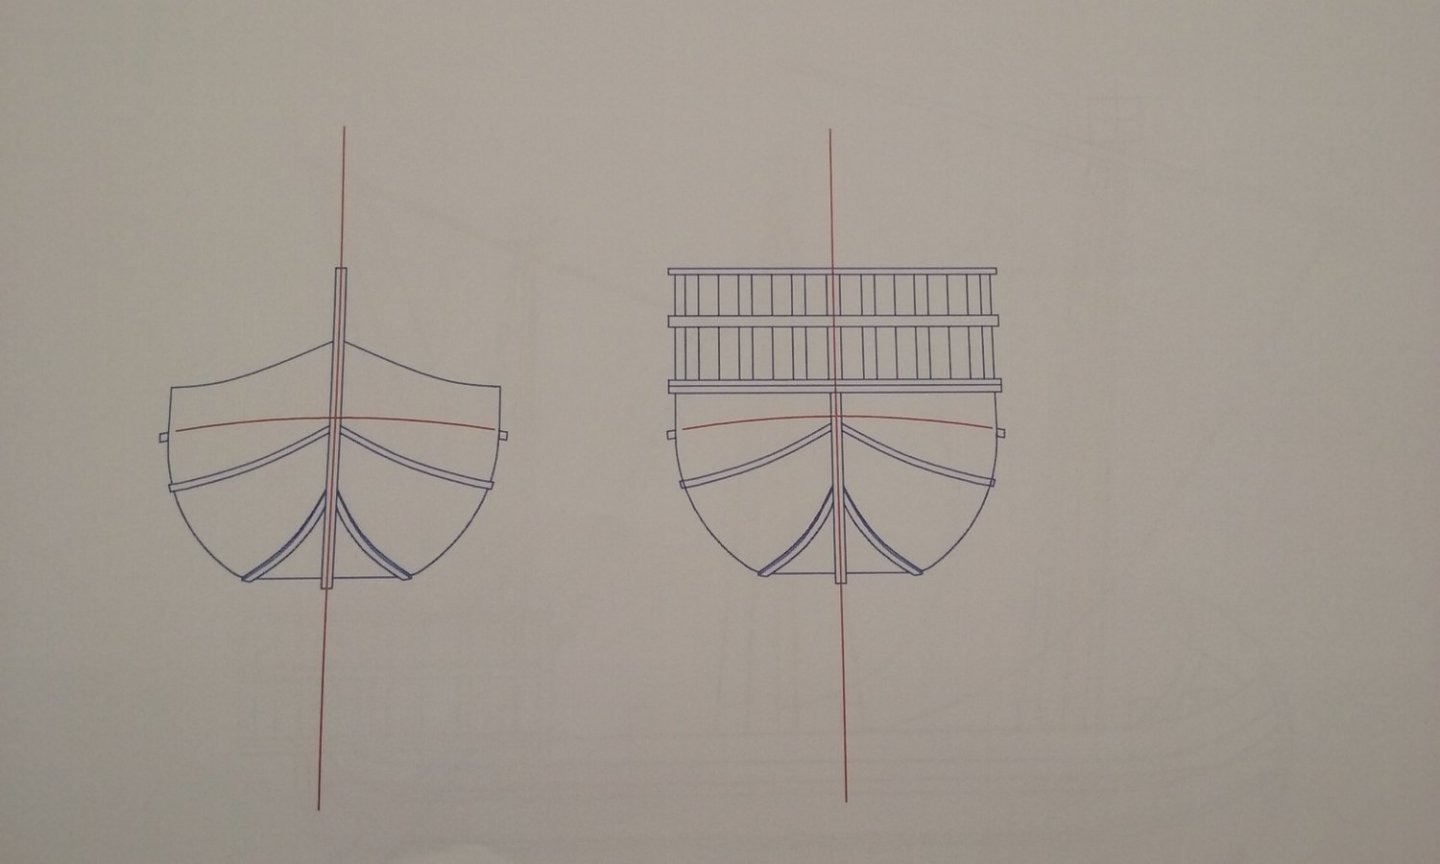
I've moved and shortened the aftercastle (poop?) and also narrowed it. So this is how it looks now (including a view from above). Though it looks like the aftercastle is now flush with the sides of the ship that's not really true, as the hull narrows there. I'm trying to balance having enough room for the side rudders with not making the castle too wide for good seakeeping. I'd debated with myself whether to taper the aftercastle so it narrowed as it went aft - a trapezium rather than a rectangle - but looking at other mediaeval Mediterranean ships where you can see it in 3 dimensions (though unfortunately most are a couple of centuries later), they almost all seem to be rectangular (where they're not semi-circular or some other weird shape). And I've decided not to include the "thunderboxes" because I can't see them shown on any contemporary picture where you'd expect to them to be. Not to say they may not have existed, but I'd want to find more corroboration before I added something which is otherwise just speculative. Steven

- 508 replies
-
- 10
-
-
That's a thought, Roger. It hadn't occurred to me and may well be the answer. If so, it (or they) wouldn't have been very wide and probably wouldn't have affected the vessel's trim all that much, and there might still be room for them to be fitted in even with a reduced overhang of the aftercastle. Steven
-
Ancient anchor found in Yucatan.
Louie da fly replied to Eugenio Treviño's topic in Nautical/Naval History
It's good that they've found it, but I wish they wouldn't use the word "ancient" - I got quite excited there for a moment and it turns out to be only a few hundred years old. Steven -
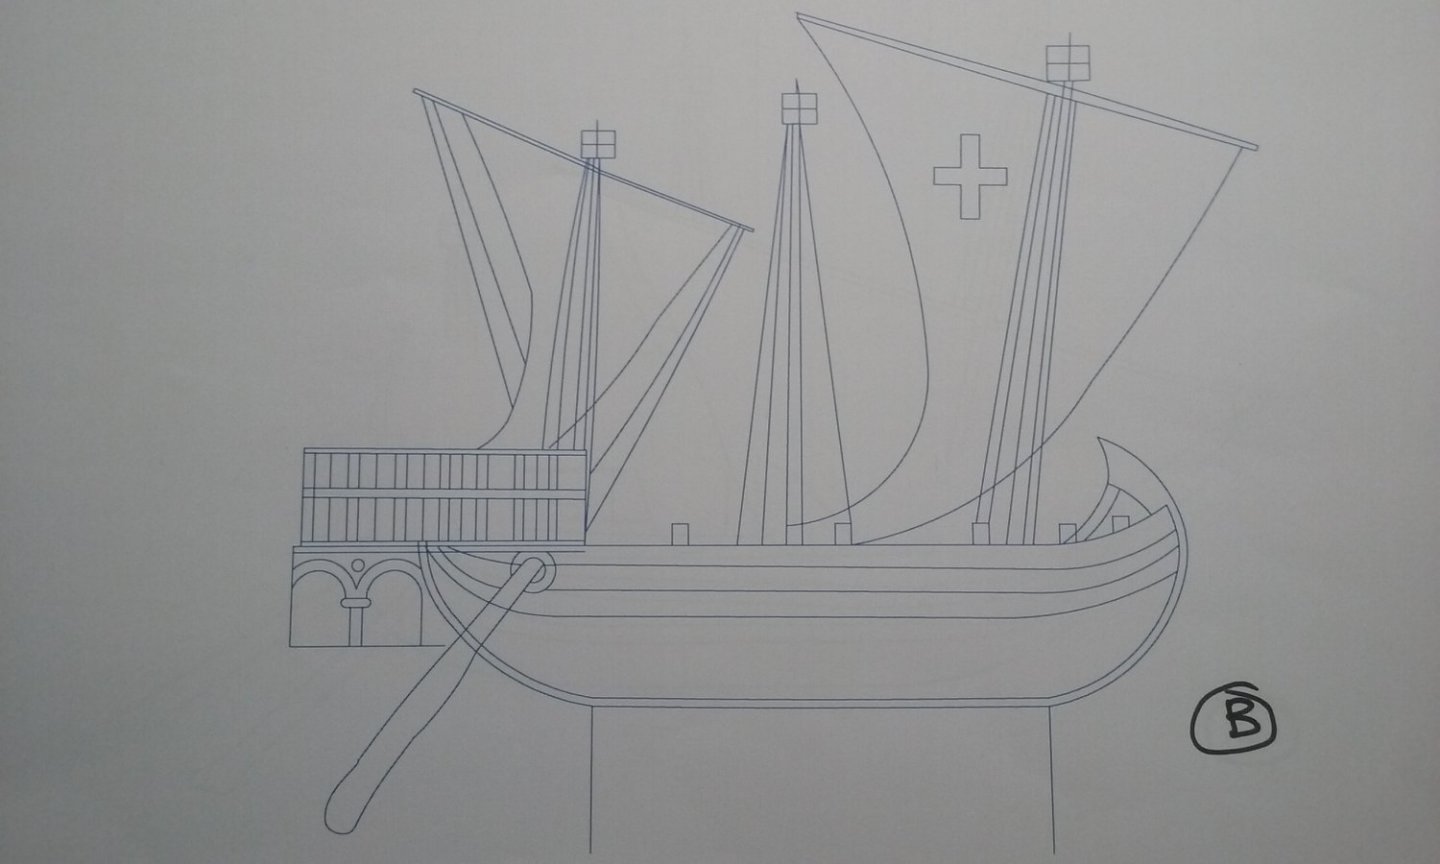
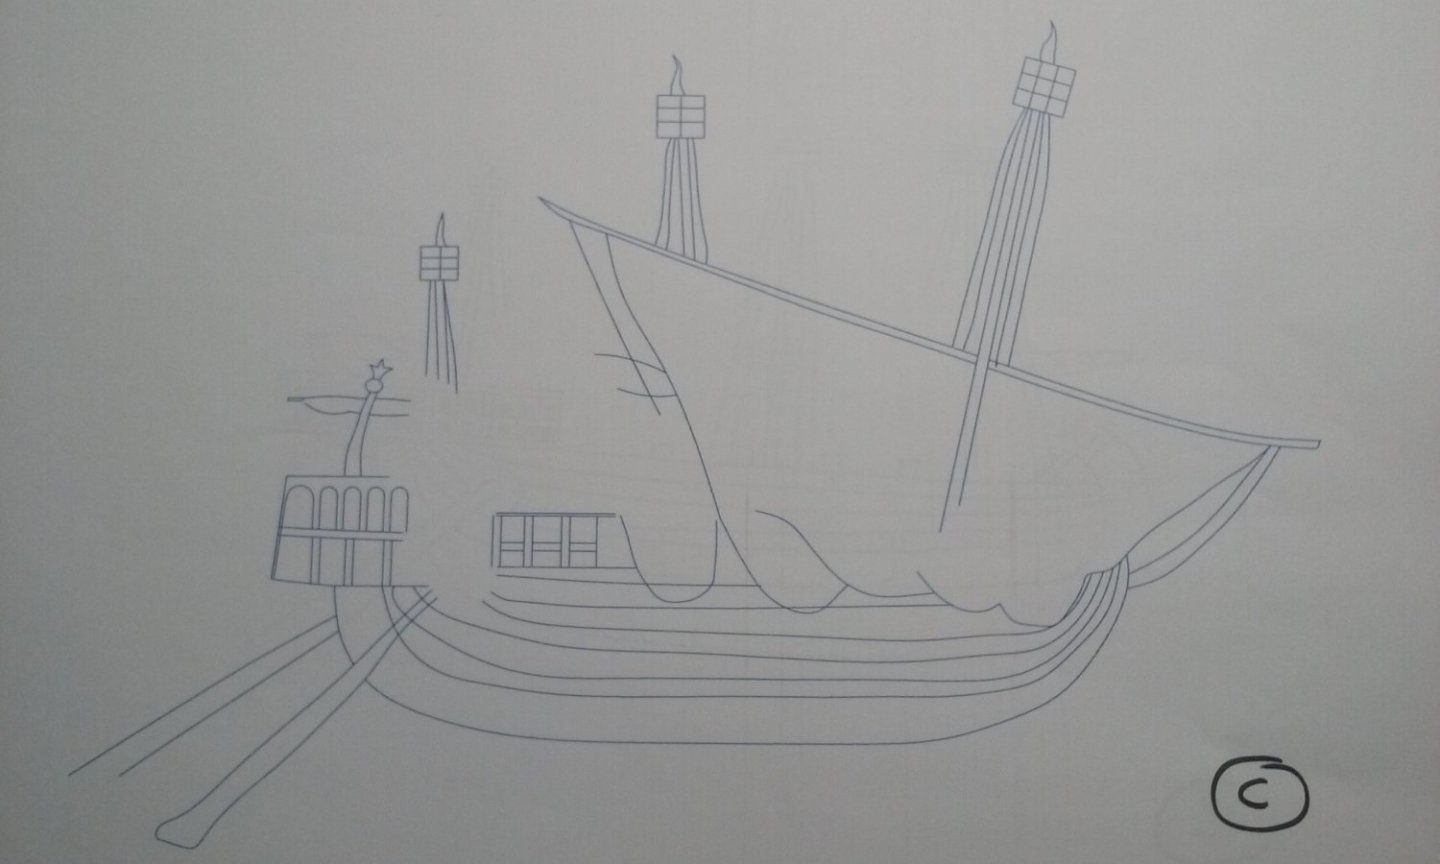
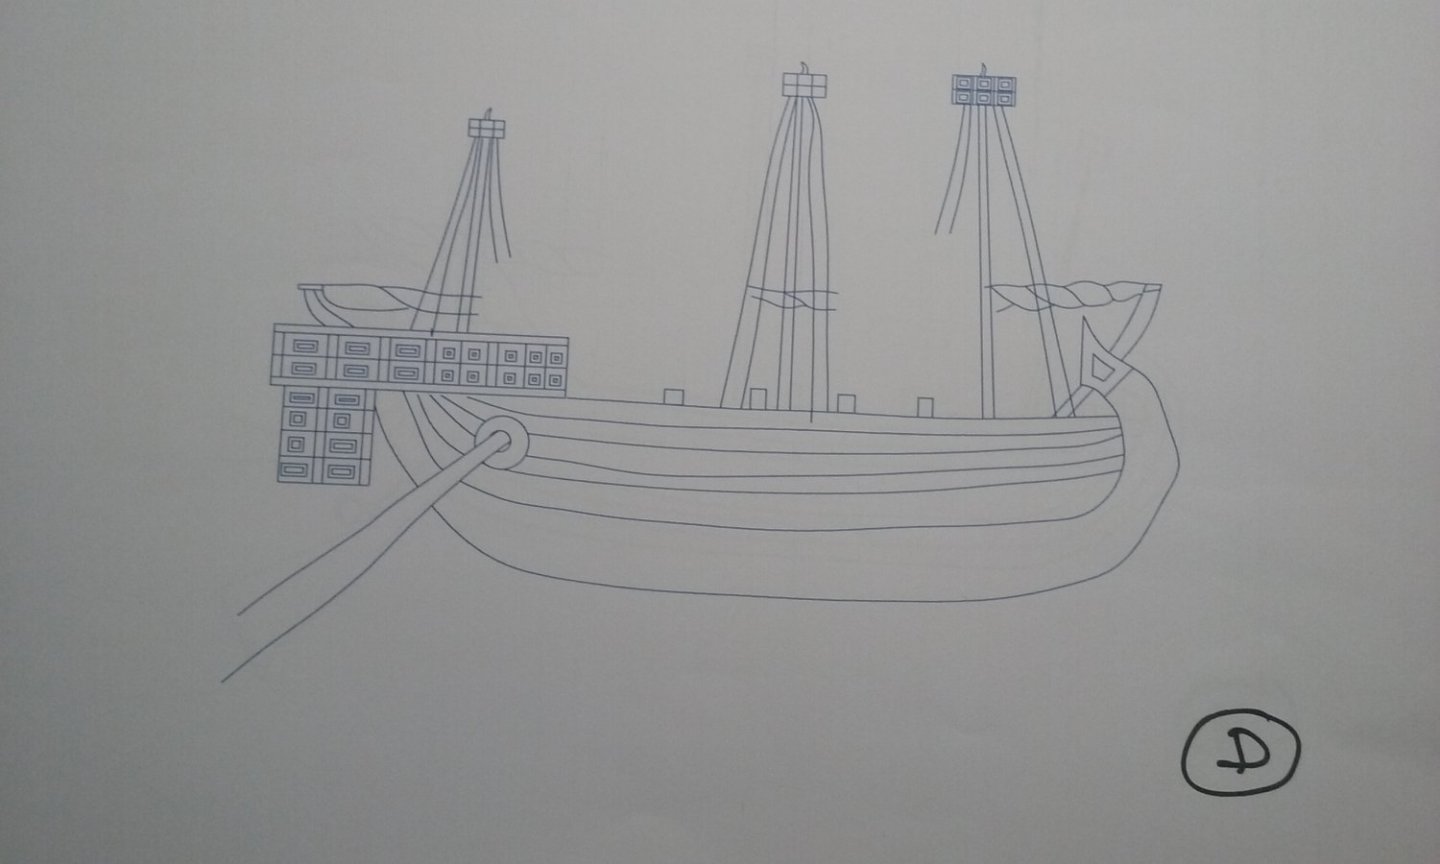
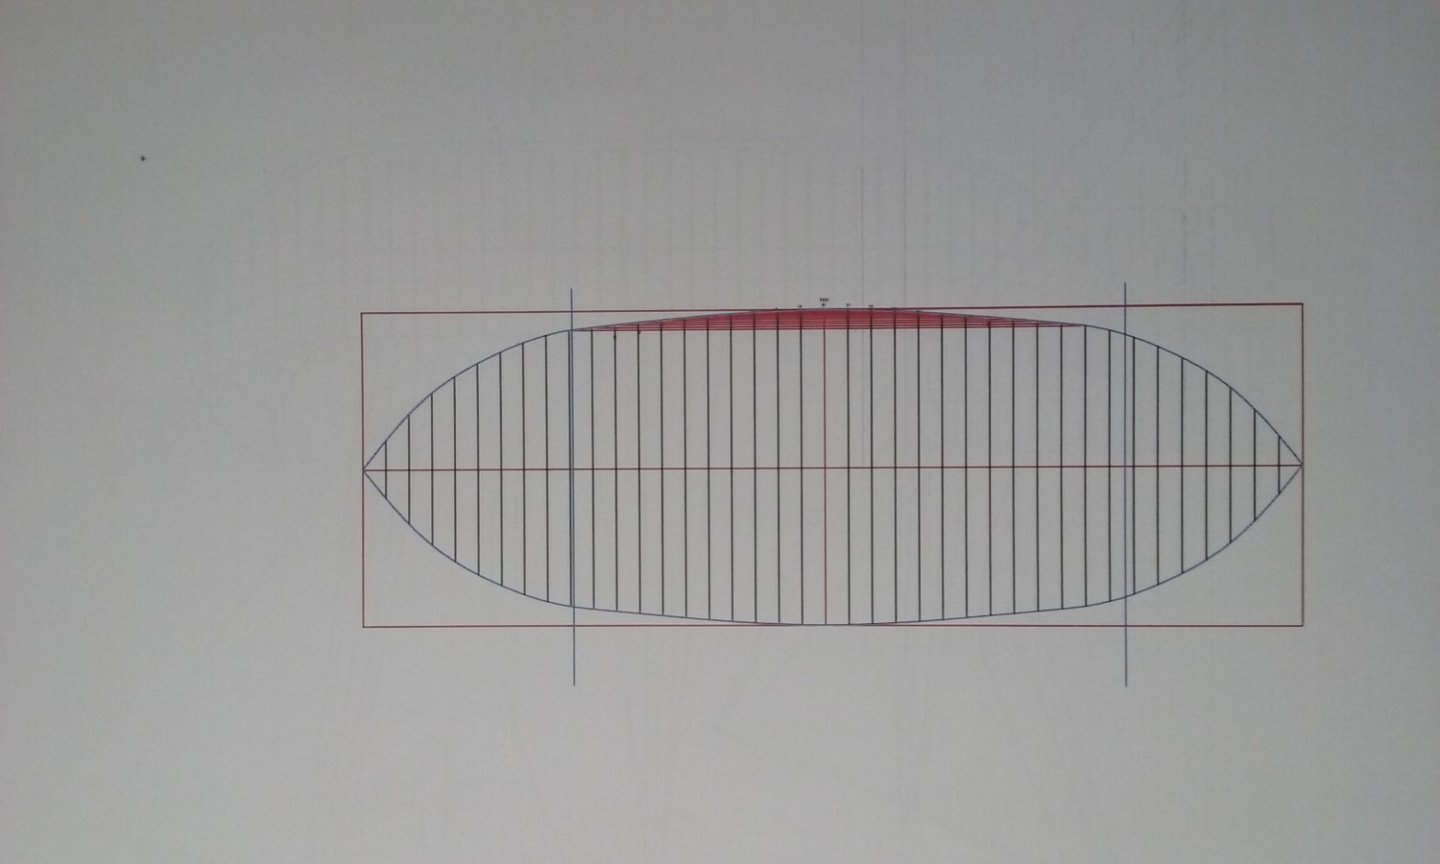
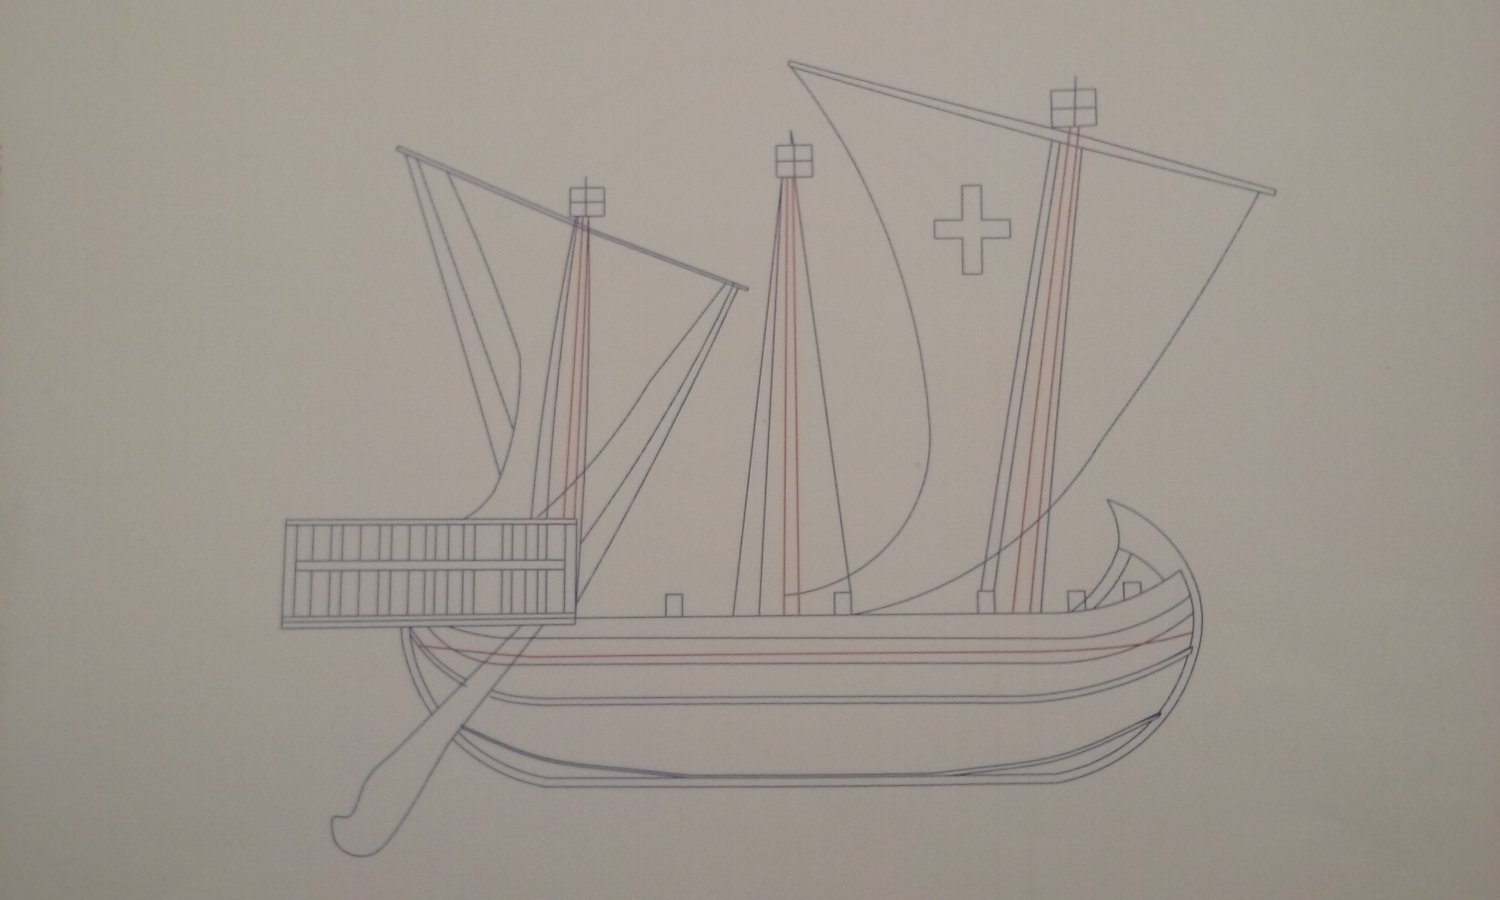
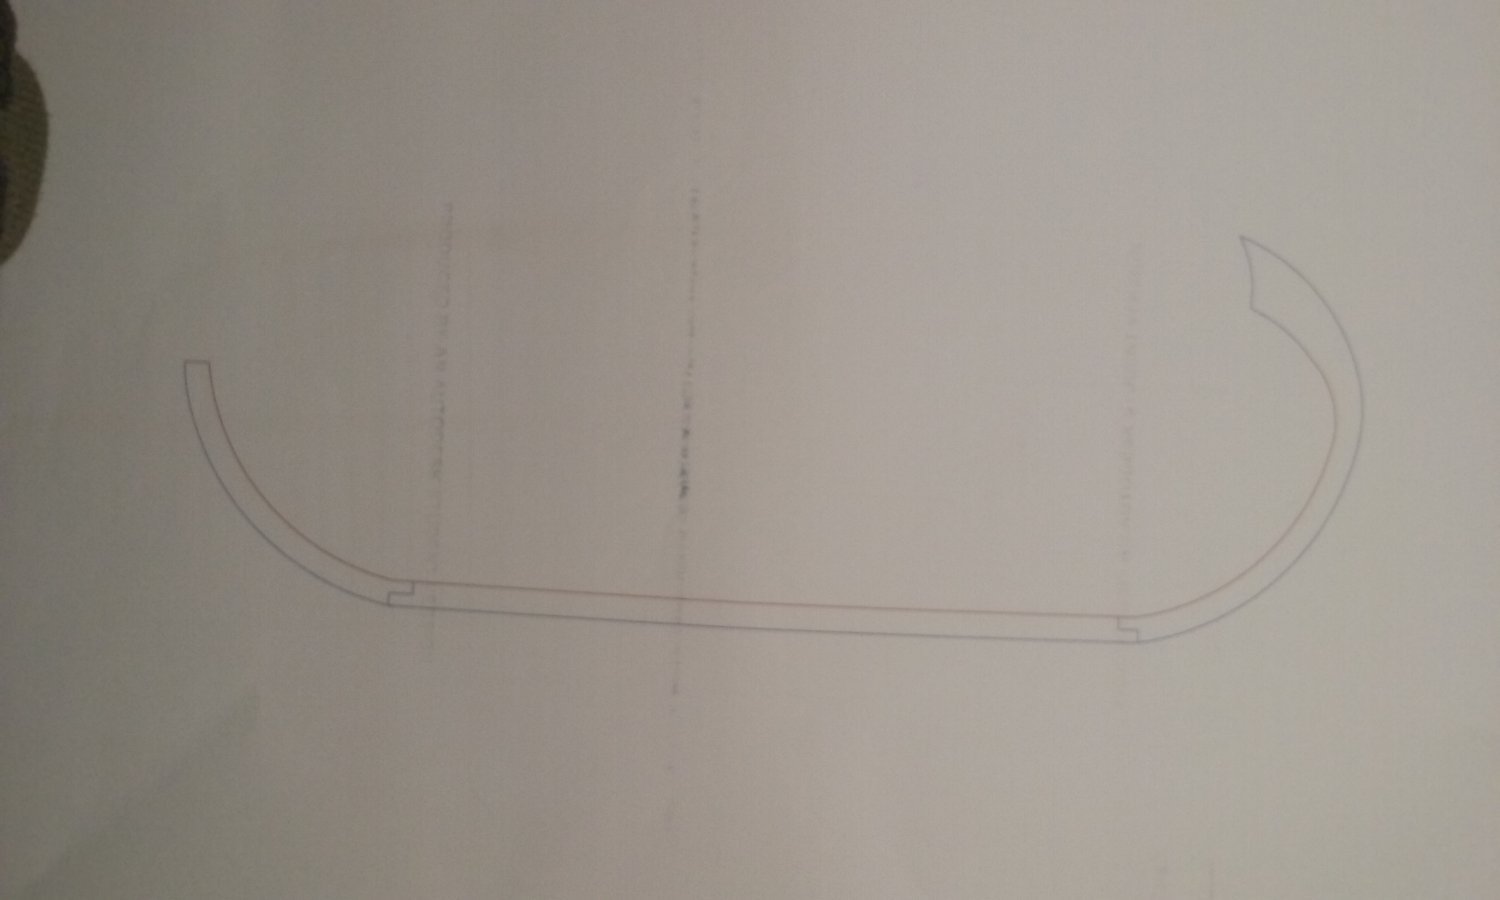
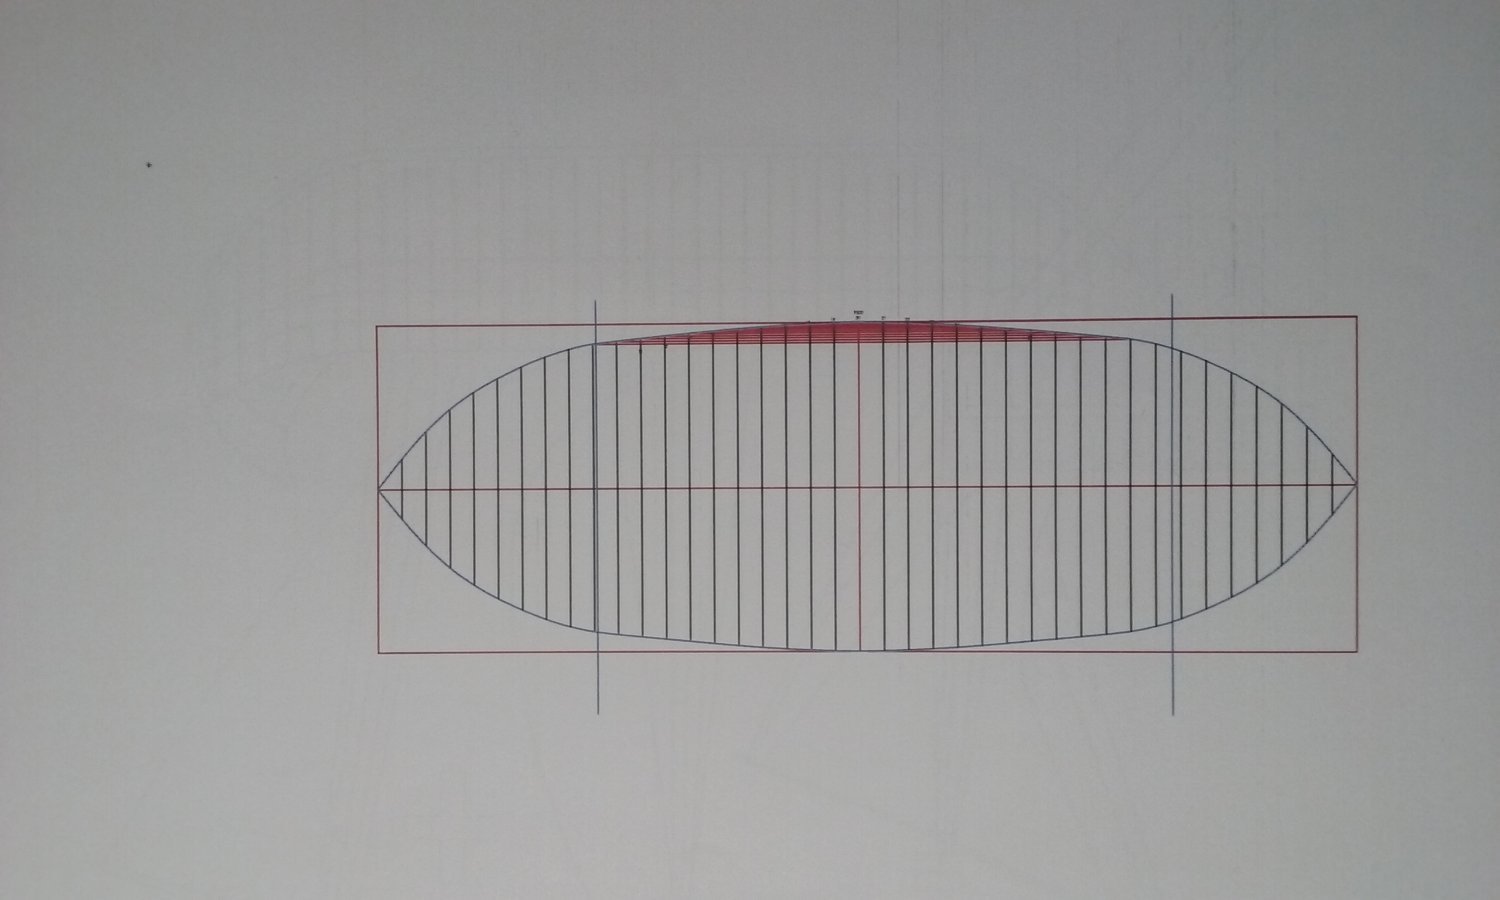
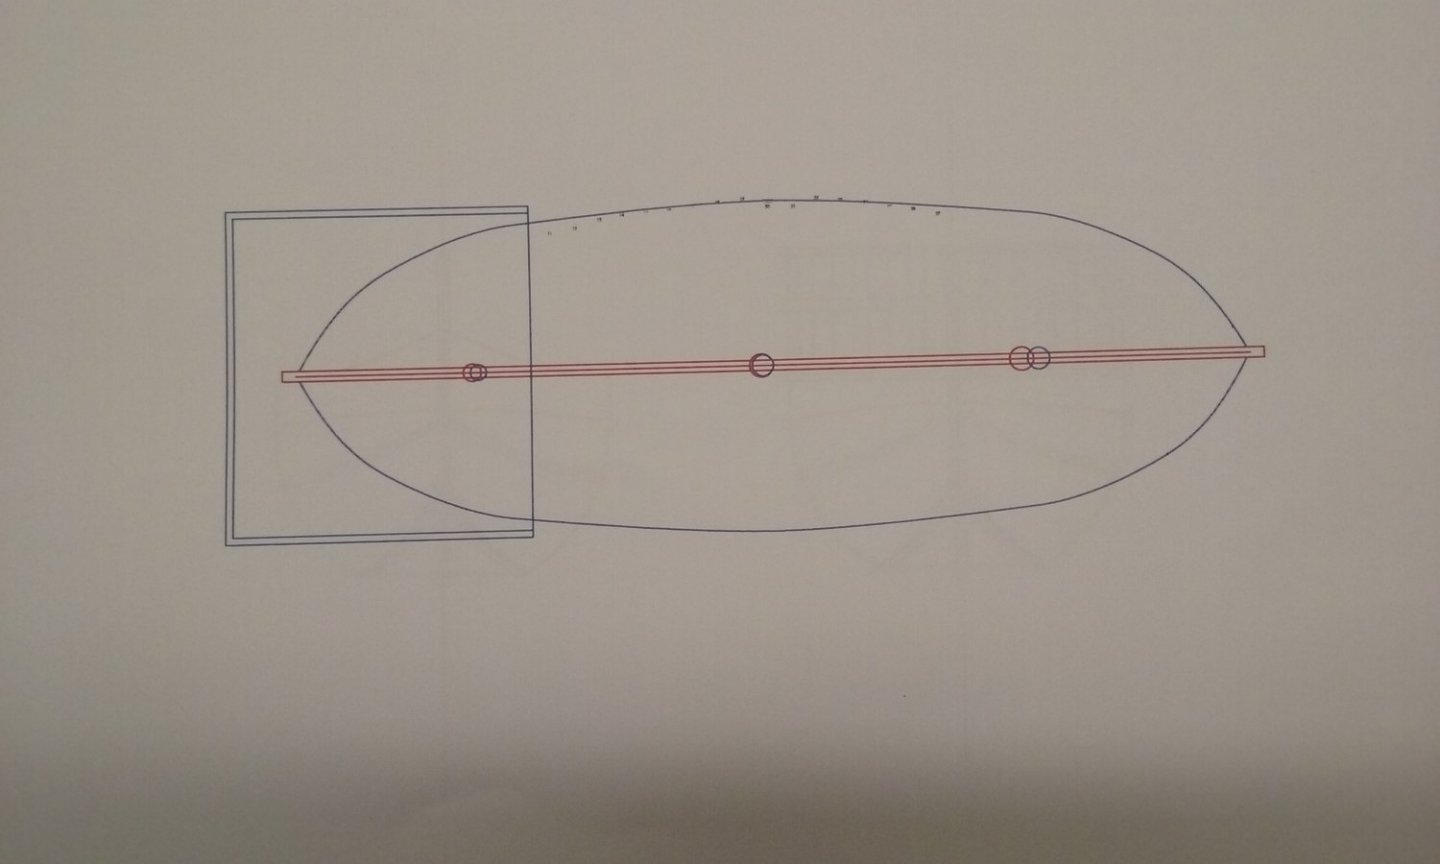
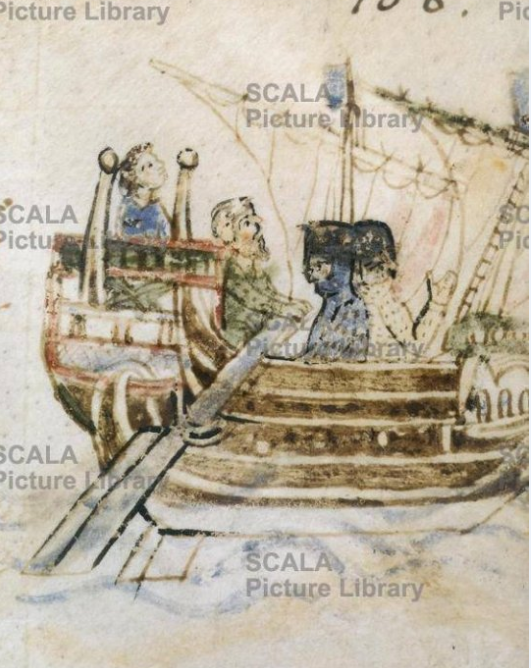
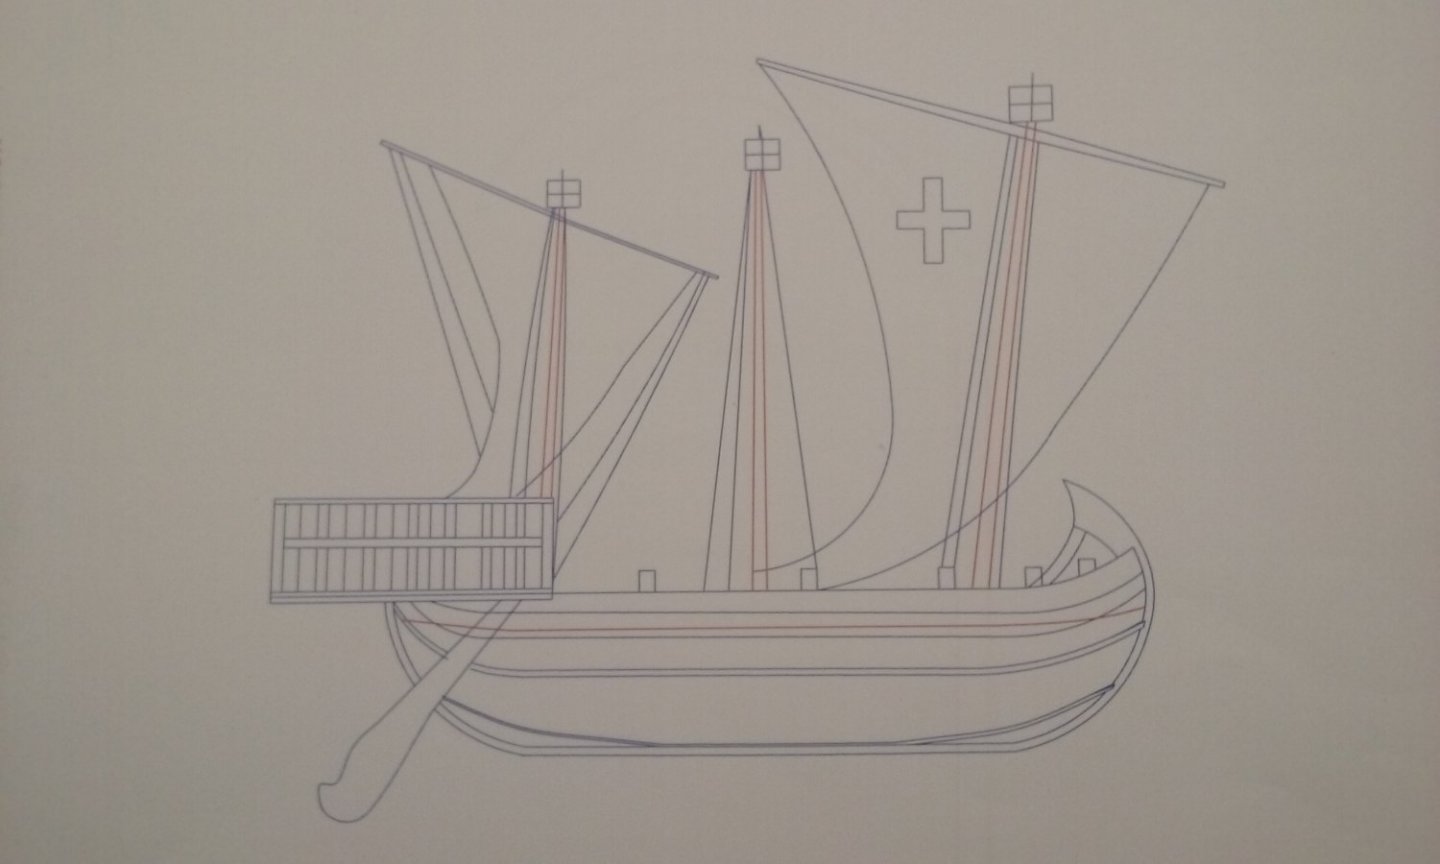
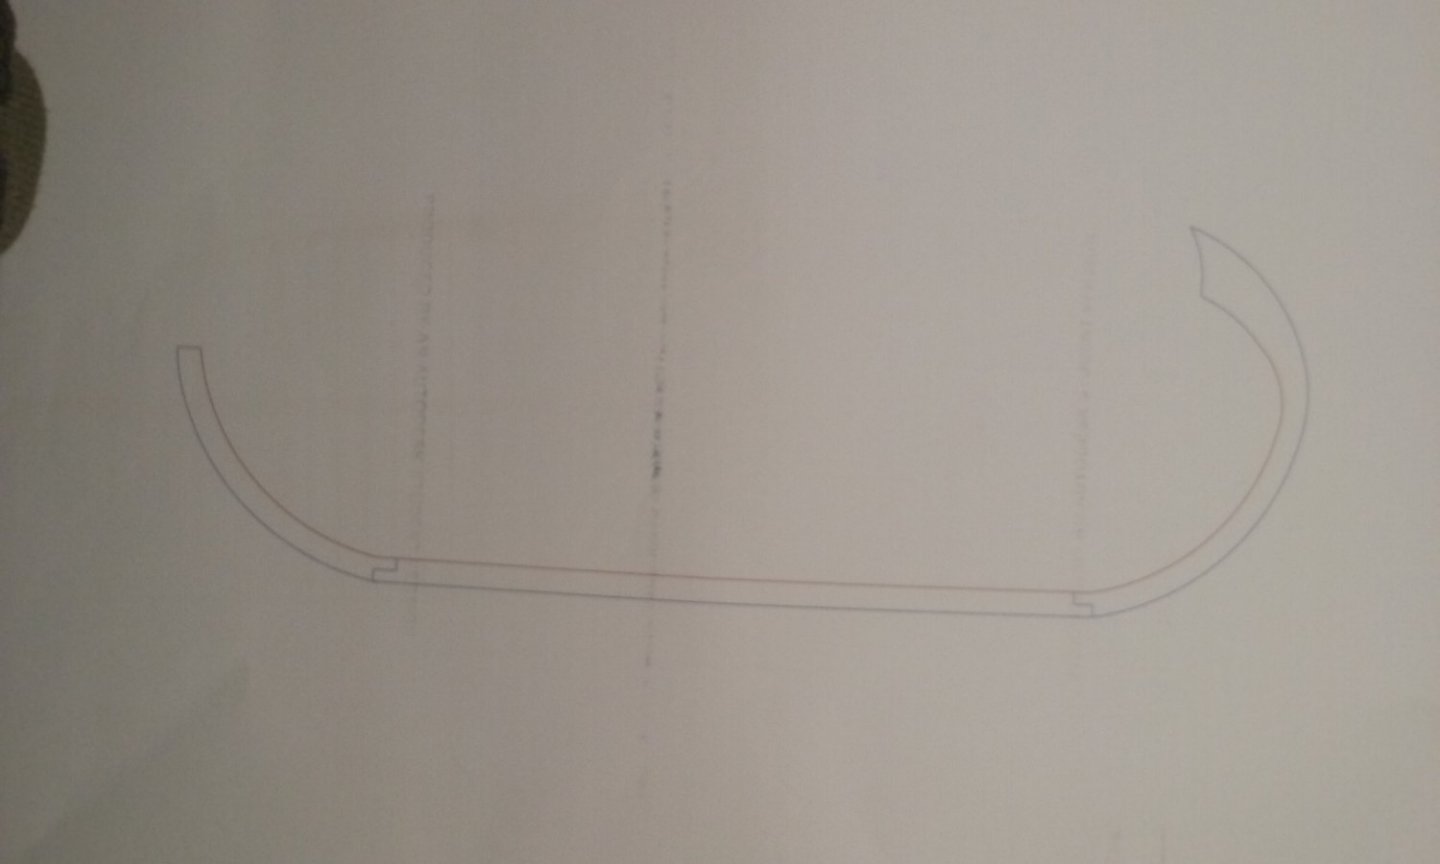
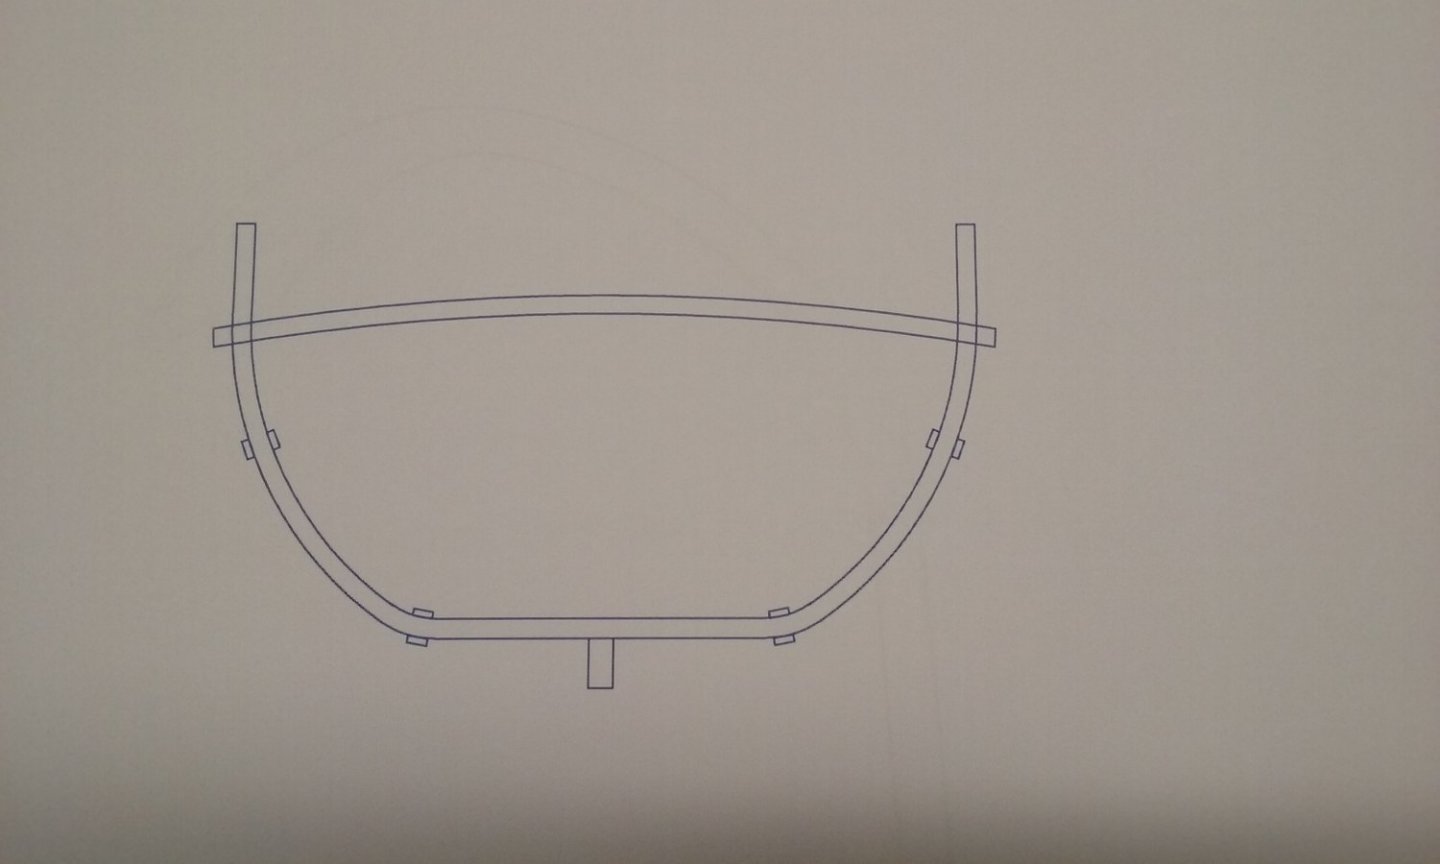
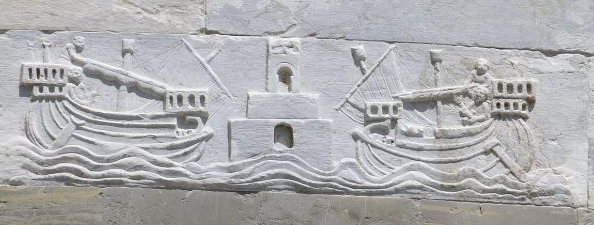
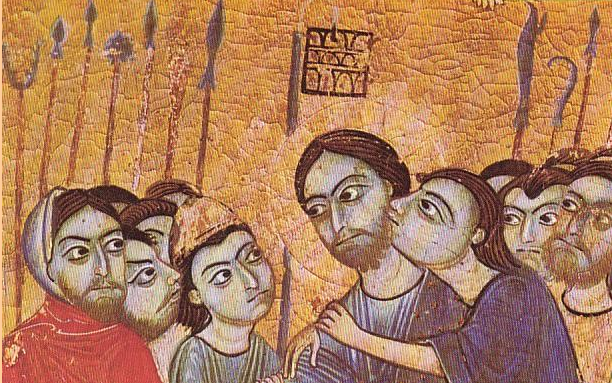
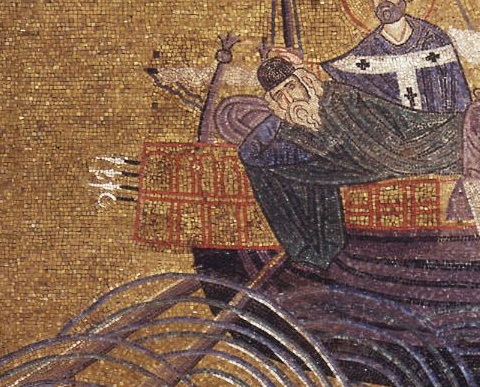
After a lot of thought I've decided I like the shape of mosaic 'B' the best. But that aftercastle just isn't quite right. I decided to get rid of the strange downward extension aft - as far as I can see that would make it very unseaworthy. But after removing it, it became obvious that the aftercastle itself extends too far aft past the end of the hull; it would unbalance the ship and make her wallow in the waves. So, what to do? Well, with the Winchelsea nef, there were any number of variations shown in the town seals, which could each be correct for the individual ship shown, but if I wanted to do the Winchelsea ship I should duplicate it as shown on the seal to the best of my ability. But in the case of the San Marco ship, there were five mosaics, all somewhat different, but all supposedly of the exact same ship. I felt that in this case I was justified in merging the representations, or at least mixing and matching. To me it seemed that the stern overhang of the aftercastles of Mosaics A, C and E (see post # 20 above) was more believable. However, the one on mosaic E comes down below the gunwale, which is very rarely shown in other fairly contemporary ship pictures. I didn't want to do multiple arches (of which more later), so that took out A and C. What I settled on was keeping B's aftercastle but reducing the overhang, possibly sliding it little forward (to incorporate the handles of the side rudders) and shortening it overall. Here's my side view (you can see how much overhang the aftercastle has - I will be reducing this) Though there are many representations of aftercastles with solid walls I believe in this case they are made lattice-fashion rather than solid, as shown in the pictures below. With an open poop deck like this, I don't think they were too concerned about protection from the weather. Or it might even have solid side walls but be open at the back, as this one seems to be. Earlier in life I was a mediaeval re-enactor and as part of my activity I investigated the Weird and Wacky Weapons of the PBI* and in fact wrote an article about them (http://www.oocities.org/egfrothos/ and follow the "Arms and Armour" link). Most art in the middle ages was religious, and a fruitful source for the weapons of the common soldier is the many portrayals of the Betrayal of Christ, such as the one below in a 12th century manuscript in the Uffizi gallery in Florence - pretty much contemporary with the mosaics of the ship. Regarding the strange phenomenon of pointy things sticking out the back of the aftercastle, I believe these are pole-arms laid to rest. It's possible that the polearms are resting on the deck, but I think they would get in the way and it's more likely they are in a vertical rack against the side of the aftercastle (or probably both sides). I've used the Libro di Navigar and Mezza Lune techniques as outlined in Woodrat's Round Ship build log and come up with this - here's the cross-section at the master frame I'm not sure if I'll be including through-beams. They're not shown in the mosaic, but that might just be an oversight by the mosaicist. And front and rear views (side rudders not included on the rear view at the moment, and I might be narrowing the aftercastle somewhat. As the ship gets narrower towards the stern I don't think it needs to be this wide to allow enough room for the side-rudders). I think the artist has shown the stempost a bit exaggerated - here's how it looks with the sternpost and keel - it does look too big to me. Compared to the curved stemposts in these 12th century ships from the Leaning tower of Pisa and in the fifth picture from the top in this post. That's the current state of play. All comments and suggestions welcome. Steven * PBI - Poor Bloody Infantry - an Australian term from World War II

- 508 replies
-
- 11
-
-
Hi Amphibette, and welcome to MSW from sunny Ballarat. I just googled the Scientific model of Santa Maria. Am I right in thinking the basic hull is already made as a solid piece? If so, this will enable you to avoid a lot of the difficulties associated with building a hull from planks. However, have a close look at the instructions - sometimes in the simpler kits they are VERY basic. And sometimes things that are supposed to fit - don't. However, wood is a very forgiving medium, and if you've already built model aircraft you have quite a few of the skills you'll need for ship modelling. I'd also recommend you start a build log. For one thing if you hit trouble you'll have a lot of people available - and very willing - to help. It can be a bit intimidating seeing all those amazing models out there. Just remember that even the demi-gods of ship modelling were newbies once. Don't be too afraid of making mistakes - you will make them. Obviously, do your best to avoid them, and when they do happen, fix them if you can. But it's a learning process. Your second model will be better than your first, and your third will be better still. Just keep at it, and don't forget to have fun (and try to avoid throwing the model at the wall if you get frustrated ) Looking forward to seeing your log. Steven
-
That looks very good, Dick. Beautiful work. I was wondering, does the shaft of the rudder swing all that way down as the rudder swings up? It looks like it would foul the tiller against the side of the ship. Steven
-
Yes, I'd been thinking about that after seeing what you'd done with your round ship. Steven
-
That's fantastic, mate. I'll be waiting with bated breath Steven
- 740 replies
-
- 2
-
-
- Tudor
- restoration
- (and 4 more)
-
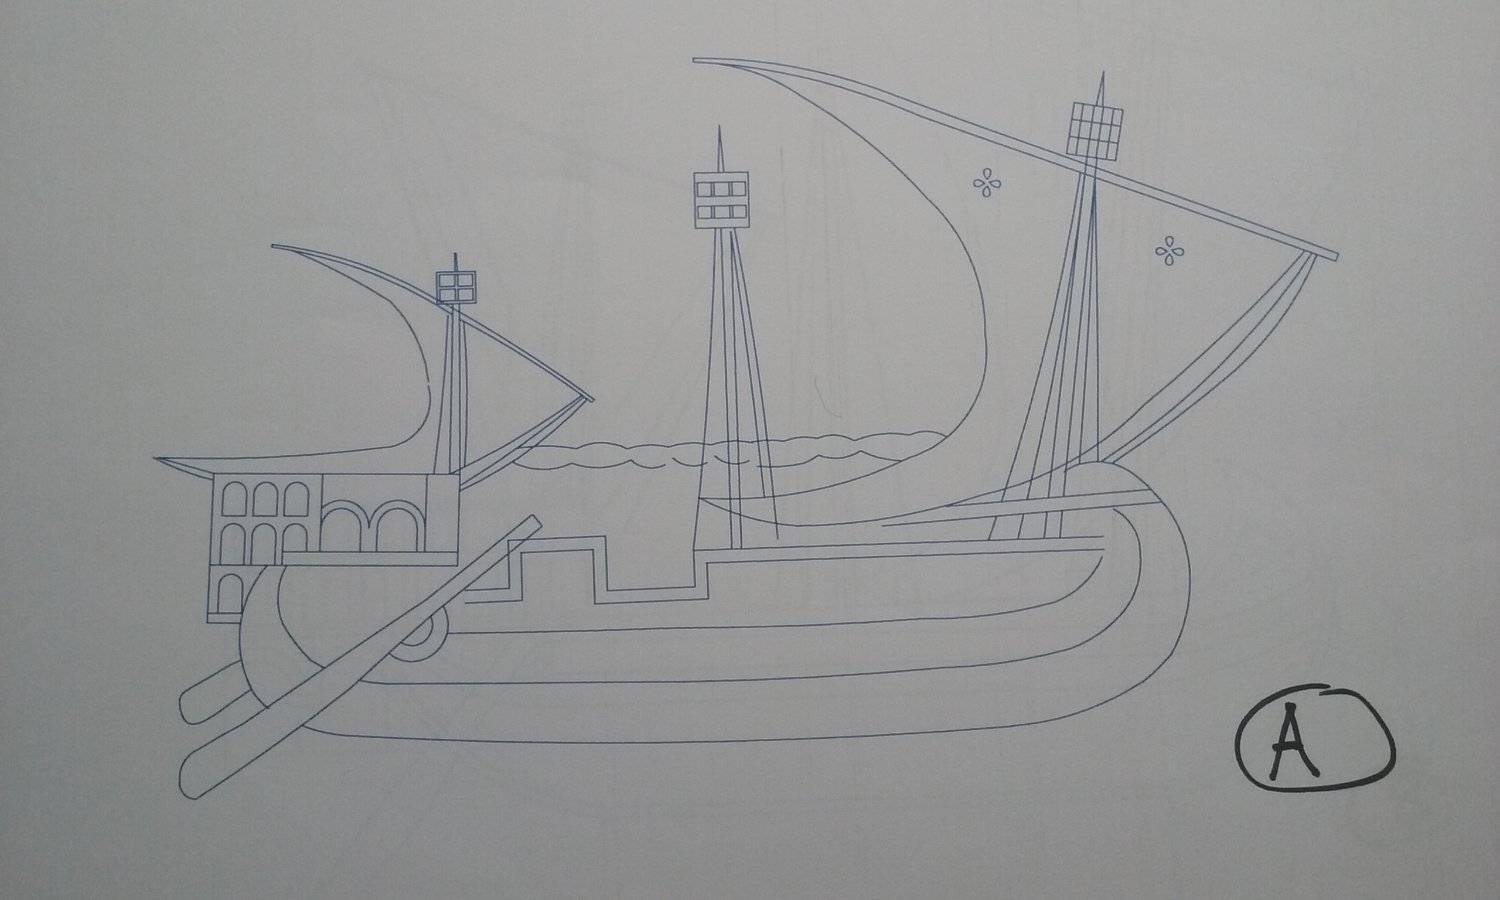
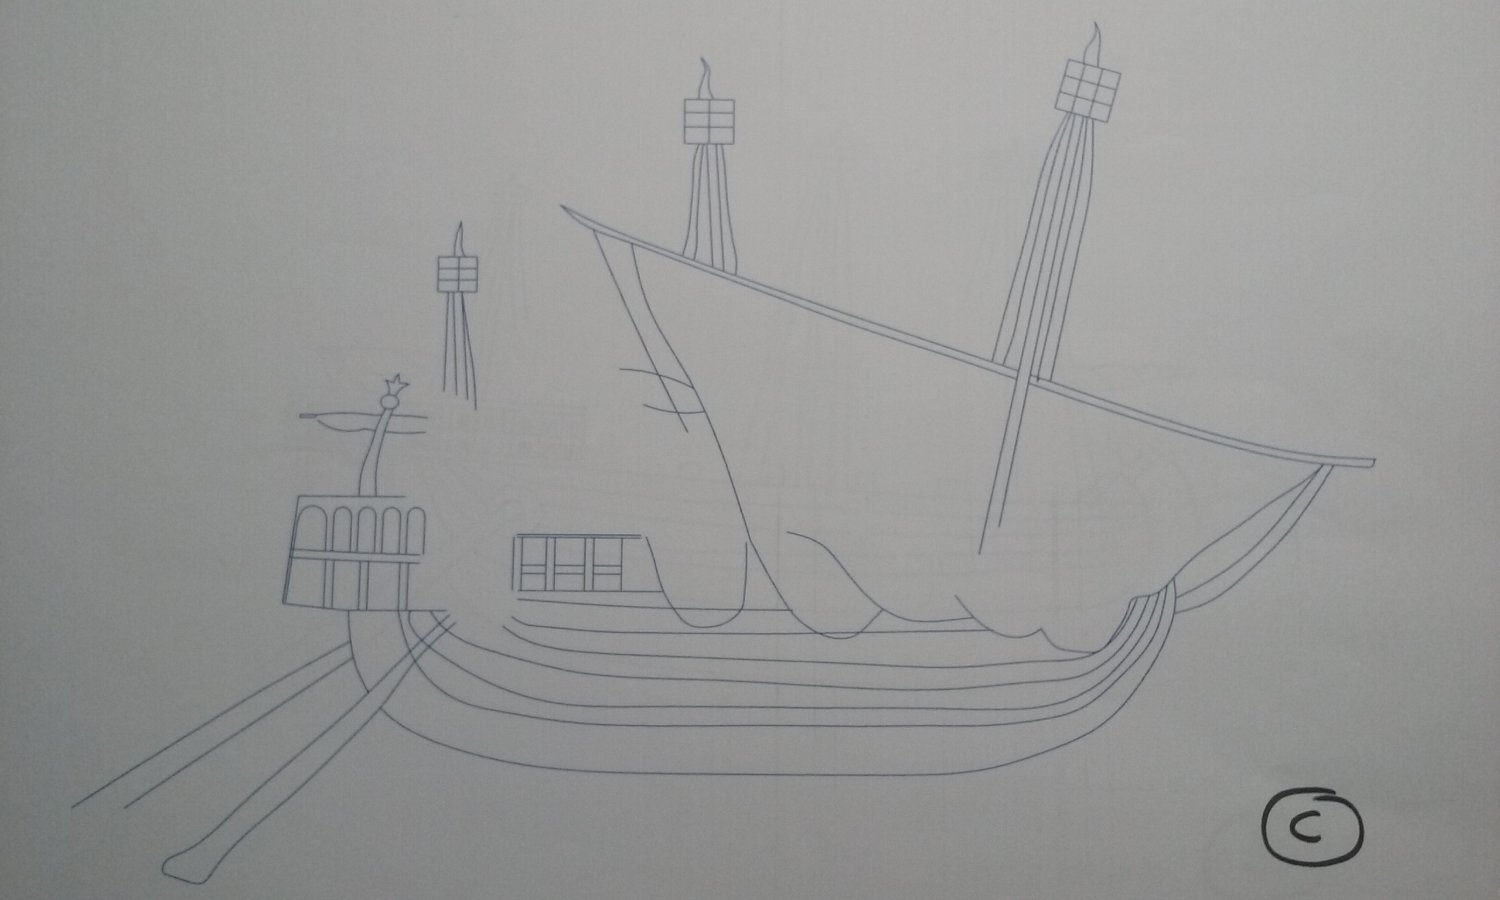
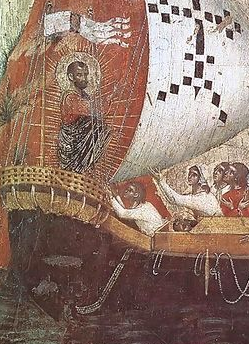
As I mentioned before, there are five representations of the same ship on the walls of San Marco, in a sort of cartoon strip telling the story of Saint Mark's body being rescued from destruction and smuggled away to its current home in Venice. The five depictions of the ship are very similar, but each one is slightly different from the others. To get a better handle on just what these differences are, and to get a "feel" for the ship itself, I took a leaf out of Björn Landström's book, by drawing them myself. But as we are now blessed with digital technology he had no access to in the 1960s, I was able to import the five mosaics into AutoCad and trace each one. Here they are: Note that there are gaps in the tracings. These are where there are human figures obscuring the lines of the ship. All the ships have three masts, evidently lateen rigged, with what appear to be lanterns (or tops?) at the masthead. In the two pictures where the sails are spread they are decorated - onewith a red cross, the other with two quatrefoils (four-leafed flowers). All are without a forecastle but wherever it's visible, the stempost curls backward. All have a "sterncastle", but each one is different. All have some sort of "fretwork", but in some it's square, in others arched. In B and D (and perhaps in A) there is a strange downward extension at the aft end. I have no idea what it is. All are shown with (usually two) side-rudders in the usual Mediterranean tradition, but the rudders are different shapes. E shows some sort of tackle for controlling the rudders, and has the larboard rudder swivelled upwards. B and D show only a single rudder, but I believe it was simply omitted from the mosaic, not that it represents the ship having a single rudder. A, B and D show the rudder shaft going into the hull through a circular hole. This is mentioned in what is pretty much the definitive study of rudder evolution The Development of the Rudder A.D. 100-1600 - A Technological Tale by Lawrence V. Mott, but after discussion with Woodrat I've come to agree with him that this is not in fact a practical way of hanging a rudder and must be a result of artist's error. Probably the thing that finally convinced me was looking at the Cocharelli Codex again and discovering that though ships are shown with this feature in a side view, in a stern view it is evident that they are supported outside the hull, from the "sterncastle". B, D and E have what might be described as cleats sticking up above the gunwales, and in the mosaics they have loops of rope belayed to them (see the second photo in my first post above, though the loops are a bit hard to see). Whereas A has a sort of "battlemented" side. Two mosaics (C and E) show "wings" at the stern, a common feature of Mediterranean ships of this period. I've used the Mezza Lune technique to work out the shape of the hull (thanks, Woodrat!). These calculations relate only to the floors - that is once the stempost and sternpost curve up from the keel it no longer applies, and you have to work out how to curve the hull inwards from there to the bow and stern. You can see on the plan view the lines that show the extent of the floors. and the last pic shows how the frames line up with the hull in B. Now I have to reconcile these five pictures and choose which features I'm going to go with - or perhaps choose a single mosaic and just go with that one. Steven