Louie da fly
-
Posts
7,990 -
Joined
-
Last visited
Content Type
Profiles
Forums
Gallery
Events
Everything posted by Louie da fly
-
 It might b the fault of the wood you're using. I've never used basswood, but on looking it up it's described as being very good for carving, which presumably means it would be ok for making this chest. Maybe just try it again; but you could also try it in a different timber. Steven
 -
I'm glad this discussion has been of help to you, rupertmac. I was going to say the planking should curve upward at the ends, but as you're doing close-ups this really isn't an issue. The sail and the planking look good in the trailer. Can I say, however, that the woman with a naked sword hanging from her belt would be an accident waiting to happen . . . apart from cutting her belt, she'd be likely to hurt herself on the blade . . . Still, that's just me (having been a mediaeval re-enactor for many years) - nobody else is likely to notice. Unfortunately we haven't heard from deperdussin1910 since November 2018 - it would be really nice to see if he continued with his project (hint, hint). Steven
- 27 replies
-
- 1
-

-
- irish galley
- galley
- (and 1 more)
-
Beautiful work, Slowhand! Steven
-
Roter Löwe 1597 by Ondras71
Louie da fly replied to Ondras71's topic in - Build logs for subjects built 1501 - 1750
I'm not familiar with beech (we don't have many beech trees in Oz). I use pear wood and have good results. But the best is supposed to be boxwood - I can't say from personal experience because I've never used it. Having said all that, you're doing very well with your lion, so I don't think there's a problem anyway. Steven -
HMCSS Victoria 1855 by BANYAN - 1:72
Louie da fly replied to BANYAN's topic in - Build logs for subjects built 1851 - 1900
Hi Pat. It does look a bit coin-toss. Against the steel version is the fact that it follows the form of the bell so closely, which is not seen on the lithograph. The wood version would be harder to make (especially as you have all those amazing metal-working equipment and skills!), but it could be done. First question - why do you have three layers at all? Is it to follow standard belfry construction? Certainly you can't see them in the lithograph. However, if you do, there are two ways to go. The first is to carve your three layers from separate pieces of fine-grained timber (box for preference) and glue them together. That would take a fair bit of care to get everything to fit accurately, but it could be done. Rather in the manner of post #1404 at https://modelshipworld.com/topic/10344-10th-11th-century-byzantine-dromon-by-louie-da-fly-150-finished/page/47/ - (only more complicated) Alternatively, treat the horizontal projections as a separate structure - you'll never get a change of direction that tight by bending. Glue the three layers of the arch together and while the glue is still wet put them in a two-piece press of the correct diameter (you'd have to make that, I suppose) to get the curve. The layers will slide over each other longitudinally, so make them a little too long and trim to length once the glue is dry. Make the projections separately and glue them in place. This is a very fiddly method, and has many opportunities to go wrong - I'd be going for carved pieces, myself. If all else fails, send me the dimensions and I'll be quite happy to carve the arch. (I have to say I'm rather tempted by the idea of having a little bit of my stuff on this beautiful model). Nup, the bow-on aspect would still show vertical legs as vertical, or at the very least as parallel. If this is an accurate rendition, then the legs would be splayed, even in timber. It could be an advantage in structural strength to do it that way, actually. Though I think you're right in spotting a "step" in the legs toward the bottom (before the gunwale obscures them). Steven- 1,013 replies
-
- 2
-
-
- gun dispatch vessel
- victoria
- (and 2 more)
-
Coca by Foremast - Amati -1:60
Louie da fly replied to Foremast's topic in - Kit subjects built Up to and including 1500 AD
Oh heck! I've already got it! But thanks so much for the offer. I've read it at least once, but I'll have to go over it in more detail. I actually used the Serçe Limani block in my dromon build (!) and yes, for the halyard . . . (see posts #1170 and #1172 at https://modelshipworld.com/topic/10344-10th-11th-century-byzantine-dromon-by-louie-da-fly-150-finished/page/39/) Steven -
HMCSS Victoria 1855 by BANYAN - 1:72
Louie da fly replied to BANYAN's topic in - Build logs for subjects built 1851 - 1900
Pat, do you have a photo of the original belfry? I've worked with making fake curves in wood and might be able to come up with some ideas if I could see what's being aimed at. Steven- 1,013 replies
-
- 3
-
-
- gun dispatch vessel
- victoria
- (and 2 more)
-
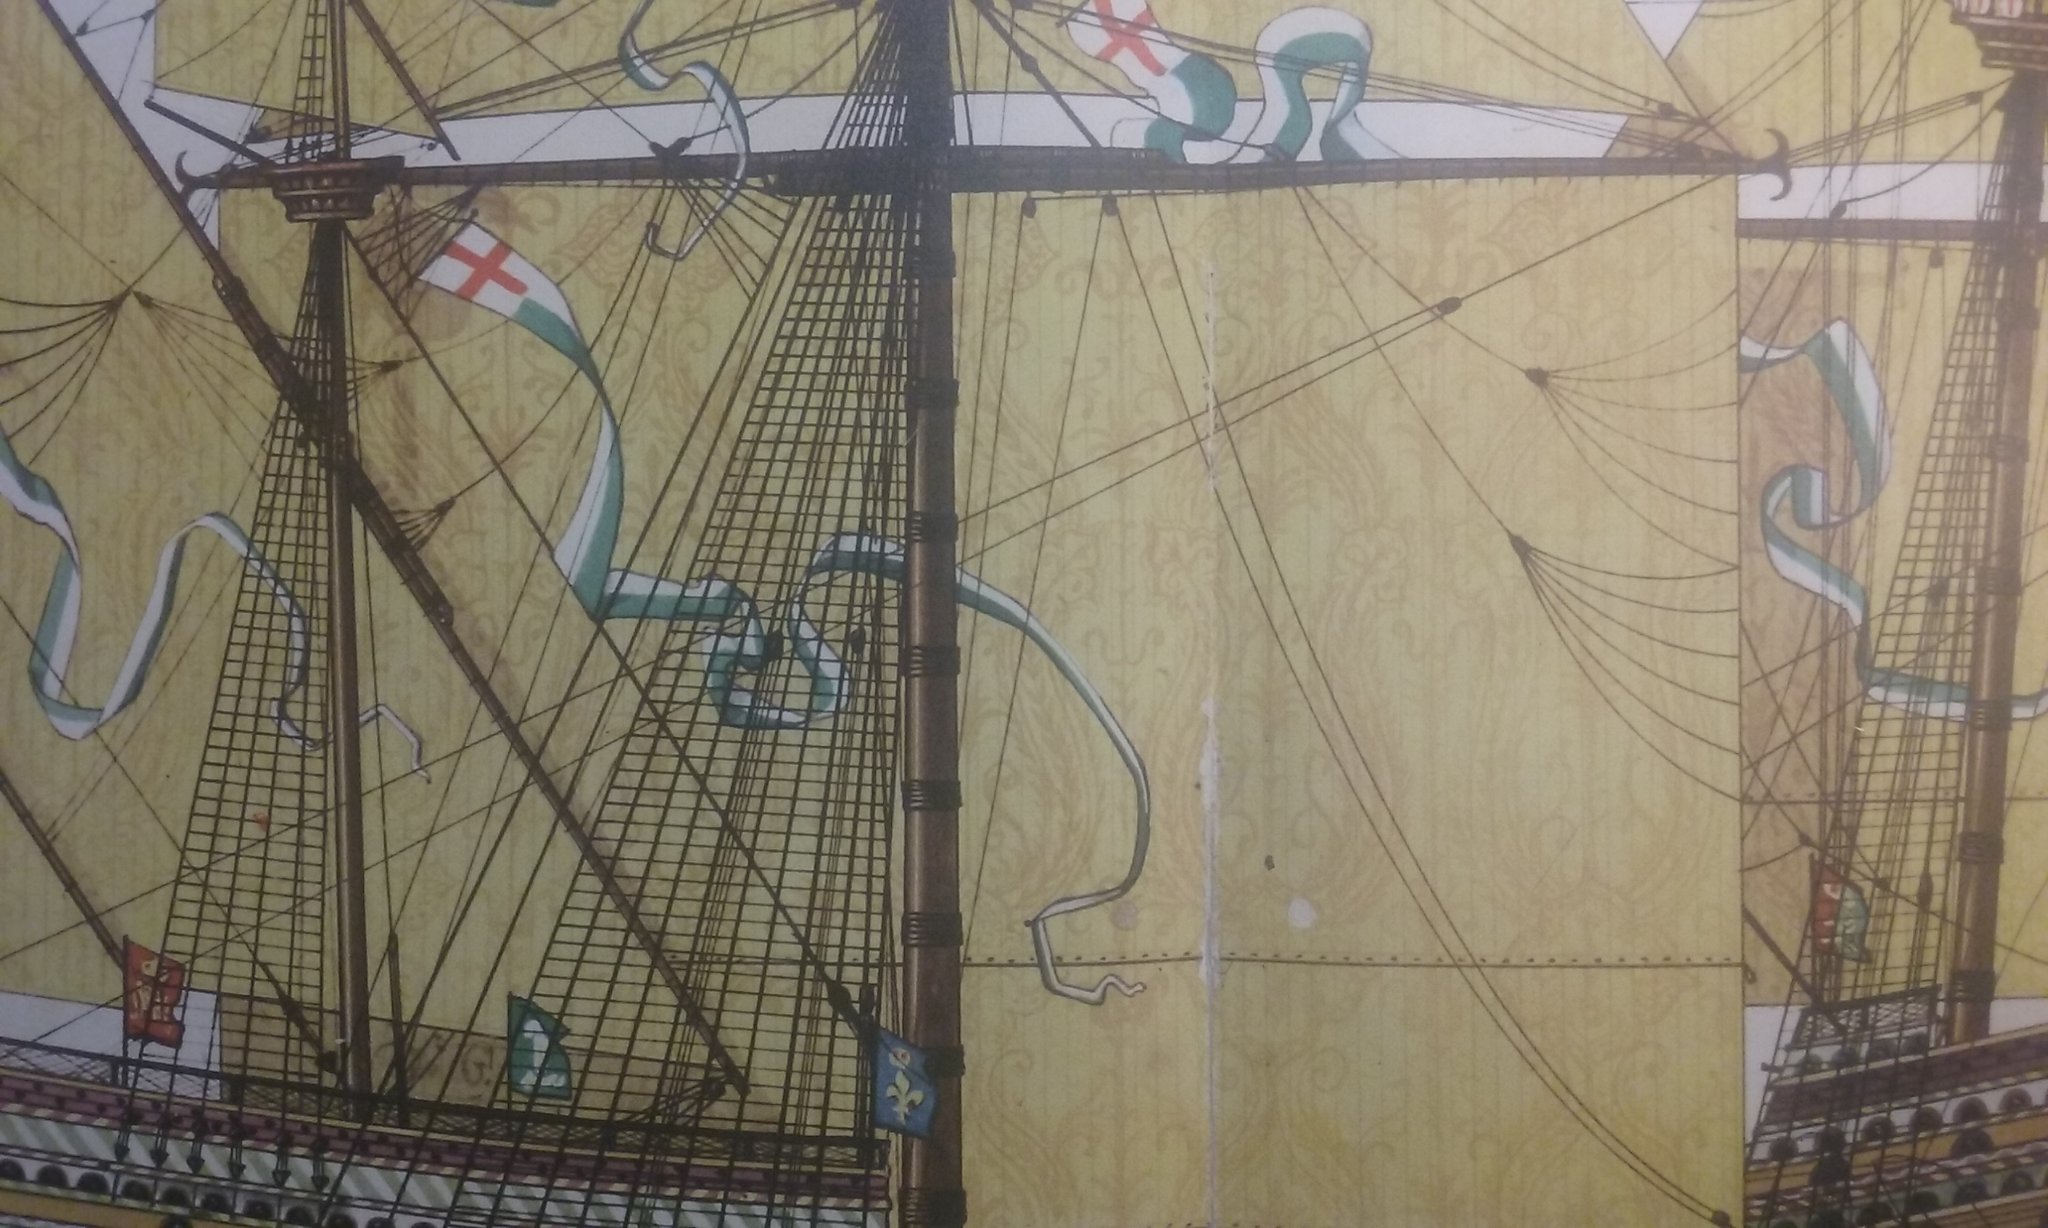
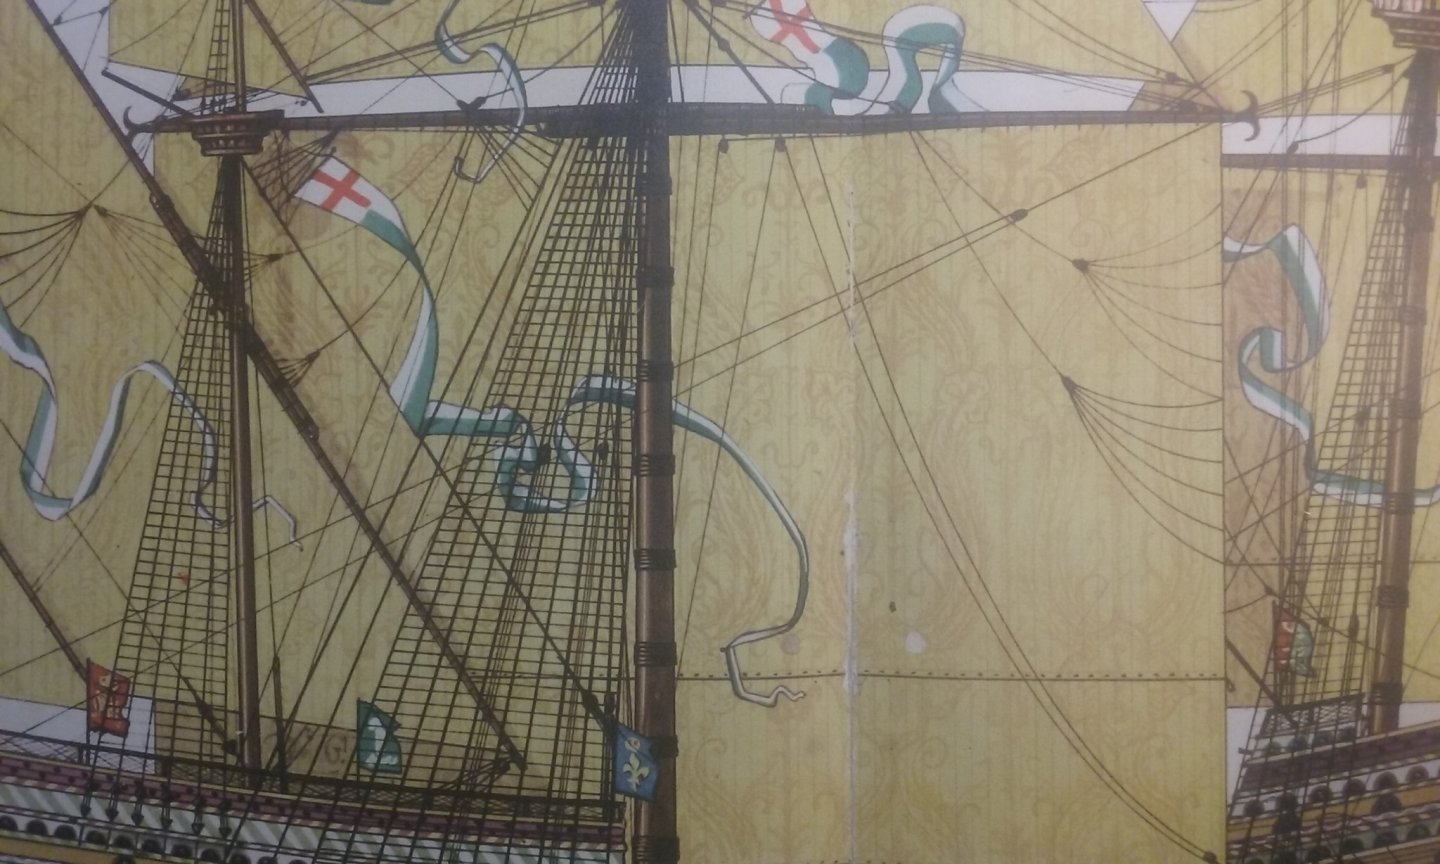
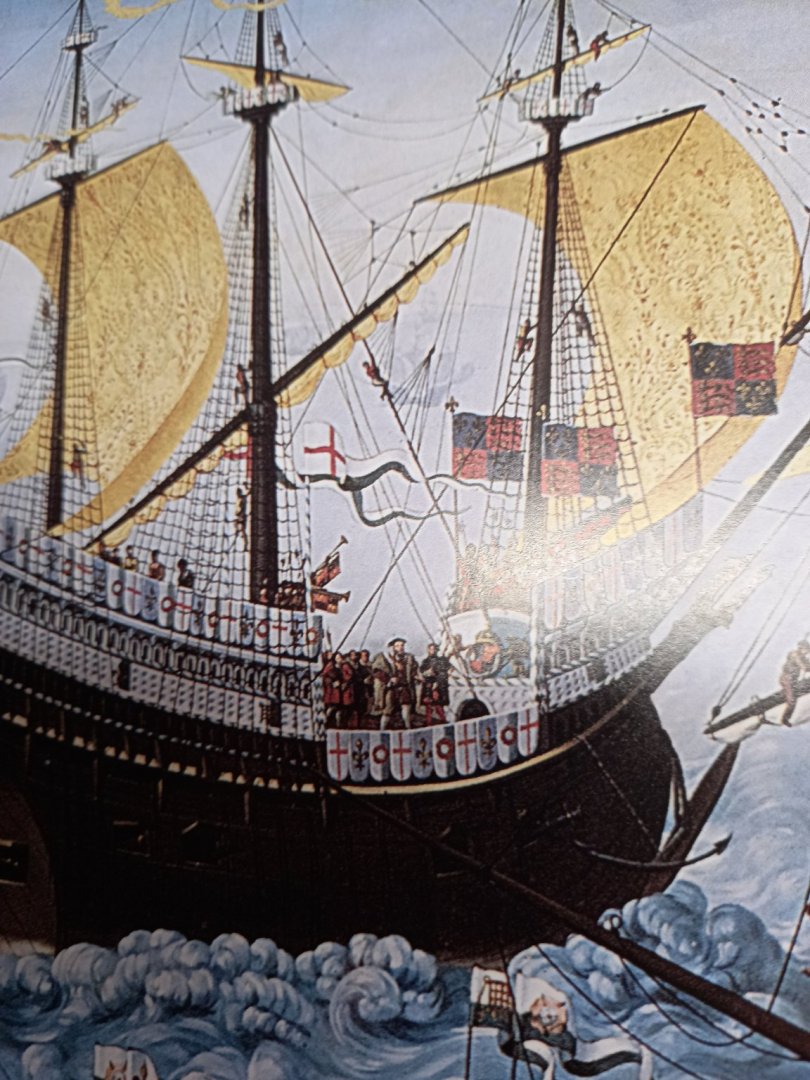
Thanks everybody for the likes and comments. It's interesting that the original painting shows the "cloth of gold" on the back of the sail but not the front. I think that as the artist shows the ship from aft this is a device to show off the pattern - and it is followed in the reconstruction painting. I believe it would actually have been on the front where it would have been more easily seen, and as shown in many other pictures of ships of this period. So I've pretty much decided that I'll have the pattern on the front (lets not even think of painting it both sides). Steven
- 740 replies
-
- 5
-
-
- Tudor
- restoration
- (and 4 more)
-
Coca by Foremast - Amati -1:60
Louie da fly replied to Foremast's topic in - Kit subjects built Up to and including 1500 AD
That looks fine, Waldemar. Except for the calcet (my ship is English, after all) I used a similar method on my Great Harry - see post #319 at but I wasn't really certain it was appropriate for my period, as at least one of the books related to ships from about 1620 onwards. Does your book specifically mention the ramshead block/knight assembly for the late 15th century? Steven -
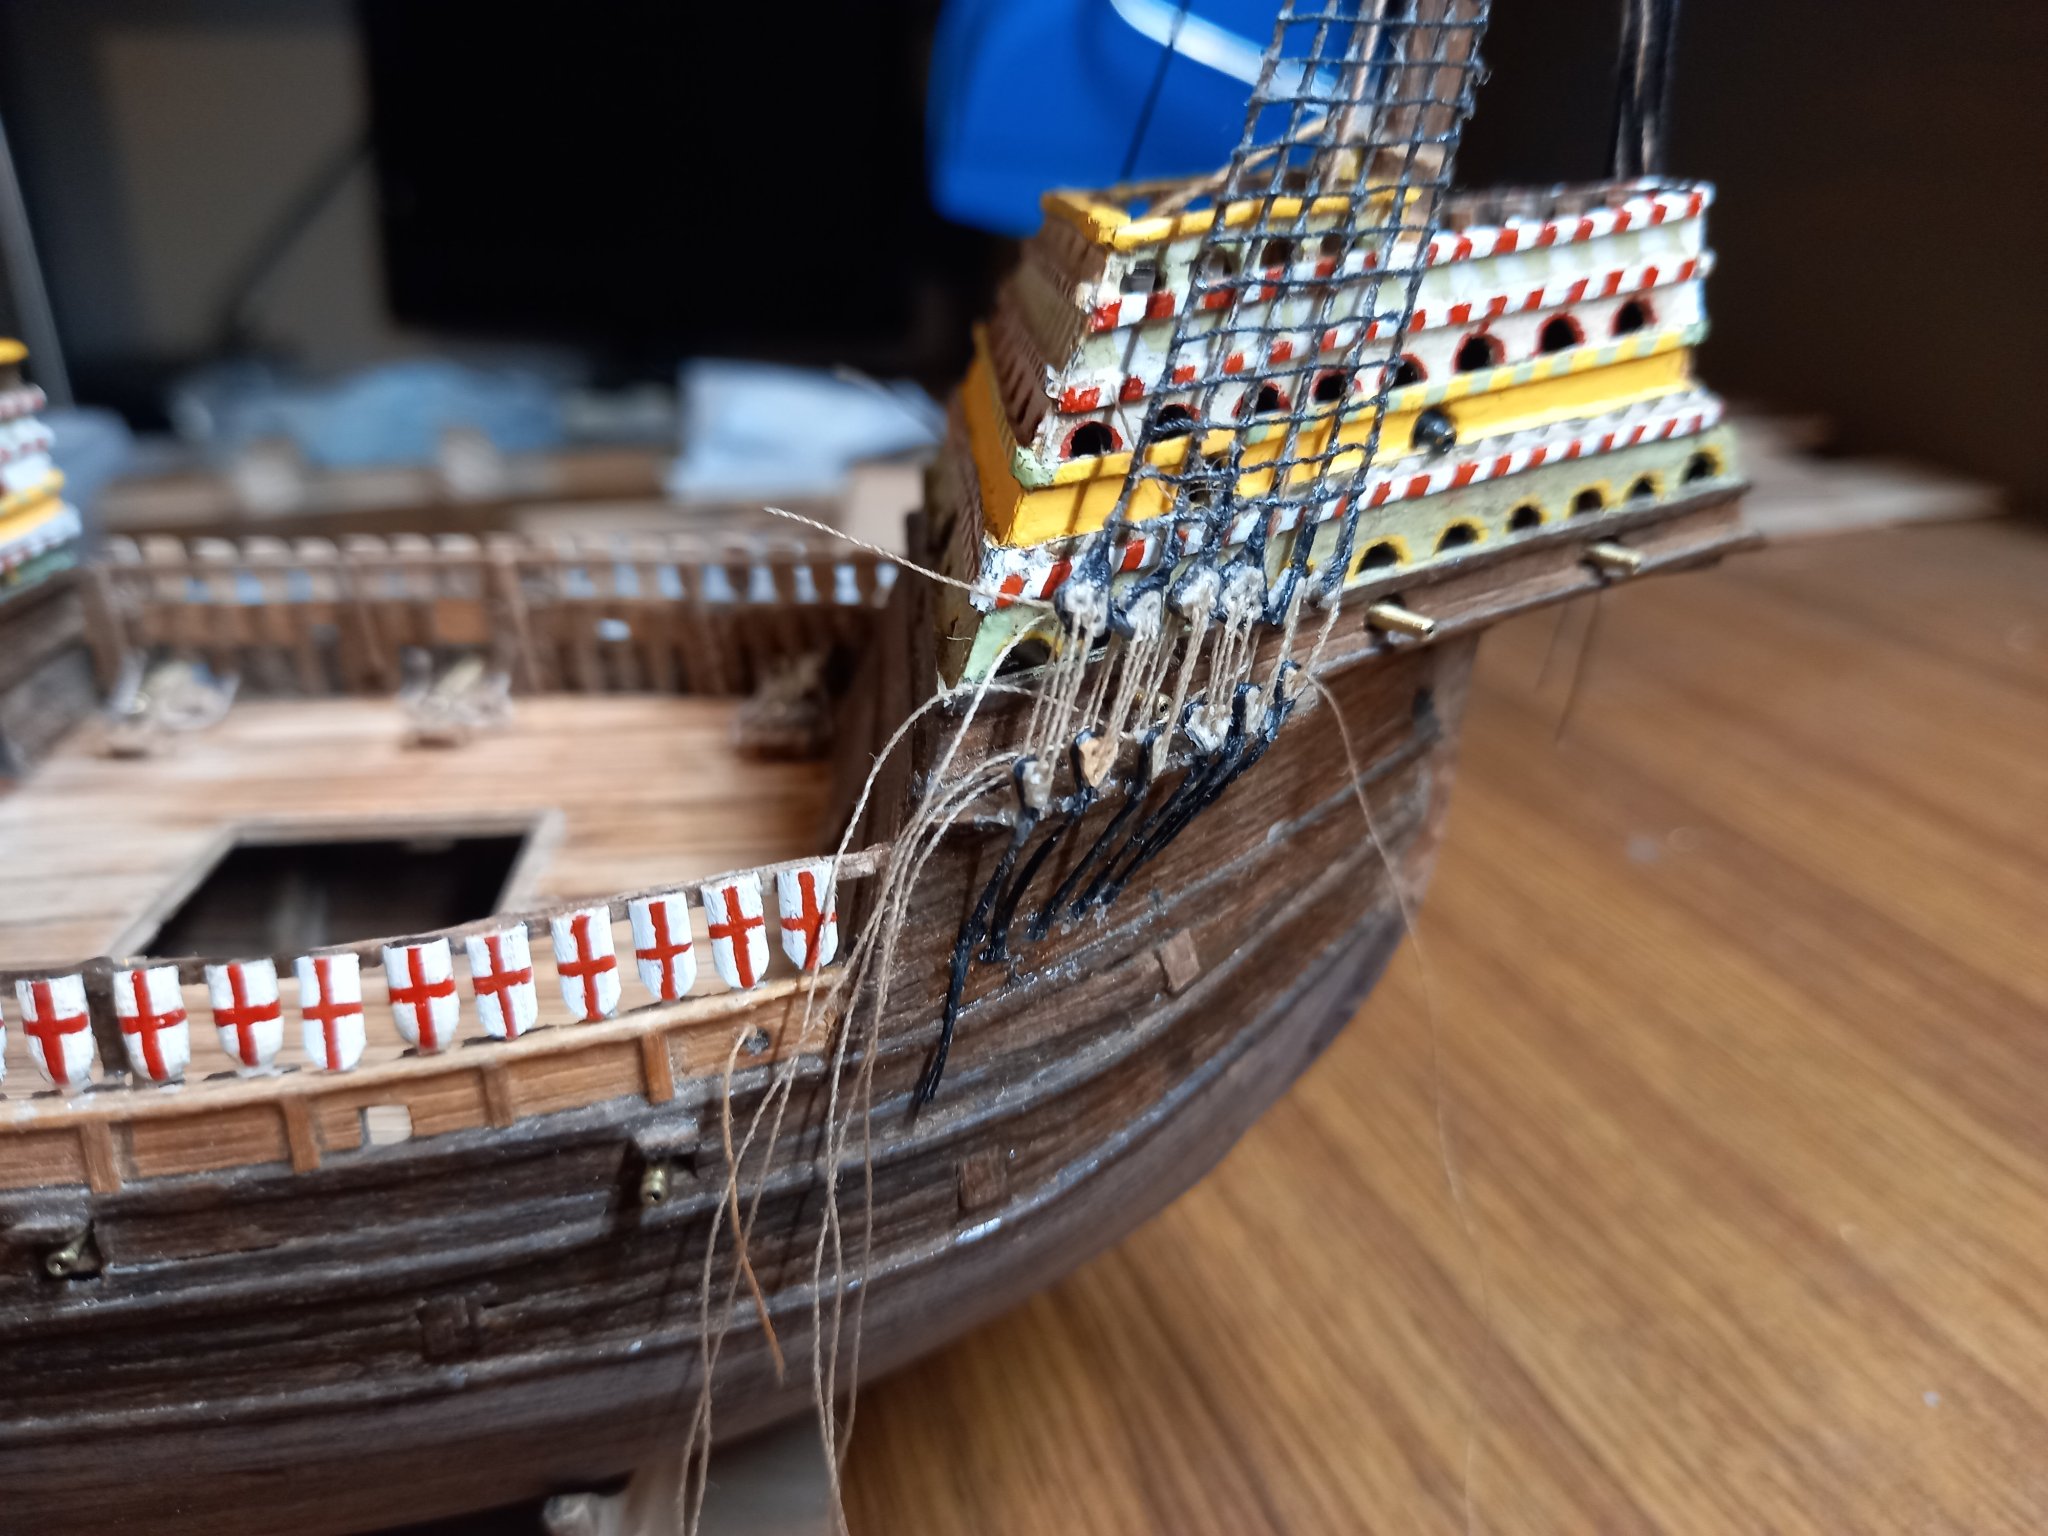
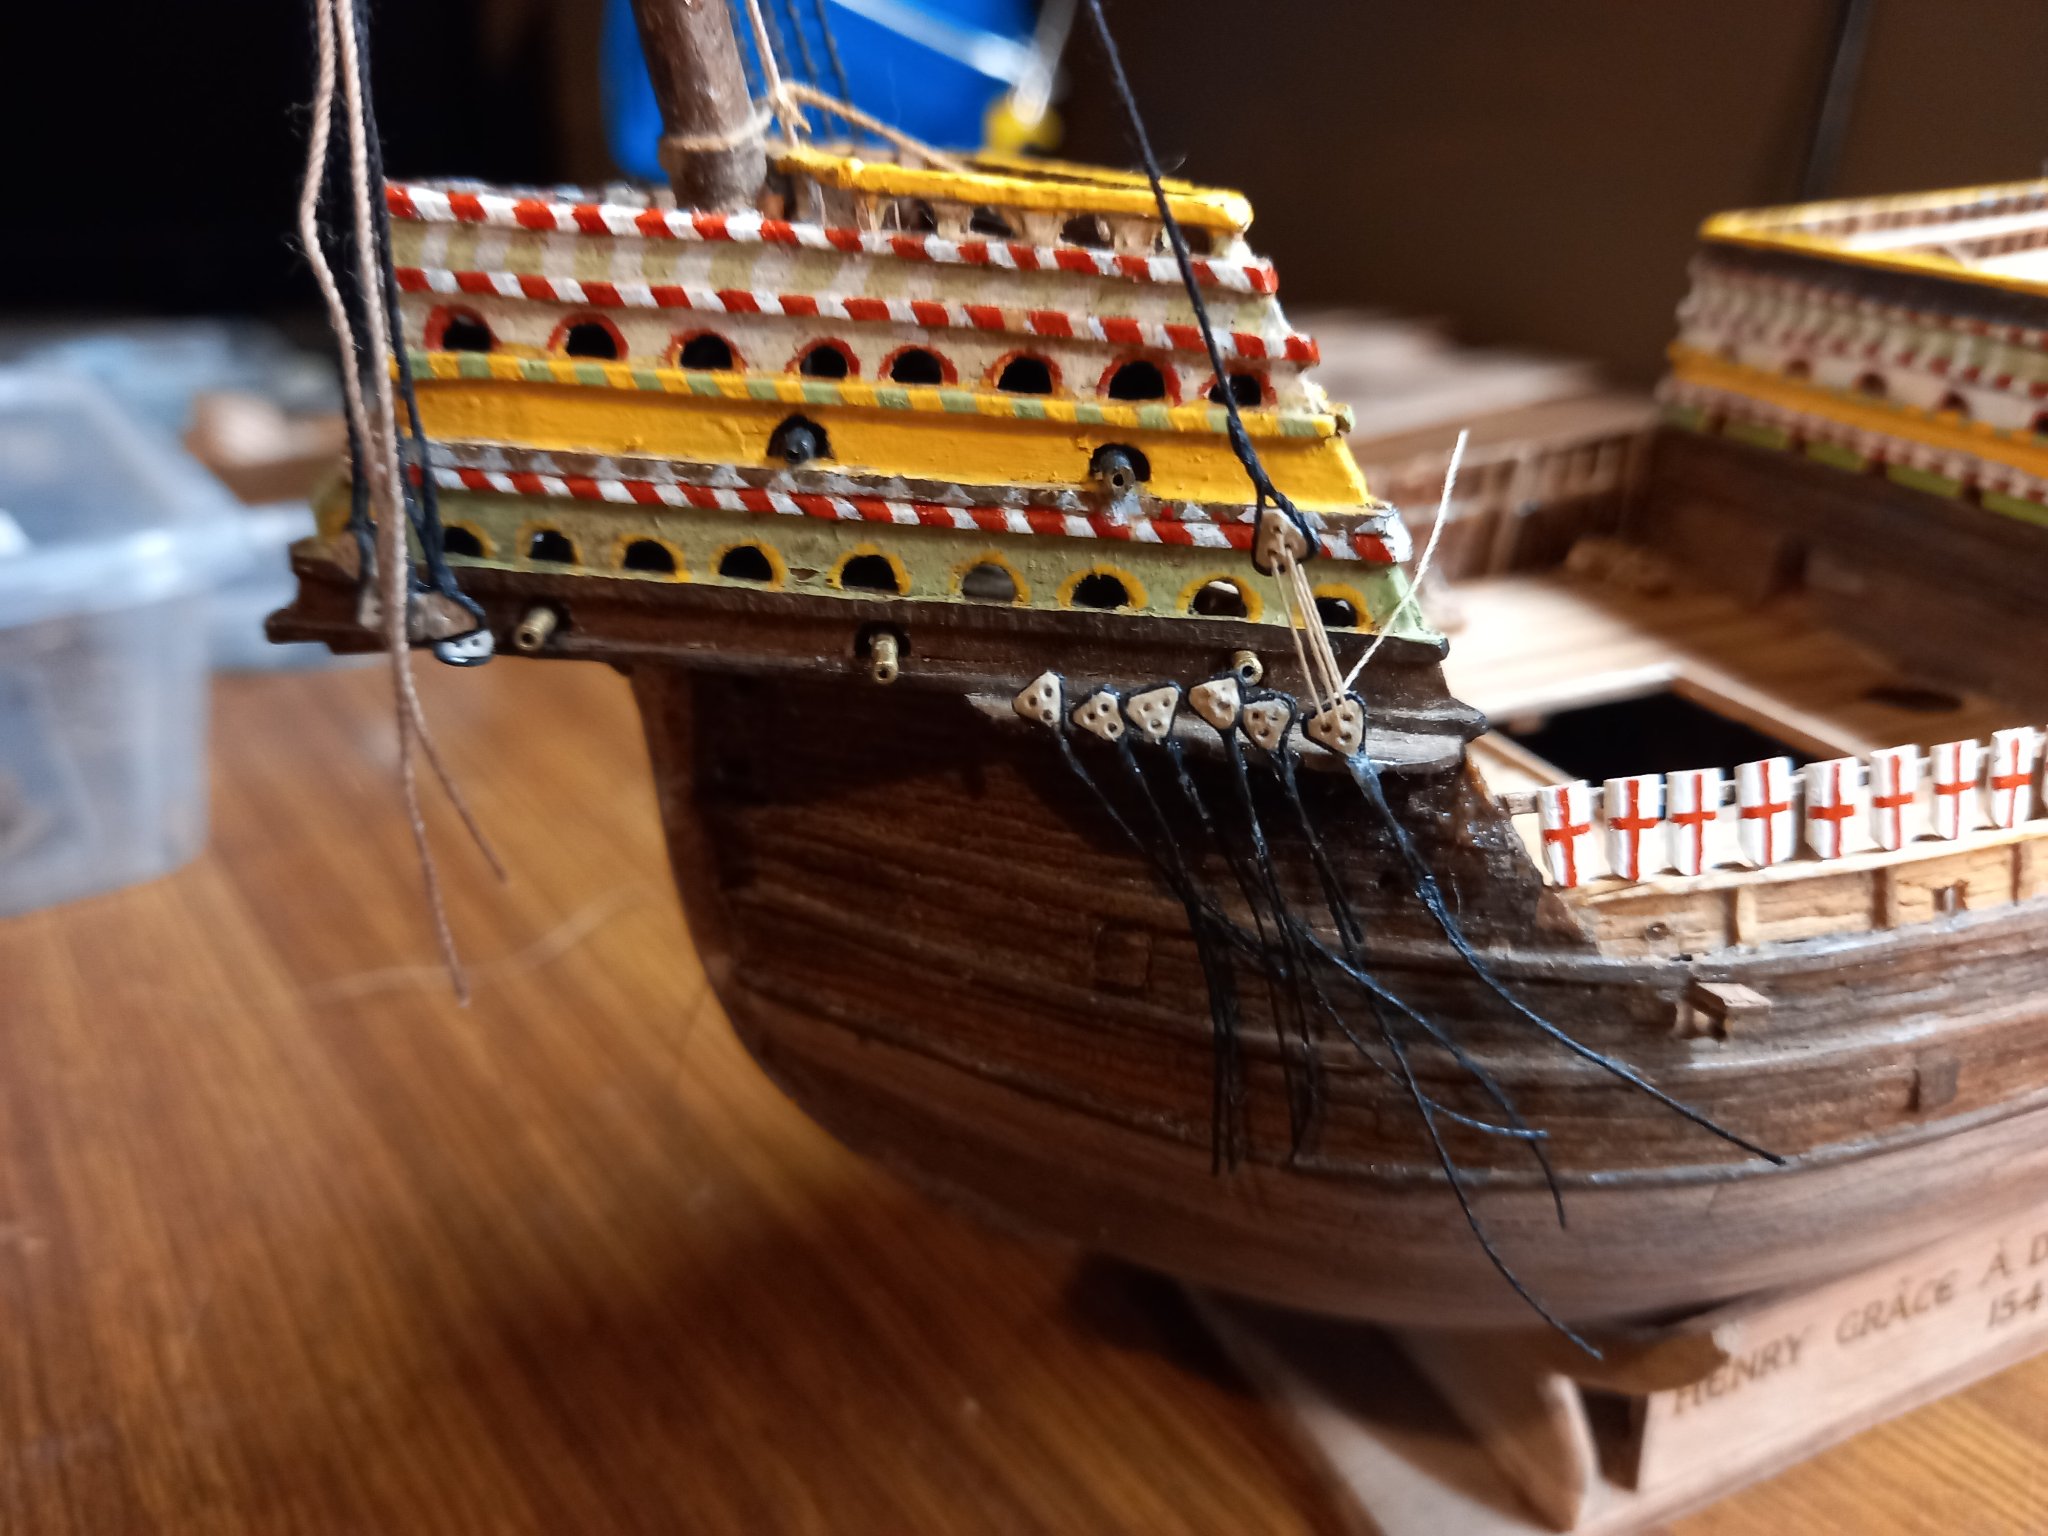
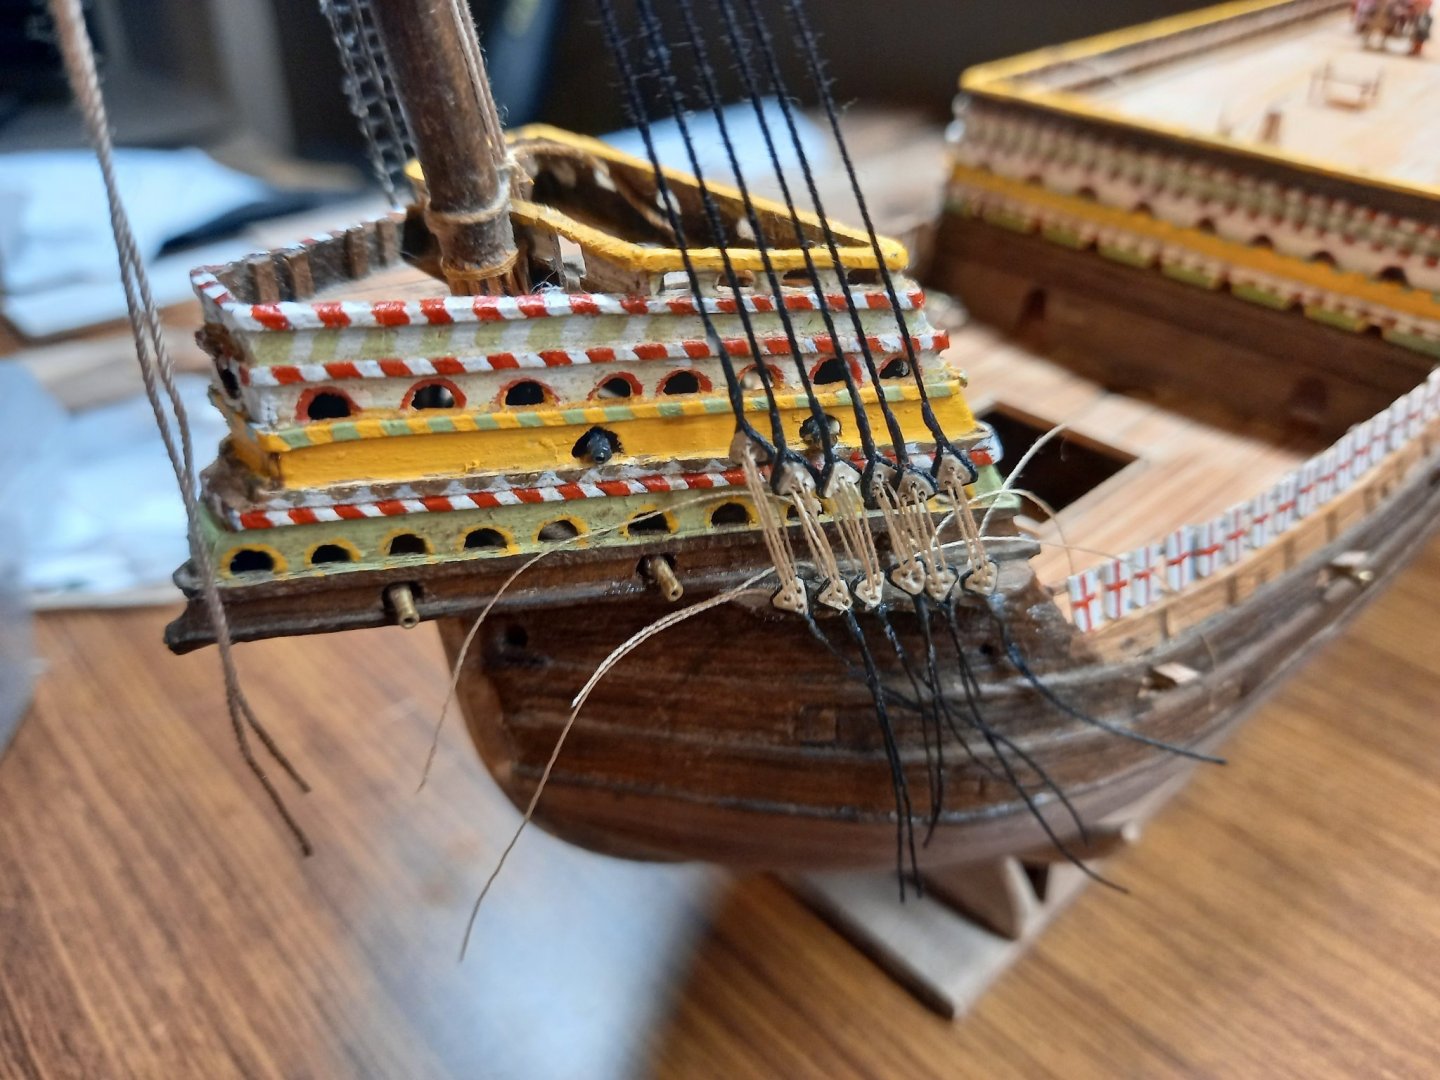
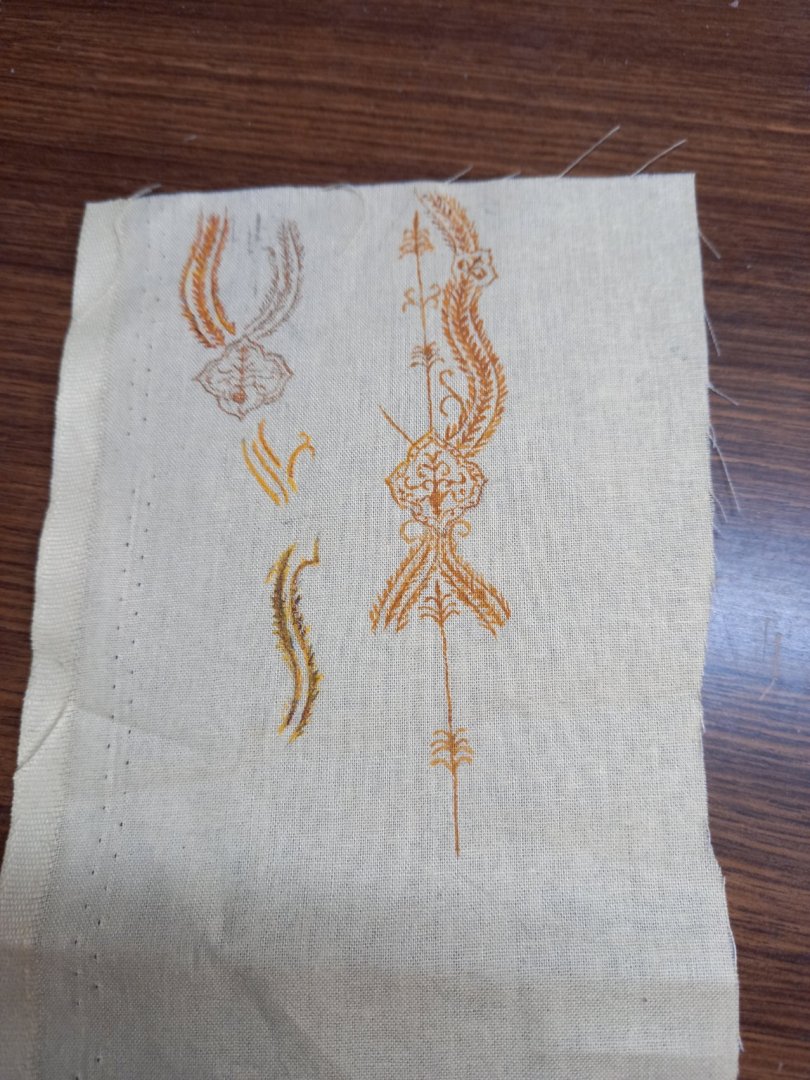
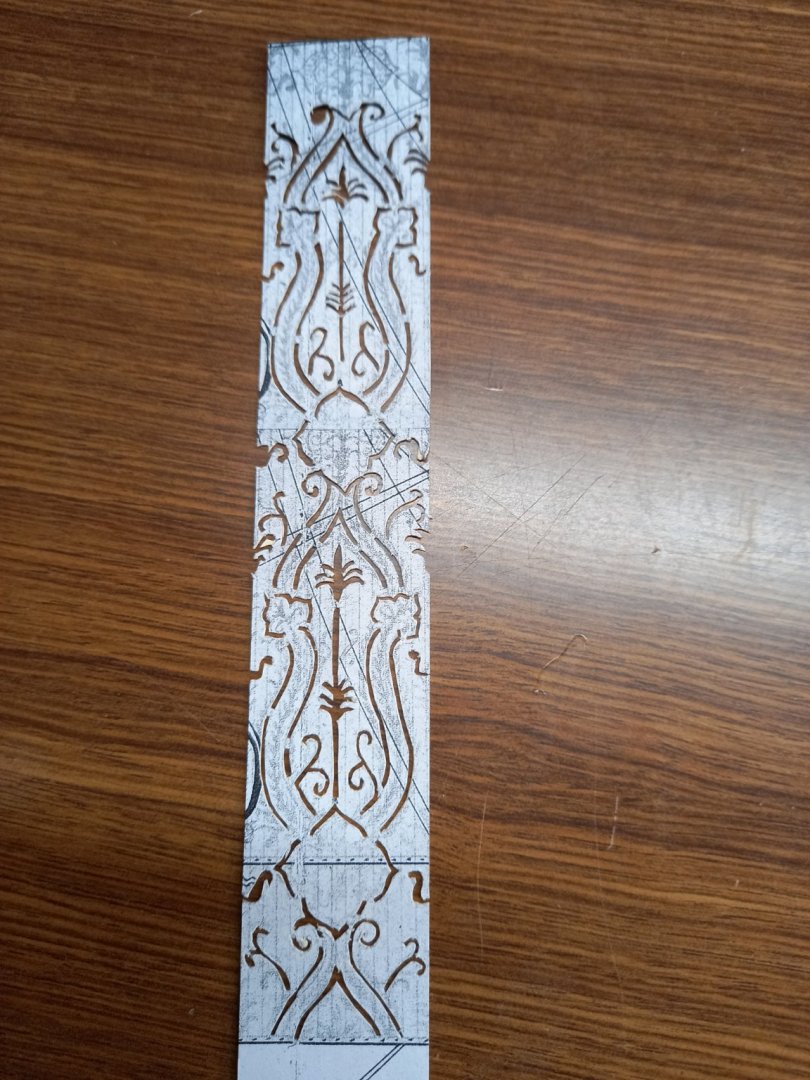
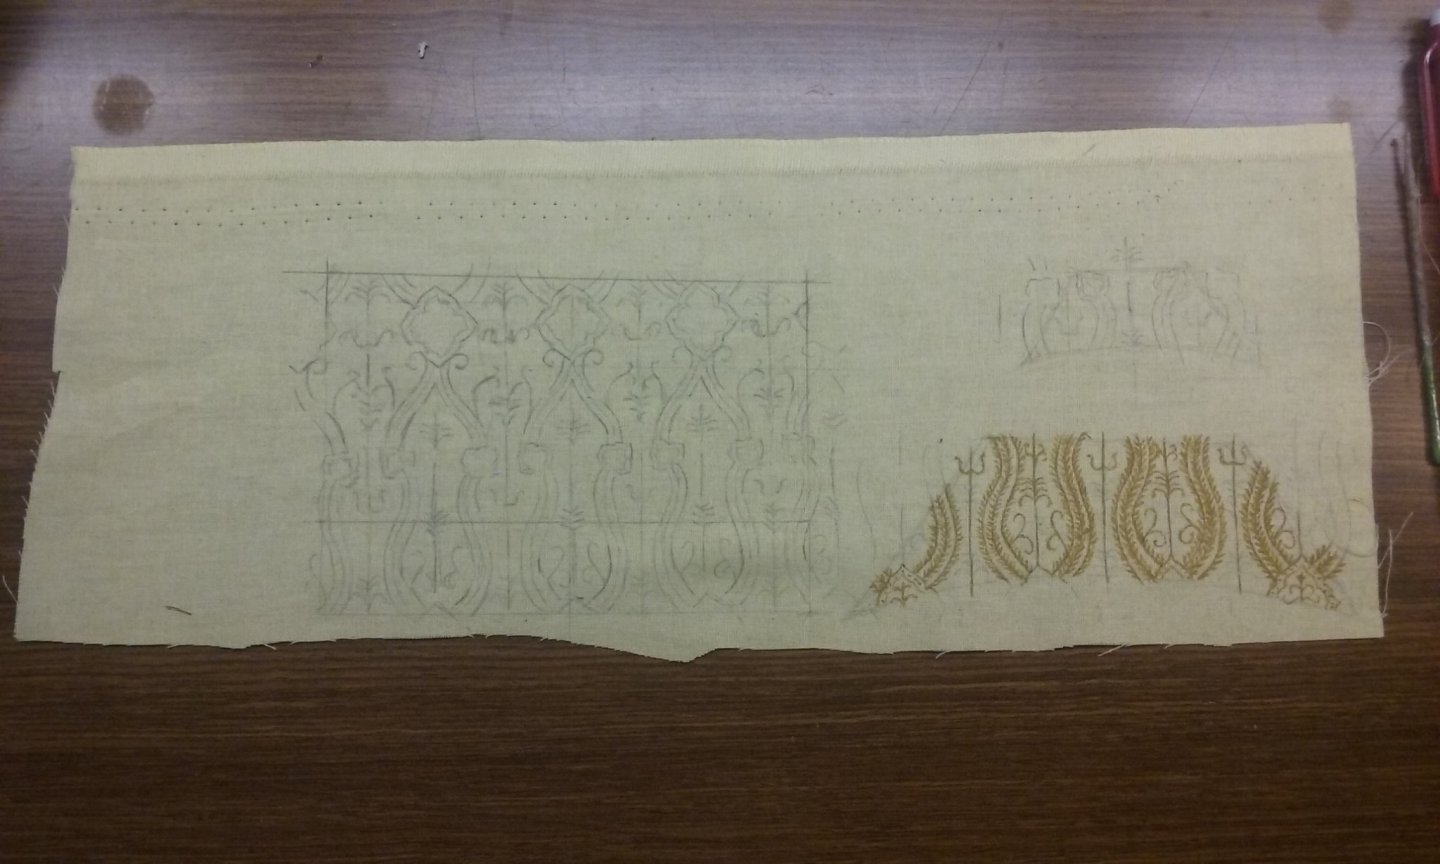
Working on the fore shrouds. I'd already (way back when I was 17) glued the ratlines to the starboard shrouds, thinking it's be easy to add the deadeyes later (how wrong I was!). Since I took this photo I have tightened the lanyards, glued them in place and cut the free ends off (also very fiddly). And the port shrouds were new. Unfortunately my clever way of setting up the spacing of the deadeyes just didn't work. The shrouds ended up too long, and I ended up having to strip them off, cut off the top end and glue them back on. A lot of mucking around. I'm hoping that with experience I'll get better on later ones. And I did some test painting for the "cloth of gold" sails. Here's the original painting from 1545, and the reconstruction painting from Björn Landström's book The Ship, which I used as my model. I traced the repeating pattern and made a template for it, but wasn't satisfied with it so I made another by photocopying the pattern and sticking it to thin card from a manilla folder. For the first test run I used gold acrylic - looked good, except they didn't have gold paint back then. So I ended up trying out various combinations of yellow, brown and black acrylic paint, doing it in layers, and finally mixing them to try and get a convincing colour (far right). By the way, the colour values are very bad - the fabric is really a canary yellow and the paint colour is a sort of brownish greyish yellow. I hadn't wanted to do it this way, because it's so hard to get separate "batches" to match each other, and acrylic starts to dry the moment you expose it to air. But that turned out to work best, so I have to grit my teeth and do great long stints of fiddly painting until the current batch runs out and I can take a break (not wanting to waste my limited supplies of paint). So here's the fore topsail painted and the foresail and topgallant marked out for painting. Since I took this photo I have painted a little over half the pattern on foresail. More to come. Steven


- 740 replies
-
- 16
-
-
- Tudor
- restoration
- (and 4 more)
-
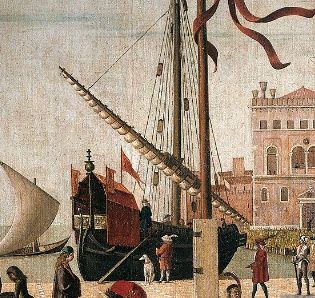
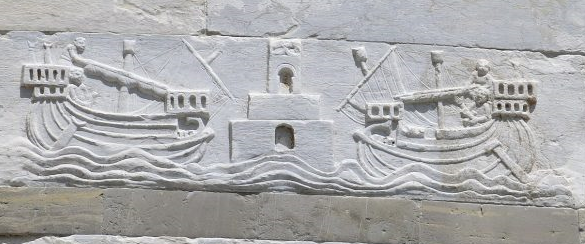
I hope I didn't offend you, Dick. The furthest thing from my intention. I agree completely with your comments regarding the value of experimental archaeology. Unfortunately, kit manufacturers follow what they perceive the "market" to be - so there's plenty of Santa Marias, Revenges, Golden Hinds etc based on very little and even (such as in the case of all those square-sterned Santa Marias), in direct contradiction of the available evidence. This alone is a justification for a certain amount of well-earned grumpiness. OTOH, there's the occasional wild card - there was a beautiful kit on MSW awhile ago of a Liburnian from umpteen BC, based on contemporary representations, and sporting a stern rudder! Personally I'm not all that interested in building a model of a ship where all the information is handed to you on a platter. I would far rather exercise my mind investigating lesser-known ships and trying to work out hwat* form they really took and how they were made. I think at least half the fun in ship modelling is in the research and speculation, and the attempt to duplicate something where the information is far from complete, or interpret the available (often obscure) information to make something that actually works. And there are so many ships out there, particularly from the Middle Ages and Renaissance, that nobody has ever attempted. Like, I wouldn't mind having a go at this one, from Carpaccio's Legend of St Ursula. or perhaps one of these, a bas-relief (probably from the 12th century) on the leaning tower of Pisa Anyway, I'm following this build with great interest, to see how the theoretical idea turns out in the real world. Congratulations on your persistence and perspicacity, and other things beginning with per- Best wishes, Steven *(that was a typo, but is also the Old English version** of the word what, so I'm leaving it in place) **(actually it's hwaet, but what they hey . . .)
- 186 replies
-
- 3
-
-
- keelless
- reverse clinker
- (and 4 more)
-
Beautiful work, Dick. Particularly for a vessel that may never have existed!
- 186 replies
-
- 2
-
-
- keelless
- reverse clinker
- (and 4 more)
-
Looking good. You should start a build log for this. Do you have any photos of her at earlier stages of construction? Steven
-
Good luck with the surgery, Bob. Good to see you've started a build log even if you have to wait a bit to start the build itself. I'll be following with interest (this period is one of my main passions). Steven
-
Coca by Foremast - Amati -1:60
Louie da fly replied to Foremast's topic in - Kit subjects built Up to and including 1500 AD
That's very interesting speculation, Waldemar (BTW, this discussion is something of a hijack of Foremast's thread, but as it's still on-topic with his own build I hope he won't mind). As Gene Wilder says in Young Frankenstein "IT - COULD - WORK!!" The bit about women's underwear - I'd always thought it went against common sense. Men's underwear is repeatedly shown in contemporary illustrations, but on a purely practical basis if anyone needed that kind of thing, it would surely be women rather than men. I was going to raise the issue of mechanical advantage if there's no blocks and tackle. And at least in the bigger carracks, the mainyard and mainsail were enormous and must have been very heavy. Steven -
Coca by Foremast - Amati -1:60
Louie da fly replied to Foremast's topic in - Kit subjects built Up to and including 1500 AD
I think so, but of course it can never be proved. But as they say "Absence of evidence is not evidence of absence". (It was thought until recently that women in the 15th century didn't wear underpants - no documentary mentions, none in iconography, no archaeological evidence. Then they found some, proving they really were used.) Steven -
Hi, Bob. I'd agree with Mark in recommending you start a build log. The instructions are here: https://modelshipworld.com/topic/24705-before-you-post-your-build-log-please-read-this-starting-and-naming-your-build-log/ I know it's a bit intimidating when you're starting out, especially when you see all those amazing models others have done. But they also had to start sometime, and they made all kinds of newbie mistakes (and you will make mistakes, believe me - don't ask me how I know), but they kept learning from those mistakes, and each model was better than the last until you see the incredible models that show up in the build logs. But starting a build log exposes you to the help, experience and advice of those self-same people, and you'll find everybody is helpful and encouraging. As well as starting a build log, I'd recommend you do a search for other people's build logs of Amati's Santa Maria - the search bar is at the top right of this page. That should give you quite a few tips and help you avoid going up dead-end tracks. There's even a Youtube video available - And if you want to delve further into the whole subject, do a search for "carrack" and you'll see some amazing, phenomenally researched builds of ships of Santa Maria's era and type. Good luck with the build. And ask lots of questions - there's no such thing as a stupid question. And you'll find the wonderful members here will do the best they can to provide the answers. Steven
-
It's looking good, Patrick. Unfortunately, the further back you go, the harder it is to be sure of how things were done. But then, who's going to tell you you're wrong? Steven
- 756 replies
-
- 5
-
-
- galleon
- golden hind
- (and 2 more)
-
Coca by Foremast - Amati -1:60
Louie da fly replied to Foremast's topic in - Kit subjects built Up to and including 1500 AD
Thanks, Waldemar. An interesting point - I looked through my entire collection of contemporary illustrations yesterday and couldn't find a single one that showed anything that looked like halyards or ties. Many of them showed lifts attached to the yards near the yardarms, but I don't believe that would be enough - I can only assume the artists just missed the ties/halyards among the "forest" of other ropes. The information you're putting up on this thread is very interesting and useful. Thanks very much for it. Steven -
Mark, apart from the difficulty of the actual carving of such fine detail, the grain of the wood is also a limiting factor - it may be coarser than the detail you're trying to carve. I'm using pear wood which has a pretty fine grain, and I'm hitting this problem. AFAIK box is finer and might be better for the purpose, but if you can 3D print these things you might be better off. Steven
-
Coca by Foremast - Amati -1:60
Louie da fly replied to Foremast's topic in - Kit subjects built Up to and including 1500 AD
By the way, have you looked at Woodrat's build log? LOTS of very worthwhile research went into this one - I think you'd find it helpful. And also a collection of contemporary pictures of carracks I've put together at https://www.pinterest.com.au/lowe1847/carracks/ Steven -
I take my hat off to you, Schrader. Exquisite work. Steven
-
Hi Darryl, and welcome to MSW. You should do well with your previously acquired skills. But I'd highly recommend you start a build log for your Flattie, and whenever you hit a "what do I do now?" moment, put the question up on your log. Lot of people here very willing to help, and probably many who've already encountered and solved the same problem. Where are you in WA? I grew up in the Perth suburb of Attadale (south of the river - I wouldn't be able to afford a house there nowadays!) and I have very fond recollections of my childhood and teenage years there. Steven