


Ryland Craze
-
Posts
1,442 -
Joined
-
Last visited
Content Type
Profiles
Forums
Gallery
Events
Posts posted by Ryland Craze
-
-
-
3 hours ago, Greg M said:
I was a bit nervous removing the tape from the stem in case I had damaged it, but there was none. I'm energized right now as I feel the hardest and most tedious parts of the fairing the hull are over and the end is in sight.
Congratulations. I know the feeling
-
Jake, Take a look at the planking tutorials in the following post:
The various links will take you to PDF articles on planking a hull. These articles are a great resource for beginner ship modelers as they will explain the hows and whys of planking a ship model. As VTHokiEE said, the planks needed to be tapered at the bow. All of this is explained in the planking articles.
Good luck on this build.
-
Welcome to Model Ship World Sam. You have some really nice looking models. It must be a lot of fun to build a model and then get to run it on the water. The Philadelphia Ship Model Society is near you. They are currently meeting by Zoom due to the Covid 19 pandemic. Here is a link to their website: https://www.philadelphiashipmodelsociety.com/
-
-
Hi Leslie and welcome to Model Ship World. I am not a plastic ship modeler, but we have many talented builders of plastic ships who may be able to help you out. You could do a search of the Yamato on this site and check out the build logs for this ship. If you get a chance, please post pictures of your completed ships. We would like to see them
-
Hi SeaDoc,
I have moved your question to a different forum and edited the title to reflect your question.
The keel on this model is two parts and the laser cutter etched the bearding line on one side of the wooden sheet that held these parts. The way the parts were laid out, it was etched on the port side of one piece of the keel and the starboard side of the other piece of the keel. What you need to do is trace the bearding line of each piece on a sheet of paper and transfer this line to the opposite side of the two keel parts. This is explained on page 6 of the instructions.
I hope you start a build log as we would like to follow your progress. It is also a good place to ask questions about your build. This kit builds into a very nice model. Good luck on your build.
-
Mike, Congratulations on finishing your Endeavour Longboat. This turned out to be a nice model and it sounds like you learned a lot building this model. What are you planning on building next?
-
-
Hi Mike and welcome to Model Ship World. I am glad hat you have been hooked into this hobby. Building a wooden ship model is very rewarding. I look forward to seeing your build logs.
- bruce d, Rik Thistle and mtaylor
-
 3
3
-
Welcome to Model Ship World Jim. You are in a nice location being close to the Chesapeake Bay. I enjoy going to Annapolis to see the US Naval Academy and as a kid I used to go to Colonial Beach. I am glad that MSW helped you in the construction of your Flying Fish. Like Chris said, the new kits today are light years ahead of the old kits in terms of quality, instructions and materials.
-
-
Really nice job on your Pickett Boat. I am also enjoying your detailed build log. It will be a big help for future builders of this model.
-
Welcome to Model Ship World Levmiller. With your professional experience and woodworking skills, you should not have a problem building the Lady Nelson. Plus, you have the knowledge of the many members here on MSW that are more than willing to offer you advice and techniques to help you complete your model. We are glad to have you aboard this forum.
-
I really like your planking and look forward to seeing the progress you make on this build.
-
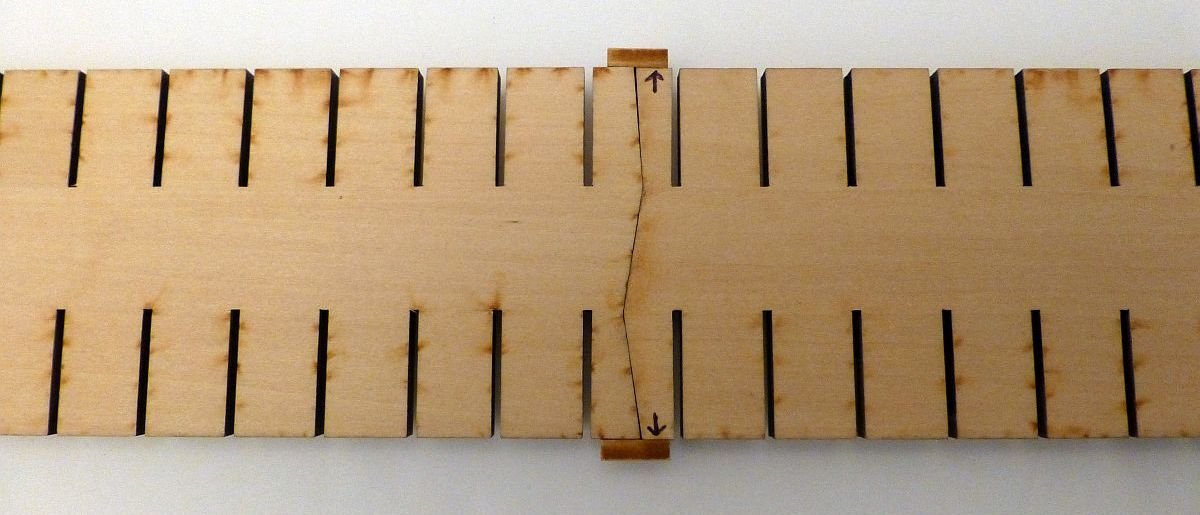
Before I placed anything on my build board, I made some tabs from scrap wood and glued them to the edge of one of the build board half's. This kept the two build boards in alignment so that they would not shift as shown in the picture in the post above. Here is a picture of the bottom of the build board and the arrows show where the tabs were glued. This kept the build board in alignment as the build boards could not shift. The two sections of the build board were not glued together at this time.
I followed the instructions on gluing the keel to the frames. I glued the rearward frames to the keel first, waited overnight for the glue to dry and then glued the forward frames to the keel. After the glue had dried, I taped both build board halves together. I ran the tape from end to end so that the build boards would sit flush on my work table. Here is another picture of my build board with the frames and keel installed.
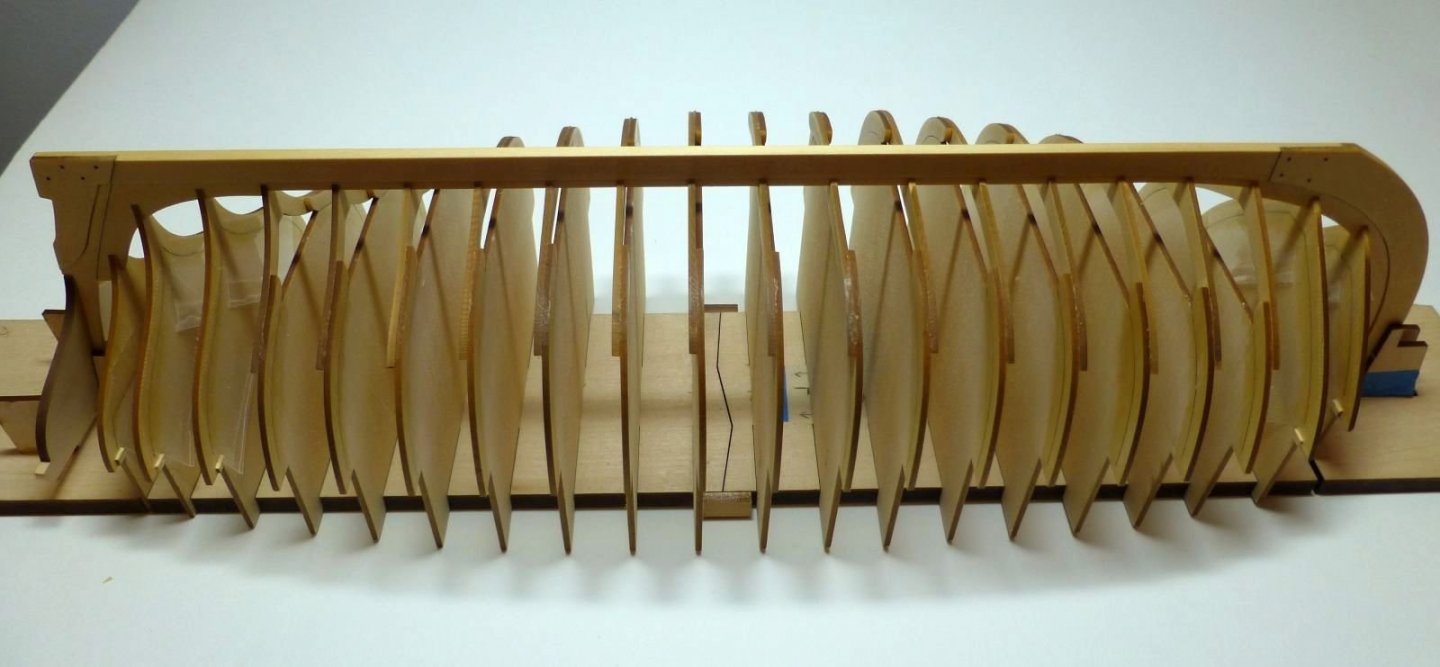
You definitely want to keep everything in alignment. I even went so far as running a temporary batten along the frames to make sure that the frames were in alignment side to side. The frames are laser cut with some side to side movement for adjustment purposes and when my frames were inserted into the build board and aligned, I taped them to the build board. Everything has to be in alignment or the planking will not work properly.
-
-
Hi SeaDoc and welcome to Model Ship World. The 18th Century Armed Longboat builds into a nice model. The large 1:24 scale is a lot easier to work with than the smaller scales. If you brace your bulkheads, you will be surprised at how strong the framework will be. Check out the build logs for the 1:48 scale Model Shipways 18th Century Longboat. There are a lot of tips and techniques in them that will help you with your build.
- Edwardkenway and mtaylor
-
2
-
You are doing a good job on your Granado. I cannot wait to see the boxwood on this model. This is definitely an improvement on the kit supplied materials.
-
Congratulations on completing your Endeavour. You did a nice job on building this model.
-
-
You are doing a good job on your Lady Isabella. Your craftsmanship will produce a very nice model.
-
Welcome to Model Ship World Eugenio. I really like your models and you did a good job on building them. I am glad that you came back and finished your Swift. They say the hardest model to build is your first one, so you should have an easier time building your Victory. I look forward to seeing your Victory build log.
-
Hi BrownBeard and welcome to Model Ship World. It looks like you have the skills to do good in building wooden ship models based on your build of your tank model. You are off to a good start on your Longboat, but I question whether you have faired the bulkheads enough for the planks to sit flush along the width of the bulkhead. This is very important for the Longboat as the planks need to be in full contact with the bulkheads and the planks provide support for the bulkheads when you thin down the bulkheads after removing the centers. Check out the other Longboat build logs to see how much their bulkheads were faired.
- mtaylor and Keith Black
-
2


Hello from Arkansas
in New member Introductions
Posted
Welcome to Model Ship World Dan. You did a good job on building your skipjack. I am glad you started a build log on your Mayflower as it will be nice to follow your progress.