HOLIDAY DONATION DRIVE - SUPPORT MSW - DO YOUR PART TO KEEP THIS GREAT FORUM GOING! (Only 44 donations so far out of 49,000 members - C'mon guys!)
×


BobG
-
Posts
3,109 -
Joined
-
Last visited
Content Type
Profiles
Forums
Gallery
Events
Everything posted by BobG
-
Thank you, Bert. If I have learned one things during my short time in this hobby, it's that I have much better outcomes when I don't rush the process. I even find that it's sometimes best to just just to stop and "sleep on it" when I'm uncertain how to proceed. It's amazing to me, that when I do that, I often get up the next day with more clarity about what to do. It's like there is some unconscious problem solving that goes on when we sleep that can be very insightful.
-
Thanks Harry. We'll see if I'll try and have as much fun as you did! Cheers!
-
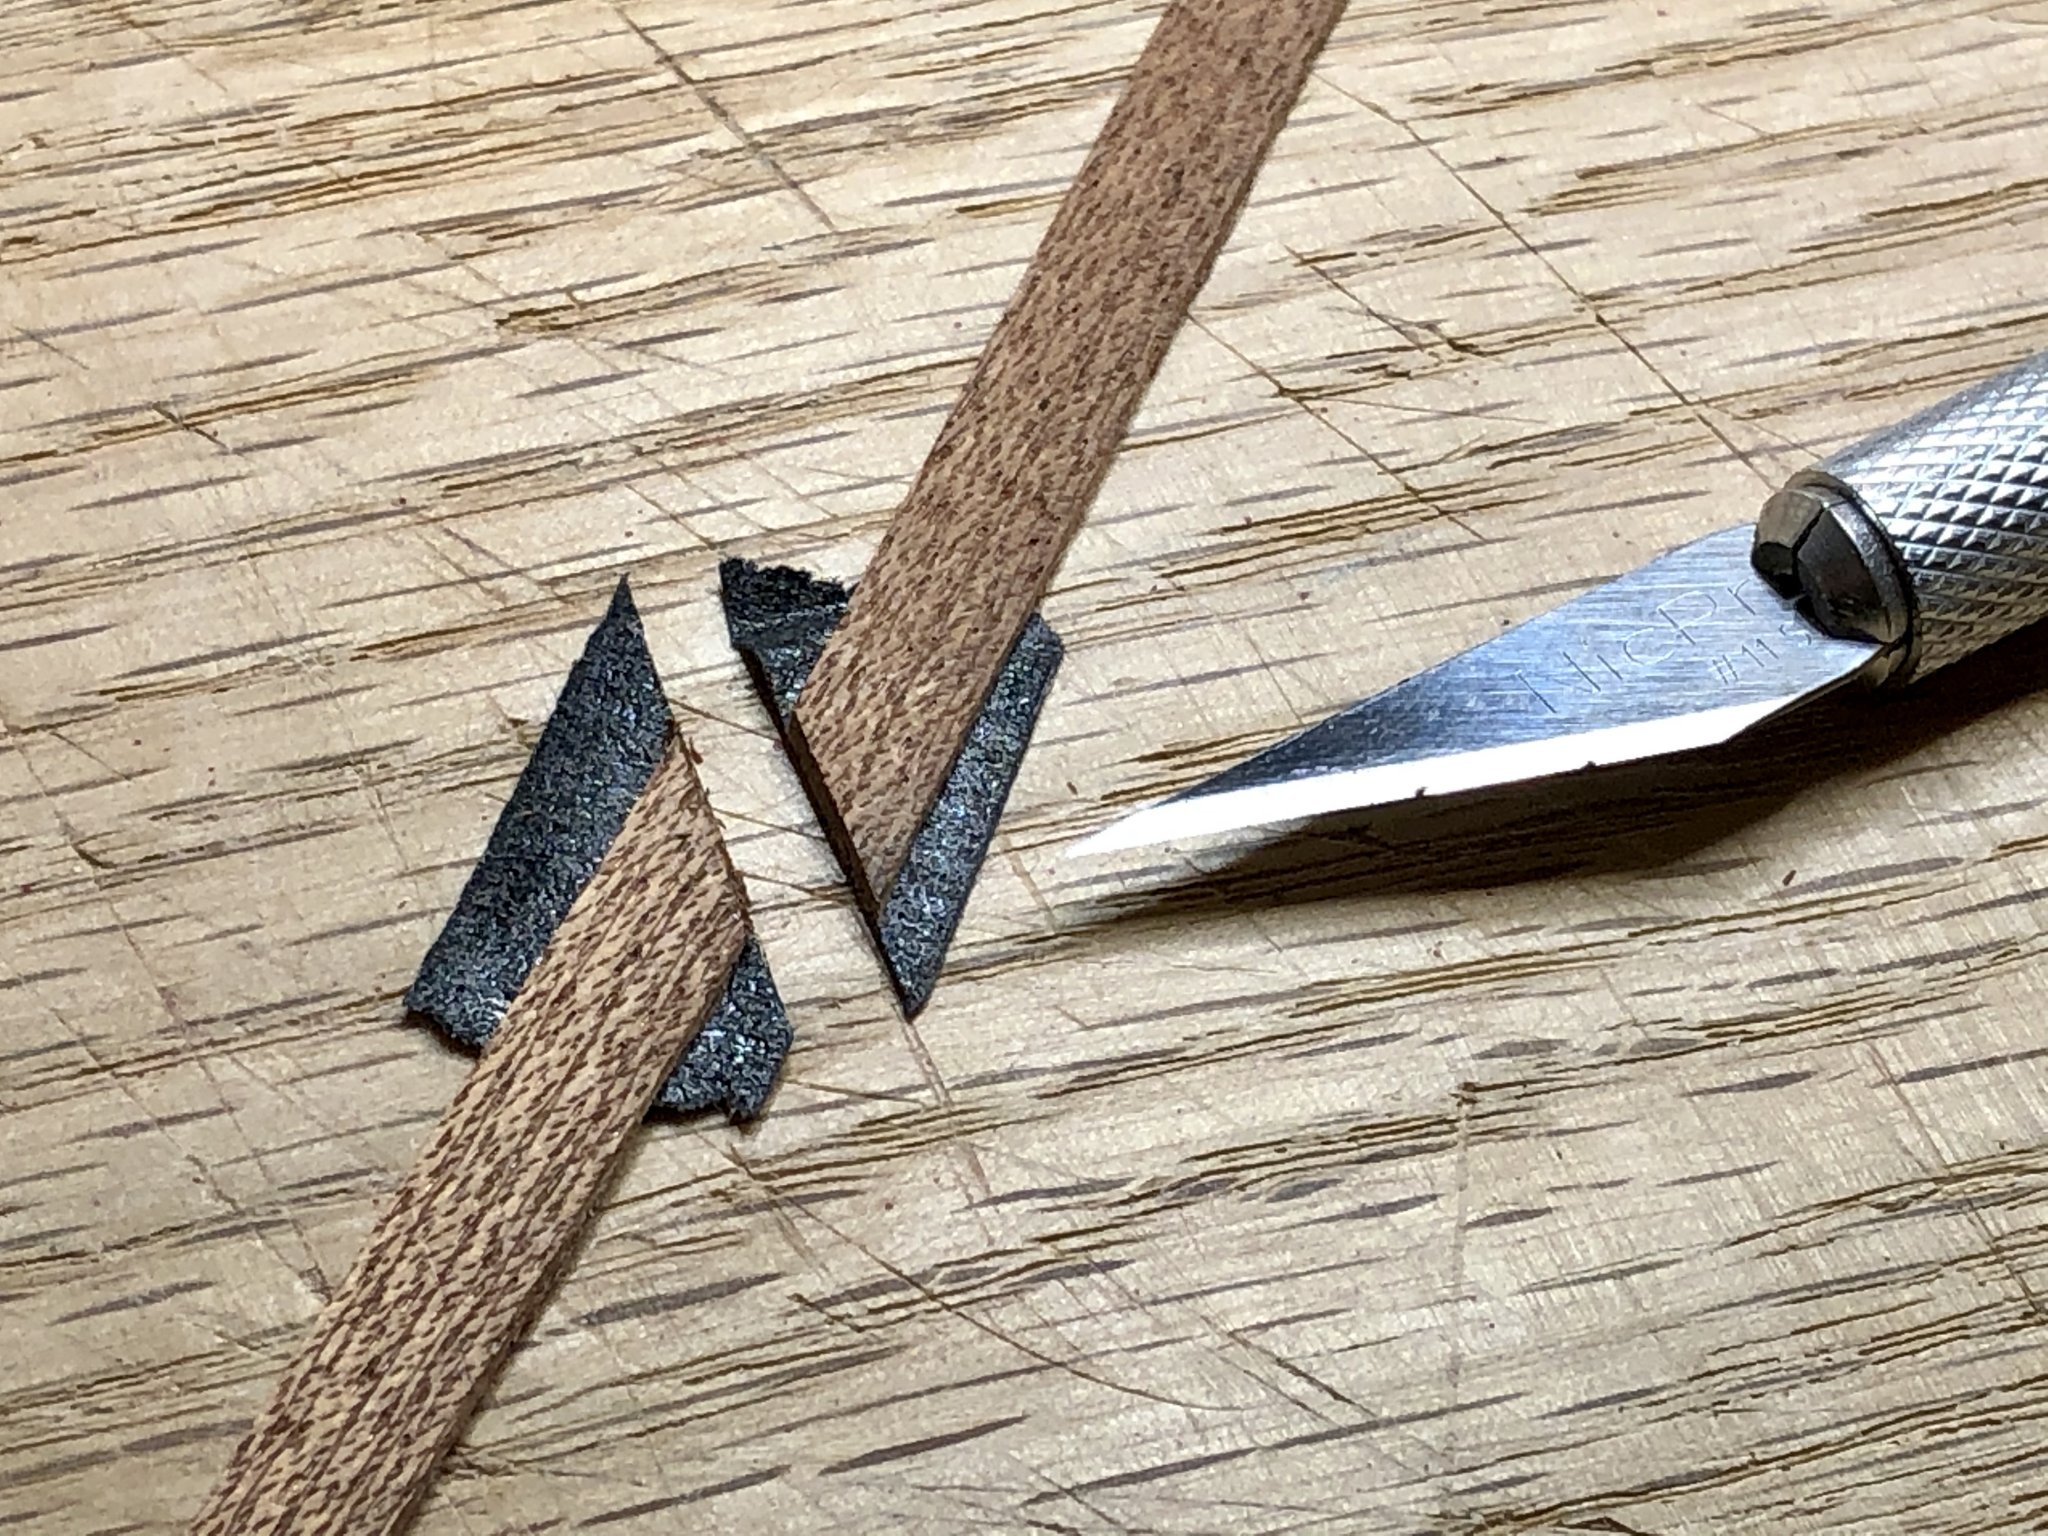
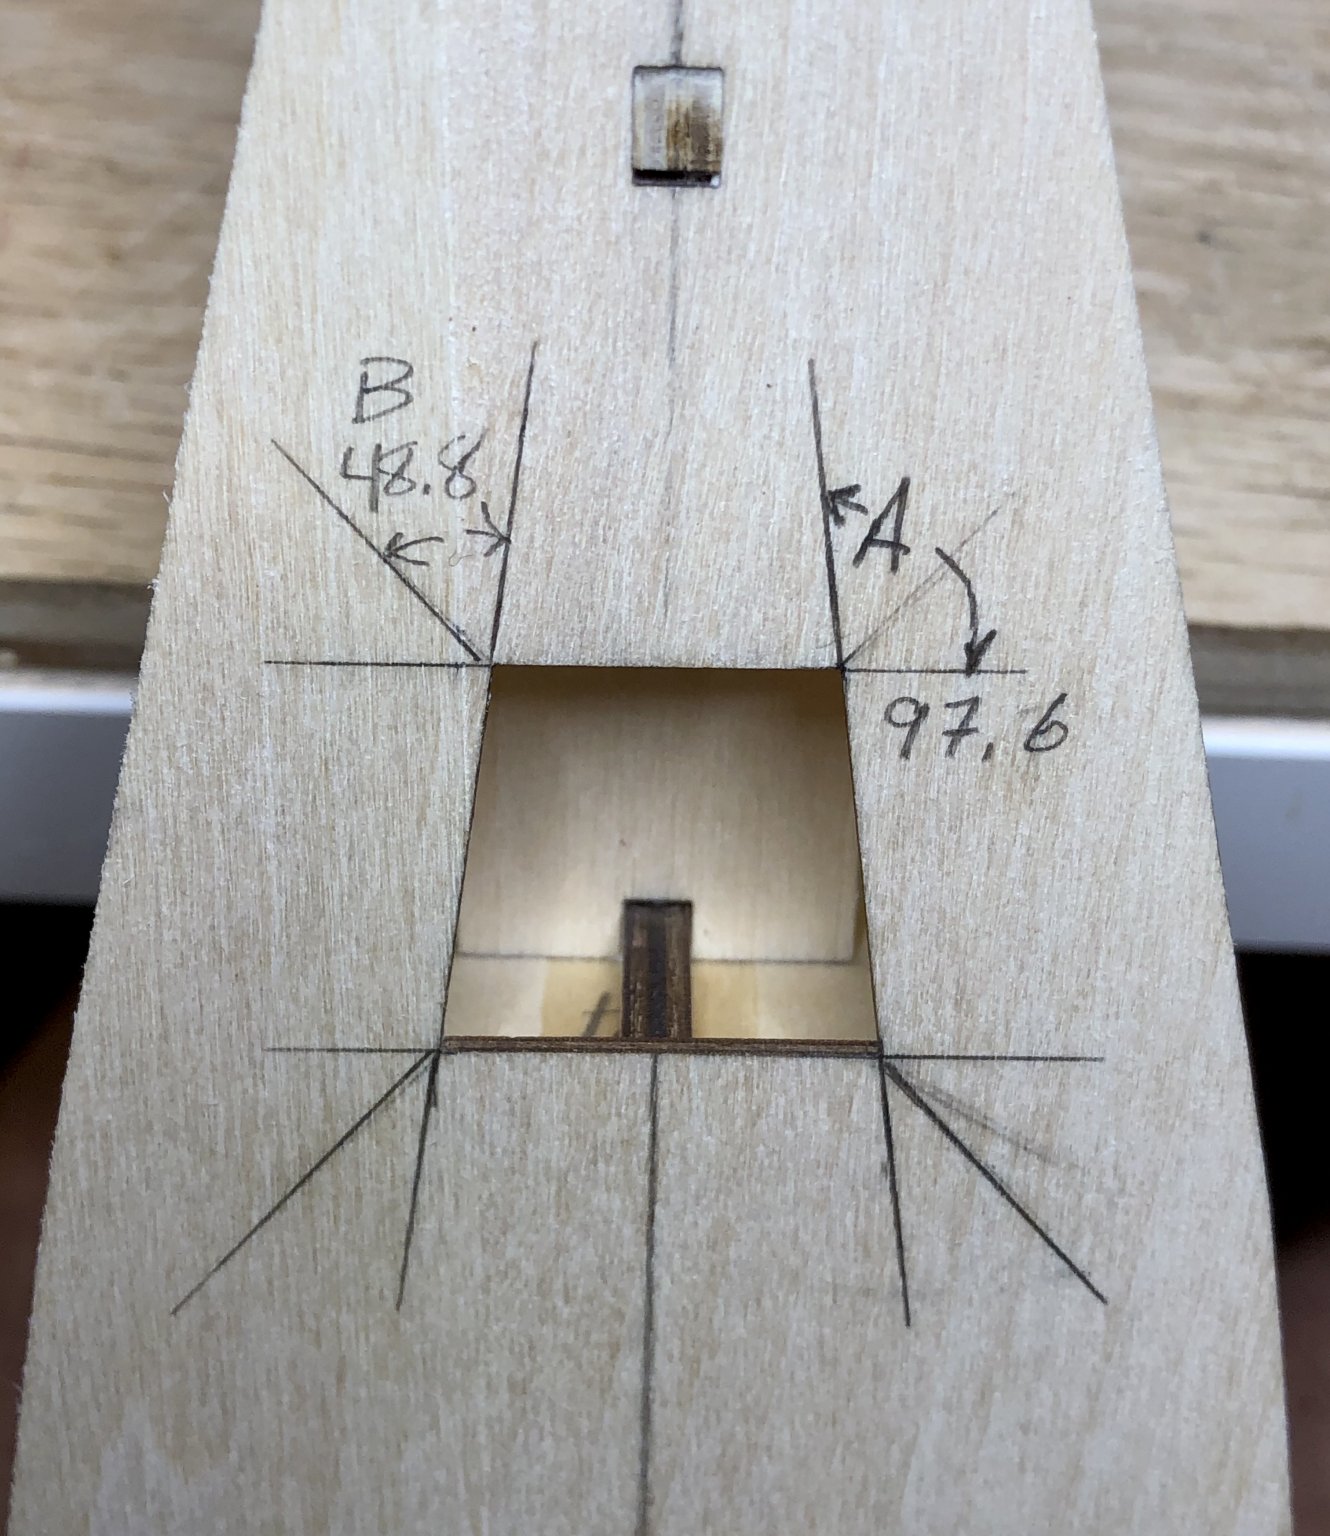
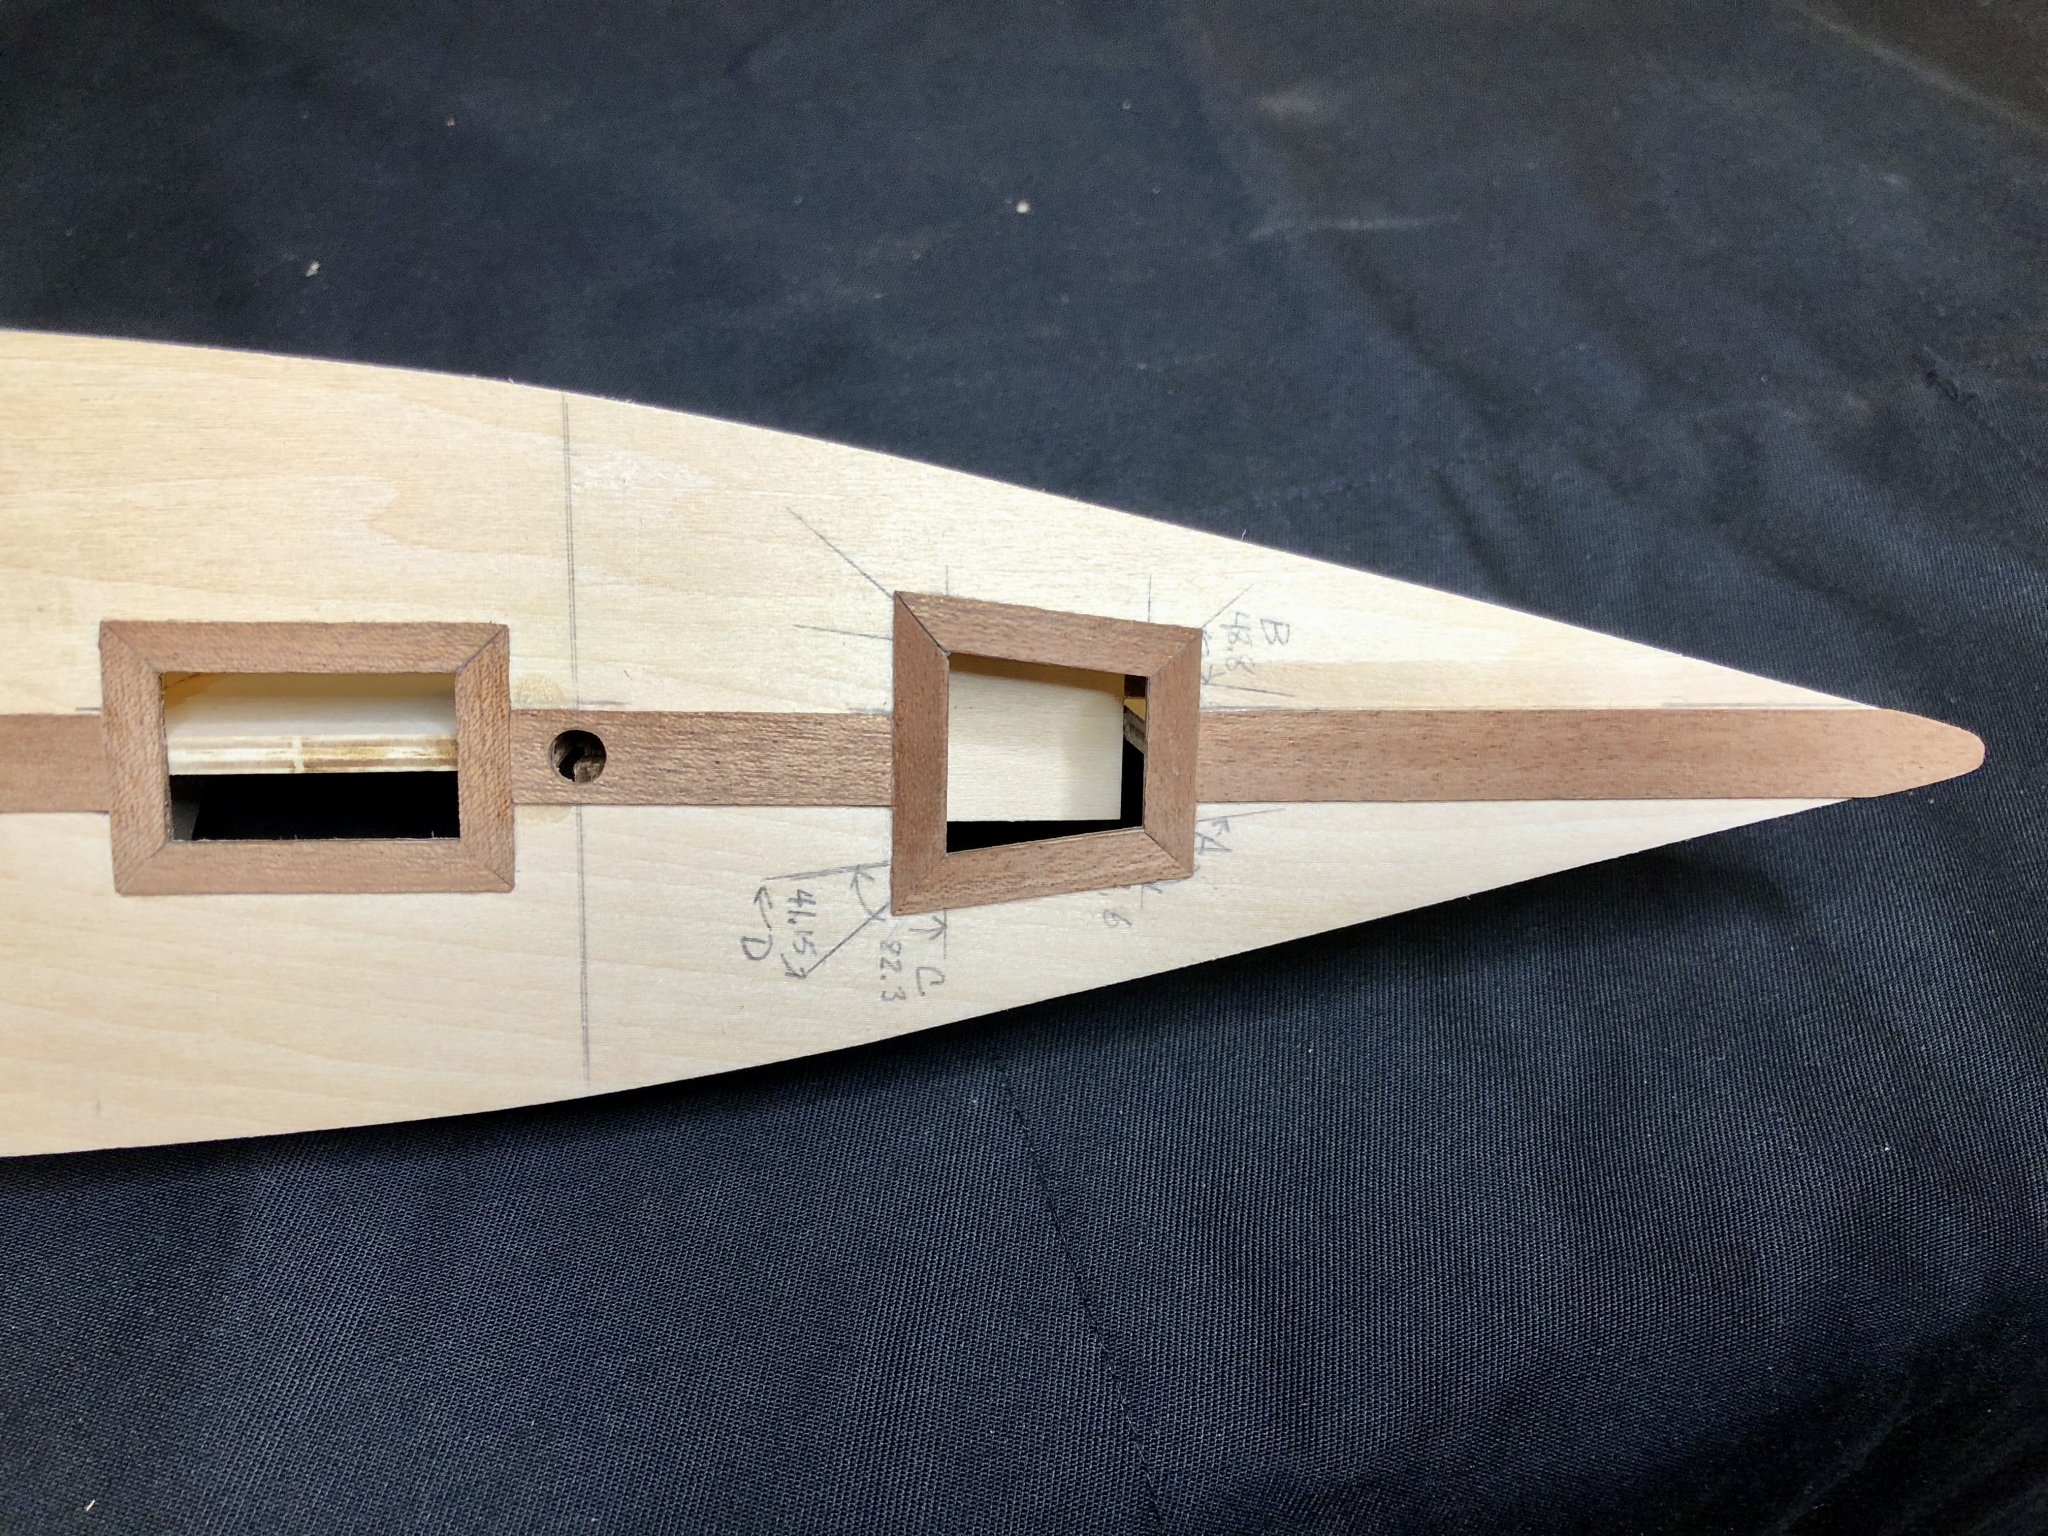
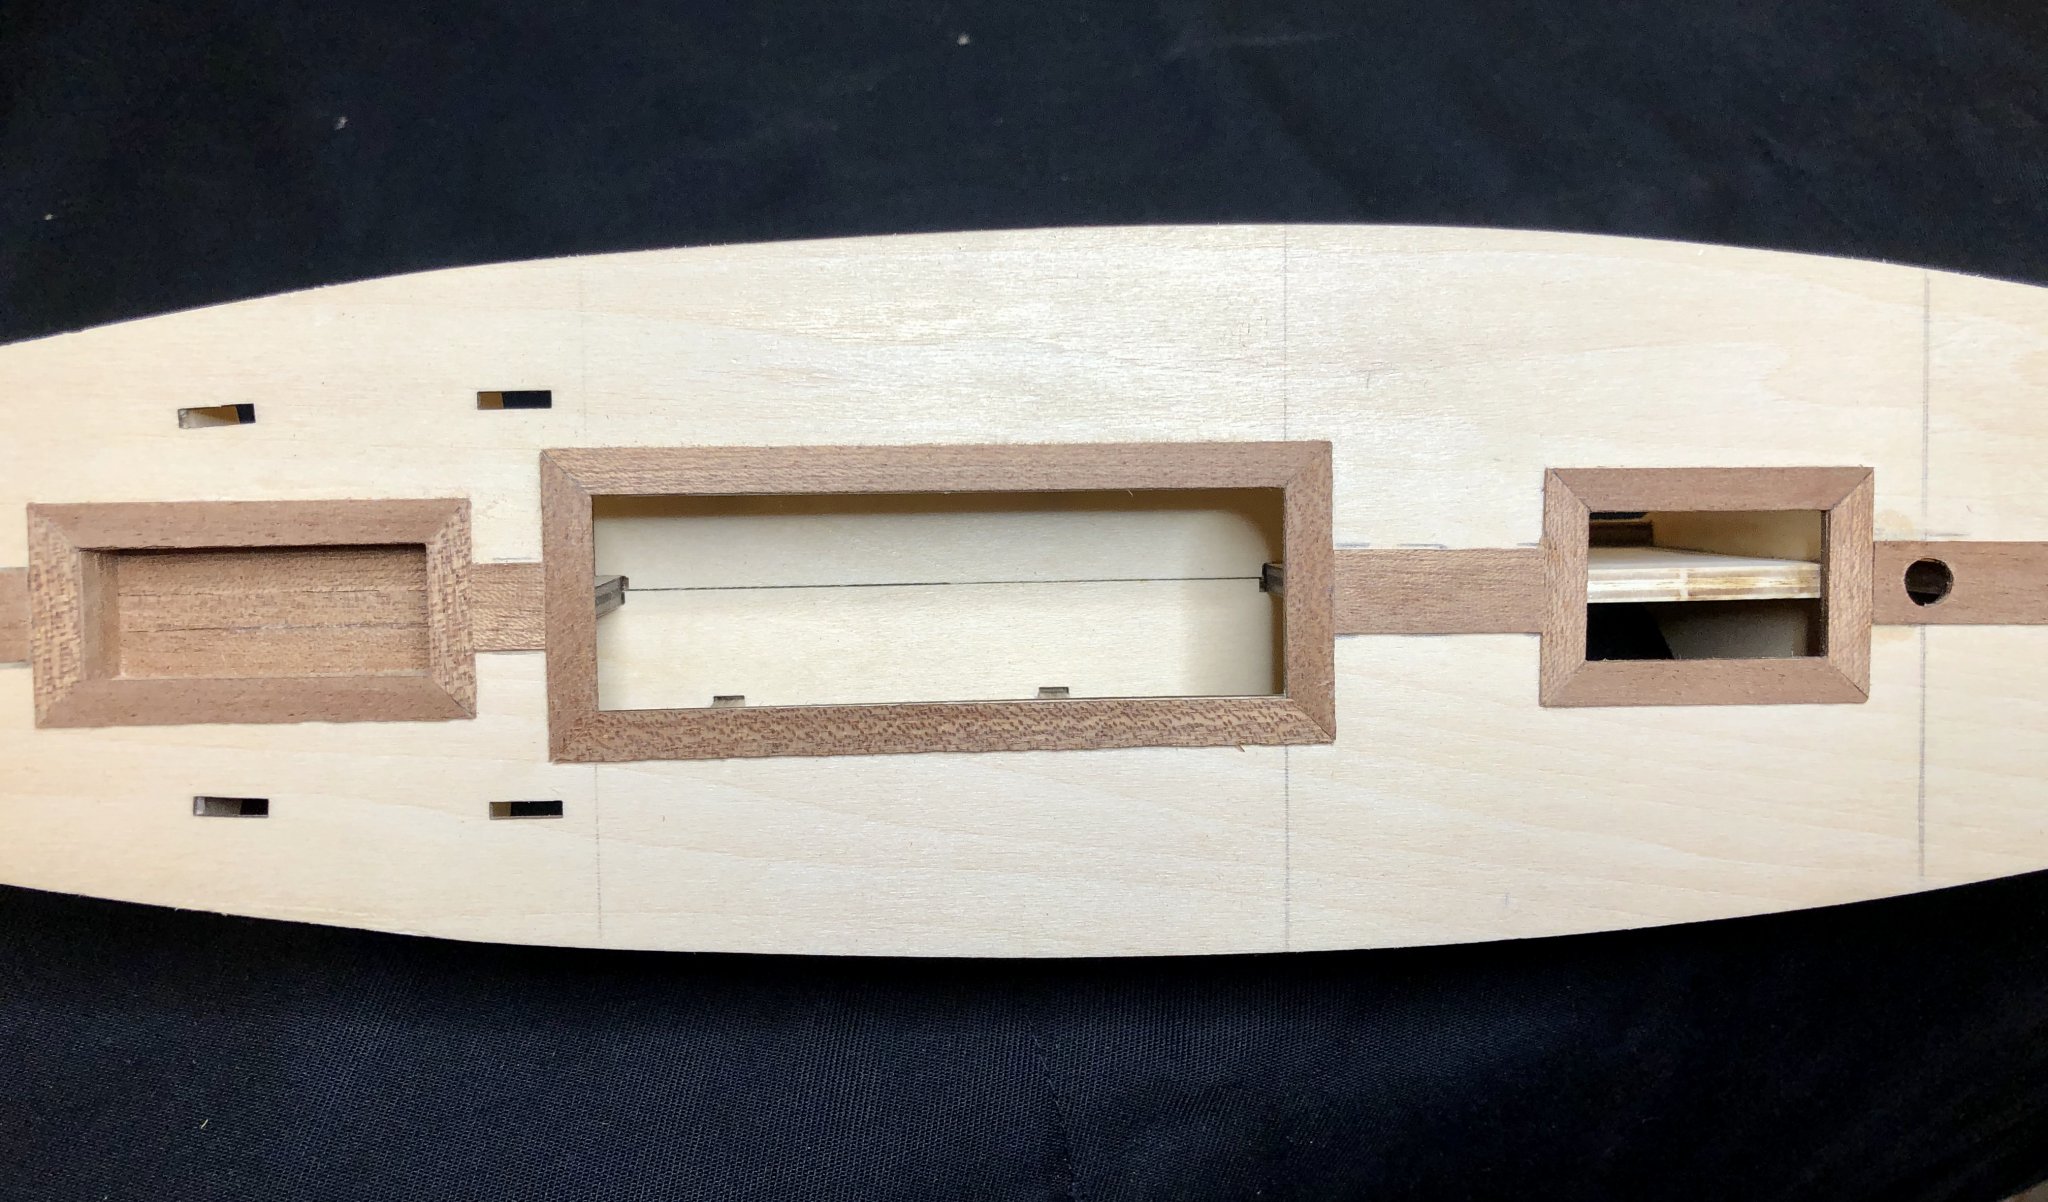
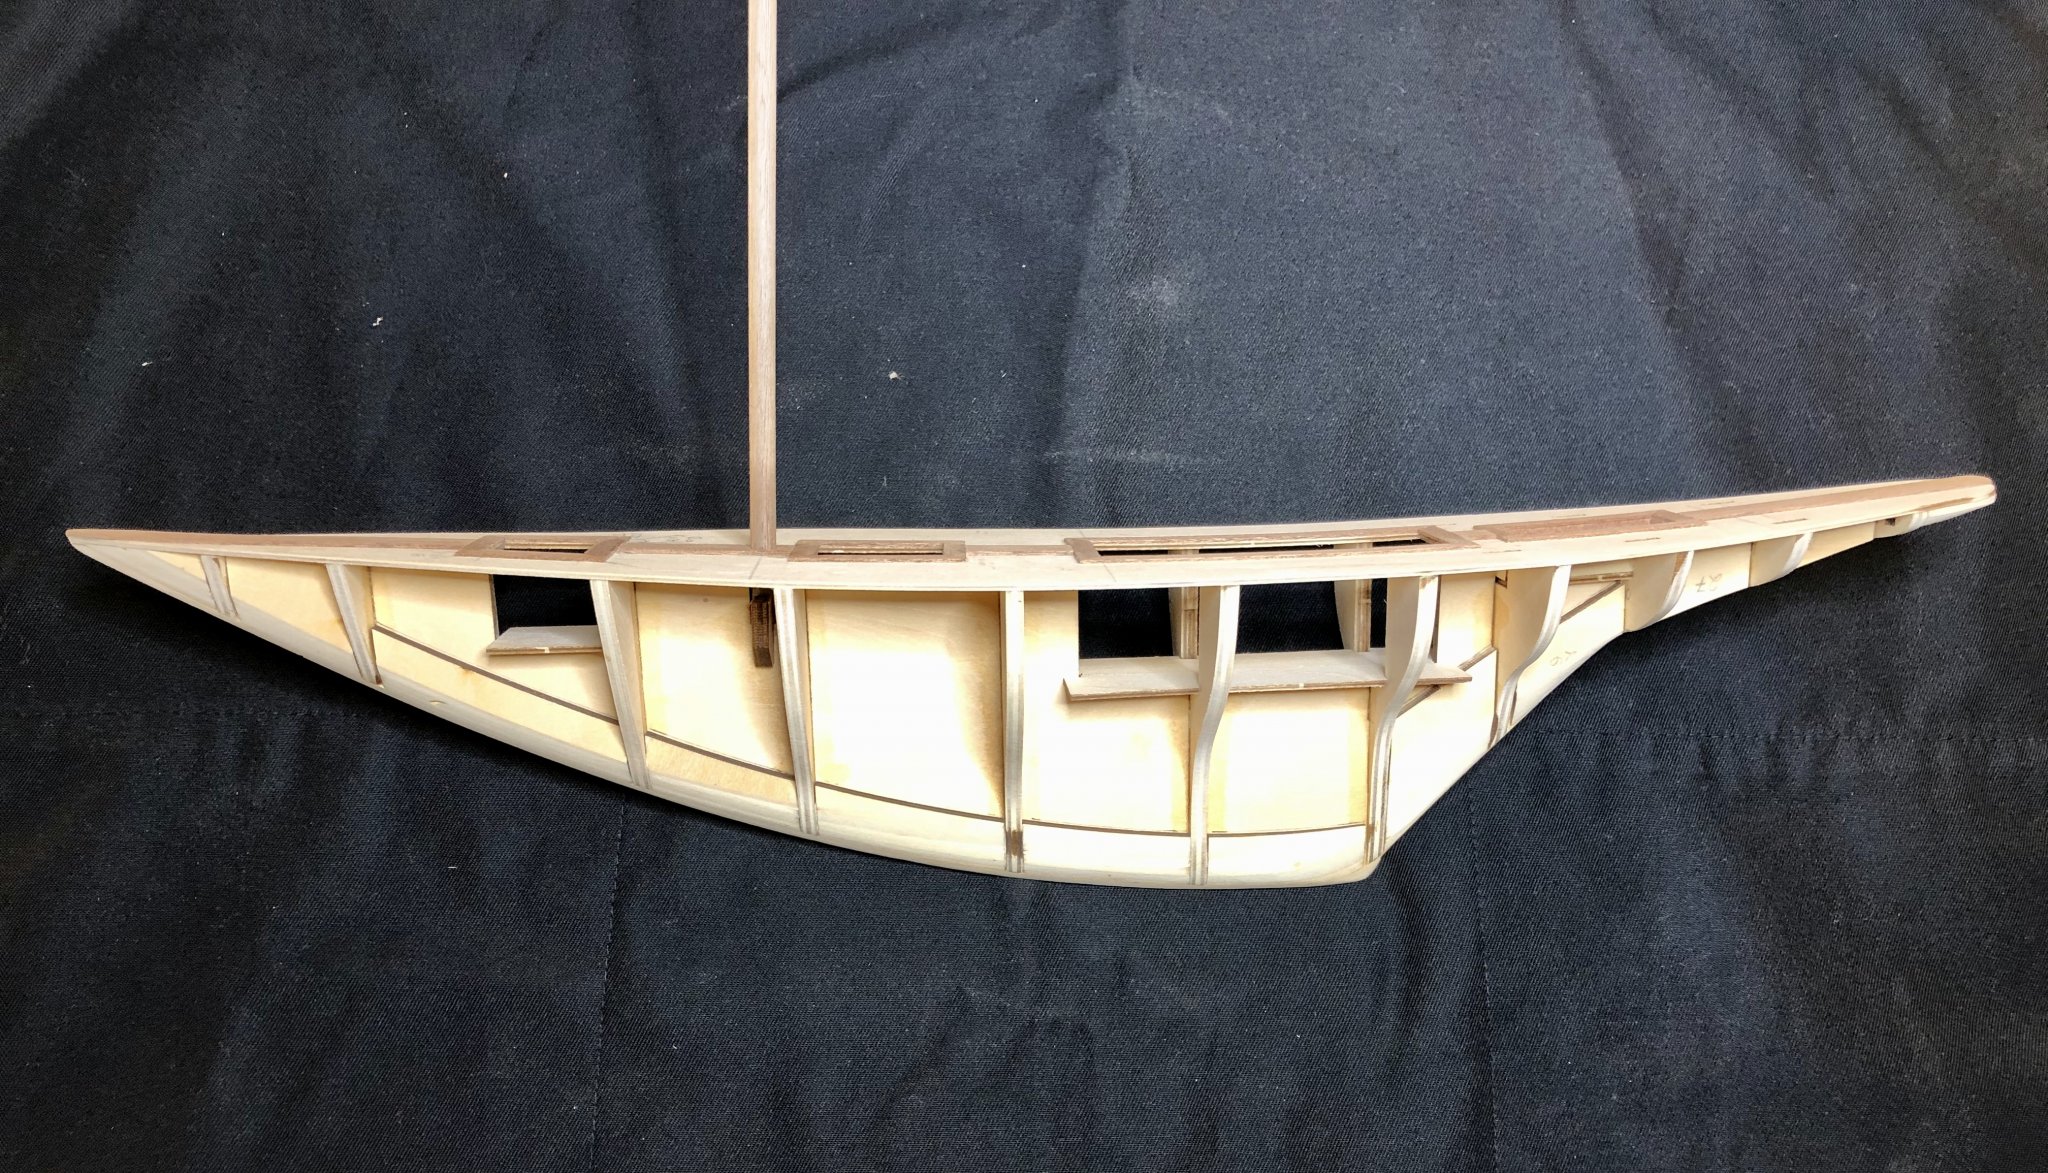
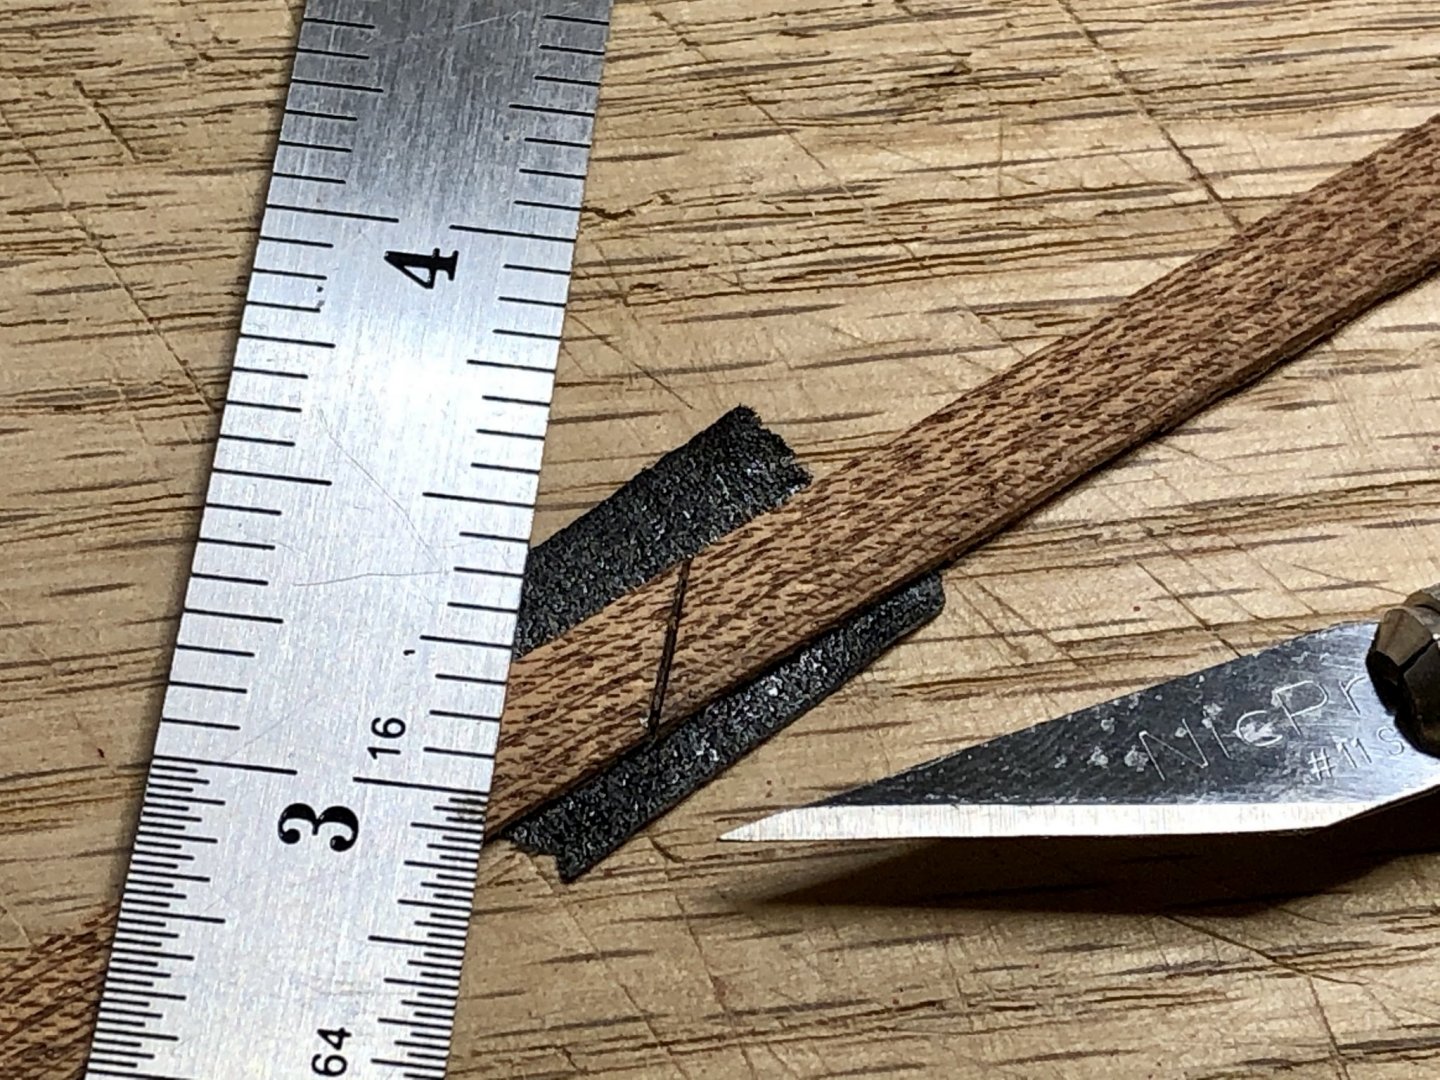
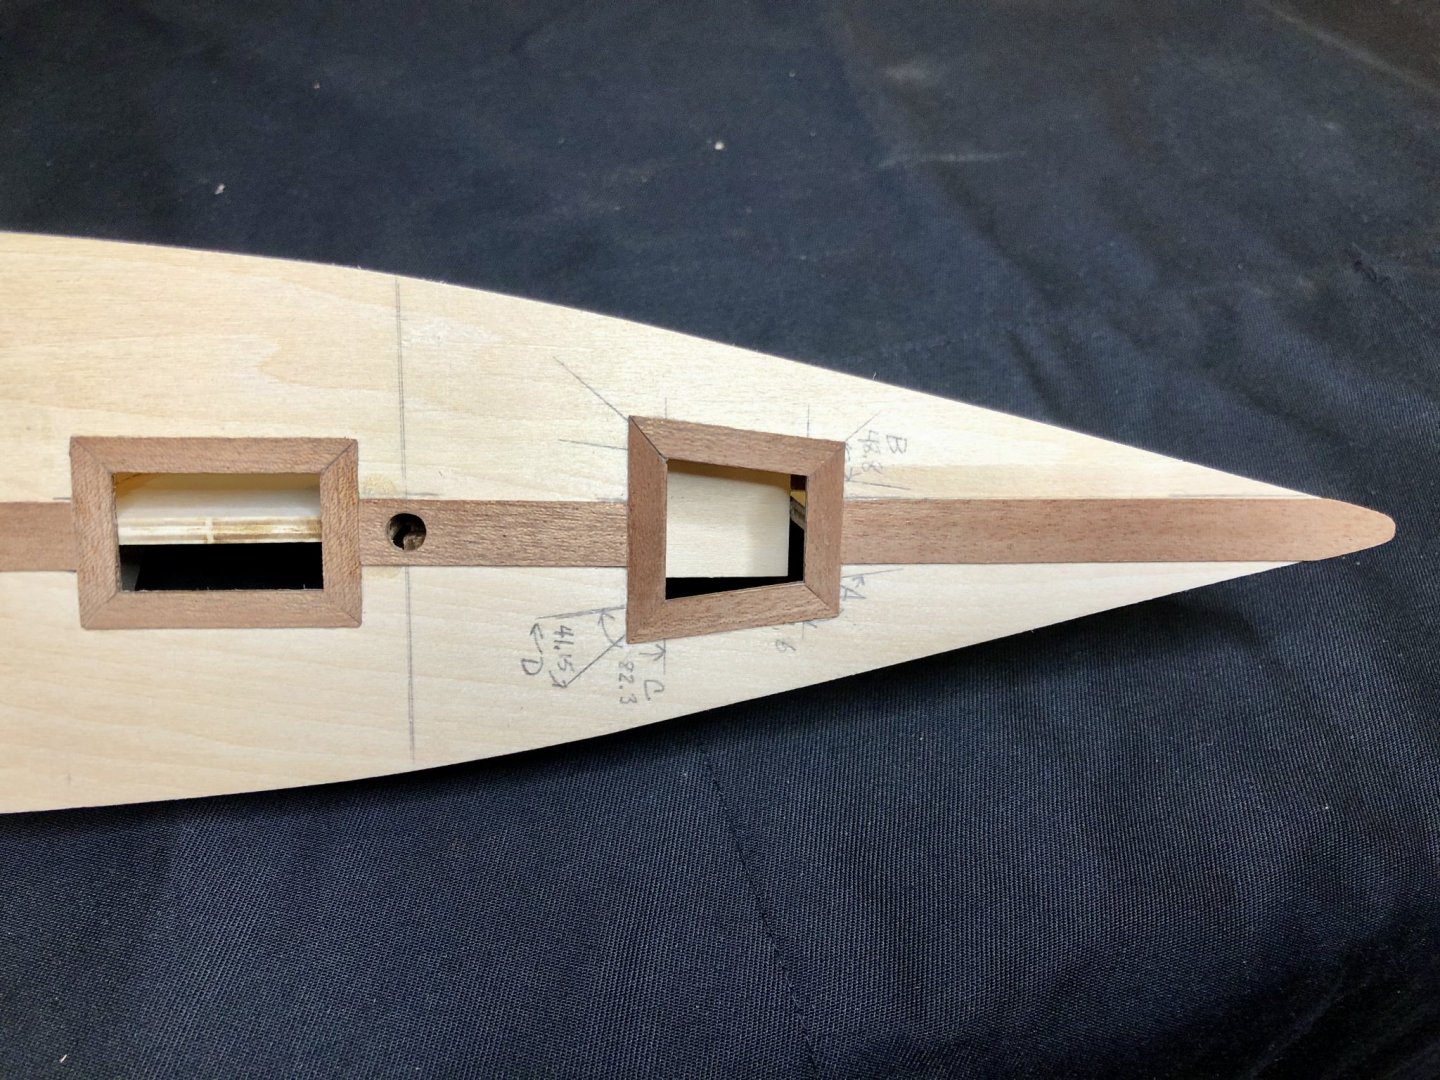
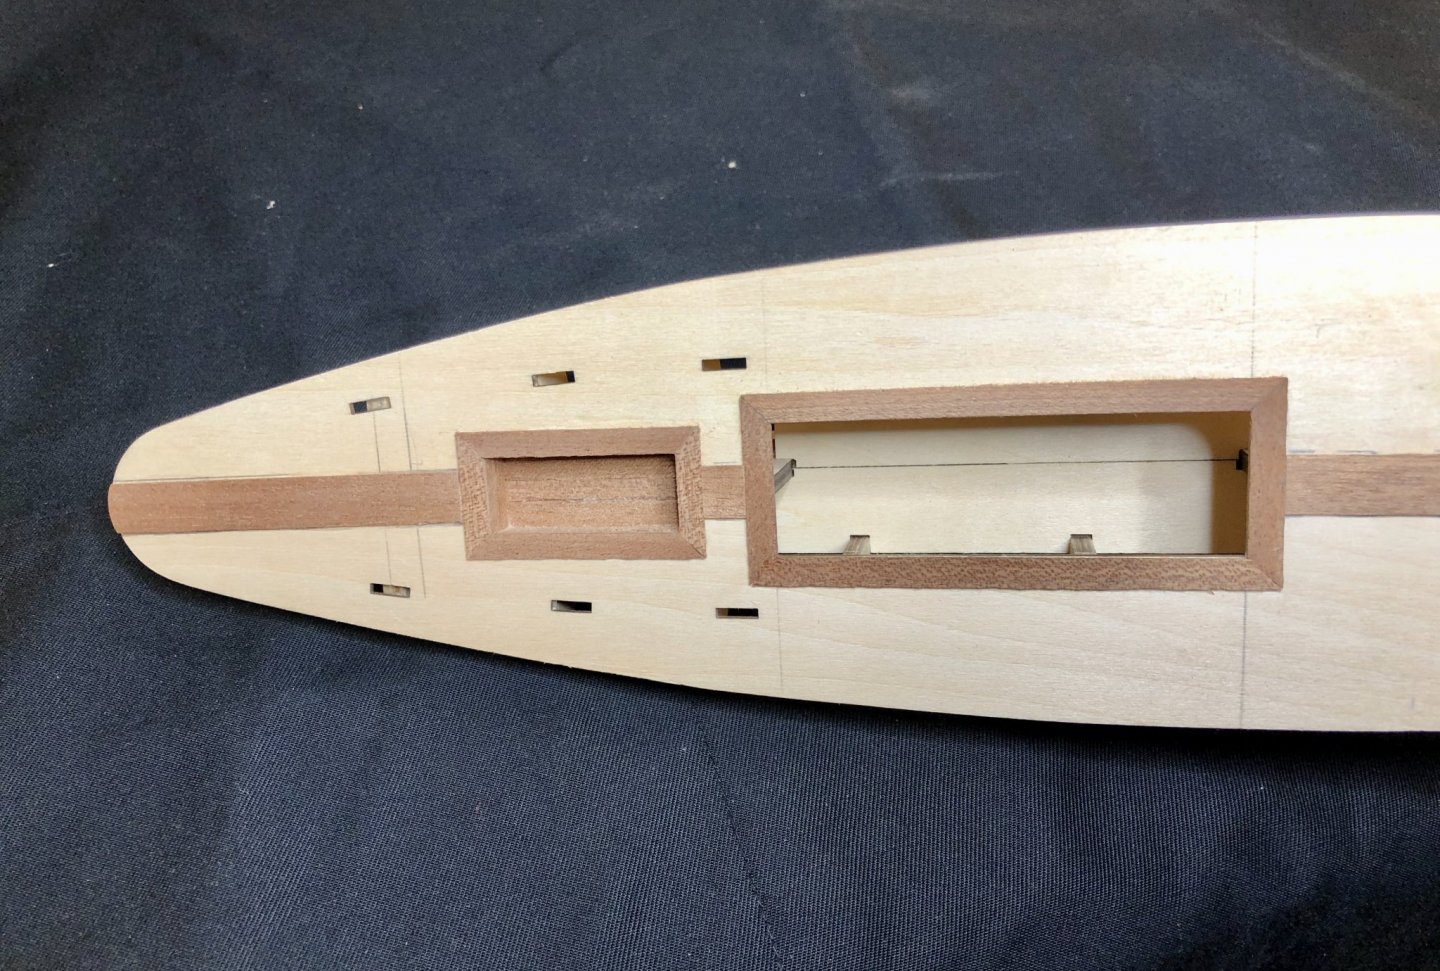
I completed framing the hatches with mahogany, glued down the mahogany king plank and lined the steersman hatch with mahogany strips. I thought these would be a simple tasks and that would be completed quickly. Wrong...at least for me. I spent a good portion of 2 days getting them done. It actually turned out to be more involved than I thought it would be. First of all, the mahogany wood is dry and brittle so it's chips and breaks easily and I had to be very careful cutting it. I don't have a table saw so I cut all the miter joint corners by hand. I worked slowly trying to get the measurements exact and the angles cut correctly so they would match up well. It took me quite a bit of time to take accurate measurements, lay out and draw the angles and then cut them cleanly. In order to prevent the cut edges from chipping, I placed a piece of masking tape under the mahogany strips and made the cuts with a sharp #11 blade using many cutting strokes across the grain. Later, I found that once I got the cut started I could then use a very fine tooth hobby saw to make the cut also. Both way worked pretty well but the whole process was time consuming. The most forward deck hatch is the shape of an isosceles trapezoid so I had to revisit my rusty geometry skills to figure out the the angles for the miter joints. After much consternation, I figured out that the angles I needed were 48.8 degrees at the top of the triangle and 41.2 degrees at the bottom although several pieces ended up in the scrap pile before I got it right. 48.8 degree angles were needed at the top of the isosceles trapezoid: 41.2 degree angles were needed at the bottom of the isosceles trapezoid: Next up was to glue the 10 mm mahogany king plank down the center of the deck. You would think that would be a very simple task but it to took me quite a bit of time. There are several sections to the king plank and they all need to be exactly centered on the deck equidistant from outer edges of the deck on both sides. Any variation in centering would create problems with getting the deck planks symmetrical where they meet on each side of the king plank especially since I want to try make joggles in the king plank for the decking strips. Finally, I drilled the hole for the mast and test fit it and its a good, tight fit. Thanks for stopping by my build log.


-
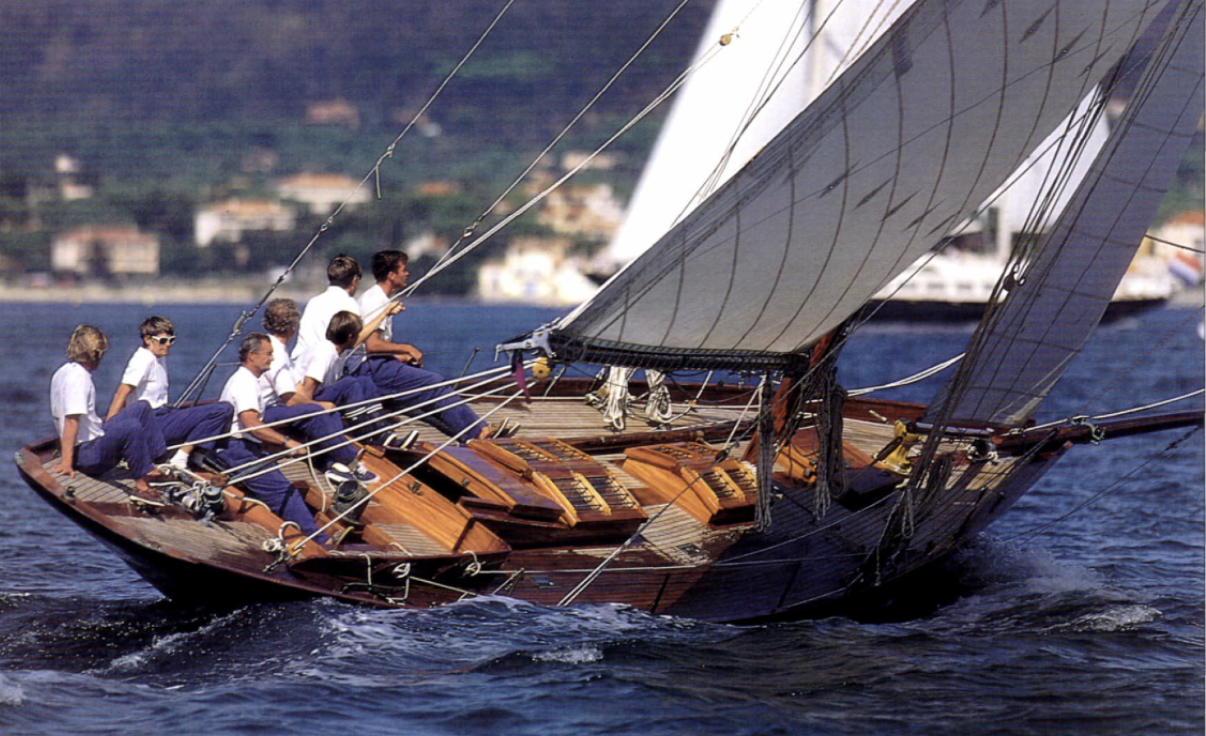
There are a lot of gorgeous yachts in that book! In the photo below it looks like the hull forms a sharp edge with the deck at the stern. It's hard to tell exactly since the photo is dark in that area but that's what it looks like to me. I've already faired the hull and I have a bit of a lip instead of an edge where the hull meets the stern on my model. I suppose I could do some more sanding and try to replicate that shape. I'm not sure that the model was designed that way though and whether that would cause a problem when it comes to the planking. I'll think about it more and see. Rather coarse mahogany is provided in the kit for the deck structures and it has very open grain and is quite dark...much darker than the wood you see in the photos. I think that might be teak that was used on the original boat and it has a much tighter grain and is lighter and more orange than the mahogany provided in the kit.
-
Those photos are fantastic! Thanks so much for posting them here, Bert. Where did you find them? I've been looking at whatever I could find on the internet but I haven't seen a couple of those. Regarding the propeller: Did the first, original Pen Duick I have and engine? The kit I am building has it as a sail powered yacht only. I finding out that there could be a lot of modifications made to the kit to make the model more authentic but I'm don't think I would be confident to try and do some of them at my skill level.
-
Making a build log is actually very easy even for those who are not confident about computer stuff. The interface that they use here on MSW to make a build log is very user friendly and there are good instructions about how to go about doing it too. For photos, I simply take them with my cell phone, then transfer them to my computer and add them to the build log as per the instructions. It's very straight forward and, if you have questions, just ask and someone will quickly get it sorted out for you. I have found that having a build log is not only a great way to get good advice but it also serves as motivation to keep working on your model and improving your modeling skills. It's also very nice to talk with fellow modelers from all over the world about a shared hobby. You'll find yourself making acquaintances with lots of very nice people in the process. Good luck!
-
Hello sticker, it's no wonder there are so many unfinished build logs when so many of the kits from some of the major, long established kit companies have such terrible instructions that inexperienced modelers just give up in frustration. It's wonderful to see how Chris Watton has designed two fantastic fishing vessels that have high quality materials and practically fail safe instructions that will appeal to beginner and experienced modelers as well. They are ideal models for a beginner to be successful and get hooked on the hobby as a result. I'm just taking my time on the Pen Duick and trying to really think things through before I commit to cutting and gluing. I'm enjoying it so far! Have you made build logs of the models you've completed? I like the fishing and working vessels a lot and the Marie Jeanne is a beauty. Congratulations on finishing her despite the poor instructions. Thanks for stopping by!
-
I've always been an adrenaline junkie so diving off into unknown territory is something I generally relish with enthusiasm. In ship modeling, however, the fun seems to end for me when I'm completely stumped and frustrated and have made a mess of things...then I start thinking about giving the poor model a Viking funeral!
-
What cutter are you building, James?
-
For some reason the link to the photo you posted did not work in your post so I opened it below. Thanks.
-
A question about varnish.
BobG replied to danbloch's topic in Painting, finishing and weathering products and techniques
I have used Satin Wipe-on-Poly on 3 models including my Medway Longboat and I have been very happy with the finish. I have also found that glue will bond just fine over it. I tried some tests where I compared the strength of two pieces of yellow cedar wood glued together with bare wood and on wood that had been finished with Wipe-on-Poly. Both of the joints were very strong. It's easy to use and I think it looks great to me so I'm happy with it. -
I see that you list the Cheerful as your current build. I hope you will make a build log. I will certainly follow along. The Cheerful is on my short list of builds of future builds and I know you will build a beautiful model of her judging by your other builds. I have a few models that are in line for me but I'm not quite sure of the order in which I will build them yet. I will continue with the Pen Duick for now. The Lady Isabella from Vanguard is scheduled to arrive today. I am also looking forward to the Flirt by Vanguard when Chris finally has it ready for the public and the Cheerful will be my first attempt at semi-scratch building. I want to get a Byrnes table saw before attempting to build the Cheerful and they are currently out of stock until more 120V motors are available. So the Lady Isabella, Flirt and Cheerful are the models that I hope to build after I complete the Pen Duick. That should keep me busy for a very long time...
-
🤣 I thought that was something that was custom made for you and I was going to ask where you were able to have it made like that. I would love one of me standing on the decks of my builds...or maybe a likeness of myself about 35 years ago or more!
-
Thanks Bob! Having such good materials and instructions really enhanced the chances that the longboat would turn out well for me. The challenge with the Pen Duick is the instructions are minimal and the instructional photos are small and blurry so they aren't much help. Consequently, I having to slow down a lot while trying to figure things out as I go. I'm flying by the seat of my pants on this one...
-
It sure looks good to me, Bob. It seems to me, that for a diorama with a boat this size, you wouldn't want a much smaller diorama. Of course, the boat is so well done it would display beautifully just on it's own too. By the way, it looks like you have enough amp power in your workshop to hear your music even with the shop vac running! How has your hearing faired over the years as a musician? Between working in the engine room of the Coast Guard Cutter Storis without ear protection for 1 1/2 followed by many years of listening to music at much too high a volume, my hearing has suffered a bit. Oh the follies of youth...!
-
Thanks Harry. I'll try various test pieces before I attempting anything on the actual deck. I'm beginning to look forward to the challenge of figuring what way works best for me...or so sez me before things get messy and frustrating!🤨 Great advice, Cabbie, and thanks for taking the time to look in on my build and provide assistance. I'll post up here and let folks know how it goes.
-
Hello Harry, I searched the forum for ideas about how to go about cutting the joggles in the deck planks and came across your post on Cabbie's Mermaid build log. I think the way that Cabbie describes how he did it may work for the king plank on the Pen Duick. The mahogany king plank is so thin and brittle that it needs some backing in order to get a clean cross cut otherwise it tears and breaks easily. I try a test piece glued down and see if I can cut the joggle and then be able to remove the wood cleanly the way Cabbie describes.
-
Your longboat looks great, Ken. How is she coming along?
-
Beautiful joggling, Cabbie. I'm currently building the Pen Duick and, although the Artesania Latina kit does not show any joggling, the original Pen Duick I had joggling on the king plank down the center of the deck and also some joggling around the hatch frames. Harry built a beautiful model of the Pen Duick and he has been sending me photos of his deck and has been a great help. I'm currently waiting for some mahogany strips to arrive to use for the margin plank before I start trying to lay the deck planks with the joggles. I think I understand how you went about it from your answer to Harry. I assume you had the margin plank securely glued down before you drew the joggle and then cut it out. Is this correct? Did you find it difficult the cut the joggle out of the margin plank while it was glued down? The king plank on the Pen Duick is mahogany and it is quite brittle and is not easy to cut especially across the grain. I tried a test piece today and it tore out a rough edge before I could cut completely through it. I think having it glued down securely should help prevent tear out. I hope that will work but I'm not sure how easy it will be to cleanly cut out the joggle even though it is glued down. Thanks!
-
Looks pretty good so far to my eyes. Keep it going!
-
I did a good job of that on my Medway Longboat too!
- 231 replies
-
- 1
-

-
- model shipways
- armed virginia sloop
- (and 1 more)
-
The Zulu Lady Isabella kit I bought is on track to arrive Thursday and I'm very curious to see the laser etched deck as well. I love these fishing vessels and I'll have to think long and hard about whether I want a beautiful, clean model of one or a hard working, more weathered and rough model to display. It certainly would be easier for me to make a nice, clean model since weathering would be entirely new to me.
- 195 replies
-
- 1
-
-
- lady eleanor
- vanguard models
- (and 1 more)
-
Thanks Captain! I enjoyed building her and I learned a whole lot in the process. I just took a look at your fantastic AVS build and it looks like perfection to me. Congratulations on building one of the best AVS models ever seen on MSW! Do you have another ship model in mind for your next build?
- 170 replies
-
- 1
-
-
- medway longboat
- Syren Ship Model Company
- (and 1 more)
-
This is a stunningly beautiful model you have built, Captain. It is most certainly one of the finest ever completed here on MSW. Congratulations!
- 231 replies
-
- 1
-
-
- model shipways
- armed virginia sloop
- (and 1 more)