


Thistle17
-
Posts
1,053 -
Joined
-
Last visited
Content Type
Profiles
Forums
Gallery
Events
Posts posted by Thistle17
-
-
Richard sometimes it is just as much fun to make a tool or jig! Nice work!
Having said that what I find that frustrates me is a device to hold my work piece that gets captured in the vise. I am constantly kludging something up to hold the part as the vise jaw depth is too deep or I need to reorient the piece or some such thing. It never seems to go away.
Joe
- Roger Pellett, Moab, Canute and 2 others
-
 5
5
-
Jim I just tuned into your build. I have been so preoccupied with other things I don't dwell on MSW as much as I would like.
Having said that the treatment you are giving your rendition is quite eye appealing and your work is impressive.
My Winchelsea sits at the bulkhead stage and right now witnessing your work I feel like the rabbit in Alice In Wonderland...."I'm late, I'm late"!!!!
Joe
-
-
-
Kiyoo I am not quite sure of the way you can make it exclusive to members of MSW. If I were you I would start with 2 people that may be able to steer you. Kurt Van Dahm (current chairman of The Nautical Research Guild) and Chuck Passaro of Syren Ship Model Company who has structured something similar to your needs in conjunction with the Guild.
One win/win just came to mind. If you were not interested in some monetary retun for yourself. What do you think of a way that would benefit MSW ( a contribution a member would make) that allows a download of your tutorial? Just an idea!
Joe
-
-
Would like to follow your progress. Keep it coming.
Joe
-
Kiyoo my experience with the results of the conversion (DXF to G code) taught me some lessons. For one, inside corners will always be rounded unlike laser processing. For outside corners the cutter has to go by the corner and return at the corner to have it come out square. As with laser machining there is always the feeds and speeds issue but the hardest lesson was that laser instructions seem to be much more forgiving in terms of path travel (we found arcs that were not continuous in the laser file that would not work in the CNC mode). Discontinuities in lines, arcs have to be "smoothed", nodes must be precise and so on. All in all i got my parts (for bulkheads and strongback) and they came out well. I believe you are absolutely correct that laser machining is the way to go. It would be the premier way if one could find a solution to char and the "slope" of the cut.
Joe
-
Klyoo I have explored this arena (bringing today's technology to this pursuit, I worked with a colleague to convert laser DXF files to CNC G code, it was a real eye opener for me) but I pale in your light and work! Just outstanding. I await your completed treatment of the process but follow your good works.
Jooe
-
Hugo I assume you have used the planking tutorials on this web site, namely within the forum you have posted. So one has to ask have you created/added a simulated rabbett on the bulkhead strongback (center element that runs along the keel). Have you carved out the stern area of this element (deadwood in a real keel) so that your planks will lay down flush with a later added stren post? At times some slight tapering of these planks is acceptable to have them lay correctly in the stern area. Does this help?
Joe
-
I have used the pinstiping tape and it adheres quite well. However I am not aware that it can be found in flat sheen. If you locate such a product i would be interested to know.
I have used cresent paper with good success. Sharp cutting is required but it cuts well with little or no fuss. Gluing as you say can be problematical. I would think some diluted white glue painted on the back side might yield a good clean bond.
Joe
- druxey, thibaultron, Canute and 2 others
-
5
-
And now we have Leo Goolden of Sampson Boat Company building/"restoring" Tally Ho to romance about. I watch 2 or 3 episodes a day and those of Acorn to Arrabella. There goes a couple hours when I could be focused on model building! Its hopeless.
Joe
-
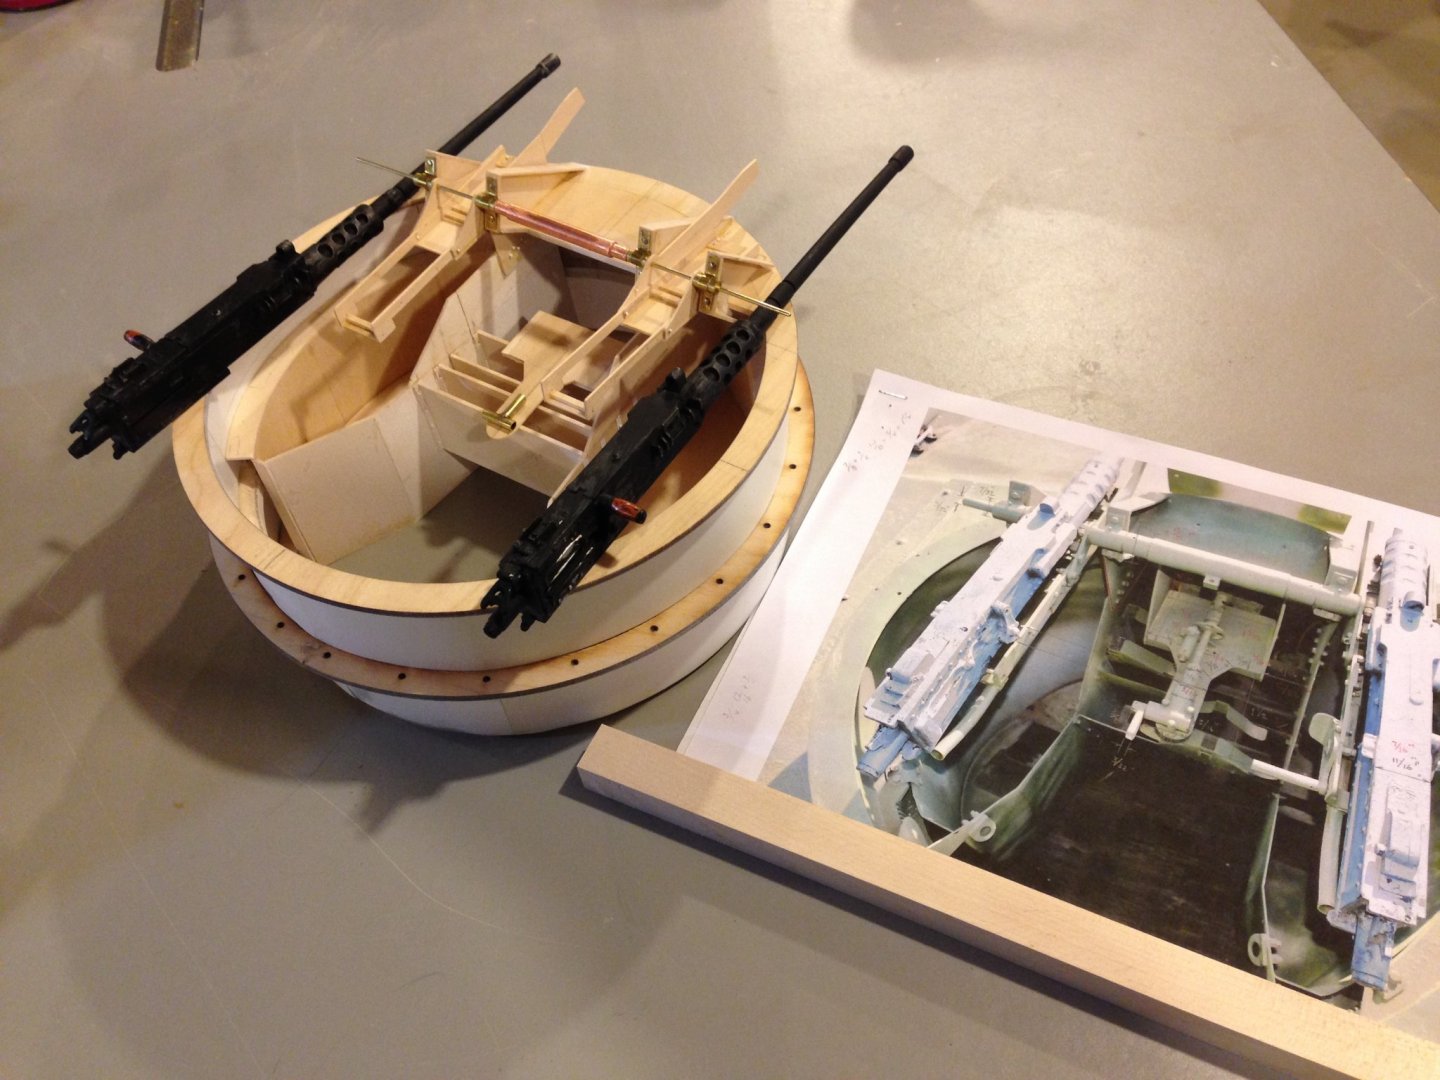
Amazing, just amazing! alross2 has sent us a response and access to the proper design drawings for the MK1 gun tub . The plot thickens a bit as he responds;
NAVORD 3741 attached. I'm wondering whether the boat at the museum has been monkeyed with, as I've never seen a MK56 mount on a MK1. The MK56 was fitted to the PBR MK2 and the PCF MK2, while both the MK1 versions used a modification of the WWII PT mount, the MK17. In the latter, the gunner was behind the weapons, as opposed to being between them in the MK56.
So we find some modifications may be in order. School is still out on this.
Thank you one and all!!!!
Joe
-
-
-
Eric i have put this model aside for the time being. I call it a bad habit of mine i.e. easily distracted. i went back to my Cheerful model and just dove in and got inexcorably hooked. In my younger days it was over a pretty girl. Guess old habits die hard. I can't believe it is almost 3 years ago that i started this posting.
i can't promise an immediate return but your query has given me a shove.
Joe
-
Thank you both for your comments. Blackreed your comments suggest familiarity with this type configuration. Although, Jim our modeler, is ex Navy, his duty was with nuclear power systems. That has left us with many questions of just how these weapons were loaded/reloaded, where the casings ended up and as you point out the spot light was just asking for it to be shot out.
-
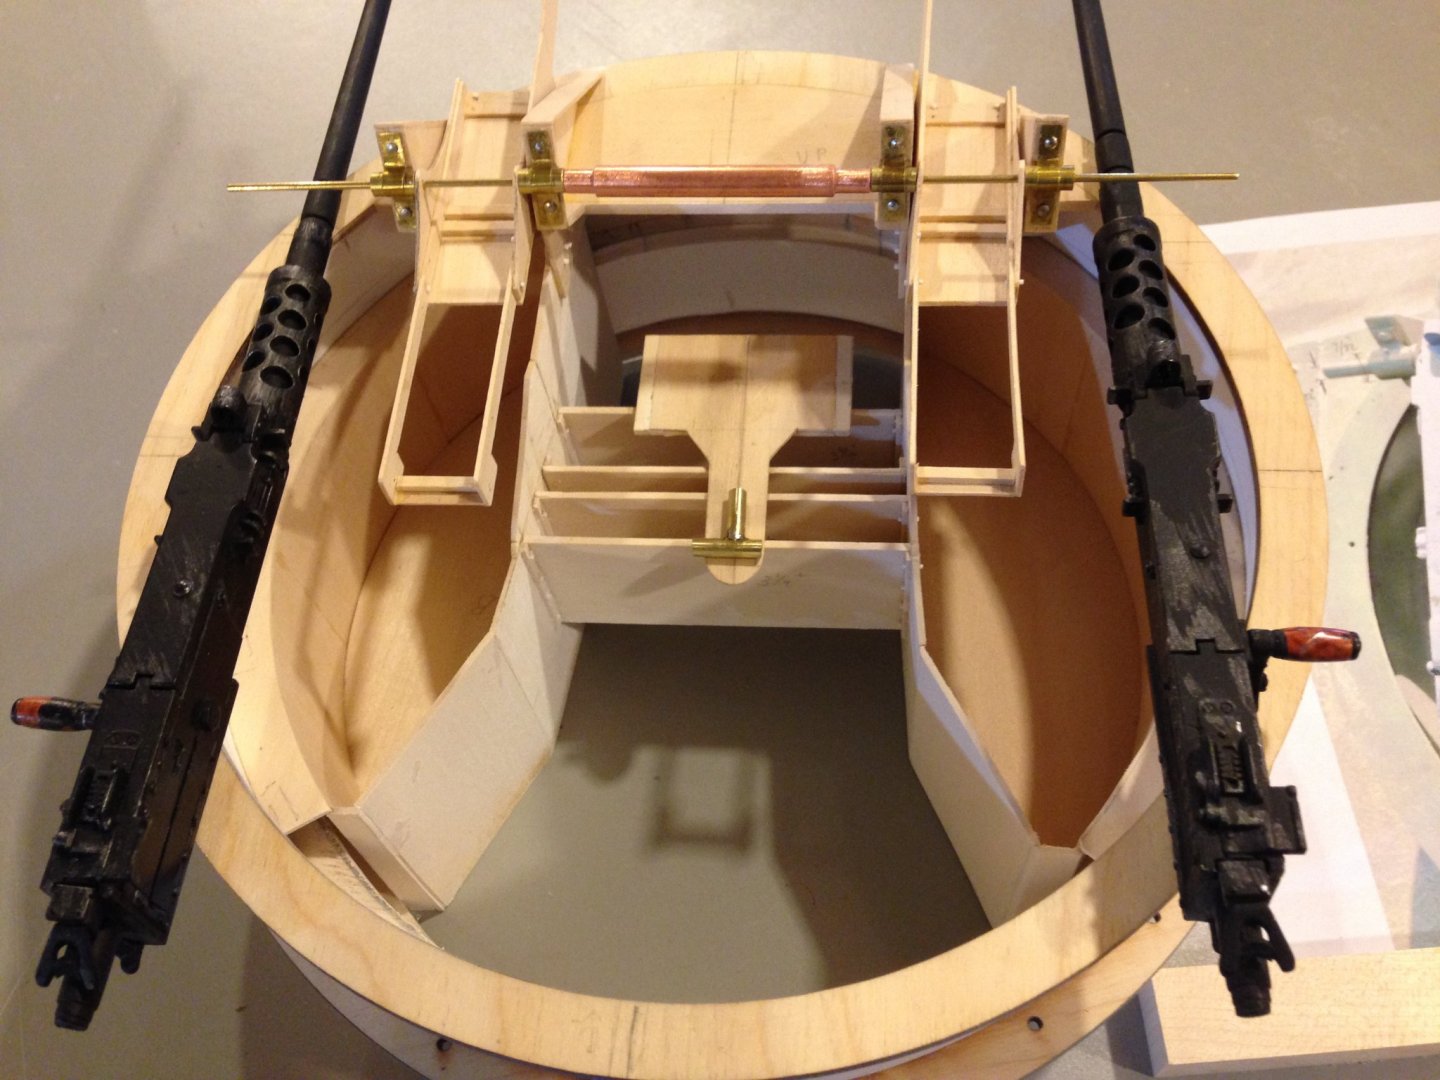
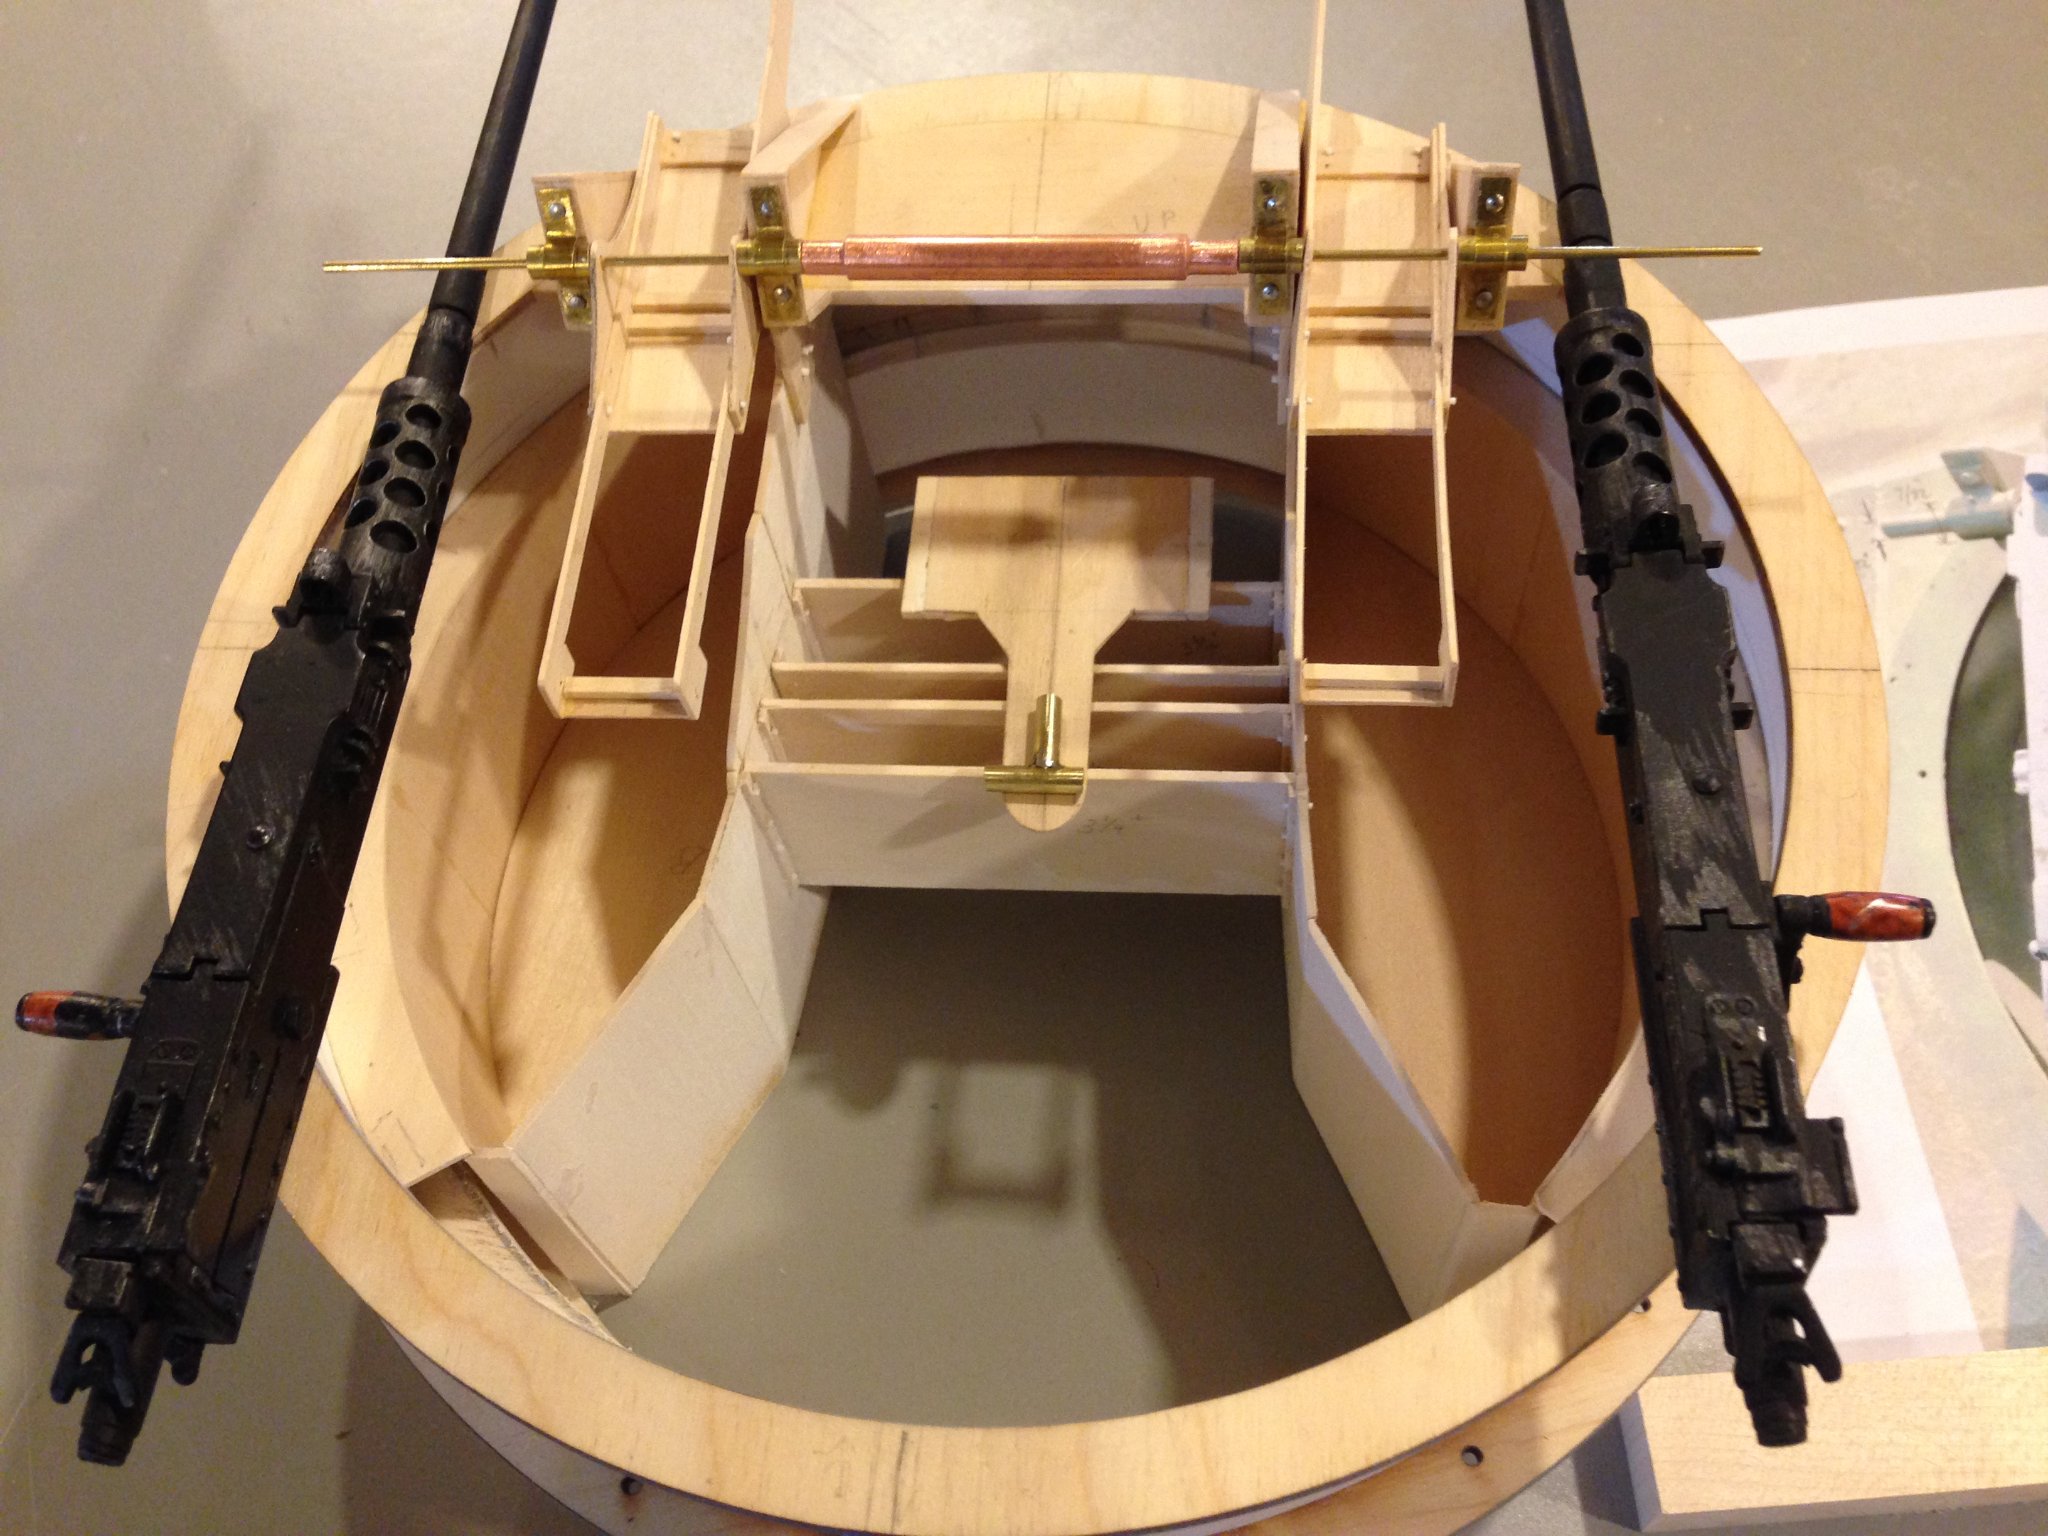
I know i have said this before but the gun tub is a project in itself making progress measured. Since the last posting, Jim, has made further advancement by assembly (albeit dry) of the gun carriage suspension components and has started some work of the gun locking system and other internal details. I think he is doing himself proud. Would you agree?
Please note the guns are not mounted in their respective carriages but lay along side for perspective.
Joe
-
How am to ever get my modeling done? Now I have to follow your fine works, watch Leo and his build and Acorn to Arrabella.
Indeed i find your "gems" amussing and it keeps me on my toes. You have a sense of humor.
Joe
- Saburo, Keith Black and jwpage
-
2
-
 1
1
-
Michael, just superb! You are such an artisan. You are an inspiration that i can only hope to follow.
Joe
- JpR62, FrankWouts and Stuntflyer
-
3
-
Joinery at any scale is a challenge. You have certainly 'nailed it' here! Just beautiful work.
Joe
-
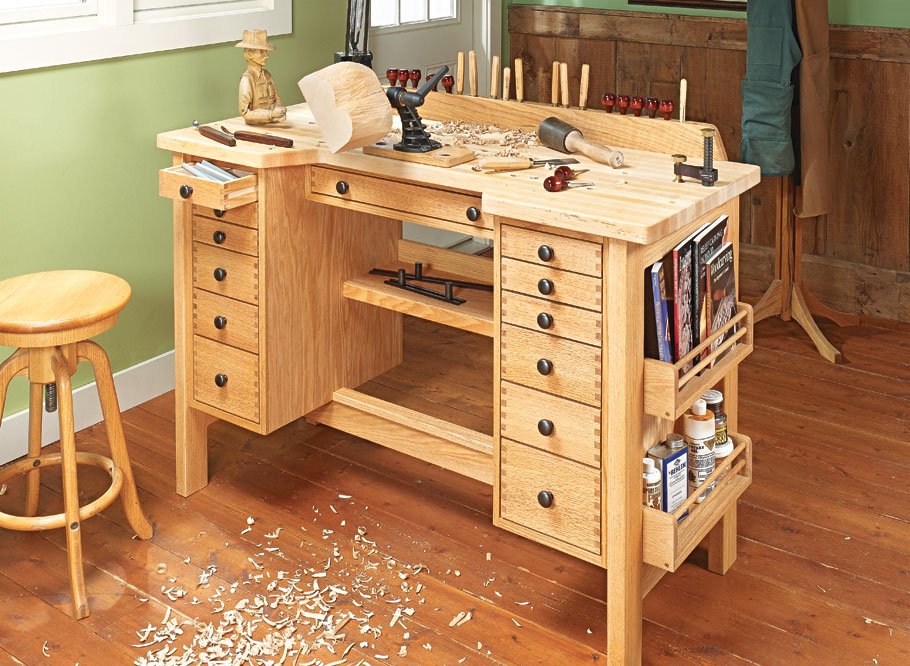
Now you have done it guys! You made me search further for the hobby bench I thought was a style that may work. It can be lowered and widened in the aperature and can be made wider in work surface area. The plan is simple and can be adapted for a wheel chair. I liked it as it was "handsome enough" to take residence in a living area as opposed to a shop environment.
Here is what I would do:
- The trestle framework can be redesigned to improve access in the knee hole area.
- Remove it all together and make the rear panel the strong back. And while your add it remove the middle shelf.
- Widen the top
- Widen the drawer storage either side
- Possibly add a bit of upper storage at the back of the top surface
It was in Woodsmith not Shop Notes.
Joe
-
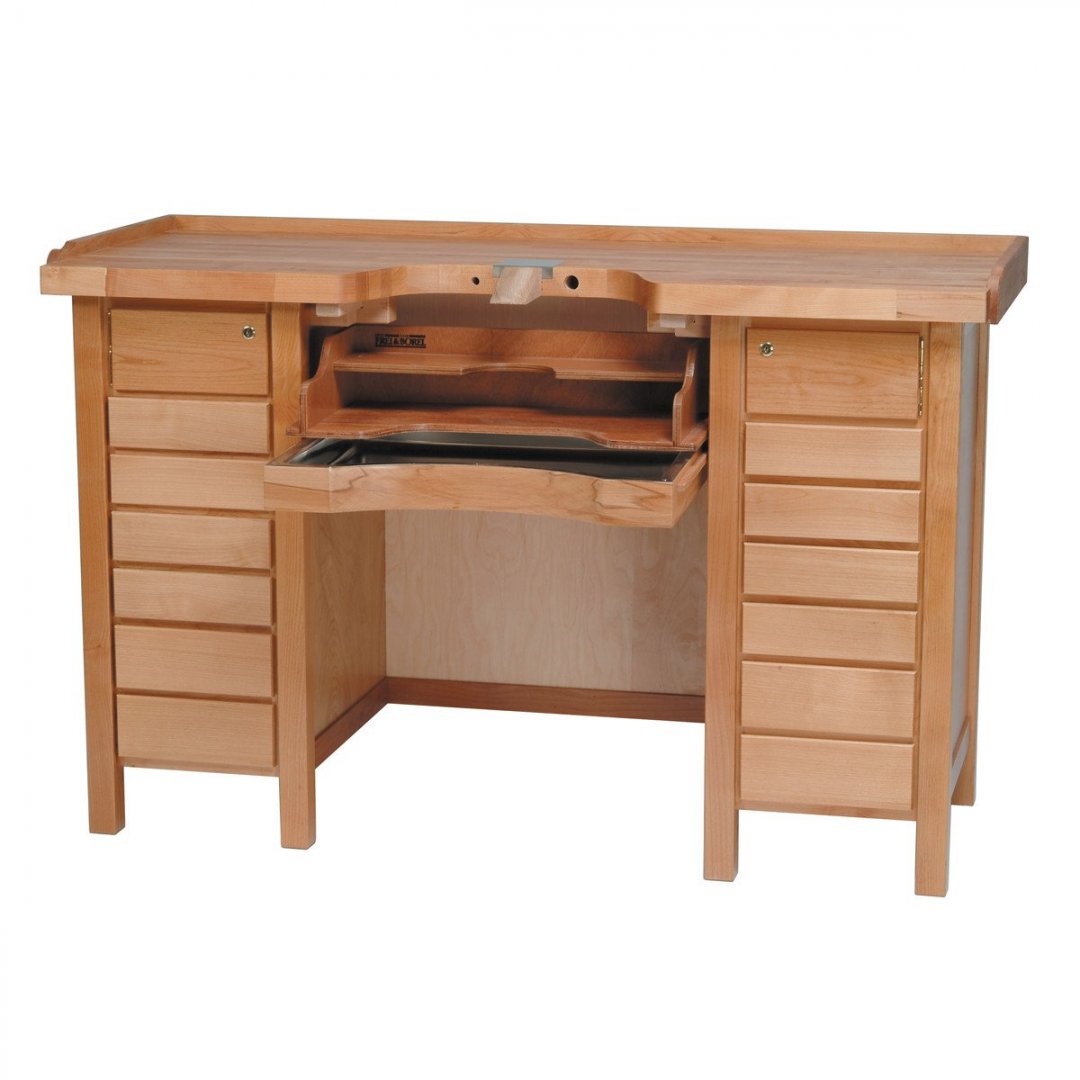
Here is a style that intrigued me sometime back. For your needs a design such as this could be lowered and widened to accomadate your wheel chair. This particular one is quite pricey but my estimate for a DYI version is under $500. The DYI version of this was in Shop Notes or its companion sometime around 2010.
Joe
-
Conditions have not improved much in the Finger Lakes Region as far as the infection rate goes. People just let their guard down and we still have an infection rate of 9%. Vaccinations for our 1B population has started but the supply chain is faltering. i suspect even with increased supply there will be a bow wave as first time recipients compete with 2nd round recipients. All part of the Covid Crazies!
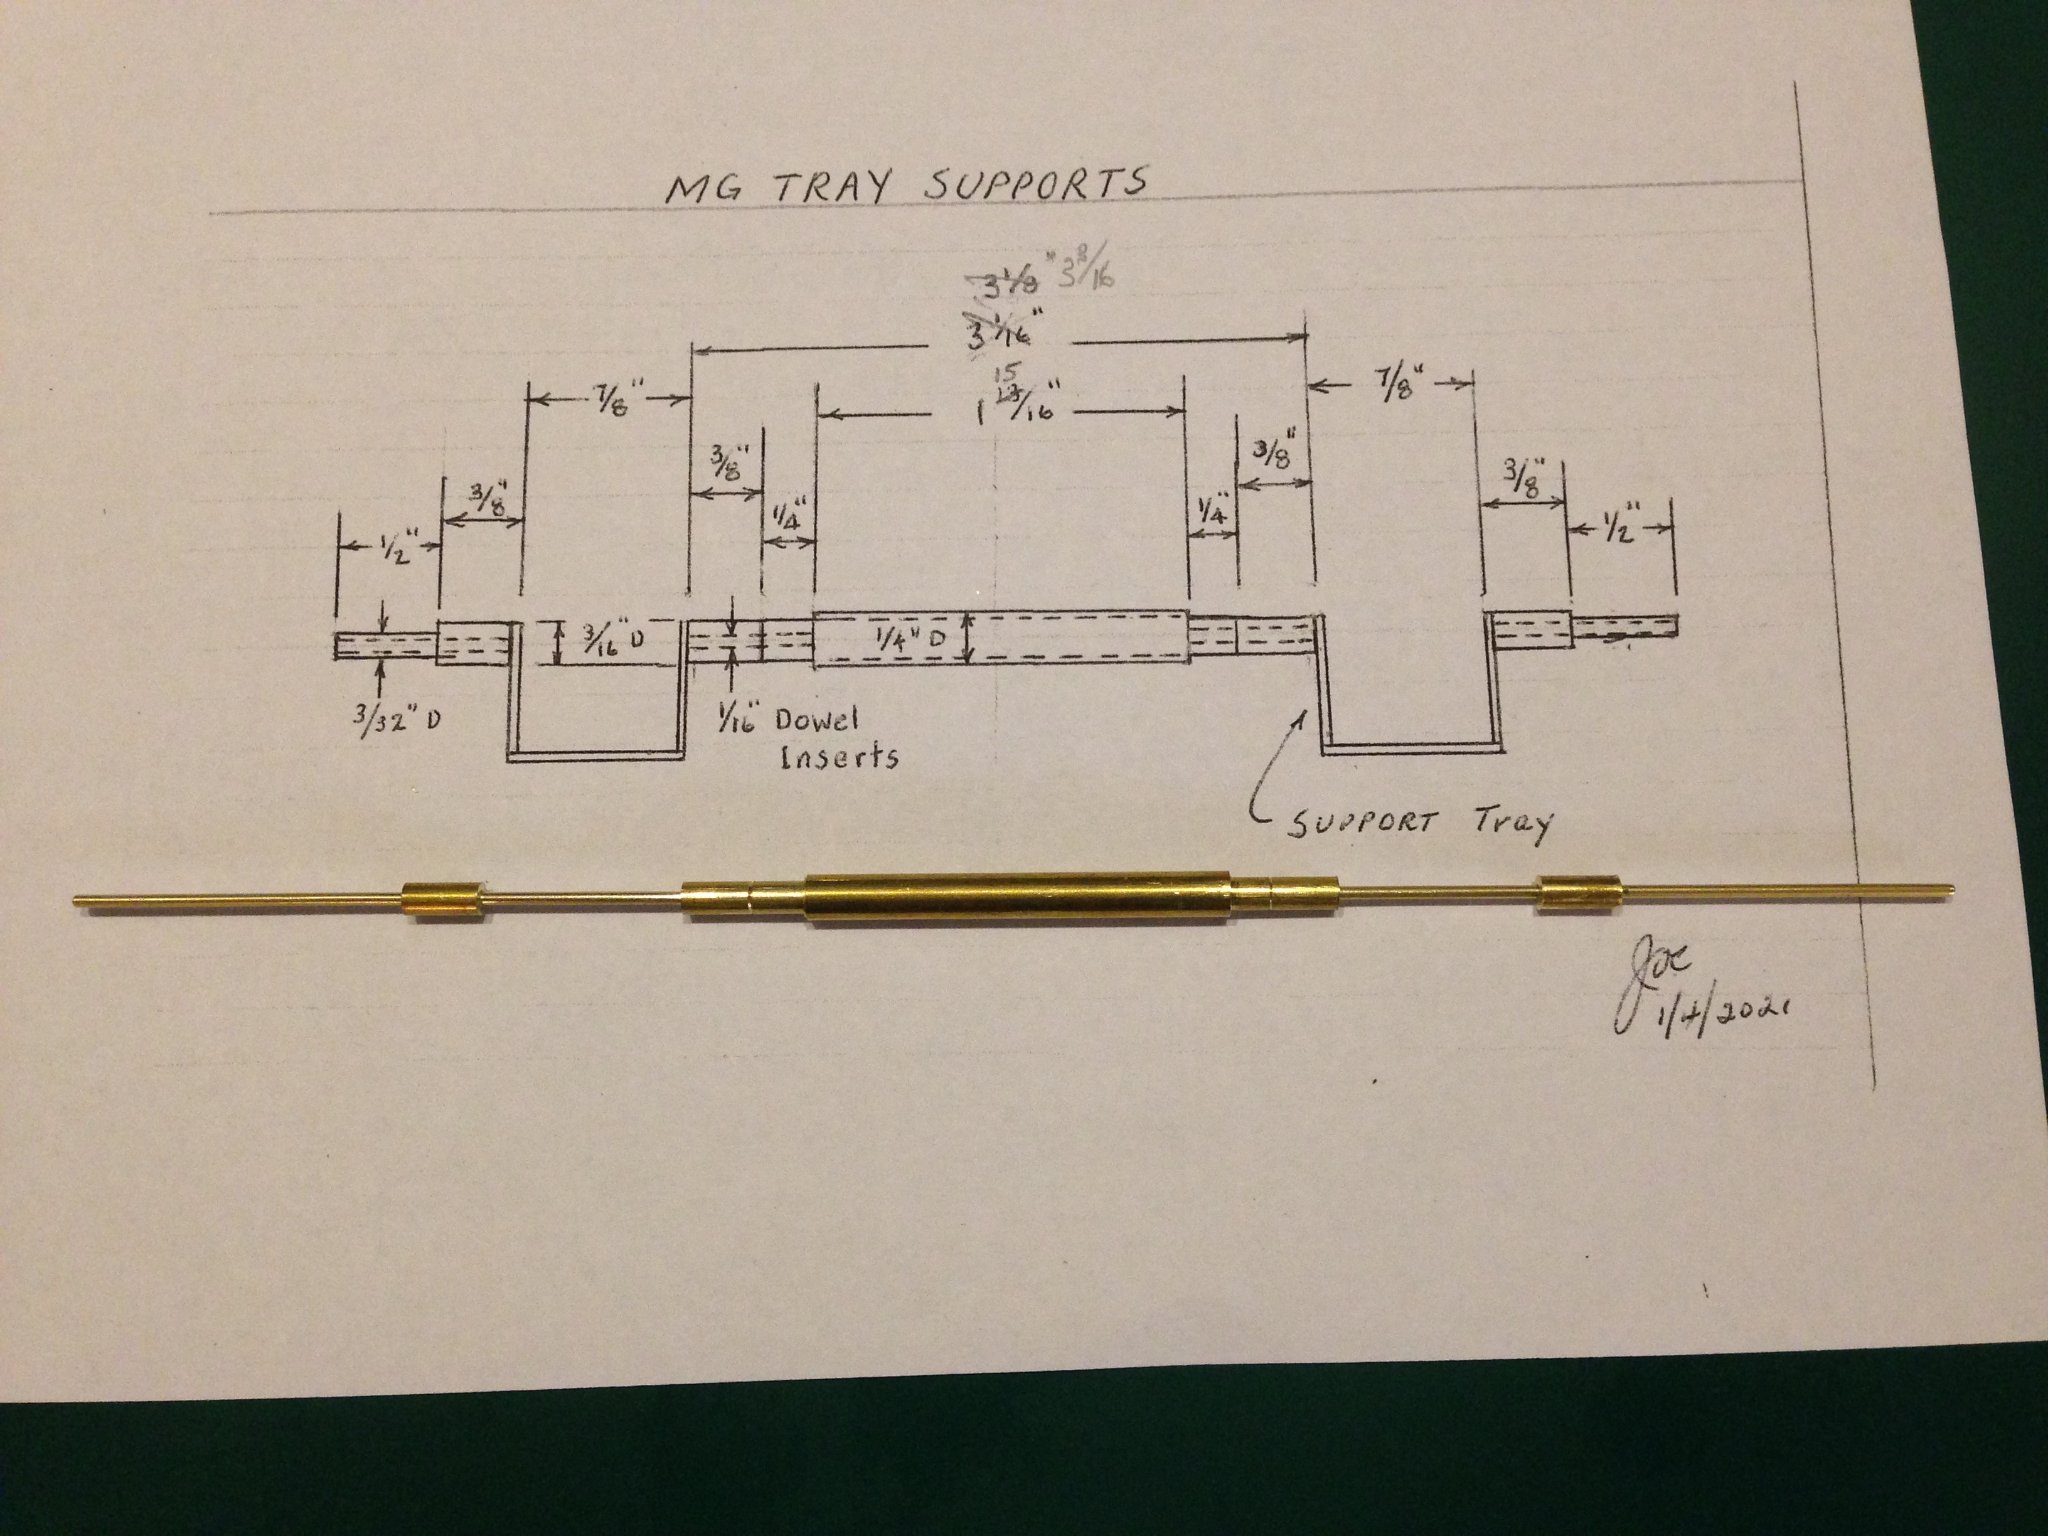
But I digress. I voluntered to turn the support system for the forward gun tub trays, as I have the lathe. I first tried making the system in one piece out of 1/2 delrin rod. It did not go well. In part because I am not a highly skilled turner and secondly when the turning got down to the 3/16 diameter the rod just did not have sufficient axial stiffness. So I turned to the old standby and made it out of brass. Actually the main body is 1/4" tubing with an ID that allowed yet another piece of tubing to slide neatly inside. That in turn very nicely accomadated a 3/16 inch rod which was end drilled to take the 1/16 rod. At present the 1/16 rod is quite long to aid in alignment of the whole assembly when it is installed on the gun tub support bracketry.
The assembly is not soldered as I have to experiment with brass blackening and its interaction with solder flux. I suspect the answer will be "not well", in which case the assembly will be glued.
Joe

- G.L., GrandpaPhil, Canute and 2 others
-
5


Anyone use a 10" table saw for detail fine wood cutting?
in Modeling tools and Workshop Equipment
Posted
Clogger I just can't bring myself to waste precious material by turning the kerf into saw dust. Having bought a boxwood billet recently (approximately 2 X 4 X 24) for $100 I find it a crime to cut that on conventional equipment even with a thin kerf saw blade. You would be better off cutting rough stock on a band saw and sending it through the Byrnes sander a few times as most of us do not have conventional wide belt thickness sanders in our shop.
Joe