


Thistle17
-
Posts
1,042 -
Joined
-
Last visited
Content Type
Profiles
Forums
Gallery
Events
Posts posted by Thistle17
-
-
Masterful work by both of you. I hold your works as the quintessential reference of human accomplishment. Hopefully next year in New London it will be there to see up close.
Joe
- JpR62, dvm27, Joseph A Robles and 2 others
-
 5
5
-
I am sure you know but just for the sake of it wood swells across its width i.e. perpendicular to its fiber cells. So don't glue them in until you are sure they are completely dry if you go this route. Look on this site for alternate measures for planking. I think you may find these methods preferable.
Joe
-
Our group got to see Rusty's model in person last weekend. It is such a warm and rich appearing rendition in pear wood. His execution is skillful aaaaaaaaand all the more so as we remind ourselves that to this point it is all scratch!
Joe
- FrankWouts, Ryland Craze, VTHokiEE and 1 other
-
4
-
-
I too am in the process of building Cheerful in the original boxwood material as offered early on. I haven't posted a build because I have gotten so far behind it is almost anti-climatic to report on it. I will say that after some false starts with planking and the like I am now at the deck level adding detail. So to give you some encouragement it is finally starting to get exciting to work on her as fleeting as that may be. Don't lose heart and as Chuck all too often emphasizes take your time.
Joe
-
Your build is coming along just fine. It too was my first build from an AJ Fisher kit that was a solid hull. Plenty of on-line pictures to help guide you and if I recall there was a book out on its build that may be of help. Of course most of the recent info is of II. And I notice that much of the deck "furniture" is for safety or comfort conformance. I did use Erik Ronnberg Jr's manual of Benjamin Latham as a guide as I viewed him as an authority.
I have a question for you. When you speak of her as a racer what do you mean. It was my understanding that the original Bluenose raced against some American vessels of the same "class" to see which was the fastest. It is my understanding she was never converted to be a racer as such.
Joe
-
This is such a magical trip you are taking us on as your build advances. Absolutely love it! Adding figures and creating the environment adds so much viewing interest. Two years ago we had a member of the Rochester Museum and Science Center in to give a talk on his work on a diorama restoration of early Rochester NY down by the falls (which was the city epicenter for a time). He related they wanted as accurate a depiction of the population represented so they went back to historical records and gleaned enough information to include people of color in the new display. Kudos to you Jond for your similar work!
Joe
-
Thank you for sharing this latest tip Mike. You make the road ahead less difficult!
Joe
-
Check this site out for properties of this wood. https://www.woodworkerssource.com/show_tree_wood.php?wood=Staudtia stipitata
Given what I read I only offer that this wood is going to be difficult to edge bend given its density and reference comparison to maple. You may have to resort to soaking in water or alcohol. I would try a sample piece before I go too far. Chuck Passaro also recommends heat to edge bend in the area of the curve.
Joe
-
I forgot to mention that you can get a healthy dose of knowledge from this individual's email and postings. He is quite the CNC enthusiast. Bob Warfield from CNCCookbook <bob@cnccookbook.com>
Joe
- thibaultron and mtaylor
-
2
-
At the outset let me say I am not trained as a machinist. Having said that I did invest in the Sherline Mill with DRO capability. I love the machine! I also invested in a Sainsmart 3018 Pro to try to teach myself and my grandson who is in college studying Mechanical Engineering to give him some early hands on exposure to this type of tooling. Firstly let me say I do not recommend that CNC system. It is a learning tool. What I would offer is that we had such a disappointing entry into the CNC world via this product. However as painful a startup as it was, we learned quite a bit about the entire environment.
Here are my thoughts: invest in a turn key system of both hardware and software (CAD/CAM) if you don't want to spend all your energy and time stitching together a system. From the standpoint of a machine paying for itself one should have other projects other than ship modeling as Ron suggests. Depending on what software front end (CAD software) you choose, and there are plenty, there can be a steep learning curve for the more powerful/useful ones. Even some of the better ones are freeware to the home user. The more powerful systems (CAD/CAM) allow one to even scan in images, import certain types of files, like DXF files and even with conversion JPEG images. But you may have to learn how to debug and edit 'g code' to have it produce what you want. There is a caution on the import of the more common DXF files. Certain DXF files that were meant for a laser system may need significant editing to have them run a router based system. Node discontinuities are the problem for the most part.
These are just a few thoughts that I/we had to learn the hard way' We did this over 2 months of summer trail and error. What made it fun I was spending quality time with my grandson!
If all this doesn't deter you please keep this thread alive and we all can learn and contribute with you.
Joe
- thibaultron and mtaylor
-
2
-
How did I ever miss this build log! In reading earlier posts I can only say that I appreciate your sense of the what elements of your work bring satisfaction and those that don't that haunt you. I can relate and at times i find it a curse in this model building pursuit. Nonetheless your work is inspiring and a joy to now follow. Your work is excellent.
If you are ever in the Rochester area we have a small model group. Our web site is www.modelshipwrightguildwny.org. Although we have members from Syracuse and Buffalo (and even Lisbon Portugal) it would be a trek to have you attend one of our meetings. You may be interested to know that the Niagara Model's group will be holding an open house in June of this year just over the border. They have some fantastic modelers. We plan to attend. Look under the topical heading dealing with model club news and events to learn more.
Joe
-
-
The larger table is still available but not advertised. I inquired about 6 months ago and he would supply it. The rub as I recall was that I had to ship my present table top to him for the rework. I have yet to do so as it is in use for a project. I still wish to do it but can't free up the top. As Mike says check with Jim.
Joe
-
I agree with Mike on the crosscut sled it is an excellent accessory. As I posted before regarding the tiling table and I must qualify once again I have never used it. However intuitively I am troubled by the "mechanics of the piece being cut tendency to "fall" in the direction of the blade. I would never do so on my full size table saw and as a matter of safety I never cut say a 45 degree cut with the piece trapped between the table and thetilted saw blade. Rather I cut the angle on the opposite side of the blade.
I am open to being corrected so please I invite feedback to the contrary.
Joe
- Julie Mo, Bob Cleek, Landlubber Mike and 1 other
-
4
-
I don't know why I missed this MSW thread before but in reading through the progression of the build, not with standing the full scale "model", it is such a beauty and like others like Michael you are gifted! I have such a fondness for small craft. Perhaps it is because of their basic beauty or maybe it is just their fundamental essence and grace.
Joe
-
I handed off the form to Bill our resident expert at computer design and who also has access to laser etching and to my utter surprise he produced the gun tub in an amazing short time! And to add to the surprise he elected to use styrene sheet for the tub surround dispensing with a good deal of sanding and filling with the stave approach. In addition he was able to add the bolt holes for further realism. I am sure to many of you that would have been a logical material choice. It certainly was for Bill as his Civil War scratch models employ this material.
The challenge now is to outfit the tub with the inner mounts, back rest, ammo cache, spent ammo receiver etc. Unfortunately we only have the Maryland Silver rendering of the tub inner details so there will have to be some "poetic license" determination of dimensions and placement of elements mentioned. We do have the 50 Caliber scale guns so that will be of some help.
Joe
- kurtvd19, Jorge Diaz O, druxey and 7 others
-
10
-
What is it about wooden boats? Every time I see these vessels since I was young(er) it stirs my heart. In case you haven't seen the Acorn to Arrabella videos on you tube they are worth every session. To me it is testimony of having a dream and going after it. Sigh!!!!
Chuck yes indeed, for we arm chair sailors, dreamers and modelers it would be a wonderful scaled project.
Joe
- mtaylor, thibaultron, dvm27 and 1 other
-
4
-
skipper1947
I do not have direct knowledge of this model however here is a kind gentleman Reni Hoelzle - Krick Modelltechnik <r.hoelzle@krick-modell.de>) (that did work for Krick just a few years back. He was quite helpful in my pursuit of parts for the Atlantis by Robbe. They bought the rights for the kit from Robbe. Now the reason I am relating this is that I took a commission to rebuild a static model of Atlantis. You can visit my build log on MSW at
I had to rebuild a good deal of the deck furniture and some of the hull components as they were missing. I would ask Krick if the kit comes with laser cut parts and what the materials are. In my build log you will see what was so displeasing to me. Also ask Pat Matthews (on page one of my build log) he is a pretty savvy individual. Hope this helps.
Feel free to ask more or PM directly.
Joe
- mtaylor and skipper1947
-
2
-
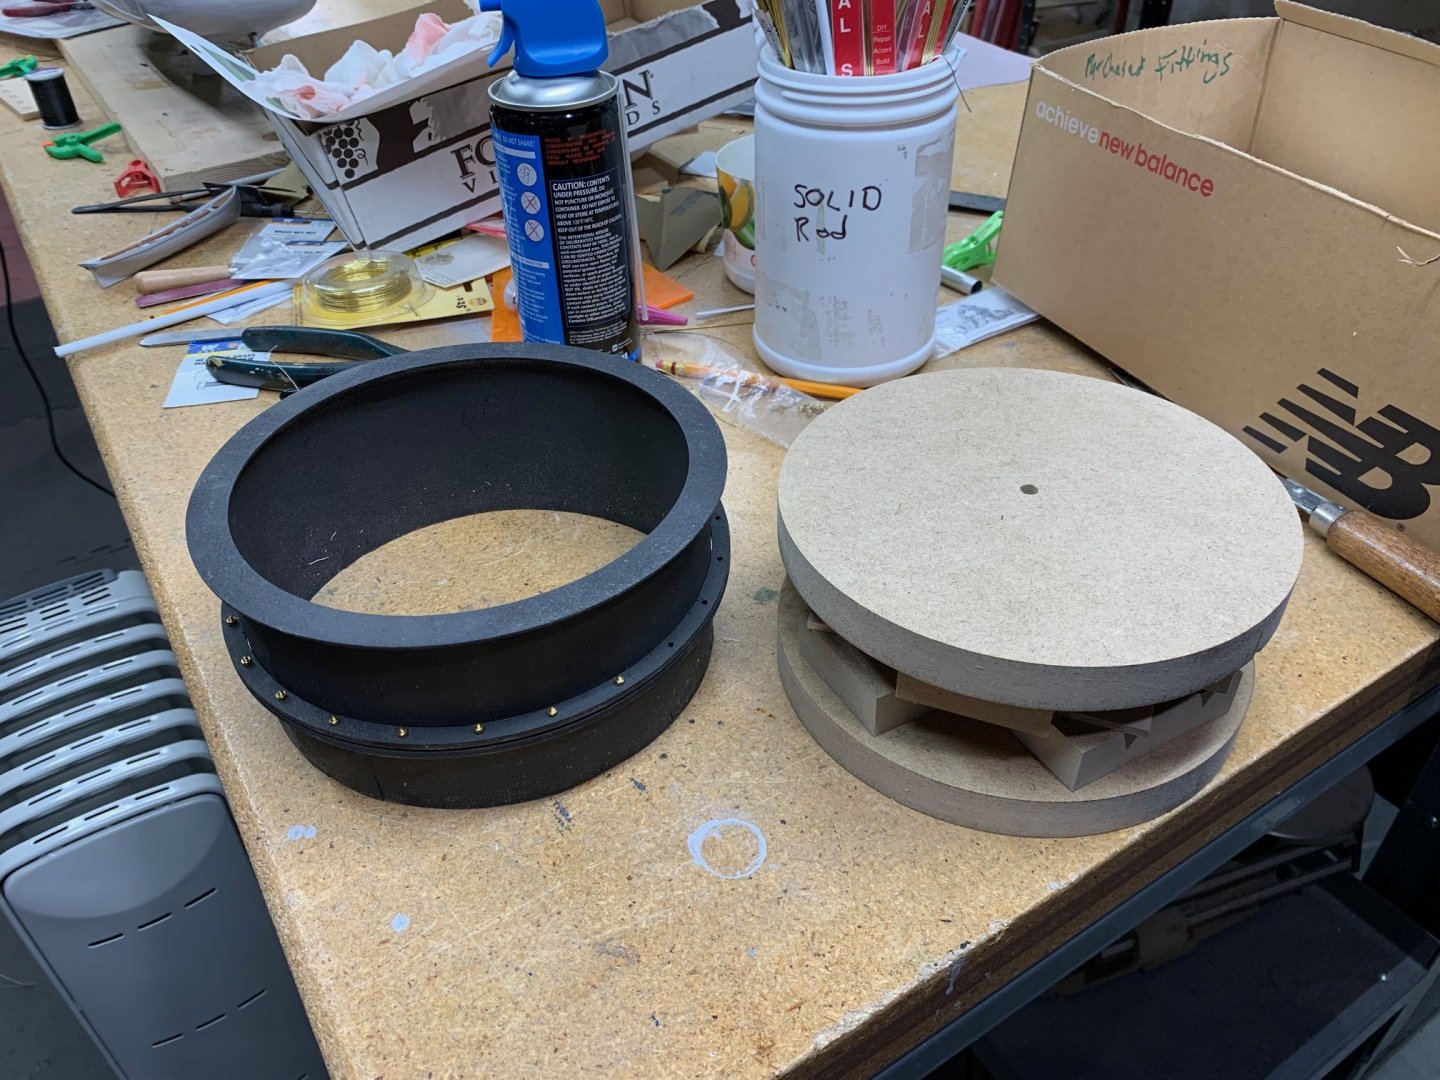
We finally got around to fabricating the gun form shown in the picture attached. The form is 7" in diameter and 3 1/8" high. We did experiment with alternate methods of creating the tub surround i.e. a veneer wrap, thicker staves and the like but finally reverted to the original thinking of two layers of 1/32 staves with the outer staves offset from the joint area of the first layer. This is now being fabricated off site. In addition the fabricator has design processing capability and access to laser fabrication to make the tub flanges (rings) and as he says with the bolt patterns included. A test fit of the form indicates we will have no problems with fit into the existing support ring of the model.
Joe
![IMG_1447[1].JPG](https://modelshipworld.com/uploads/monthly_2020_02/2075874878_IMG_14471.thumb.JPG.92a4e0e5764f5b06347feeec2dfab973.JPG)
-
Simply amazing in itself but when one works to imitate it in physical form what a reference! The other edge of the sword however is can I ever hope to make such clean crisp joinery as the 3D model?
Joe
- Ryland Craze, dvm27, VTHokiEE and 2 others
-
5
-
Great way to introduce yourself Bob. Ah that Viet Nam era! I was actually drafted during that era and only, just only, did my deferment keep me out of the fray. They actually pulled the notice back as I was working on sonobouy radio receivers for General Dynamics out of college. I often think I may not have come back save that twist of fate.
Joe
-
-

![IMG_1447[1].JPG](https://modelshipworld.com/uploads/monthly_2020_02/1650216099_IMG_14471.JPG.ebc2919e694cb3412561e4328a1ae01b.JPG)
Good tool to cut perfect squares
in Building, Framing, Planking and plating a ships hull and deck
Posted · Edited by Thistle17
It is not a coincidence that we all need a tool akin to those suggested here for all types of square cuts or even angle cuts. I made this simple one out of cut offs of MDF. It is modeled after my wood working shooting board. One can use either a low angle plane with a sharp, sharp blade or even sand paper glued to a stick. The plane is the Lee Valley Block plane. I am working on a similar version for angled fine tuning that will incorporate my mitre fence from my Byrnes sander.
Joe