Thistle17
-
Posts
1,054 -
Joined
-
Last visited
Content Type
Profiles
Forums
Gallery
Events
Everything posted by Thistle17
-
 You may have heard that RBG never said "umm" before she spoke. She always thought and then spoke. Well had I paused and followed good sense I would have done so on the catch assemblies and construted them as druxey suggested. So before I went for the polystyrene approach. I manged to build up the 2 trays as suggested. They assembled quite easily and have no distortion due to built in wood fiber stress.. Joe
 -
Yes David you point out what I should have told myself. You would think I would learn from my past experiences. Admittedtedly this is not an endeared project for me. Out of duty and a sense of 'get er done' I am in a forced function mode. Again you would think I know better. Joe
-
Thank you Roger for that insight. It certainly makes sense. Unfortunately our contacts in the Navy are no longer available to us as we did try, pre pandemic, to reach them. So we muddle on. In the last few days I have attempted to fashion the tub out of 3/64" basswood and it was a huge disappointment. The height of the "catch or holding wells" was guesstimated to be about 2 1/2". Pre bending the basswood along its grain turned out to be a mistake. At that thickness the curved side acts somewhat as an archer's bow. The resulting tension distorts the assembly to such a great degree that it is a nightmare to assemble and the end result is unacceptable. I am now driven back to polystyrene as the preferred material. If at first you fail try, try again seems to be my mantra these days. Joe
-
Allan I had a brain cramp and incorrectly named this CA based product. It is Rapid Fuse, not Insta Cure by Dap! And here is the data sheet reference. You will see accetone is recommed. https://www.dap.com/media/4866/rapidfuse-wood-adhesive_tds_100118.pdf Sorry for the bad information. Joe
-
Another approach I was quite happy with was the use of DAP Insta Cure. There are two versions a general purpose one (good also for wood) and one used for wood. What I liked about the CA like glue was that one could lift the plank within 30 seconds if the result was not perfect and it could be repositioned again. I also found that it could be removed and relaid once again should a new one be required with just minimal "clearing" of the previous layer of glue on the false deck. Joe
-
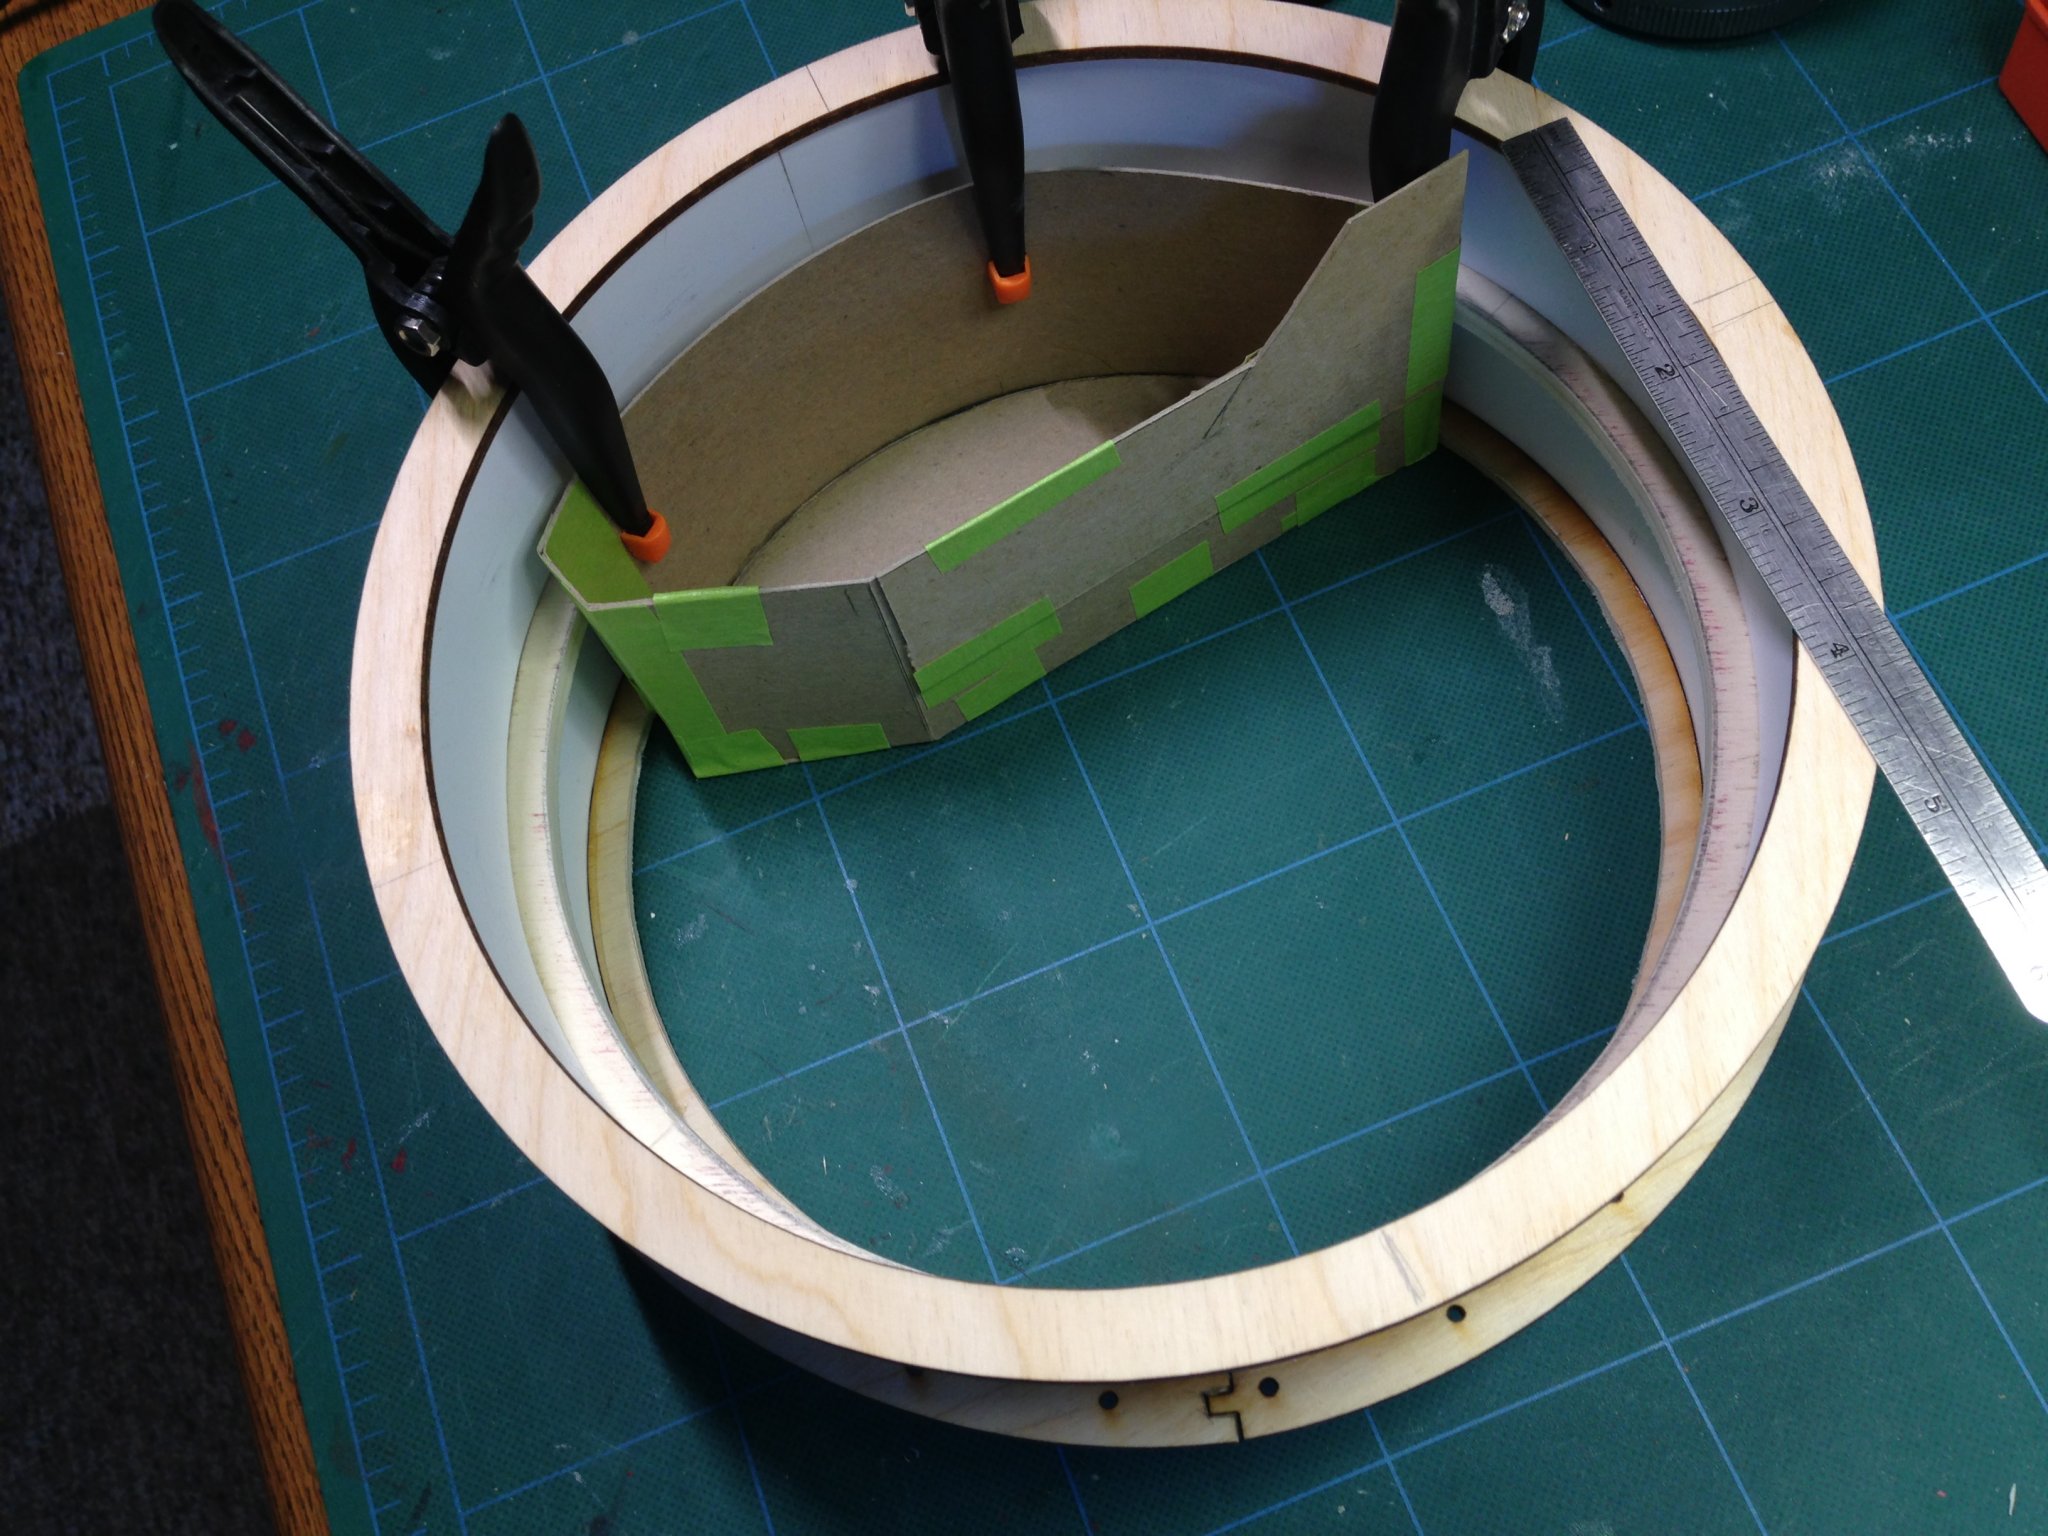
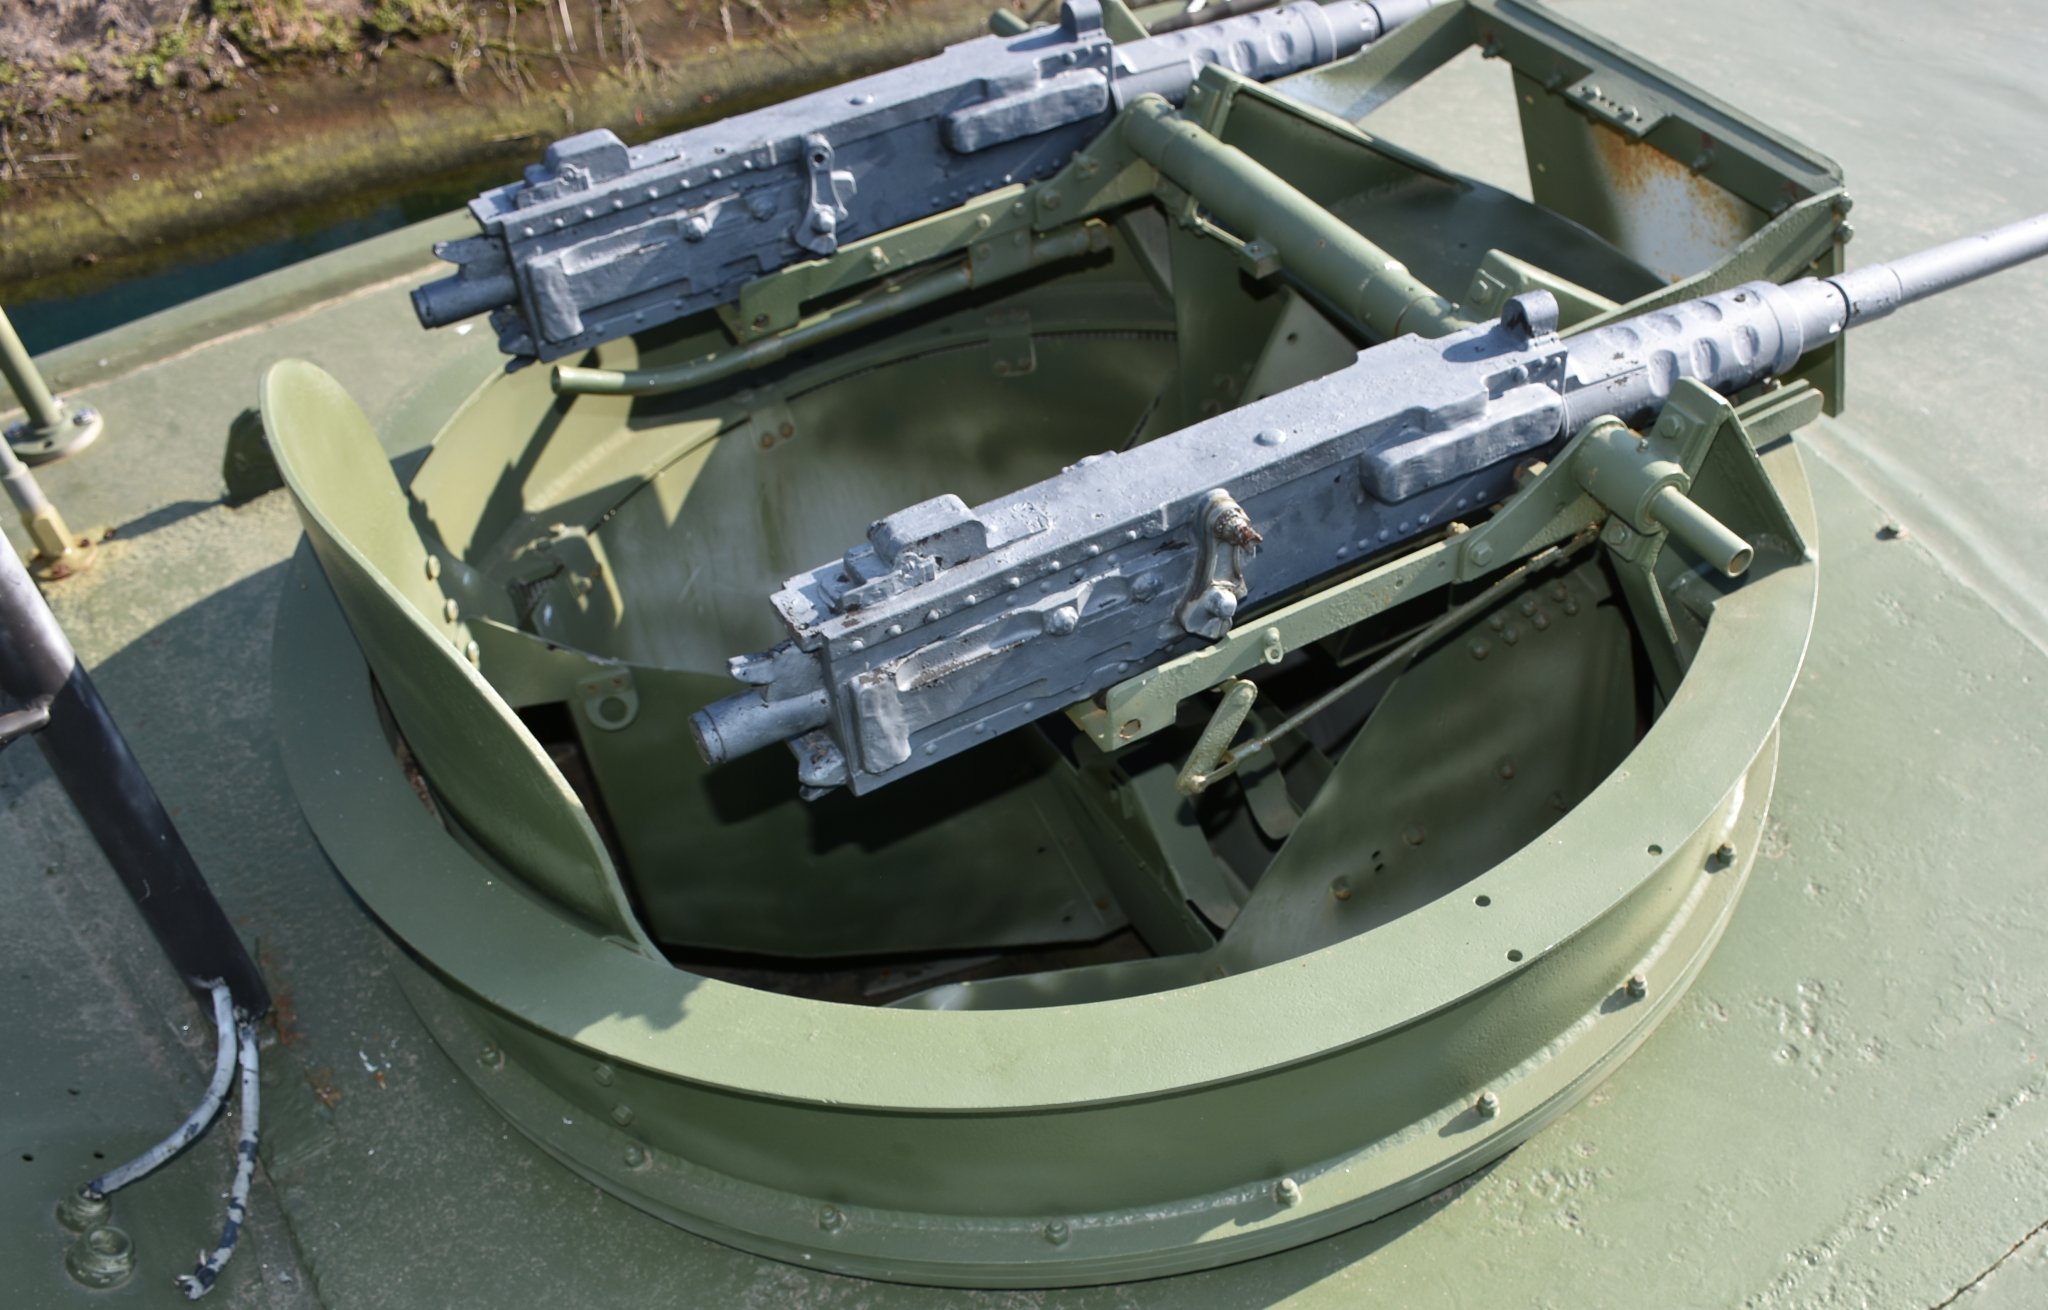
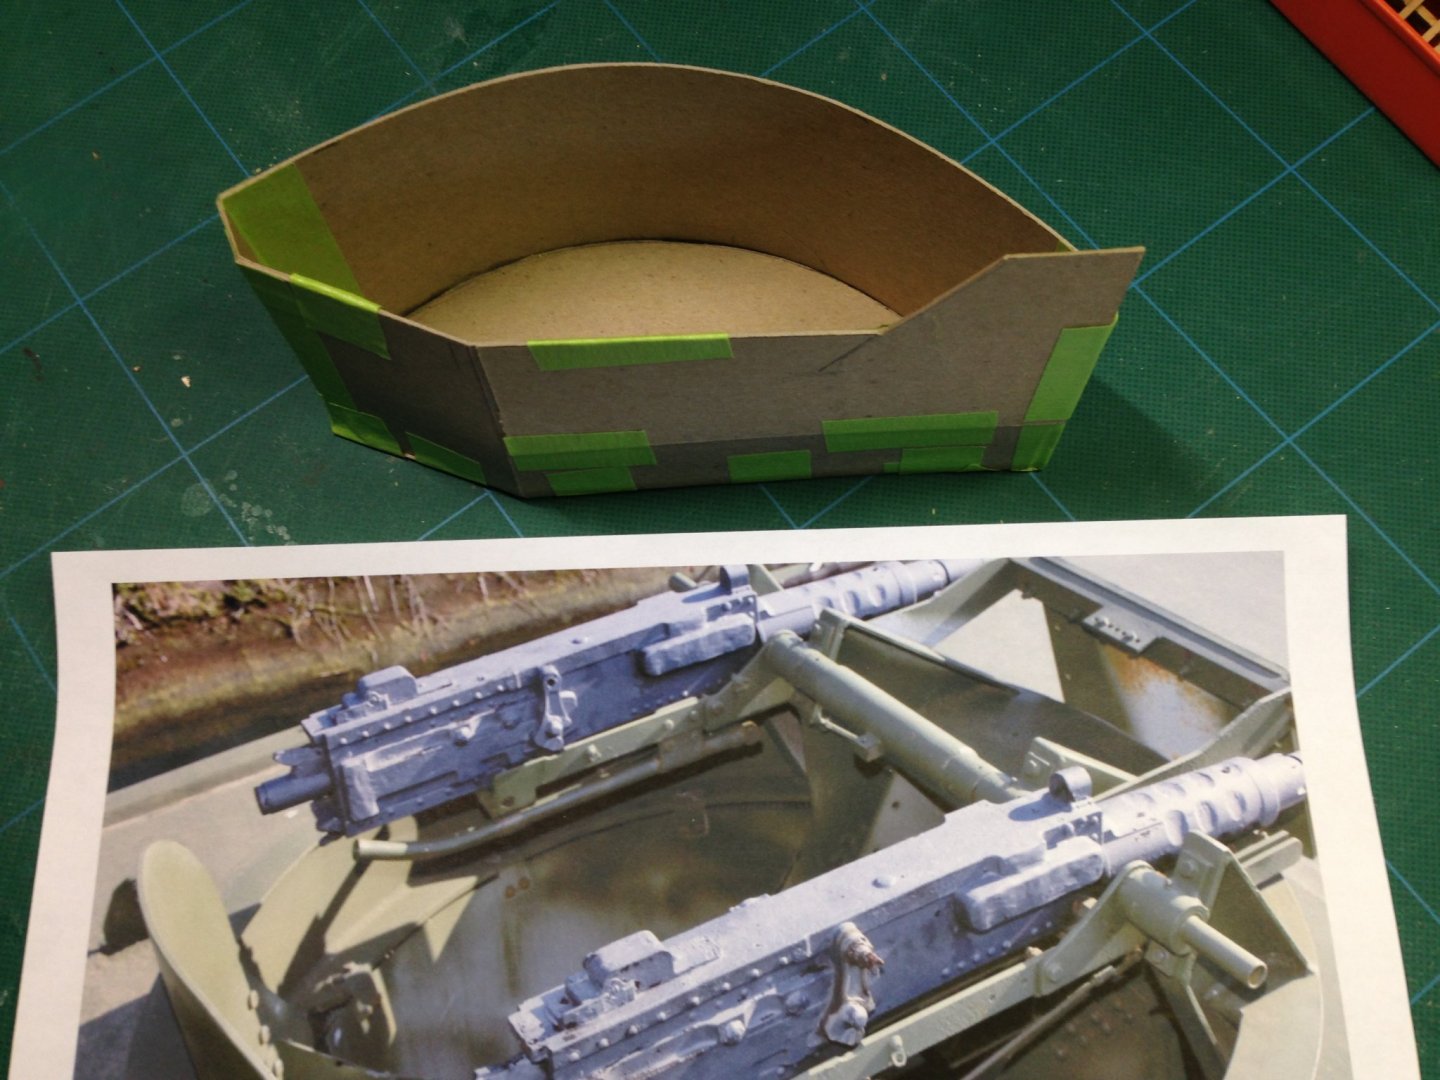
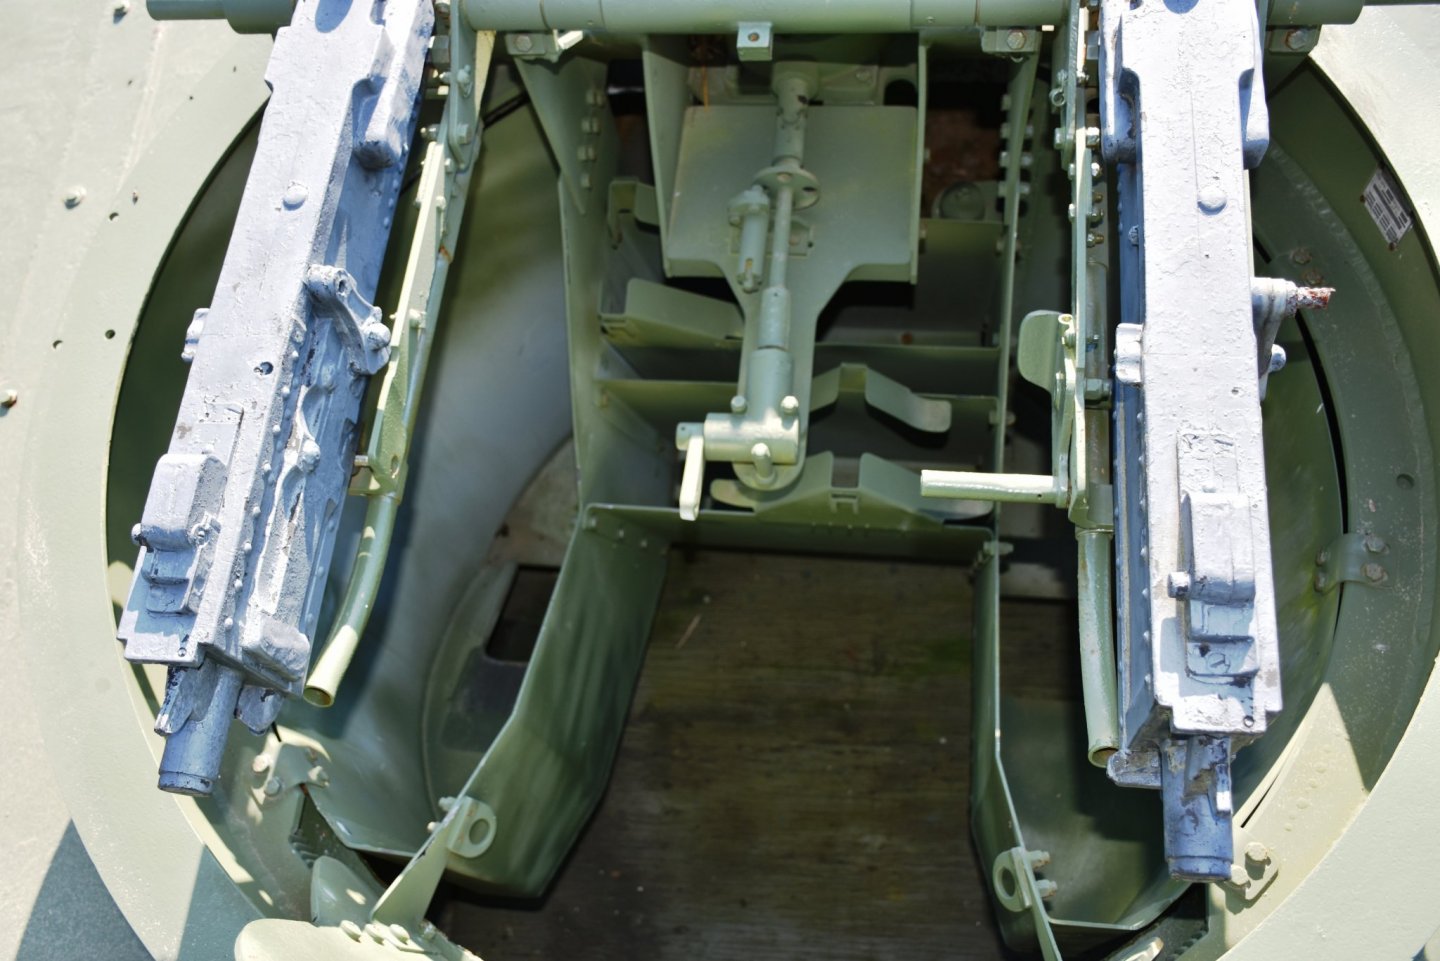
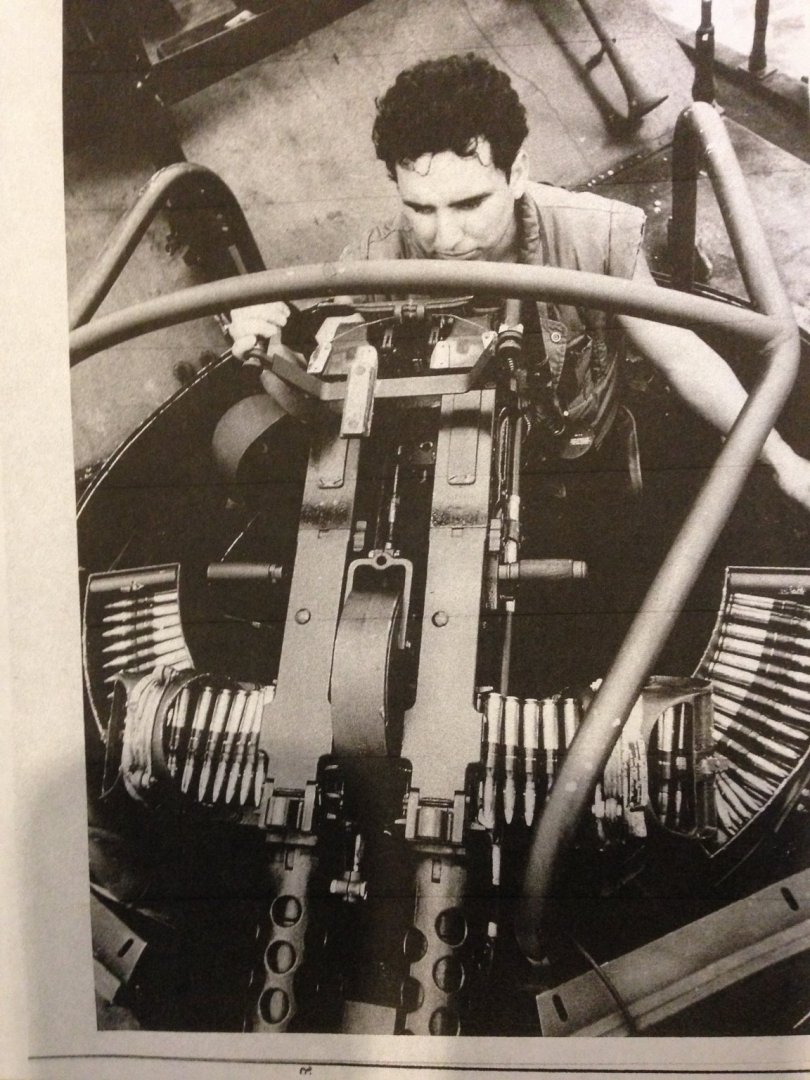
The gun tub is turning out to be quite a guess work project. In a recent conversation with a naval officier I asked why we were unable to secure the gun tub drawings. He reminded me that the Navy Bureau we dealt with held a few drawings back. Given that it is related to armament we suspect they may have erred on the side of caution. So for whatever the reason the construction of the tub innards has become a head scratcher. With the aid of more photos The tub structure was assembled and a cardboard model of the tub shell casing and gun mount steel works was constructed. Admittedly it is crude but does seem to give an elemental sense of the tub innards. As there are two of these the cardboard model has been taped together and will be taken apart enabling the fabrication of both. Basswood is likely the material of choice. Further elements will be added to replicate those shown in the photo such as the cross members, gun trunions, sheilding and the like.The second photo while depicting the actual shell catch tray reasonably well it marginally shows its internal placement. Joe

-
I know the feeling jfhealy as I have not even attempted my Winchelsea until I have completed Cheerful. I made so many minor mistakes on Cheerful, only to rip them off and start again. This passion we all have has been a pursuit of perfection and frustration given so many references on MSW of incredibly fine work. I find in most anything I do the second time is the charm. For many reasons it seems to be so. So starting anew I am sure you will find it that way until you reach a new chapter and then it seems to start once again. The frustration that is. So for me I now do a practice run on a mock up or in your case maybe W1. Nonetheless with your determination and persistence I think you will get there. Joe
-
As we delve into references for the gun tub innards we find a number of different configurations for the gun mounts, the inner catch tubs and even the ammo feed elements. One can only suspect that there was quite a bit on "in field" retros and contrivences. Shown below in order is the Patriots Point forward gun tub followed by what is obviously a in field shot. In the latter one note the 50 caliber shell trays and the relative gun spacing. The tubular frame overhead here is likely weather shielding framework. In looking at the multiple pictorial sources one has to assume that it does not matter which side of the weapon shells are fed into the chamber. Not having a difinite reference we have decided to mimic the Patriots Point configuration.

-
Glenn I too am building Cheerful but elected not to post my trials and tribulations as the model has forced me to improve my skill levels along the way when compared to so many who have posted. I too replanked both starboard and port as my irst attempts were pitiful. You were not alone on this journey. In regard to the moldings I ultimately went the traditional way using jeweler files to fashion the countours in sheet brass. The only thing I did make the countours a knife edge by back filing one side of the stock. That seemed to help the profile scraping. I used boxwood as I found the cedar is a bit too soft. The only deviation in the scraping that I found to work better for me at least was the following. If the moulding width was to be 'x' in width I milled stock (strips that is) to that dimension in thickness. I then clamped the,edge up, in a homemade strip clamp such that the strip protruded from the clamp enough that my brass profiled scrapper would nicely "saddle" the protrusion. Light passes as you start to get a true run and then successive passes with a bit more attitude to achieve the end result. I then flipped the clamped stock and repeated the other edge. These were then ripped to the desired thickness. Just another way to do it. One more thing regarding decking. It is a bit of a 'sleeper' in terms of difficulty. Unlike the hull it stares at you and imperfections are so so obvious unlike the subtlies of the hull even when observing it from broadside. There are so many elements on the deck to work around and one has to be dead on to maintain deck plank symmetry. I started at the bow and worked to stern as my first attempt in reverse was off by mid ship. In confering with Chuck I also softened the bend of the planks forward and that worked much better. I did not nibb the margin or waterways as that seemed a bit difficult for me. Lastly check, check, check plank symmetry as you progress from the center line to the waterways it is too easy to lose. Joe
- 778 replies
-
- 6
-

-
- cheerful
- Syren Ship Model Company
- (and 1 more)
-
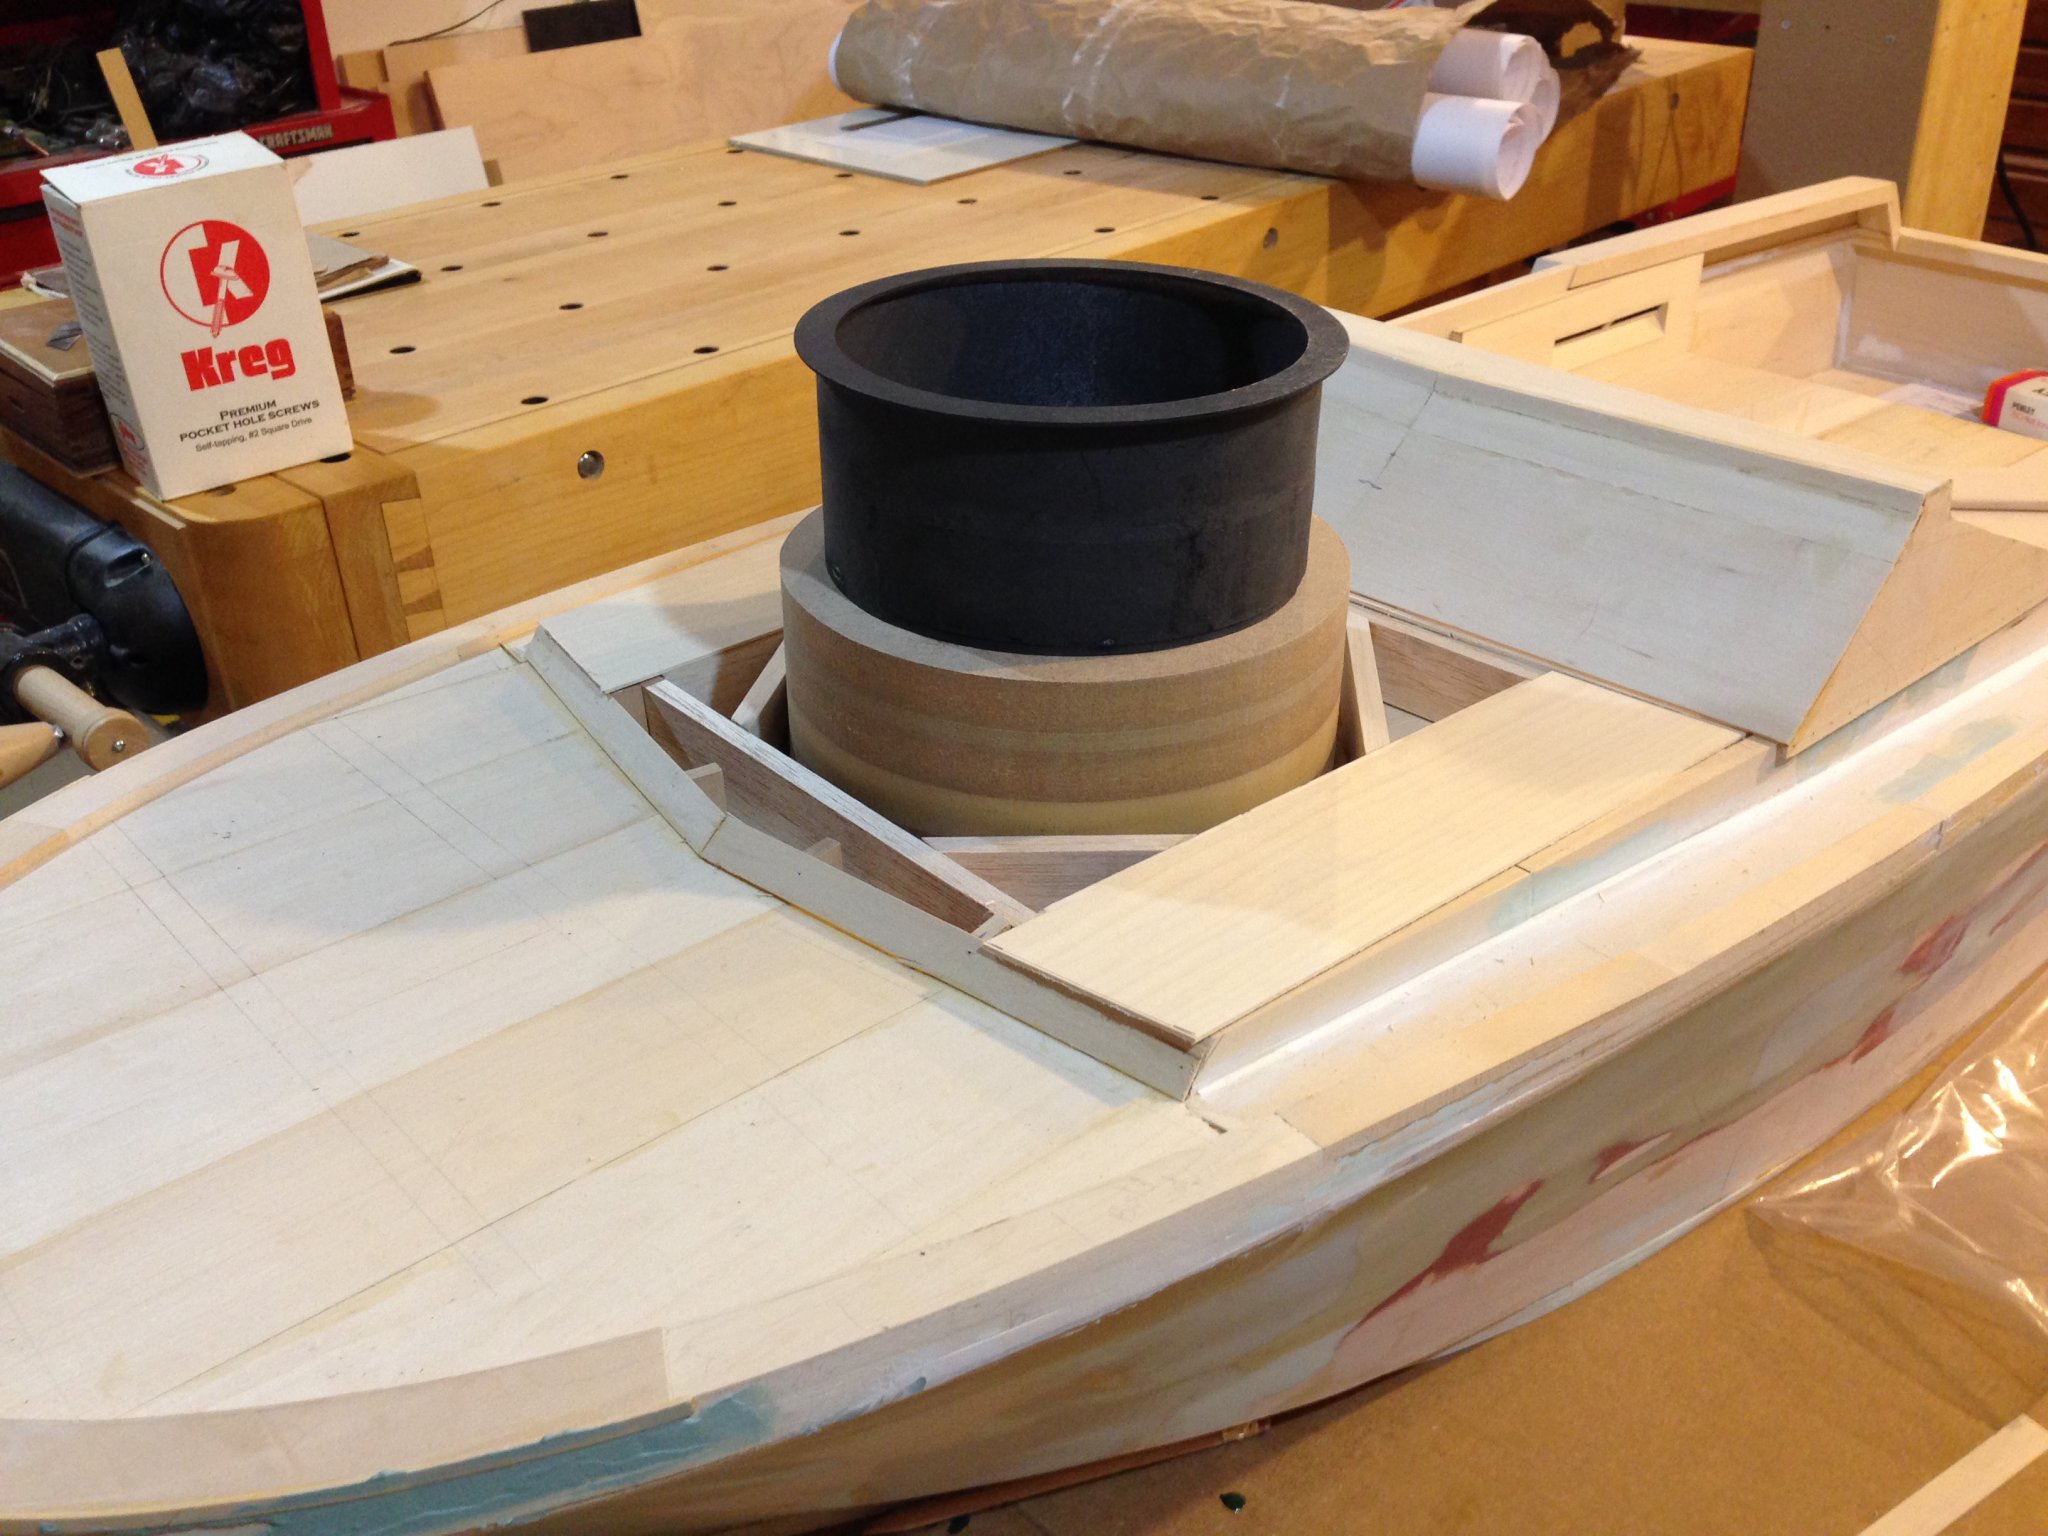
Pictorially the difference between the earlier gun tub and the soon to be new one (just the form) can be seen in the attached photo. This time I made a full form out of stacked MDF scrap. The glued up assembly was bandsawed to near diameter and then sanded on the shop disc sander which has a convenient way to make perfectly round elements. The new form is 3 3/8 inches high and sits on the sub deck. It will be wrapped in .030 polystyrene. Luckily one of our group had 3 foot long polystyrene stock so there will be just one joint. I am thinking of wrapping the upper part of the tub once again with .020 stock just from the tub top to the upper deck level and offset from the layer joint beneath. This should give the completed tub more integrity and it will also serve to place the bolt ring which will abutt to its lower limit. Again as soon as I finish this tub it will be handed off to have the cap and bolt ring design modified and sent off to our laser machinist. Both rings will be made from 3/16 inch ply wood. Joe

-
Our last posting made the press just about the time we all became accutely aware of the emerging pandemic. Both seem like a long time ago. In the intervening time little was done on the build as priorities turned elsewhere. Well just last week we felt comfortable enough to restart the project with a priority on the forward gun deck and tub. With the on again, off again mode we were in we quickly realized the gun tub diameter was incorrect. Somehow in our haste we neglected to understand its doameter until a composite sketch was drawn utilizing the Navy and Maryland Silver drawings. Sadly the earlier tub is just about 1 1/2 inches in diammeter too small. Not shown here is the new form constructed, as before, to aid the new tub build.The new tub is presently under construction utilizing .040 styrene. Once we are satisfied with the result it will go off to our Corel Draw guru to use as a guide to update the file for a rerun of the laser machining of the tub flanges. I am told it should be a straight forward update and we should be back in stride to complete the deck soon. I had quiered a number of MSW folk on conformal coating for the hull once we are finished with this phase. All suggest use of epoxy resin without glass fiber to fair the hull. That will be the next phase once past the tub detail. Joe
-
And thanks again for the update. Looking into this appraoch as I write this. Joe
-
Thanks guys. I have helped lay up a cedar strip canoe with the fiberglass resin approach. Even with an experienced leader it was messy but indeed the finish was beautiful. I was afaird that would be the response/solution. I certainly will take it outside to follow this regime if we march down this avenue. Can you tell I am reluctant to go this route? I do know they make a fine mesh fiberglass expressly for models and I will likely use that material. We do have a limited group budget for this project so the next step is to check out West System product costs. Joe
-
We have a thread on MSW related to building a Mark I River Patrol boat in 1:6 scale. In spite of the fact that it is a waterline model it has large surface areas that needs to be coatedand faired prior to painting. The model will be placed in a museum display for the public so a convincing quality finish is desired. The substrate of the hull is basswood. It has been skim coated in the seam areas with Rage, Easy Sand and further patched with Nitrostan body filler. We have tried Golden Edge but it as well as the Rage have little open time to spread and work the 2 part compound. As a matter of fact Golden Edge is so hard to sand once cured it would be impossible on this very large model. It is nearly 5 feet long. I/we are reluctant to use dry wall compound as we are not comfortable with its long term stability over the wood base. Using fiberglass cloth and resin is an obvious choice but the VOCs generated are not safe in the environment we are working. We are open to suggestions and even willing to experiemnt with suggested methods. So if anyone(s) out there have ideas please repl. Joe
-
Ah the Navy echelon Andre. When I worked for Raytheon I lived in an apartment complex that housed an Annapolis grad, a Great Lakes 90 day Lt JG and an enlisted guy. The white gloves, silver calling card tray and uniforms came off on weekends but watch out Monday morning! I still chuckle about it all. But nonetheless it would have been my choice if I had enlisted. Welcome aboard. Joe
-
Maury I lived at the "Top OF The Golden Triangle" for a short period too many years ago. It would have been an honor to have met you in person. Your works are spectacular! Joe
-
Hobby saw with larger table top
Thistle17 replied to ONEVW's topic in Modeling tools and Workshop Equipment
Just a brief update on re installment of the larger table top. I had left the saw for a few days w/o installing the saw blade. When I put it back on and was checking the travel I found it would not elevate as hisgh as before. The problem was the lead screw controlling the arbor lift was hitting the arbor arm cross plate preventing further travel. It turns out that the coupling to the front lift wheel was not seated back quite far enough on the shaft. I thought it was positioned correctly but I learned on this attempt that the coupling was hung up on the shaft. There is no specification on its positioning but with about 1/16 inch clearnce between coupling collar and wheel collar all should work as before. Joe -
I have spent hours dockside in New England taking in the fishing fleet work craft. I have a special reverence for them.There isn't a one that doesn't show the ravages of toil, sea and weather. You have captured those effects perfectly and I might add your modeling talent is to be admired. Your model tells a story. Extremely well done! Joe
-
I have had a Unimat Sl1000 and by way of a group member I just sold his Unimat 3. Both were sold to ship modelers and both had lots of accessories. I would have kept(bought the Model 3) from his estate. Had I not made an earlier pruchase I would have been happy to have bought the latter. It has a number of nice feature upgrades over the former version. During the "back to work" at Sherline they had a special sale of certain lathe models. I bought the 17" bed version with Package 'A'. It is a beautiful machine and the quality of product is outstanding. With coast to coast shipping it was just under $800. I debated about the 17" bed length and still am doing so to some degree. The unit is 30 inches in length overall as the motor protrudes beyond the headstock drive some 6 inches. Indeed with a jacobs chuck mounted and the tail stock fully positioned to the right one has nearly 13 1/2 inches of stock mounting capability (3 jaw chuck mounted on head stock). The tool carriage is much larger than a Unimat. It is approximately 2 3/4 X 6 inches. I do have the need to machine ferrous and non ferrous rod/tubing so that is one of the reasons I chose the longer bed. I may try turning some masts (yes I know it is not the traditional method) but I will have to buy the steady rest and likely the wood turning tool rest for an addtional $150+ to do so. The only thing I was disappointed in was that it does not come with cut off stock or holder. More dollars! Yes I was warned but I could not help myself. Joe
-
Hobby saw with larger table top
Thistle17 replied to ONEVW's topic in Modeling tools and Workshop Equipment
I just received my new larger saw table top from Jim Byrnes Model Machines and I have to say that it is big and beautiful. Should I be surprised by what his shop turns out. Not really but what I got back exceeded my expectations. It is a brand new top! I somehow had imagined that sending my smaller table top in would set off a remanufacturing process whereby the added width was achieved by adding wings. Not sure how I got that into my head guess it was from my woodworking shop table saw mentality. I did add the micrometer fence adjust while it was in the shop as I gave up on my linear digital scale system that I installed earlier. It just wasn't that repeatable. Goodbye to frequent fence removals to cut larger stock! It is so worth the extra cost to me. Joe -
This era we are living in has taken so much "wind out of the sails" (or sales if you prefer) of every manufacturer or parts supplier, no matter the arnea. I have found this in building supplies, home freezers, PPE and even elective surgery. The backlog of work laid on our normally responsive suppluiers I am learning is staggering. We all have to temper our expectations of availability. I have had to relearn that with Model Machines lately that it is not all about me! Be kind. Joe
-
And here I thought you had taken time away from the bench. Quite impressive Rusty! In the chosen woods it comes off as an elegant rendition. Joe
- 642 replies
-
- 2
-
-
- winchelsea
- Syren Ship Model Company
- (and 1 more)
-
Manitowoc Crane - RESTORATION
Thistle17 replied to mtdoramike's topic in - Build logs for subjects built 1901 - Present Day
It seems to be the "season" to come across folk that are no longer with us or can not do the things they used to do especially in the area of ship modeling. In the last year I have been asked to help sell or donate five modeleer's tools, models (partially finished or complete) and about 35 kits in the box untouched. In one case I await input from a son about a model he wishes finished that was his dad's. It is a delicate task to undertake as it is usually the family asks for help. The stories they tell humanize these one time modelers and make it all the more poignant. The skill set of the past modelers are wide. The sad ones are those that could but no longer can and it shows in their recent works. Some of their works are quite good. I am always torn with the former as in my estimation the models especially the poorly done ones really have no value. I do not have the heart to walk away without helping. I always am reminded that this may be my situation some day not too far off so I do what the situation dictates out of respect for all. "Ask not for whom the bell tolls. It tolls for thee!" Joe. -
Byrnes machinery dust collection
Thistle17 replied to Bill Hill's topic in Modeling tools and Workshop Equipment
I bought the Rockler https://www.rockler.com/dust-right-flexiport-power-tool-hose-kit-3-to-12-expandable It works perfectly with the Byrnes machines as the blue insert is a nice friction fit. Joe -
Hobby saw with larger table top
Thistle17 replied to ONEVW's topic in Modeling tools and Workshop Equipment
More questions have come to mind Jim. 1. I have access to a tilt table for the saw from a group member. How does that work with the larger table design? 2. I would be asking you to incorporate the micrometer fence adjust. Does either the tilt table or the larger table present any problems with this addition? Joe