-
Posts
3,522 -
Joined
-
Last visited
Content Type
Profiles
Forums
Gallery
Events
Everything posted by Cathead
-
None here, I've never used varnish so have no useful input.
- 109 replies
-
- Finished
- Artesania Latina
-
(and 1 more)
Tagged with:
-
My hands shake a bit, too, I've learned to balance my forearms or even wrists on something when doing delicate work. It makes a huge difference. Apologies if you're already doing that; it was a bit of a revelation to me.
- 114 replies
-
- Lady Nelson
- amati
-
(and 1 more)
Tagged with:
-
This is a fantastic exercise that everyone should engage in! You have a great perspective on thinking this through as part of becoming a better modeler.
- 109 replies
-
- Finished
- Artesania Latina
-
(and 1 more)
Tagged with:
-
Huh, I'd never experienced that. I've always used a very thin sheen of wood glue on the bottom side of such pieces, since they aren't under a lot of stress and it ensures glue doesn't squeeze out anywhere else. I can see how overloading the glue might have the effect you mention (and I certainly believe you given your experience). Just interested to hear of it because I hadn't run across that effect.
- 109 replies
-
- Finished
- Artesania Latina
-
(and 1 more)
Tagged with:
-

Permission to board from the Finger Lakes
Cathead replied to Freezing Parrot's topic in New member Introductions
Hey, just saw this introduction. I grew up in the Finger Lakes and never stop missing it. Enjoy it for me and welcome to MSW! -
Another way to look at it is that blackening most metal will improve the realism but leaving metal as brass can improve the artistry. There are some very nice models that leave all fittings brass, it's very attractive, just not as accurate. My take would be to choose one way or the other for the most part (for example, as noted above, bells remain brass even if other metal is iron). Haphazard mixing (like blackened rudder hardware but brass chainplates) may look inconsistent or even silly.
- 160 replies
-
- Model Shipways
- norwegian sailing pram
-
(and 1 more)
Tagged with:
-
Just read through your log so far, great work to this point. You're really doing a nice job learning how to do things and asking the right questions. I can't wait (ok, I can) to see how this turns out.
- 114 replies
-
- Lady Nelson
- amati
-
(and 1 more)
Tagged with:
-
I agree, I don't know why they would suggest that when PVA is so much cleaner and easier to use. May be a translation issue, foreign kits are notorious for poor English. Thanks for the kind words! Lots of people find this kit to be a good entry point and it produces an attractive display piece even if it isn't particularly accurate (which isn't necessarily important). If you enjoy it and want to dive deeper, I strongly recommend Model Expo's Chaperon kit, which is the only accurate wood riverboat kit I know of. Strongly agree on Twain, and one I never get tired of rereading.
- 109 replies
-
- Finished
- Artesania Latina
-
(and 1 more)
Tagged with:
-
Personally I would use regular wood glue for all wood-wood contact. Makes a very secure and stable bond, and dries at the right rate (slow enough to allow you to set the joint, fast enough that you're not waiting days). I agree that choppers like that are wonderfully handy.
- 109 replies
-
- Finished
- Artesania Latina
-
(and 1 more)
Tagged with:
-
Enter! At worst it's a learning experience. I won silver with Arabia in the Wisconsin contest despite my photos being not all that great (wrinkled sheet behind the model and everything).
-
Mark, I believe the problem is that known hulls show no signs of ever having had figureheads, removable or otherwise (Steven can correct me if I'm wrong). If there was a clear socket for one, or a clearly hacked-off stempost, we might at least confirm that we were used. But as I understand it they're only known at all from literature and later artistic renderings.
-
Have fun! I’m near the end of the larger version of this, took me over a year rather than the few months I expected, but much of that was my own fault. I had some trouble with various aspects of mine but the smaller version may be easier. Looking forward to what you do with it!
- 6 replies
-
- Dusek
- Viking Longship
-
(and 1 more)
Tagged with:
-
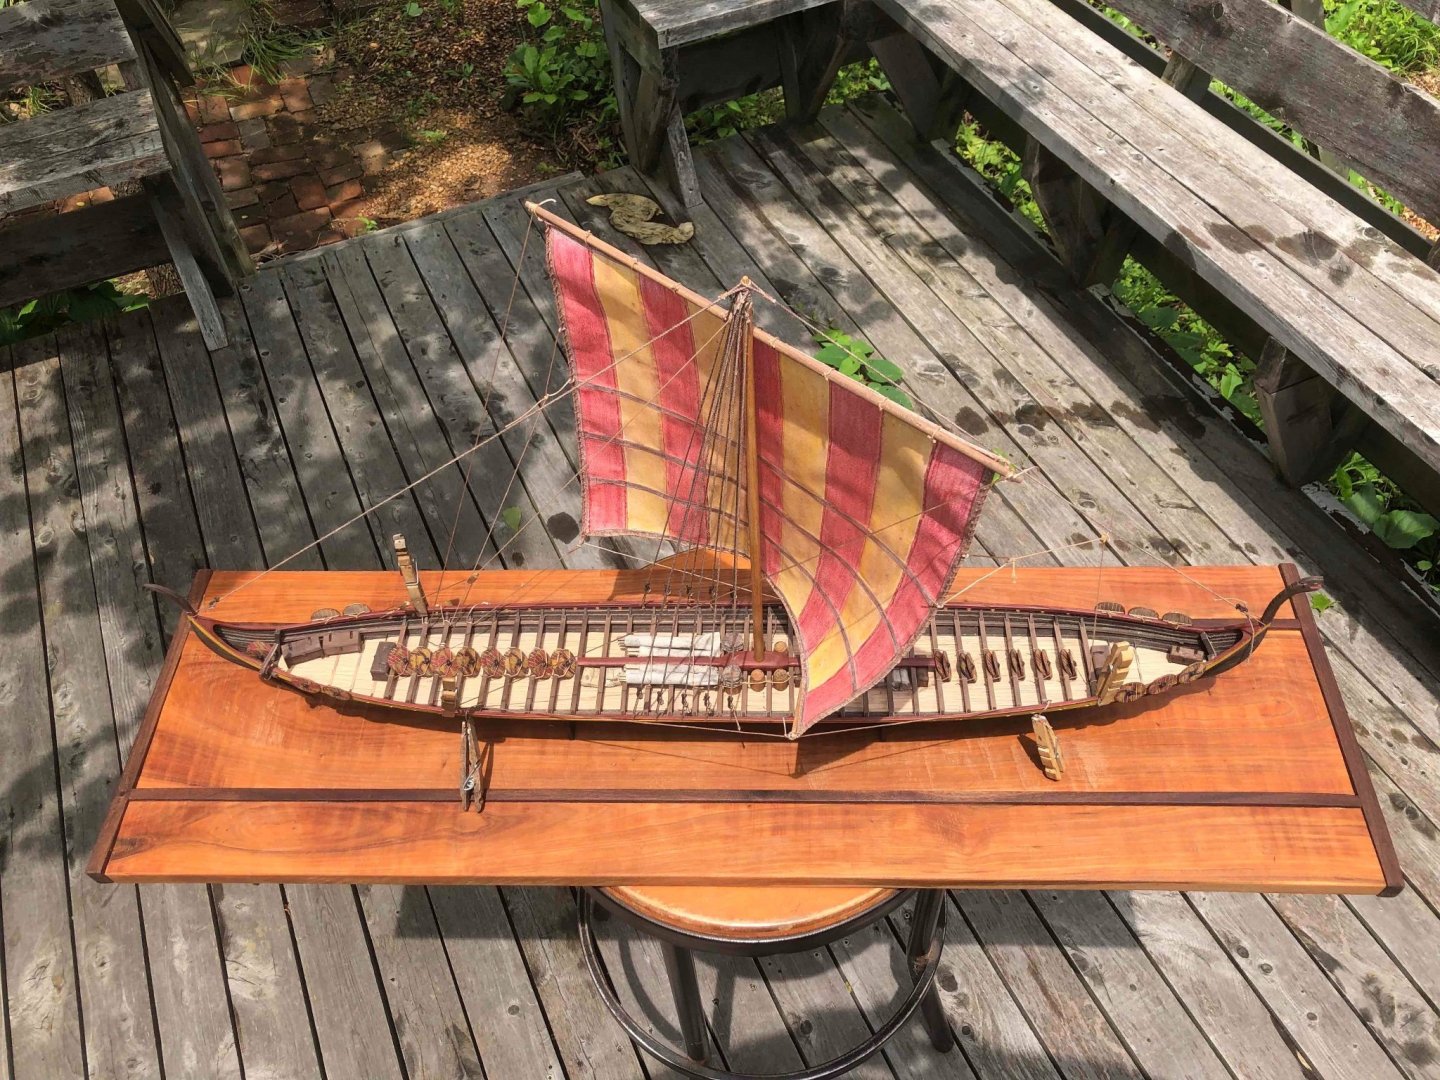
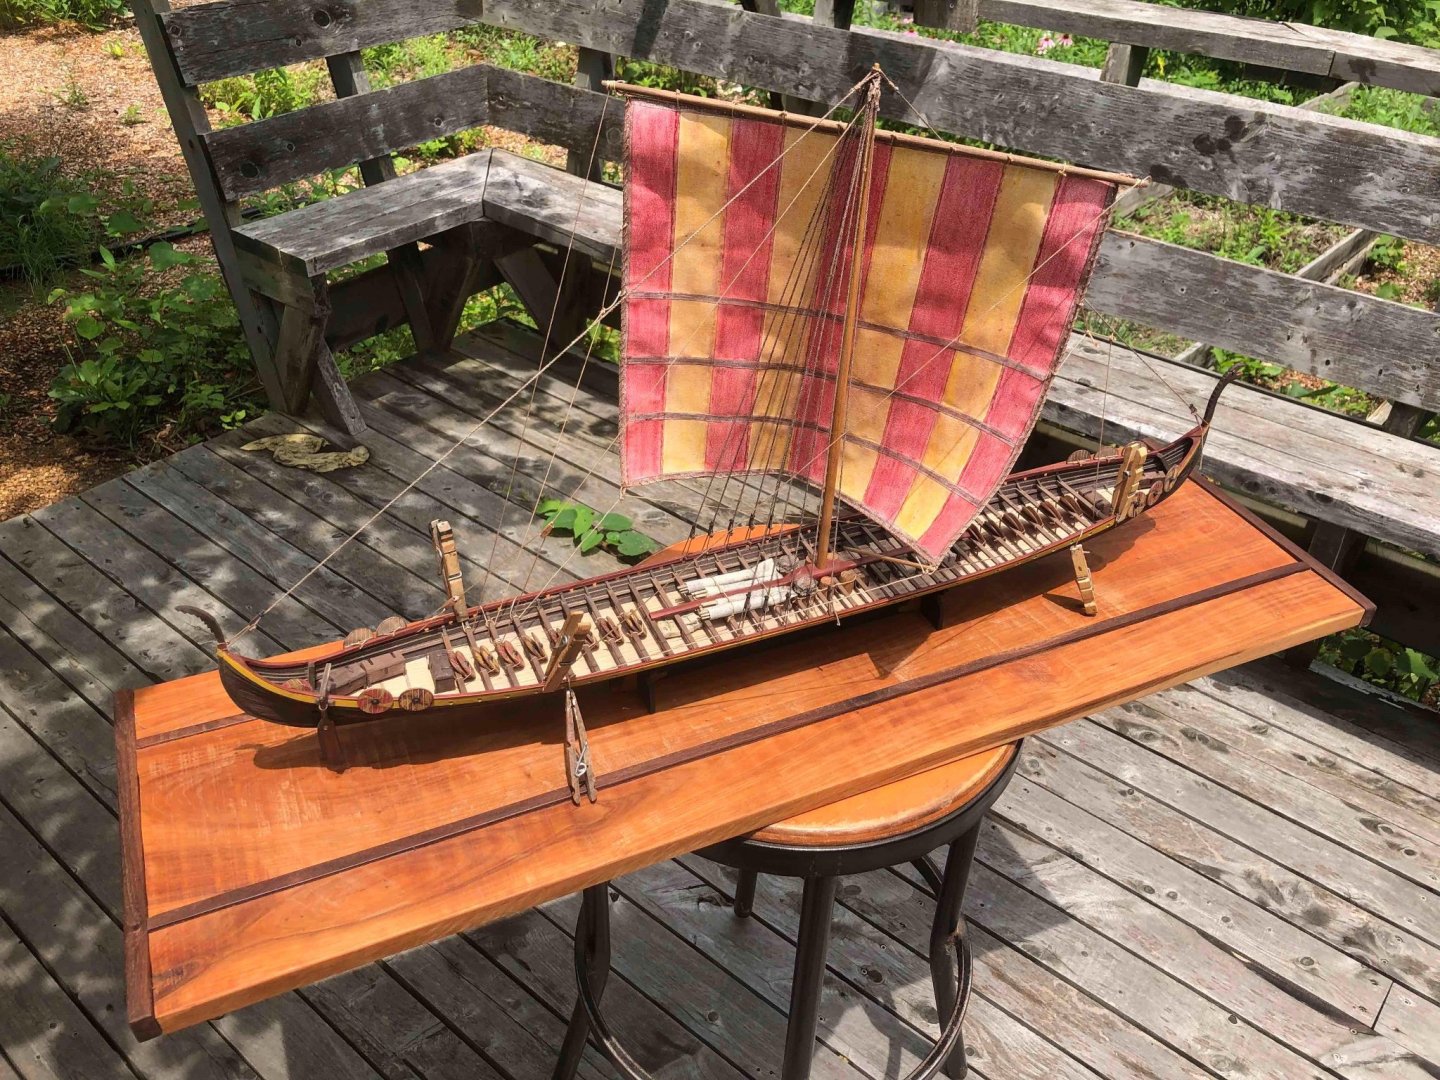
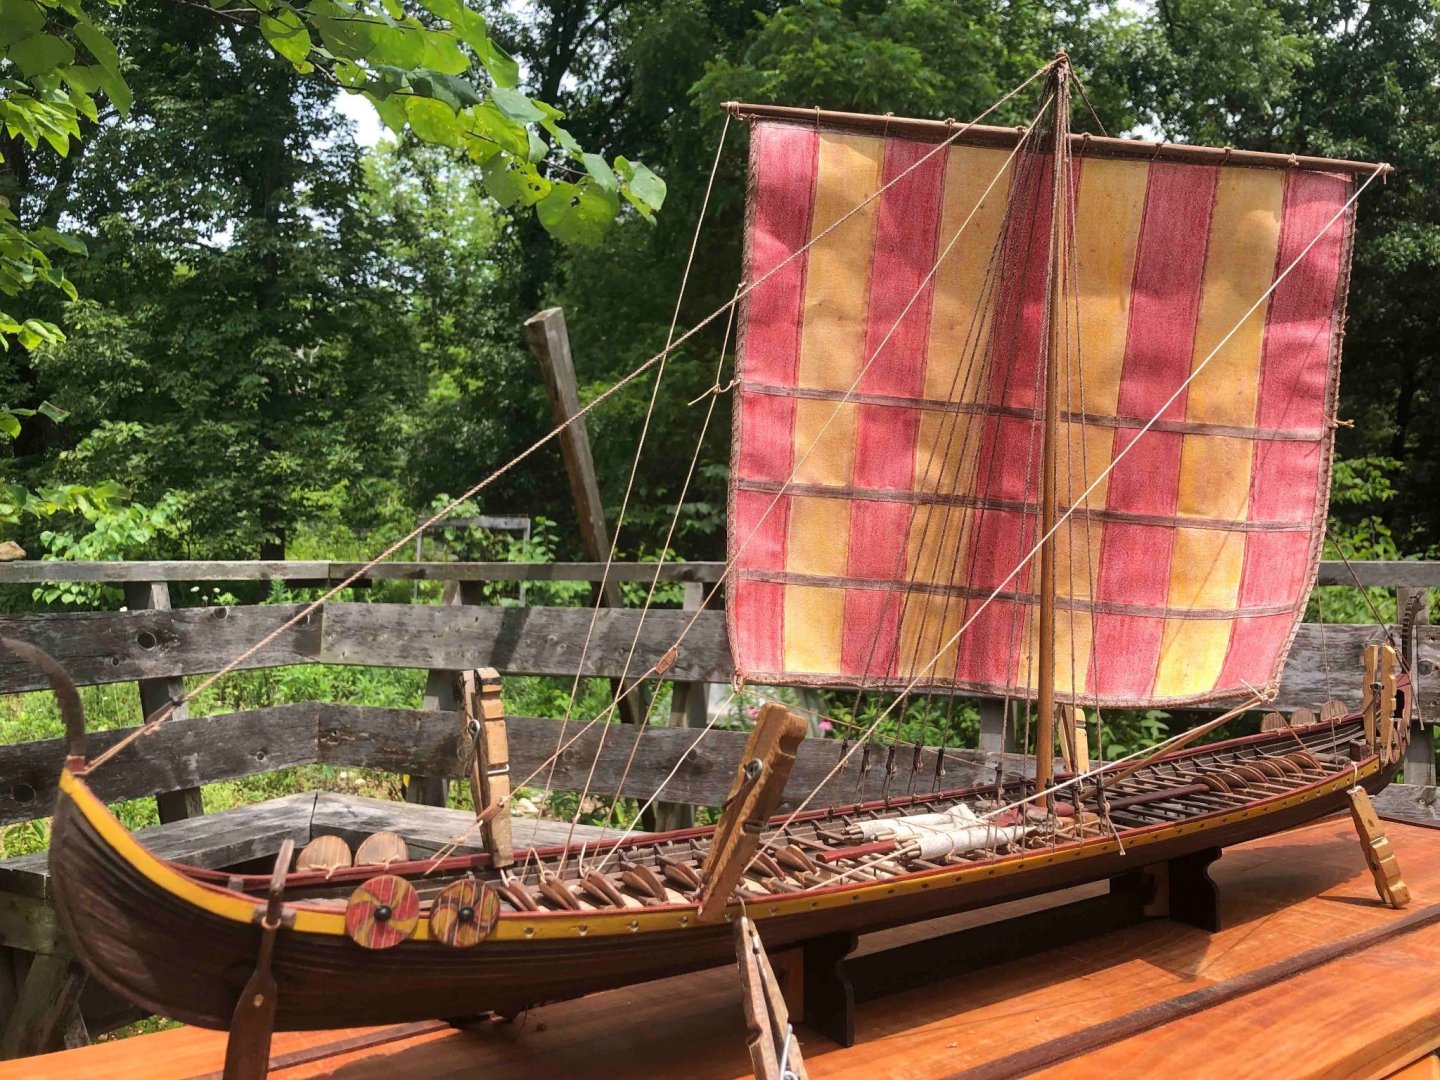
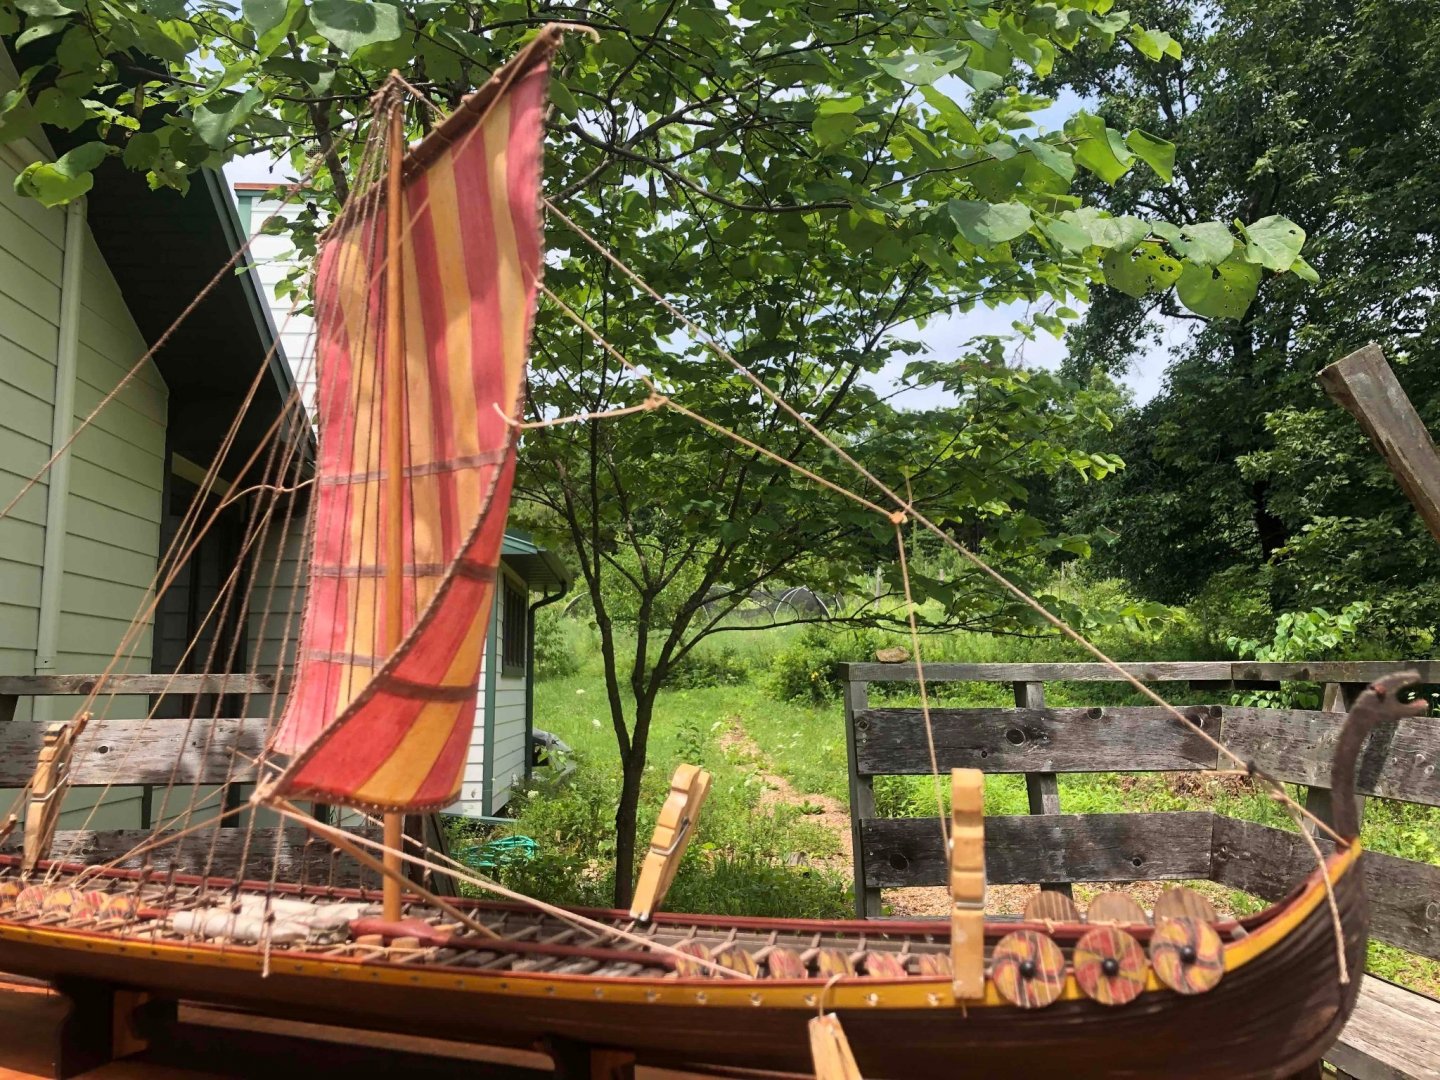
Finished the rigging, which wasn't overly complicated. I just followed the kit's instructions. There's probably a more complex and accurate way to do it, and I temporarily studied some photos of the reproduction, but had a really hard time following the lines. What's shown here at least makes basic operational sense to me. Note the beitass holding the windward corner of the sail (the pole wedged into the leeward hull and extending up to the sail). Balaclutha75's drakkar log has some good discussion and imagery of how this might have functioned, especially the lovely National Geographic artwork linked in this post. That image also shows a few shields lashed along the bow gunwale, forward of the oars, just like I decided to do. Don't know if that's coincidental or if I subconsciously remembered that when working out my shield arrangement. It also shows shields stashed below the deck, which I can always used as an excuse for my missing 20 shields, even though I dismissed that as an overall solution earlier. Nothing is glued in yet (hence the clamps in the photos below), so I'm curious if anyone has specific arguments for how/why I should change anything (within reason). You'll also notice that I installed my figureheads. I realize these are still somewhat controversial as literary and archeological sources don't line up. But as someone who loves the Icelandic sagas and other literature from the period, I'm fine with hinting at that style of ship-building. Artist's license. Looks like I got the focus a bit off on this last one, but don't feel like retaking it as the ship is already back inside. It gets the point across regarding rigging setup. Once I'm comfortable with the rigging, all I have to do is add the oars back in and I'm done. Then it's time for some proper photography. Please let me know what you think of this rigging setup (especially if you think any changes should be made), so I can move toward completion! Thanks so much.
-
I've never used pins myself but I'd have to assume the idea is to draw them again once the glue dries. Or you could use a pair of flush cutters to nip off the heads, leaving the shaft of the pin in for strength.
- 109 replies
-
- Finished
- Artesania Latina
-
(and 1 more)
Tagged with:
-
Honestly, the sort of high-end machinery shown there is primarily used in managed tree plantations. It only really works with high-density uniform stands, not the sort of gnarly, diverse stands you get in "natural" woods, and these are usually replanted. Globally, deforestation (as in the permanent removal of natural trees) is driven by more brute-force methods (chainsaws, bulldozers, etc.) in places that can't afford the sort of machinery shown in the video. Tree farms like that still aren't great, because they lead to major soil, biodiversity, and habitat loss, as well as often using copious amounts of helicopter-applied herbicide to suppress unwanted regrowth until the next round of farmed seedlings are planted. But they aren't really "deforestation" once their cycle gets started. For example, here in Missouri, it's common to see woods being bulldozed to make room for more corn planting (the government pays for corn, not for trees). Acres at a time just bulldozed into a huge pile, burned, most of the topsoil stripped off to get rid of the stumps, then plowed for crops. But that's just dudes with bulldozers and matches. Same thing happens in the Amazon at a much larger scale.
-
Very cool model. I particularly like the consistent and muted color palette that ties the whole thing together, and the extra thought and detail you put into making it your own. Thanks for sharing and inspiring me to reach higher in my own work.
-
If you're referring to what I think you are, there are no standard measurements, as the idea is to make a jig that matches the curve your hull needs. So you'd need to either trace the curve of the hull or take if off plans (if your kit has them), then use that trace as a template to make your own jig. It doesn't have to be exact, the idea is just to get most of the curve set in the wood before it goes on the model. So, for example, you could hold a piece of paper against the hull where the plank needs to be, then use a pencil to make a rubbing following the approximate curve needed, then use that to drill a series of holes for pegs that would hold a plank in that curve. Does that make sense? Or am I misunderstanding you?
- 62 replies
-
- amati
- greek bireme
-
(and 1 more)
Tagged with:
-
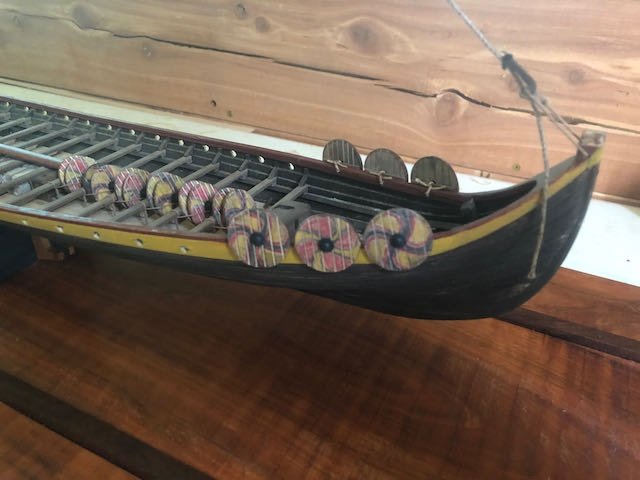
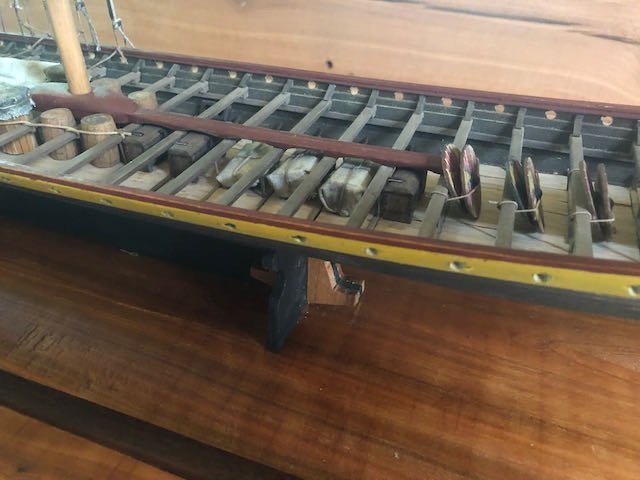
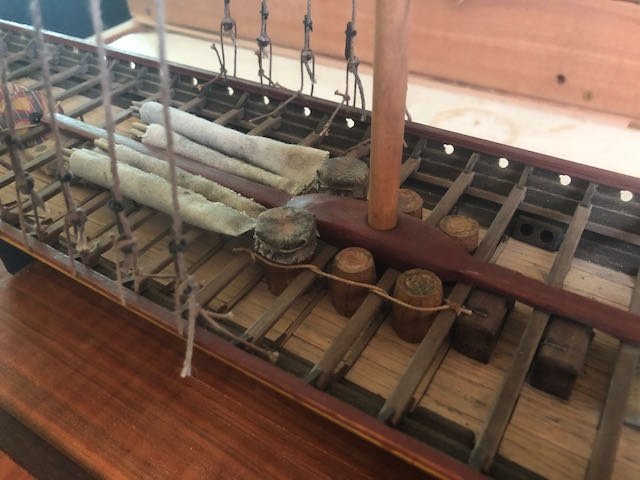
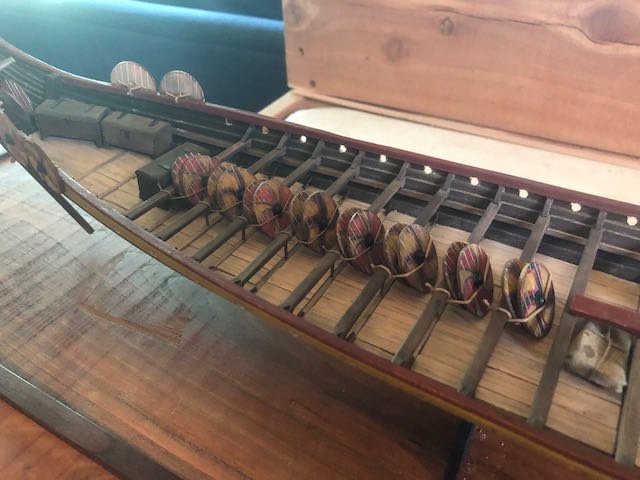
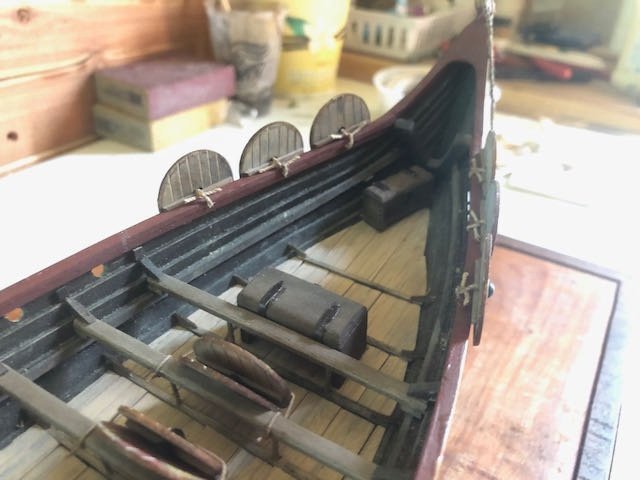
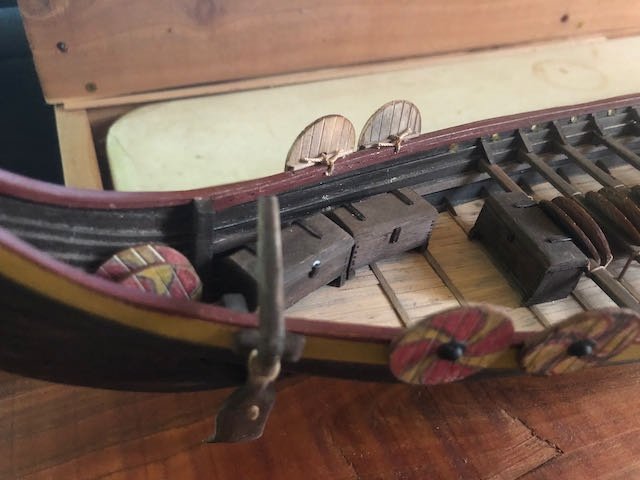
OK, for better or worse, here's the hull with its final detailing arrangements. These are all glued in and no going back. Apologies for the crappy photos, I hurt my knee this morning (nothing permanent, just very stiff) and didn't feel like carrying the model outside for better light with the increased stumbling hazard. You'll get proper photos when it's fully done. This is just to show you what I did. Bow: Paired shields lashed between the thwarts as far back as the mast foot, with three shields lashed to the outer hull. A couple chests in the bow and another angle of the shields: Amidships cargo: Bundles and chests before the mast, barrels around the mast, spear bundles aft: Stern: More shield pairs lashed between the thwarts aft of the mast foot, two more shields on the hull on either side along with a couple stashed in the very stern, and more chests: And an overhead view of the whole thing: Astute eyes will notice that this is only 40 shields for the 60 rowers, but I'm stopping there. Partly laziness in just not wanting to make more shields, but more that I don't see a clear place to store/display any more without the hull starting to look crowded. Maybe it was crowded in real life, but I don't want the model to look too busy. I'm pretty pleased with this overall. It's enough detail to bring the hull to life without really feeling cluttered. Next step is to tighten the standing rigging and install the sail & yard. Actually getting pretty close now since I pre-made that whole assembly. Looks like I'm not quite going to finish by the one-year anniversary (July 5), but I do intend to finish in time to enter this in the NRG's online contest (deadline August 2). Thanks for sticking with me!
-
Heh, thanks. As you can tell, I submitted that a long time ago, but he's got so many submissions it took this long to make it through the queue!
- 599 replies
-
- sidewheeler
- arabia
-
(and 4 more)
Tagged with:
About us
Modelshipworld - Advancing Ship Modeling through Research
SSL Secured
Your security is important for us so this Website is SSL-Secured
NRG Mailing Address
Nautical Research Guild
237 South Lincoln Street
Westmont IL, 60559-1917
Model Ship World ® and the MSW logo are Registered Trademarks, and belong to the Nautical Research Guild (United States Patent and Trademark Office: No. 6,929,264 & No. 6,929,274, registered Dec. 20, 2022)
Helpful Links
About the NRG
If you enjoy building ship models that are historically accurate as well as beautiful, then The Nautical Research Guild (NRG) is just right for you.
The Guild is a non-profit educational organization whose mission is to “Advance Ship Modeling Through Research”. We provide support to our members in their efforts to raise the quality of their model ships.
The Nautical Research Guild has published our world-renowned quarterly magazine, The Nautical Research Journal, since 1955. The pages of the Journal are full of articles by accomplished ship modelers who show you how they create those exquisite details on their models, and by maritime historians who show you the correct details to build. The Journal is available in both print and digital editions. Go to the NRG web site (www.thenrg.org) to download a complimentary digital copy of the Journal. The NRG also publishes plan sets, books and compilations of back issues of the Journal and the former Ships in Scale and Model Ship Builder magazines.



.jpeg.16e1d70852ff17475326b628d7aa0a17.jpeg)
