kurtvd19
-
Posts
3,049 -
Joined
-
Last visited
Content Type
Profiles
Forums
Gallery
Events
Everything posted by kurtvd19
-
Any of the yellow carpenter's glues can be loosened just like Elmer's white glue is by water - just use Isopropal alcohol. The 90% works faster but he common drugstore stuff is just slower - and half the cost.
- 9 replies
-
- 3
-

-
- new member
- wood ship
- (and 4 more)
-
Soup: What's your name? Noticed this is your first post. Welcome to Model Ship World. Do a search for "Aliphatic Resins" and one for "wood glue" and you will find several discussions on the subject. If you are still in a quandary after the search ask away - you will get answers. Again, welcome. Kurt
- 9 replies
-
- 3
-
-
- new member
- wood ship
- (and 4 more)
-
 It looks like you have to email them or call them. I thought they had a link to the books/store but either I am not remembering correctly or they changed the website since I last visited it.
 -
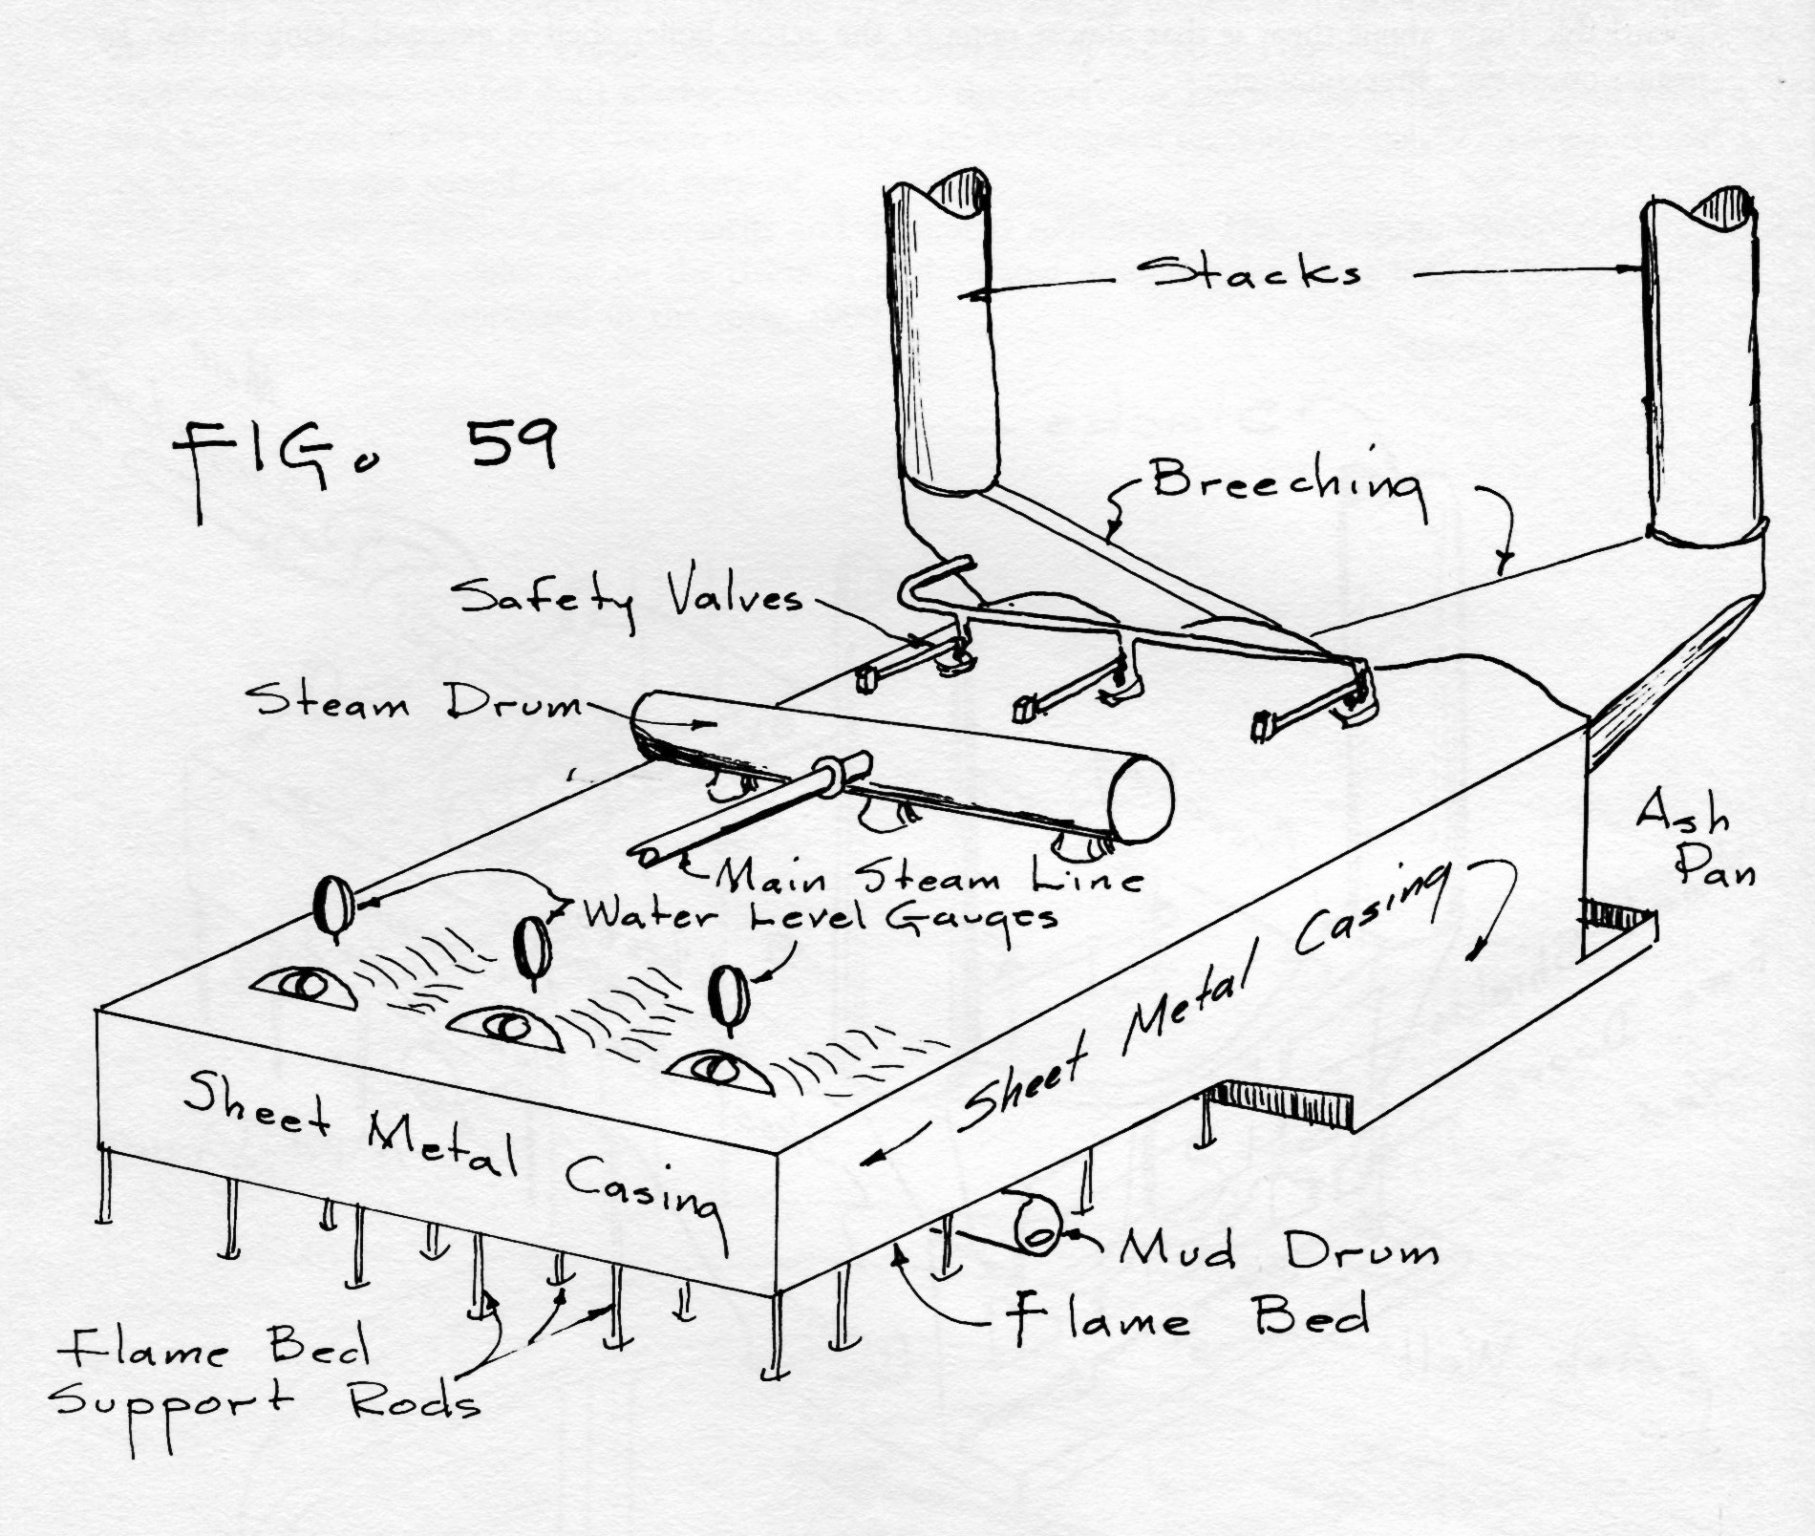
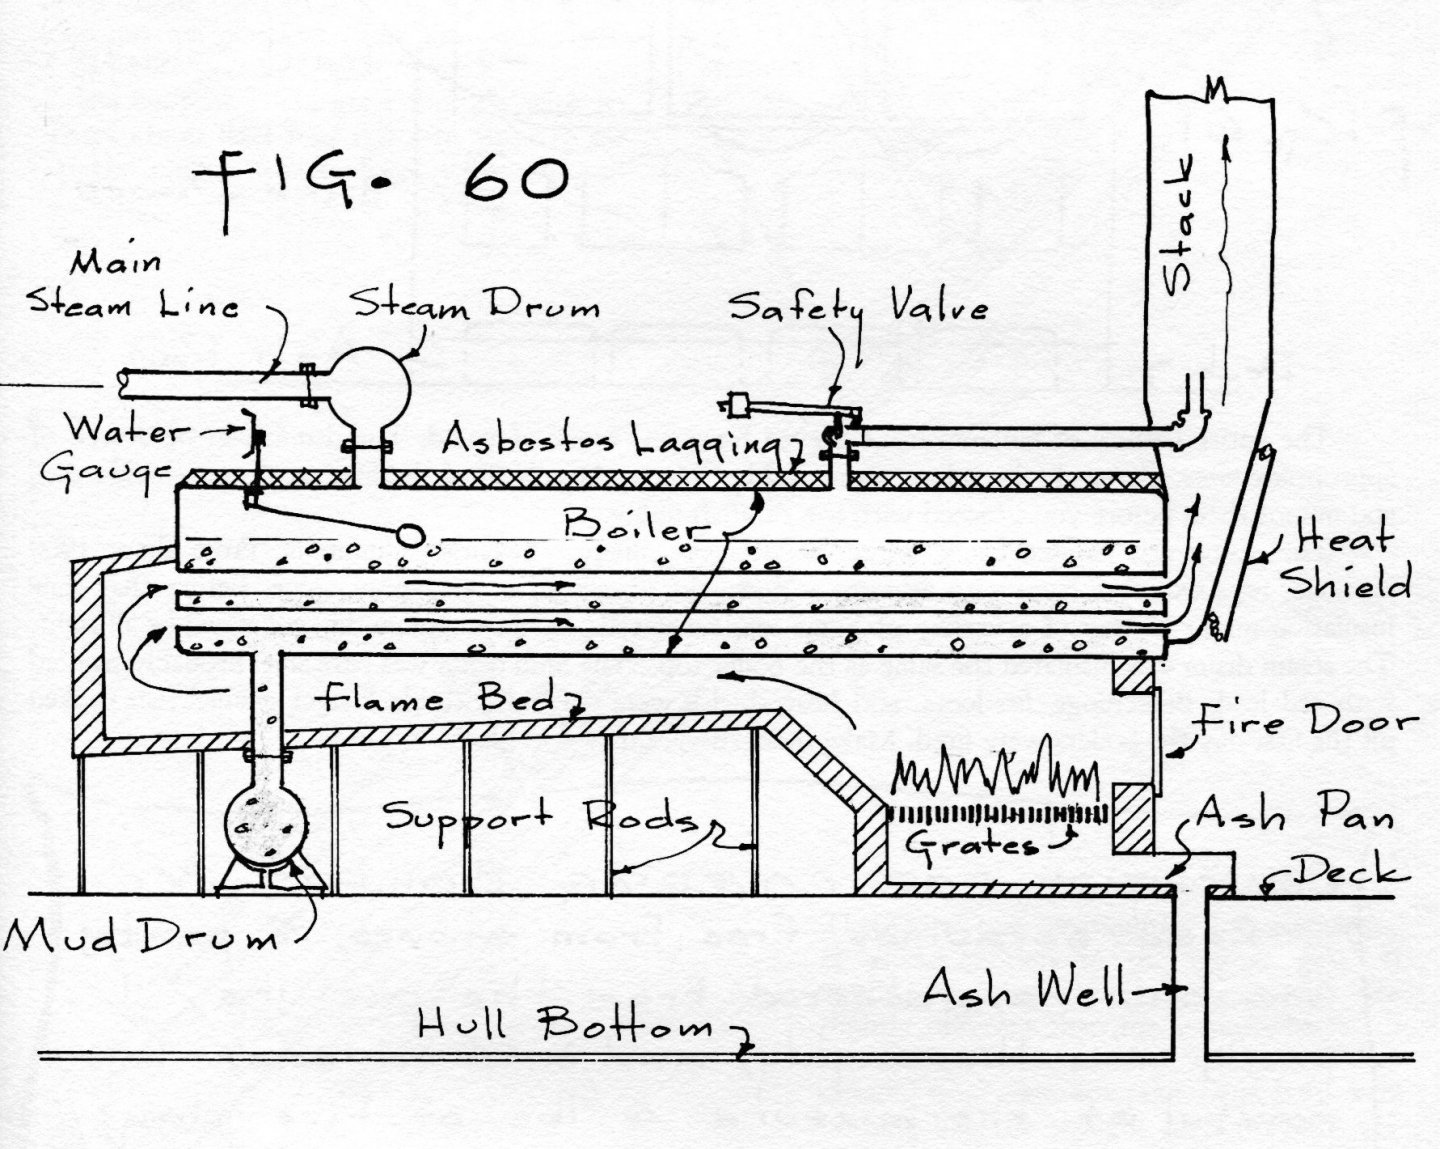
A must have book for modelers of riverboats is Allan Bates' The Western Rivers Steamboat Cyclopedium and for details of boilers and engines his Western Rivers Engineroom Cyclopedium is good to have. Both are inexpensive and available used many places or new from the Howard Steamboat Museum in Jeffersonville, IN http://www.howardsteamboatmuseum.org/ Drawings 59 and 60 on pages 42 and 43 (respectively) show boilers from riverboats and the cross section - Drawing 60 shows the use of fire brick at the bottom of the boiler and the insulation on the top of the boiler. Heat transmission through the fire brick would not endanger the wood hull. Also, asbestos is noted as being used about 1900 on top of the boilers. A mixture of cow manure, fire clay, flax or chopped hay and hair (probably horse) along with road scrapings free of stones. Add water to the consistency of mortar and then applied to the top of the boilers. BTW I have permission from the author to use text and photos from his books. I hope this helps. Kurt

-
Micromark cutoff saw?
kurtvd19 replied to Brewerpaul's topic in Modeling tools and Workshop Equipment
I do this all the time. The cut edge needs to be cleaned up both ID and OD. A wire wheel works fine for the OD and either a file or a knife blade for the ID - keep a blade just for this type of work - you don't want to try using the blade for a fine cut after using on the tube. -
Micromark scroll saw?
kurtvd19 replied to jeffBoats's topic in Modeling tools and Workshop Equipment
Take a look at this saw from Home Depot - looks almost like a twin - and a lot less $$ One thing about Micro Mark - they have a lot of stuff but if they have it for sale it's commonly known that nobody sells the same thing for more than Micro Mark. https://www.homedepot.com/p/General-International-1-2-Amp-16-in-Variable-Speed-Scroll-Saw-with-Flex-Shaft-LED-Work-Light-BT8007/206347735?MERCH=REC-_-pipsem-_-205419917-_-206347735-_-N -
Gary: The shrouds turned out great and your solution to not using wire looks very realistic. Kurt
-
Paul: I have told many members to check out your videos on all aspects of modeling but especially on airbrushing. Your Facebook channel is on a list of sites that I hand out to learn about airbrushing.
-
Latex wall paints?
kurtvd19 replied to Brewerpaul's topic in Painting, finishing and weathering products and techniques
Acrylic model paints have very finely ground pigments - some have pigment grinds as fine as 1 micron. Typical wall paint has pigment that is about 37 microns. That's how they can advertise - Guaranteed One Coat Coverage. No amount of thinning can reduce the pigment size. Use model paints on models. -
Byrnes makes a true draw-plate for making treenails. The sharp edges shave off the excess wood as one uses progressively smaller holes to get the proper size. The cheap ones advertised to do the same thing are most likely jewelers draw plates made to shape wire. If it's not shaving off wood its a jewelers draw plate or you have it going through the plate the wrong way. A good draw plate for treenails isn't going to be cheap - it has to be good hard steel and the flat surface has to be properly finished after the h oles are drilled. Jewelers draw plates shape the wire by squeezing the soft wire in the hardened steel. A jewelers draw plate does not shave off material. The wire will be longer when drawn down to the smaller size/shape as the draw plate is simply compressing the wire while it changes the size/shape and the excess metal has to go somewhere - and that results in it being somewhat longer when finished. Yes the jewelers draw plate can produce treenails but it will be a lot harder than using a proper draw plate and you will break a LOT of wood. Like everything else using the proper tool makes work easier and better.
-
New Website Thread?
kurtvd19 replied to Justin P.'s topic in NAUTICAL RESEARCH GUILD - News & Information
Journeyman: I have no idea about monographs there - I see a couple of articles listed. Please clarify. Thanks -
New Website Thread?
kurtvd19 replied to Justin P.'s topic in NAUTICAL RESEARCH GUILD - News & Information
Thanks. Will check this info out. -
New Website Thread?
kurtvd19 replied to Justin P.'s topic in NAUTICAL RESEARCH GUILD - News & Information
The NRG's new website is live - 100% changed. Even a new store. We will be making announcements on Friday to all NRG members and here on MSW. Had a few things to do regarding our ability to send the mass email to members. So look at the site if you want but we will let everybody know about it on Friday. -
I would build the building frame then wet and weight the keel let it dry and then get it into the building frame to hold it straight. I would want it as straight as possible before starting construction. Good luck
-
The seams can be filled in and the etched lines between planks can be cleaned up. Not real visible after this is done. If you plank over the decking make sure you transfer the markings for structures and pieces to be located to the new planks and open up the holes in the deck you will be covering - eliminate the need to measure and cut holes after doing the planking if done as you fit each plank.
- 23 replies
-
- 3
-
-
- model shipways
- chaperon
- (and 1 more)
-
I just came across this topic when Chris directed a new comer to MSW to it. I was unaware of it till today and now that I am aware of it, I will be providing the link to those writing to me asking if I can identify or fix their model. It will be a real time saver. I have also provided the link to Mary - our NRG Office Manager - so she can send it to people who contact our office asking for help. This will save her a lot of time and will also save me time (again) when she doesn't direct the questions to me. Like David I wish I could see the face of some who said "OK but how much would you charge to fix it". Kurt
-
You picked a good brush. Practice and you will soon be doing good enough to feel confident to lay paint down on a model. Good luck Kurt
-
Yes I have built a few of theirs with more to go. They were vendors at the 2003 NRG Conference and they sold a lot of kits there. The Edmund Fitzgerald in 1/700 was not their best but a lot have been built. There was a problem with warpage of the hull but they replaced it w/o question. I have their USS Panay PG45 - one of the best resin kits I have ever seen - I sure hope I get it built someday.
- 5 replies
-
- 4
-
-
- resin
- manufacturer
- (and 1 more)
-
Byrnes machinery dust collection
kurtvd19 replied to Bill Hill's topic in Modeling tools and Workshop Equipment
It's a Turbo I It's now several years old and I think the Turbo II is quieter. -
Byrnes machinery dust collection
kurtvd19 replied to Bill Hill's topic in Modeling tools and Workshop Equipment
The Fein hose is very flexible. I want to add a small cyclone pre-filter to mine. It resides under a bench with drawers so I need a smaller unit - like would fit on a 5 gal pail. Everything else I have needed comes with the unit. -
Multiple light coats is the way to do it. With acrylics one can keep laying down coats until there is good coverage. By the time the second side is shot the other side is ready for another coat.
-
Fix it. If you don't you will look at it sometime in the future - near or far out - and wish you had. The voice of experience.
-
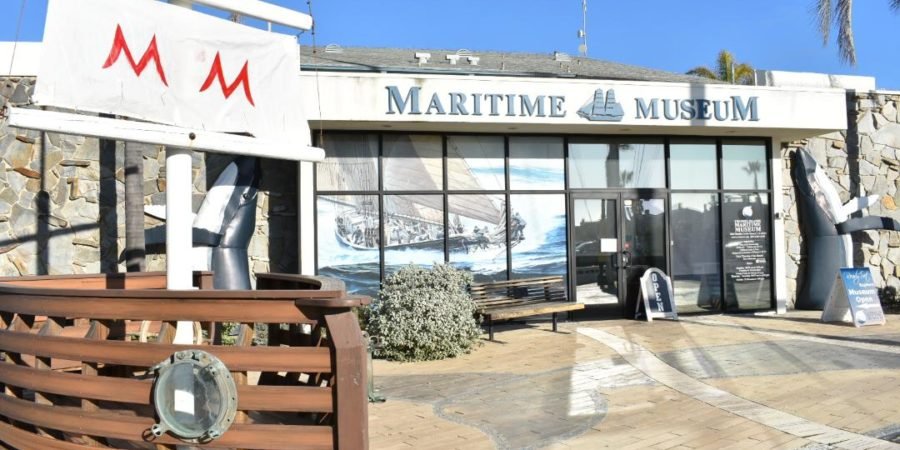
The dates are set for the 2021 NRG Conference. October 21-23, 2021 at the Channel Islands Maritime Museum.
- 55 replies
-
- 14
-