Chuck
-
Posts
9,703 -
Joined
-
Last visited
Content Type
Profiles
Forums
Gallery
Events
Everything posted by Chuck
-

HMS Winchelsea (1764) 32 gun frigate GROUP PROJECT INFO
Chuck replied to Chuck's topic in Group Projects on Model Ship World
Remember that all group builds and downloads areas are at the top of the page in the drop down.....see below This also includes teh Winnie group and Winnie downloads area. I am posting because some new folks couldnt find the drop down menu at the top of the page. It is also along the right side of the forum as well. Two places to access them.
-
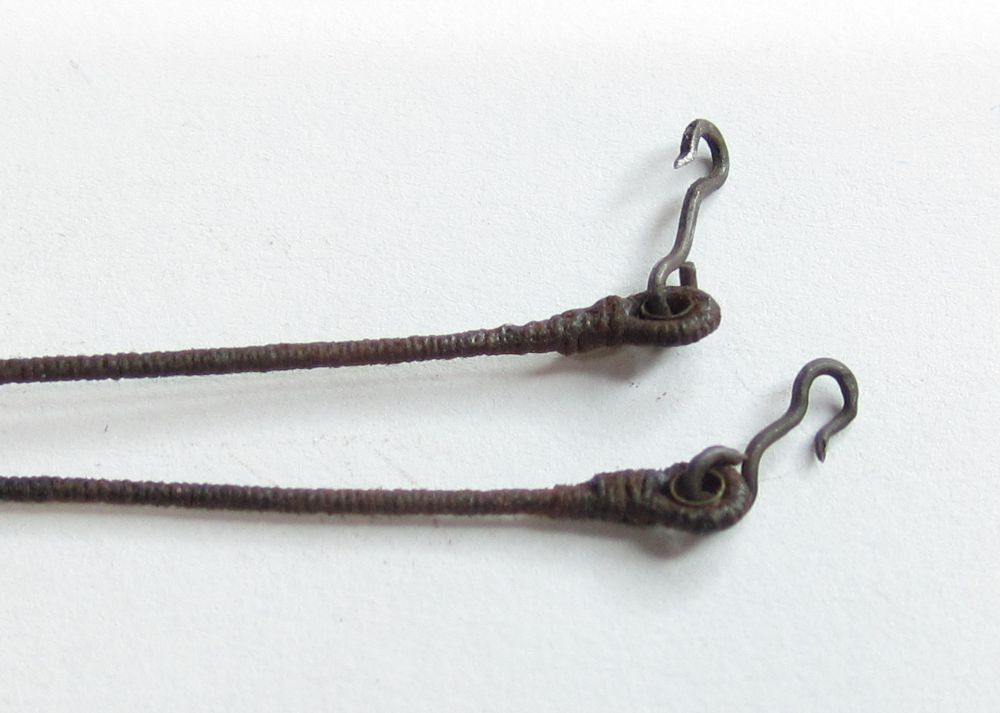
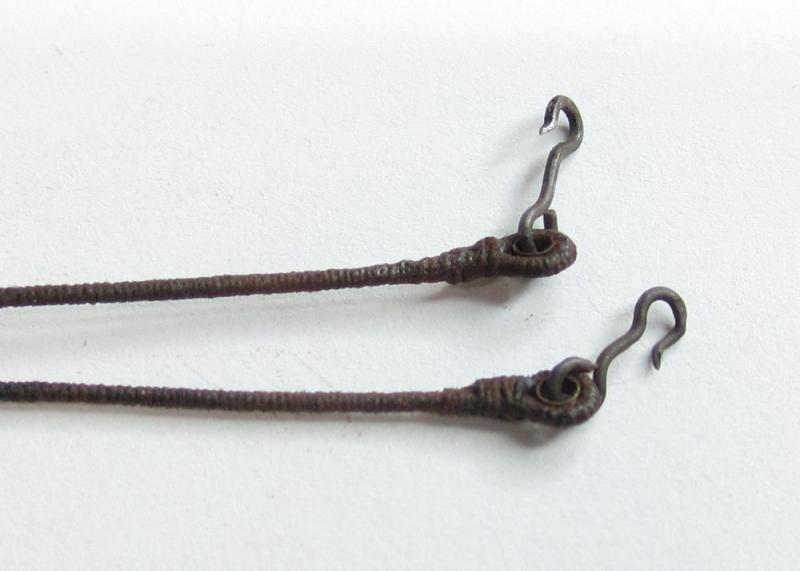
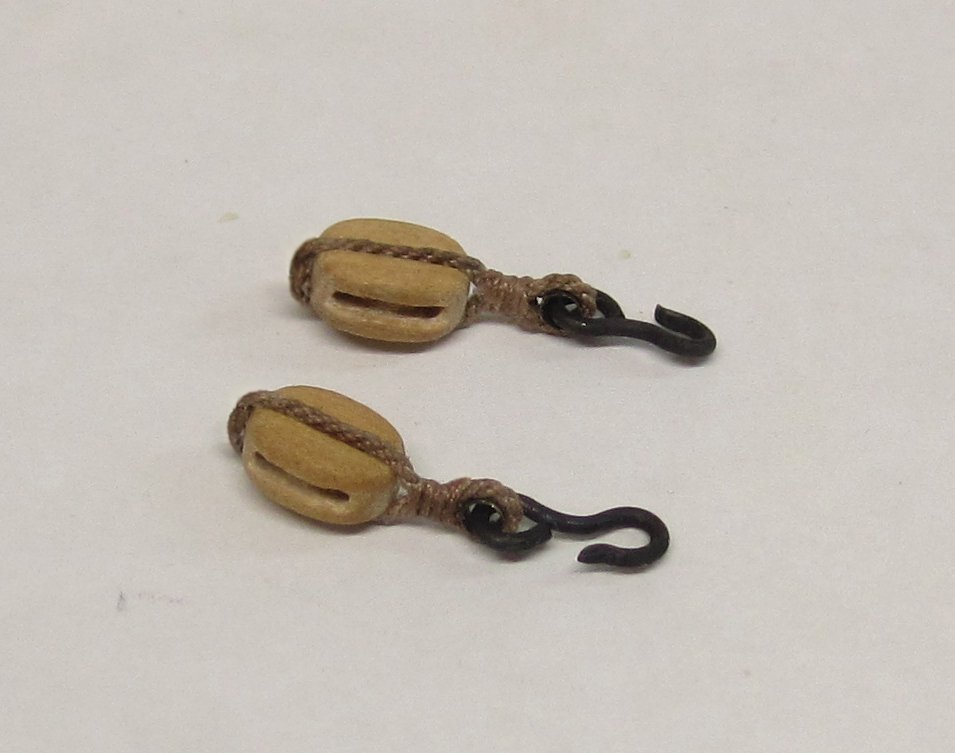
Unfortunately my suppliers of hooks went belly up!!! The last guy shut down after I placed and paid for a huge order. Needless to say I never got those hooks. I have however just found one stray package of 3mm hooks laying around. I will throw it in with your recent order Glenn. I usually make my own hooks out of brass wire. They look the best when you make them yourself. You can make them any size and length you need that way. But it takes practice and a lot of time. Once all of this virus stuff is over I will look into finding another supplier or figure out how to make them myself.....but that is a long way off.
- 335 replies
-
- 4
-

-
- alert
- vanguard models
- (and 1 more)
-
Man oh Man you did a great job on that. Fantastic. Whats next? How about a that second new build log? I actually like the blue frieze better than the red!!! Chuck
- 77 replies
-
- 1
-
-
- model shipways
- pinnace
- (and 1 more)
-
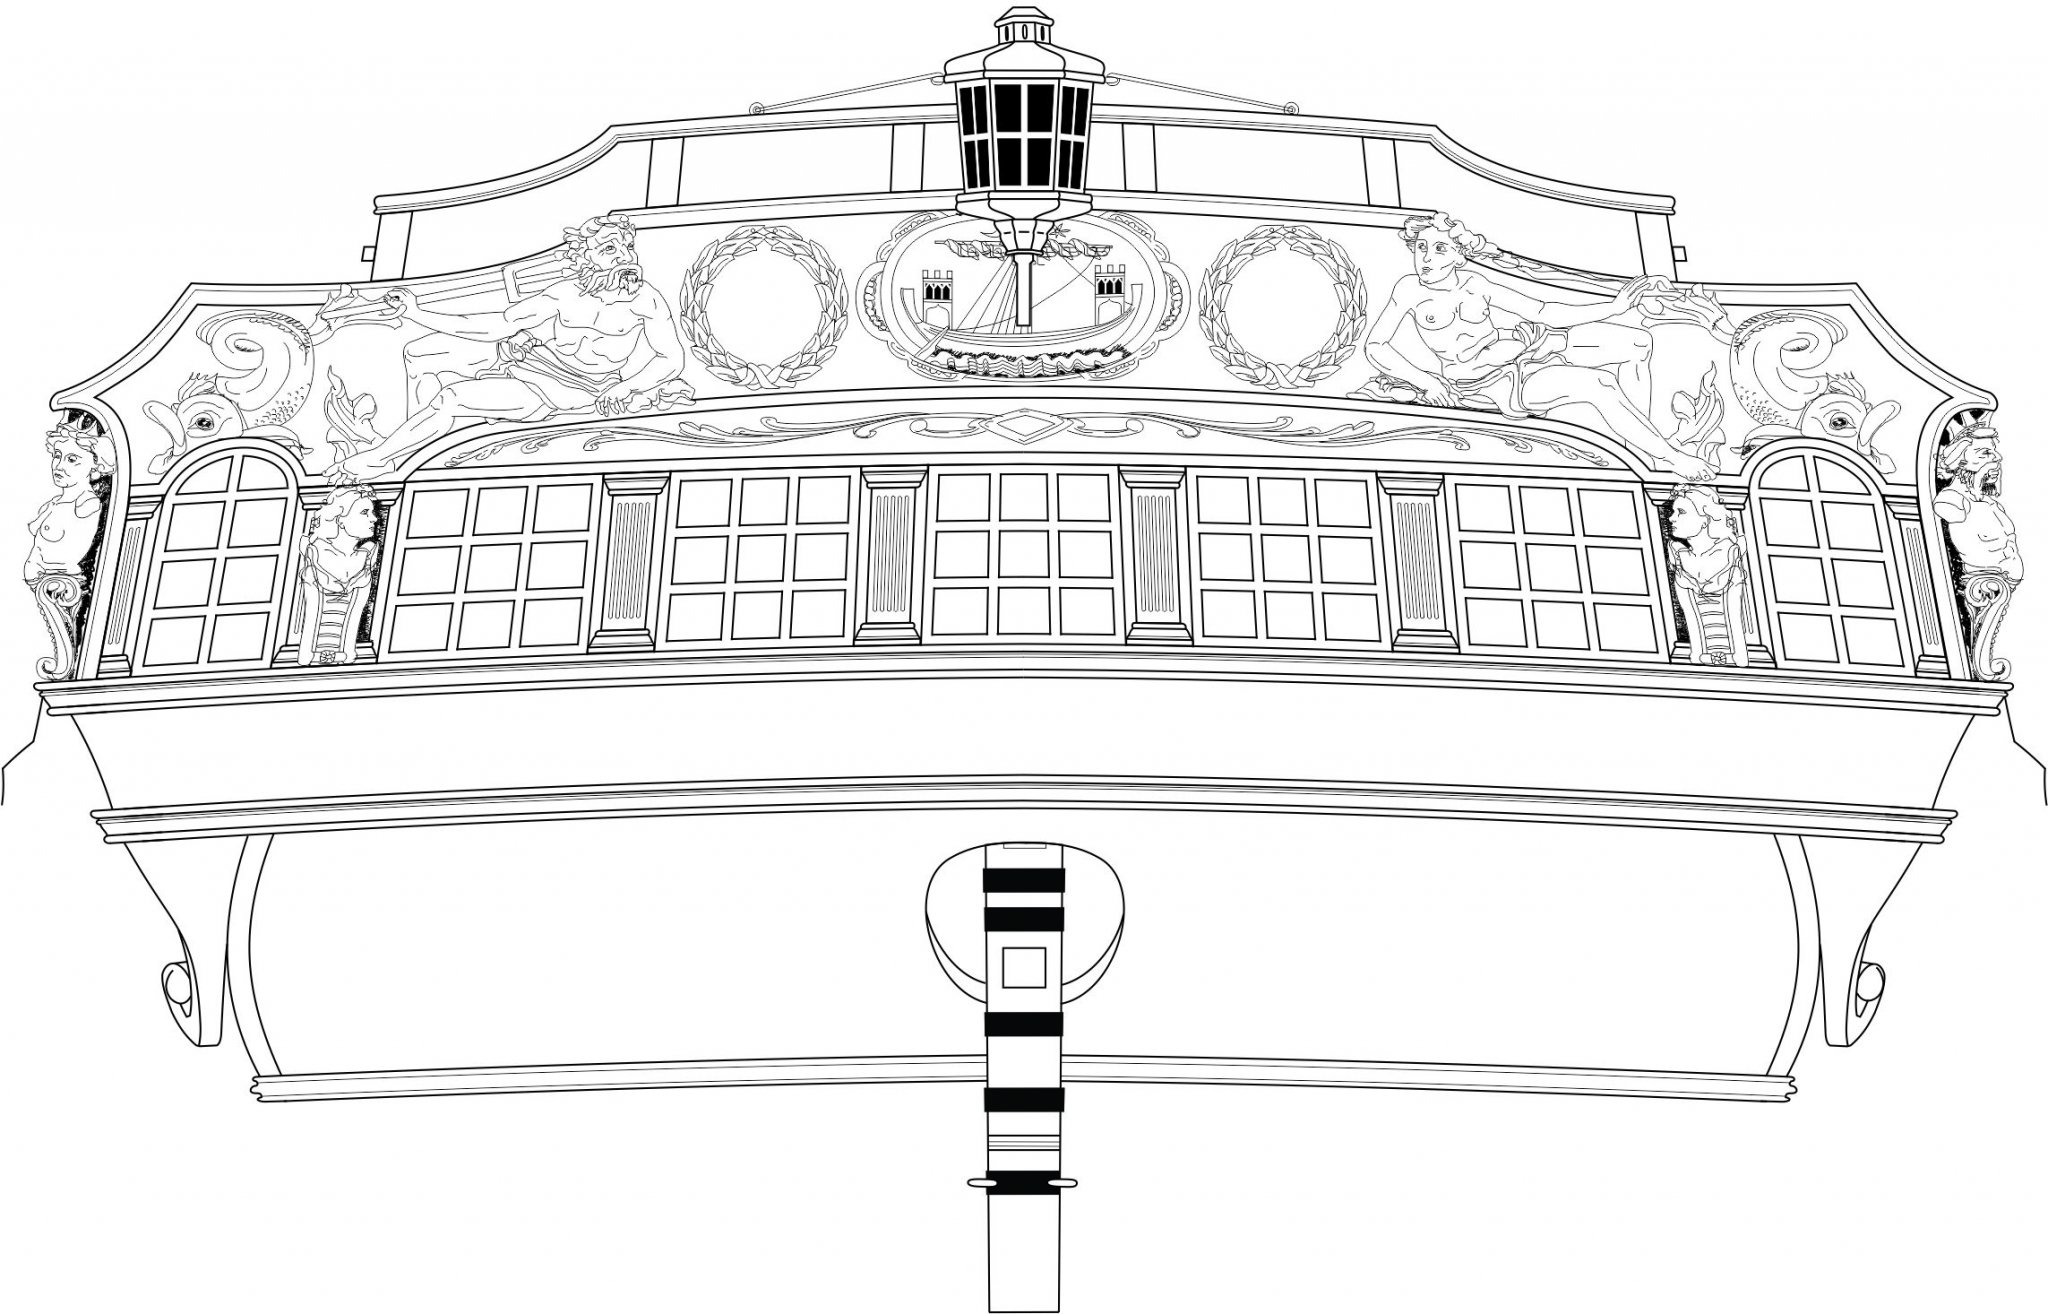
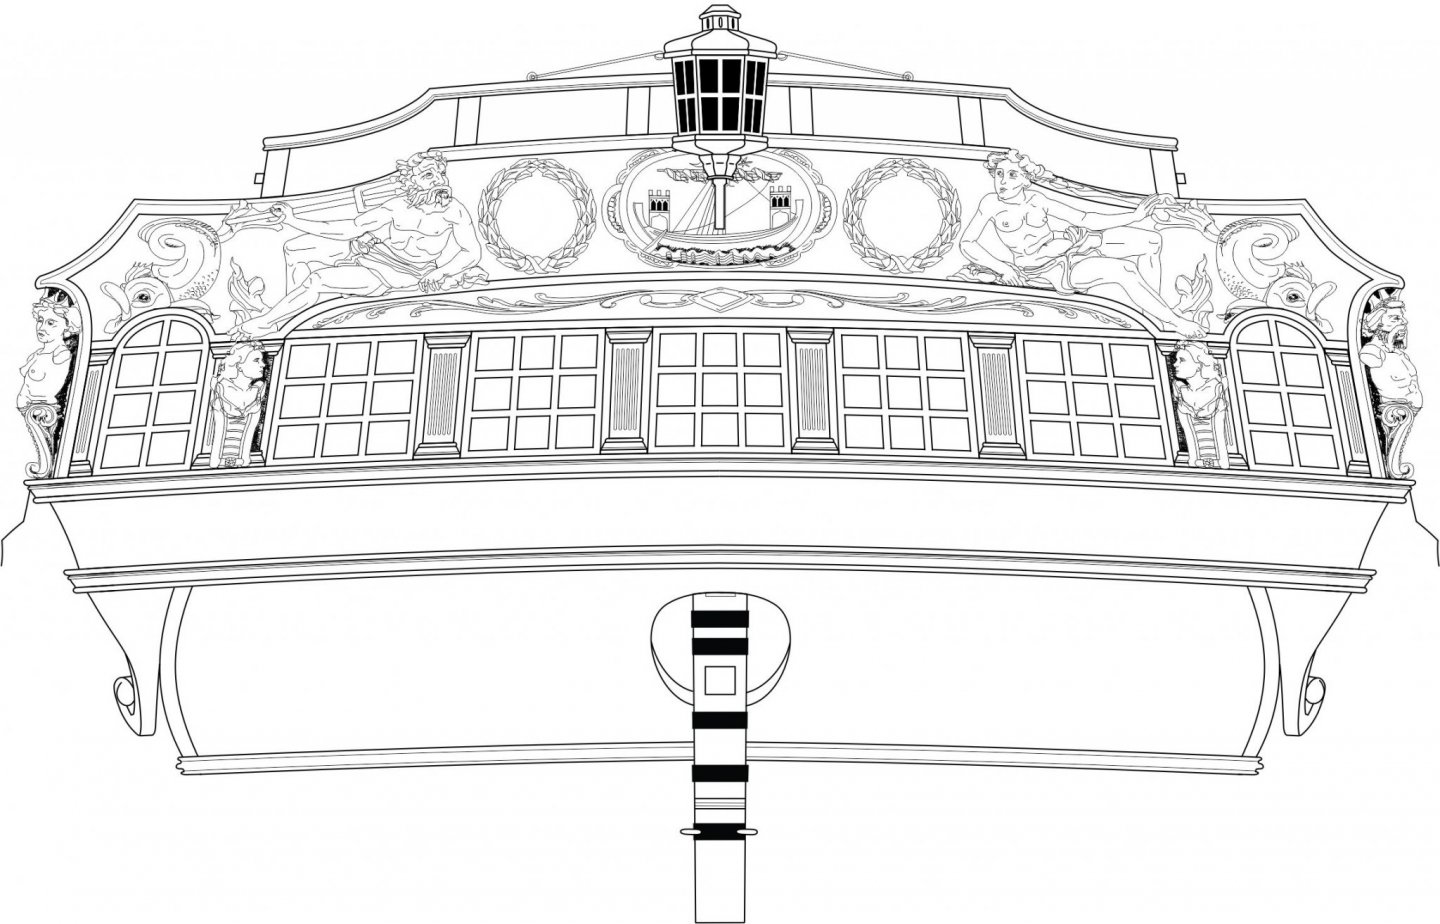
I believe so. I believe it was the exception to have them as actual windows. Most were false. I am not entirely sure why but my guess is probably to make it stronger. I could be wrong. Chuck
- 1,784 replies
-
- 1
-
-
- winchelsea
- Syren Ship Model Company
- (and 1 more)
-
That really looks fantastic Ben. It is refreshing to see you make this project unique and different!!! Love it!!!
- 399 replies
-
- 4
-
-
- winchelsea
- Syren Ship Model Company
- (and 1 more)
-
Xtra cause their was room for it
- 221 replies
-
- 1
-
-
- queen anne barge
- Syren Ship Model Company
- (and 1 more)
-
Yupp. Thats them or you can use any scrap really.
- 221 replies
-
- 1
-
-
- queen anne barge
- Syren Ship Model Company
- (and 1 more)
-
That looks really good. You should be very happy with that result. The color looks fantastic. If you just do a little light sanding before you use the glue it will be fine. I havent had any issues. You should absolutely apply the WOP though. At least two coats sanding between coats. Wipe off the excess and buff the second coat so it doesnt get glossy. I hope this project has been worthwhile so far and you are enjoying it. Based on your model I would say that you are!!!
- 99 replies
-
- 3
-
-
- winchelsea
- Syren Ship Model Company
- (and 1 more)
-
Just remember to post pictures sso folks can help you as its really tough to do so without them. You can even use a piece of tape to hold the keel straight as the glue dries. Try and keep the mindset that this is the farthest thing from "assembling" a model kit like a "Lego" set. A kit like this is "built/crafted" rather than assembled. And you will see many different and unique solutions to these typical problems that prop up along the way in the many build logs in the group. I have given you just one possible solution...there are many others. You could also try and straighten the keel with heat...... Chuck
- 217 replies
-
- 3
-
-
- medway longboat
- Syren Ship Model Company
- (and 1 more)
-
That is to be expected until you glue the keel on the frames. You need to glue the keel on straight. It will flex very easily......This is a very simple.....and predictable occurrence. Just take your time. In fact, a good way to remedy this is to put a shim in the notch of the keel where the curve is to make the fit more snug. Then when placed in position straight the snug fit will hold it straight. These are types of problem solving you will need to think about when building any ship model. Keep posting questions and pictures as folks who have done this before will be able to explain the routine solutions for these challenges as they prop up. Chuck
- 217 replies
-
- 4
-
-
- medway longboat
- Syren Ship Model Company
- (and 1 more)
-
That looks very good. You are carefully planning and proceeding in a step by step Fashion. Bravo! That is the way to do it and it looks great.
- 170 replies
-
- 2
-
-
- medway longboat
- Syren Ship Model Company
- (and 1 more)
-
Make sure all of your frames are facing the correct way. Usually that happens when folks have some the wrong direction. Hard to say unless you post pics.
-
And dont forget to download the stern drawing to help you. Its 8 1/2 x 11 so you can keep it by your side and use it for chapter 3. sterndrawing.pdf
-
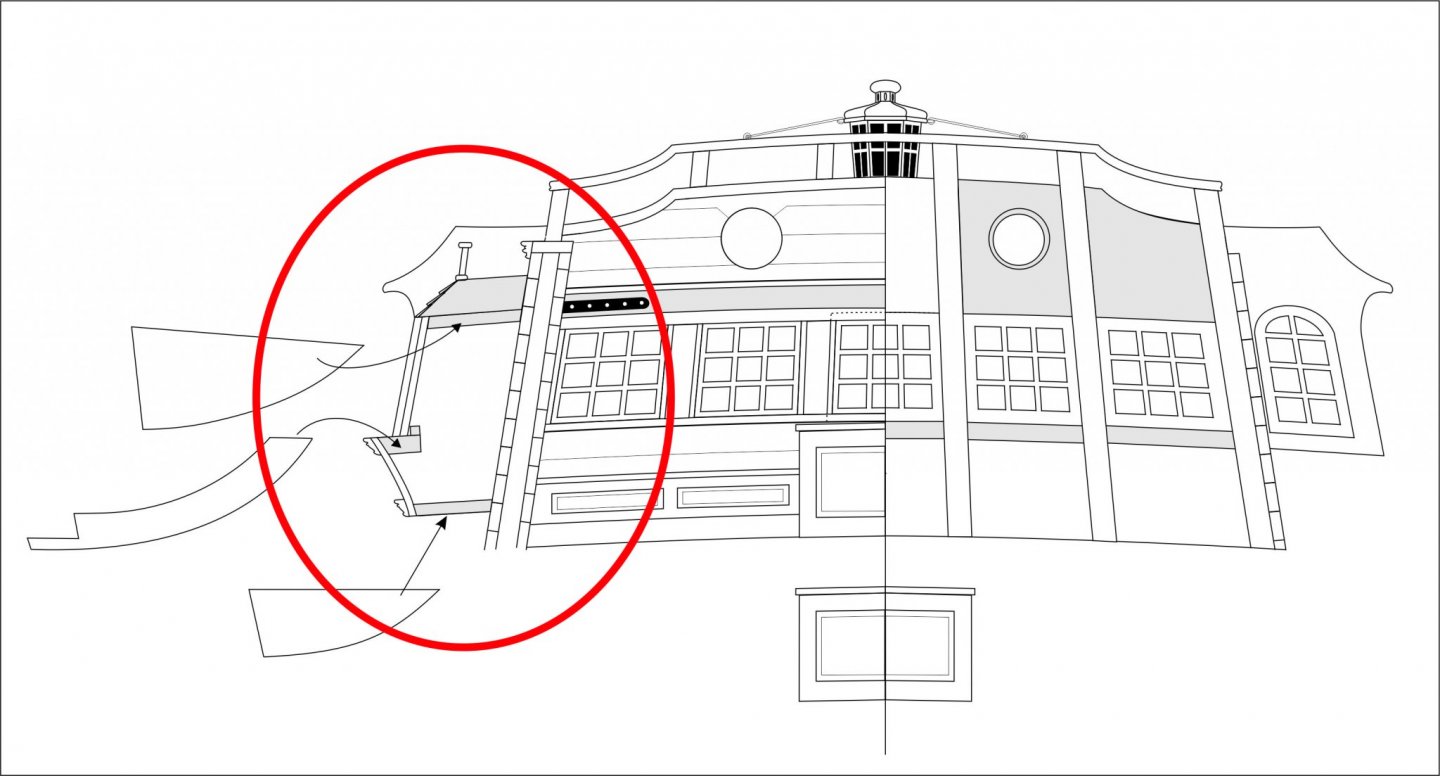
This is where we will discuss all things chapter 3..... There are some complex angles and some folks may not be too familiar with how to frame a qgallery or work on those stern details. Lets talk about the details here so every knows where to find them later.... Dont forget to really examine your plans. There is a lot of info at your finger tips. Dont rely entirely on the instructions or the logs. The plans hold the key. For example....how many of you have started building your q galleries and never thought to check out the plans for this little gem......its all there. Just look them over.
-
James Caird by BNoah - FINISHED
Chuck replied to BNoah's topic in - Build logs for subjects built 1901 - Present Day
Noah it looks great but just reply to this topic rather than start a new one when you want to update it. Chuck- 12 replies
-
- 1
-
-
- james caird
- boat
- (and 1 more)
-
Looking very good!!! Very nice work.
-
That really turned out nicely. You did a fine job building it.
-
That looks like some good progress. Keep going....one plank at a time.
-
Hard to say really. I dont think it will make much of a difference. I pretty much just eyeballed it and either would do. Or split the differnce.
- 160 replies
-
- 1
-
-
- cheerful
- Syren Ship Model Company
- (and 1 more)
-
That is looking much better. Remember that you will have a little wiggle room should you want to lower the forward side just a bit more. But i think that looks very good.
-
Yes that looks fine. But you have done this type of planking. Its no different than planking the hull. Im sure it will look great.
- 160 replies
-
- 3
-
-
- cheerful
- Syren Ship Model Company
- (and 1 more)
-
Yes on the outside of the hull. Just sand the planking. Dont worry about the inside of the hull. It will all be covered up and nobody will see it. Only the bottom strake will be slightly visible. And for those you can literally just put a dab of paint the same color as the cheery planking or just close enough to the color. Nobody will ever see them. And if you do see them.....it is fine also. So you have many choices.
- 221 replies
-
- 1
-
-
- queen anne barge
- Syren Ship Model Company
- (and 1 more)
-
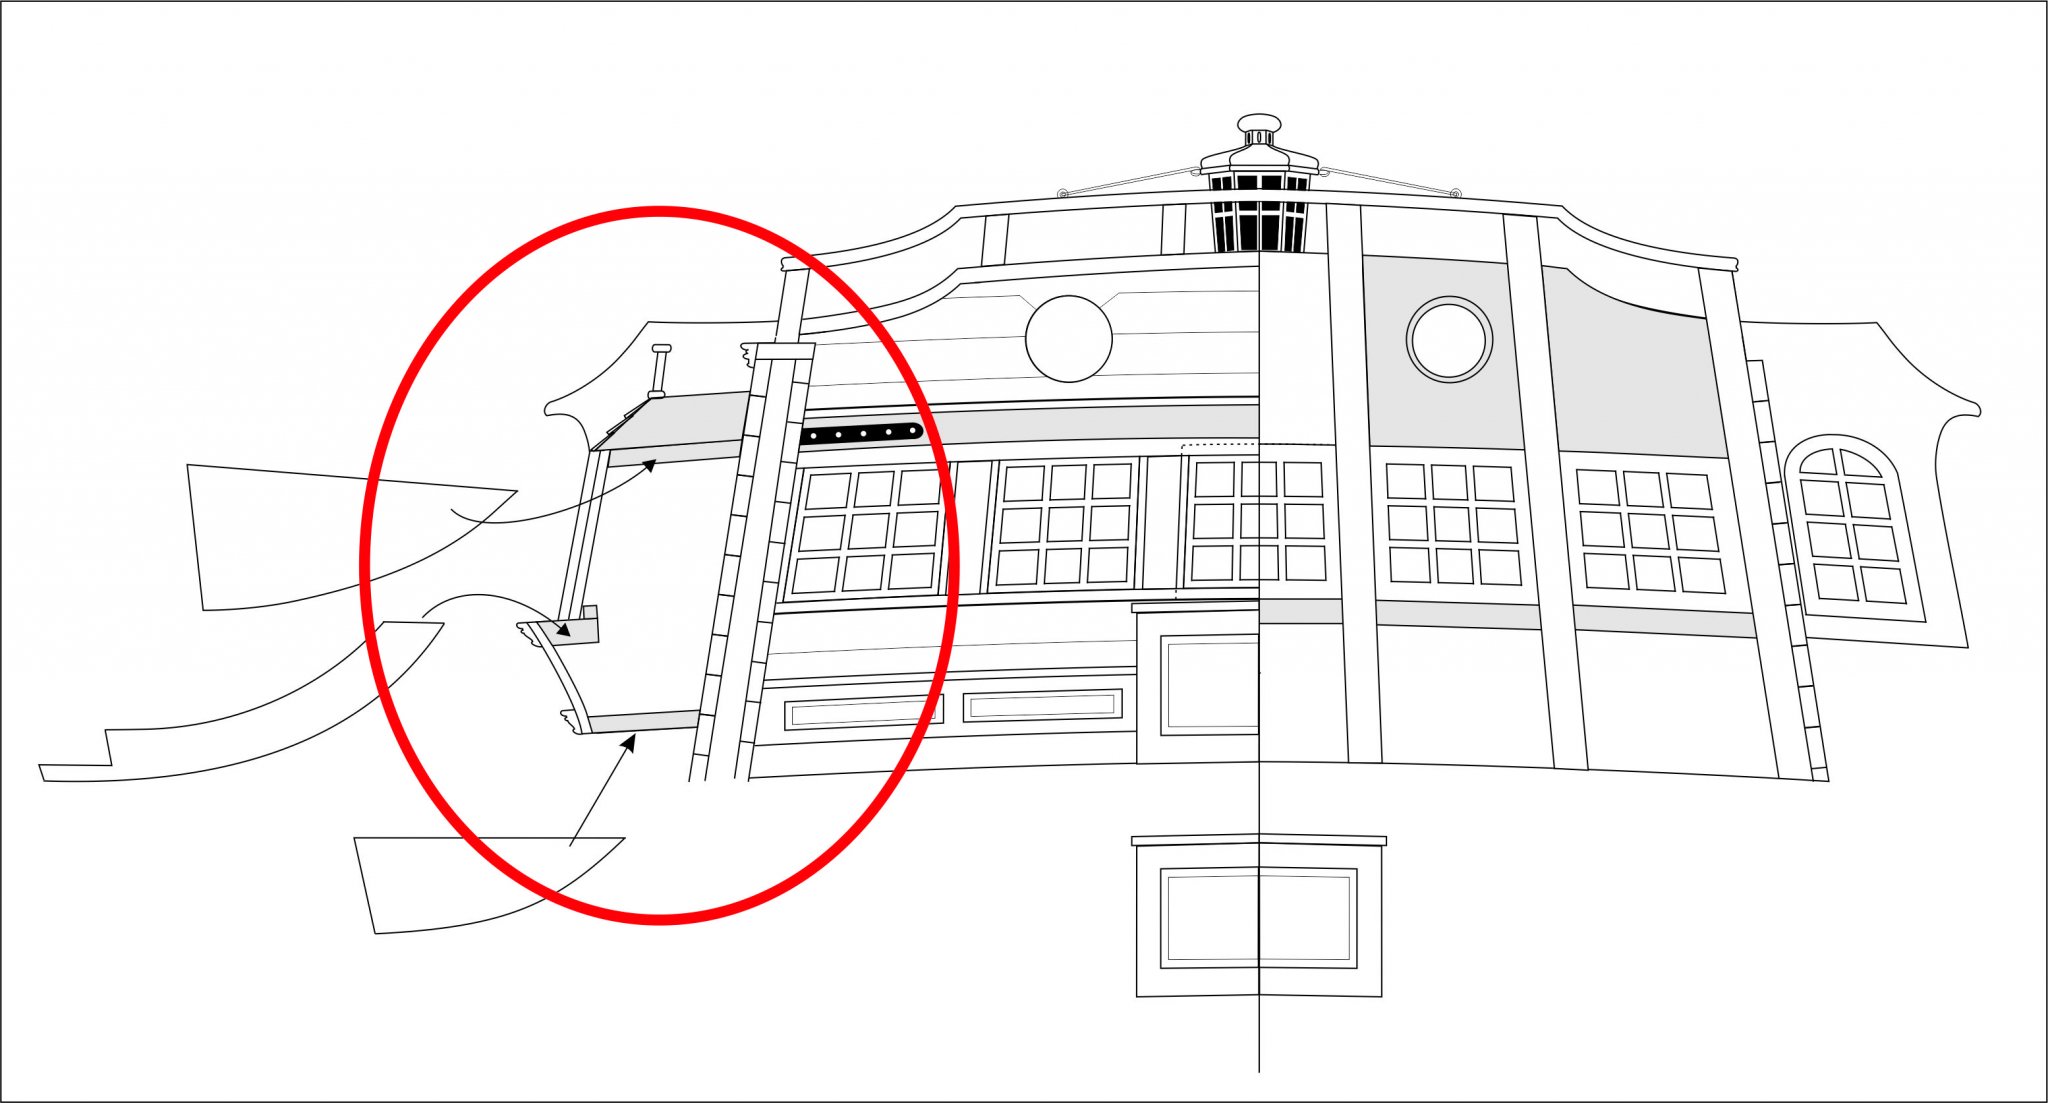
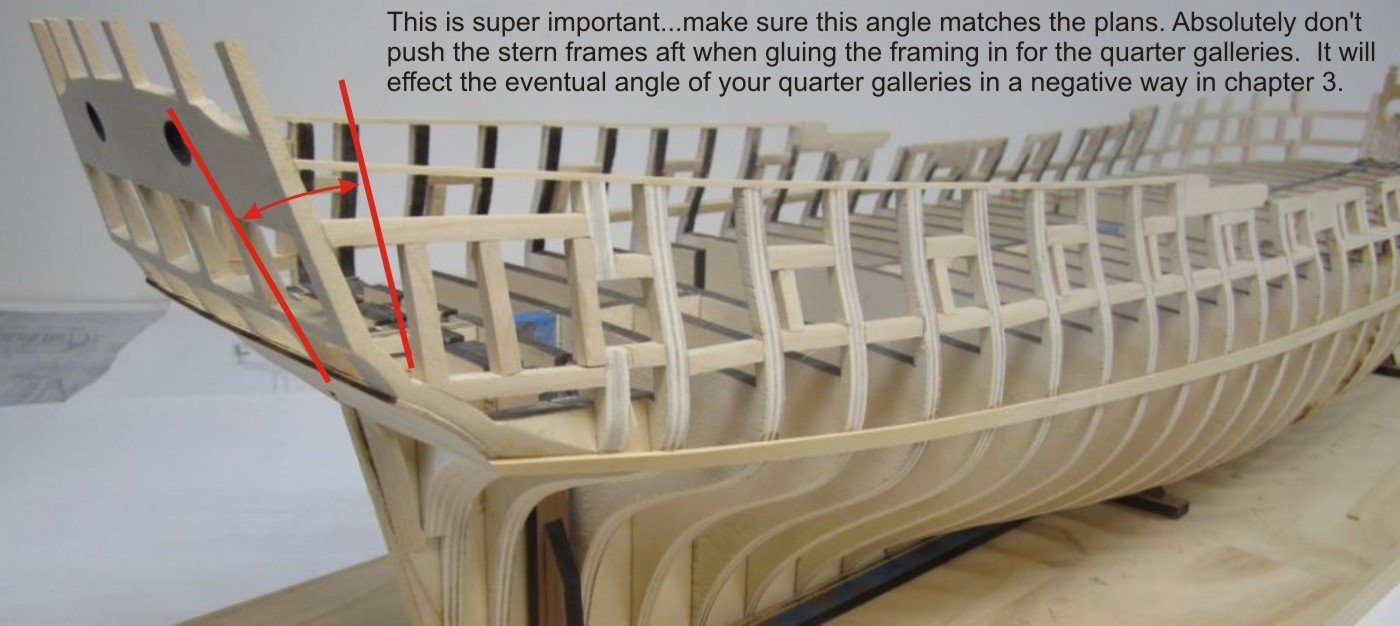
Just another quick note to make sure everyone checks and corrects the angle of their stern frames. If you pushed back those outside stern frames when you framed the q galleries, you will run into problems later on. In addition, be sure to fair the width of those outside stern frames properly to match the width shown on your plans. This will also have an impact on how easily you can frame your quarter galleries in chapter 3. Your transom filling piece wont fit correctly. Do a lot of checking against the plans. You will be so happy you did. Many might not realize how the smallest details will have an enormous impact later in the project. When you build a complex subject like the Winnie you must think several moves ahead like when you play chess. This is often hard to visualize but I will do my best to point these areas out as I recognize that some folks may be overlooking them. All of these details were mentioned in the instructions so please read each step several times and even highlight certain areas like these so you wont forget check them against the plans.
- 1,784 replies
-
- 19
-
-
- winchelsea
- Syren Ship Model Company
- (and 1 more)
-
Just another quick note to make sure everyone checks and corrects the angle of their stern frames. If you pushed back those outside stern frames when you framed the q galleries, you will run into problems later on. In addition, be sure to fair the width of those outside stern frames properly to match the width shown on your plans. This will also have an impact on how easily you can frame your quarter galleries in chapter 3. Your transom filling piece wont fit correctly. Do a lot of checking against the plans. You will be so happy you did. Many might not realize how the smallest details will have an enormous impact later in the project. When you build a complex subject like the Winnie you must think several moves ahead like when you play chess. This is often hard to visualize but I will do my best to point these areas out as I recognize that some folks may be overlooking them. All of these details were mentioned in the instructions so please read each step several times and even highlight certain areas like these so you wont forget check them against the plans.
-
Very clean and crisp work. That is a fine looking model.