DONATION DRIVE - SUPPORT MSW - DO YOUR PART TO KEEP THIS GREAT FORUM GOING!
×


Chuck
-
Posts
9,693 -
Joined
-
Last visited
Content Type
Profiles
Forums
Gallery
Events
Everything posted by Chuck
-
 For those reference lines for the port framing and wales....just use a sharp xacto blade and score the lines through the paper sheet with a straight edge and into the wood. Its permanent that way. If they dont show up enough after for you to see them.....use some poly over the cut line and they will be. Dont be afraid to make these cuts real cuts....no reason to be delicate with them. Its actually more precise and thinner than a typical pencil line.
 -
Im not sure i understand your question.
-
Nicely done. Just remember to go slow and have fun.
-
You dont have a staples or office depot near you? You could even try your public library. You really should get the four large plan sheets done as well. You can probably send them to staples online from their website and they will ship them to you. chuck
-
Welcome to the project Mark. Its a tough choice but choose the wood you like best. Dont hesitate to ask the group any questions.
-
No need. I already waxed your rope. Its good to go right out of the package. You can add more if you want to but I wouldnt recommend it. Chuck
- 421 replies
-
- 3
-

-
- medway longboat
- Syren Ship Model Company
- (and 1 more)
-
That looks great!!!! I have everyone home also.....I hope we dont kill each other. I will just hide in my shop until its over. Chuck
- 221 replies
-
- 3
-
-
- queen anne barge
- Syren Ship Model Company
- (and 1 more)
-
You are good there....its perfect and everything will fit just fine.
-
Very nice....well done on those stern frames.
-
Looks great Mike. Exactly as it should at this stage. Well done...
- 607 replies
-
- 2
-
-
- winchelsea
- Syren Ship Model Company
- (and 1 more)
-
That will work. Unfortunately things like this will happen but there is always a way to correct it.
-
Michael...that is looking really fantastic. Nice work. The scary is part is now done with. The remainder of the build is lots of fun. I hope you enjoy it!!
- 221 replies
-
- 1
-
-
- queen anne barge
- Syren Ship Model Company
- (and 1 more)
-
You are very welcome Glenn. Enjoy the project. Its a real fun model to build. I am looking forward to seeing your progress. I cant believe how quickly you got those packages. Chuck
-
Just wait until later and if needed use wider planks for the 2nd layer of the wales.
-
If you are cutting your planks to shape with the spiled curve, you will need to use a wide sheet the same thickness as your planking. if you only have thin strips, you can bend them edge wise. see this video series
-
Dont worry about the bollards. Just cut the planking around it. Remember...the bollard timbers will be painted black anyway.... Any of the bollard timber that may show will be unseen deep within the head timbers. Just leave it as is. With the planking...small gaps and or small changes in beveling will give you that tiny difference. It is also not wort over thinking and worrying about. If you want to cut down a wider piece so it fits and matches the bottom layer that would be fine. I do however think it is a mistake to add the second layer of wales now. You should wait until the planking above and below the wales is completed first. The whole reason for two layers is so you can micro-correct the run of the wales should you need to and this becomes more evident only after having the topsides planked.....and the drop plank in position. In addition, there is a strong possibility that you will chip or dent and damage the edges of your wales while planking everything else. Then you cant really fix that. You can build in any order you like but if you are curious as to why I selected the order and why I use 2 layers.....those are the reasons. Chuck
-
Remember to have fun along the way!!!!
-
Thank you....yes some of those parts were tricky to mfg. Just be careful because some of them are fragile.
- 137 replies
-
- 3
-
-
- winchelsea
- Syren Ship Model Company
- (and 1 more)
-
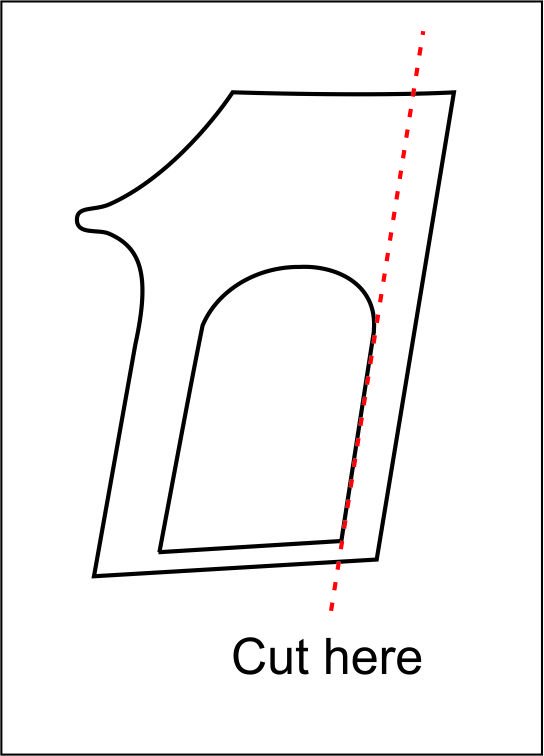
I am sure you can fix that right up. The windows do look good and they fit really well. For everyone else, have a look below. You can tell pretty easily if you havent faired the outside stern frames enough. Notice how the outside stern frames are nearly the same width as the four inside frames when viewing the stern head on. This is important and everyone should correct this if they can before they start chapter 3. Those outside stern frames should be thinned down considerably. Compare these to the width of Matthias' outside sterm frames. I would say probably in the neighborhood of 1/16" too wide....give or take. I have drawn a red line to show you guys. Its also shown on the plans.


-
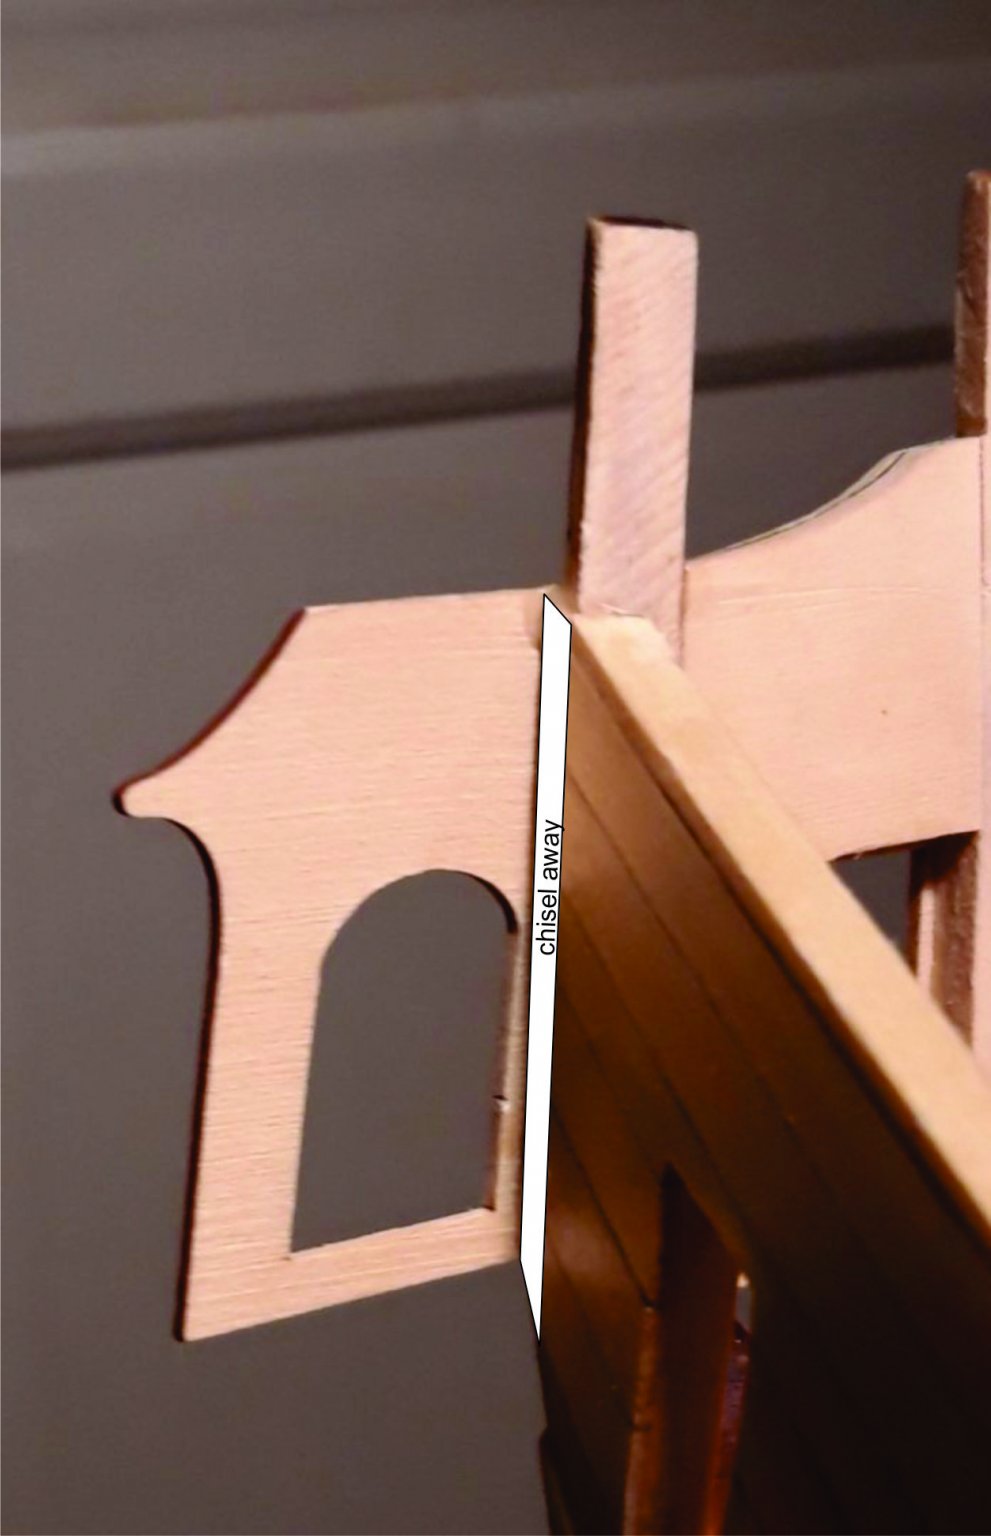
Its not a huge issue but yes it requires a fix. You can simply cut a bit off of your filler like this below. But also carefully slice a bit from your window on the inboard side as well. As long as it looks centered when you view the false window from the other side. But in addition....you might consider chiseling some of that planking away. The filler is 3/32" thick. So draw a line that represents this on your hull and chisel away some of that planking. Maybe another 1/32" or even all of the planking. But remember to glue a filler block on the inboard side of your planking before you start chiseling. You will need a backer there for your planks.....between the stern post and that qgallery door. These are all things to consider. You can do a combination of all three. Its up to you. I hope that helps. Yes most folks underfair the hull back there.

-
Looking great Mike. Yes the friezes for the lower and upper counter are a great way to check the curves. They will also help you get a consistent width for the upper counter. In Mike's photo below....the space between the two friezes is where the 1/8" wide molding will go. So align the upper counter frieze with the bottom of the transom and that should leave 1/8" between the lower counter frieze. Perfect!!!!
- 607 replies
-
- 7
-
-
- winchelsea
- Syren Ship Model Company
- (and 1 more)
-
Beautifully clean model. The finishing techniques are superb.
-
Yes but the washer was already on it....but it doesnt have to be. Just use these....after the bit breaks of course. The kind with the 1/8" shanks.
- 421 replies
-
- 6
-
-
- medway longboat
- Syren Ship Model Company
- (and 1 more)
-
That looks pretty good to my eye. Well done!!!