michael mott
-
Posts
5,197 -
Joined
-
Last visited
Content Type
Profiles
Forums
Gallery
Events
Everything posted by michael mott
-

Another type of clamp
michael mott replied to michael mott's topic in Modeling tools and Workshop Equipment
Bill do you mean these clamps. Michael -
Good to see the beginnings of the hull taking shape Bob. Michael
-
Cutty Sark by NenadM
michael mott replied to NenadM's topic in - Build logs for subjects built 1851 - 1900
Sailor, The reason for a mirror finish is that when one is shaping brass or other fine metal parts when the surface that you are working on is a fine finish you also have a fine finish on the piece being hammered it also pays to have a fine finish on the shaping hammer(planishing). If your surface is pitted and full of dings then you will transfer those same marks to the side of the material that is resting on the anvil. It will give a much better final result. Of course if you want a rough pitted surface then you need a rough pitted surface to work on, it is all a matter of preference. at the model scale these things make a huge difference between appearances. Michael- 4,152 replies
-
- 4
-

-
- cutty sark
- tehnodidakta
- (and 1 more)
-
Cutty Sark by NenadM
michael mott replied to NenadM's topic in - Build logs for subjects built 1851 - 1900
Nenad, your hull is looking better all the time. regarding the miniature Anvil if you can polish the top flat surface with some fine emery or wet and dry sandpaper (use a drop of oil and lay the sheet of paper on some glass or other very flat surface) you can get a nice mirror like finish which is good to have on the anvil. Michael- 4,152 replies
-
- 1
-
-
- cutty sark
- tehnodidakta
- (and 1 more)
-
Interesting concepts Denis, Now skating on a pitching ship could be a bit tricky. Michael
-
Amazing Daniel, it is only when I see your fingers that I realize how tiny this ship is. Michael
-
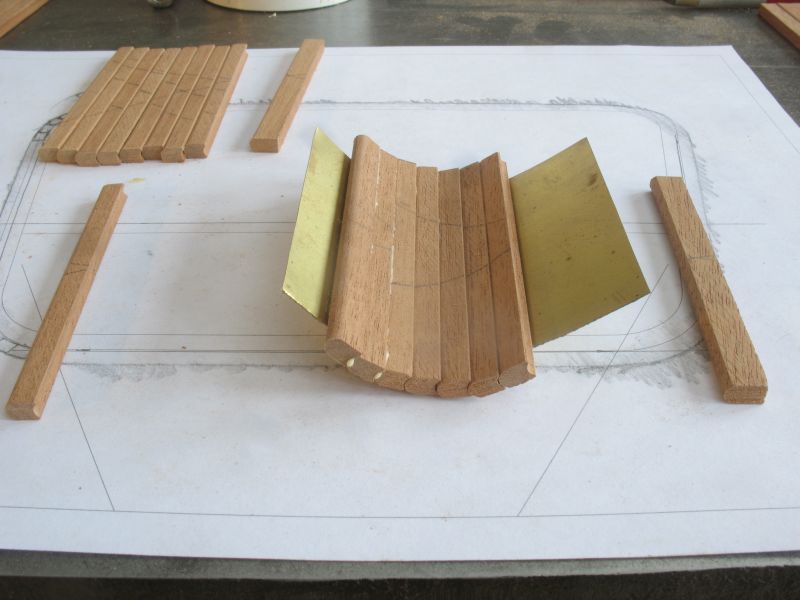
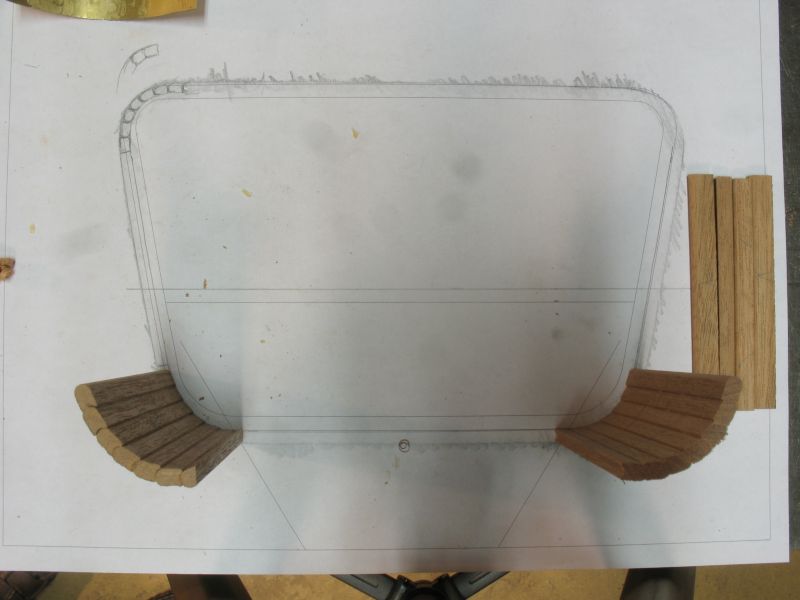
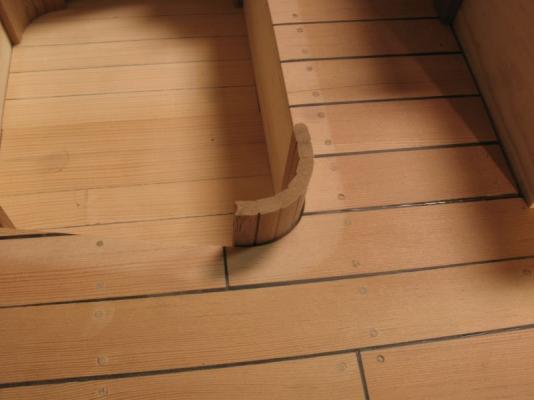
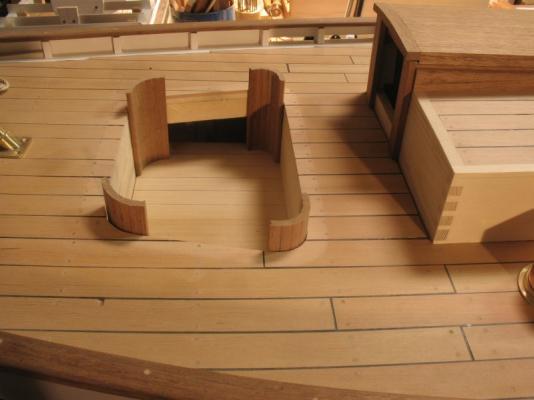
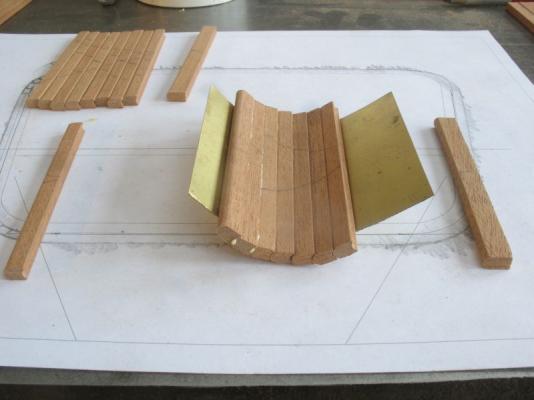
Hello Dan I have checked the major suppliers and so far the smallest appears to be 3/16 radius. New Cockpit part 3 All four corners are now glued and the final shaping is underway on the corners. The sharp radius turned out well. The oxidation of the fir decking is obvious now that the wide section of the old cockpit has been removed. Michael
-
Another type of clamp
michael mott replied to michael mott's topic in Modeling tools and Workshop Equipment
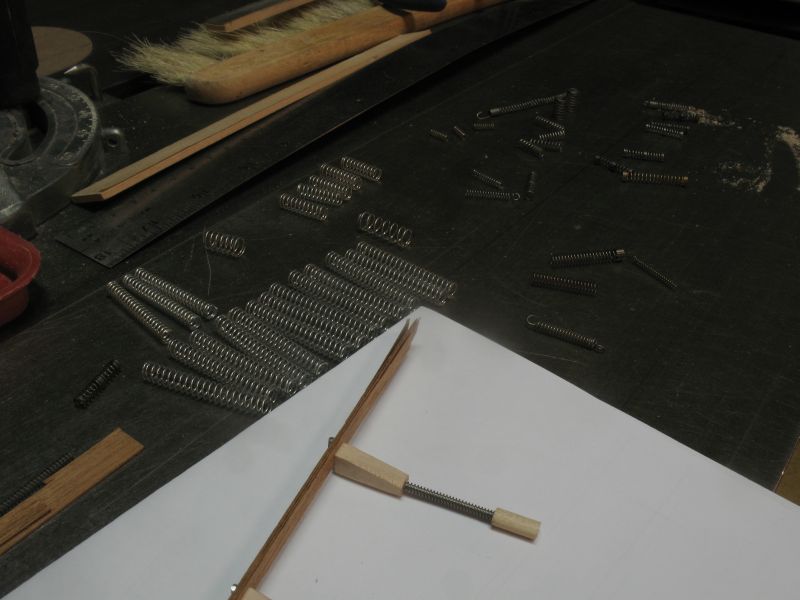
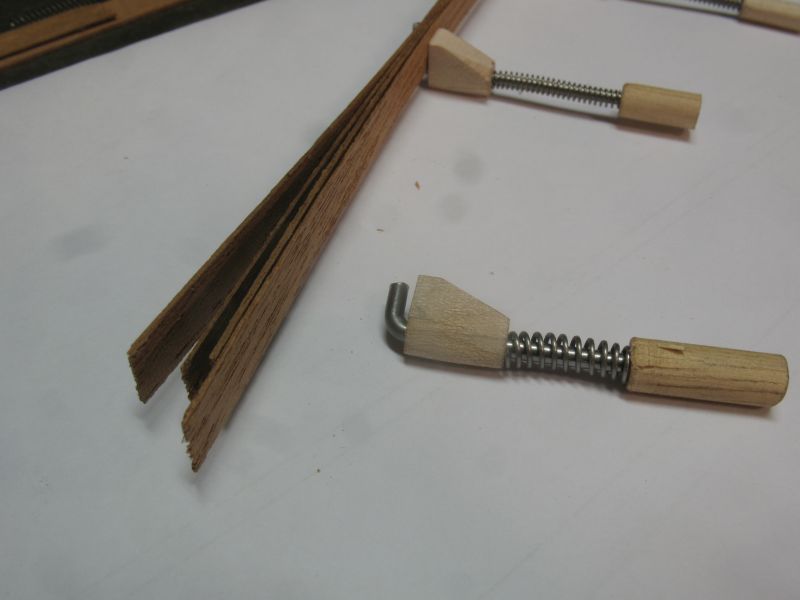
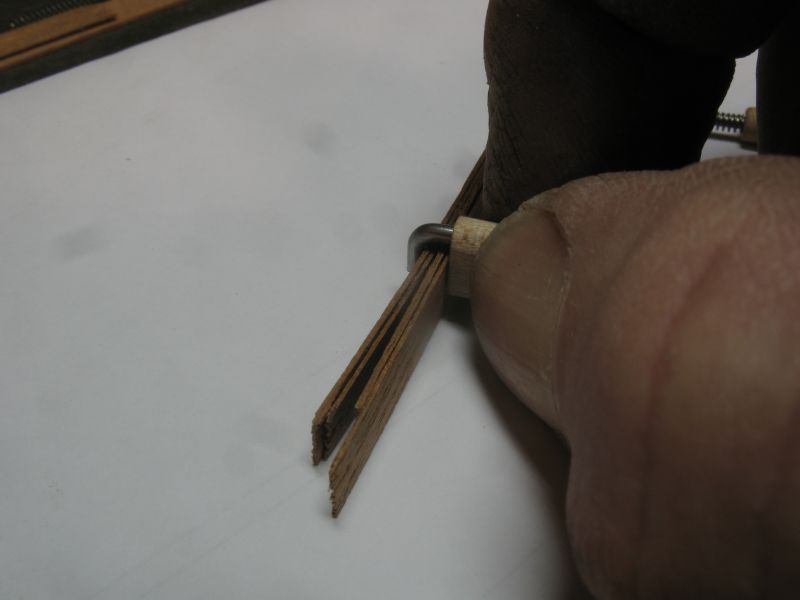
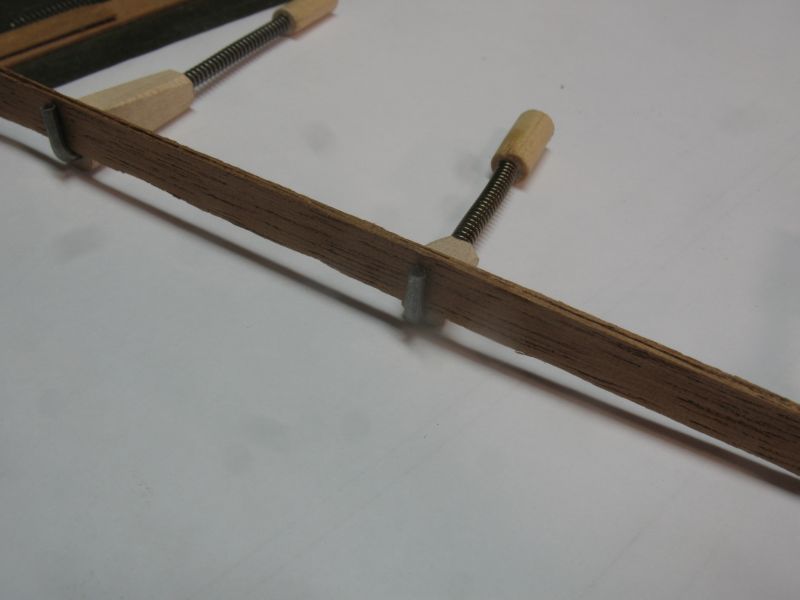
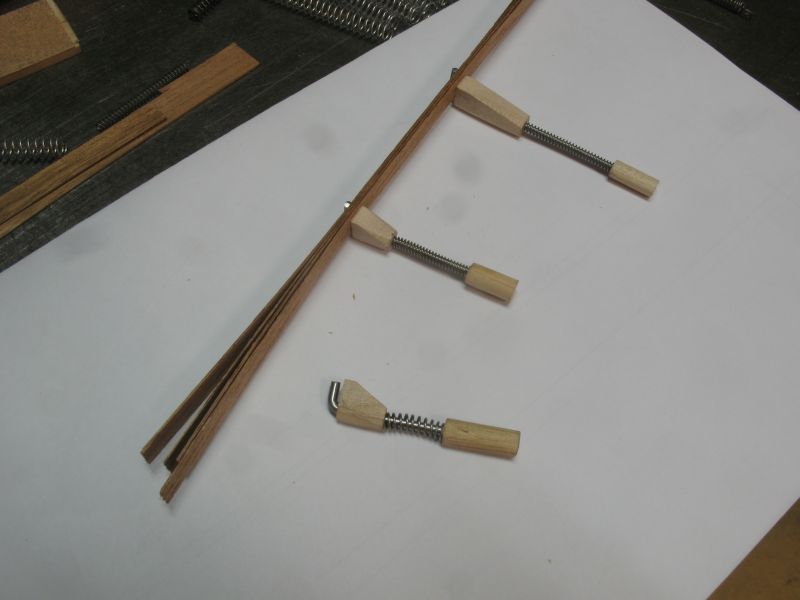
A little more work this evening rendered a few more clamps the metal bar is 3/32 brazing rod bent and threaded 3 x 48 the brass nut was parted off with a form tool from some 5/16 hex stock. By changing springs and being able to change the position of the brass nut makes these more versatile. Eight more clamps for the collection I hope to use these for the planking of skipjack, when I get to that stage. Michael


- 10 replies
-
- 12
-
-
I woke up this morning thinking about Ed Tosti's miniature clamps and one thing led to another. I rummaged through the scrap spring box and made two sizes of clamp. one with a 1/16th steel rod and one with a 2 inch finishing nail. The small wooden block has a clearance hole for the steel rod, depending on the springs one has. the 1/16 rod used some old bic lighter flint springs the bent finishing nail used a tension spring stretched out and then used as a compression spring/ These clamps close to about 1/64 but this design has a lot of possibilities for different openings like miniature bar clamps even The short piece of dowel for the handle is a tight fit I can see that i will be making a few of these using coat hanger wire as well. I made the bend short but I am posotive that a longer bent arm will also work. These will be useful where it is difficult to use a clothes peg type. Michael
-
Storing and using those tiny drills
michael mott replied to Modeler12's topic in Modeling tools and Workshop Equipment
Thank you Grant. Michael -
Storing and using those tiny drills
michael mott replied to Modeler12's topic in Modeling tools and Workshop Equipment
Who is ME? Nice stand Jay. Where did you get the pin vices? Michael -
Pete I just finished this entire build log..... I need to take a nap now I'm completely worn out. I am blown away by how fast and beautiful these builds have turned out! I don't think you could be having more fun if you tried. and I'm with Tom about getting on the list. Michael
- 209 replies
-
- 2
-
-
- muscongus bay lobster smack
- midwest products
- (and 1 more)
-
Ron that is a large amount of thinning! I am curious as to your method for this, which saw you will use. Michael
-
Ron, your work on the plug is very fine work indeed, as it the rest of the model. I am with Dan on that you accomplish all this fine modelwork without a table saw is a testament to your skill. Frankly I would be like a fish out of water without my tablesaw. I will be following along now and eagerly await your next installment on the cutter. Michael
-
Pete this is very interesting I am following with great anticipation. Michael
- 153 replies
-
- 1
-
-
- musongus bay
- sloop
- (and 1 more)
-
HMS Bounty by UdoK
michael mott replied to UdoK's topic in - Build logs for subjects built 1751 - 1800
Hello Edward Your model of bounty is taking shape now, sorry to read about the differences that you have encountered looking at the quality of you work I am sure you will overcome these early tribulations. Michael -
Clare, I agree with Bob a tutorial on your brass etching would be great. I had to backtrack a few post to catch up . Your work on the rims for the paddlewheels was outstanding beautifully executed. The skylights look great too. Michael
-
Good to see your build where it belongs Nigel. Michael
-
Looks good I am looking forward to seeing how you fit the contrl gear into the hull. Michael
-
Daniel, thanks for the information regarding the canoe bits, I checked them out in my Lee Valley catalogue, pity the smallest is 3/16 and not 1/8th it is easy enough to make them out of 3/8th drill rod. it was holding them that was the more difficult to figure out for some reason. I am thinking of making the cap corners from some .010 veneers and laminating the curve. Michael
-
Nigel, I just finished reading through all 22 pages. Your details and carving are exquisite!, yes it really is not a kit is it, it should be in the Scratch build section in my opinion. Some bold moves there during the construction. The treatment of the hull and the treenailing really do look sharp. the step by step on the carving was useful, I shall have to give some carving a go. How did you find the maple for your planking to work with? Michael
-
Low speed power drill
michael mott replied to grsjax's topic in Modeling tools and Workshop Equipment
Finished the drill today, it is not quite as powerful as i would like but the drill works fine for those very small drills. First picture shows the the additional ball race and flywheel. The second shows the second to last sleeve which is the same diameter as the can motor the hole lines up with the locking hole in the flywheel and also the 2x56 set screw. The largest sleeve has a wooden end piece that the wires exit from . last one show the # 80 drill and some holes in some boxwood, there is no vibration and it runs soothly. All the tubes were assembled with loctite except the solid end brass keeper next to the chuck, which was soldered with soft solder.. All in all I am pleased with the salvage. michael


-
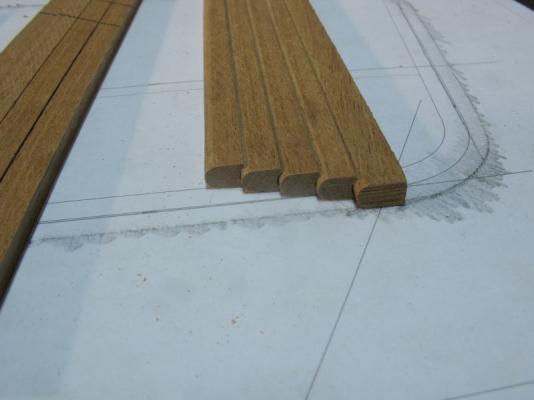
New Cockpit Part 2 The second cutter was not quite a successful as the first so a bit of handwork was needed to clean up the round, Basically I made it a bit too small. I shaped a piece of .008" shim-stock to the aft curves on the deck hole to act a a platform to lay the boards while they set. After they set one edge was trimmed on the disk sander . This method is working well enough so on to the forward curves. Michael

-
The juxtaposition of the superbly clean model and the workspace was amazing! I work in a similar manner. Michael