


michael mott
-
Posts
5,198 -
Joined
-
Last visited
Content Type
Profiles
Forums
Gallery
Events
Everything posted by michael mott
-

SS Vinal Haven by TBlack - FINISHED
michael mott replied to TBlack's topic in - Build logs for subjects built 1851 - 1900
Tom, things look to be coming together very nicely. Michael -
It is easy to criticize something like this. As mentioned the people who buy this sort of thing are as has been stated likely just buying a piece of "decoration" As "offensive" this might be to some, think about the implications for the "craftsmen" who are making this stuff. (How different is this from the rather garish decorations that adorn a great number of houses every Christmas, the fake trees that can cost up to a thousand dollars? ) for them it is a way to put bread on the table, to feed themselves or family, some of them might even enjoy doing this work. I would imagine that it beats sitting on an assembly line installing "x" in an I phone or some other piece of disposable electronic junk (think again of all the stuff filling the toy shelves every Christmas). I would not be too quick to be so judgmental of these things, just my two cents worth, and for those who are engaged in the production of this stuff they probably need the two cents more than I do. Happy new year to all. Michael
- 27 replies
-
- 14
-

-
Hello Doris, Happy new year and thank you for your continued inspiring work. I have run out of words to say, other than absolutely stunning. As a side note I mentioned this at the beginning of my work on MSW 1 It was seeing your work on the westlake publishing forum a few years ago that inspired me to begin a small card model of my pilot cutter. Then I found this site. I am so glad that you are back posting your wonderful work. Michael
- 883 replies
-
- 1
-
-
- royal caroline
- ship of the line
- (and 1 more)
-
Bedford your waterline tool brought a smile to my face this morning. Michael
-
Ed your thoughts are exactly how I cut the deck beams for my Maria boat, I used the first beam as a template for the rest regarding the top curve. Michael
-
Mark Just catching up, first your line up of the deck beams and carlings is most impressive that shows the level of skill and attention that you are using to build this fine model. looking at your work makes me feel a bit like a wood butcher. I am not familiar with the Preac elevating screw, and when I saw it my immediate reaction was what a great looking adjustable screw jack. I have made a few out of short lengths of rigid PVC with 1/4 x 20 bolts in the past. they are very useful on the mill. when working on one end of long pieces. Interesting discussion on the curvature of the deck beams, I had always considered that the curve was a constant, at least in my naive knowledge of ship and boat design, it has been how I have approached the issue so far anyway. That is a great looking model Druxey happy new year Sirs. Michael
-
I find that most self centering chucks have enough slop in them that they are fine if you can do all the work in one setup, then everything is concentric. If however you have to flip it around in the chuck then getting it perfectly re centered you need to use a four jaw chuck I use a dial gauge to center the work. it is very easy then to make the fine adjustments. Michael
-
making chisels
michael mott replied to michael mott's topic in Modeling tools and Workshop Equipment
Gr, I have to confess I have no idea, the store that i purchased this stuff from many years ago simply had a rack of various diameters of drill rod, I purchased a few sizes at the time. When I was an apprentice in the mid sixties we did use oil for some things because it slowed the cooling process rather than the shock of cold water. There have been a great many changes in metalworking since I learned the few things I know and my career path did not require that I keep up with them all the whole CNC process for instance is completely foreign to me. I deal with backlash on my machines and have to calculate amounts from simple dials. Bill thanks for the kind remarks, I do not have much disposable income so I have to make do with materials I have on hand. I scrounge a lot from odd sources as well. Michael -
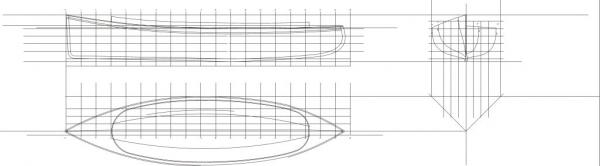
I have been busy with an old project (all will unfold in due course) so it was good to get back to Skipjack today. I received a number of photographs today and some dimensions for Skipjack from Roger. I will be asking permission to post some of the pictures that I have received. Skipjack/floss Part 6 Based on the new information I have prepared a new drawing , the most significant detail change is that the skeg was removed from Skipjack a long time ago. The overall length is 18 foot 6 inches, not 19 foot as was written in the article. The foredeck is 37 inches long and the stern deck is 27 inches long beam is 55 1/2 inches here is the new drawing based on the new data I have also renamed the thread Skipjack. Michael
-
Following the discussion on Gaetan' threads here is the translation of his link This is a very important subject. tough news about Oak though. Michael
-
SS Vinal Haven by TBlack - FINISHED
michael mott replied to TBlack's topic in - Build logs for subjects built 1851 - 1900
Looks pretty good to me Tom. Looks like you are getting the hang of working this brass stuff. Happy new year to you Sir. Michael- 326 replies
-
- 1
-
-
- vinal haven
- steam ship
- (and 1 more)
-
very Nice work so far Dan, I think that you can drop the newbie label now. I would imagine that you are also thinking about the next boat as well. Michael
-
Ron, One word does it for me Exquisite!! Michael
-
Ron , What an outstanding model you have built! it is a beauty, well done sir. And a happy new year to you and your family. Michael
-
Gaetan, Work work is very enjoyable to follow, your comment about scale and time was interesting in that you see space really as the only limiting factor, and that time is equal. Your storage of tools is inspirational and by the looks of it very practical. Michael
- 728 replies
-
- 1
-
-
- le fleuron
- 64 gun
- (and 1 more)
-
Doris first I hope your new year gives you good health and the strength and confidence to ignore Jealous minds. Second it is so wonderful to see you continuing to weave your magic. Your work and skill are exemplary and it gives me an enormous amount of pleasure and joy to follow your progress on this remarkable journey that you are taking us on. Your work is exquisite and your photographs of your work are also creative as well as educational. Happy new year Doris. Michael
- 883 replies
-
- 4
-
-
- royal caroline
- ship of the line
- (and 1 more)
-
Storing and using those tiny drills
michael mott replied to Modeler12's topic in Modeling tools and Workshop Equipment
Joe Merry Christmas, no worries, I tend to not use initials and acronyms. To Me "ME" is Model Engineer, and it is a magazine, I didn't think they were selling drills in cases but could be wrong, they do sell special taps for model steam work. Michael -
Another type of clamp
michael mott replied to michael mott's topic in Modeling tools and Workshop Equipment
Thanks, for the picture Bill, I didn't see anything like those when I searched on the net, probably just didn't look far enough. Michael -
Merry Christmas Gary, beautiful work on the deck, as already mentioned I would let the maple oxidize for a while before applying any finish. Michael
-
Very neat Denis, you do have your work cut out for yourself over the holidays. Michael
-
making chisels
michael mott replied to michael mott's topic in Modeling tools and Workshop Equipment
Vic thanks, the chisel in in use here Janos, Yes I think that it is called silver steel in the UK as well. Mark, that is a great idea. There really is something special about making your own tools. Michael -
Thank you Druxey, my those look good am wondering if the cranked pins are something that could be switched out on my own pair. I shall look into this. Michael
-
making chisels
michael mott replied to michael mott's topic in Modeling tools and Workshop Equipment
Q A' Revenge, (what's your name?)Thanks for your kind remark and the information. I do have a sheet of 1/8th gauge plate I use it for certain tools like plane blades and also have used it for the expansion link on a live steam engine. Doreltomin to heat up to cherry red you do need a very hot flame, I use an Acetylene torch, I have a large bottle and the torch uses air as the mix, a jewelers supply has them. A smaller propane torch that has a good pointed flame will also work on material if the amount of metal is not too large. Michael -
making chisels
michael mott replied to michael mott's topic in Modeling tools and Workshop Equipment
Hi Slog All I did was to heat the end about 1 inch at the tip to cherry red then quenched it in cold water. it was not quite hard tested it with a file, so heated it again to a very cherry red and again quenched it in the same water and then it was hard. I thought about tempering it but decided not to. if it is too brittle I will temper it that means heating it up again but watching very carefully the colour of the oxide forming on the polished surface I would take it to a dark straw colour then quench it again. I did use Drill Rod which comes in just about every size up to 1 inch in 36 inch lengths. it has a ground finish and is great for making tools. To soften the steel heat it to cherry red and let it cool slowly. To case harden mild steel heat to hot as possible without melting it and plunge it into some carbon powder, reheat and repeat a few times and you have a hard coating on the mild steel. Michael -
Very nice Ron. Michael
