
HOLIDAY DONATION DRIVE - SUPPORT MSW - DO YOUR PART TO KEEP THIS GREAT FORUM GOING! (83 donations so far out of 49,000 members - C'mon guys!)
×


michael mott
-
Posts
5,200 -
Joined
-
Last visited
Content Type
Profiles
Forums
Gallery
Events
Everything posted by michael mott
-

making chisels
michael mott replied to michael mott's topic in Modeling tools and Workshop Equipment
Hi Slog All I did was to heat the end about 1 inch at the tip to cherry red then quenched it in cold water. it was not quite hard tested it with a file, so heated it again to a very cherry red and again quenched it in the same water and then it was hard. I thought about tempering it but decided not to. if it is too brittle I will temper it that means heating it up again but watching very carefully the colour of the oxide forming on the polished surface I would take it to a dark straw colour then quench it again. I did use Drill Rod which comes in just about every size up to 1 inch in 36 inch lengths. it has a ground finish and is great for making tools. To soften the steel heat it to cherry red and let it cool slowly. To case harden mild steel heat to hot as possible without melting it and plunge it into some carbon powder, reheat and repeat a few times and you have a hard coating on the mild steel. Michael -
Very nice Ron. Michael
-
Today I needed a long small chisel To make what I needed I began with a piece of 5/32 drill rod and filed the end into a rectangular section. this was then polished up with some wet and dry sandpaper stuck to a strip of wood. After hardening the end only the bevel was ground ready for shapening. Finally a handle was fashioned from a piece of hard maple. Michael


-
Mississippi Sternwheeler by kpnuts
michael mott replied to kpnuts's topic in - Build logs for subjects built 1851 - 1900
Hello Ken, welcome to this wonderful forum. Do not worry about what you term Standards, your models look very good, well made and appear to be ones that also sit in their true element, I mean the water. As you continue to build more please start a build log so we can follow along. Michael -
Agreed! but that shop wouldn't stand a chance in -30C single pane windows , no insulation in single plank walls, judging by the T shirt must be somewhere warm or summer ;>) Michael
-
Another type of clamp
michael mott replied to michael mott's topic in Modeling tools and Workshop Equipment
Thanks Druxey, I think that the tinkering is something that I caught a long time ago, but it has been strengthened by all the other great tinkerers that inhabit this most amazing forum. I think it (this forum) is what keeps me sane these days. Michael -
Hello Druxey, is is possible to show a picture of what you describe. I am having a difficult time visualizing it for some reason. I have a good quality set that I acquired many years ago, Sometimes I have noted a little creep when opening and closing them over a period of drawing. There are the register pins to reset them when closing but still it was annoying. Michael
-
Ron the more I see of these small sanding tools and drums and the jigs set up to prepare the wood the more I am impressed by the thought and ingenuity that goes into them. making simple tools and jigs requires a good foundational knowledge of what one is doing. I like yours I shall make one for myself. working with the wood flat seems to be better somehow than vertical. Michael
-
The cable looks great , what is the diameter and what threads did you use to make it? Michael
-
Papegojan 1627 by mati - FINISHED - 1/48
michael mott replied to mati's topic in - Build logs for subjects built 1501 - 1750
Matt the figurehead looks beautiful, I like the finish that you have achieved. can you give us the formula or the proportions of how you prepare the finish wax? Michael -
Rusty the work so far is superb, had to laugh at the T shirt stories. I have found that an old worn out cotton bed sheet works very well and is also lint free. One sheet provides a lot of 12 inch squares of rag. no dangers involved in procurement either. Merry Christmas to you and family. Michael
- 421 replies
-
- 3
-

-
- granado
- bomb ketch
- (and 2 more)
-
Great to see an update Mark, The gunports look nice and clean. Merry Christmas to you and family. Michael
-
SS Vinal Haven by TBlack - FINISHED
michael mott replied to TBlack's topic in - Build logs for subjects built 1851 - 1900
Tom with the small tubing if you file it while it is attached it is much easier to hold onto because you need to remove quite a lot of the tube to make it look like the picture you posted and if you cut them to length first you end up losing them either to the floor or to a snag while filing because there is so little tube left by the time you are done.. it also helps to have a small v groove in a block of hardwood for the filing. I will sort out a picture of what I am trying to describe. Michael -
Good morning Dan. excellent question, it has been something that I have been wondering about myself. I had asked Russ about the rails on his sloop and about the sorts of clearances needed to make things like rails and pins workable. when I did a Google search for fife rails they appear to be all over the map(both literally and figuratively)regarding heights and sizes. The top of the rail on mine is 9 inches above the deck and the pins are also 9 inches long, short perhaps for a ship but long enough I think for this size of boat she is basically 40 foot long, well 42 feet. My cap rail is only 8 inches above the deck as well. The other option is to redo the whole rail and make it higher, I wouldn't rule out that option either. Oh there are so many things that I will do differently on the next cutter well smack actually I want to do a working fishing boat based on the Gloucester fishing smacks. after the launch or when this cutter is finished. this is proving to be a very interesting learning curve. The more I learn the more I realize how little I know. Denis thanks for your encouragement. Michael
-
Pete, Elia, Alan, Druxey, and Tim. Thanks for your kind remarks and encouragement. and all the likes Regarding the forward hatch and the dovetails, I might be confusing you or I am confused. The dovetails on the Cabin structure will remain as they are there will be no rounding. I was referring to the small Mahogany hatch forward of the fife rail. the corners on it were mitered and not dovetailed and it was already rounded, but it was taller and heavier looking. You have got me thinking now that I might have to build a new one out of pine with square corners that are dovetailed. Michael

-
Pete I can see that you are slowly being drawn to the dark side. with these builds. Michael
- 209 replies
-
- 3
-
-
- muscongus bay lobster smack
- midwest products
- (and 1 more)
-
Grant just finished the entire build log so far, most impressive work. your work on the small boat was really fine workmanship I, would have no fingerprints left after that. After viewing all the block-work all I can say is that I am glad I only have one mast and a few blocks. Michael
-
Grant just visited for the first time I think, your work on those details on the yard and mast are great, I like the comment about Longridge's drawing being made from your work and not the other way round. I have Longridge's book and have often thought that models of just those fold outs would make for some fun and interesting work. and you seem to have accomplished that. Much too small for me though. I would end up in a straight jacket. I will have to have a look through the rest of your build now. Michael
-
Bedford, the epoxy really shows what a tight job you did on the planking. Michael
-
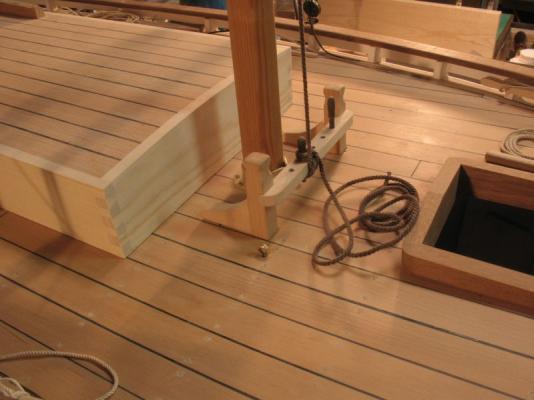
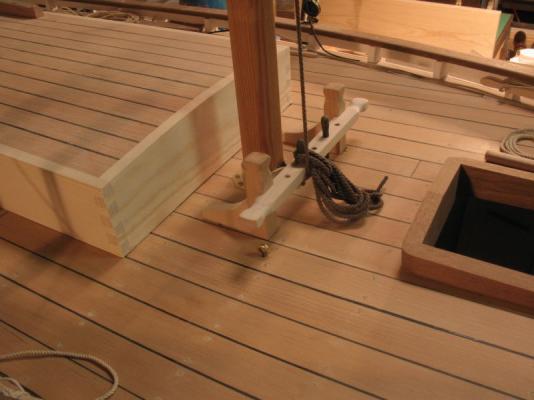
Thanks John and Bob for stopping by. This evening I replaced the fife rail with a slightly longer one with shaped ends it is hard maple. The first rail And the new one The new one has a greater scope for operation. I have also begun shaping the forward hatch, it will have a pair of lights that will hinge up. Michael
-
Elia what a grande job you are doing! your rework of the yellow cove looks superb The shot looking down on the deck is really neat. Nice work on the lettering. michael


