gjdale
-
Posts
4,897 -
Joined
-
Last visited
Content Type
Profiles
Forums
Gallery
Events
Everything posted by gjdale
-
 Sorry to hear about the Half Moon, Sjors, but do I recall correctly that Anja has a scratch build Hannah package waiting in the wings? Could be just the excuse needed to start on it!
- 1,616 replies
-
- 3
-

-
- caldercraft
- agamemnon
- (and 1 more)
-
Ken, You could always try "ebonising" your wood instead of painting it. The process is described quite well in this video:
-
Very clever indeed Nils - they look great!
- 2,625 replies
-
- 4
-
-
- kaiser wilhelm der grosse
- passenger steamer
- (and 1 more)
-
Very nice work Mike. Must have been a bit nerve-wracking the first time you used the plane on it!!!
- 969 replies
-
- 4
-
-
- hahn
- oliver cromwell
- (and 1 more)
-
Congratulations on completing an outstanding model and equally fascinating build log / history lesson, Cathead. I have really enjoyed the journey - thank you for sharing this with us all.
-
Fascinating and educational Druxey - not to mention exquisitely executed!
- 641 replies
-
- 4
-
-
- greenwich hospital
- barge
- (and 1 more)
-
Good choice Mark. I've learned that if you are considering whether or not to do a re-do, then you absolutely need to do it!
-
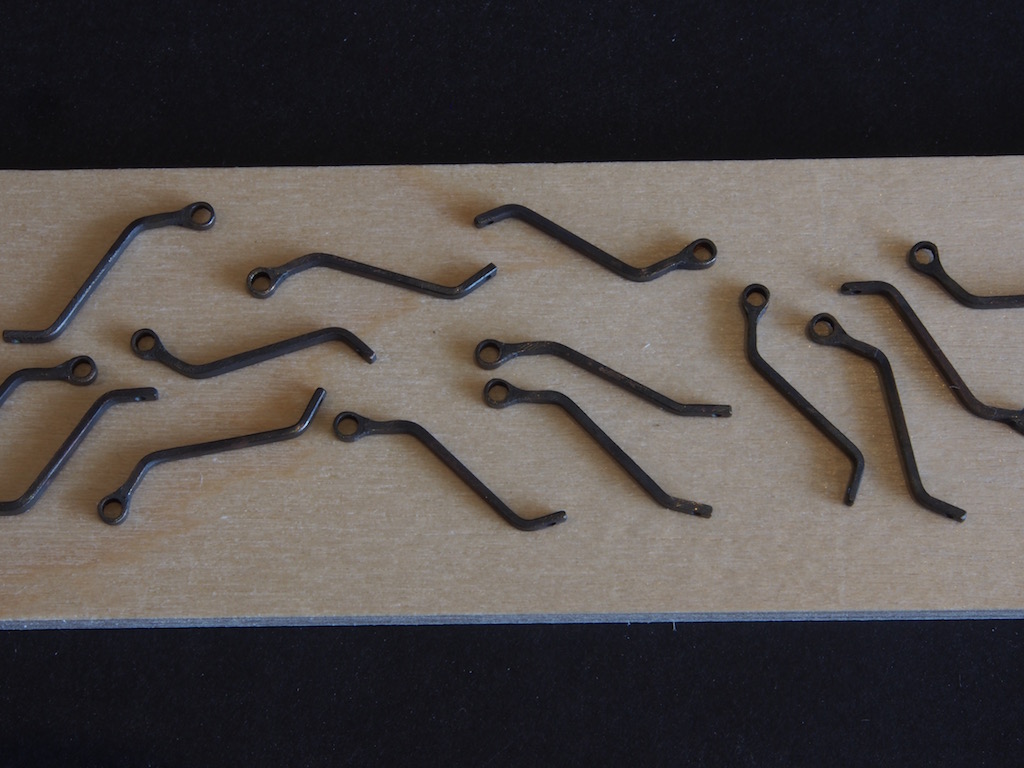
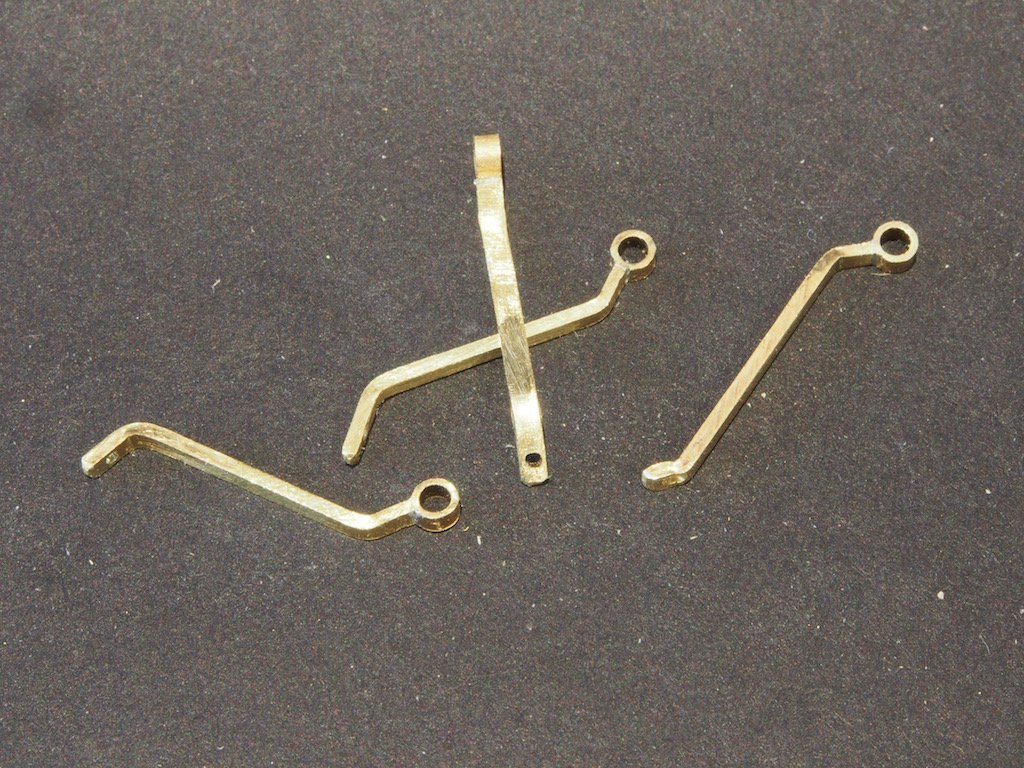
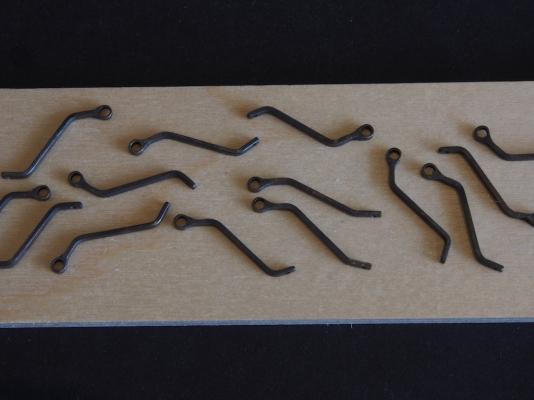
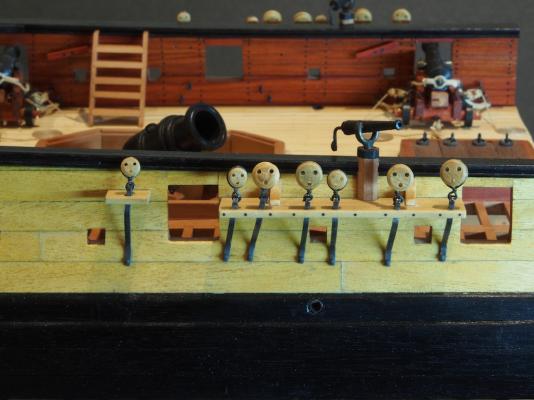
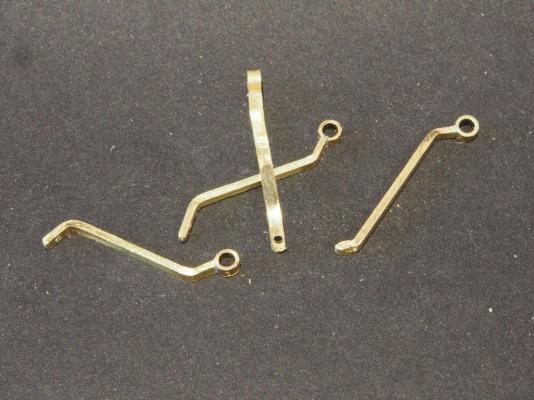
Thanks again for all the kind comments, thoughtful suggestions, and of course all of the "likes". Chainplates – again! After pondering the problem of the chainplate failure for a few days, and after receiving a few suggestions from my MSW friends, I concluded two things: Firstly, I had been a little too zealous with the clean up of my silver-soldering when I attached the tube to the flat-bar. The result was that the joint had too small an area of bond, and hence a weak joint. After considering alternative approaches, I resolved to give this another crack. So I used exactly the same method as previously described, only this time taking care to leave a fillet of solder on the “shoulders” of the joint. Here is a picture after drilling, bending and blackening. If you look closely you can see the slight thickening at the joint line. The second conclusion I came to was that I was using wire of too great a thickness for the chain strops. I had been attempting to use 0.75mm diameter brass wire for this. After checking with both Mobbsie and Rusty, I decided that 0.5mm diameter would be better suited (Mobbsie successfully used 0.5mm diameter on his build at this scale, and Rusty used 0.78mm diameter for his build in 1:24 scale). The only problem I ran into here was that I was unable to silver solder the joints of the thinner wire. If it’s possible, it’s beyond my current skill set! Instead, I copied the method used by both Mobbise and Rusty on their builds, and that was to twist the wire one complete turn under the deadeyes, and then tuck the ends into the tube section of the chainplate. This at last produced an acceptable result. I secured the bottom ends of the chainplates with small brass nails left over from previous kits various (though I had to shorten them), and then blackened the heads in-situ by painting on Jax Pewter Black, and washing with distilled water afterwards to halt the reaction. This worked very well and did not have any impact on the surrounding timber (which I was careful to avoid). Finally, I used a dab of C/A glue to encourage the deadeyes to “stand up”. Here is the result: All in all, I’m quite happy with the results. All that remains now is to make the external entry ladder, and perhaps the Mortar Pit Housing, as well as the final stand.
- 456 replies
-
- 19
-
-
- finished
- bomb ketch
- (and 2 more)
-
How would you improve your Byrnes tools?
gjdale replied to Keith_W's topic in Modeling tools and Workshop Equipment
Boyd, Jeff Hayes (HobbyMill) has a page on his website about operating the Byrnes Saw, and it includes advice on Blade selection. I just checked, and the page is still there - don't know how much longer he'll keep it up now that he's "retired". Here's the link to the Saw blade selection part: http://www.hobbymillusa.com/byrnes-saw-operation-2.php -
Looks like a fascinating subject and a little unusual. Think I'll tag along too.
- 641 replies
-
- 3
-
-
- greenwich hospital
- barge
- (and 1 more)
-
Cutter Cheerful 1806 by rafine - FINISHED
gjdale replied to rafine's topic in - Build logs for subjects built 1801 - 1850
Mighty fine work Bob - looking great!- 525 replies
-
- 3
-
-
- cheerful
- Syren Ship Model Company
- (and 1 more)
-
I'll add my thanks and appreciation for your detailed explanations and photo essays Ed. The techniques you have so skilfully demonstrated and explained, are applicable to a wide range of models and are an absolute treasure. Thank you for taking so much time and effort to post in such detail for the benefit of all.
- 191 replies
-
- 9
-
-
- young america
- clipper
- (and 1 more)
-
I always enjoy watching your builds Rusty, so I'll pull up a chair for this one too.
- 310 replies
-
- 4
-
-
- cheerful
- Syren Ship Model Company
- (and 1 more)
-
HMS Naiad 1797 by albert - FINISHED - 1/48
gjdale replied to albert's topic in - Build logs for subjects built 1751 - 1800
Gosh that's nice work Albert! -
Looks like your perseverance has paid off there Robbyn. Glad to hear the foot is mending well too.
-
Congratulations Bob - a truly fine model and excellent craftsmanship.
- 196 replies
-
- 3
-
-
- higaki kaisen
- woody joe
- (and 1 more)
-
Good decision John! You won't regret it.................once the re-do is completed that is!
-
Thanks Dan, Coming from a professional model builder, your kind words are especially appreciated. Thanks also for posting pics from your QAR - that method might well be the "winner"! I'll have a closer look today
- 456 replies
-
- 5
-
-
- finished
- bomb ketch
- (and 2 more)
-
Thanks Jack, I had a look at your log last night, after Ken sent the link through. Nice work, by the way!
- 456 replies
-
- 5
-
-
- finished
- bomb ketch
- (and 2 more)
-
Thanks for the link and the suggestion Ken. I've got a couple of ideas floating through my head at the moment, including the reasons WHY my joints failed. I'll add this to the list of possible solutions though.
- 456 replies
-
- 4
-
-
- finished
- bomb ketch
- (and 2 more)
-
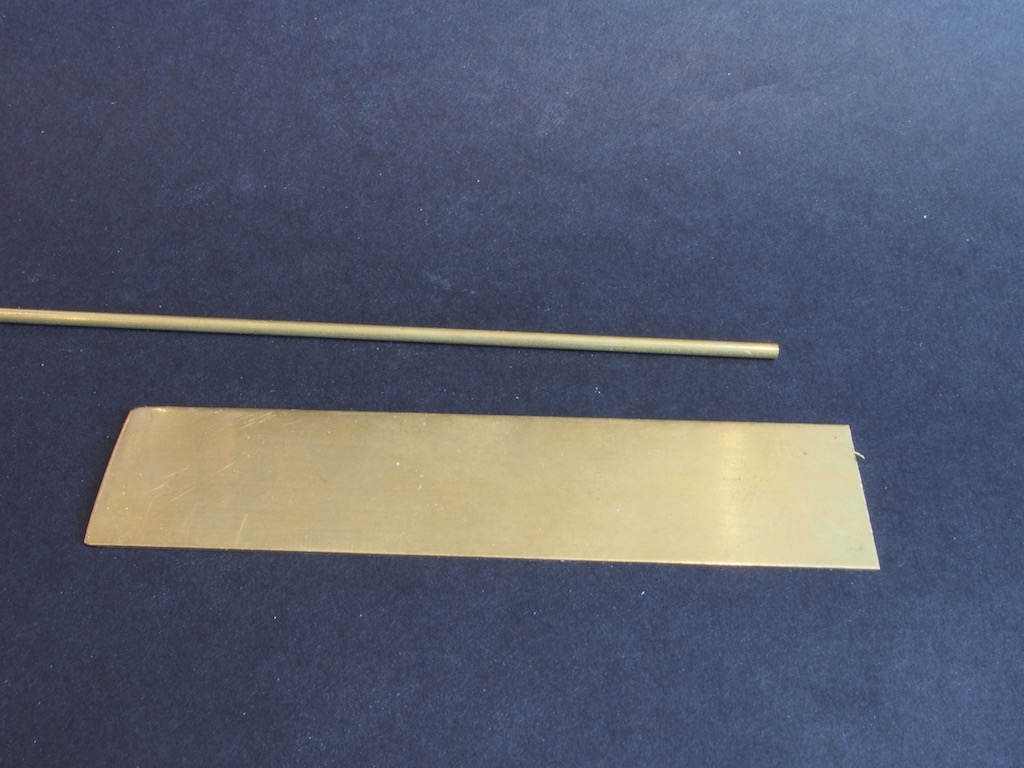
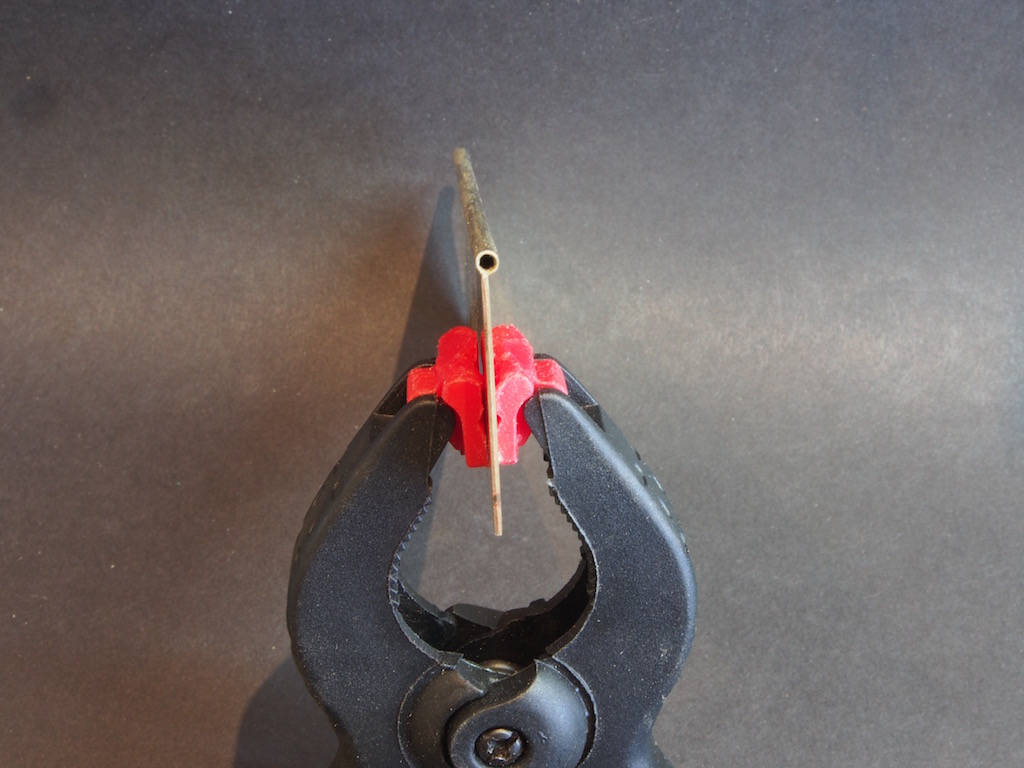
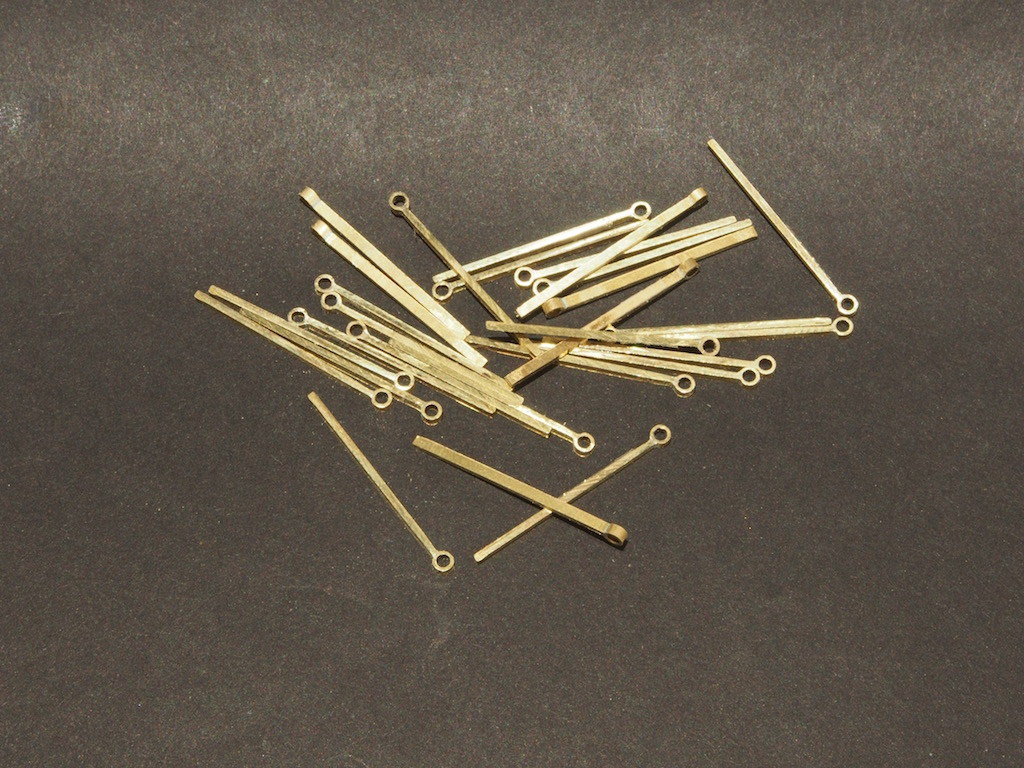
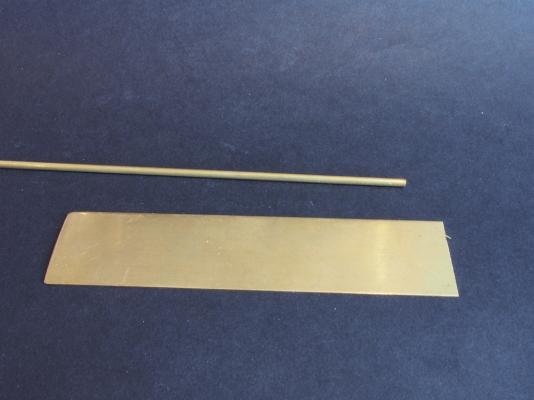
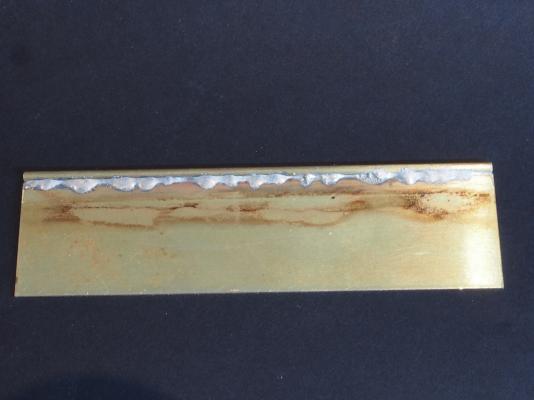
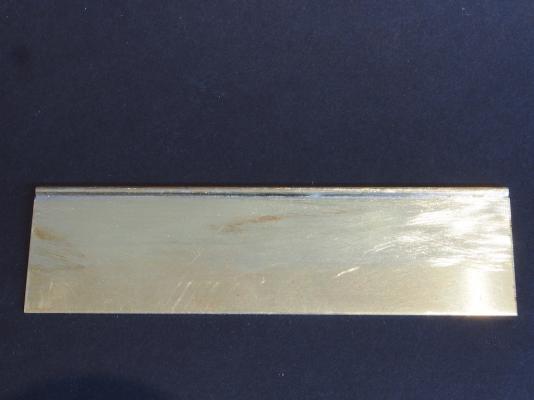
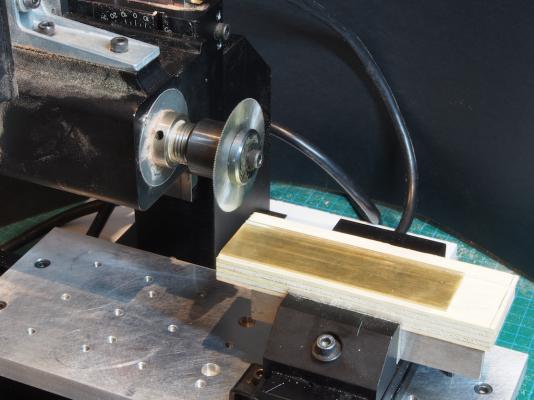
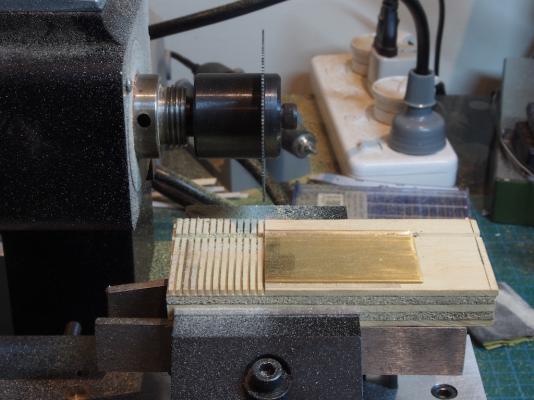
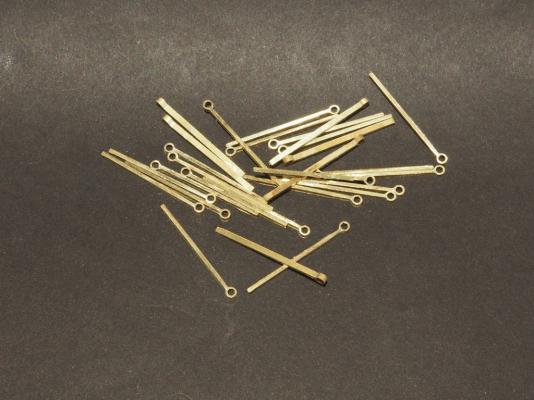
And now to the not so successful story... Chainplates I had a brainwave about making the chain plates, and was absolutely convinced this was going to work! The drawing below shows the chainplate (#8) as having a tubular-like section at the top, through which the strop for the deadeye passes. Having thought about this for a few days, I devised a cunning plan. I took a sheet of 1/32” thick brass flat bar, and a piece of 3/32” OD brass tubing, and silver soldered them together. I even devised a way to support the flat bar so that it remained level with the centre of the tubing. Here is what it looked like after soldering – not pretty. Not to worry, a bit of a clean up with a file and some sand paper, and it’s looking much better: And just to prove that I managed to get it centred properly: The next problem to solve was how to slice off pieces of the correct thickness to fit into the milled slots in the Channel boards. I first had to decide how to hold and cut the work. No problem – rotate the mill head 90-degrees and attach a slitting saw. Make up a sacrificial holding board for the brass stock, with a small channel cut into it to seat the tubing while keeping the flat-bar flat. Mount said piece in mill vise and we’re ready to cut – almost…. The slots in the Channel boards were milled with a 1/16” mill, so that was the maximum width for each slice. My mill handwheels are calibrated in millimetres (1/16” = 1.59 mm) and I planned to use a slitting saw that has a kerf of 0.6 mm. I decided that if I went for a slice thickness of 1.4 mm, I would allow myself a tiny bit of wiggle room, while at the same time making the Mill work easier as I would need to advance the X-axis handwheel exactly 2 mm (ie 2 complete rotations) for each slice. I then simply set the depth of cut to 2.5mm (just over the 3/32” thickness of the tubing), and advanced the Y-axis into the saw – carefully, and slowly. This part of the operation worked like a charm. You can see in the following shot, how the process looks part way through. And here are the resulting pieces – a test fit showed they fit into the Channel slots perfectly. A 0.8mm hole was drilled in the end of each piece to take a securing nail, and the chainplates were then carefully bent to the approximate shape shown in the drawings. At this stage I was feeling pretty darned pleased with myself! My success, however, was short lived and it was at this point that success finished and catastrophic failure took over! I made up some deadeye strops from 0.75mm brass wire. This had to be inserted through the tube part of the chainplate before being soldered closed. The parts were then all cleaned with a wire wheel in a rotary tool, and chemically blackened (using Jax Pewter Black, as it also blackens solder). It was then time to insert the deadeyes and squeeze the strops tight around them and the top of the tube. Two things happened here – both failures of the soldering process. Either the tube parted company with the rest of the chainplate, or the strop soldering point gave way, or both. Either way, I had a greater than 75% failure rate, and the remaining 25% were looking a bit dodgy too. Several days’ work down the tube, but learning (of sorts) has taken place! Back to the drawing board……


- 456 replies
-
- 18
-
-
- finished
- bomb ketch
- (and 2 more)
-
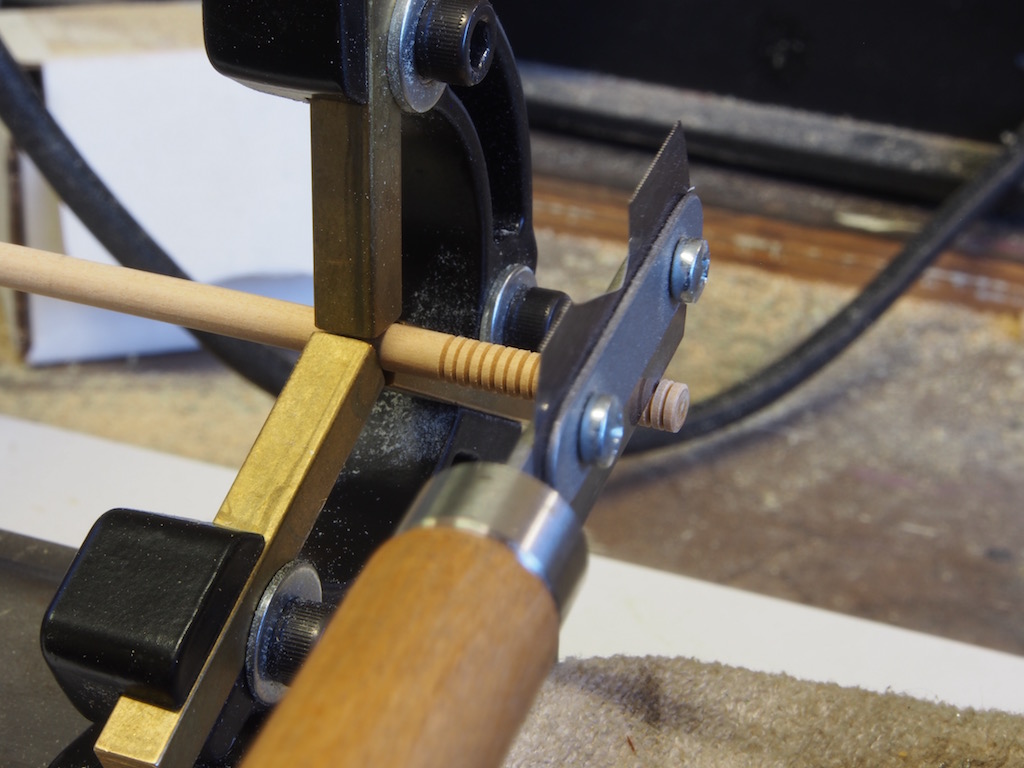
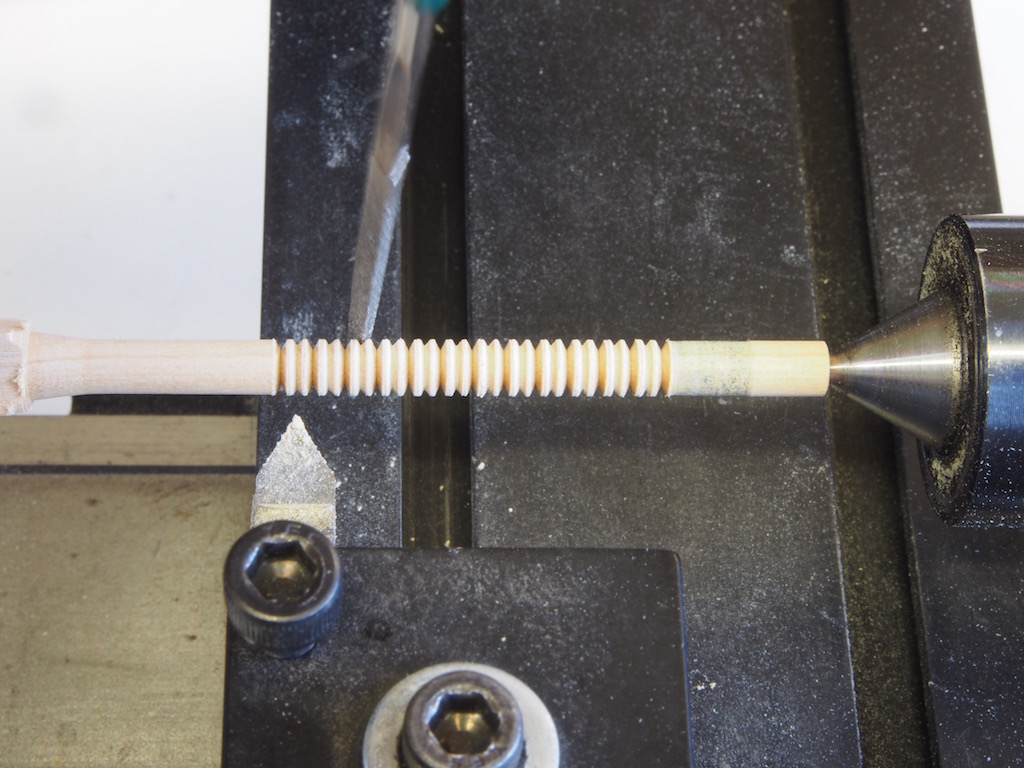
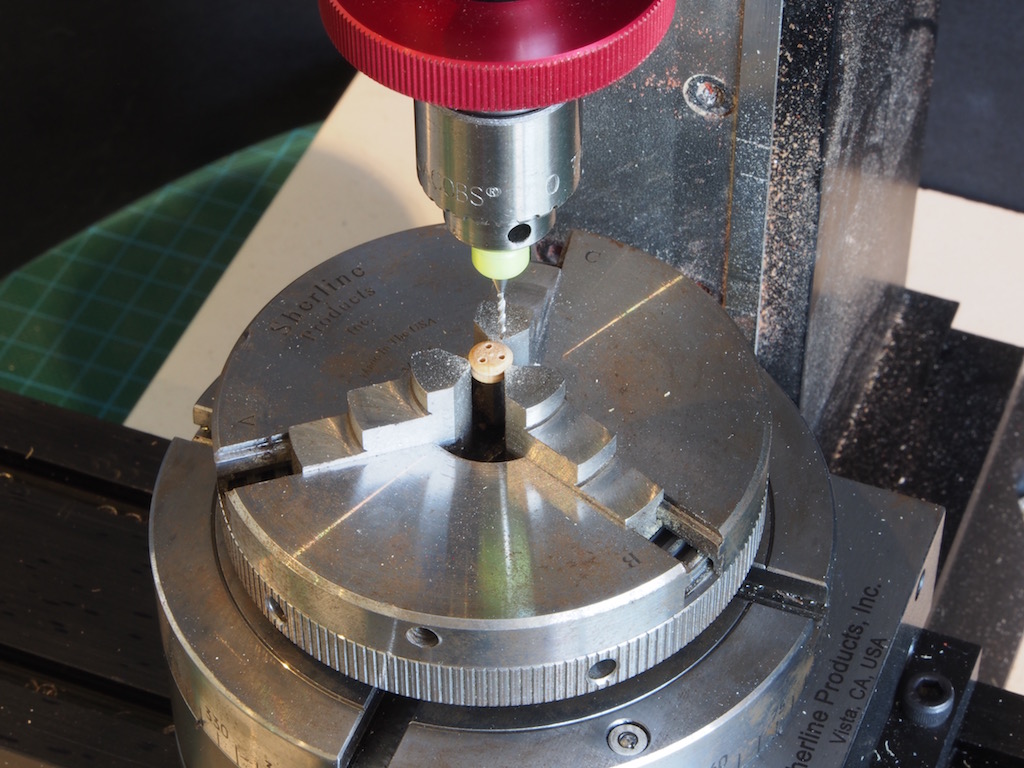
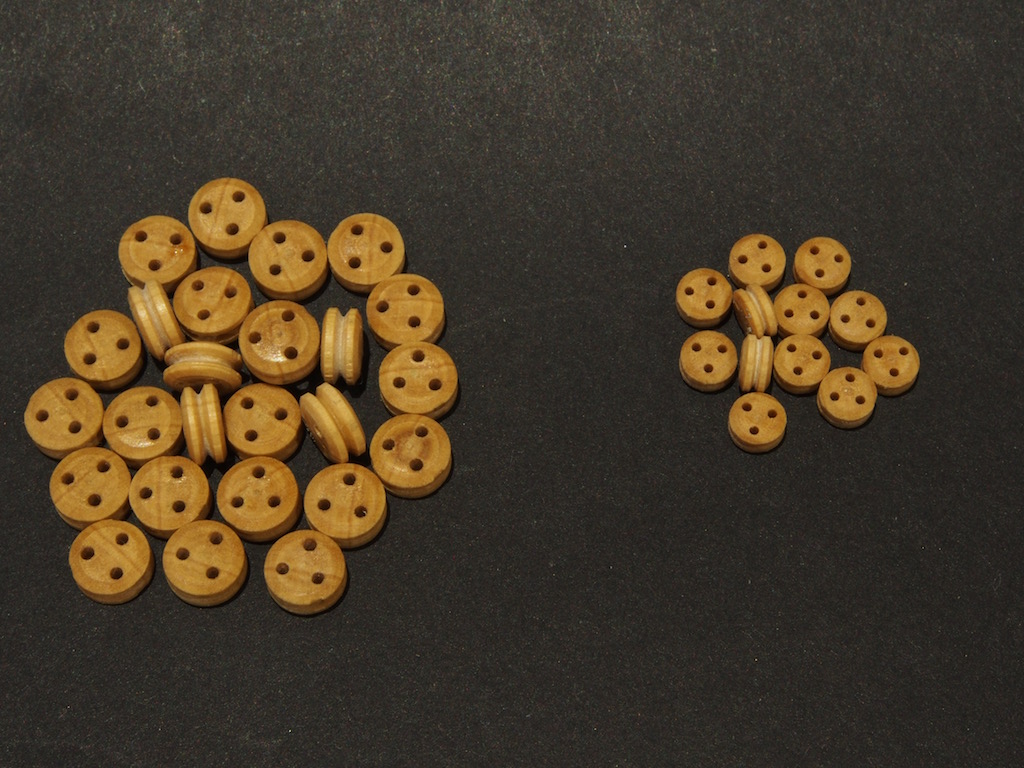
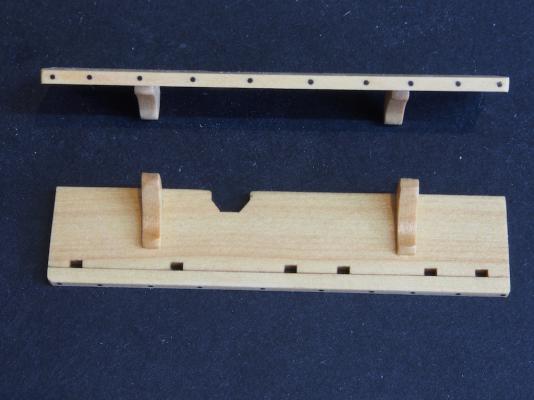
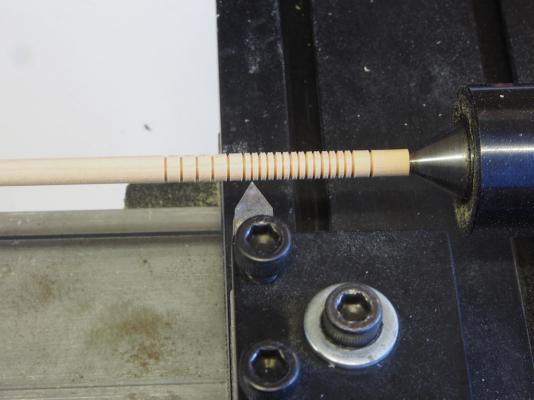
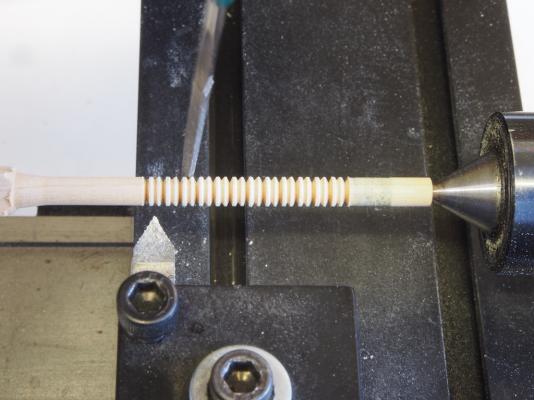
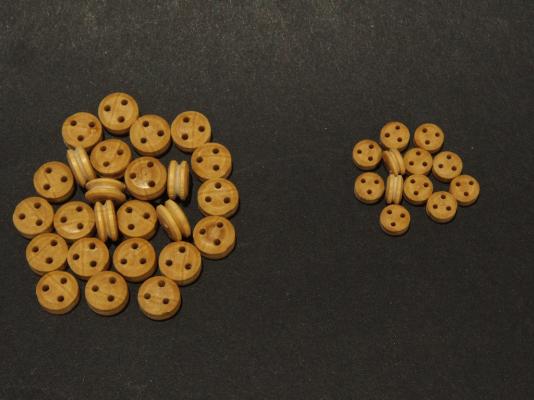
Thanks again for the kind comments and all the "likes". And welcome to the log Don - you'll find cold refreshments at the bar with Mark, and Sjors is around somewhere wit the popcorn. Some success and some spectacular failure this week! I'll spread this over two posts. Channels and Deadeyes First up, I decided that I wasn’t very happy with the cut-out in the Channels for the Swivel Gun pedestals - so I remade them, taking greater care with the cut-outs this time around. I also made up the Retaining Paunches. The drawings show these held in place with pins, so I drilled a series of 0.5mm holes and inserted copper pins into these, blackening in-situ with Liver of Sulphur on completion. Next up, a gratifying success story – the deadeyes. Two sizes of deadeyes are required – 6mm and 4.5mm diameter respectively. After turning down some 1/4" square Castello Boxwood to the appropriate outer diameter, I used a 60-degree Carbide-tip threading bit to delineate between individual deadeyes. By cutting only to about 1/4 of the diameter deep, this enabled me to cut a chamfer on both faces of each deadeye. Once all the individual deadeyes were marked out, I went back and, with the same bit, cut a small stropping groove. This groove was then widened slightly with a hand file while still on the lathe. This picture shows the initial cutting in progress. All individual deadeyes have been marked out, and the stropping grooves are now being cut. The work was supported during this process by a live centre at the tailstock end. When it came to parting off the individual deadeyes, the live centre was removed and a Steady Rest was placed close to the unsupported end of the stock. A razor saw was then used to complete the parting off process. I again decided I wasn’t happy with the first batch of deadeye blanks as neither the chamfer, nor the stropping groove were deep enough. So I re-did them. Here is a shot of the second attempt in progress. To drill the holes in the deadeyes, they were mounted one at a time in a three-jaw self-centring chuck, which itself was mounted on the Rotary Table on the Mill. The sensitive drilling attachment was used to drill a 1 mm hole in the larger (6mm) deadeyes, while a 0.7 mm hole was drilled in the smaller (4.5mm) deadeyes. The Rotary Table made short work of this task. After centring the drill bit over the lathe, it was then offset in the X-axis by one-quarter of the diameter (ie half-way between the centre and the outside of the deadeye). The first hole was drilled and the Rotary Table was turned 120-degrees for the second hole, and again for the third hole. It sounds long and tedious, but this turned out to be a lot quicker than one might at first imagine. Here is the Mill set-up: And here are the resulting deadeyes after a coat of Wipe-on Poly had been applied: Continued next post....


- 456 replies
-
- 20
-
-
- finished
- bomb ketch
- (and 2 more)
-
Cutter Cheerful 1806 by rafine - FINISHED
gjdale replied to rafine's topic in - Build logs for subjects built 1801 - 1850
Great work Bob!- 525 replies
-
- 4
-
-
- cheerful
- Syren Ship Model Company
- (and 1 more)
-
Very nice start Jack. I look forward to seeing the new building board.
- 170 replies
-
- 2
-
-
- gokstad
- dusek ship kits
- (and 1 more)