tlevine
-
Posts
1,951 -
Joined
-
Last visited
Content Type
Profiles
Forums
Gallery
Events
Everything posted by tlevine
-
Try making your eyebolt by twisting a piece of wire around the appropriate diameter drill bit to give the correct ID. This leaves you with a "pig tail" rather than a single piece of wire to insert into the deck. Drill the hole in the deck slightly smaller than required and then screw the "pig tail" in to the hole after applying a little two-part epoxy. This gives a lot more surface area for the epoxy to take hold.
-
 What beautiful craftsmanship. You have done all of this in 8 months? Incredible. AntiSpiral mentioned that there is a Russian forum you have the build posted on as well. Would you mind posting a link to that? Thanks.
- 226 replies
-
- 2
-

-
- cumberland
- 74 gun
- (and 1 more)
-
The update was definitely worth the wait. She's beautiful. You said she is smaller than a Swan class...approximately what is her length? How much internal detailing are you planning?
-
Looks great, Bob. I also made the breast hook flush with the caprail.
-
Thanks for looking in, Kevin. Greg, I have actually run into people I know when hiking. No small feat when you consider this park is 1300 miles from home.
-
Look in the Gallery section for photos of my Hannah. There is a picture of a fully planked side.
-
John and Druxey, thank you. Mark, the picture was taken in Glacier National Park, Montana on the Grinnell Glacier trail. I forget which mountain that was.
-
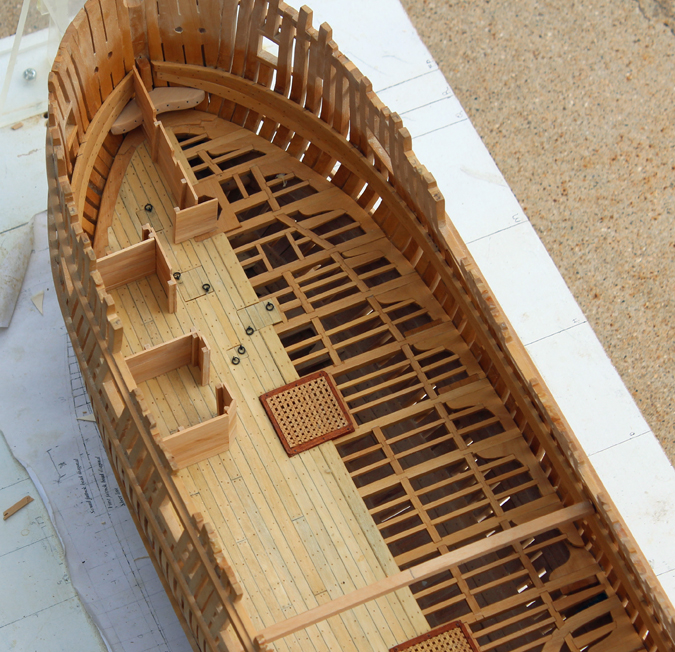
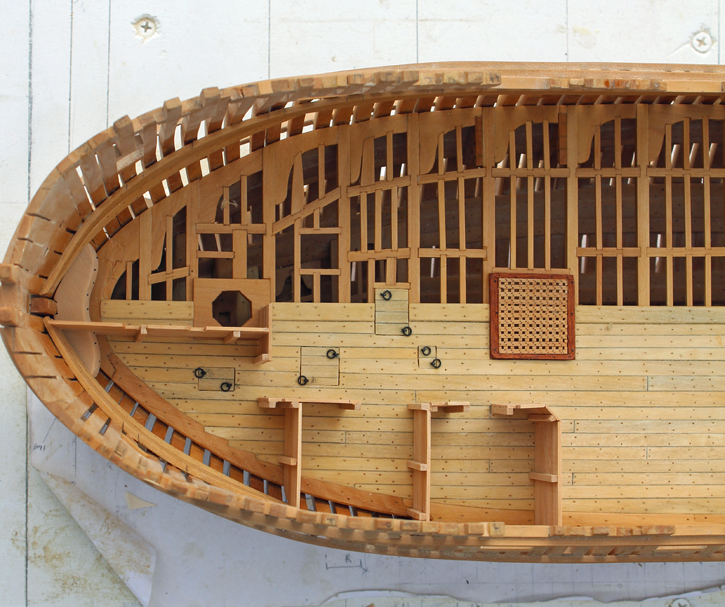
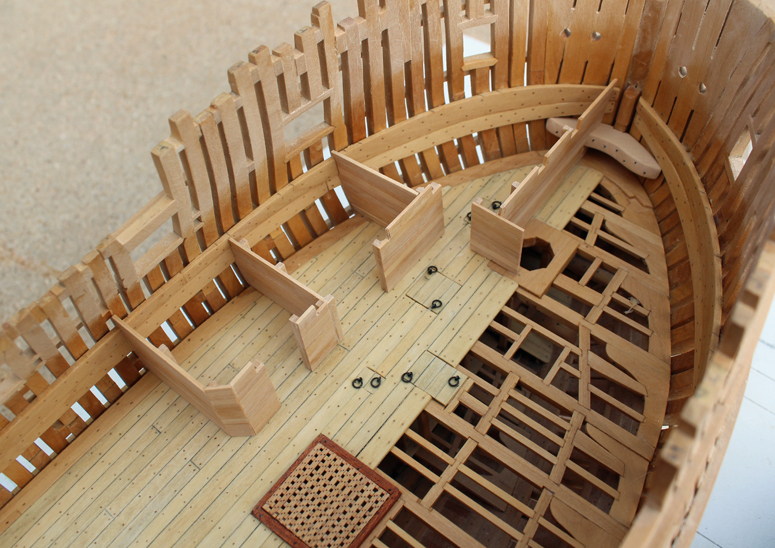
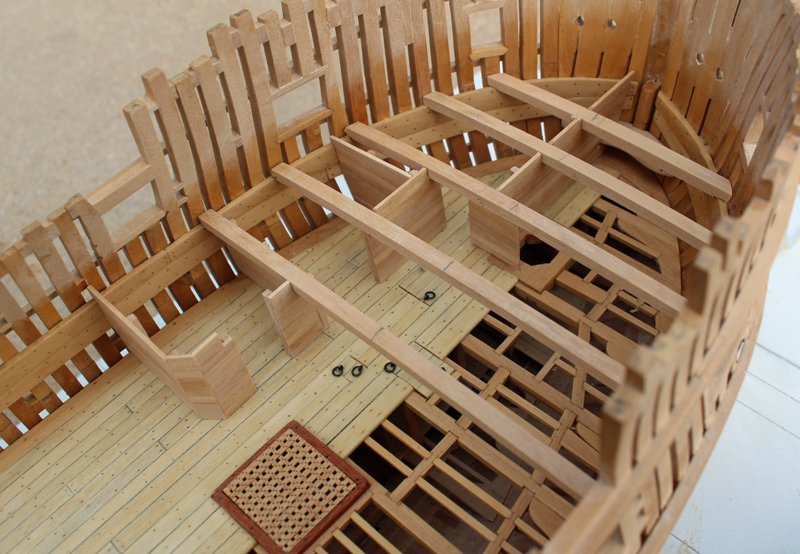
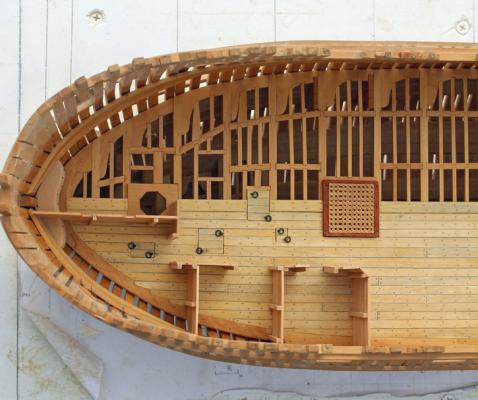
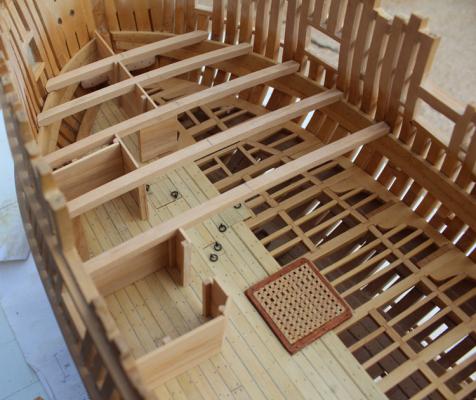
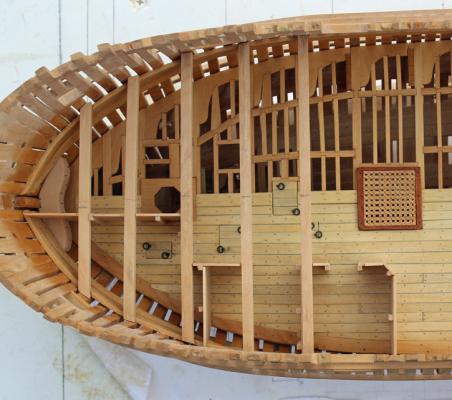
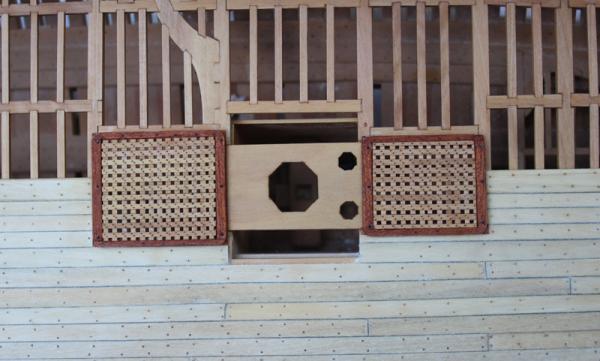
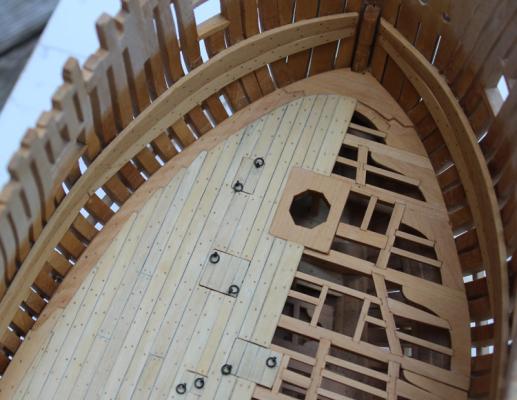
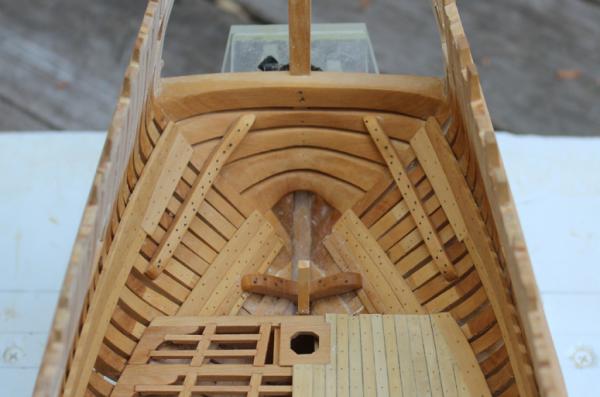
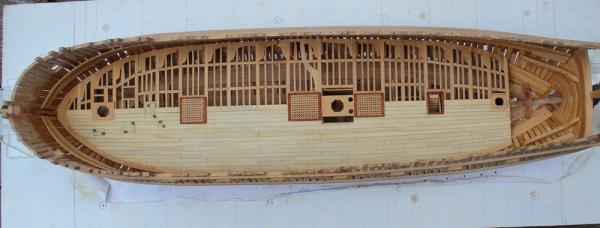
There has been nothing to show for the last few weeks since I turned in my workshop and tools in for a tent and hiking boots. Now I am back and have started on the structures which sit on the lower deck. My plan is to erect the fore and aft bulkheads first and then install the upper well. The foremost structure is a breast hook which is located between the lower and upper beams. On the Mylar plan this is shown as a horizontal structure but on the NMM draft it is canted up 30 degrees. This was made using a template out of 8" (scale) stock. There are nine bolts that secure the breast hook to the frames. Because of the angle, the bolts are all decorative. The bulkheads are made of 2" x 6" material. I made a sheet of eleven rows of planks long enough to fabricate all of the fore bulkheads (approx. 14" long). The location of the various bulkheads was confirmed from the plan and was identical to the plan shown in the book. The first five beams had to be temporarily installed so that notches could be cut into the bulkheads. I have attached pictures with the beams in place and removed to show the notches. At this point, nothing has been permanently installed. The next steps include fabrication of the lanterns and doors.


-
HMS Druid by Krug - FINISHED - 1:48 - Hahn
tlevine replied to kruginmi's topic in - Build logs for subjects built 1751 - 1800
You will be applying some sort of finish after the hull is completed, won't you? With soft woods in particular, a penetrating finish will help stabilize the wood and decrease its swelling/shrinkage with changes in humidity. -
Thanks for looking in, Harvey. I am using the Costello boxwood for the pillars. The few pieces of "real" boxwood I have are reserved for future attempts at carving. This wood is really no more costly than cherry and turns nicely.
-
Thank you Maury and Druxey. Since there are several more pillars to make I will continue to experiment. I was just about to try your suggestion, Druxey, when "me" time was over and family time began. I will be away from my workshop until mid-August so any further attempts will have to wait until then.
-
Mark, I have owned the duplicator for several years but because I don't need to use it very often it is always a challenge to set up. The total set-up time, including making the pattern was about an hour. Getting a decent pillar...another hour. After that, at my 2:1 throw-out to keep ratio, each good pillar took another half hour. The biggest problem for me was holding the pillar square in the chuck. My two choices are the standard three-point lathe chuck and a Jacob's chuck. With either one, the blank tended to be just slightly off center, resulting in incomplete cutting of the spindles on one side of the piece. With the next batch I plan on using an oversize blank to compensate for this and then trimming down the square ends to the correct size after it has been turned.
-
I have started making the pillars between the upper and lower decks. The pillars in the hold were simple affairs but these have a spindle on the top and bottom. There is a drawing of the pillar on the plans and I did my best to copy it. On one end, the spindle has two turns and at the other end only one. I am turning them on a Sherline lathe using a duplicator from Vanda-Lay. http://vanda-layindustries.com/html/duplicator.html The outline for the pillar is ground onto a single edged razor using very thin grinding discs designed for use in dental labs. The spine of the razor was removed to allow it to fit into the duplicator holder. The rough shape was made with the cutting tool and final shaping was done with a triangular needle file. The top square of the pillar is 5" and the bottom square is 6". I will remove the extra wood on top after I have a few more pillars made. The good news is that all the pillars do not need to be made at once. Since I am averaging one keeper to two throw-aways, that is a good thing.


-
The breeching line looks much better with the stain. Not only is the color more consistent with the tackles but the stain also brings out the twist in the line, making it more "ropelike".
-
Thank you Ed and Druxey regarding the yellowing of holly. I think Greg used the GF product on Pegasus.
-
Greg, it may also be the holly I am using. This wood is cut from billets I have had approx. 20 years. I used the same finish on the Swan cutter (the holly is from Jeff at HobbyMill) and I looked at it today and it has barely yellowed after almost three years. Druxey, if it yellows that much over time, I guess I won't worry about it. The whole idea is to have some contrast between the two woods, rather than a monotone, and even the minor color difference provides for that.
-
Elmir, I am not sure what linen oil is...maybe linseed oil? From personal experience, I have had the experience of bleeding as a result of the finish being applied. I hope you do not have any problems.
-
Way too hot and humid today. And it's supposed to rain later. How's that for a few excuses to stay with the ship?
-
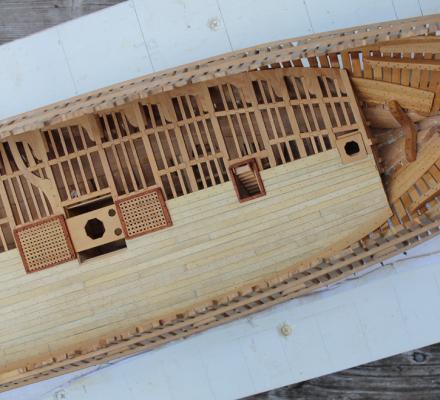
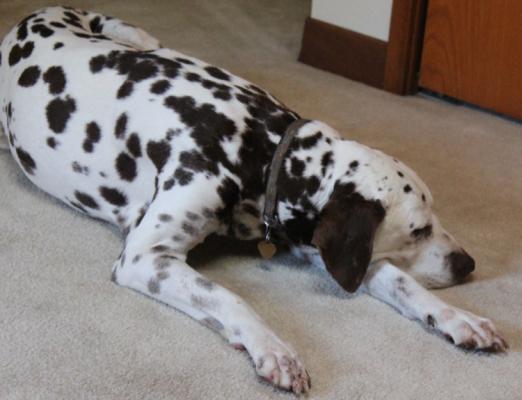
Having heard Mr. Excitement got his picture posted, Sadie got jealous and tried to give me her best "I'm excited" or is that "Feed me" look. I have applied the finish to the deck, hatches/coamings and inner hull up to two (scale) feet above the upper deck clamp. I am a little disappointed that the holly turned so yellow but there is still a reasonable contrast between it and the boxwood waterway. On the other hand, the cherry on the hatch coamings really pops. The last picture shows the change in the color of the boxwood with the finish applied and sanded with 400 grit.

-
Thanks for looking in Nils. I have not yet decided whether to leave the build as hull-only or to mast and rig her. A lot of that will depend on my mood when she is completed a few years from now. It will be placed on a stand with two pedestals. The keel has already been drilled for them. This is an entirely scratch built ship following the Fully Framed Model series by David Antscherl and built using costello boxwood as the primary wood with holly decking. The plans were obtained from the National Maritime Museum.
-
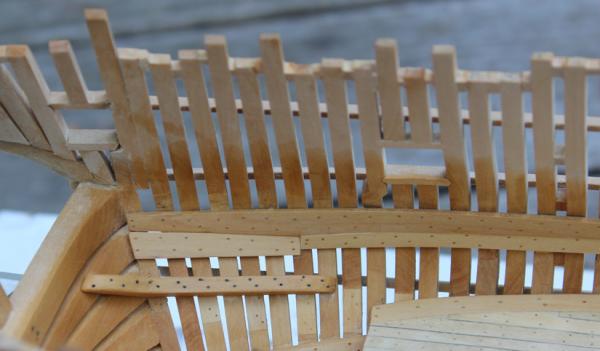
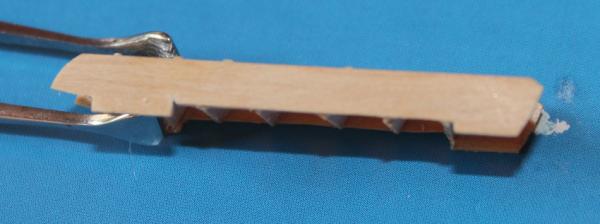
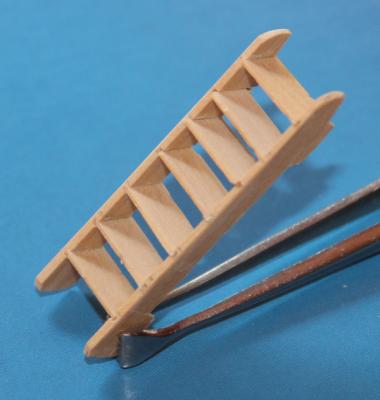
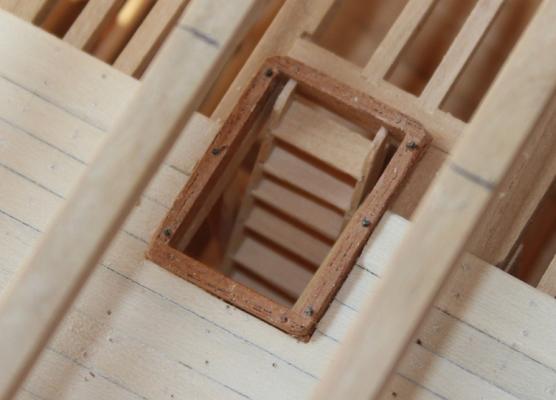
Daniel, isopropyl alcohol keeps us all out of trouble! And if it is too late for that...then it's time for they ethyl alcolhol instead. I have built the ladder from the lower deck to the aft platform. This is the last structure to make before starting work on the lower deck furniture. I have used the pattern from TFFM. The slots in the stiles for the risers were made with the table saw. I have a 0.16" kerf slitting blade which is just wide enough for the risers and used that to make the mortises in the stiles. A coat of finish was applied before gluing it in place. Although I am pleased with completing this part of the build, Mr. Excitement (aka Cocoa) is less than thrilled.
-
Danny, I've been very quiet on you build log for the last several months since the rebirth. I used this time as an opportunity to review all the old, reposted work as well as things that I ordinarily would not have looked at. I saved the best few for last (ie Vulture and a few others). Love what I see and hopefully, when I get to this point in my build, I can do almost as well as you have done. Question...what was the lead time on your cannons?
-
Before you go any farther with the deck, make a mock-up off the model and then apply a coat of finish. If there is going to be any bleeding, it will show up then.
-
Thanks a lot Paddy. Bob F uses the same building board. In fact, he might have made mine! These were distributed to all the participants in the Tri-Cub. Anyway, the board is 3" x 9" and is made of 3/8" plywood. Enjoy your build and don't be afraid to ask questions.
-
Thank you, Druxey. The hardest part was keeping them mirror images of each other. Thanks, Geoff. When it is time for the gratings on your Connie, remember to make jigs for various scales all at once. Then you'll never have to do it again! On the back of this jig is the jig for Hannah, both made at the same time.