

Timmo
-
Posts
609 -
Joined
-
Last visited
Content Type
Profiles
Forums
Gallery
Events
Posts posted by Timmo
-
-
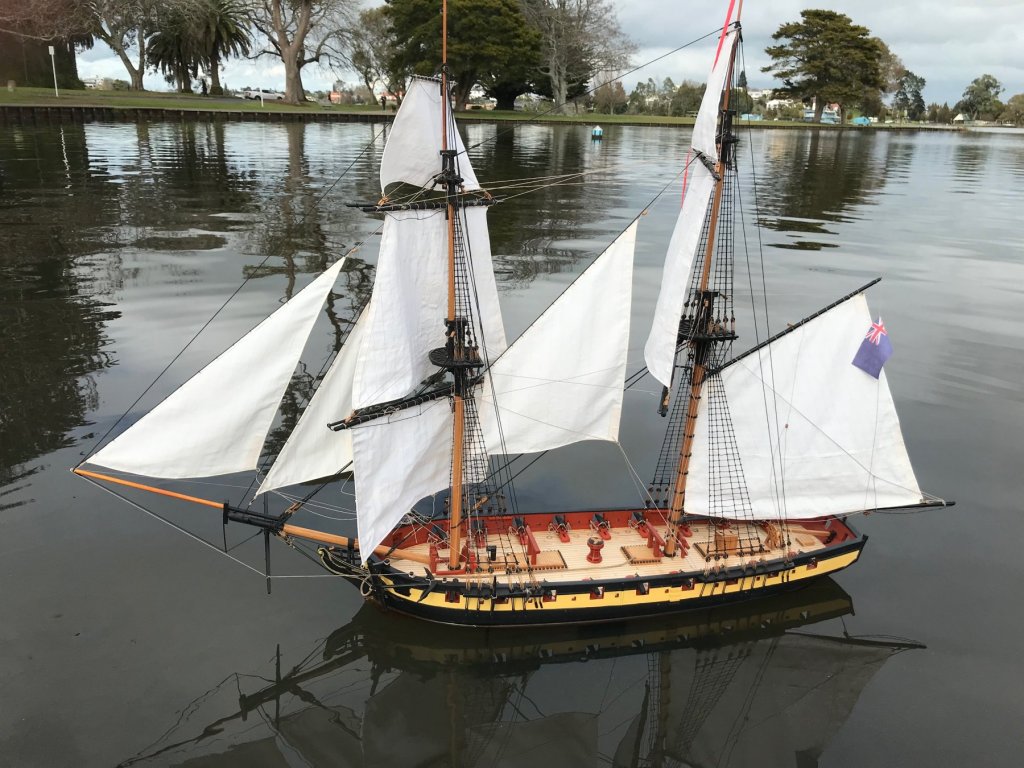
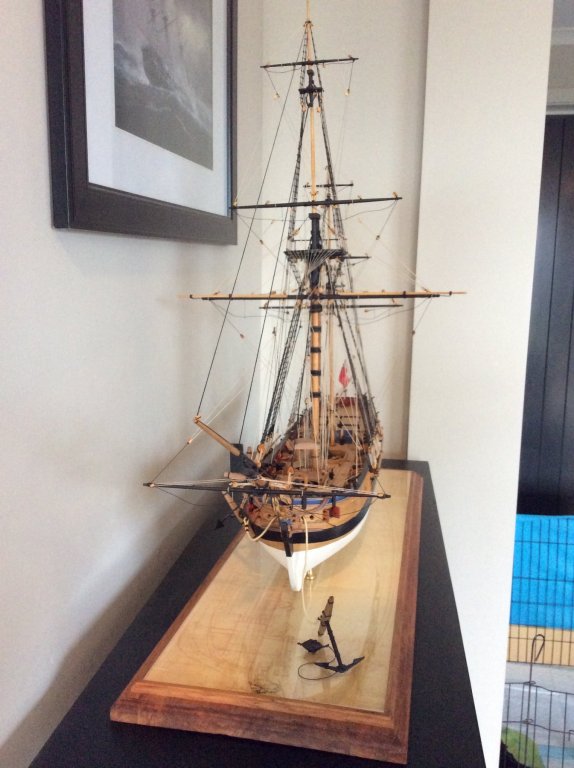
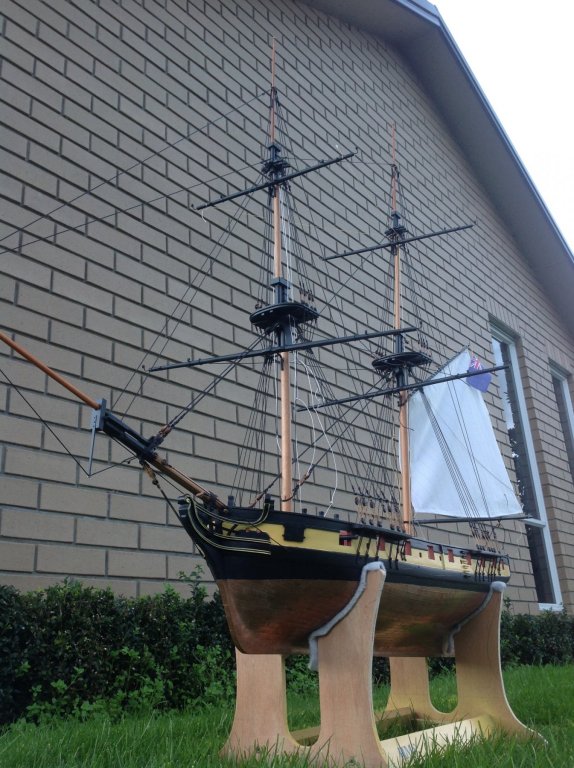
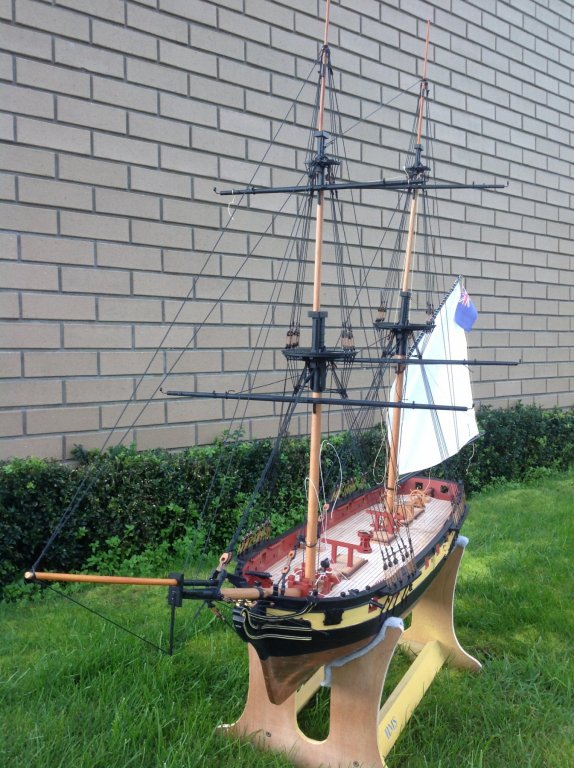
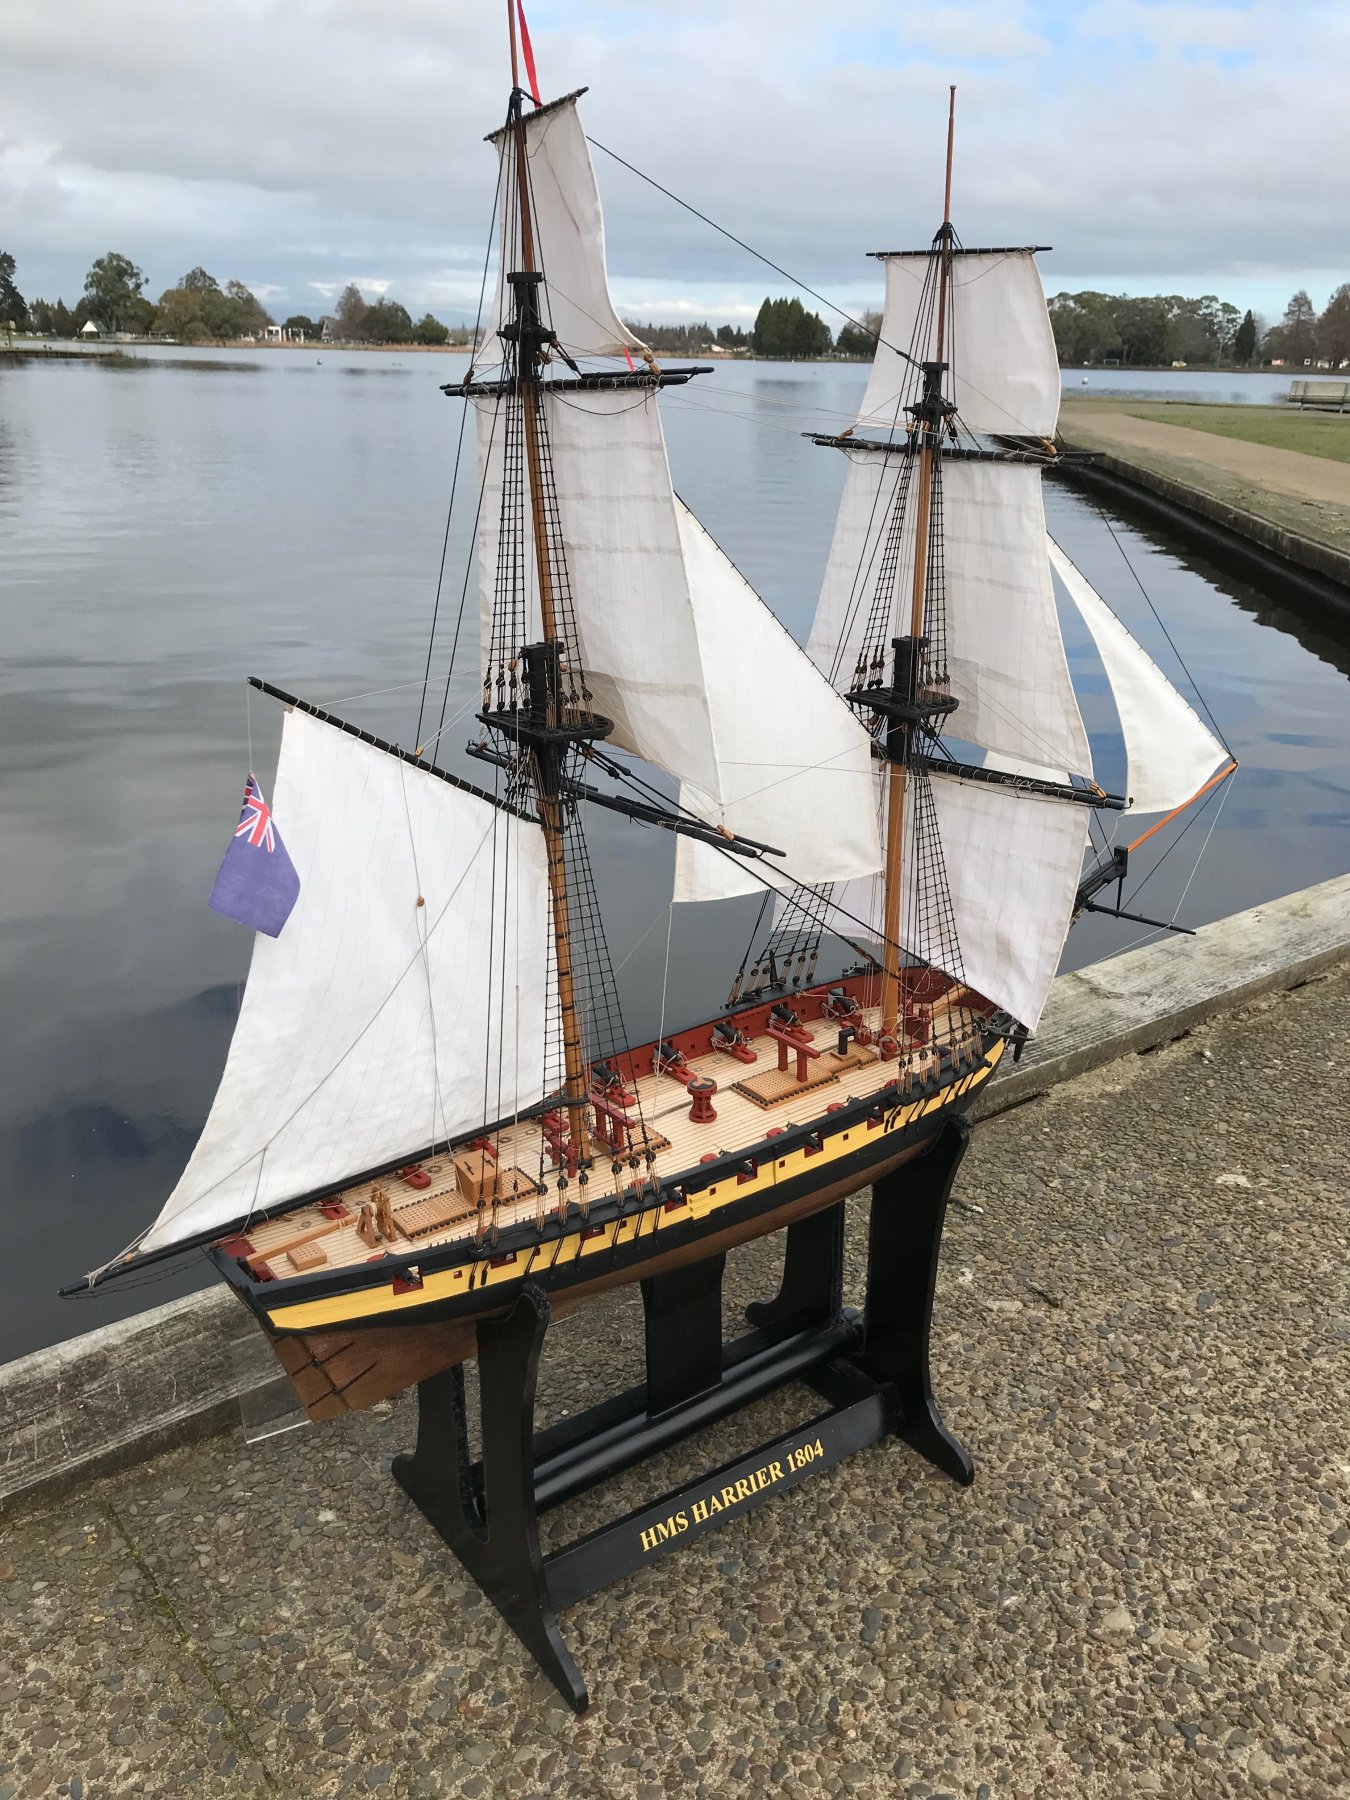
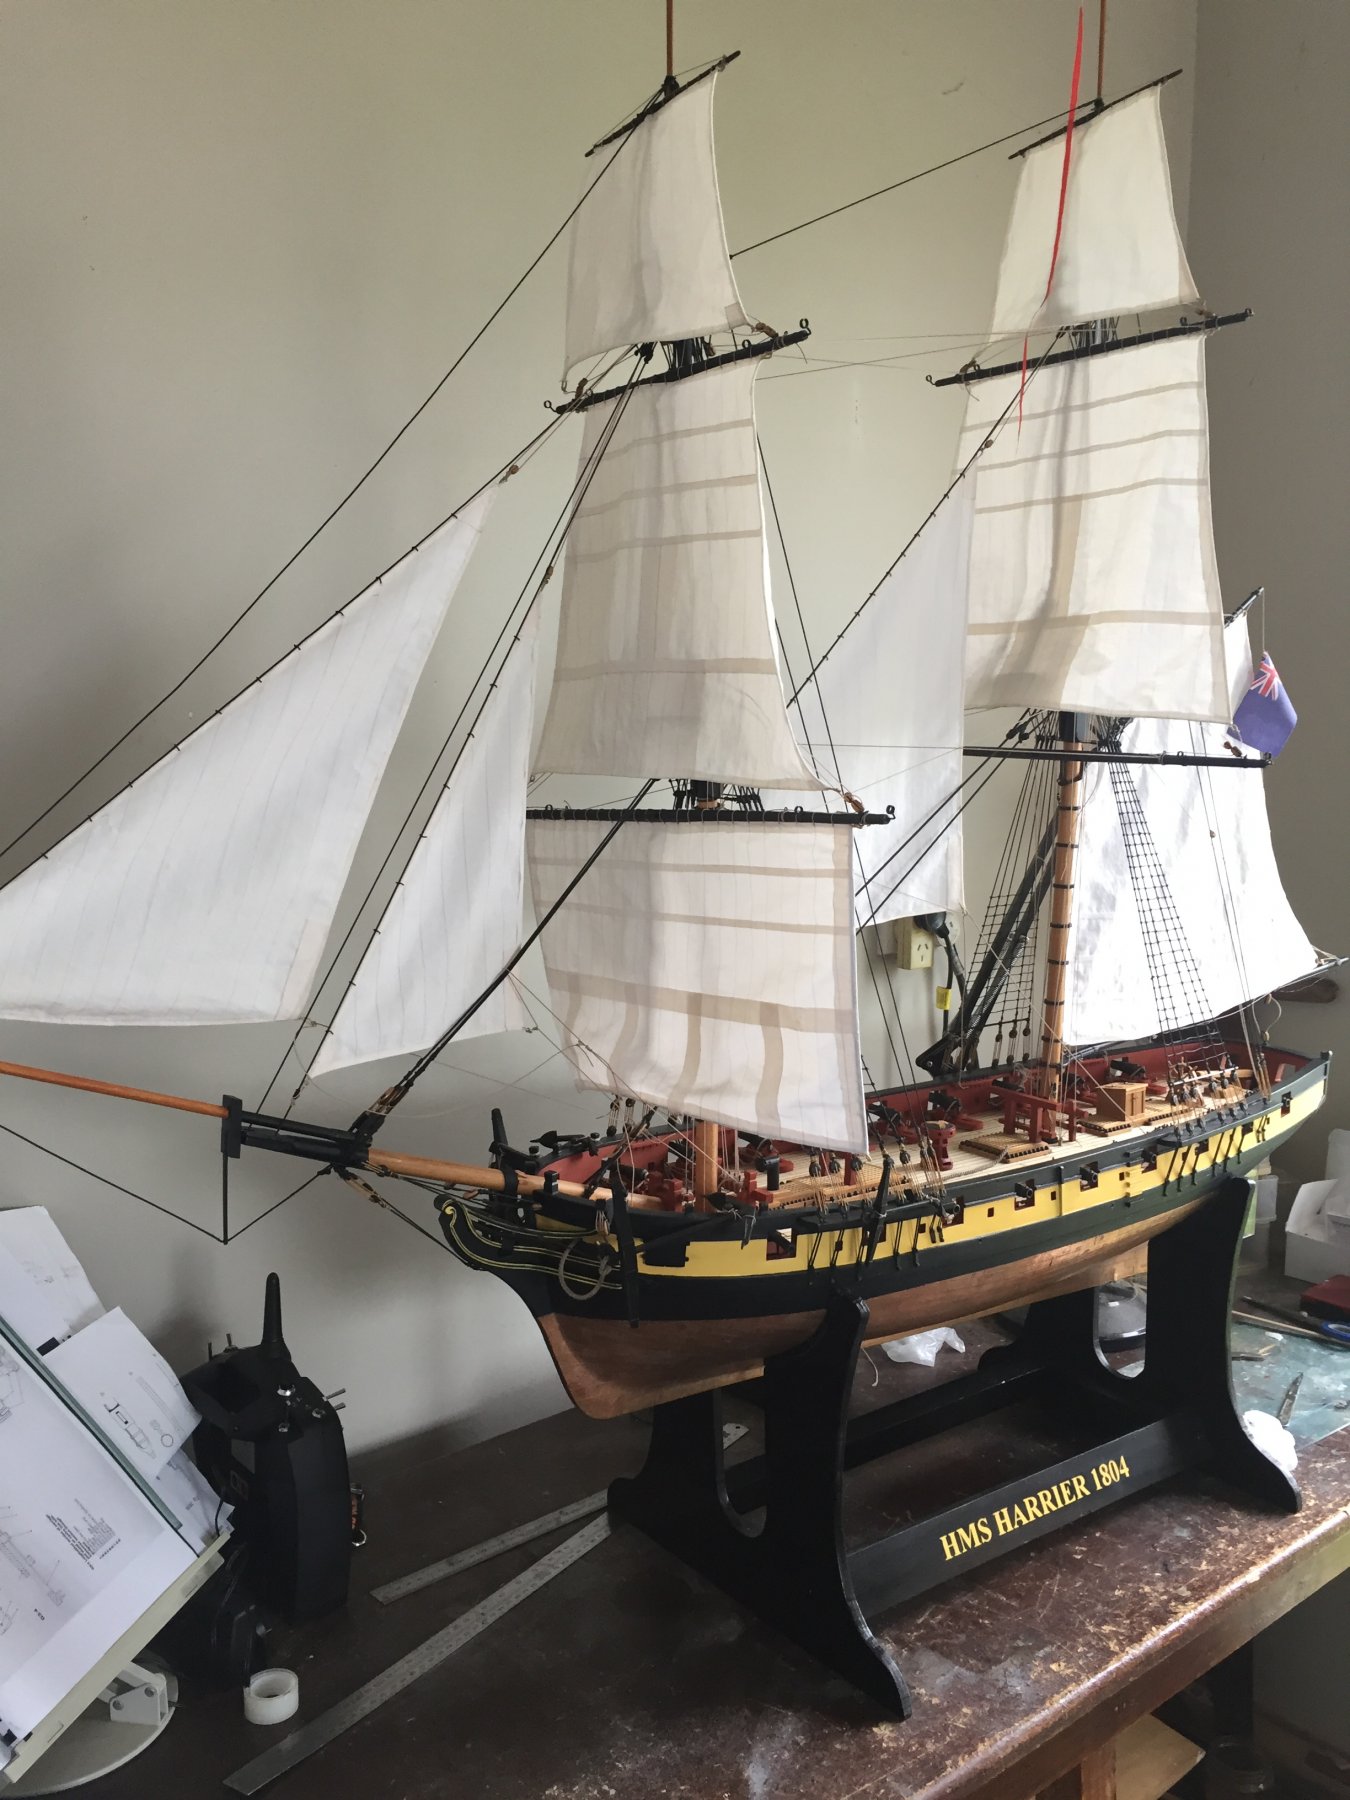
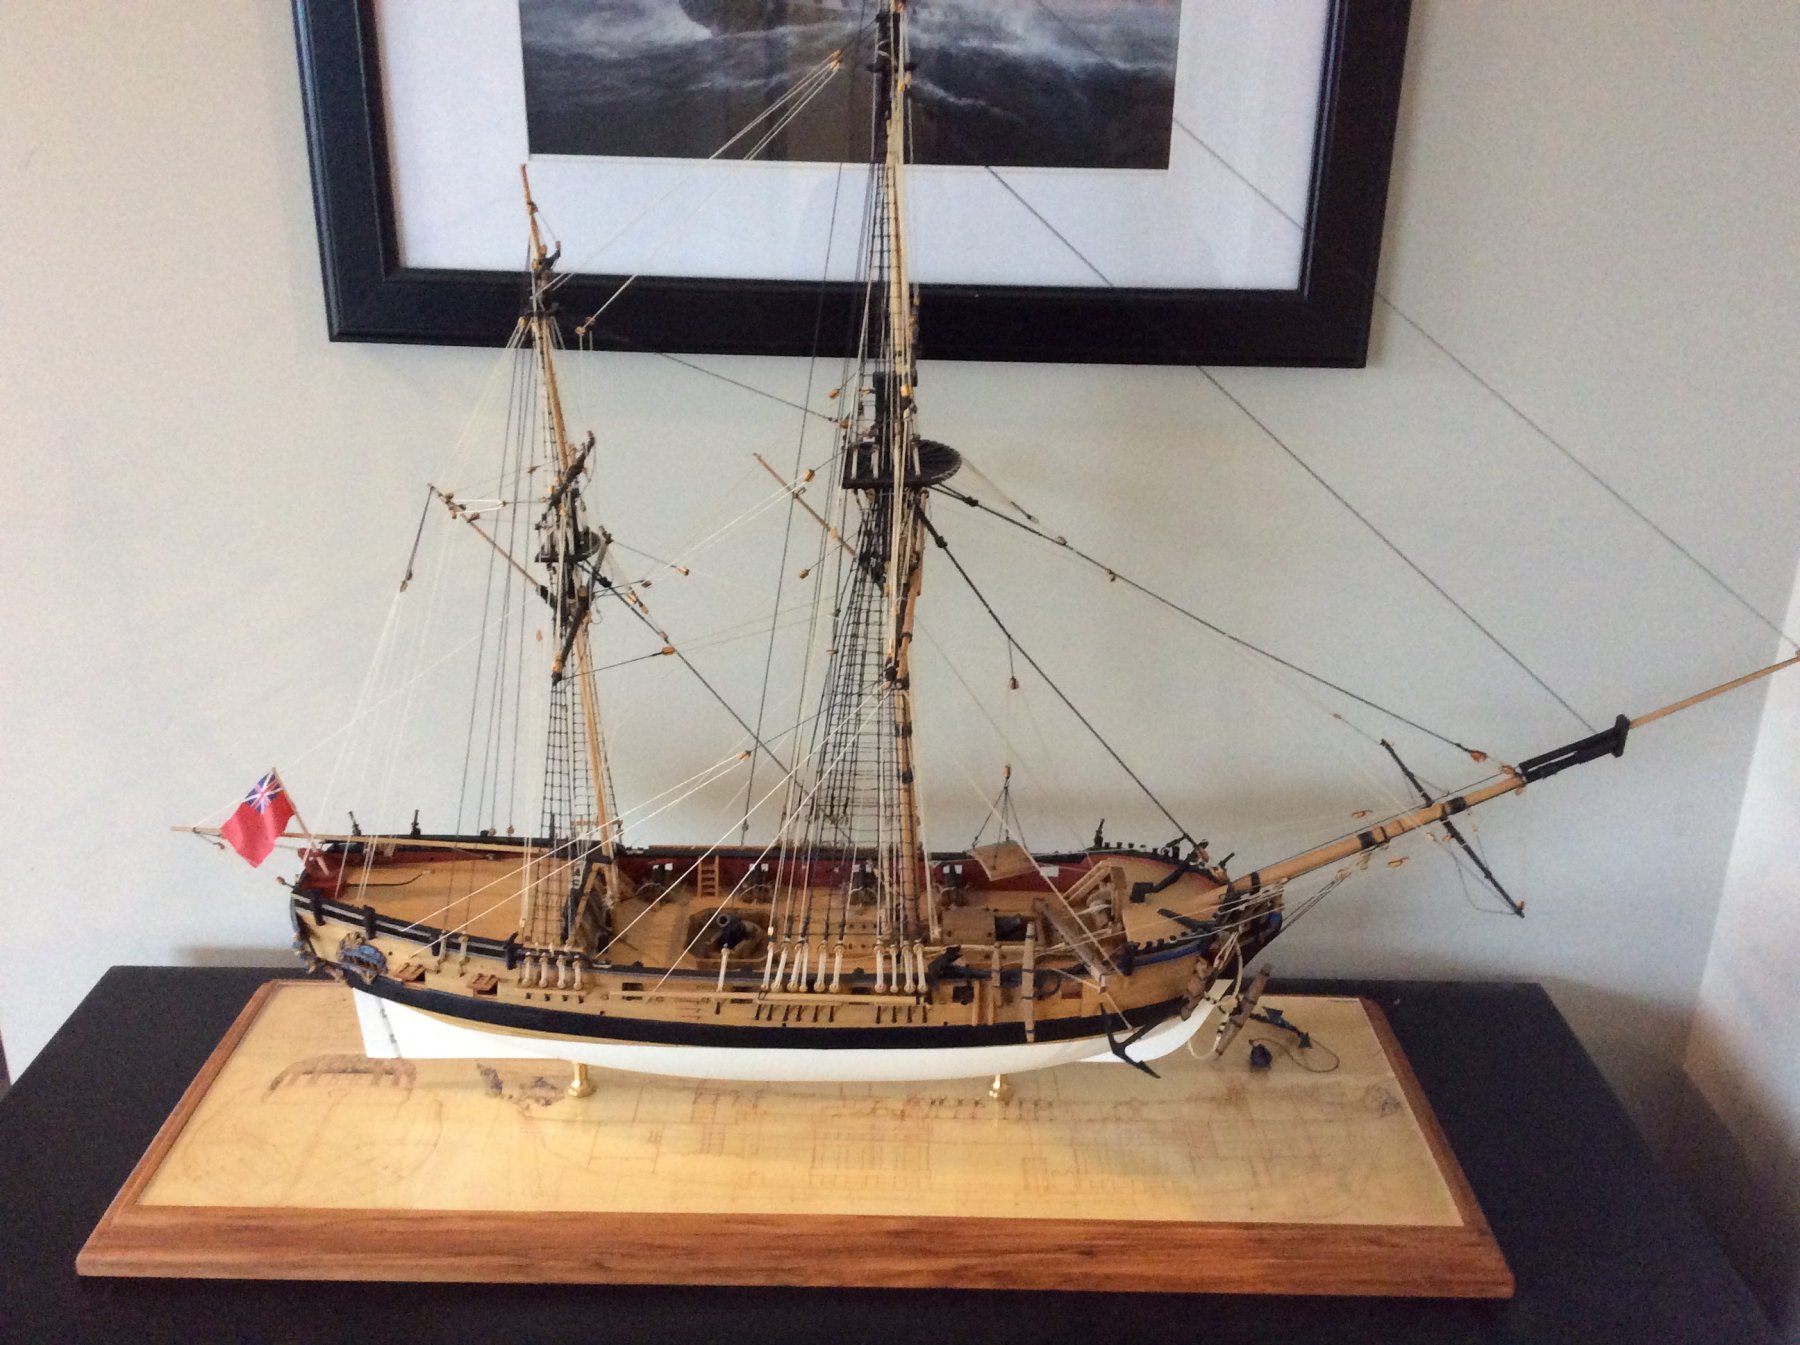
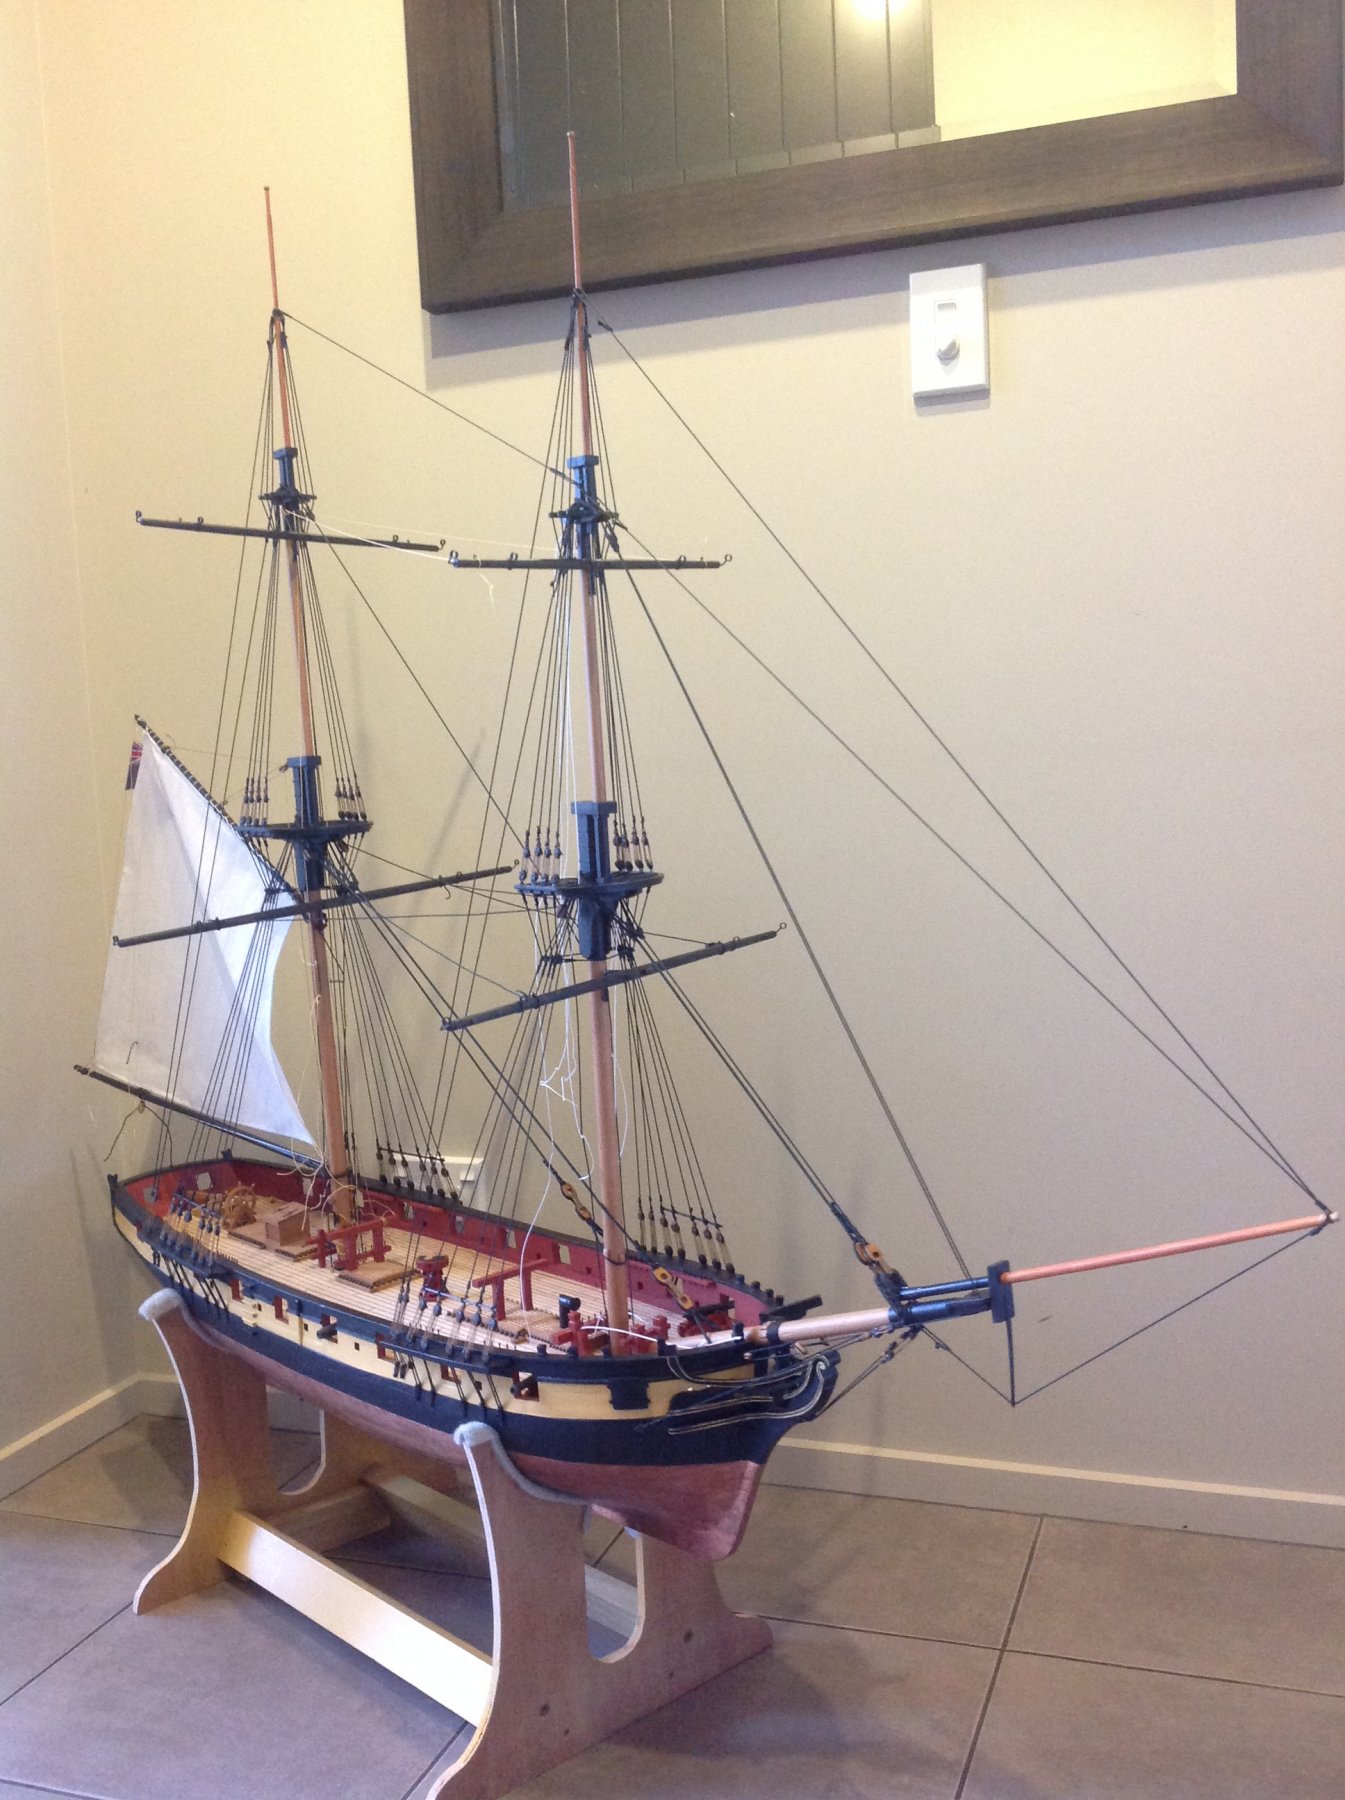
Harrier has been sailing for a while now but I've finally got her how I wanted her with some modifications to improve yard rotation and hence windward ability and also the cosmetics like gun and other rigging.
Also, I've got evidence that she sails uploaded to youtube, (check my other vids and you can also see my recently built cedar canoe that's kept me from ship modelling for a bit).
Thanks to all who offered advice and knowledge, whether you knew it or not, and provided actual bits for her. It wouldn't have happened without you.
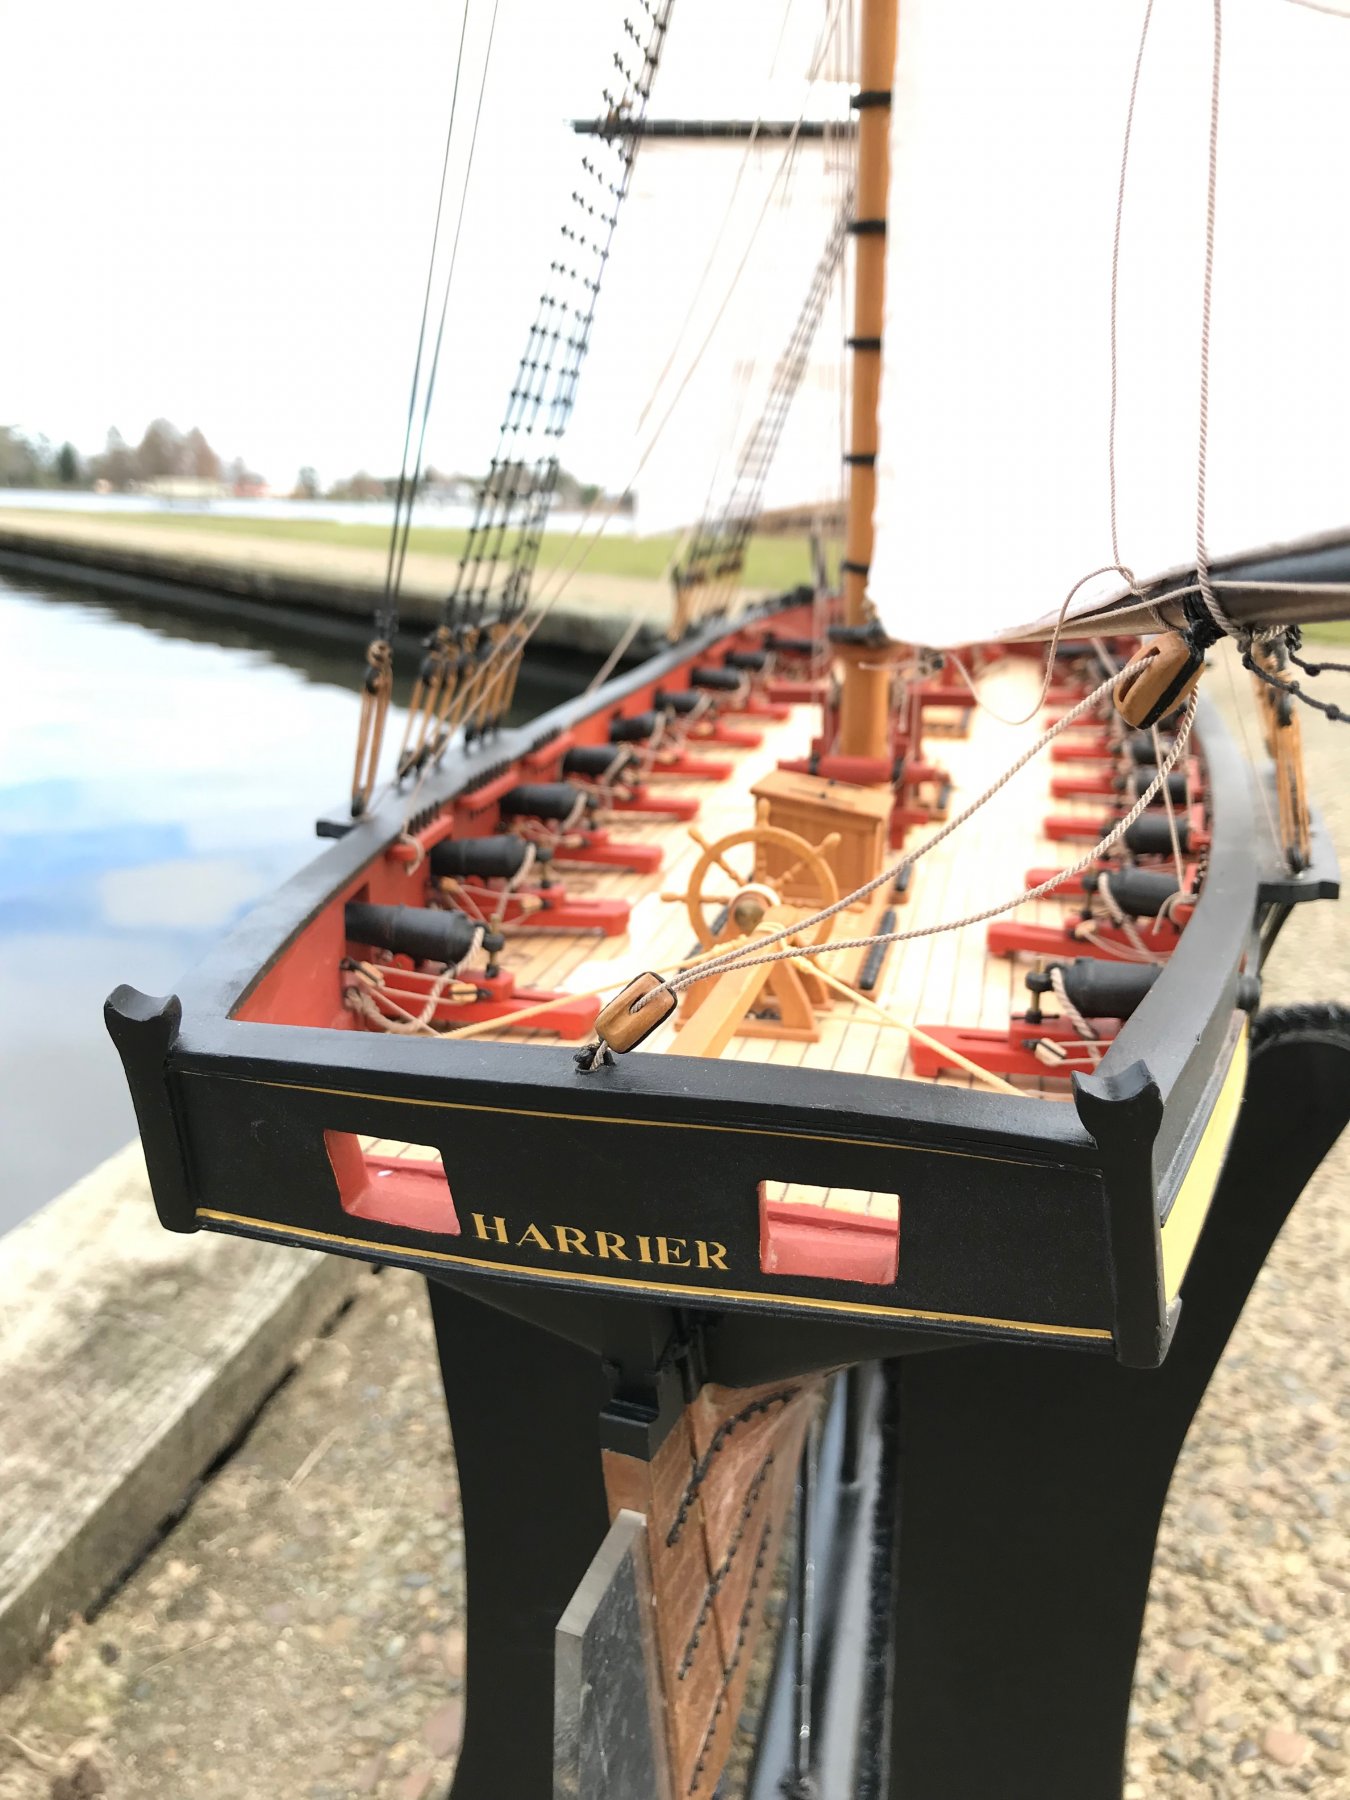
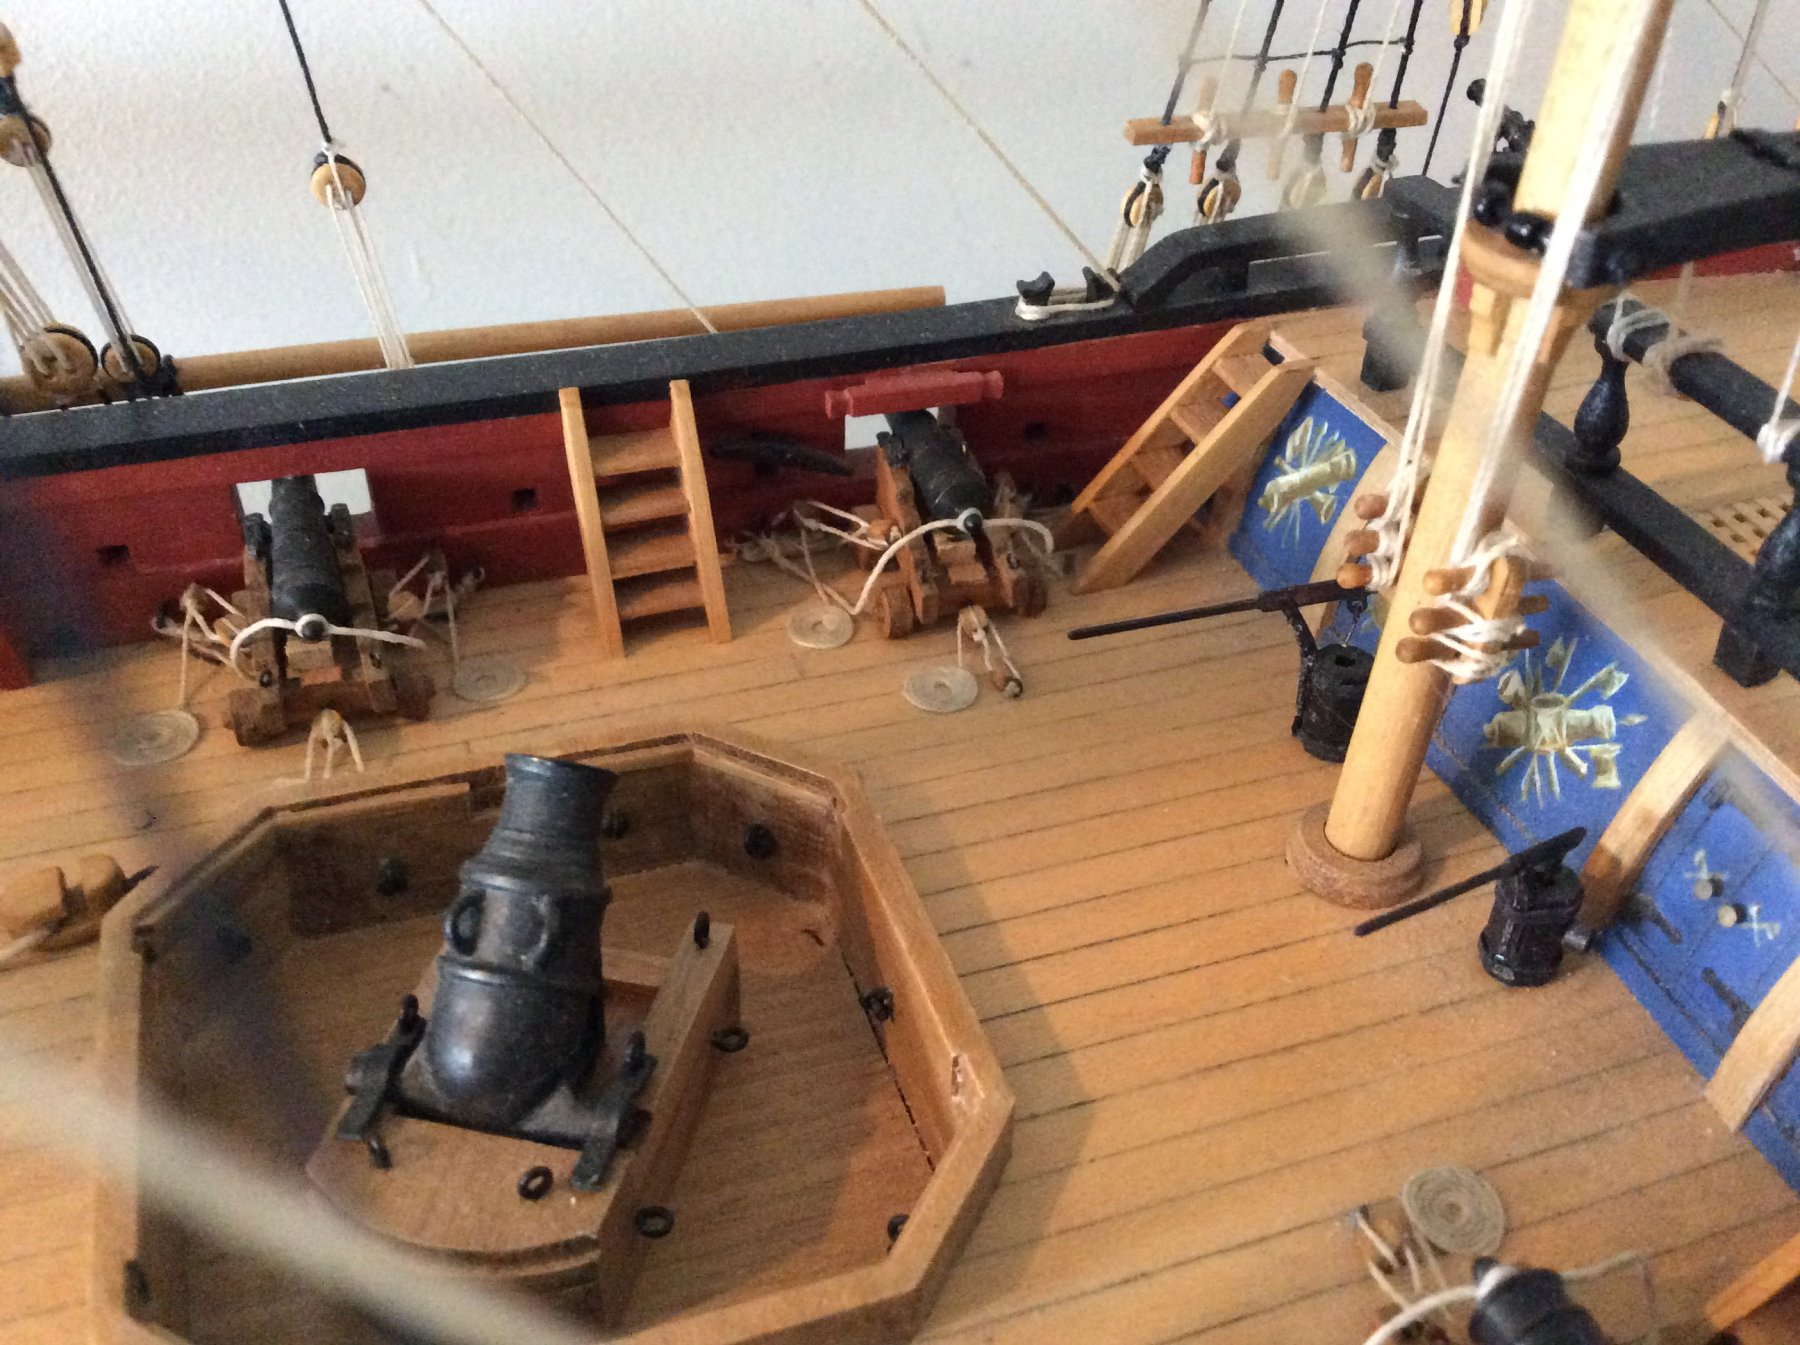
Harrier cleared for action.

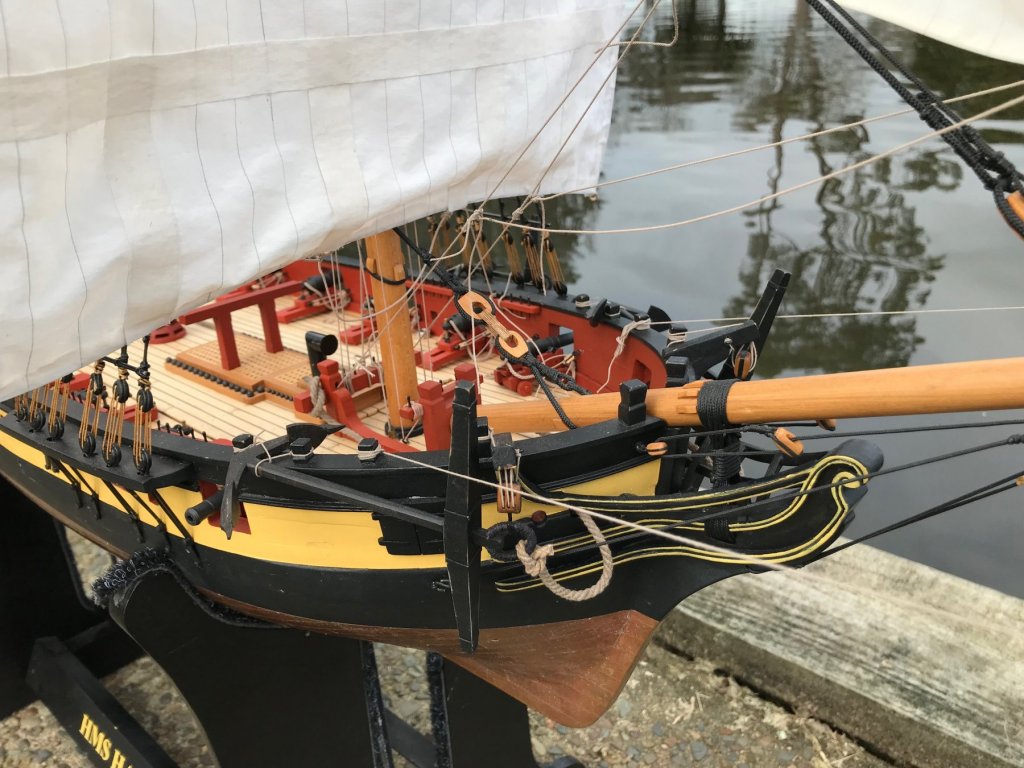
The deck hatches lines offering access to the radio gear disappear at the right angles. You can see the rear hatch to the left in this shot and the clear tape that's used to seal them before sailing. After many attempts to get a self sealing hatch with rubber seals this was far easier and more effective.


The tiller is functional with the lines coming from a drum servo below decks and pulling it to either side. The wheel, however, is static as it felt like one more thing to go wrong and a little fragile. It's nice watching the tiller swing under a ghost helmsman's hand.

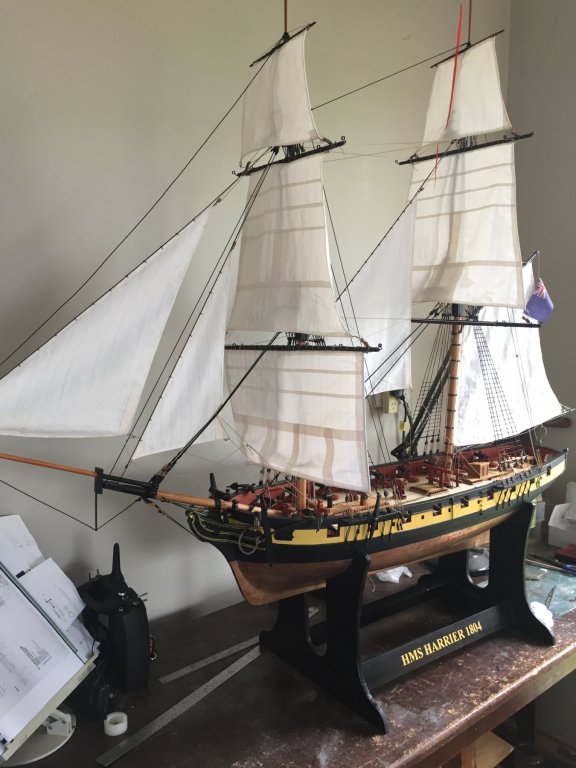
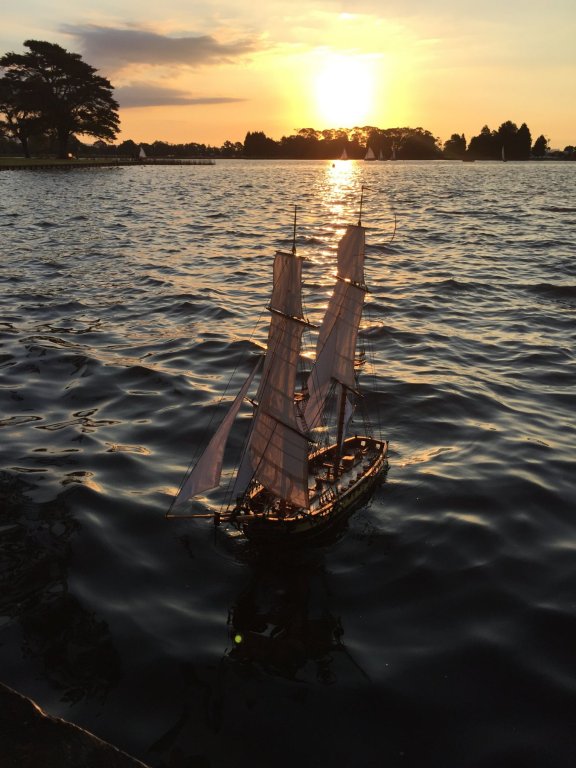
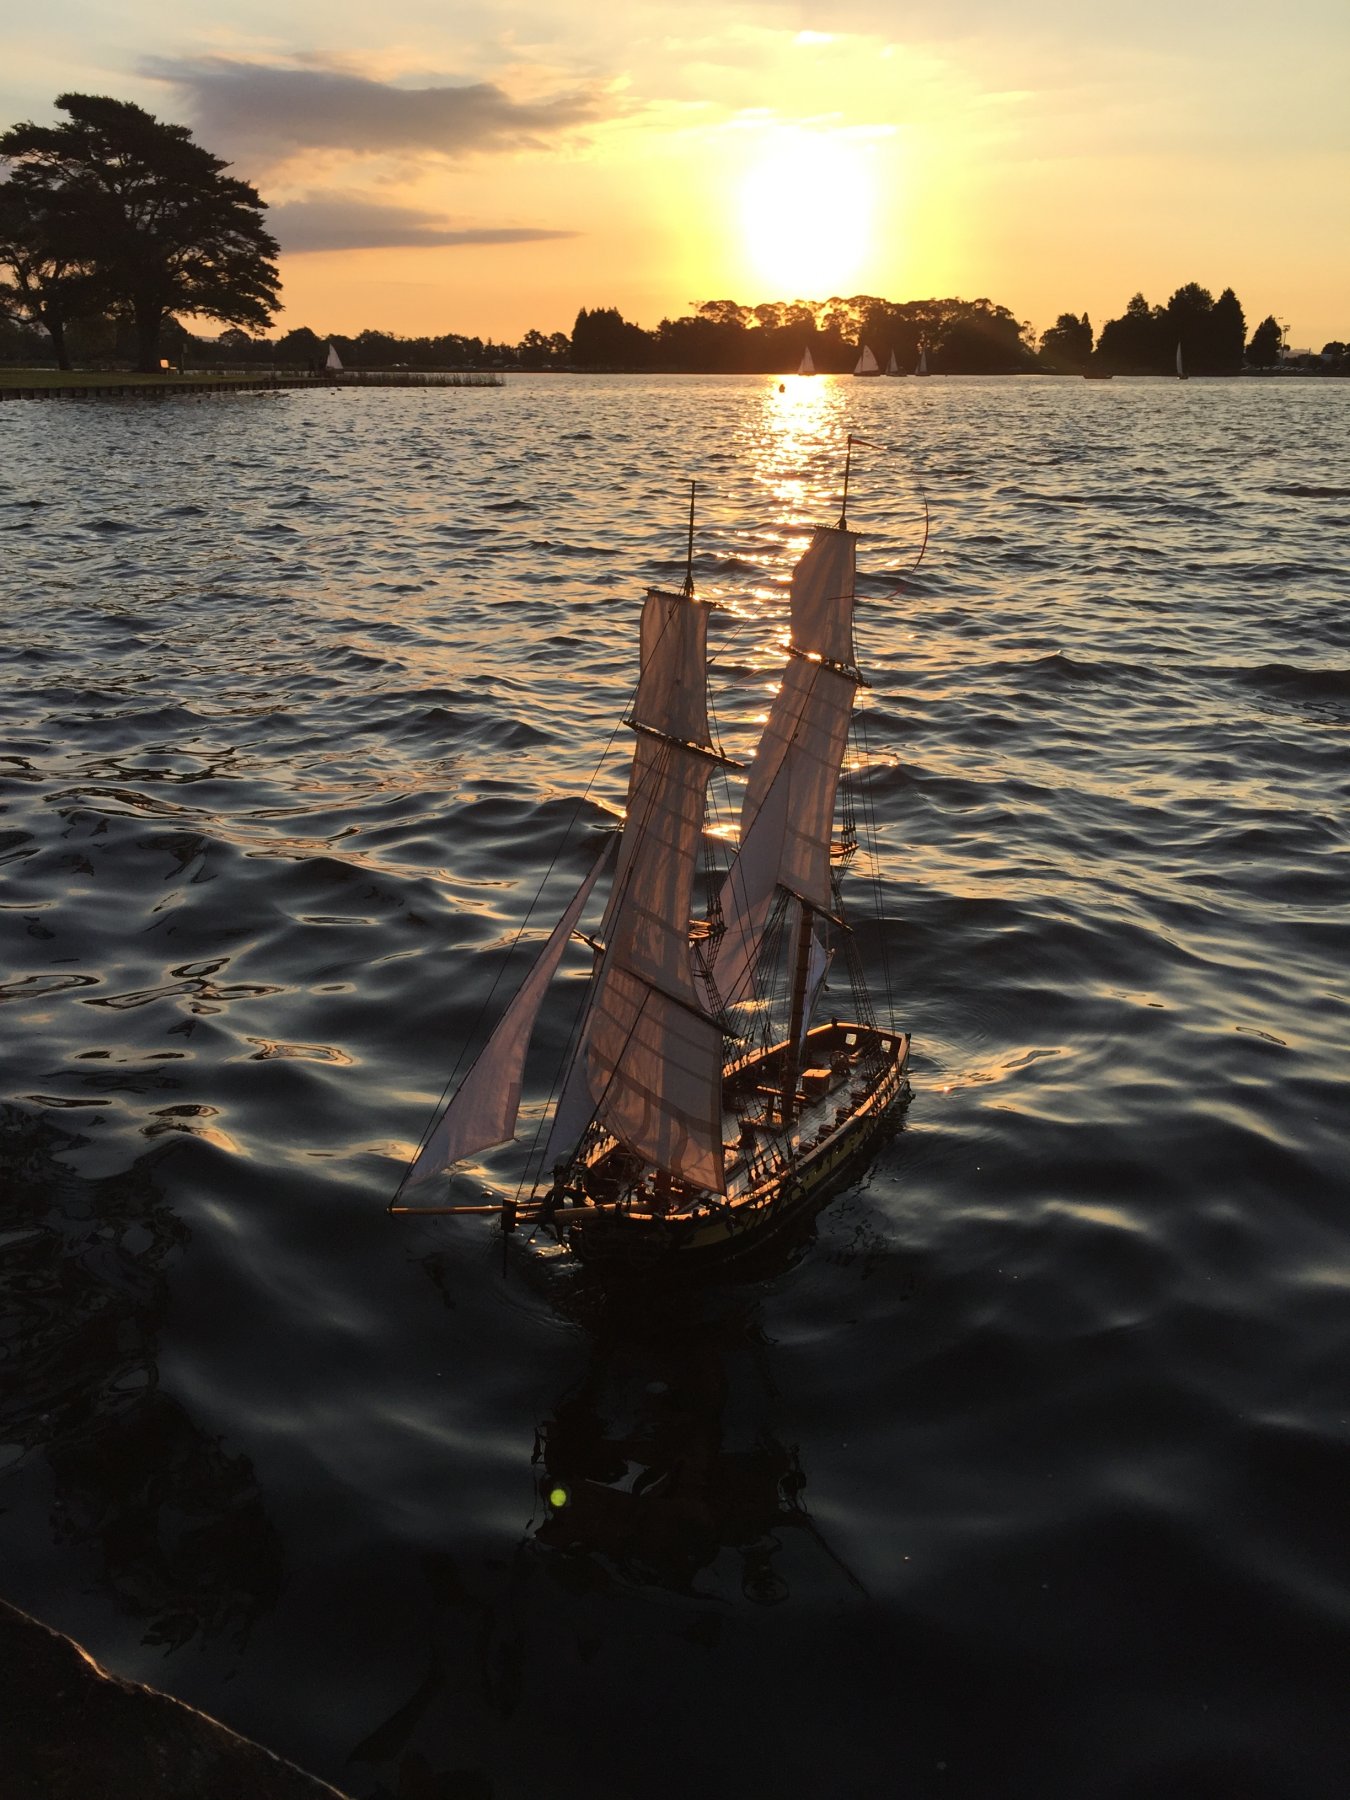
Sailing into the sunset. I've got plans scaled for a 1/36 Enterprize class 28-gun frigate and might start on some smaller pieces of that in near future. However, if the bank balance allows this year I'll crack into my real dream of a 1:1 sailing dinghy. Time for the real thing.
Thanks for following this drawn-out build.
- Edwardkenway, Ondras71, jwvolz and 19 others
-
 22
22
-
-
-
-
1 hour ago, Vane said:
Impressive, she looks really great and that stand is really the iceing of the cake.
I have just finished the first planking on my kit and about to do the 2nd. But I am struggeling on deciding what wood to use. What have u used here and do you have any recommendations?
Thanks Vane. The planking is all kit timber so it's some manner of walnut or what passes for it with a household matt oil-based varnish on it. The model has been out on a shelf for a couple of years before finishing touches applied and the hull has lightened noticeably compared to the mortar covers which were in a box and out of all light. I like the tone and guess it'll change over time.
-
7 hours ago, jwvolz said:
Great to see her finished Wayne! Love the display idea, it looks fantastic.
Nicely done!
Thanks Joe. Good to hear from you.
-
3 minutes ago, Beef Wellington said:
Now that is stunning, really nice idea on the base, and the grounded anchor is a great touch. Airing my dirty laundry, the reason my Snake is still inches from completion is because I just can't get round to figuring out options for a display base.
Thanks Jason. Yes, it's hard to go back once you've moved on to another project but with my RC ship Harrier finished (I'll update pics and get some sailing vid) and also the 1:1 scale canoe that kept me off Granado there were few excuses. The base layout had been in the too-hard basket for a couple of years with no definitive solution until conscious effort with ruler in hand sorted the idea in the space of one morning. Another day or so of work completed it.
HMS Jason is looking very good BTW.
- Ryland Craze, egkb and Canute
-
3
-
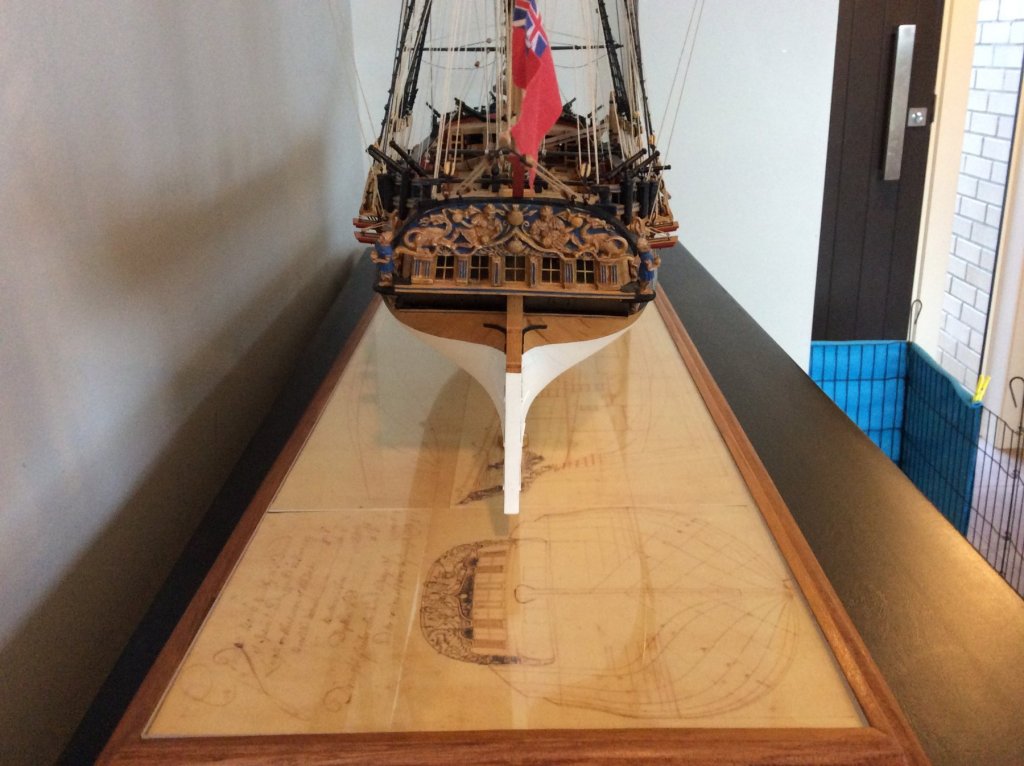
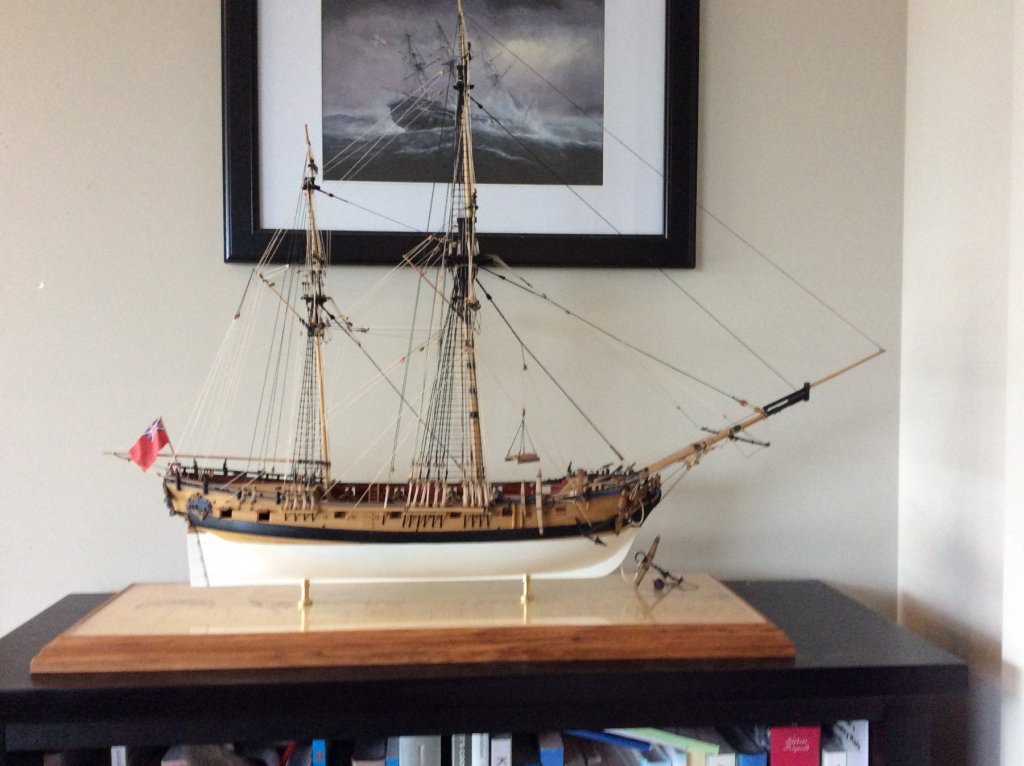
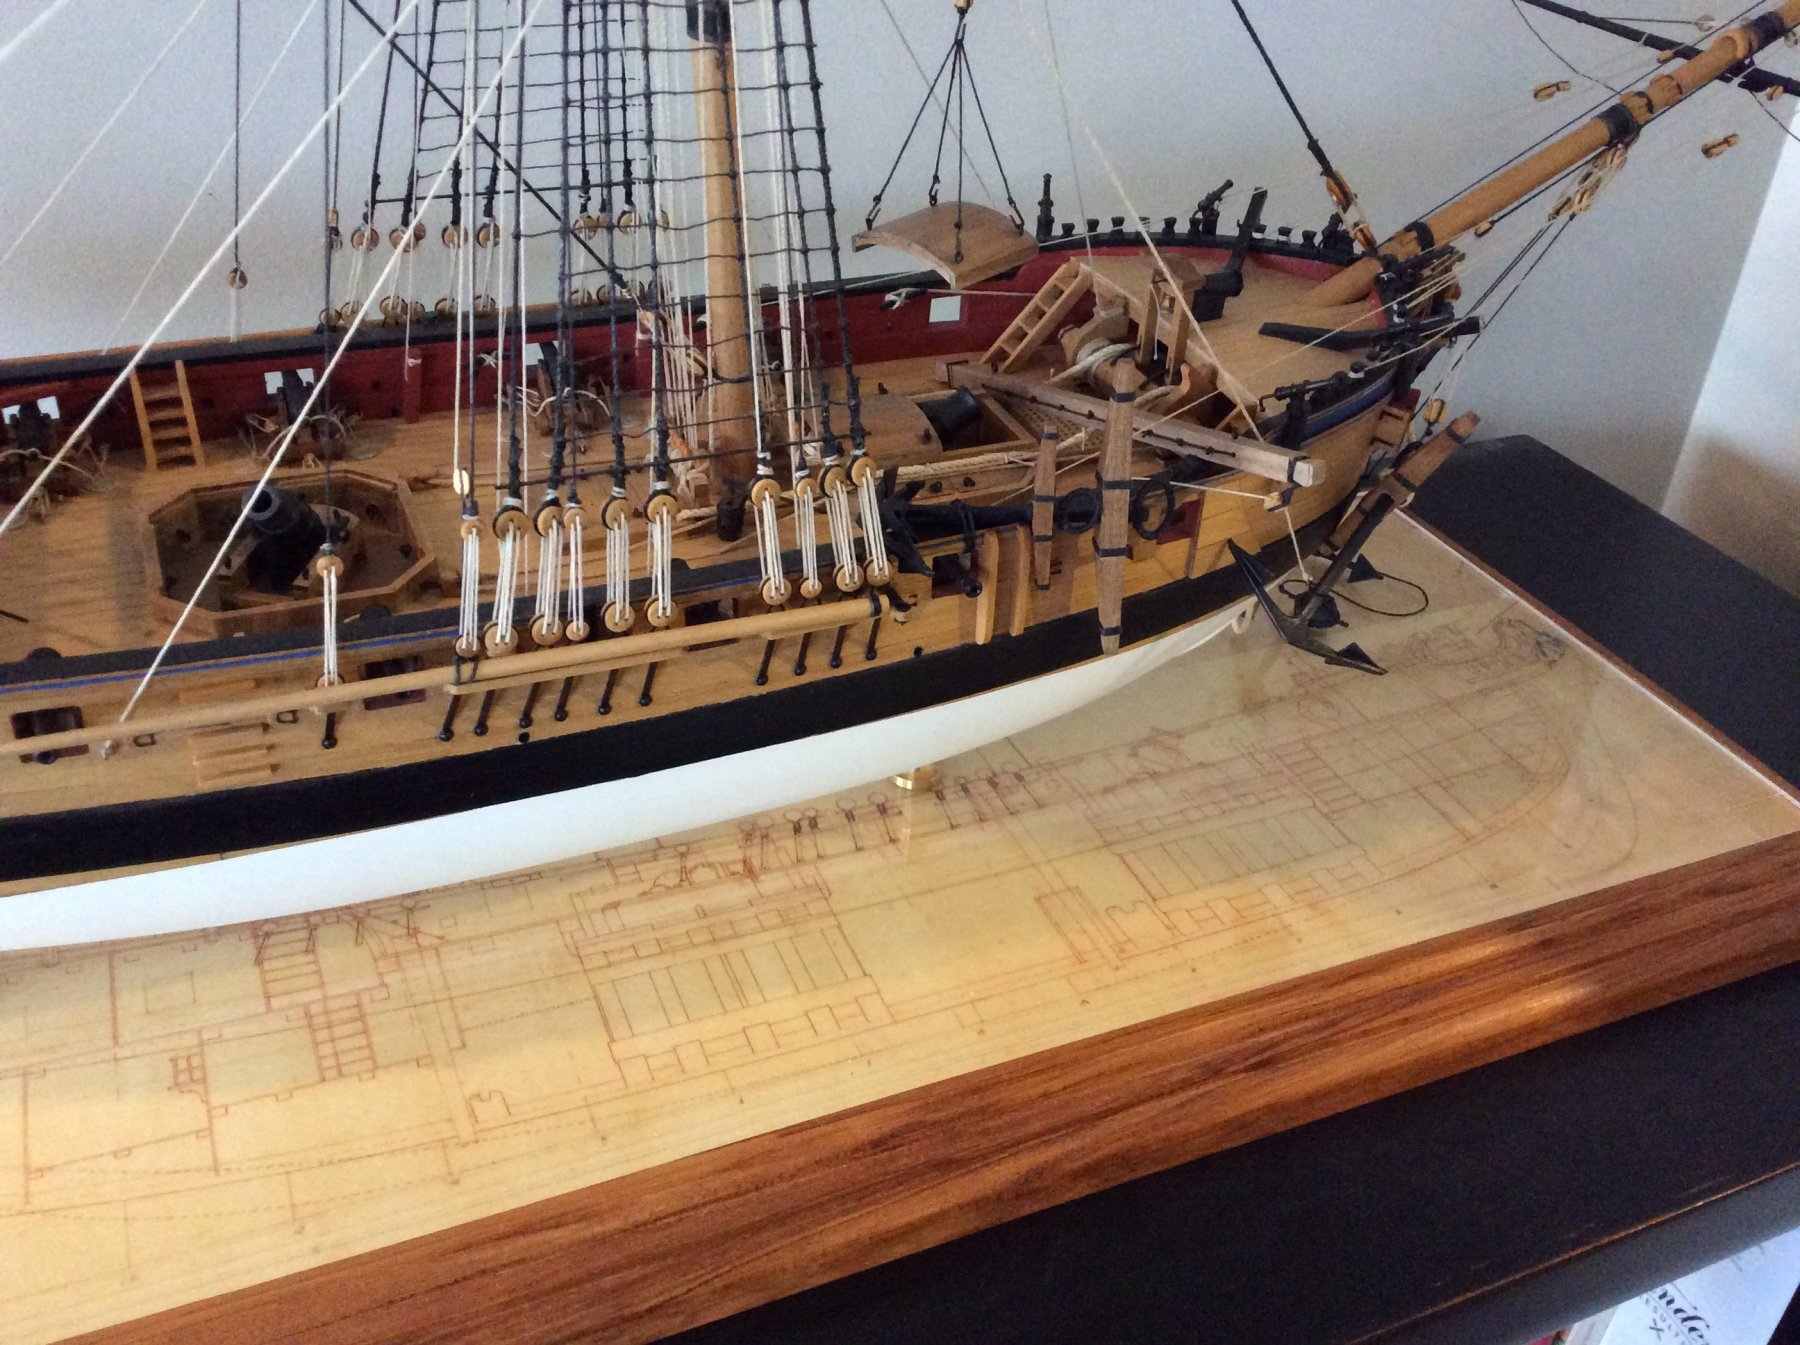
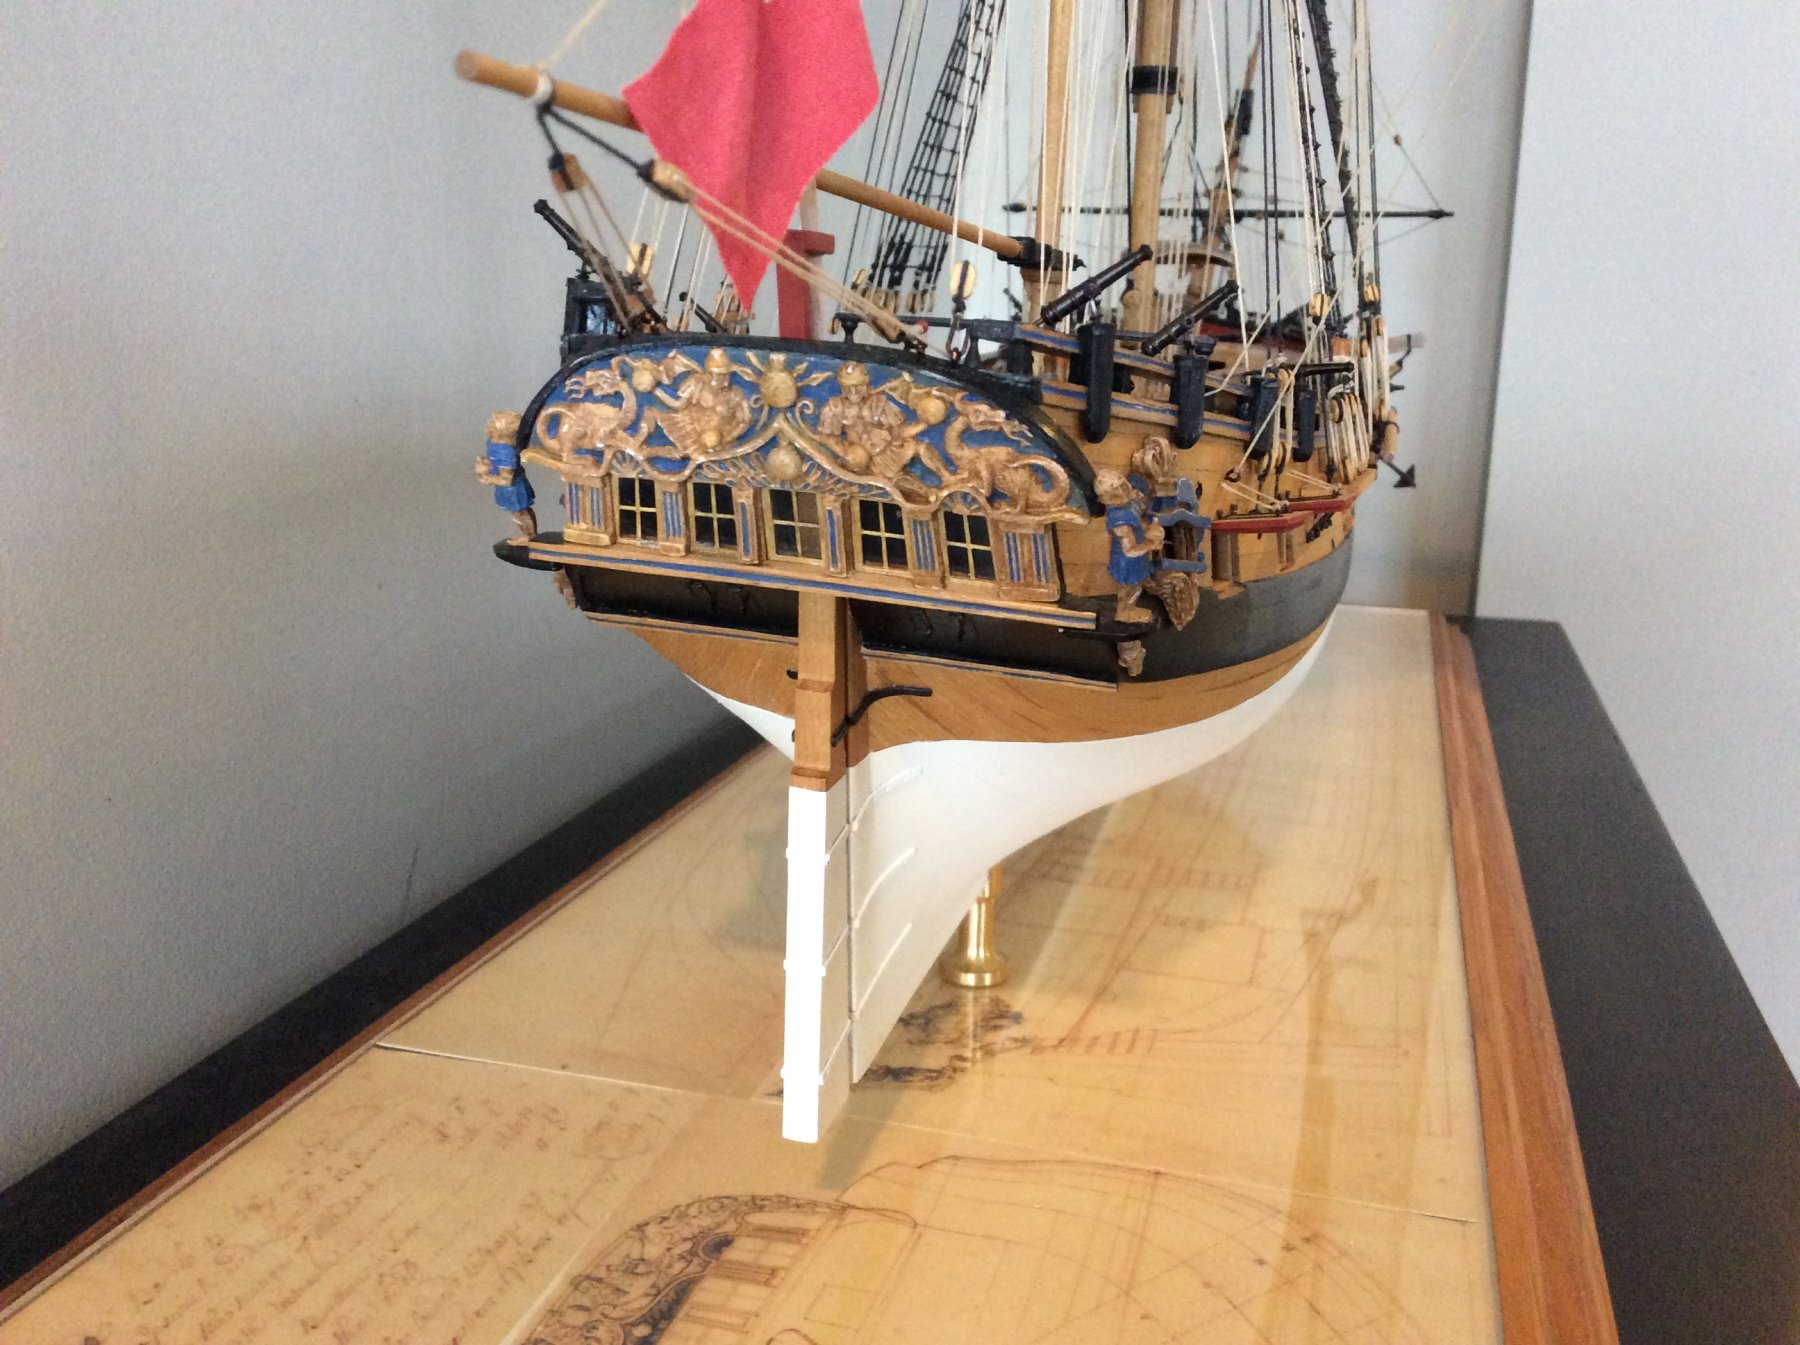
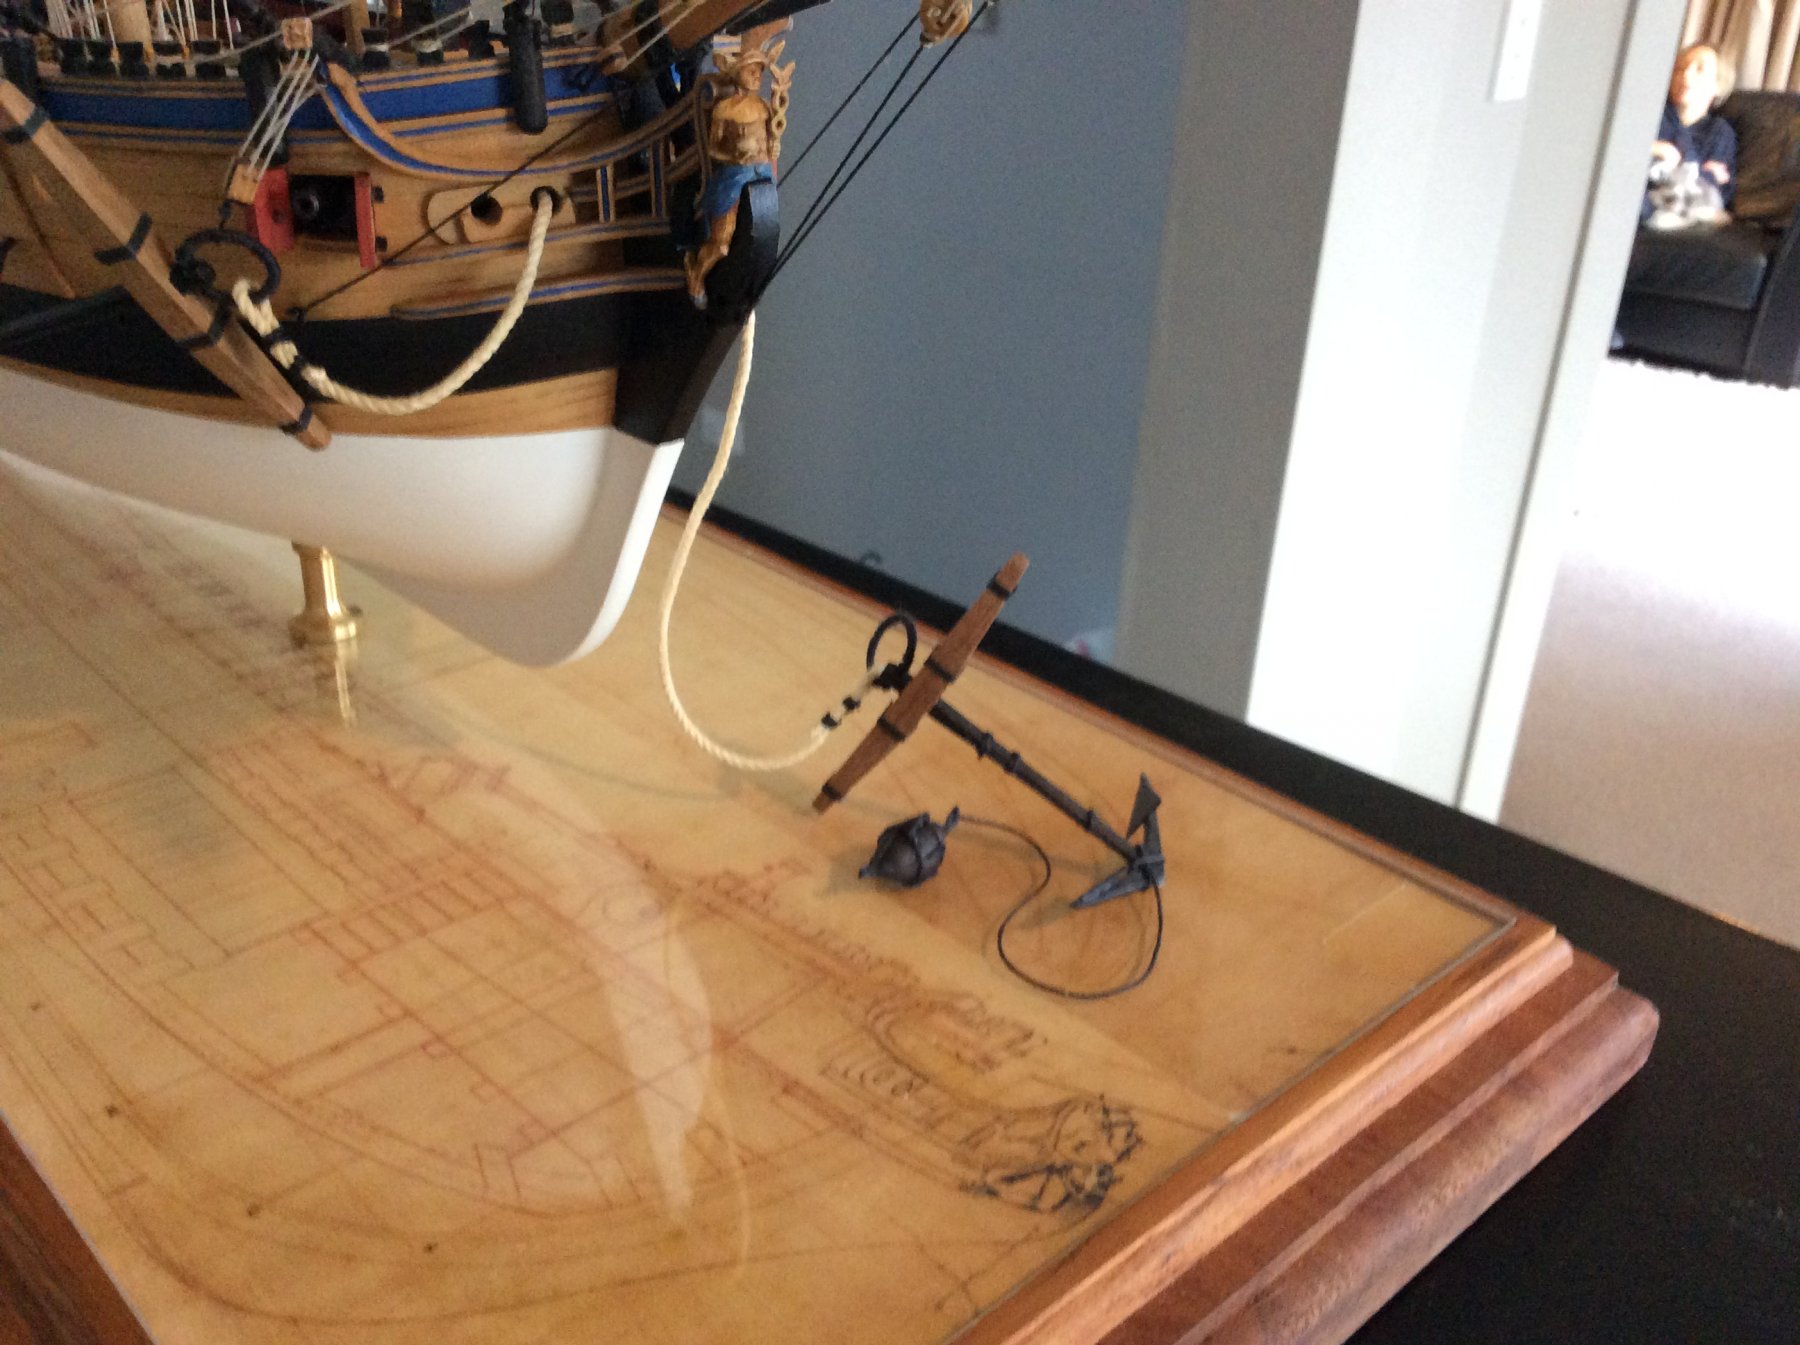
Granado is finished! A mere six years after she was started and four years after my last post I've returned to finish her off with the final bits of rigging, anchors and a base.

The base is rimu timber from an old bookshelf with an edge routed on. I'd always wanted to incorporate the lovely detailed plans of the original vessel from the Greenwich maritime museum.
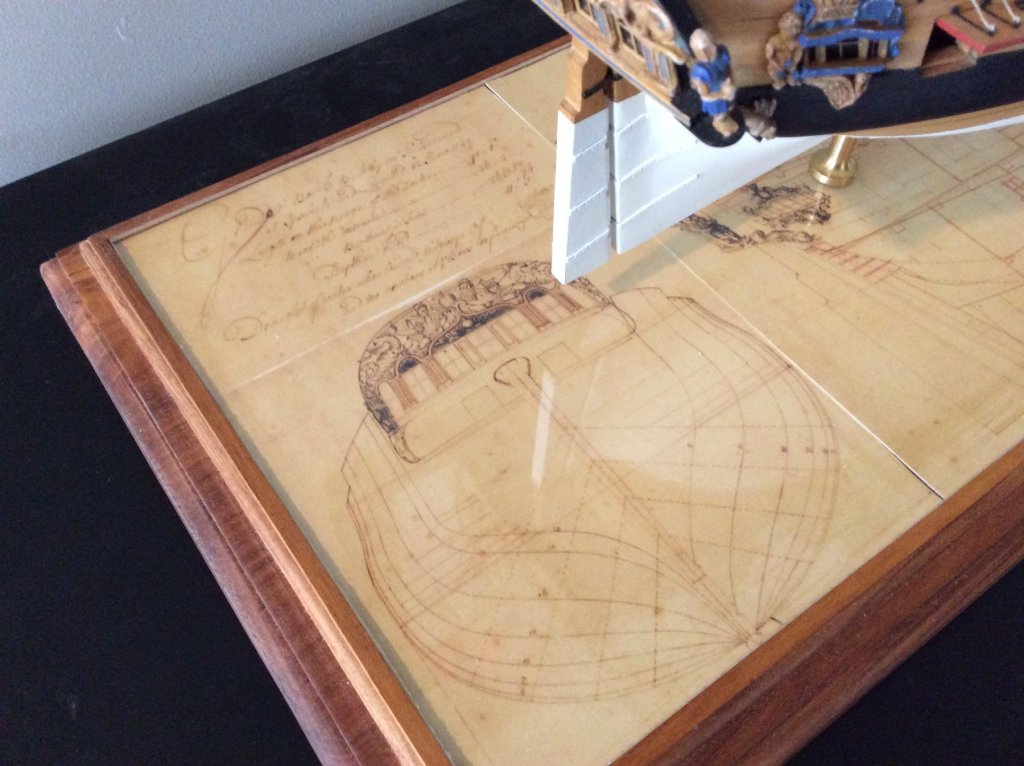
I copied this at a slightly smaller scale and cut them into sections to arrange the profile, plan view, stern and builders details to best effect underneath the model. This is sanwhiched between two 3mm sheets of acrylic and held down with the screws through the base and into the model. Thin routered strips hide the edge.

The grounded anchor ties the ship to the base visually and fills a bit of a blank space on the plans.
A rewarding project overall.


-
Beautiful work Chuck and a great looking kit in the making. I'm sure sales will go well.
- Chuck, FrankWouts, Canute and 1 other
-
4
-
-
Hi Gerry, Costellation is looking good and ever more refined.
Got the message about the square rigger forum but haven't done much about it yet. I've been sidetracked by a cedar canoe build.
I need to get some good vid of Harrier underway and show you fine folk what your advice and inspiration built.
-
-
-
Looking very fine with that rudder installed Jason.
-
-
Mike, I had very mixed results with the ahem... personal fluid method. It worked very well on a flat piece of board with sample copper with a gentle brown colouration and nice hint of verdigris but spread into droplets on the curve of the model and left a blotchy appearance. I rubbed most off with vinegar and steel wool. I'd recommend applying in thin layers and watching closely.
-
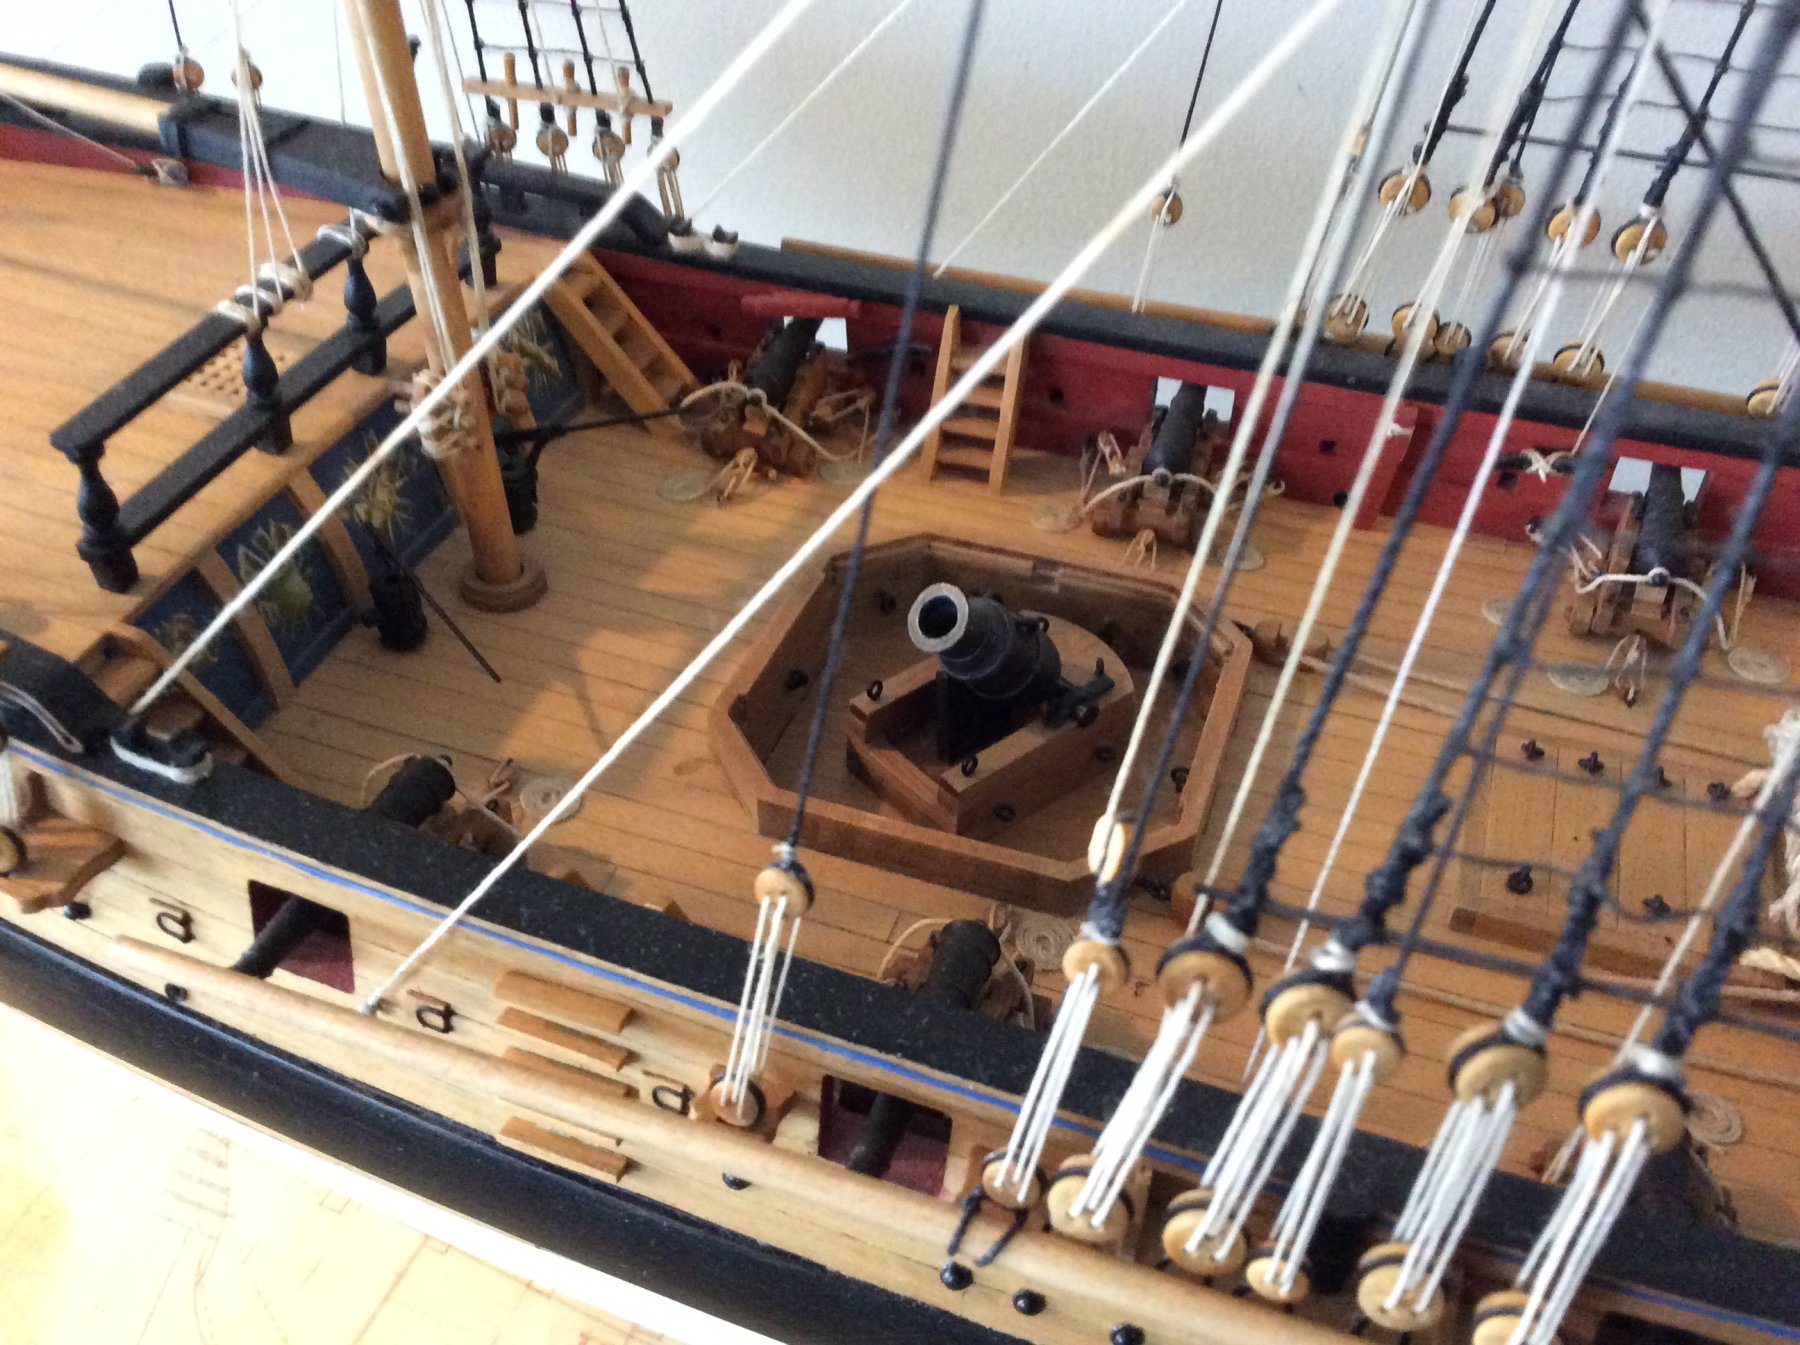
Thanks Joe. Guns are finished and ready to be shown off when rigging line arrives. Likewise anchors. The only other bits to make are the pumps, which should be pretty simple.
Gerry, thanks for that sketch on the reeking arrangement. I like it a lot and will likely use it. Tying individual reeding lines was looking impractical and had been preying on my mind.
Its a cracking day here and a gentle breeze is promised so hopefully I'll get her on the water again this afternoon once duties at kids' sports matches are finished.
-
Thanks Jerry. No video as yet as I've been a bit busy try not to lose control to wave the camera at it for longer than a few seconds. It'll come.
The topgallants are removeable and the topmast staysail in the middle there is uncontrolled but can be brailed down to limited sail area. I've got her set up like this and now the wind has disappeared entirely.
I'm still considering putting reef points in the topsails to give a few more options. There's still the fore course to be made also.
-
Rigging line is on the way thanks to a fellow modeller with a ropewalk. This will replace the temporary rig up at present.
While I'm waiting for this some of the cosmetic fittings have got some attention.
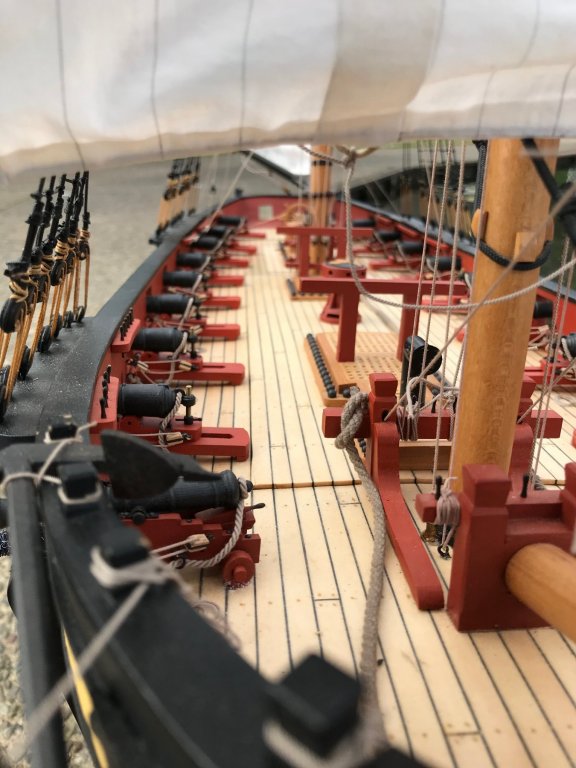
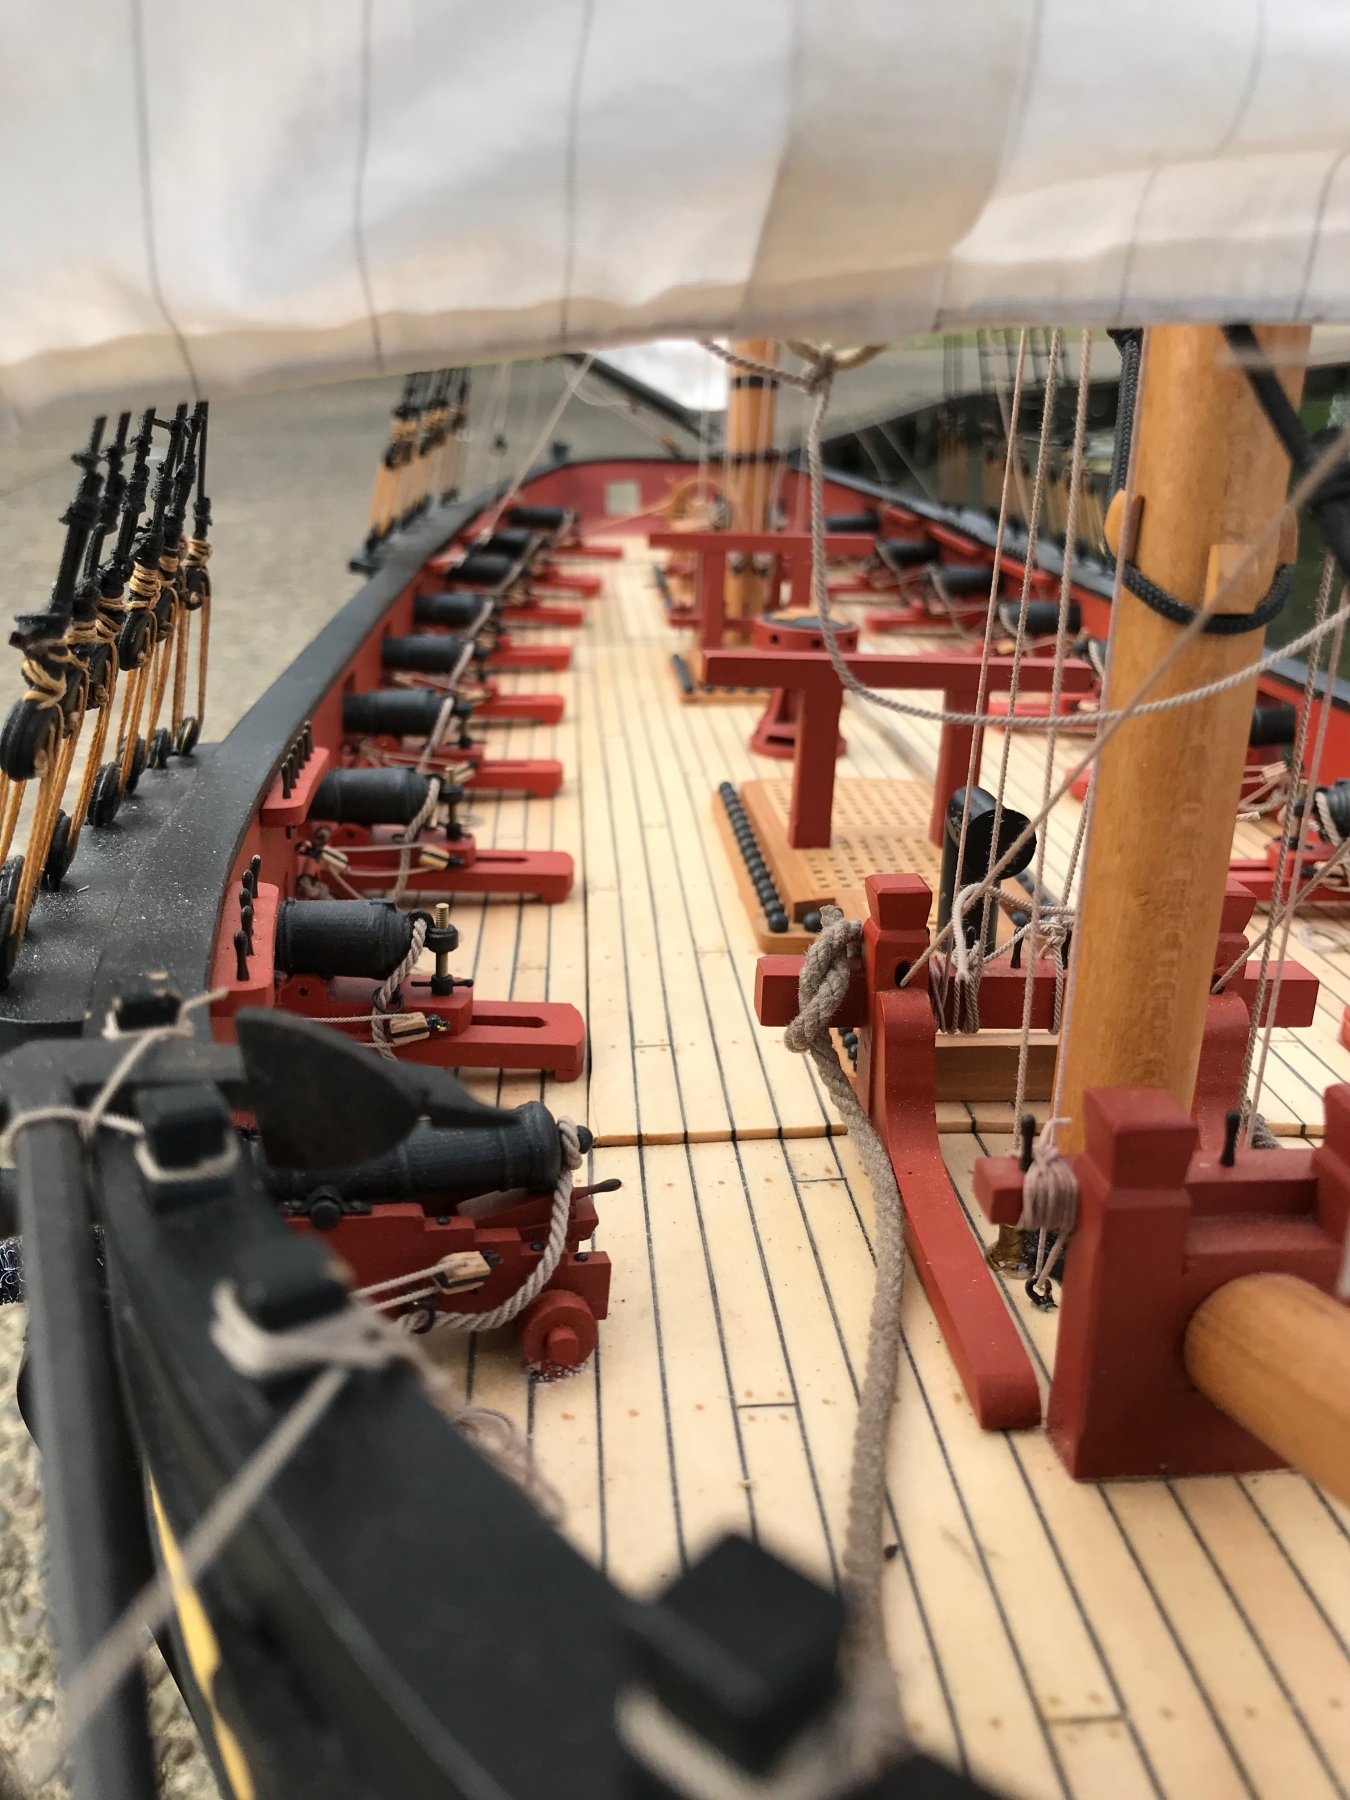
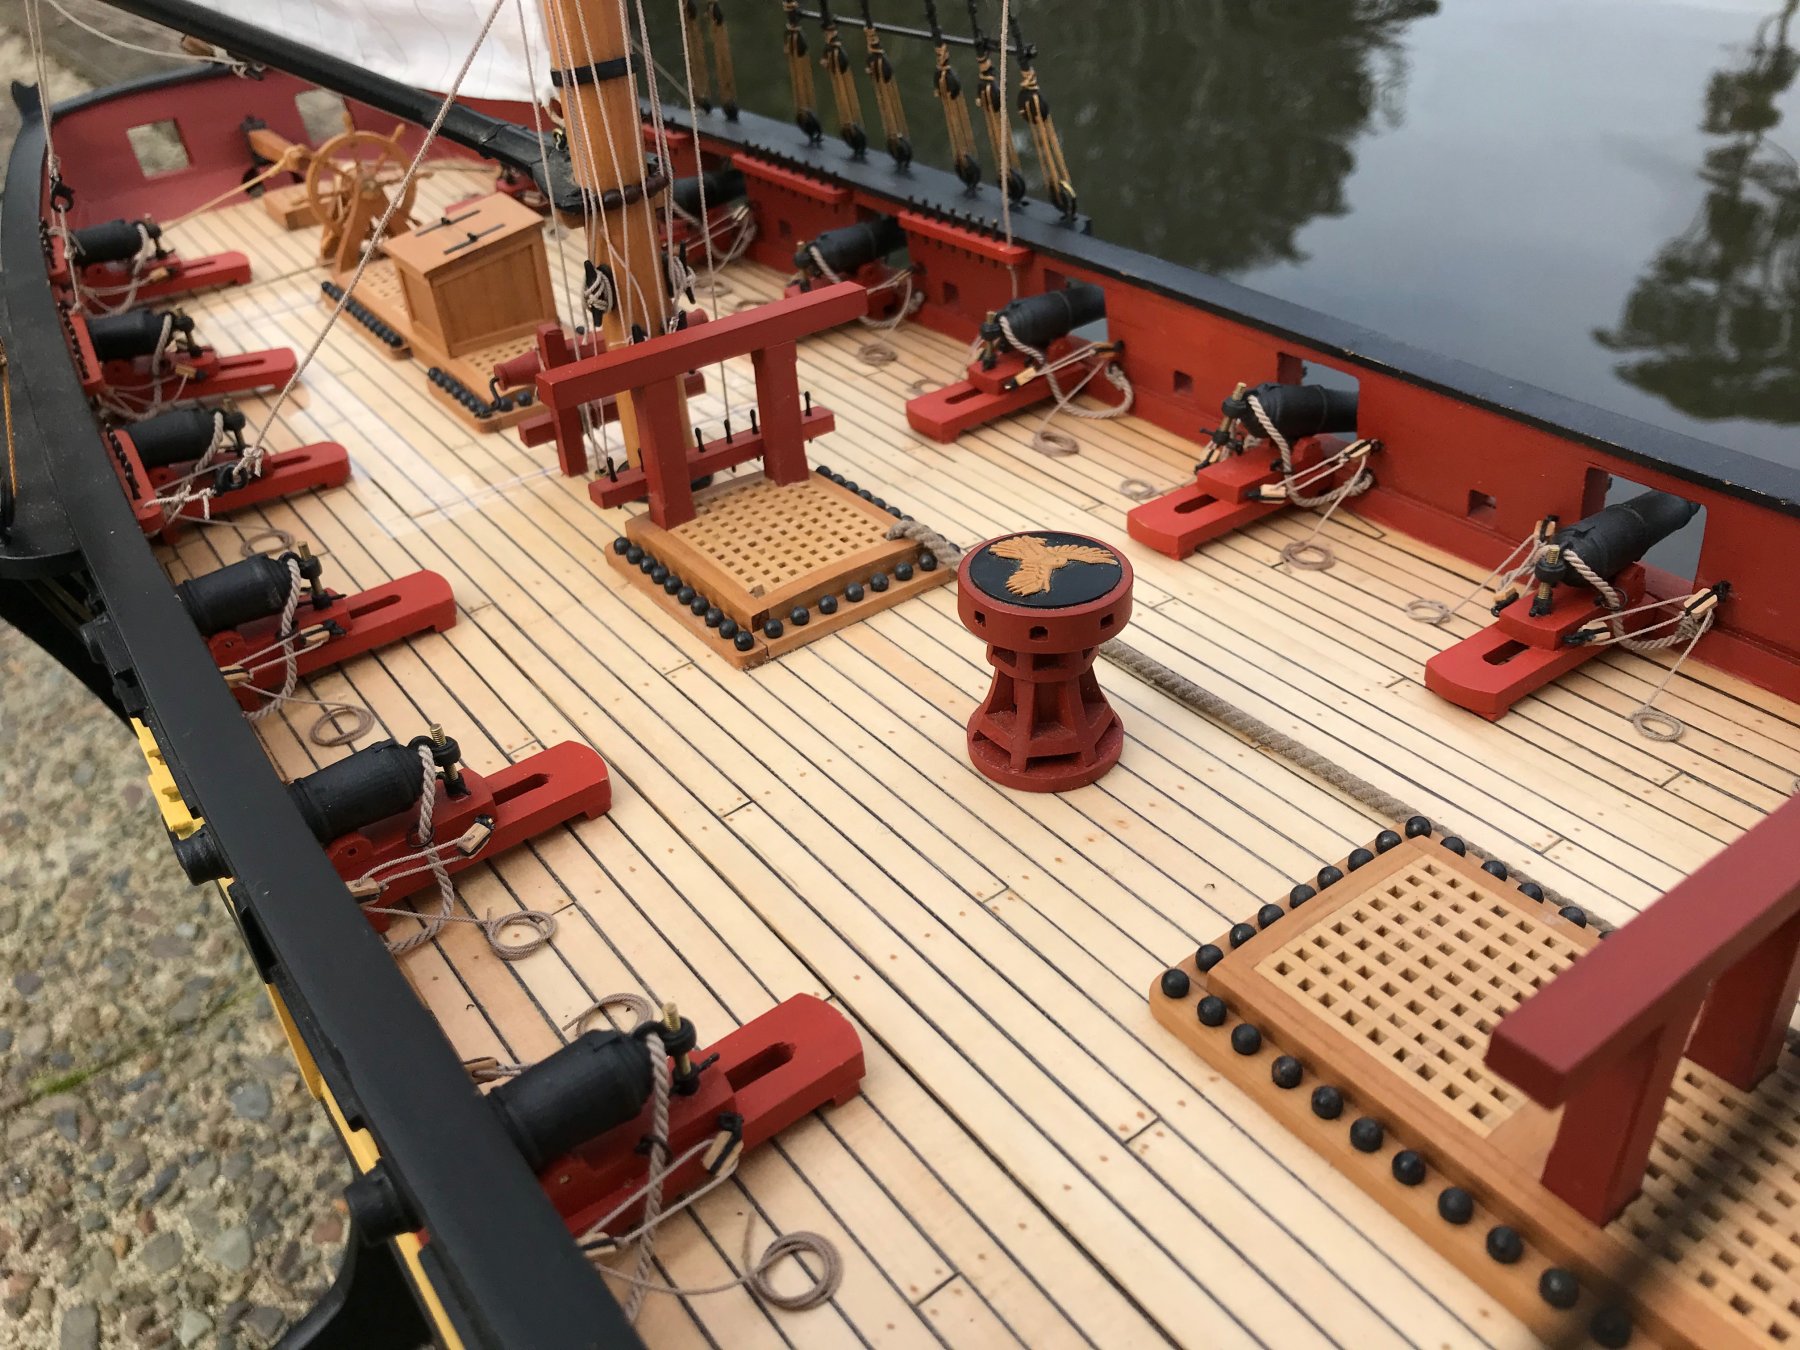
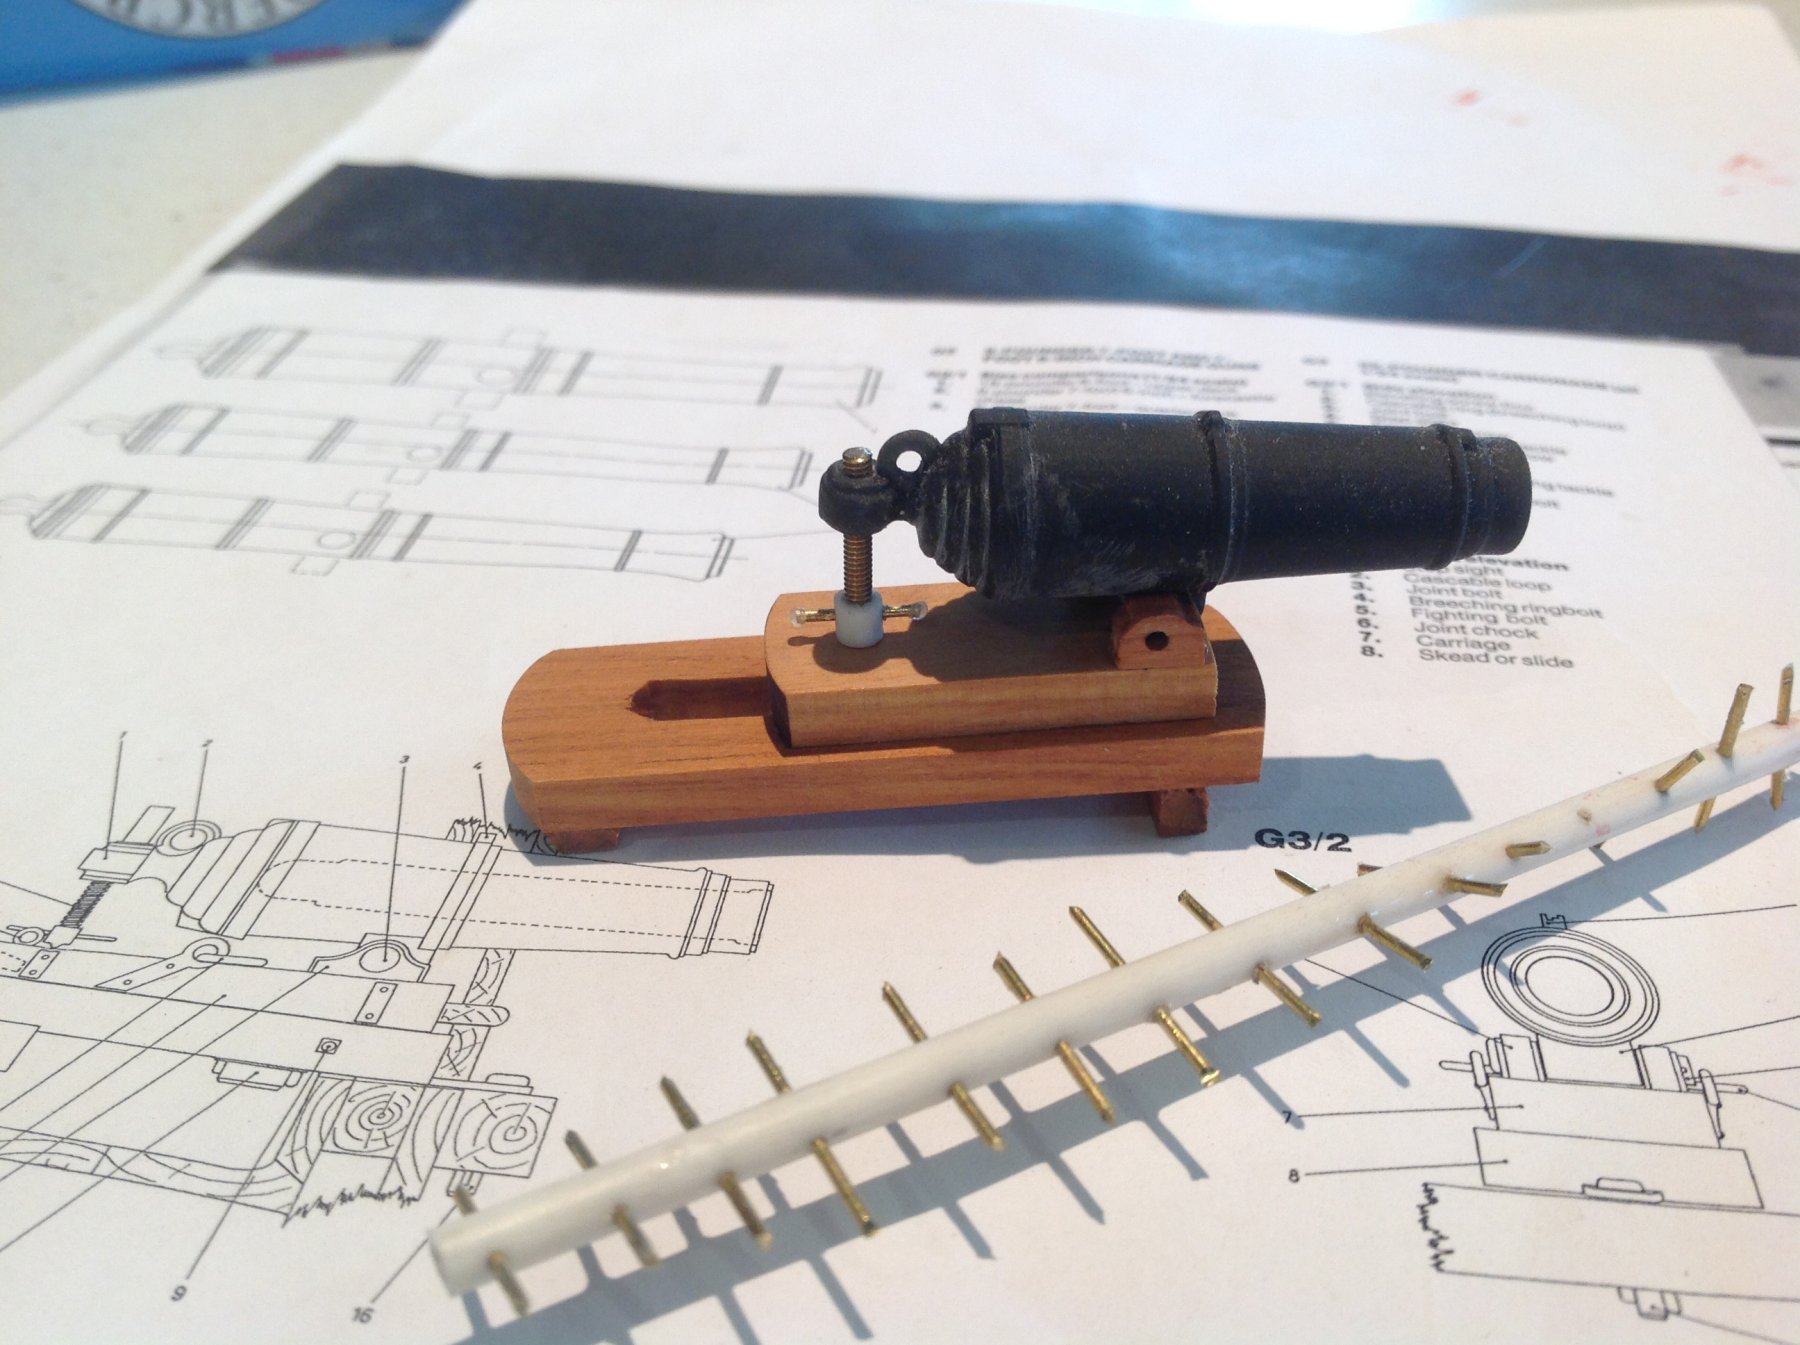
The carronade slides have been made.
The elevation screws are threaded brass rod with the turning handles brass rod though a drilled styrene tube section. The pic below shows the plastic rod with turning handles ready for mass production for the 16 guns. Painting is next up but the guns won't be installed until rigging line has arrived and they can be rigged off the vessel.
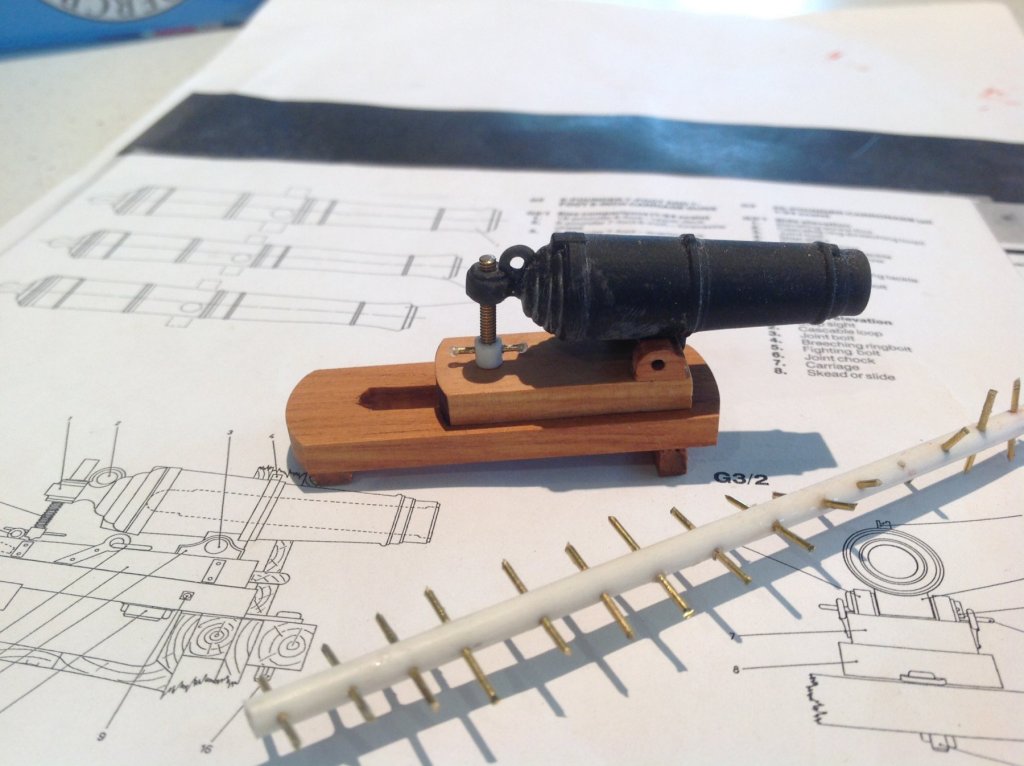
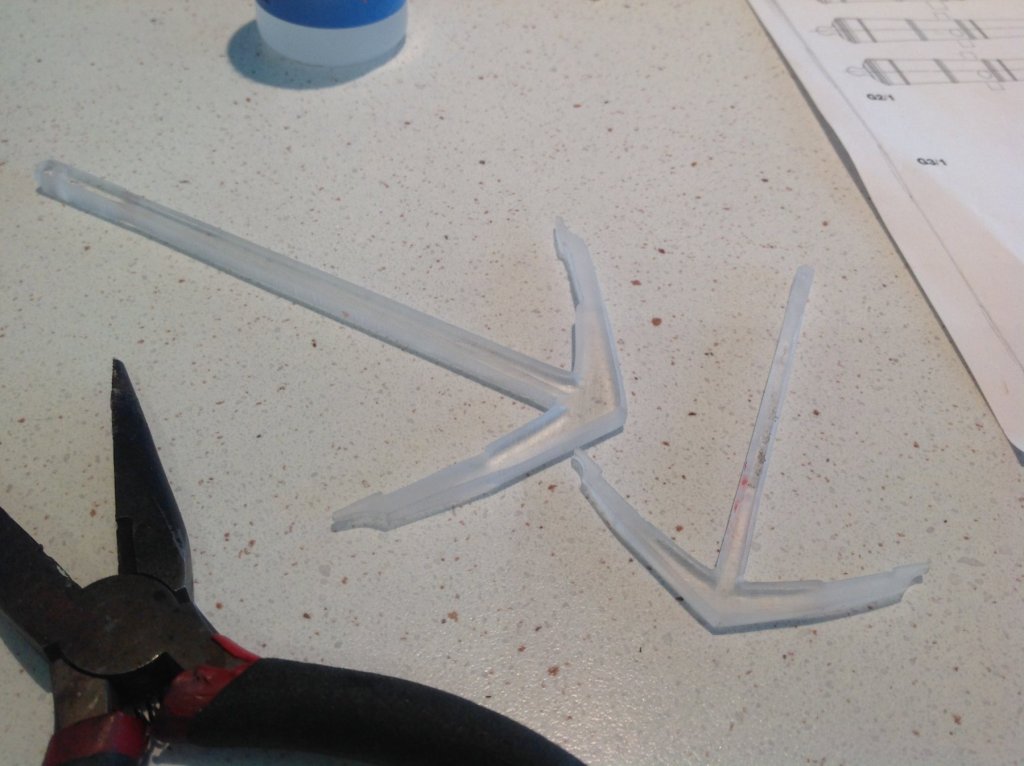
Anchors have also been cut and filed from clear acrylic left over from the rudder extension. This cuts on a bandsaw and is easily filed to shape. They will have brass sheet flukes and a wooden stock.
There will be two bowers and a smaller stream anchor.
- Deperdussin1910, egkb, mtaylor and 5 others
-
8
-
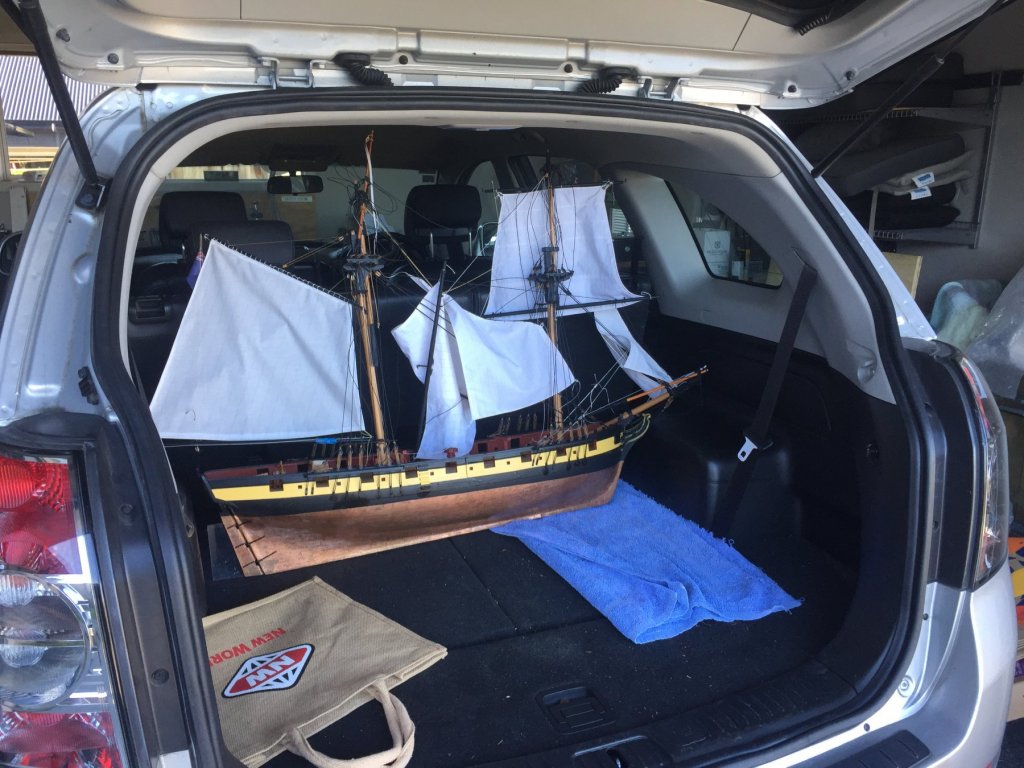
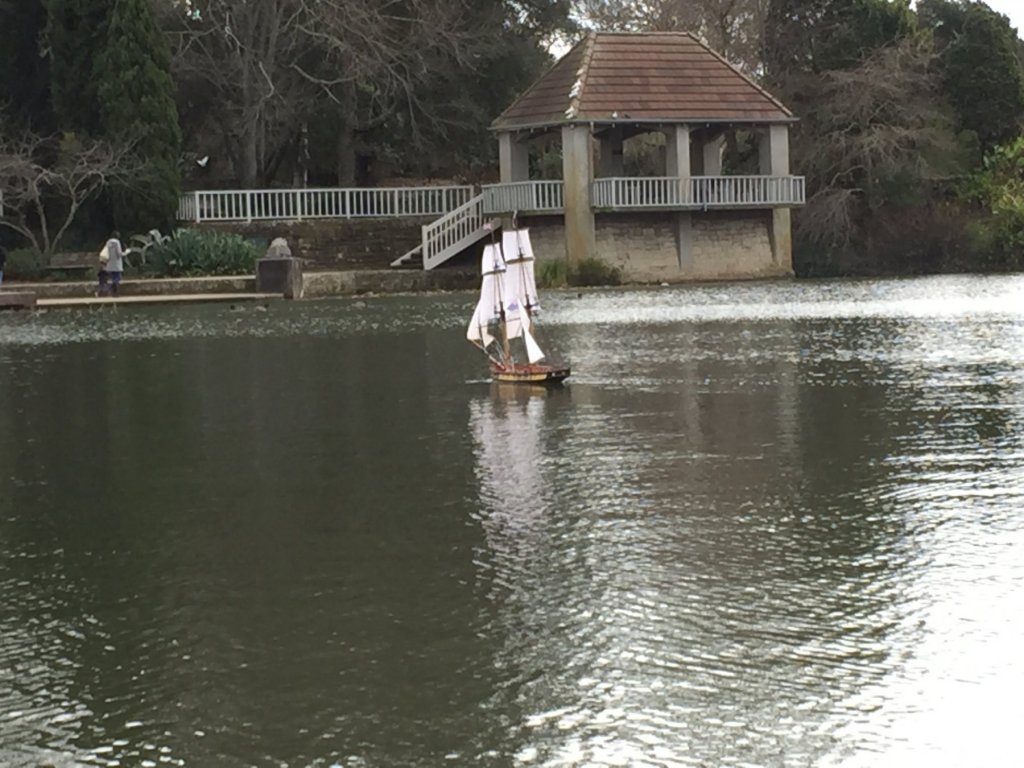
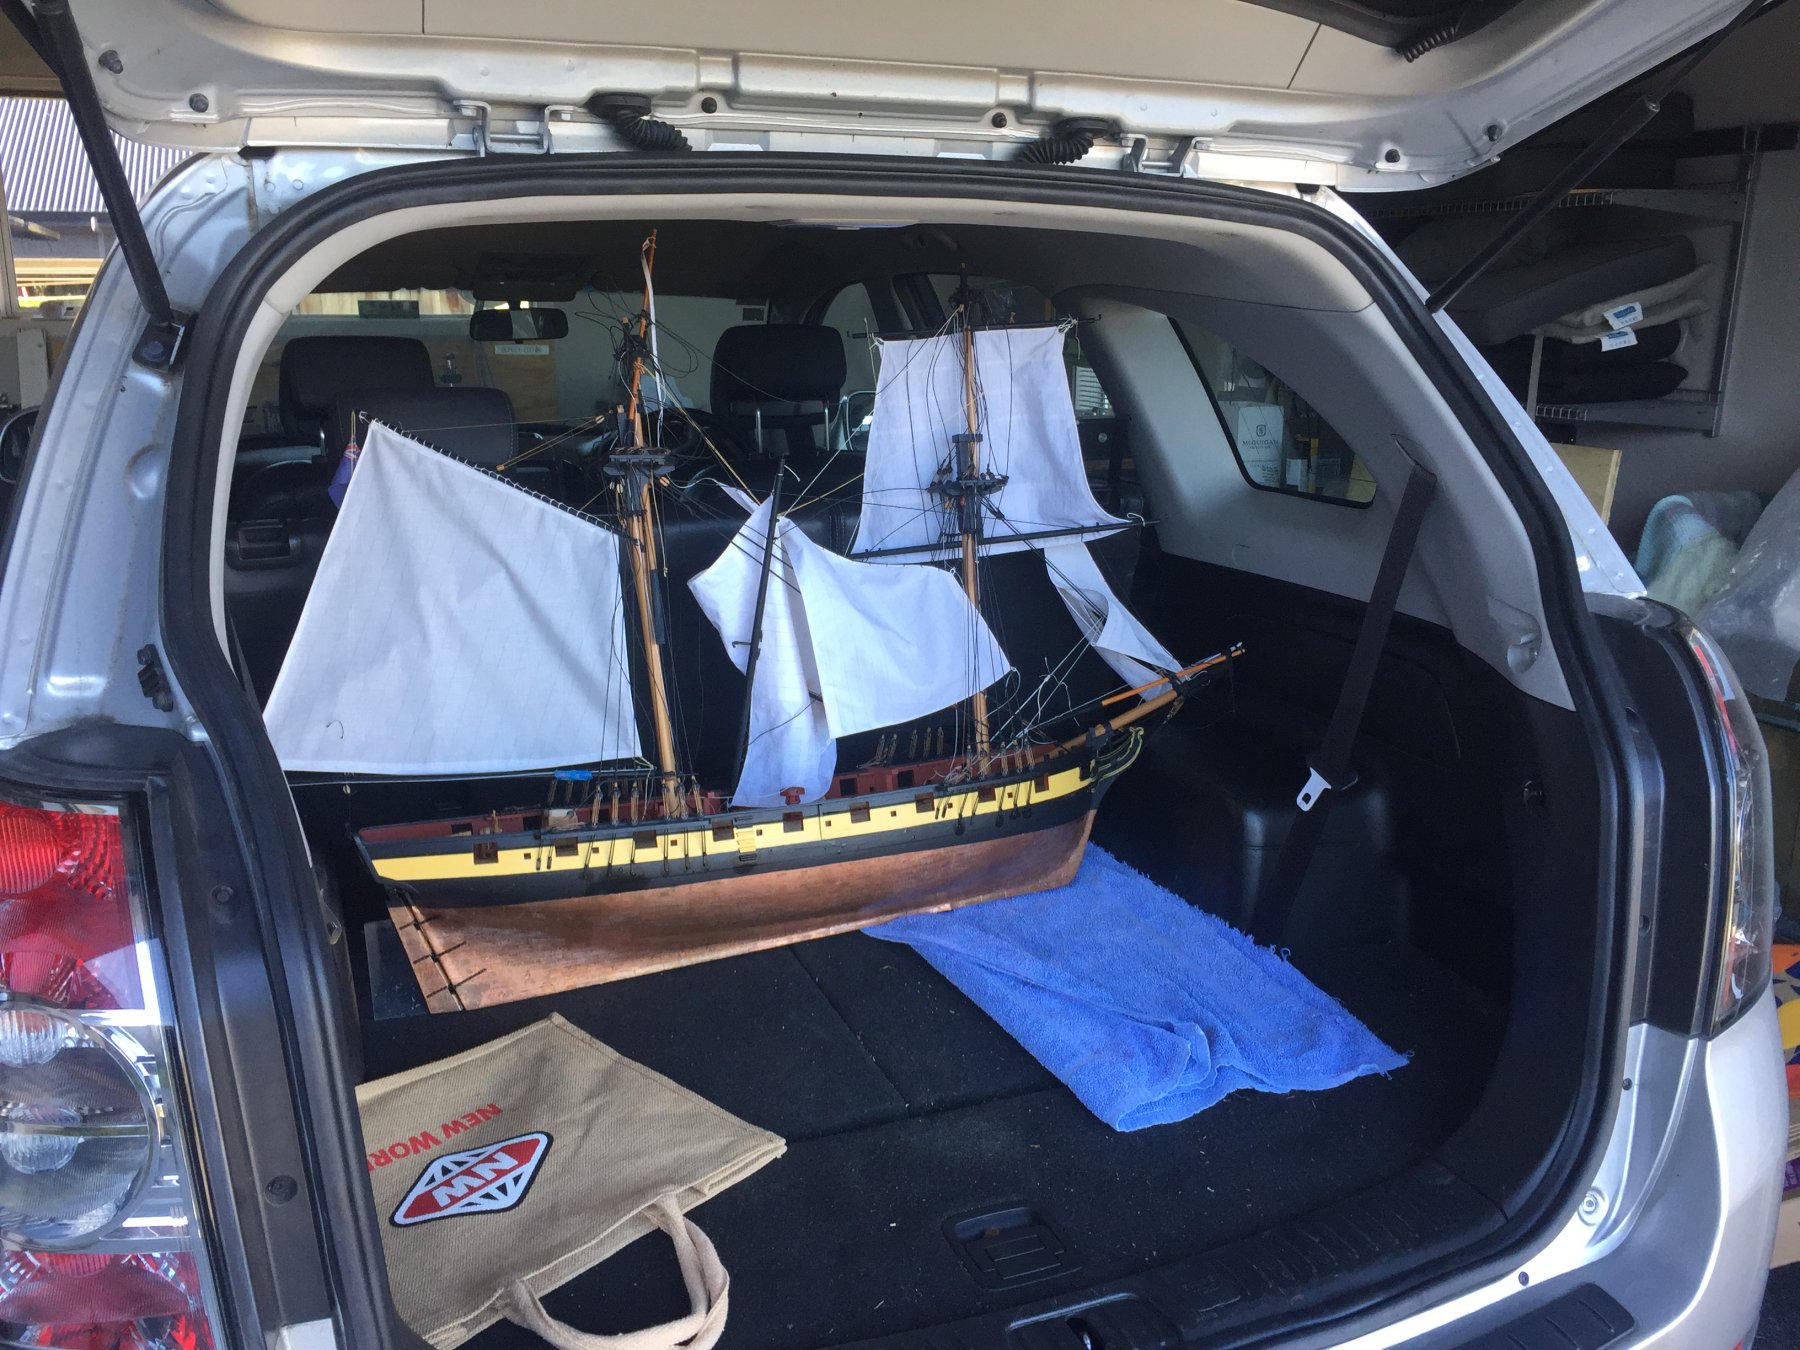
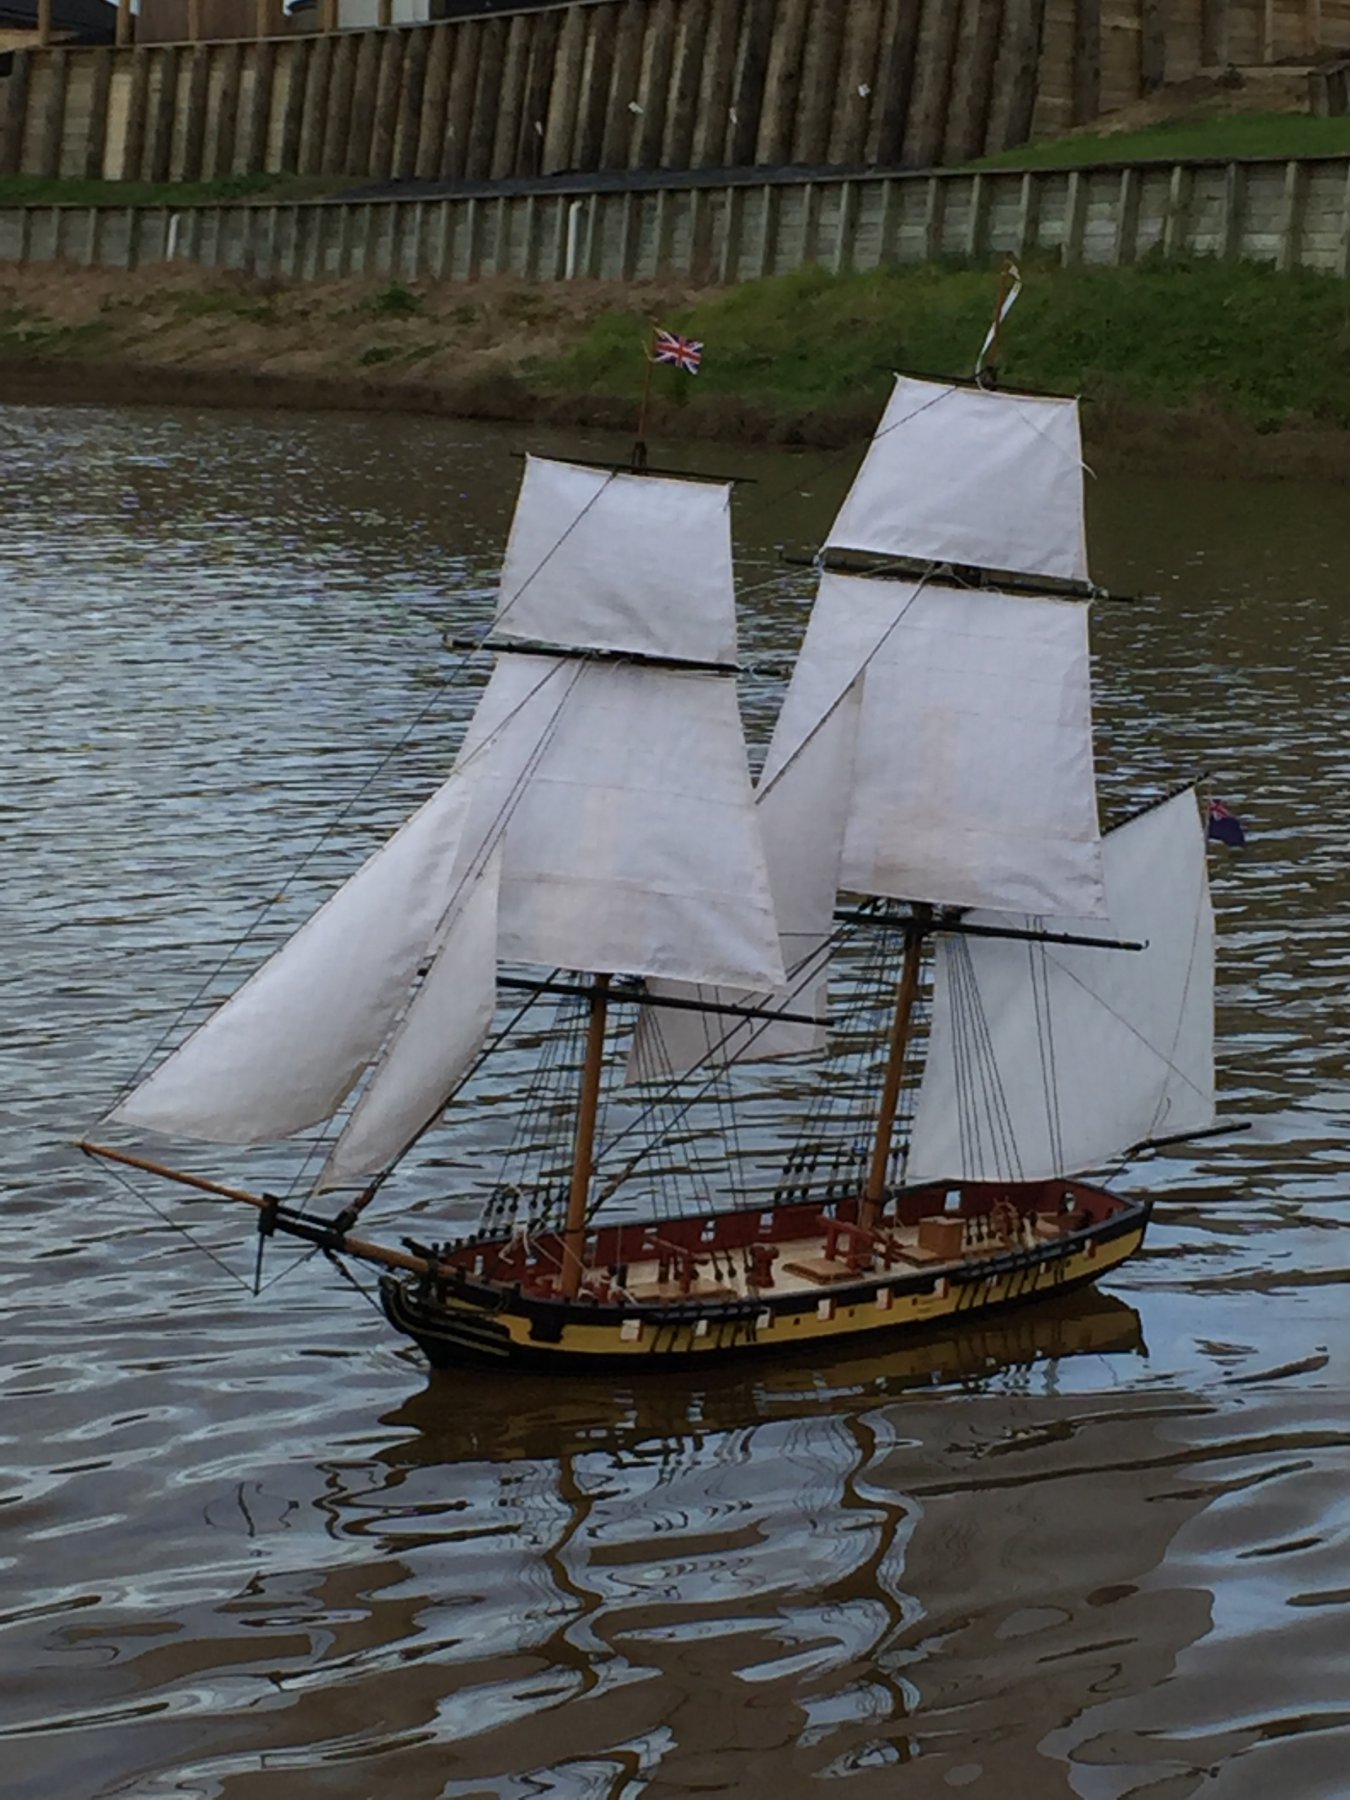
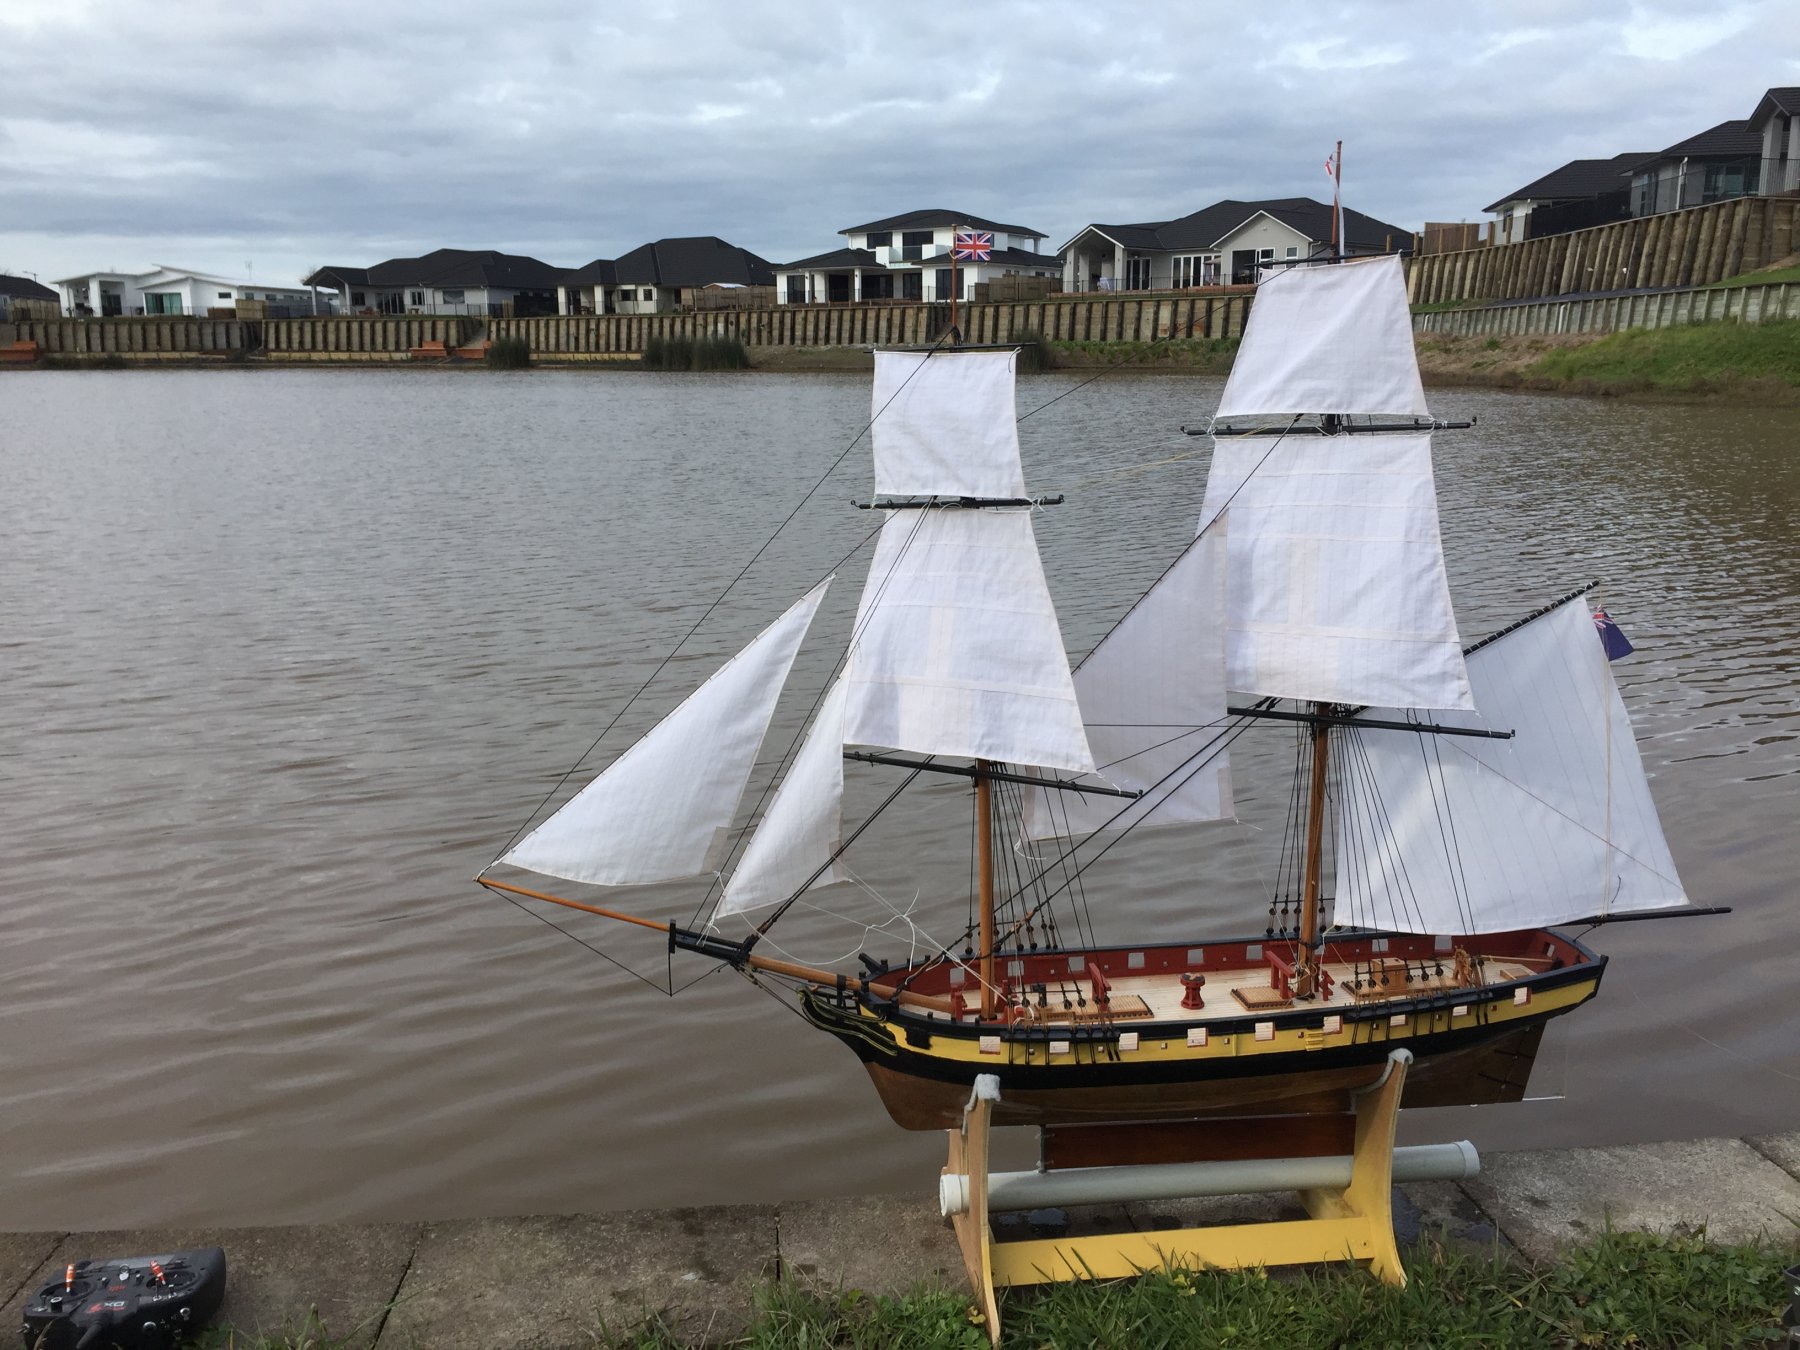
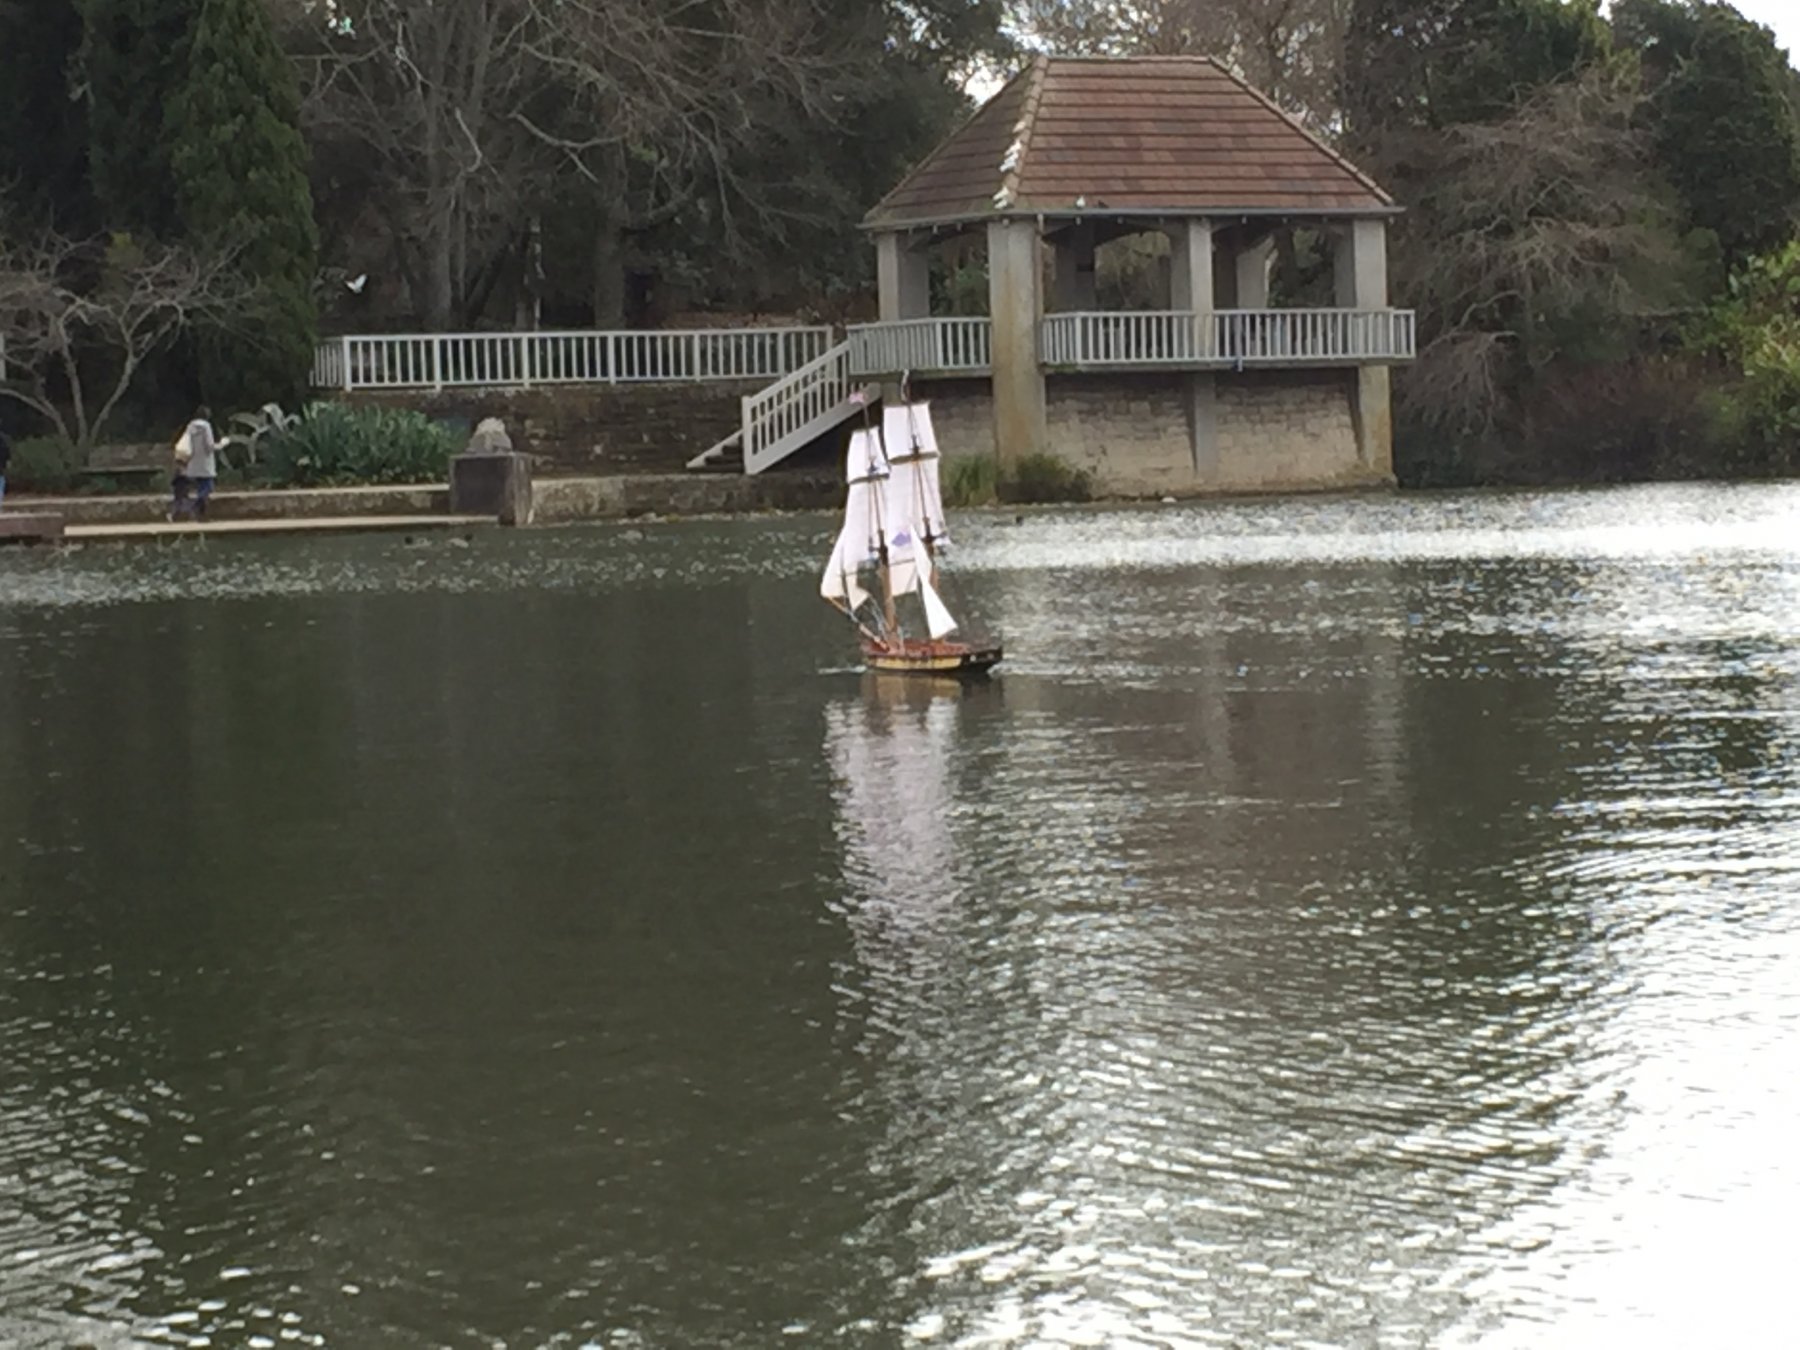
Harrier has been launched. Despite mid-winter weather I've made it to a couple of local lakes for some testing.
The masts broke down to allow the vessel to fit in the back of the car easier than expected. I don't even have to drop the seats which means I can even take kids.
It's been extremes of weather each time with the first outing having not enough wind to give enough control to go about comfortably while the second was a bit too much for the amount of sail up.
Harrier has been tethered each time with a line tied to a stern gunport to allow it to be retrieved when things either got nervous or the I was caught on a lee shore and pushed into the weeds.

Some strong gusts in the second outing put a decent heel on and caused some worry that she might not right, but up she came. She took water through the gunports but the hatches only shipped a small amount of water. I'll work on water tightness.

 There's a bit more ballast testing to be done yet. I've had the ballast pipe keel set about 20cm below the keel and it'll be a matter of trial o see how far up I can raise it while maintaining stability. I've also been experimenting with a temporary centreboard to see what effect it has. The jury is still very much out on all this.
Theres a lot to get to grips with here, but as one lakeside spectator said 'practice makes perfect'.
- glennreader, Dubz, reklein and 17 others
-
20
-
-
Harrier was laid up in ordinary for a while due to other projects like building an outdoor fireplace over summer and general issues like having a life and job.
But there has been some decent progress. I haven't many pics through this stage of the build as it's been mainly incremental.
 Here's the highlights:
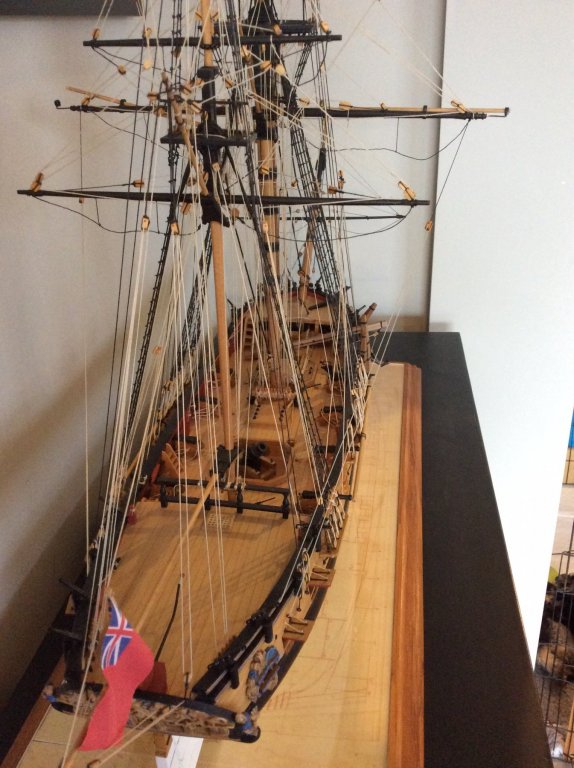
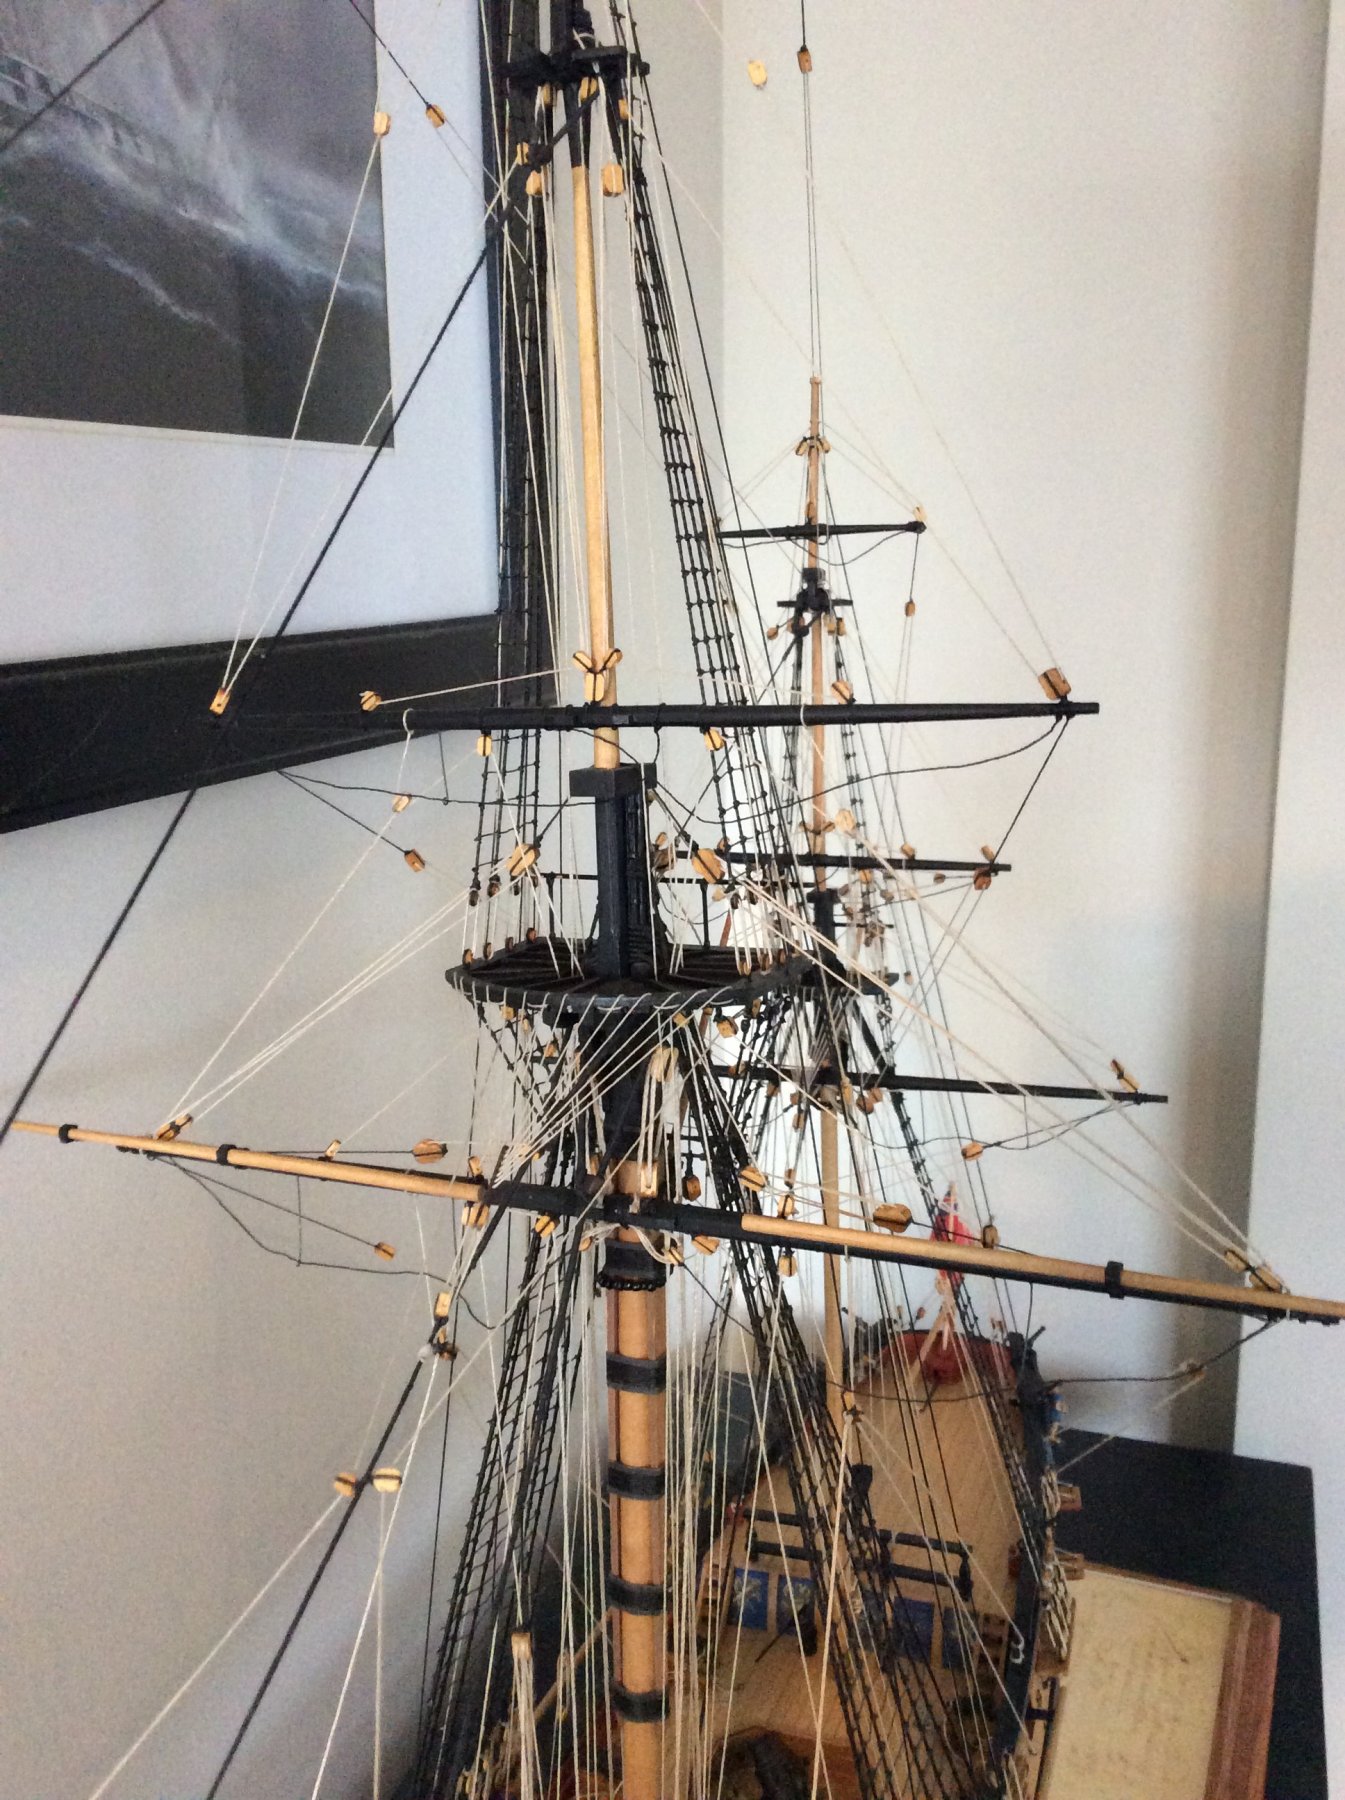
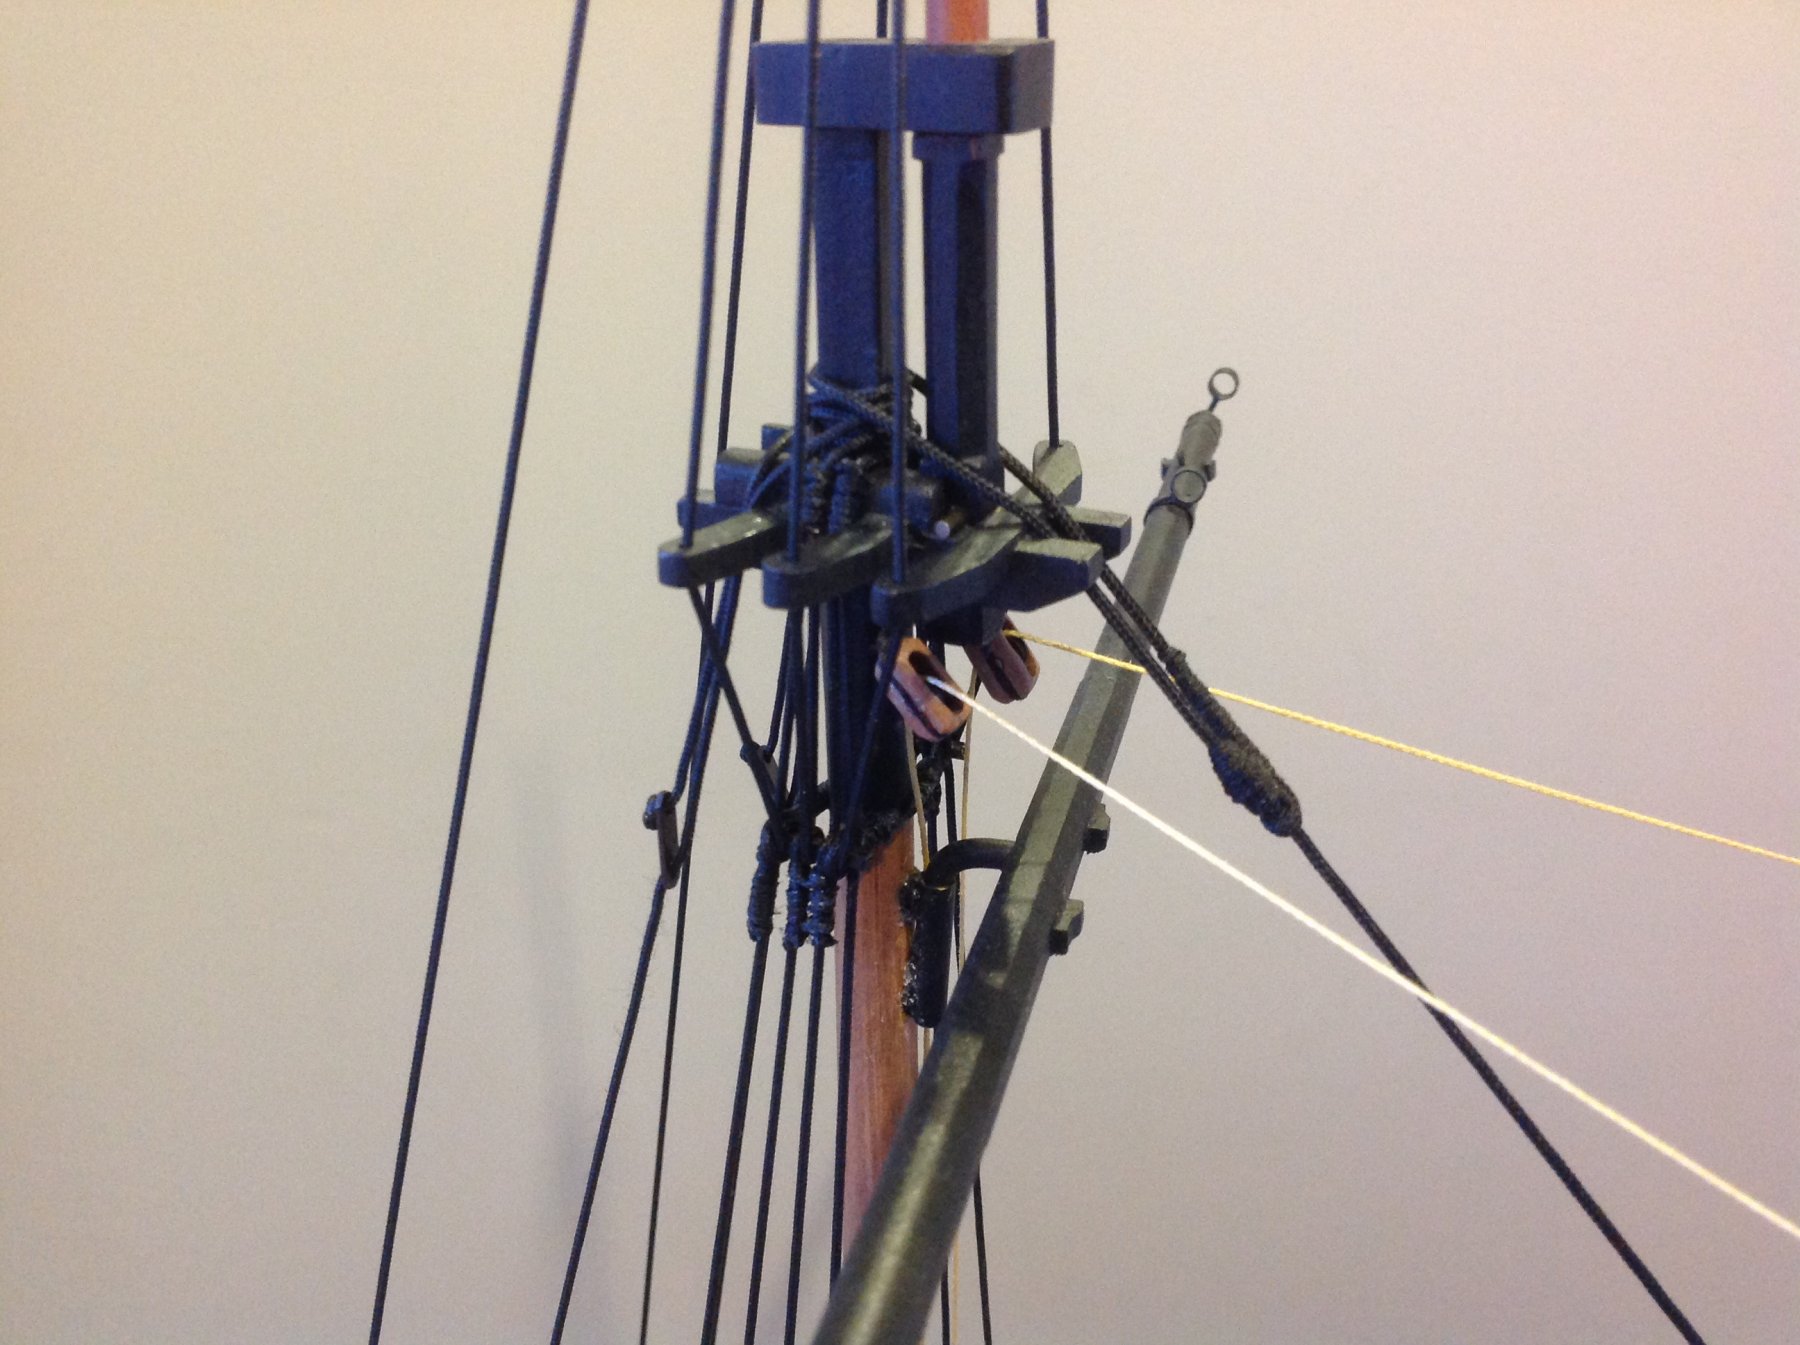
-The yards have all been completed, including a yet to be mounted spitsail yard. topgallant yards are done but just absent for the pic.
-the standing rigging is largely complete with just ratlines to be tied (joy). This follows Petrejus fairly closely and includes shrouds with catharpins, stays and backstays, martingale stay etc.
The shrouds are fixed as due to limited lateral movement the only issue there is the cord stretching. The deadeye lanyards can always be tightened if this happens.
The main and forestay are likewise fixed as the lower masts won't really move but the top stays and up are rigged with adjustable length plates (think tent guy ropes) so tension can be adjusted.
This is necessary as the top and and topgallant masts can drop by about 6-7 inches combined for transport. Likewise the jib boom can come inboard by its own length.
I'm impressed with how rigid the masts are both fore and aft and laterally.
- working rigging blocks for the top and topgallant masts have been made to allow working braces run from servos.
- Sails have been made, just the main course to be done once I decide how much wire bracing to include (more on this later).
-servos are all installed (pics to come) and all yards have been temporarily rigged to check functionality. Fore and mainmast yards rotate independently on separate servos with about 55 degrees of rotation to each side. ( video to come which will explain the concept better.)
More pics:
Foretopmast stays etc at the front end. The hearts are made from wood. The bowsprit stays with dead eyes are fixed while the fore topmast stays, to the right in the pic, running through the bees abaft down through the bowsprit cap are adjustable due to the wooden blocks acting as length plates to disguise their real function. I want to avoid anything that looks less than period correct near the hull. Higher in the rigging is not so obvious.
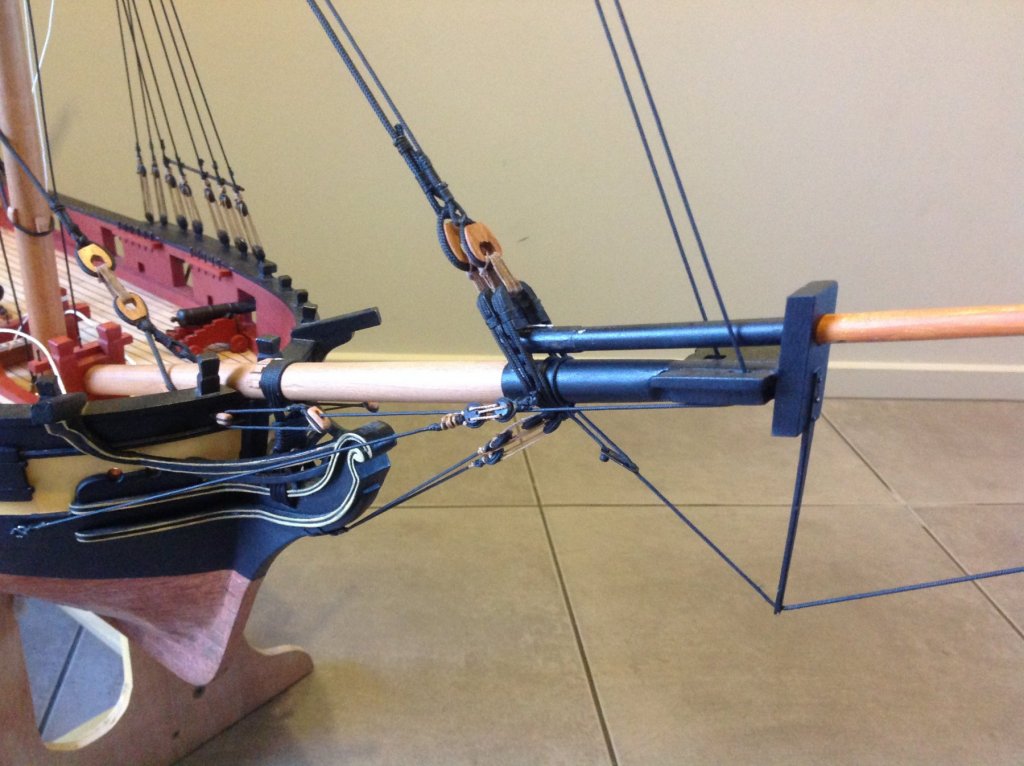
Forestays. The white line visible are the temporary sheets for the forestays. They travel from the servo through a brass tube in each side embedded in the forward bitts. The black line running from the deck straight up the mast is the temporary main brace rigging.
Fore chains and shrouds, with backstay dead eyes at left. If the line ever stretches and slackens it's easy enough to just cut the lanyards off and rerig.

Topmast shrouds and stays. The upper masts have a brass pin through them which can be removed to drop them a bit. The mast caps are also not fixed to allow this to go a bit easier. Close tolerances and the rigging tension keep them very firmly in place.
Maintop and yard etc. The main and top yards on each mast are on a rotating pin set forward to allow a greater arc of rotation.
Also visible here are the working blocks to take the brace sheets to the yards. These were made from timber with brass sheaves from RB Models. I've used their blocks elsewhere on the model where they don't have major stress on them but they don't seem to make the large single blocks anymore and I'm a bit more comfortable with these made from NZ Matai timber which is fairly hard.
 Running braces from this position isn't accurate but borrows from concept used by the likes of RC square rig kit manufacturer SC&H.
Attribution time- this design is based on looking at their fine products (I wanted a smaller scale and couldn't afford theirs with shipping to the ends of the Earth) and many fine builders and modifiers of their work including Dan Lewandowski and others, plus the work of Jerry Todd, who you've seen commenting here.
Also you can see the mouses/mice (?) on the main and main spring stay.
Main topgallant top. Same concept as before but smaller.
The driver sail is a temporary job. The other has been made but not fitted. It's hard to find a backdrop given the size of the vessel.
Next steps are bending the sails and installing running rigging. This is waiting on the rigging. I've been unable to find the right sizes in a white or otherwise braid. I've got .5mm and 1.1m in white which can be dyed ok but while the smaller is ok for the deadeye lanyards etc neither size is right for braces or other similar functional rigging.
RC square rigger Dan mentioned above has been kind enough to offer to make me some rigging line on his rope walk. A true gentleman who not only doesn't worry about me using his ideas but makes the rope for me to do it with.
While I wait for the rope I'll tidy up the servo wiring and install fuses (pretty clueless with electrics), and test the ballast keel weight and depth below keel in a mate's pool.
There are still carronade slides to be made and guns installed and the spritsail yard but these are cosmetic and I'll concentrate on the bits that'll get Harrier in the water soonest before moving on to the pretty bits.
I'll post a vid of the yards in action soon. The optimist in me wants me wants her on the water in the next couple of months The weather should be better then.
-
-
That name looks great Jason and the cheeks and other stem work is fantastic. Well done.


HMS Jason by Beef Wellington - Caldercraft - 1:64 - Artois-class frigate modified from HMS Diana 1794
in - Kit build logs for subjects built from 1751 - 1800
Posted
Great tackle and stove there and very nice weathering on the copper.