hamilton
-
Posts
1,933 -
Joined
-
Last visited
Content Type
Profiles
Forums
Gallery
Events
Everything posted by hamilton
-
Hi Bruce: That's weird! Did you call their customer service? How long ago was this? I imagine it must have been pretty disappointing....The saw I want is the DSH/E - a larger saw than the one in the link with a tilting table for mitre cuts....This one seems to have pretty universally good reviews....I'm going to take my chances with Home Depot, and we'll see how it goes - can't say I'm too encouraged by your story! hamilton
-
The issues is that I want to use a Home Depot gift card for the purchase, but Home Depot Canada only carries the Makita and Proxxon saws....The exchange rate being what it is, I would rather buy in Canada at the moment....long and short, I think I'm going to go for the Proxxon. It's a very exciting time....Happy holidays to all hamilton
-
Thanks Hornet - definitely the way I'm leaning after reading up more..... hamilton
-
Thanks Per: I read through these reviews and they are quite helpful - don't see the Makita there, though I have read some negative reviews....thanks again! hamilton
-
I know this subject has been covered elsewhere, but I was wondering about a specific comparison between the Proxxon DSH/E scroll saw and the Makita SJ401.... I'm in the market for a scroll saw and was looking for something in the $200 range...but then I came into a windfall and am thinking I can rationalise the Proxxon, which I can get for around $400....if there's no significant difference between the Makita and the Proxxon, then I'll save my money but from what I've read about Proxxon products in general the extra expense might be worth it....any advice would be appreciated! Thanks in advance hamilton
-
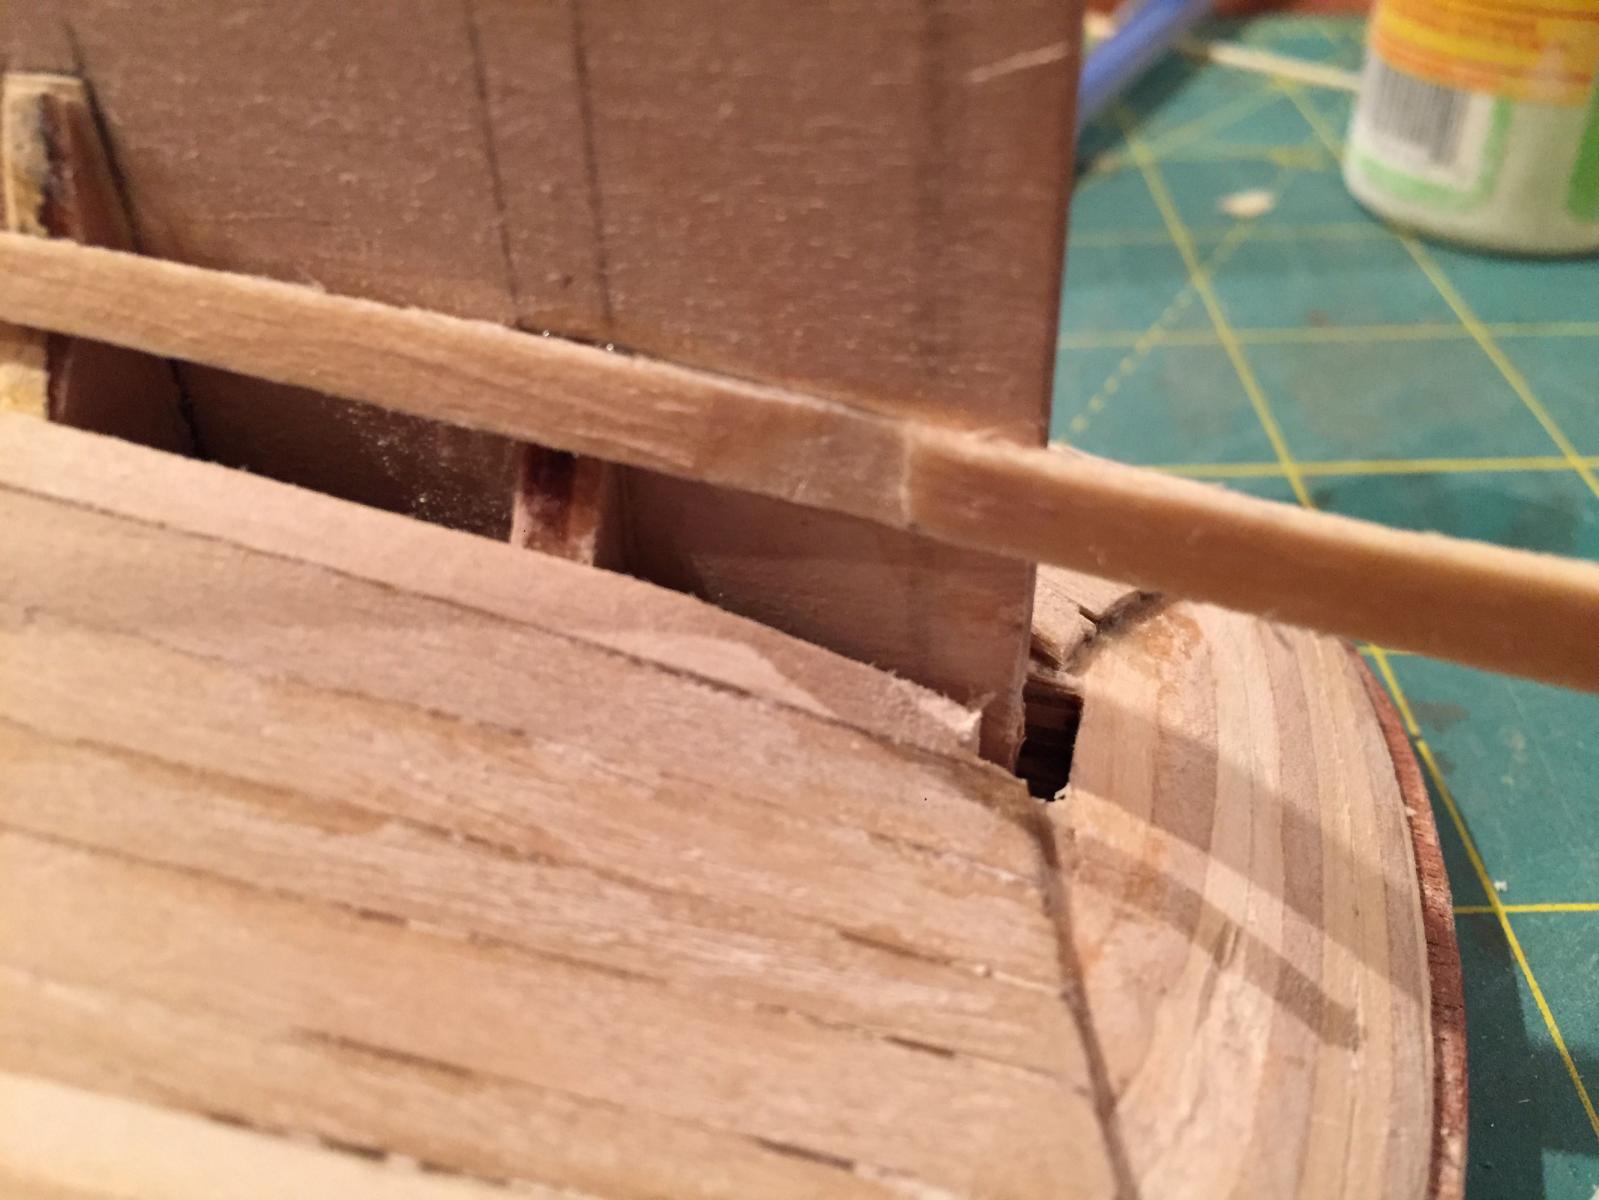
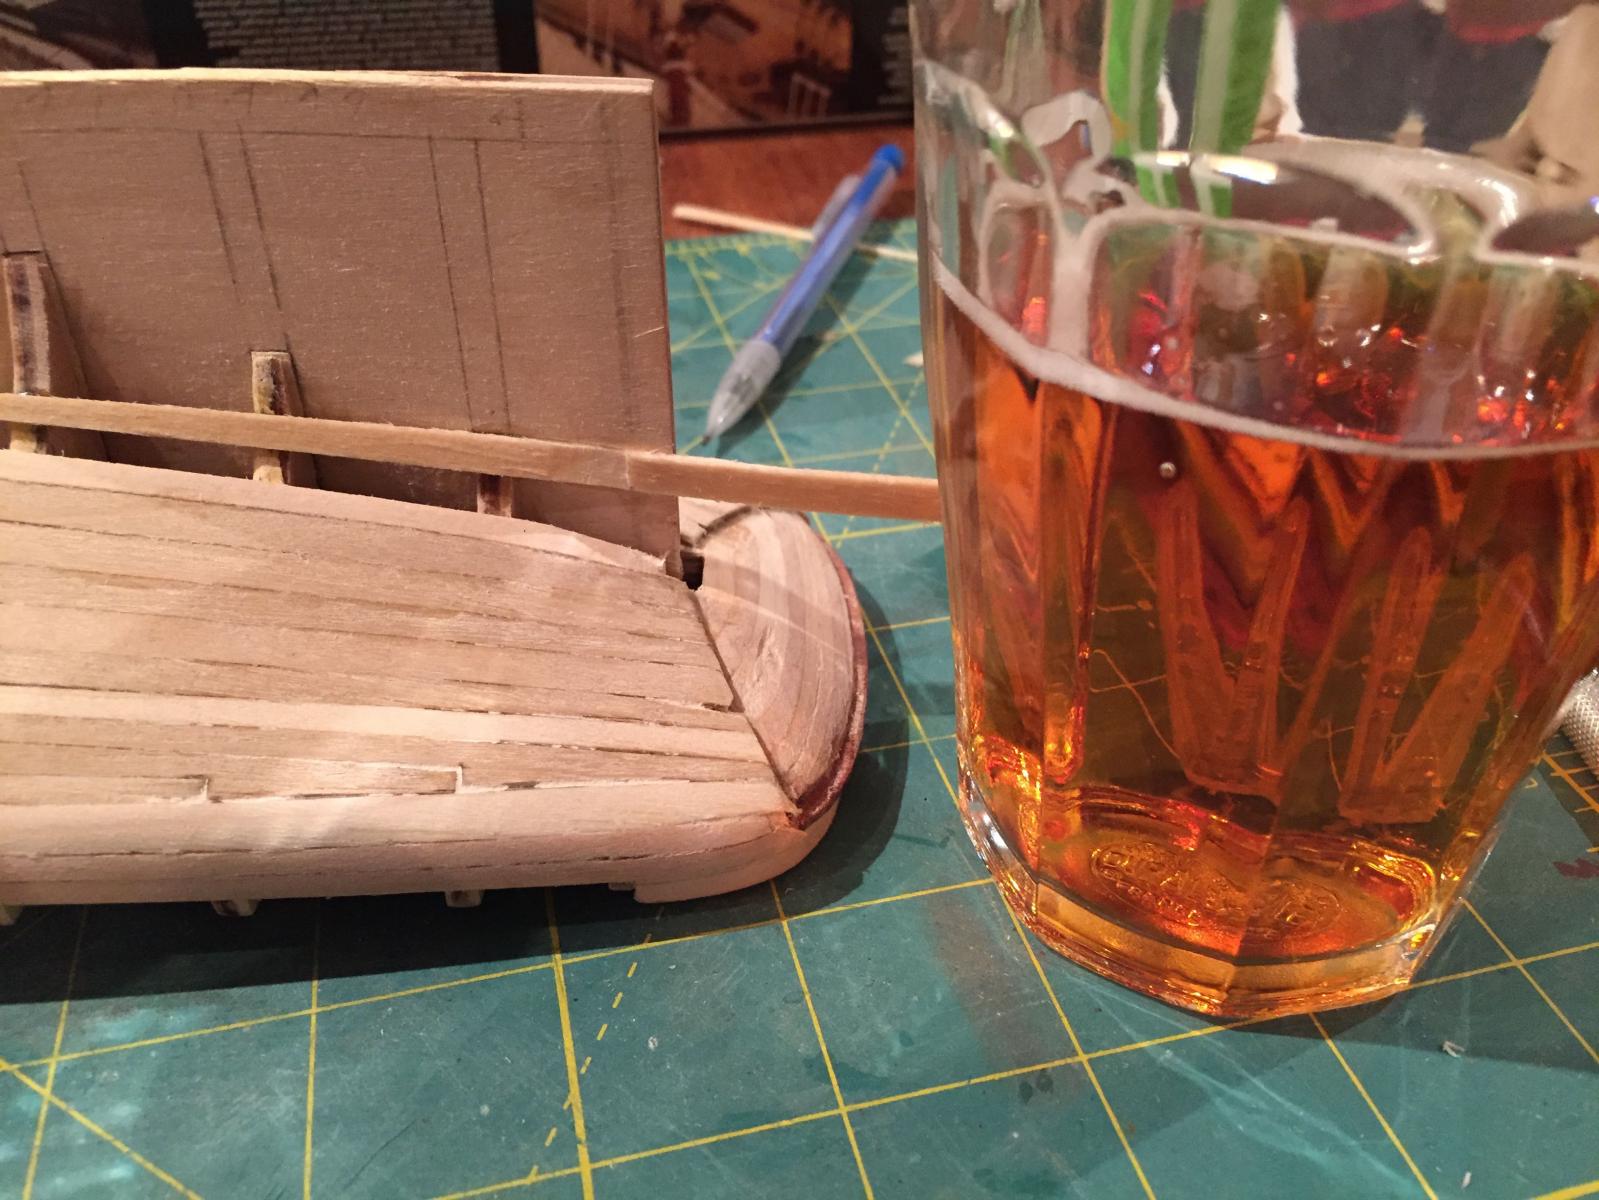
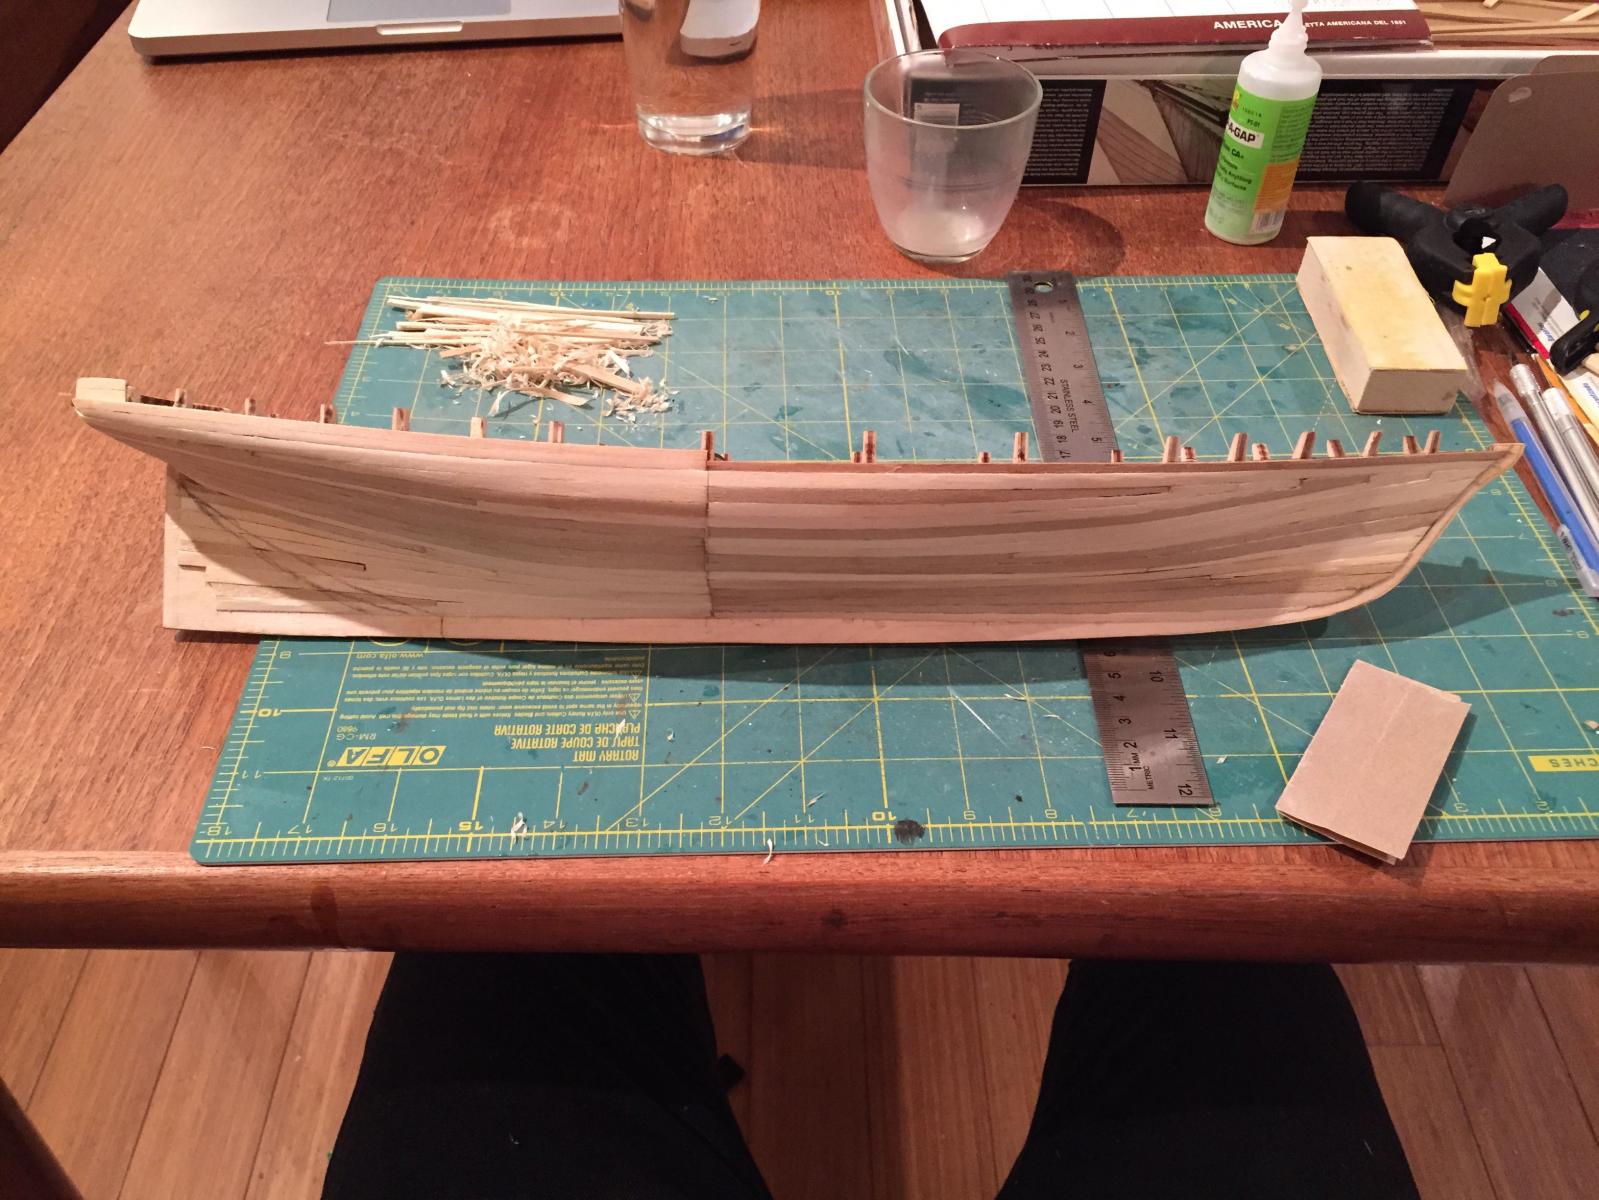
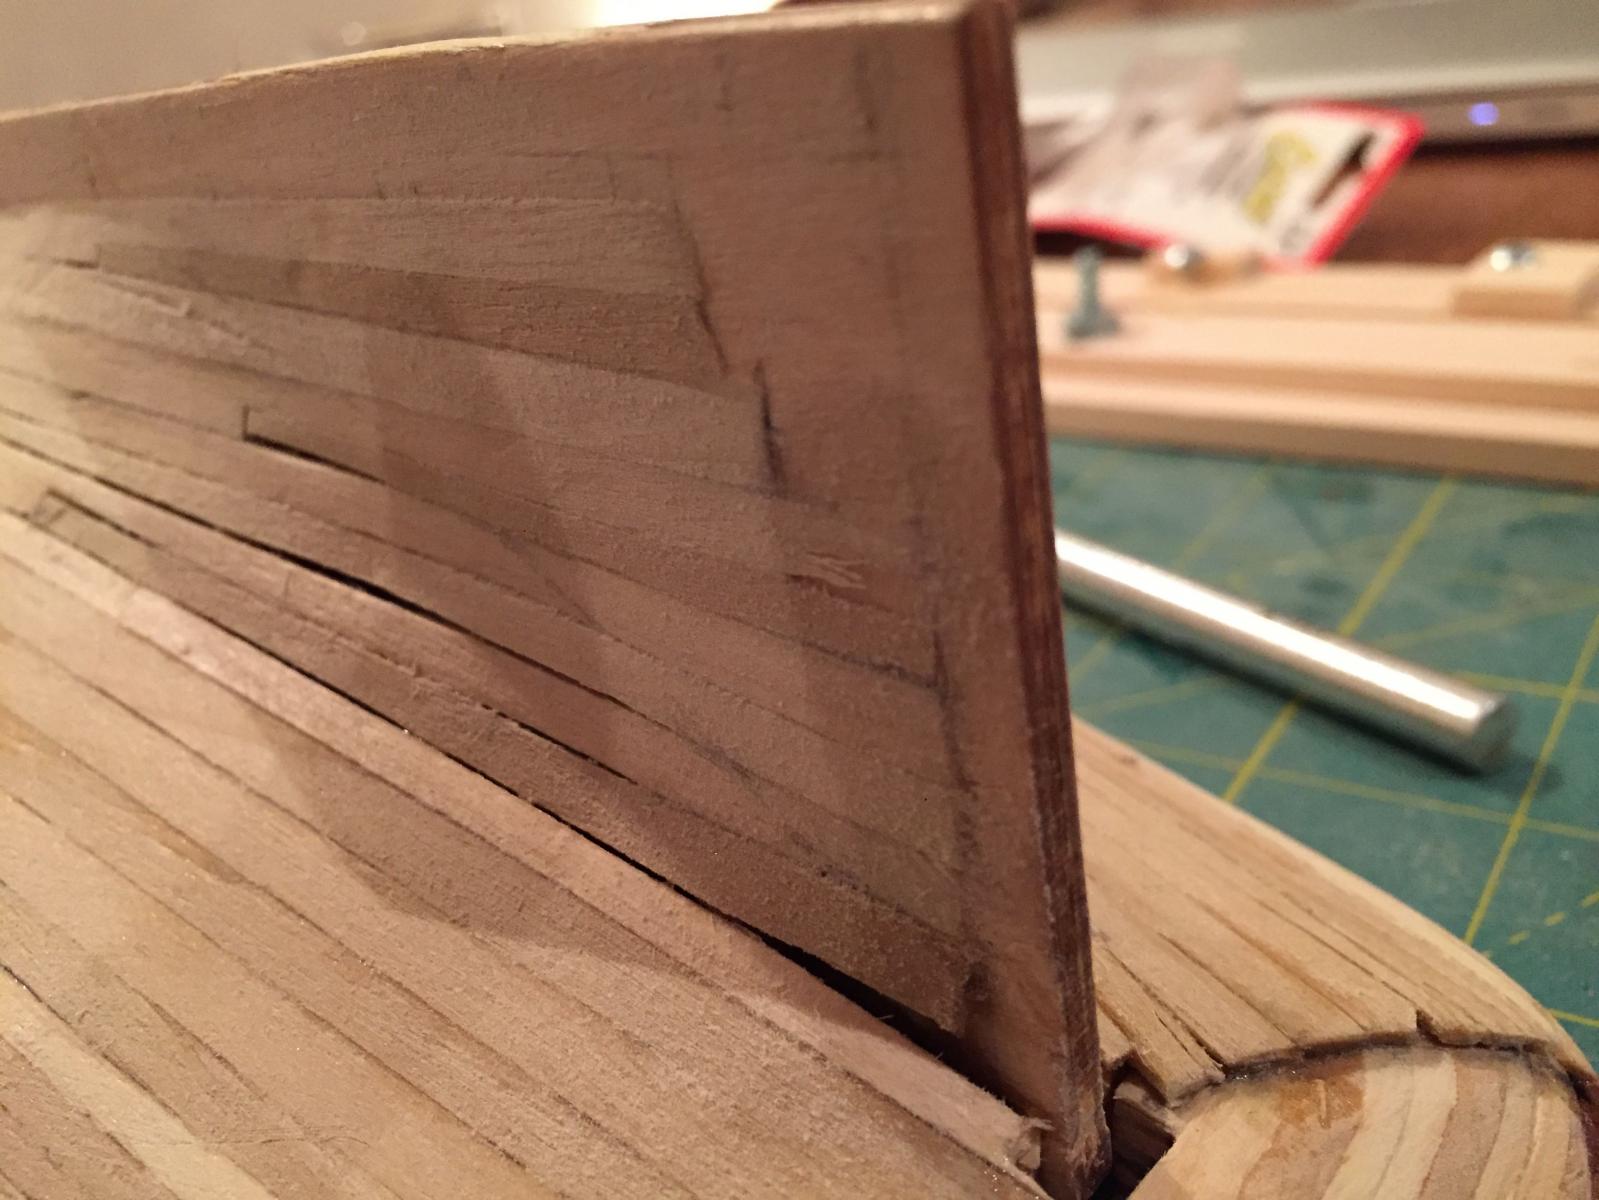
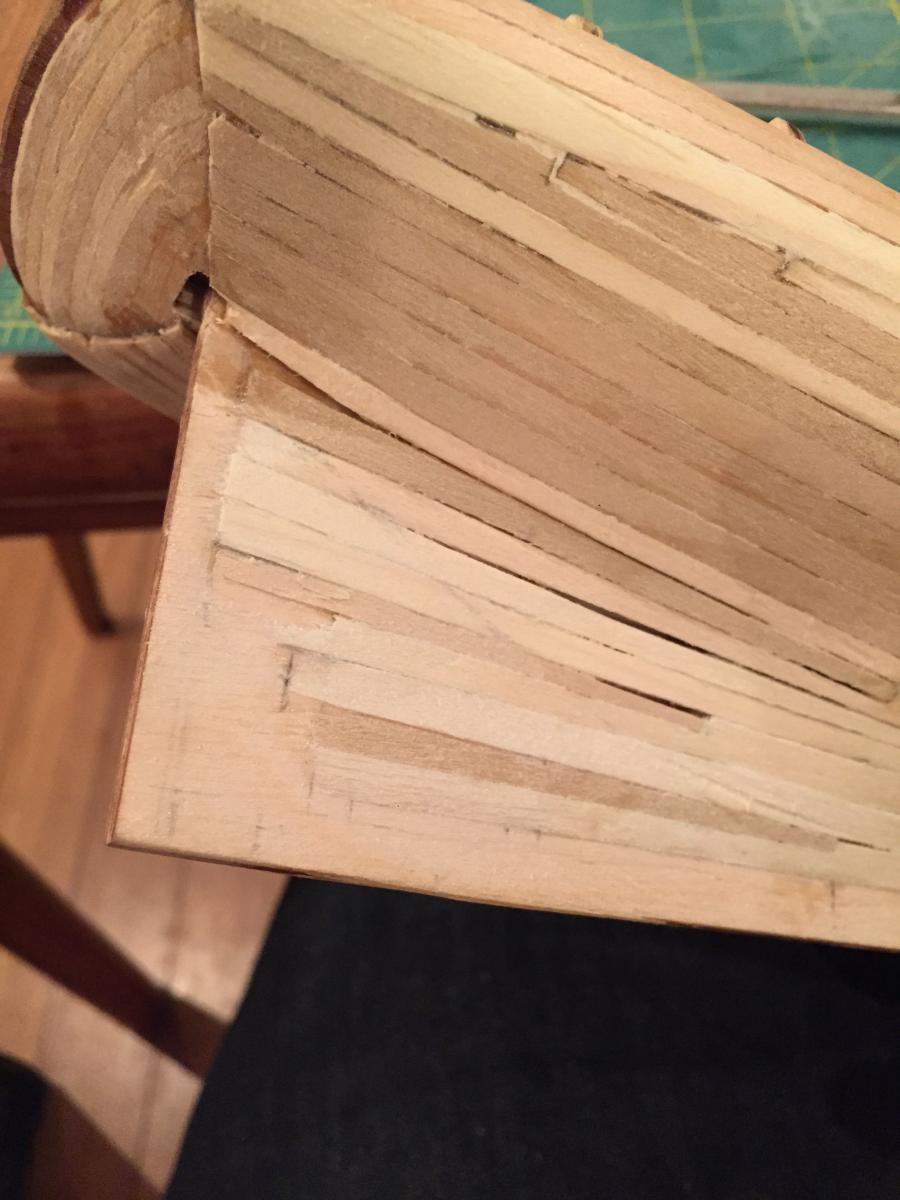
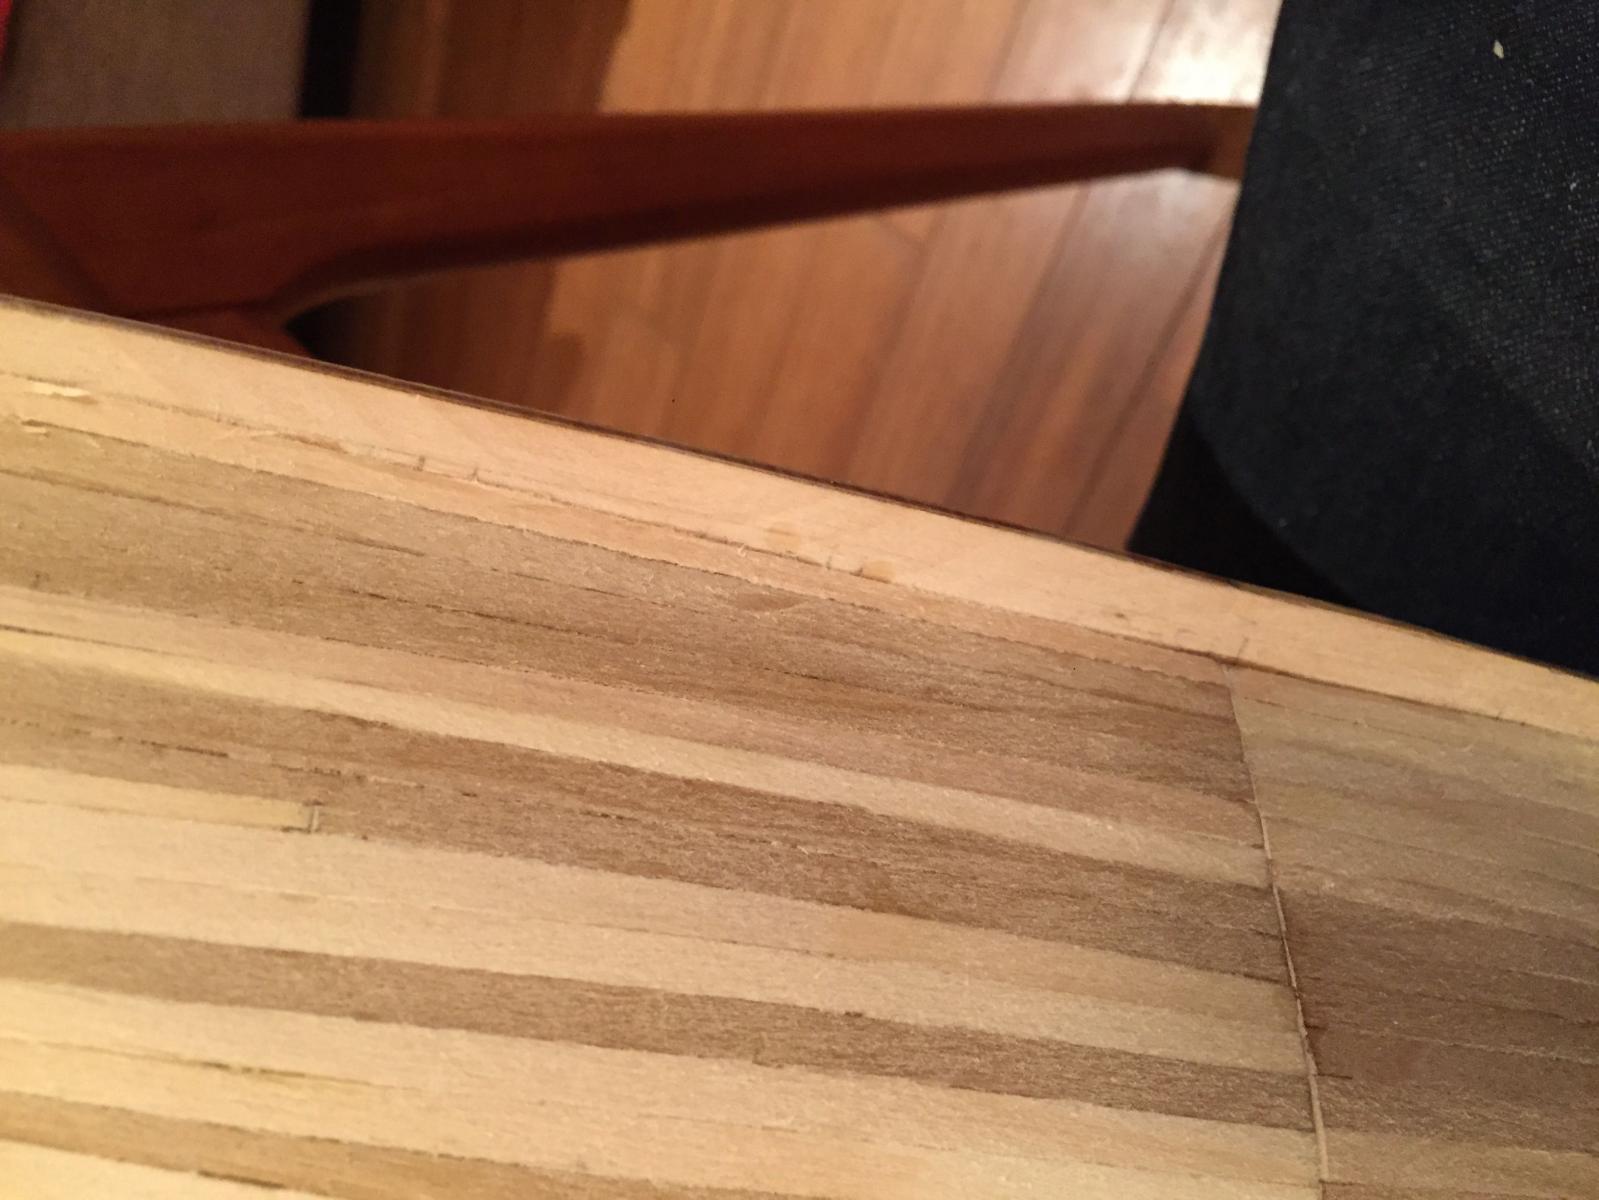
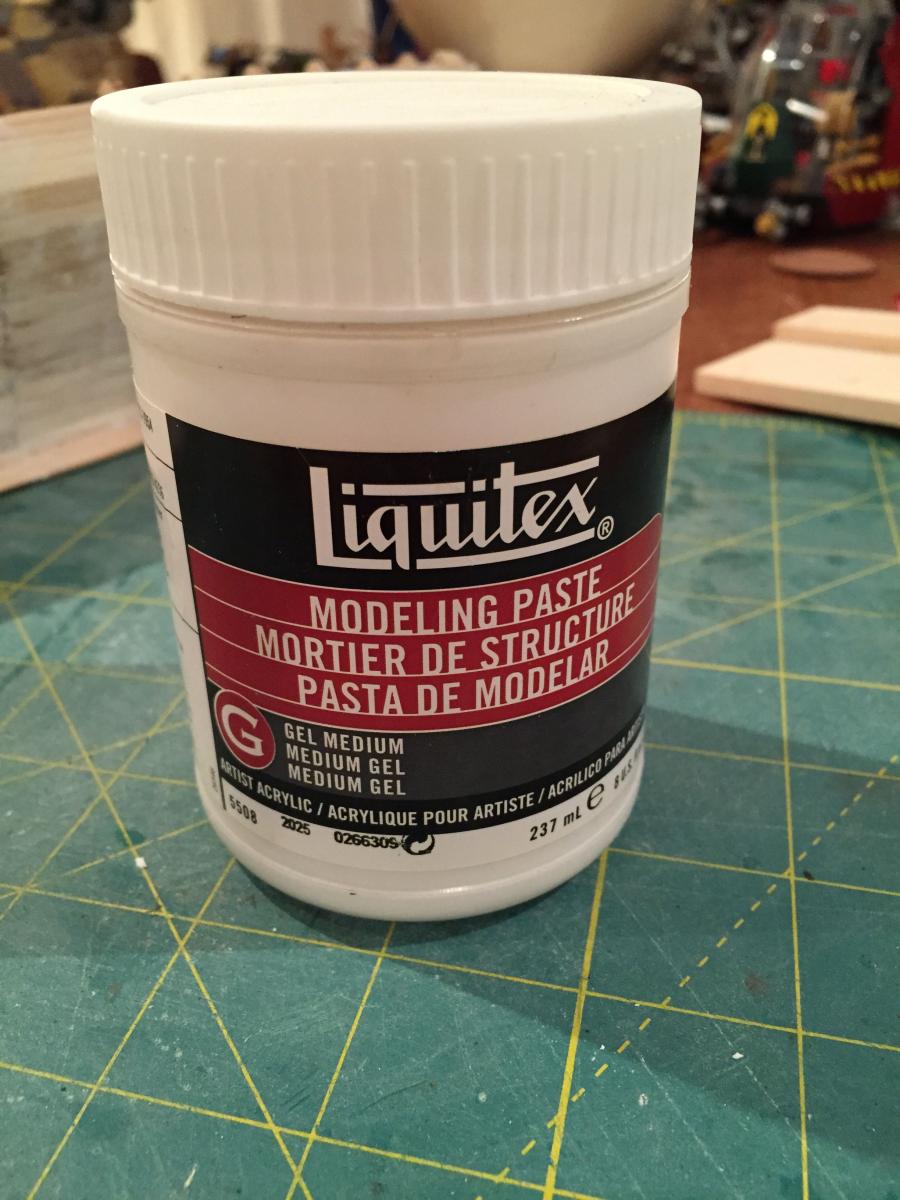
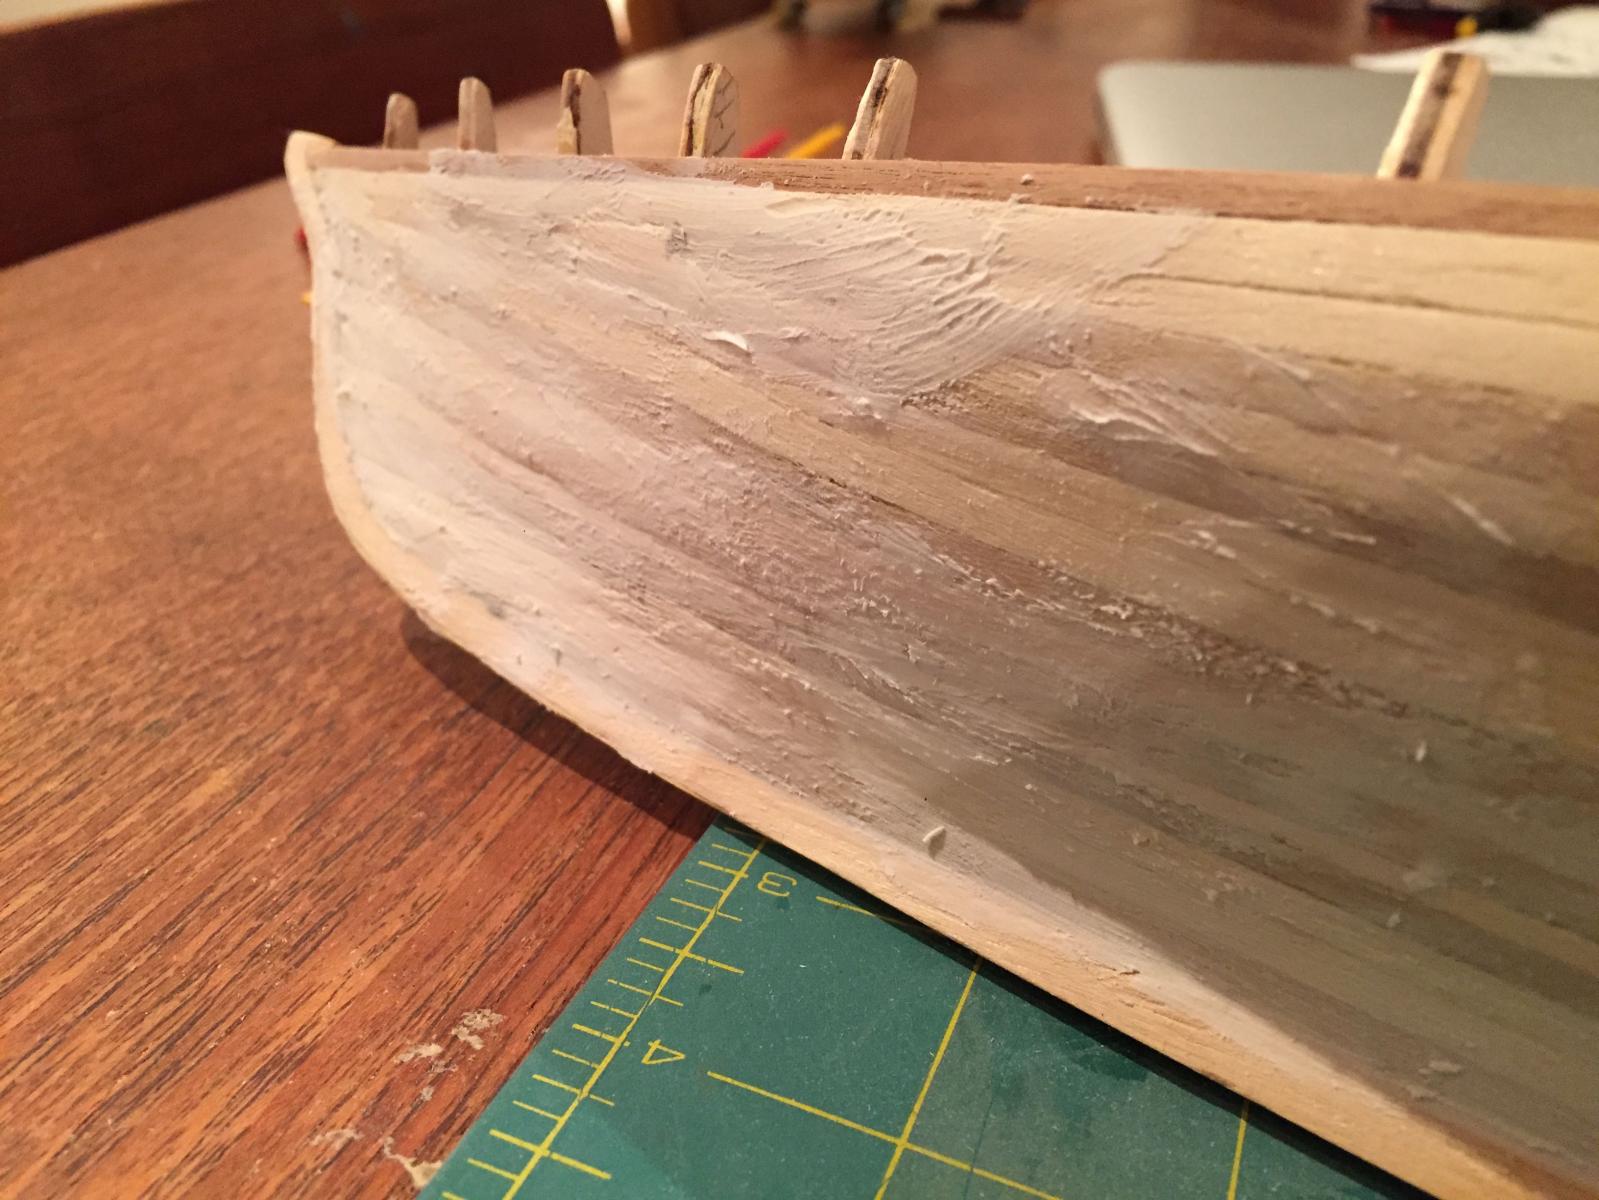
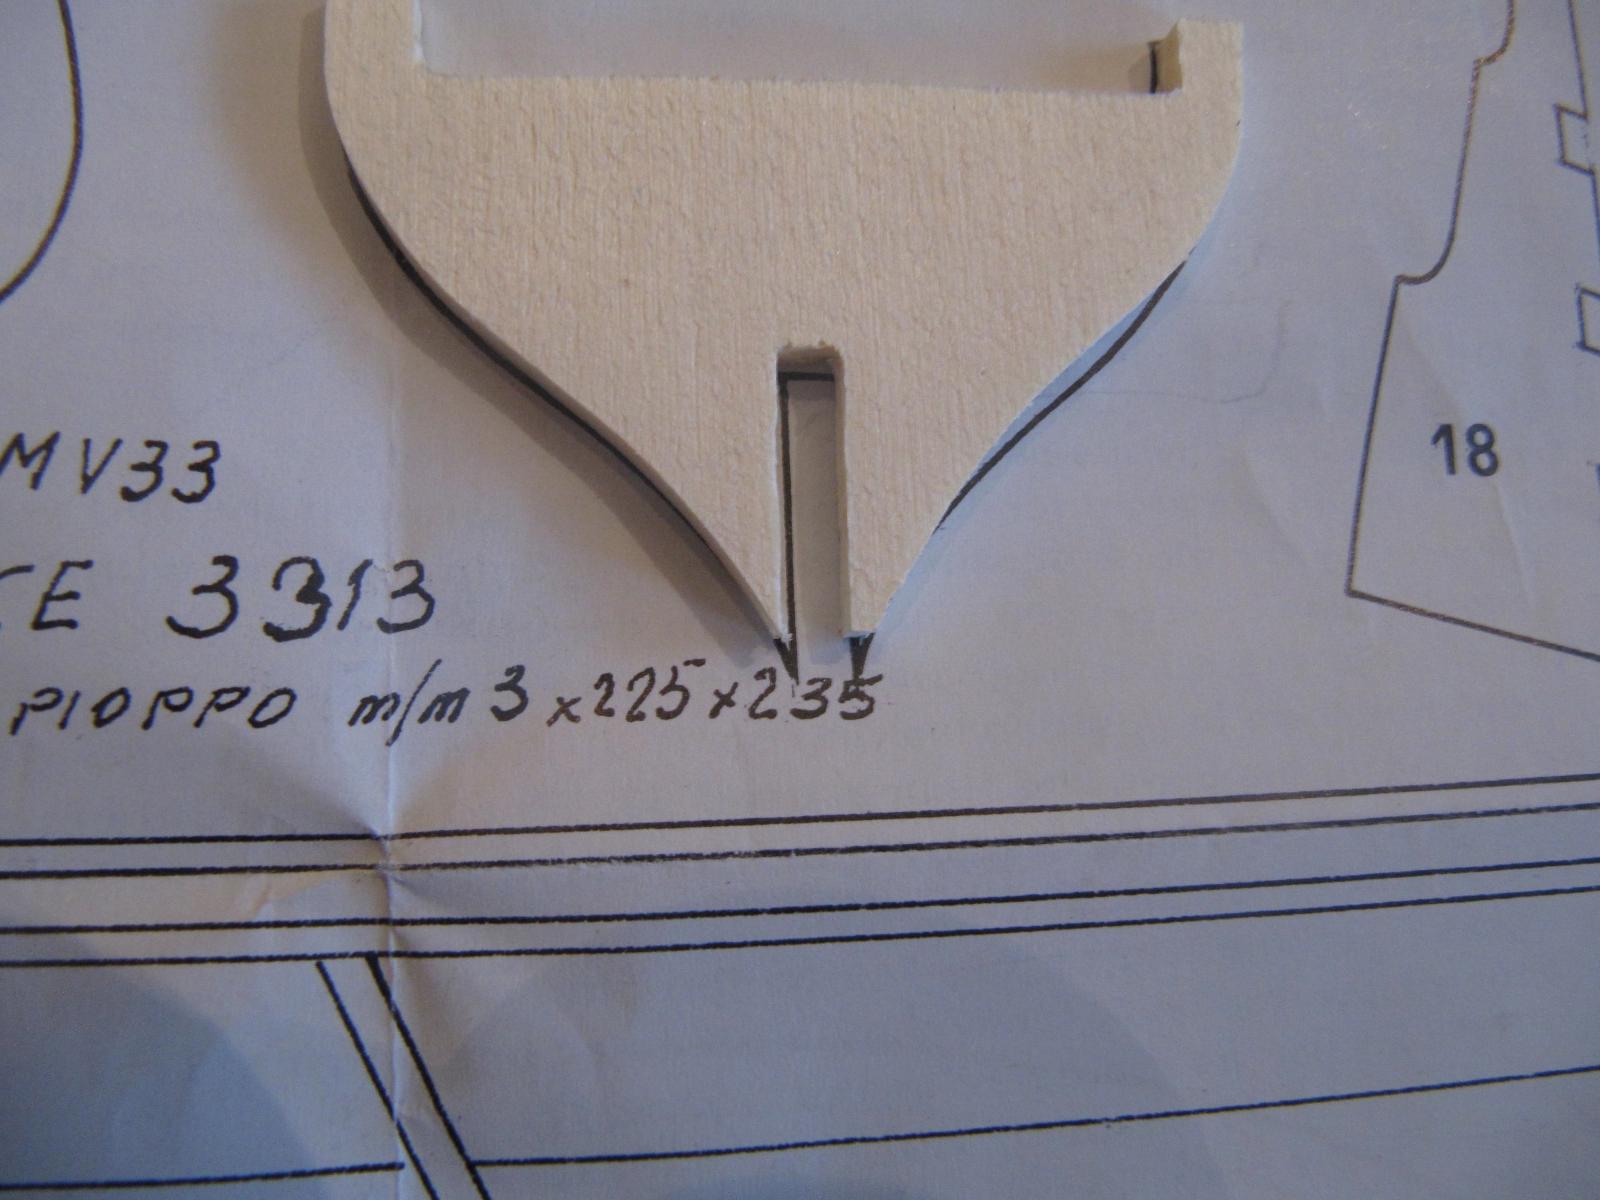
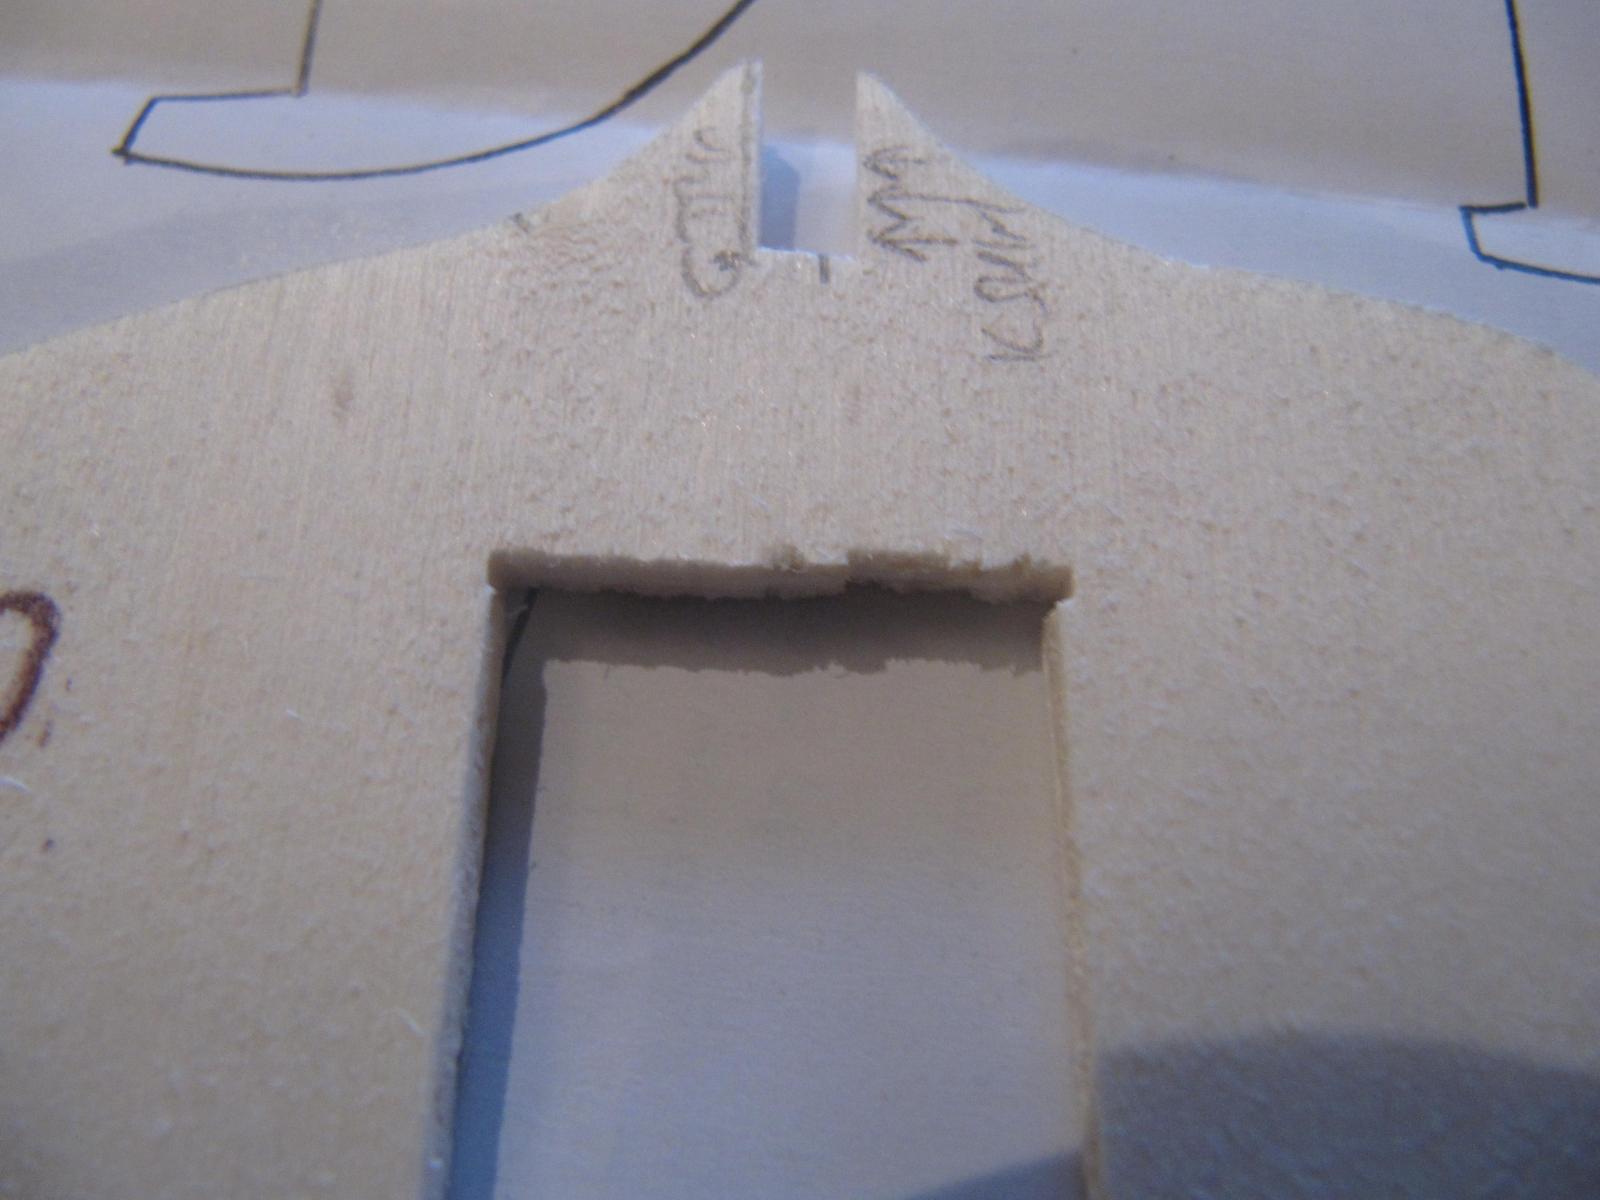
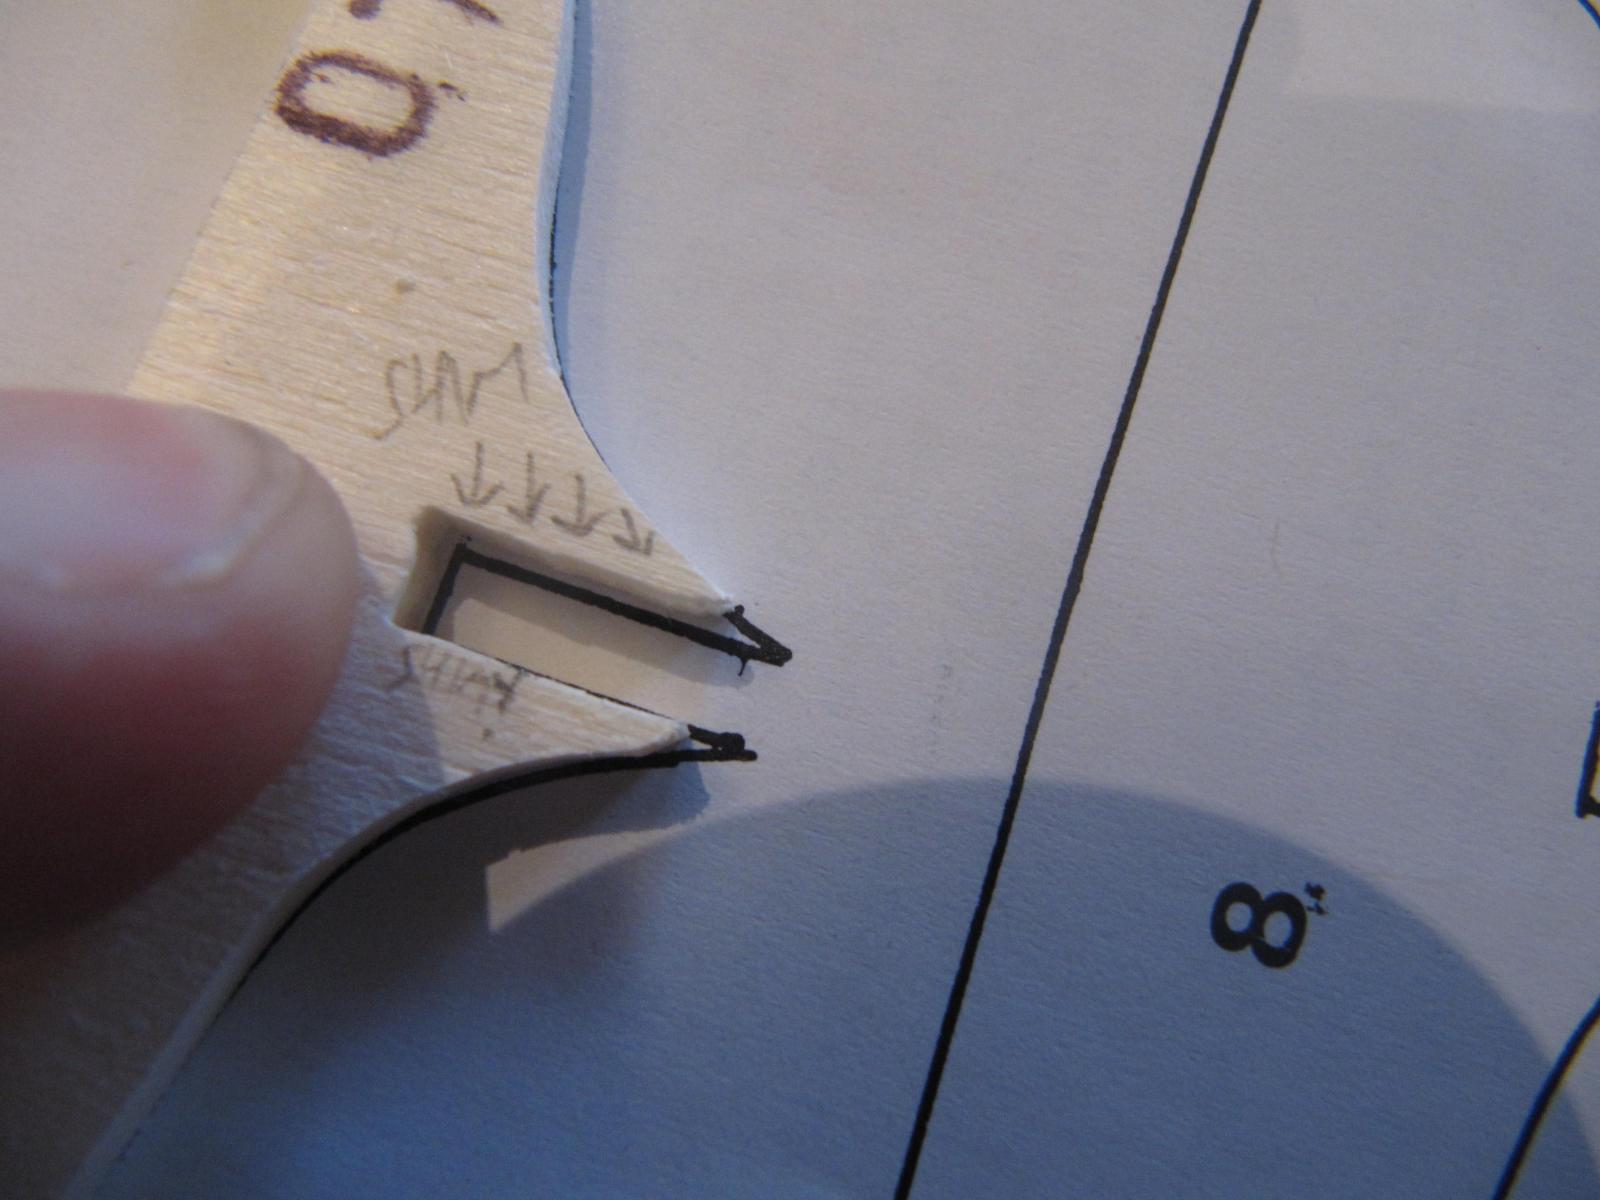
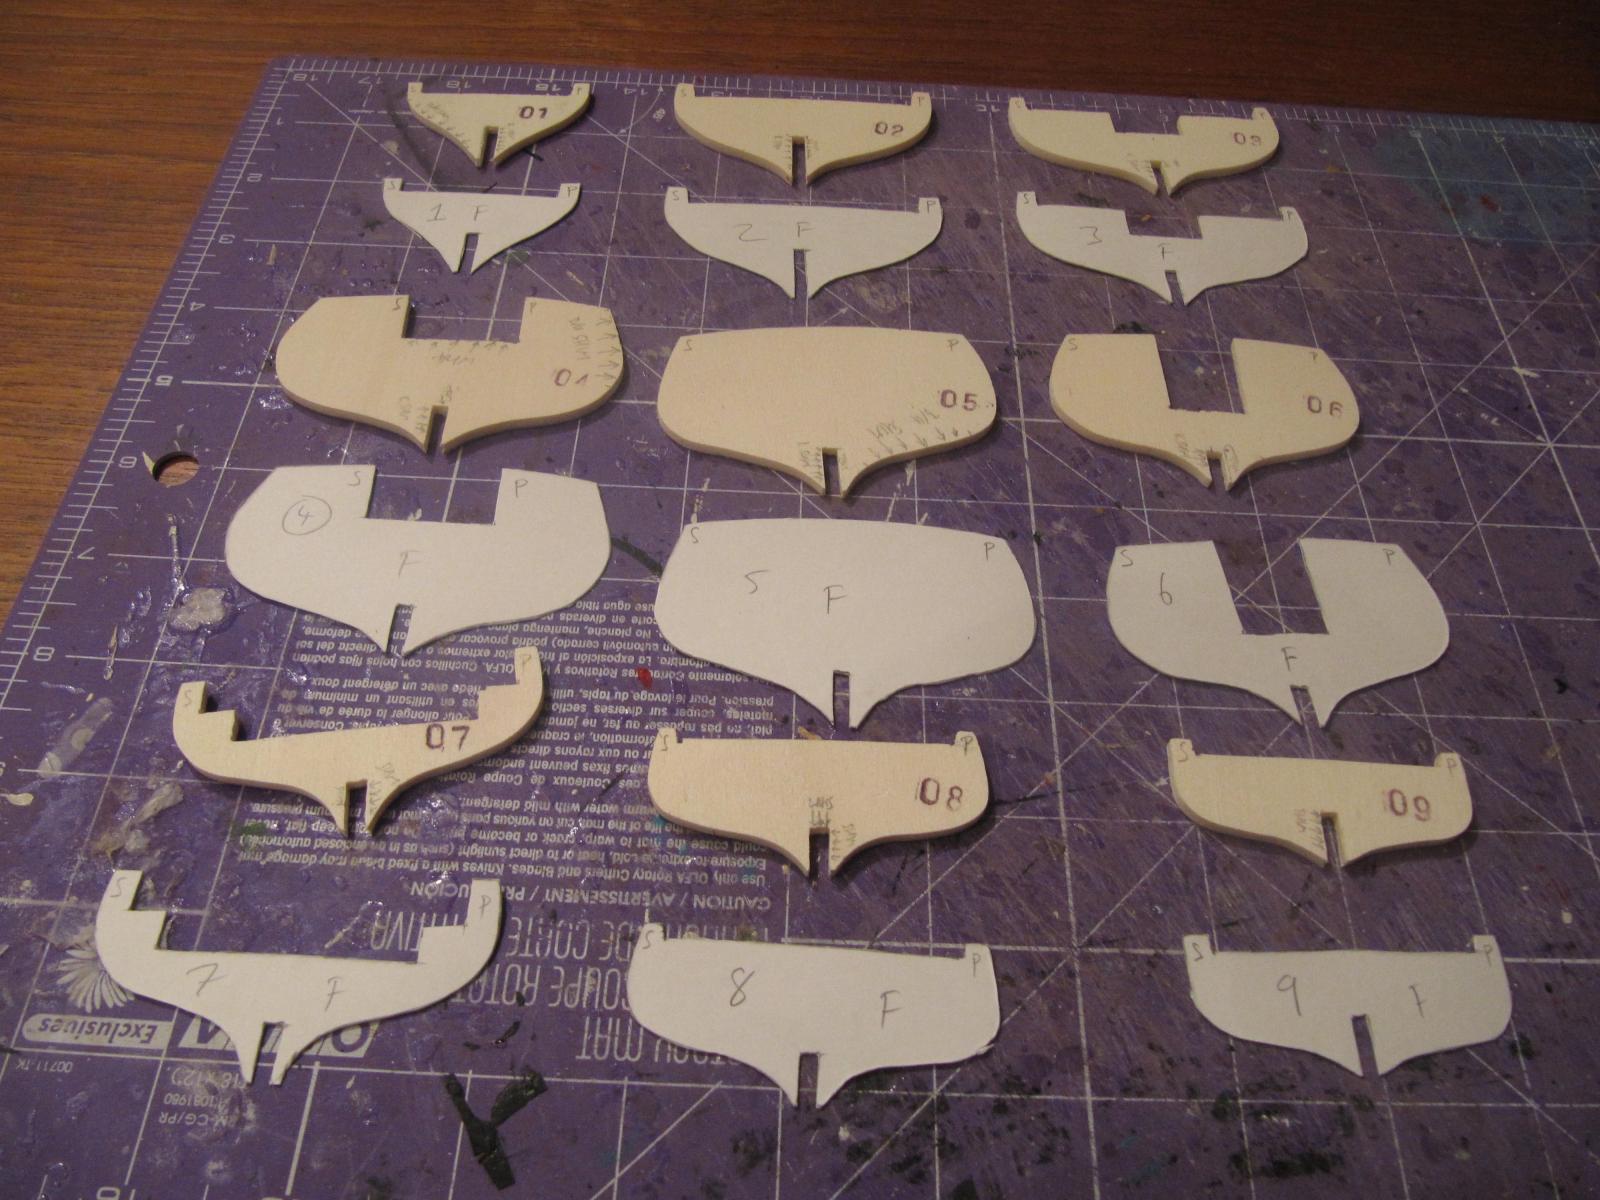
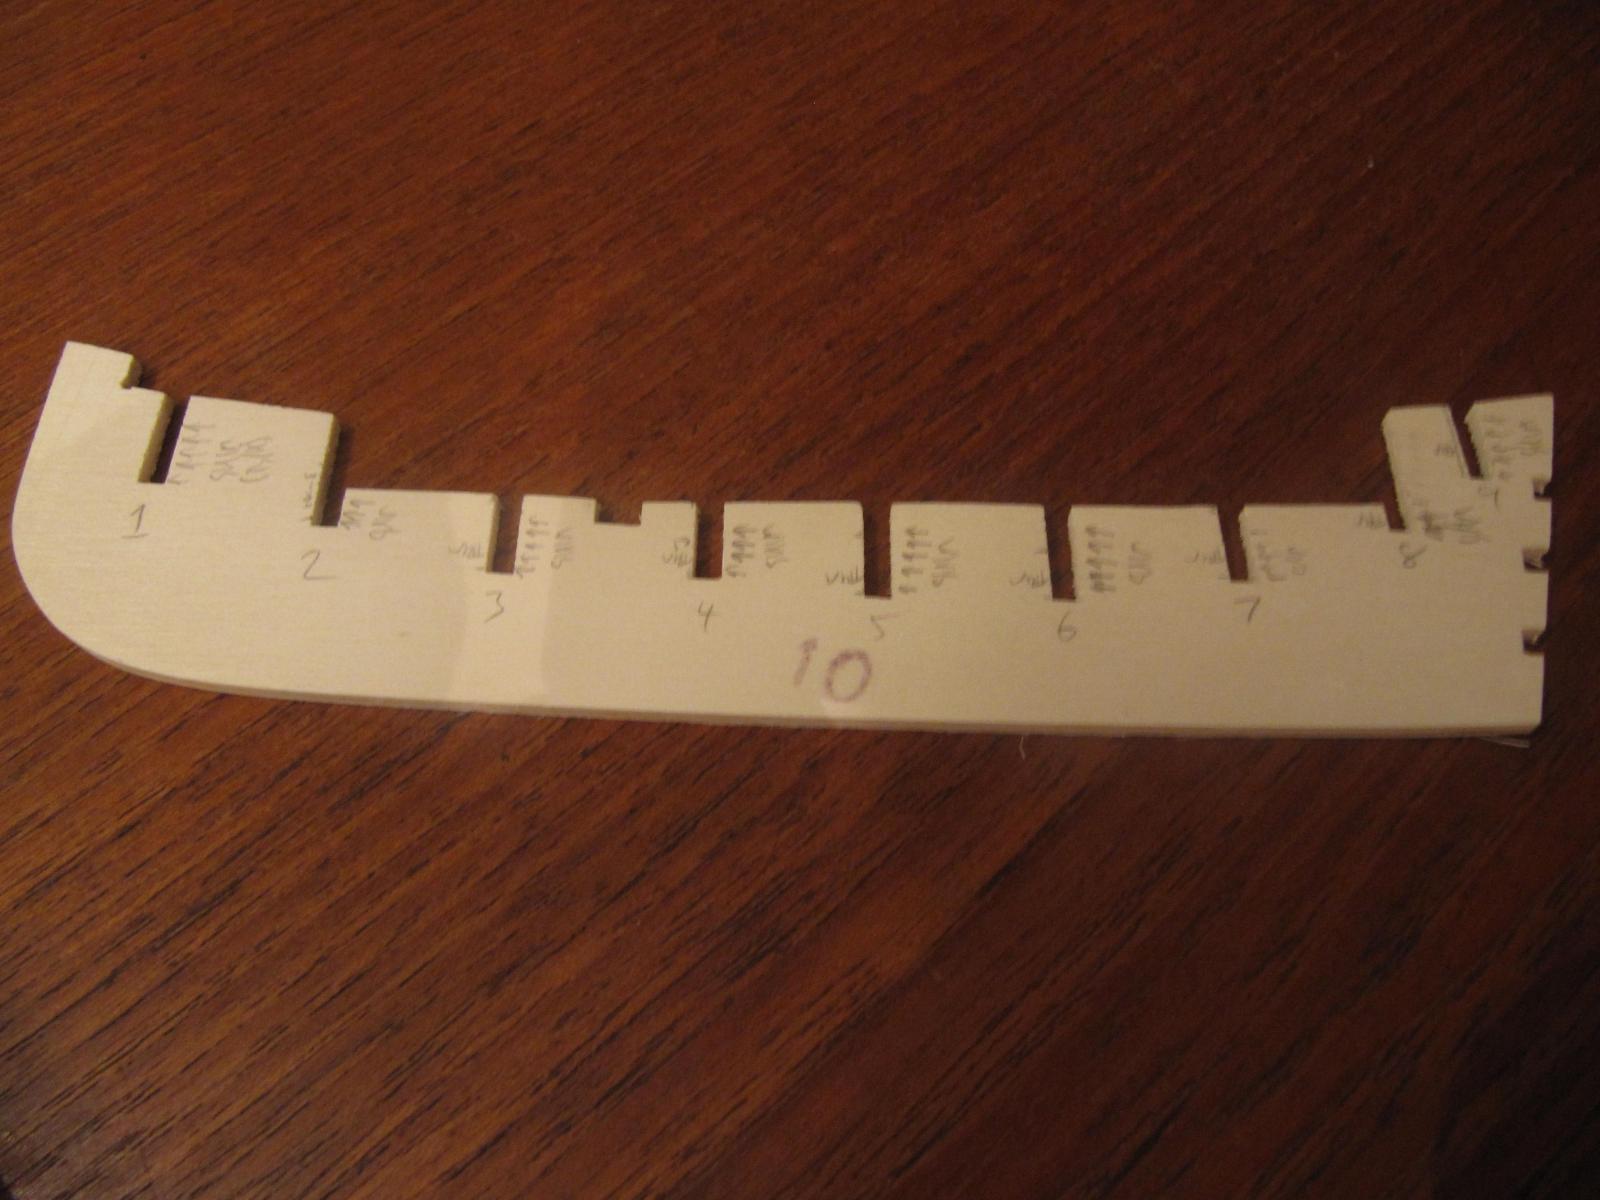
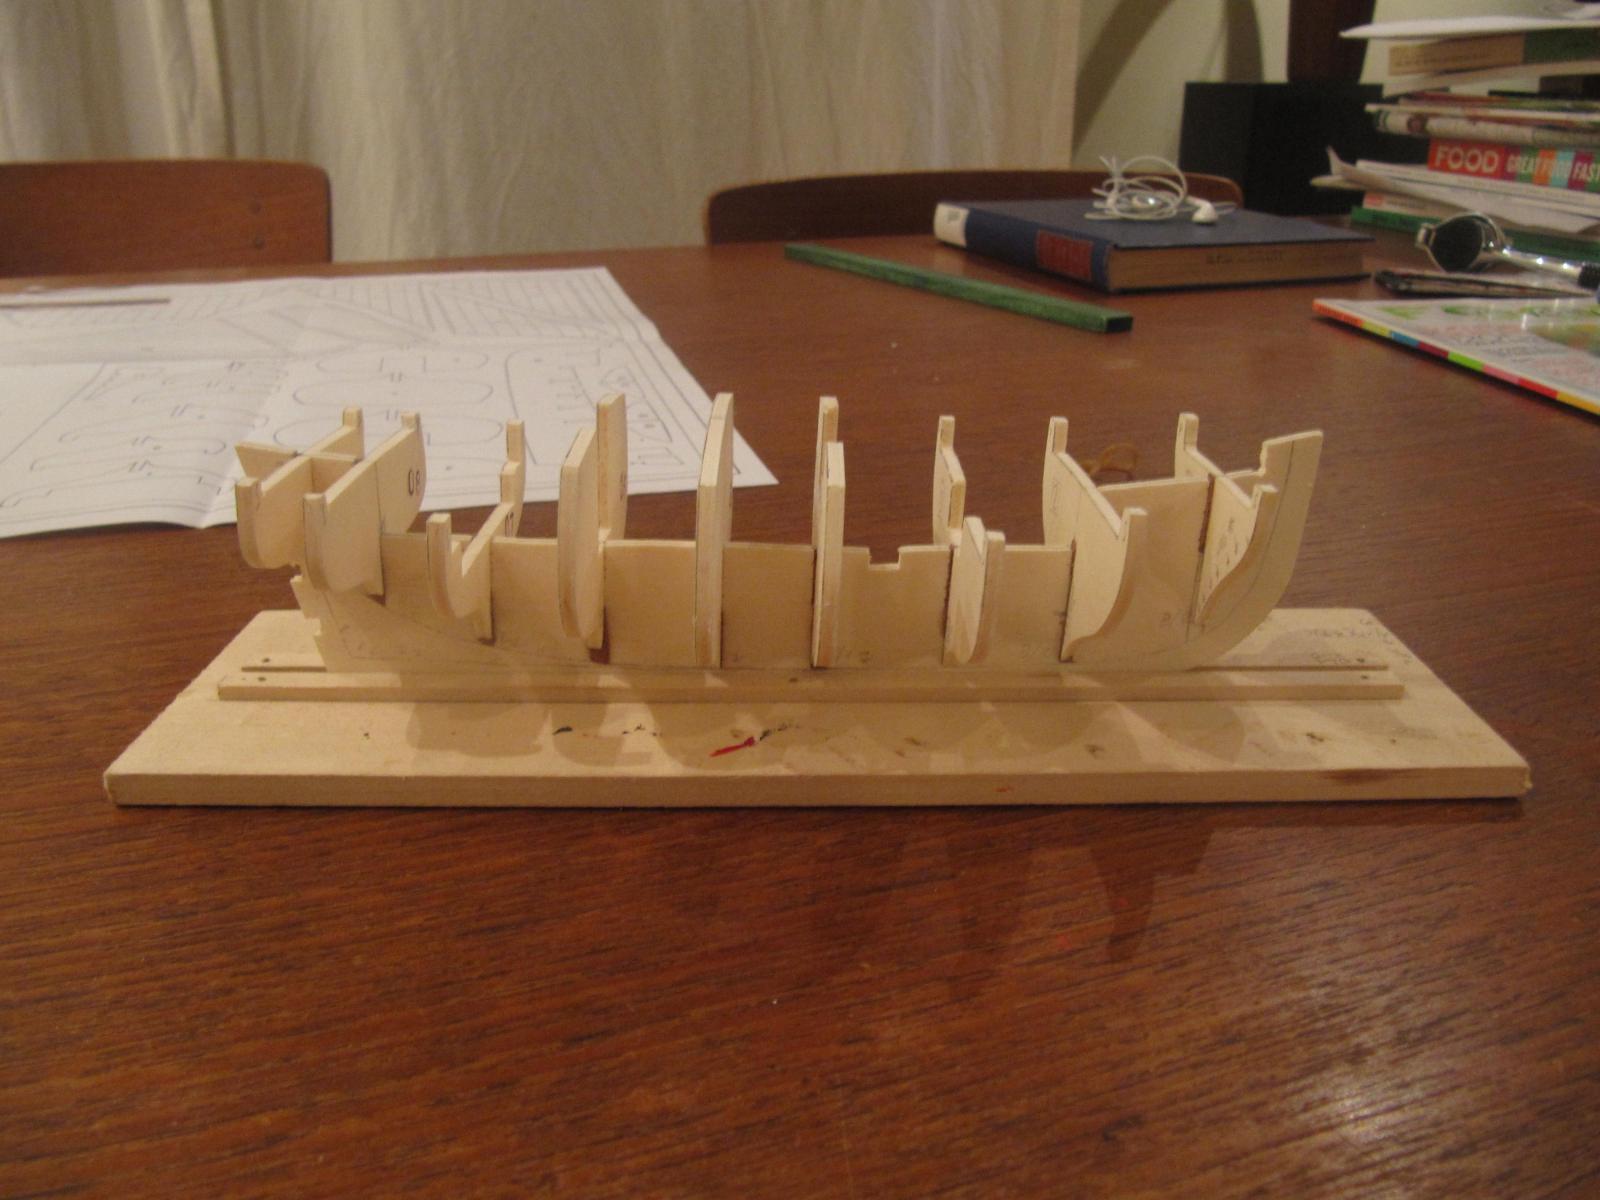
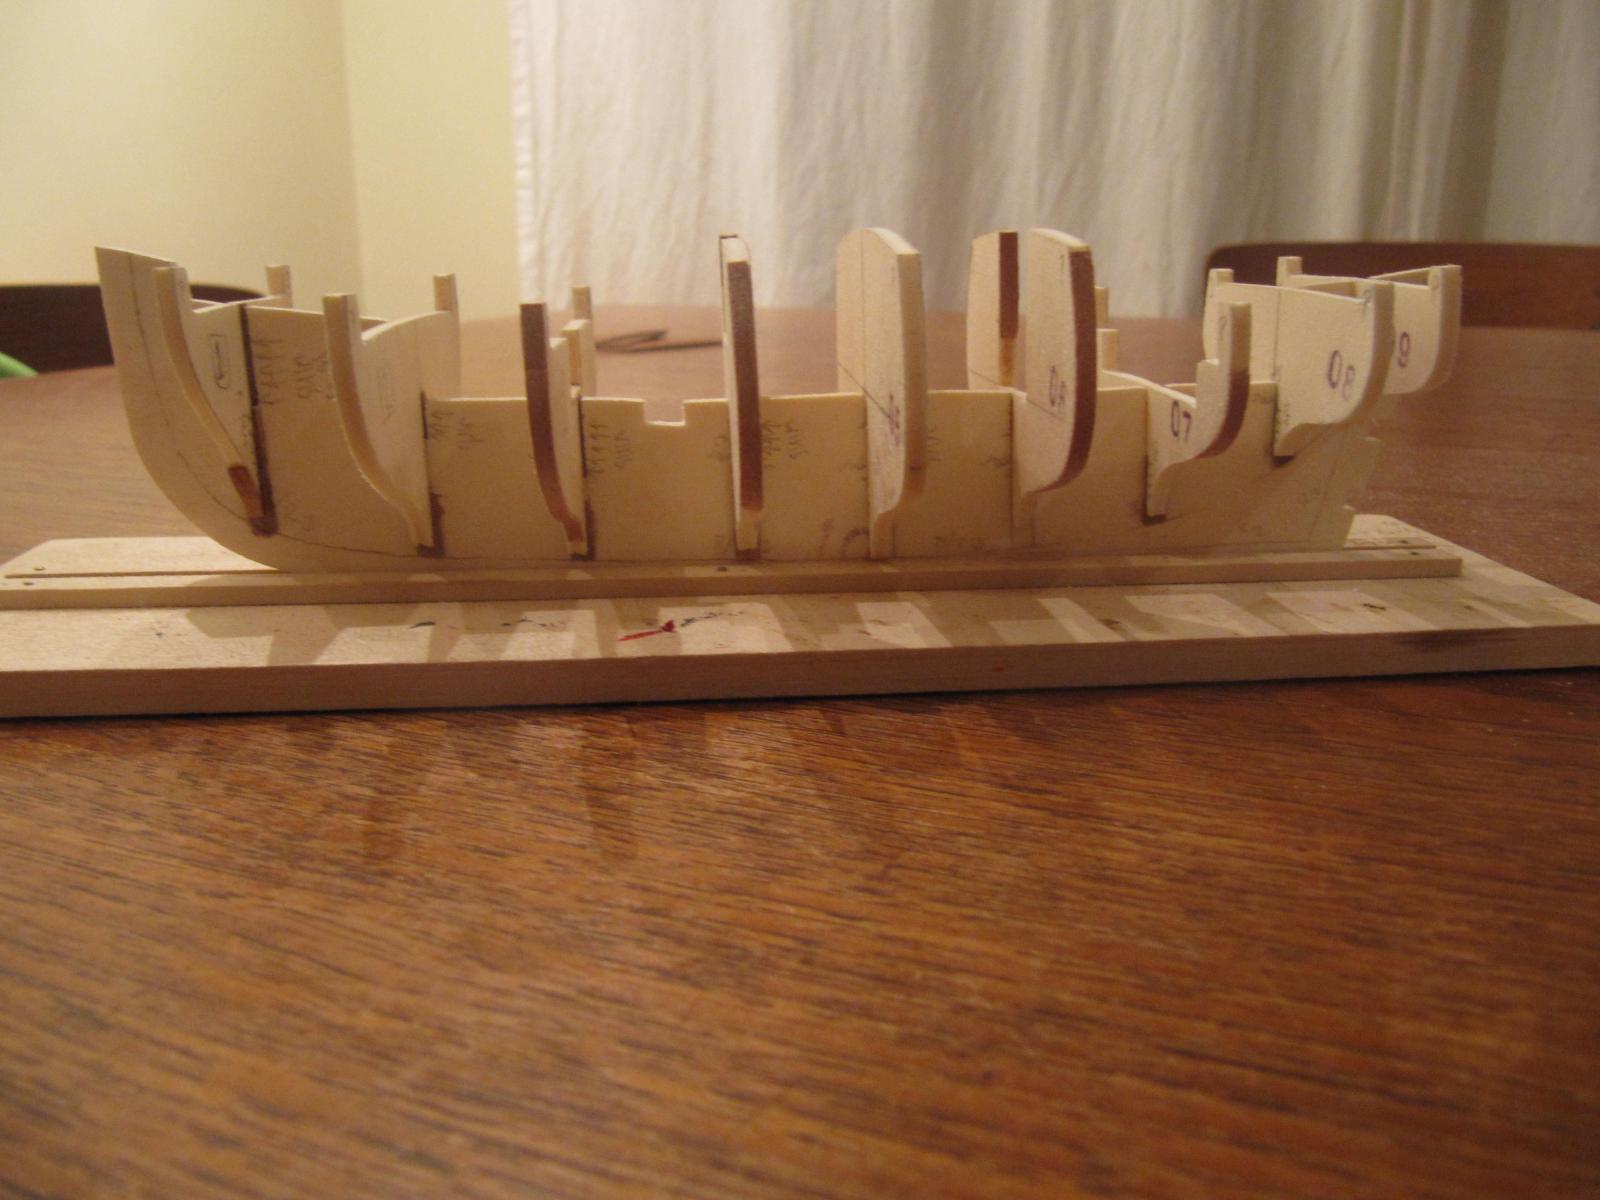
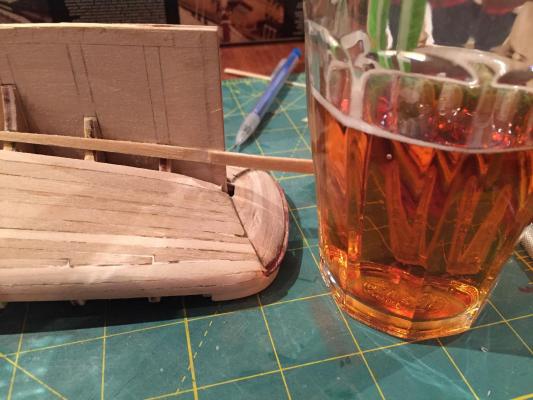
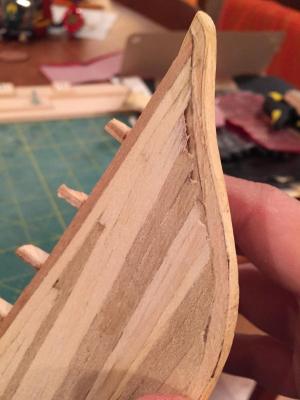
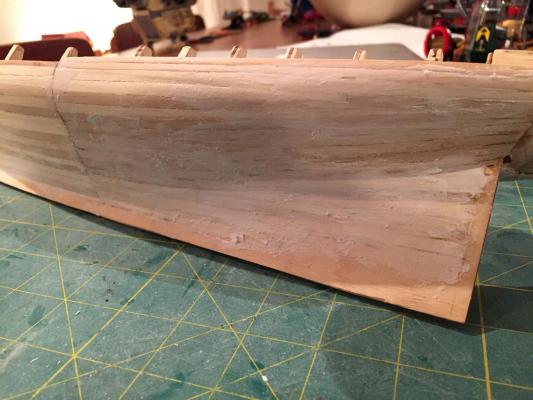
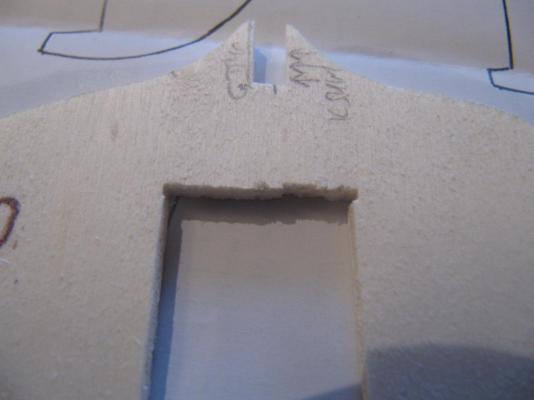
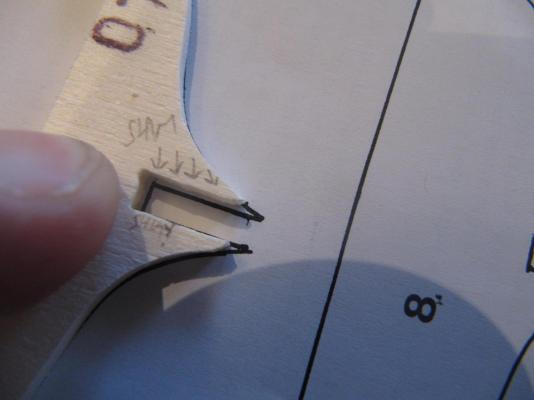
 Well, after not working on America at all for pretty much the entire month of November I've now been able to return to her for 2 nights in the last week! Though my reasons for keeping away last month were to do with the sheer volume of work I needed to get through at the university, in the last couple of weeks it's more been about a lack of desire....I'm assuming we all feel this from time to time. Anyway, once the first planking was underway, I began seeing a couple of hurdles on the horizon which I think made me slow down. First is the bulwark planking, which needs to be edge glued in place since the bulkhead extensions will be removed and there is no other inner layer of planking to cover up any imperfections inboard...but second, I've noticed that the transom piece and the bulkhead extensions do not define a fair run of planking along the bulwarks, but knuckle in at the forward end of the transom piece (I'll post a photo of this at some future point...The long and the short is that I'll have to make adjustments to the laser cut transom piece and the bulkhead extensions to get the bulwarks to run fair....A lot of tedious and exacting work! Which of course made finishing the first planking less attractive than spending my nights re-watching that great HBO show Deadwood. But no more....I've now finished the first planking. It's not much to look at, but one thing to note is that it was necessary to feather out the planking strakes along the rabbet line. Not to do so would result in a keel that was 4mm (laser cut part) + 3mm (1.5 + 1.5 first planking) + 1mm (.5 + .5 second planking) - 8mm!! Crazy! So I established a bearding line more or less by rack of eye, since nothing is indicated on the plans, and then feathered out the planking from there, so now the first planking blends into the keel. Here are a couple of photos - again, not pretty..... Here's the first of a few steelers at stern.... And here it is notched and thinned down provisionally - you can see the pencil line marking the fake rabbet joint along the sternpost.... Here's the same shot with a glass of local IPA for scale comparison And here's the first planking complete - you can sort of see the ends of the planking still to be feathered out at stern. It took a lot of work with a #10 x-acto blade to feather out the planking - here is a shot of the planking at stern roughly feathered and prior to good heavy sanding.... Here's another shot of the same - you can see what a motley job I've done on the planking at stern, bow and midships....I'll try to be neater for the second time around.... Anyways, once this rough work was done I laid into it with 100-grit sandpaper. A lot of elbow grease later I got it pretty evenly feathered into the keel. I then went over it with 220 and 400 to smooth it out ready for filling. I use Liquitex acrylic modelling paste for filler, rather than a regular wood filler. The reason is because though it is quite messy to work with, it dries very hard and sands down to an absolute eggshell finish. On a painted hull, having this kind of base for the paint is really important for a nice finish on the hull. It takes quite a bit of work sanding, so I've learned from experience to apply it thinly. Here's the product, followed by a couple of shots of it applied to the hull Well, that's all for now. My next step will be to sand the hell out of the first planking to get it nice and smooth, and then to add .5mm planking to the keel, stem and sternpost. This will create a rabbet joint into which to fit the second layer of hull planking strakes. Then I'll turn my attention to correcting the transom piece and bulkhead extensions and planking the bulwarks....once this gets done, I think I will have successfully turned a tight corner on this build! Bye for now hamilton


- 165 replies
-
- 12
-

-
Gretel by hamilton - Mamoli
hamilton replied to hamilton's topic in - Kit build logs for subjects built from 1501 - 1750
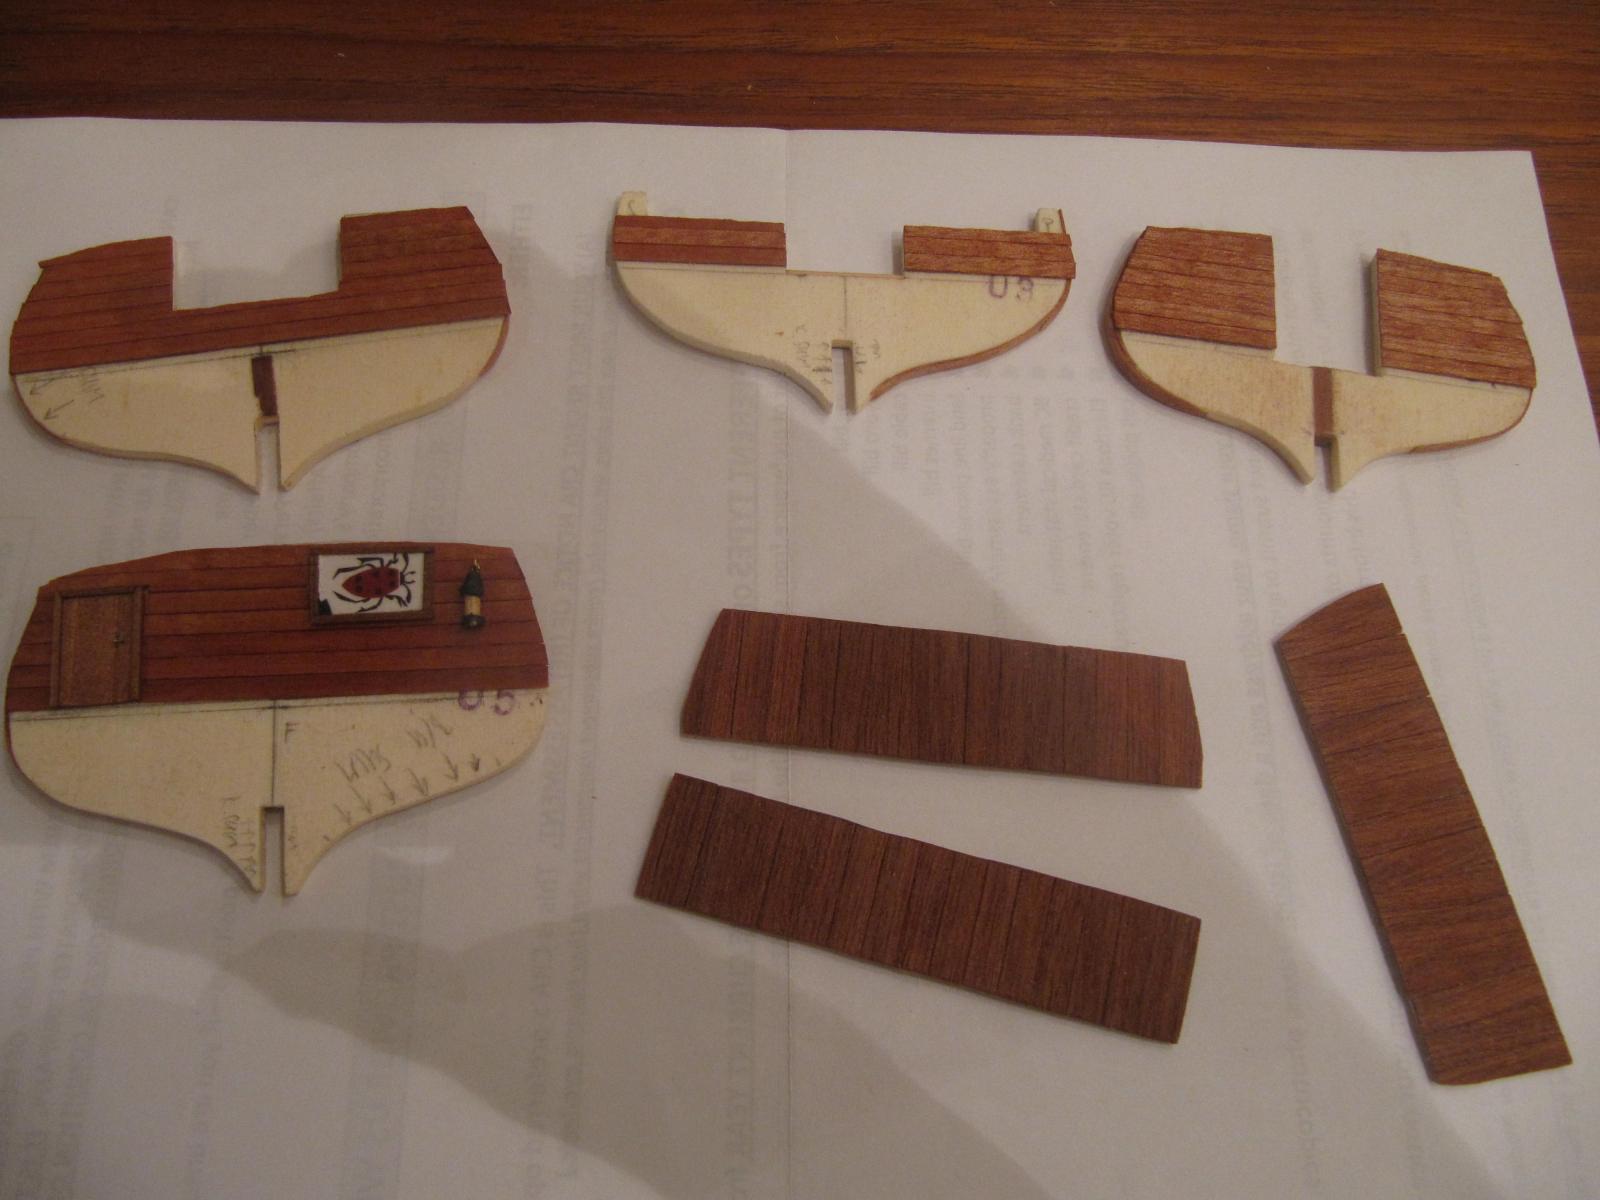
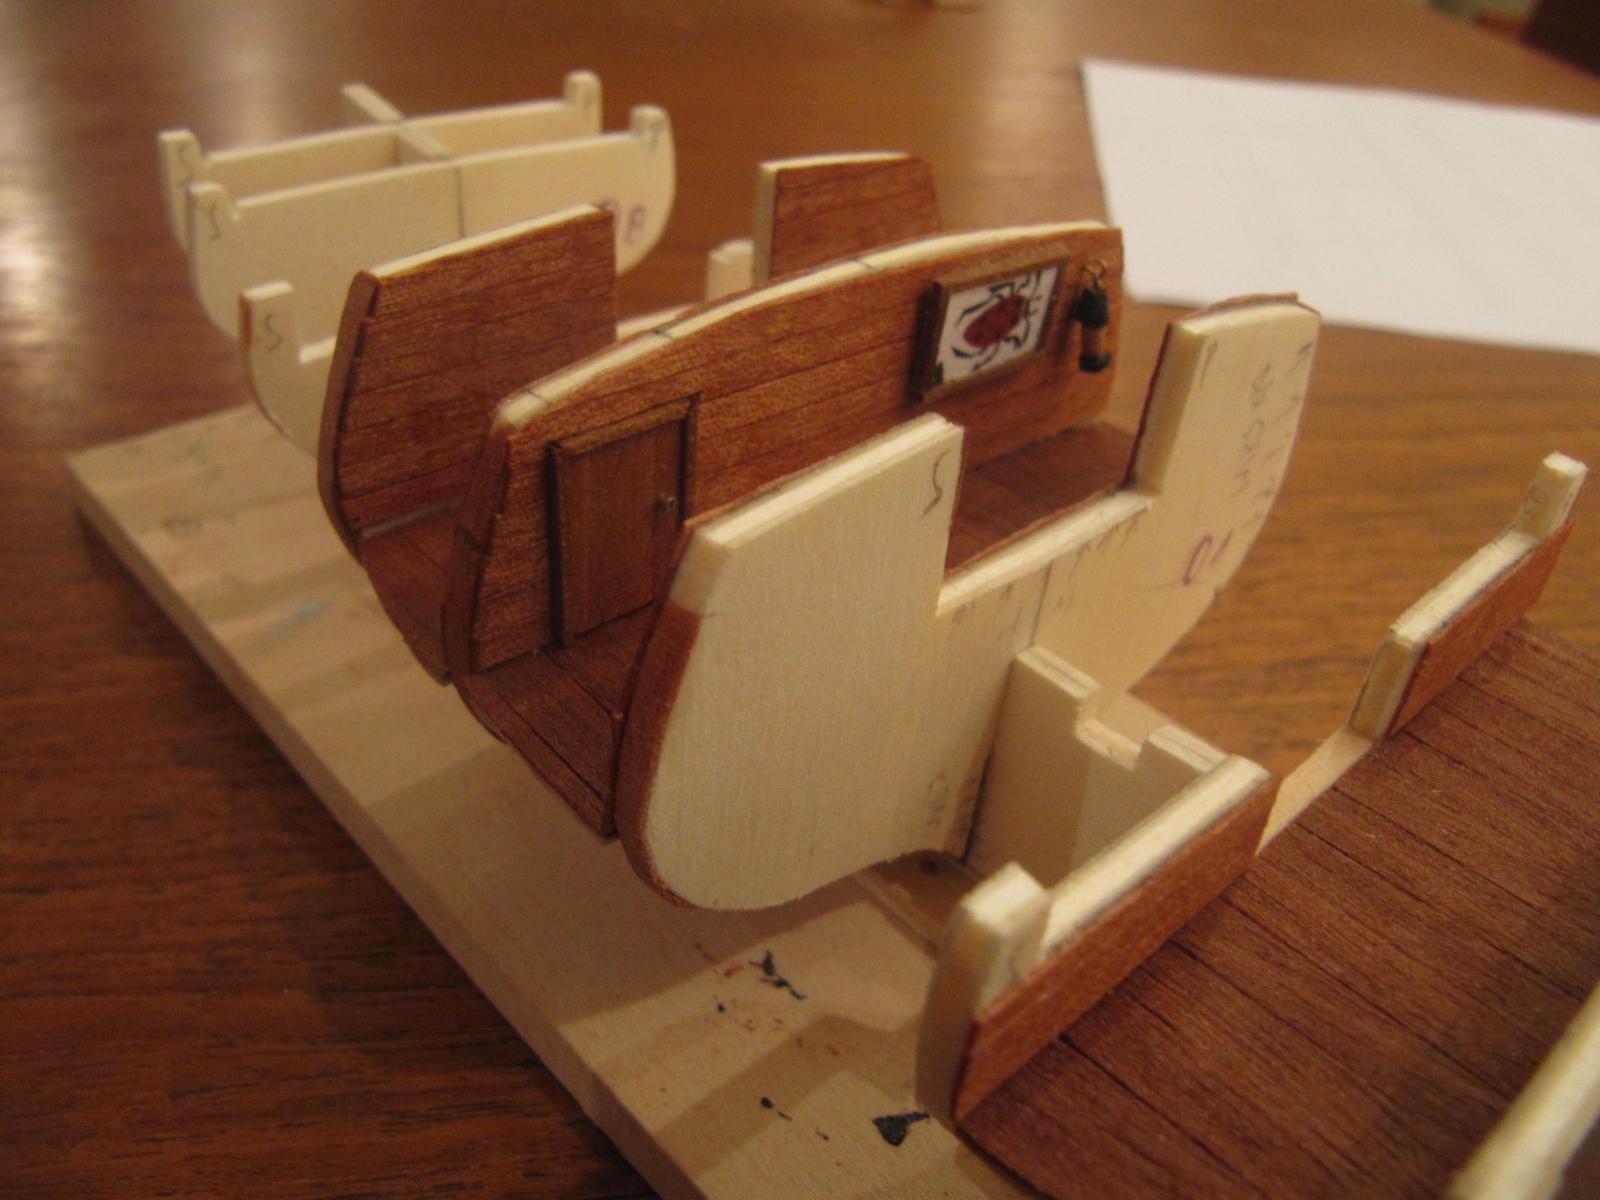
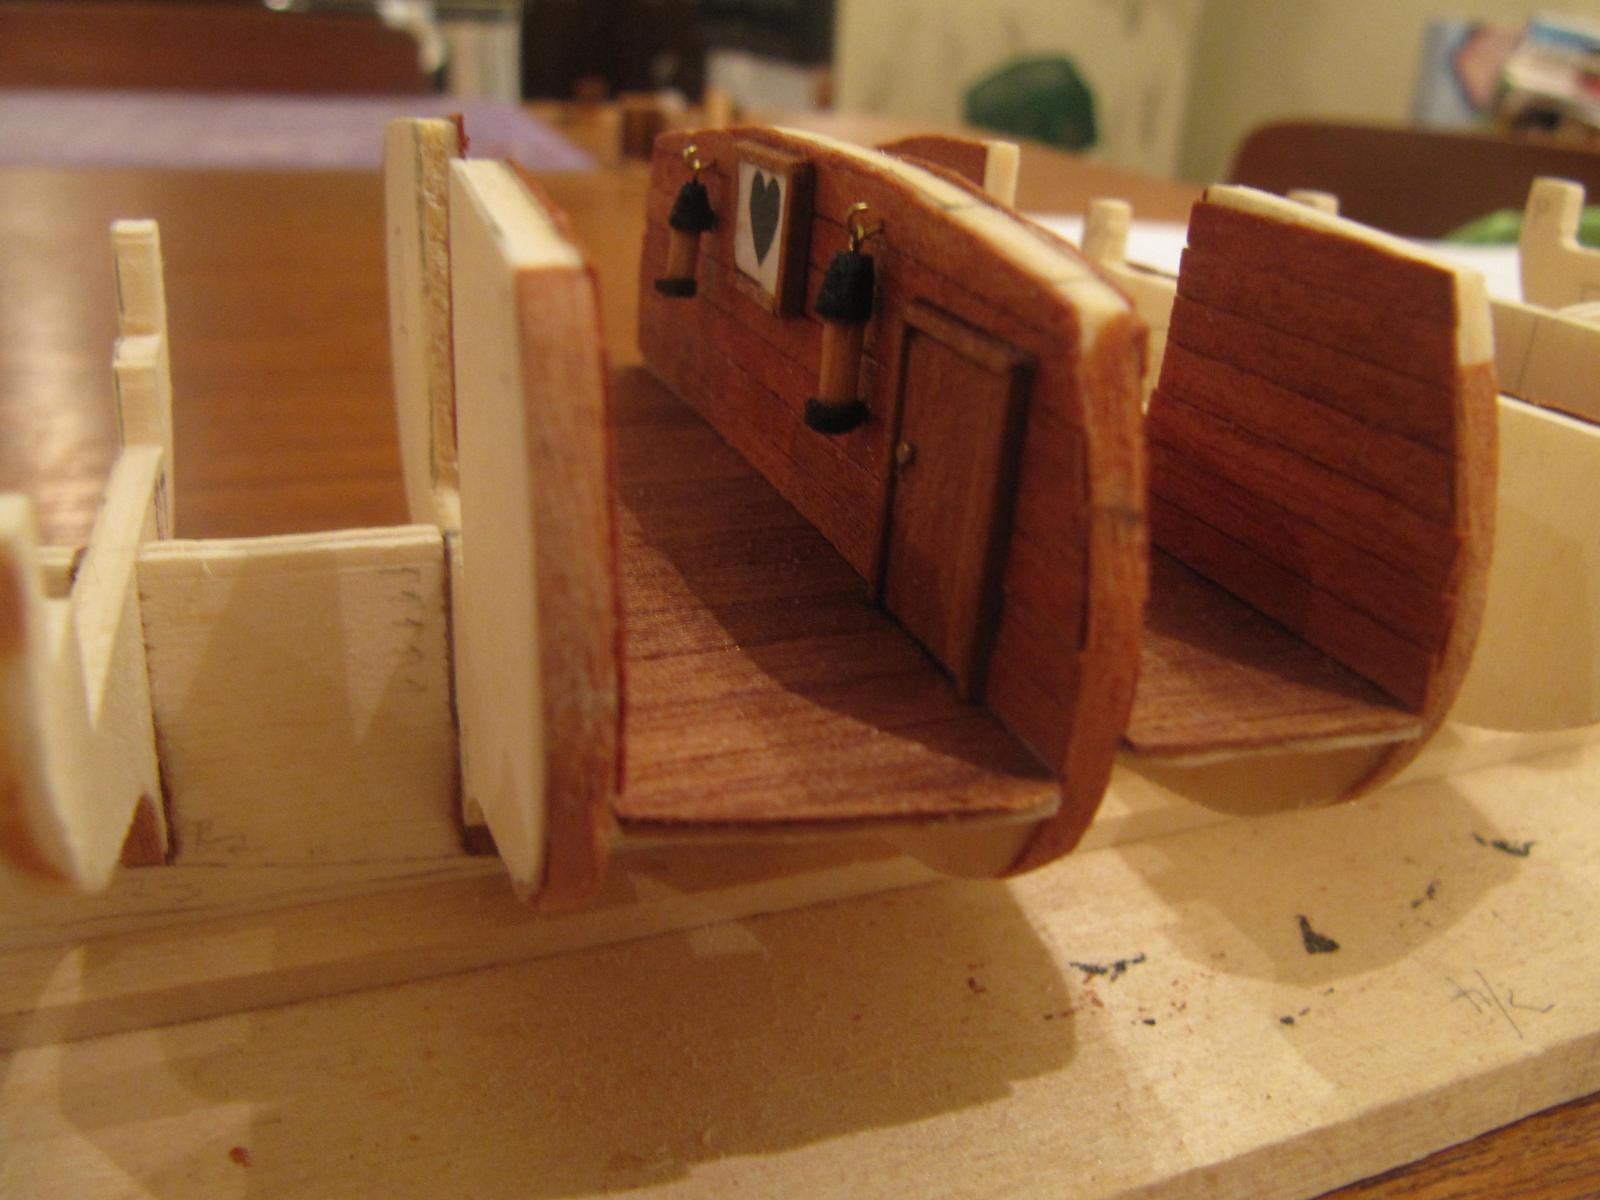
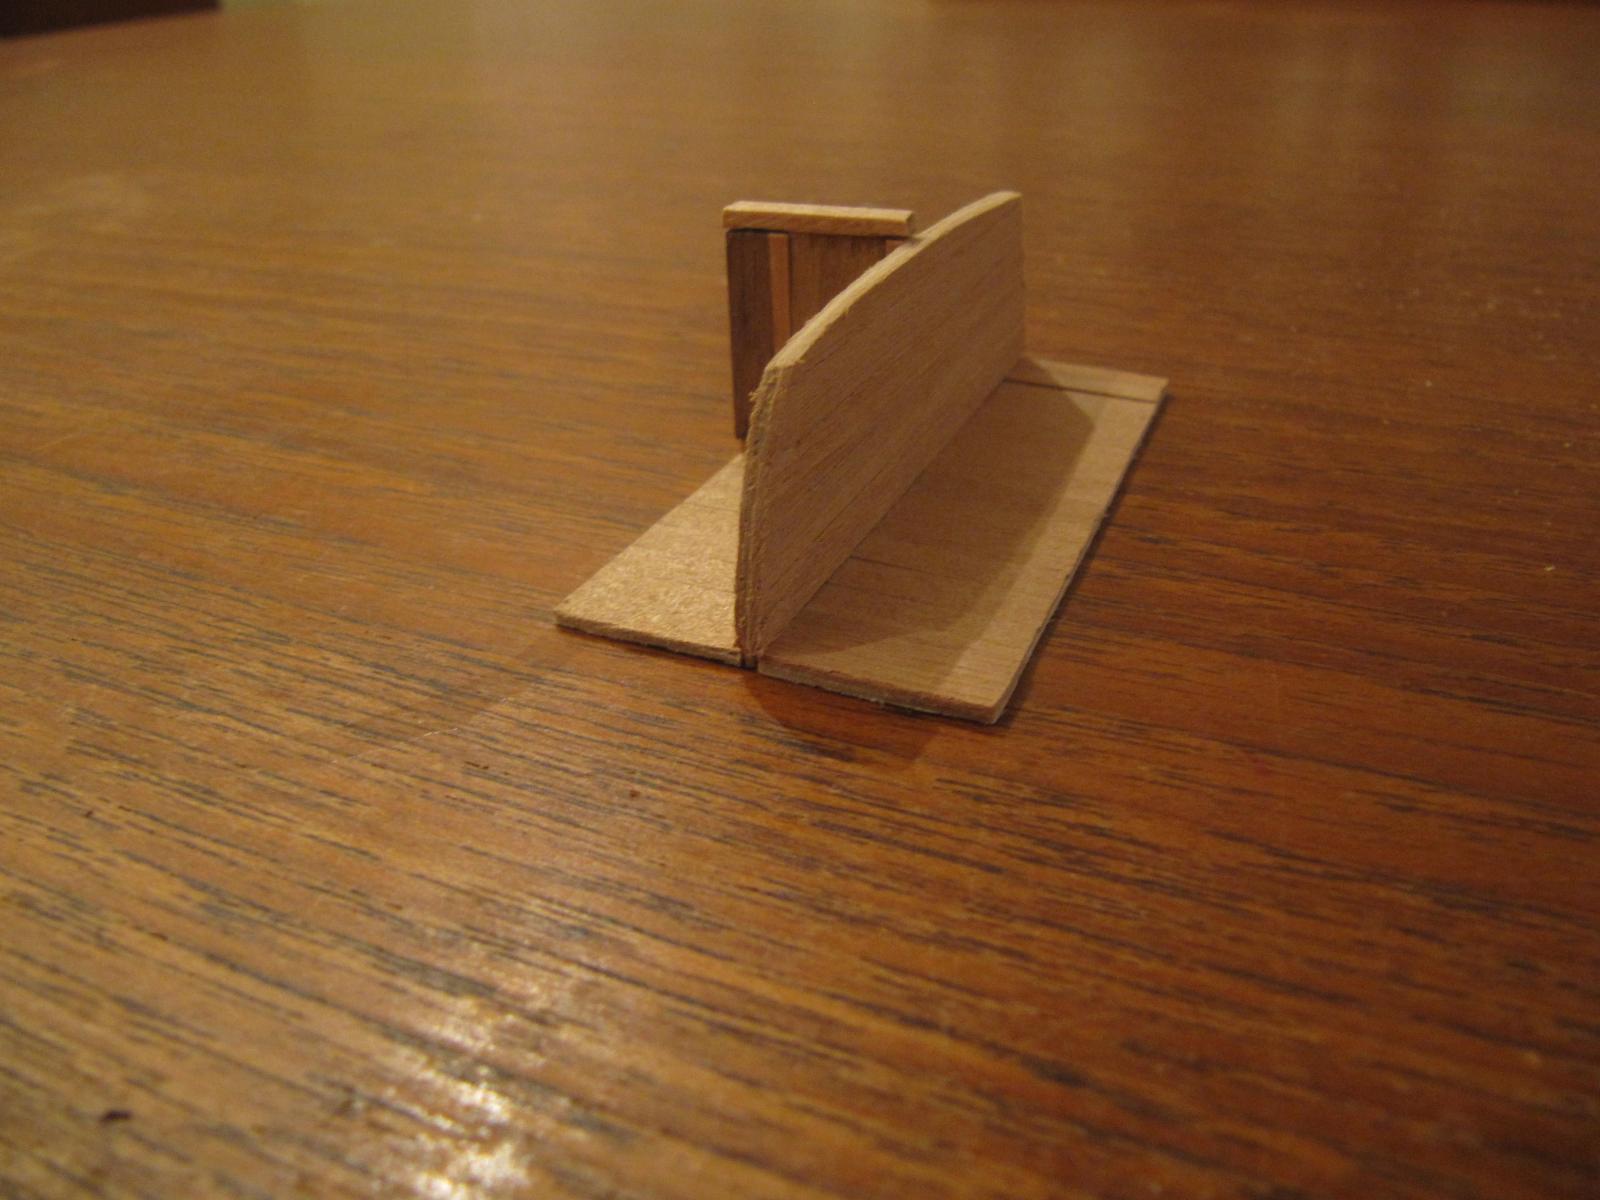
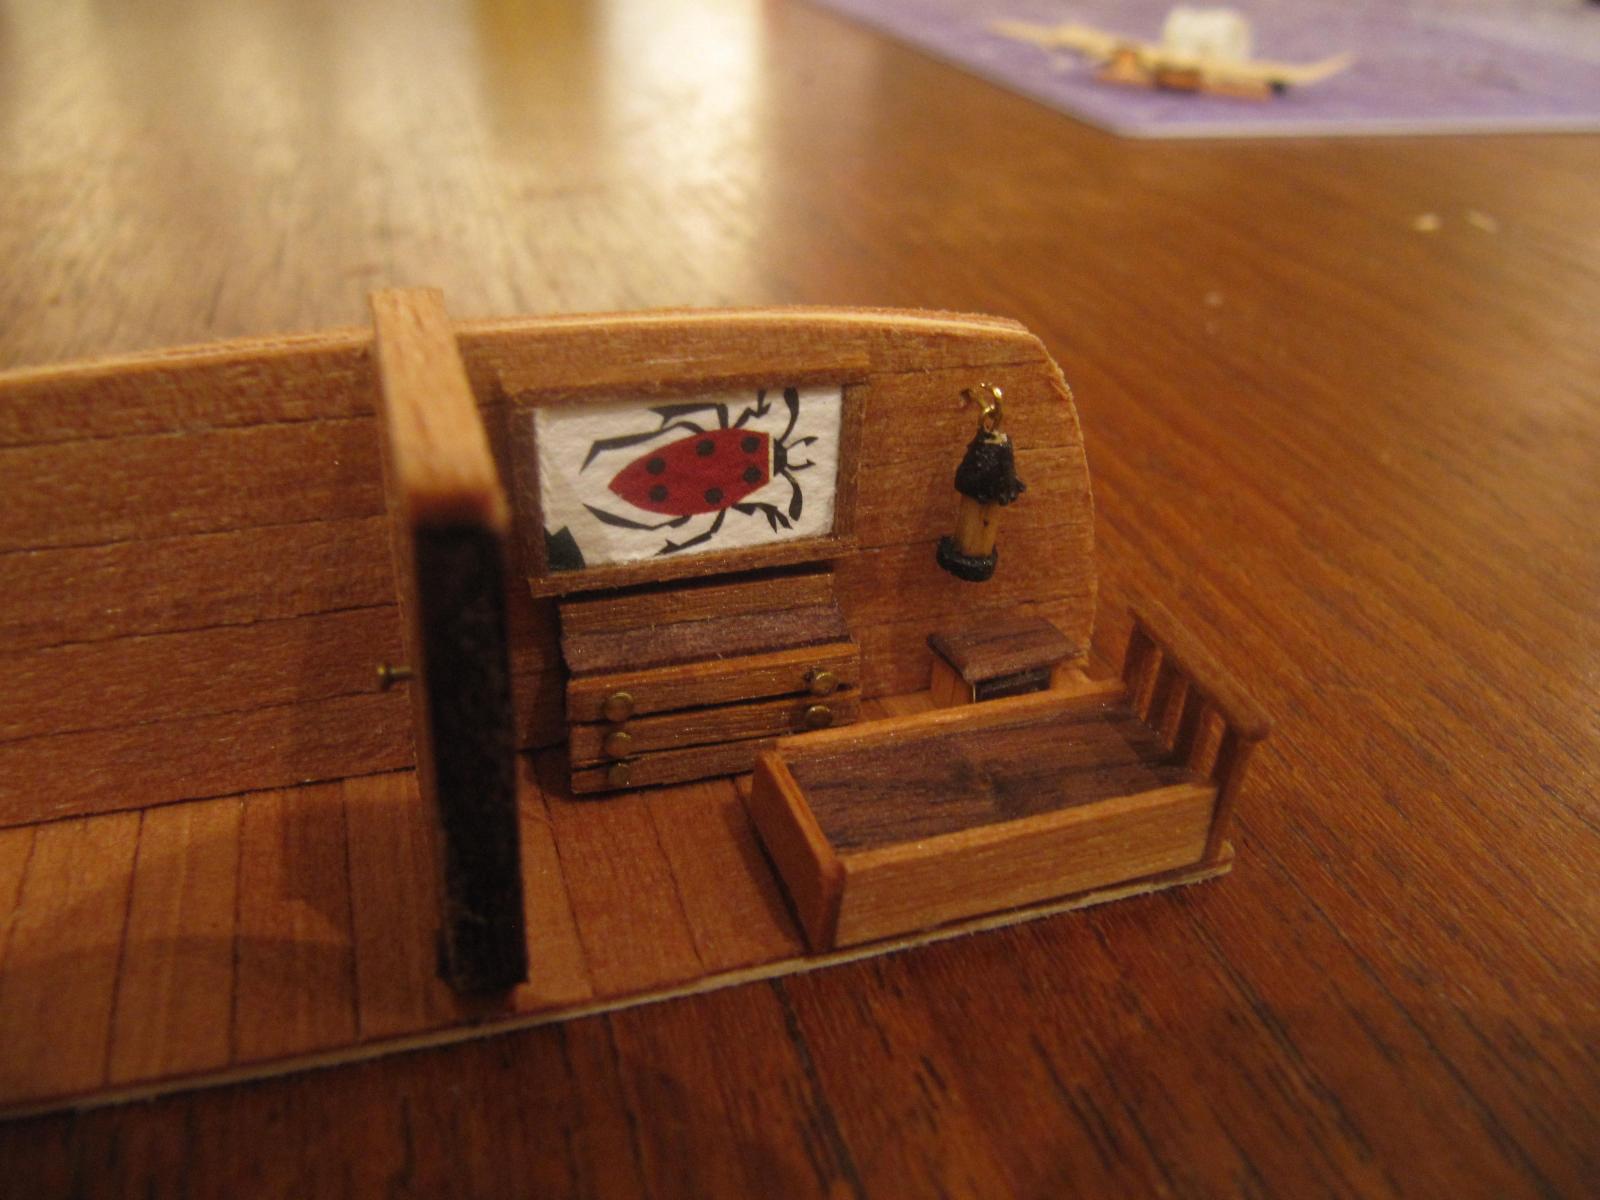
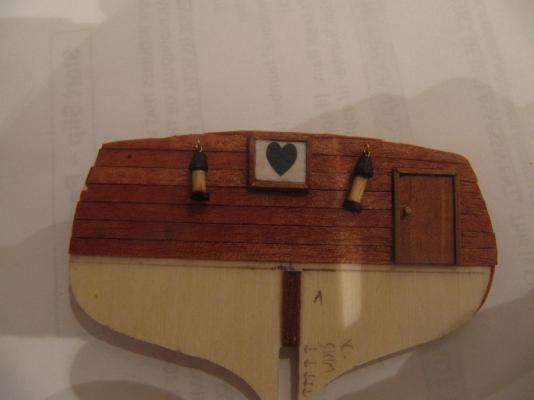
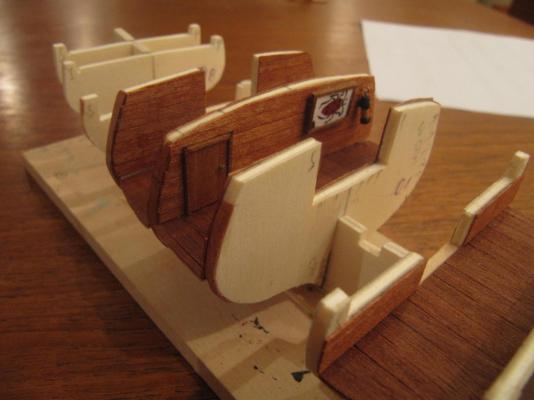
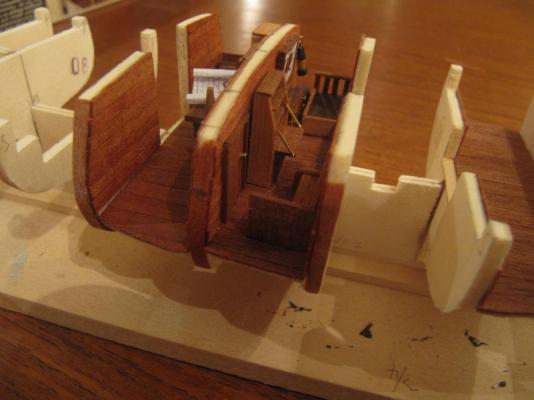
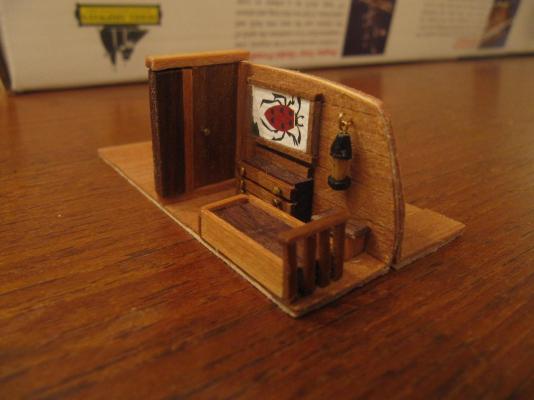
OK, well another night where I'm settling down too late to start at the workbench, so I thought I'd update this Gretel log.....This post is somewhat of a repeat, since it will document the fitting out of the cabin. I didn't make any structural modifications to the kit in order to do the cabin. Those with more skill and better tools would probably be able to make modifications easily. I think both the cabin bulkheads and centre keel would need to be altered to accommodate the cabin decking, which would likely have been lower into the hold than I've shown here - but since none of this is visible on the finished model, I don't have to have too much anxiety about it. Anyway, my first step was to make false floors for the cabin sections - 2 of these - plus one more for beneath the forward scuttle. I used some 1/32" basswood sheet for this, cutting it to width simply by taking a measurement between the keel slots of the appropriate bulkhead frames and then, with the bulkheads dry fit, fairing the edges to shape. I then planked these using .5 x 4mm mahogany. With these false floors in place, I marked the top of the planking on the adjacent bulkheads - this would represent the lower limit of the planking on the bulkheads themselves. For this I used .5mm x 3mm mahogany. Before installing the bulkheads on the model, I also put on the wall hangings (my oversized lanterns and paintings, framed with 1mm x 1mm walnut. The doors were framed with 1x1 walnut and consisted of slats of the .5mm x 3mm mahogany. Here's a couple of shots of the prepped pieces I then installed the bulkheads permanently on the keel and then fixed the cabin furniture. Here are the results..... That's it for now hamilton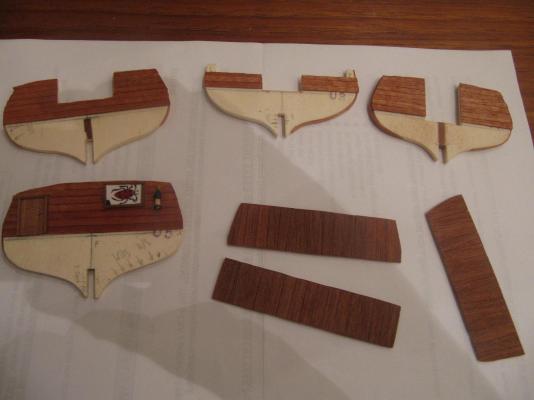


-
Gretel by hamilton - Mamoli
hamilton replied to hamilton's topic in - Kit build logs for subjects built from 1501 - 1750
Hi Dee Dee: Interesting - I wonder if yours is a later generation kit? It seems that there is always some distortion in the CNC/laser cutting process - though it's equally likely that it is the plans that are distorted through shifts in humidity and/or cumulative error in the printing process.... In any case, ladder steps should be easy to cut, but the warp could be an issue. My decking came shrink wrapped, and there was no distortion - in my kit these pieces (as I'll show in my next update) fit very well - it seems our kits have opposite issues!! Another solution (if you don't have a scanner) for making bulkhead templates is to use graphite or carbon paper and medium card stock. Place the card stock on the table top, the graphite or carbon paper (graphite or carbon down against the card) atop that, and then lay the plans on top and use a sharp pencil to transfer the bulkheads by hand to the card stock. As long as you have a steady hand and go slow you can easily make templates this way.... Best of luck! hamilton -
Hi Regan: This looks like a fun challenge you've taken on! I hope you stick with it! As for getting the curve into wood - there are a couple of techniques. I usually soak the wood strips in hot water to loosen the fibres - about 25-40 minutes, though some might say this is too much others not enough. I then bend the wood around a jig built to the shape I want things bent to...the jig could be something simple like a tracing of the moulding as drawn on the plans taped or rubber cemented to a piece of scrap wood. You could then insert stainless steel nails following the line of the moulding's curve and then slowly and gently clamp the wet piece of wood to the nails. Let it dry and then remove it from the jig. If you have equipment to cut a scrap wood piece to the shape of the moulding that would be even better. When you remove the dried piece from the jig it will spring back a little bit, but it will be much easier to install in the form you want. Another technique is to steam bend the pieces - this can be done by holding the wood over a pot of boiling water - the steam has the same effect on the wood as soaking and probably has a more congenial effect on the wood (though I really don't know if there are any considerable differences in the techniques - others could fill you in here). As for the railing stanchions, as they're called (on a real ship they would be the top timbers of the hull frames), I usually drill a small hole in the bottom, enough to fit a small piece of brass wire to act as a support. I drill a corresponding hole on the surface to which the stanchion is attached and then use a very tiny amount of CA (super glue) to hold it in. Many ship modellers use CA sparingly - I'm trying to be more like them. An alternative in this instance would be 5-minute epoxy. PVA is not going to work to bind metal to wood from what I understand.... I hope this helps. Other forum members may have different and/or better advice than mine! hamilton
-
Gretel by hamilton - Mamoli
hamilton replied to hamilton's topic in - Kit build logs for subjects built from 1501 - 1750
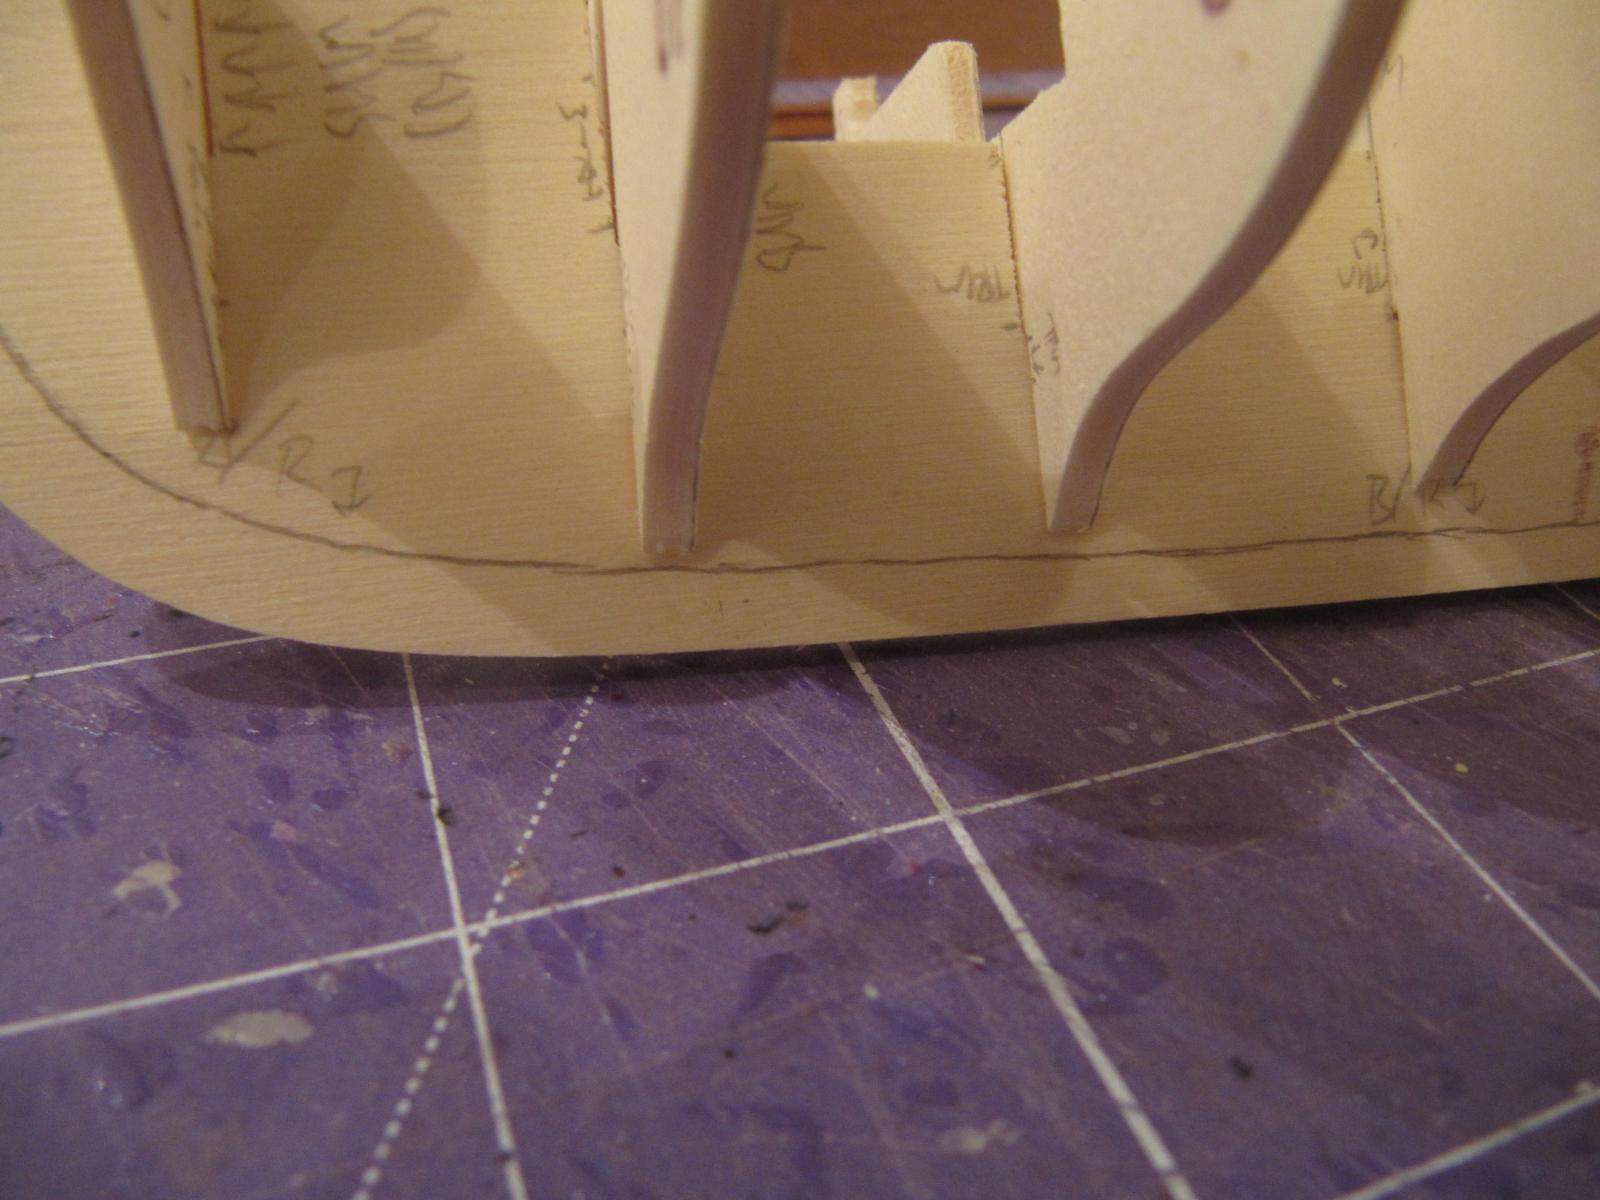
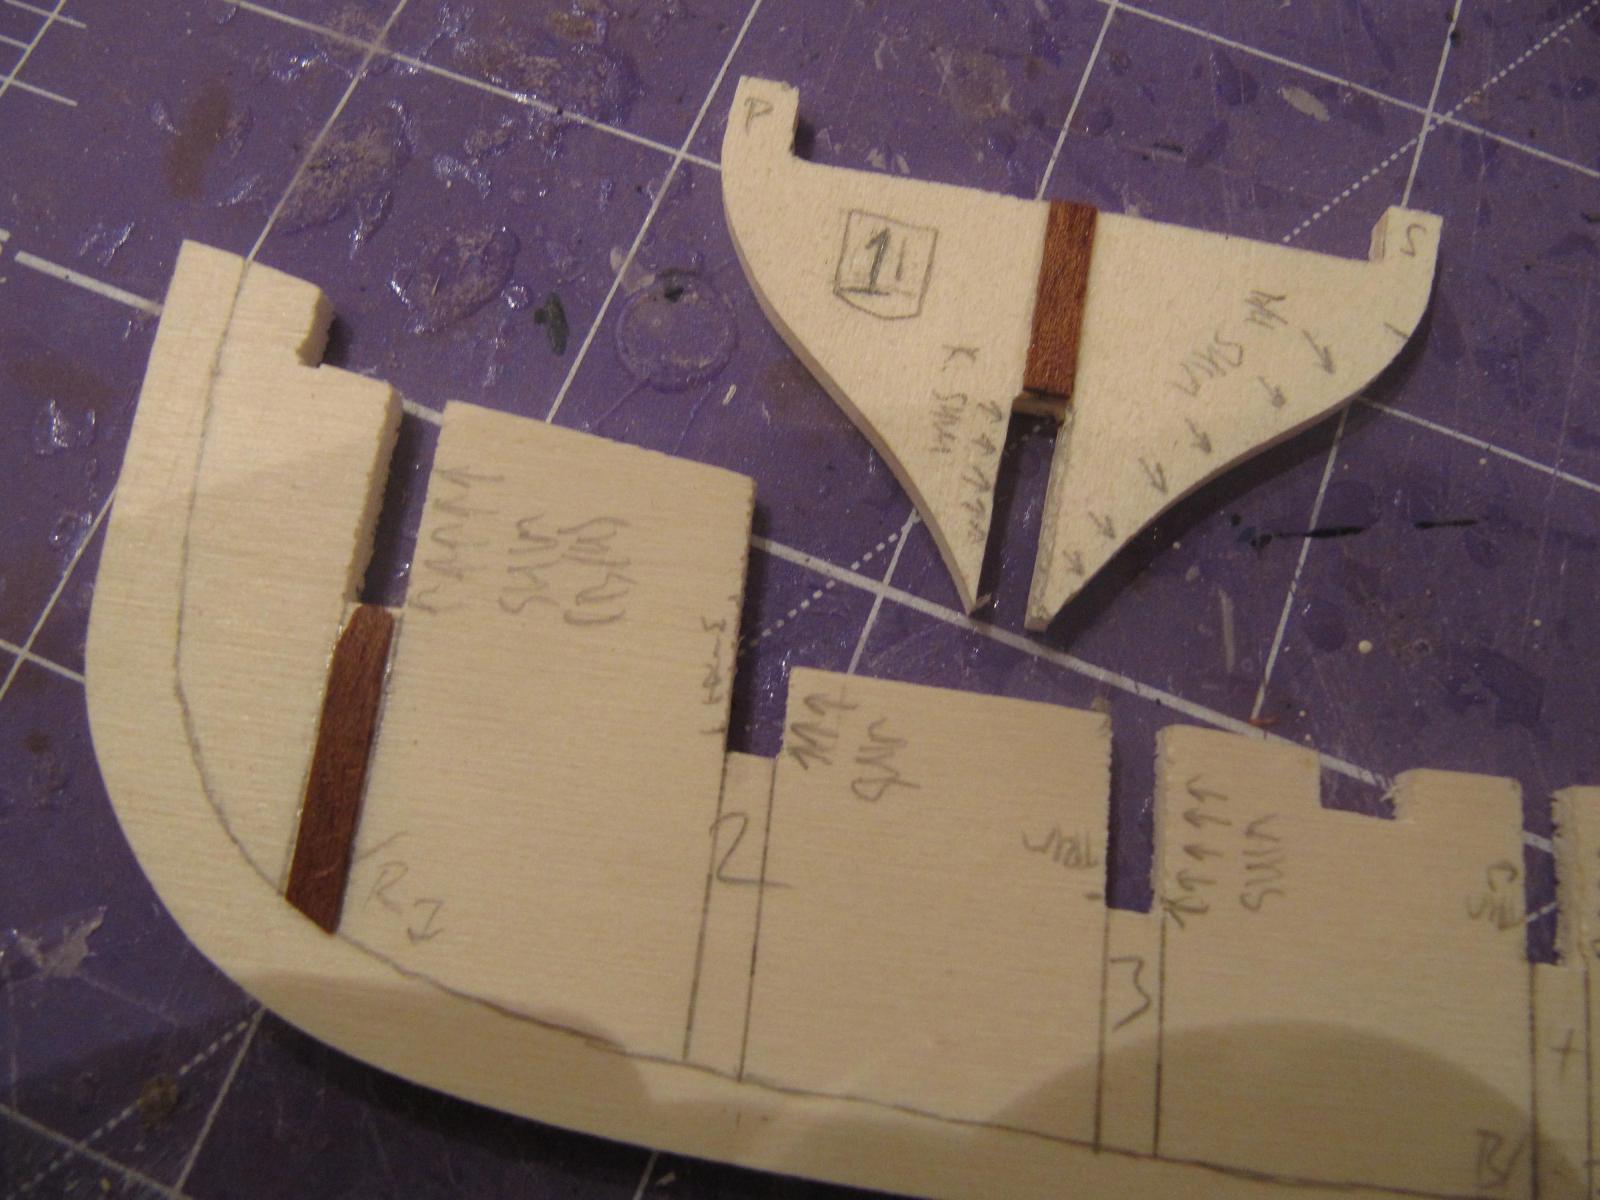
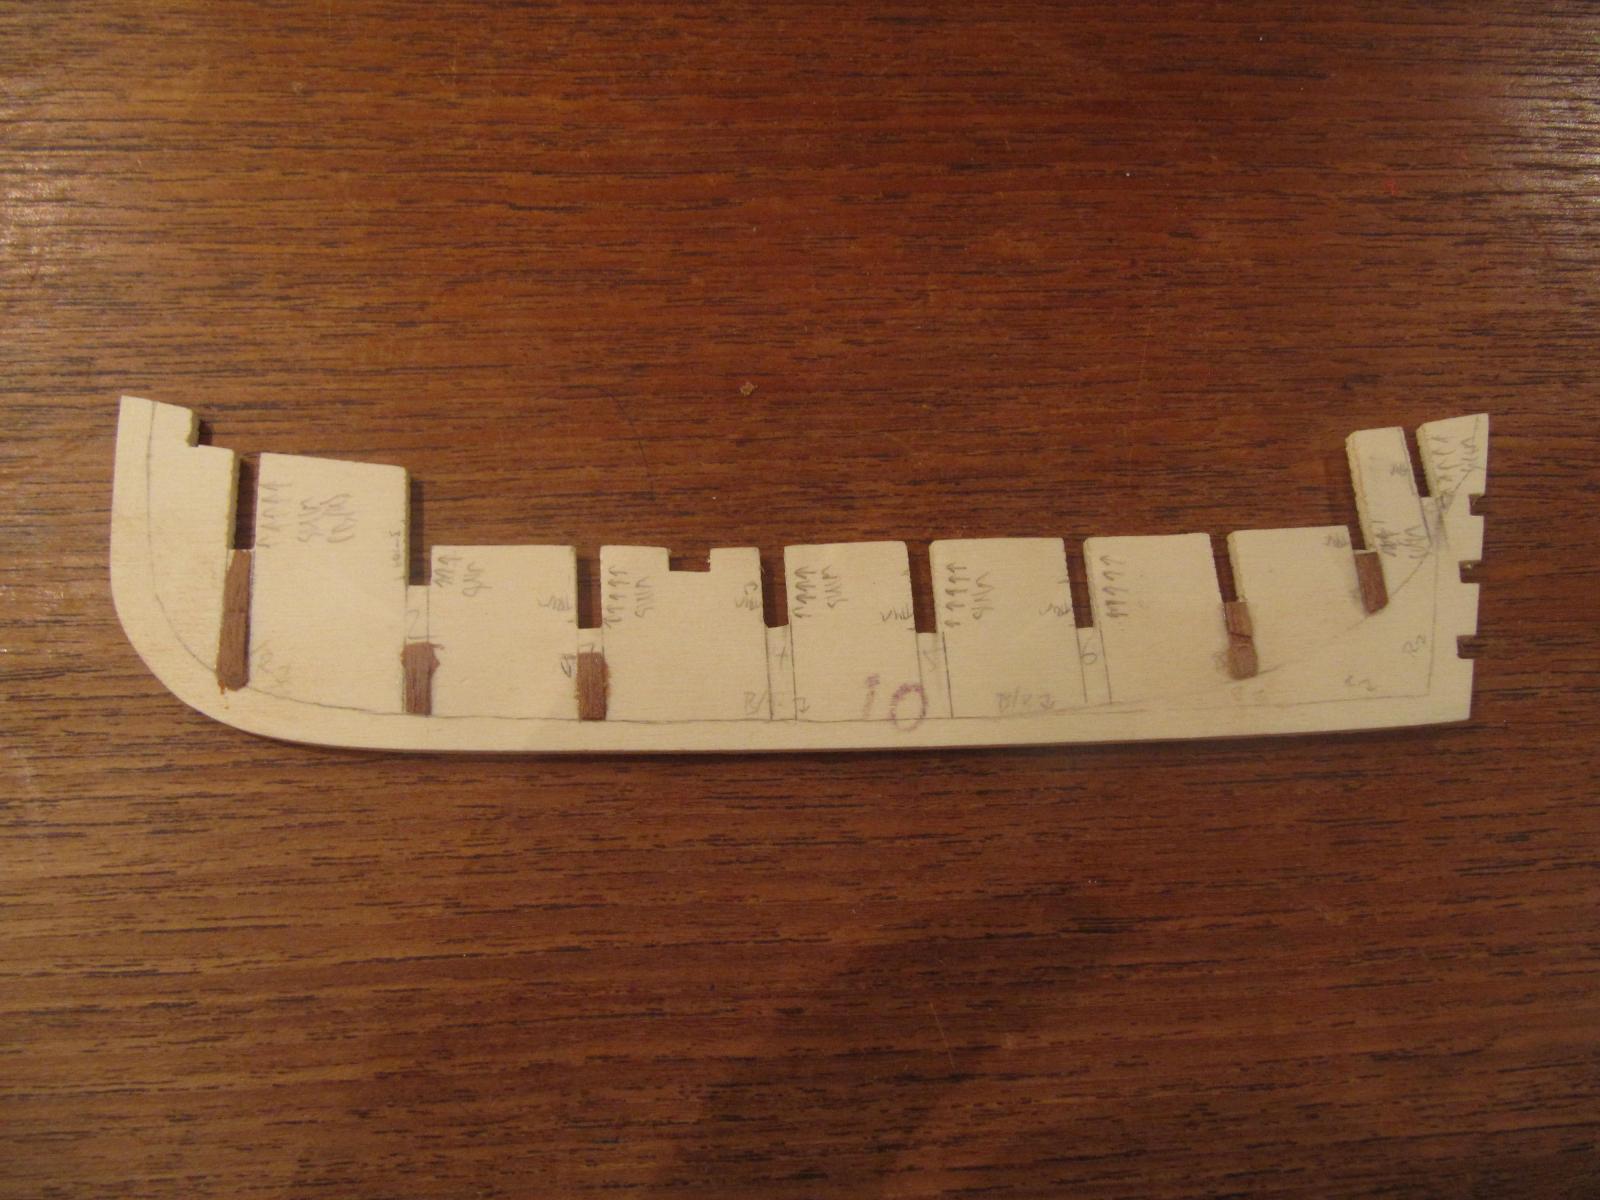
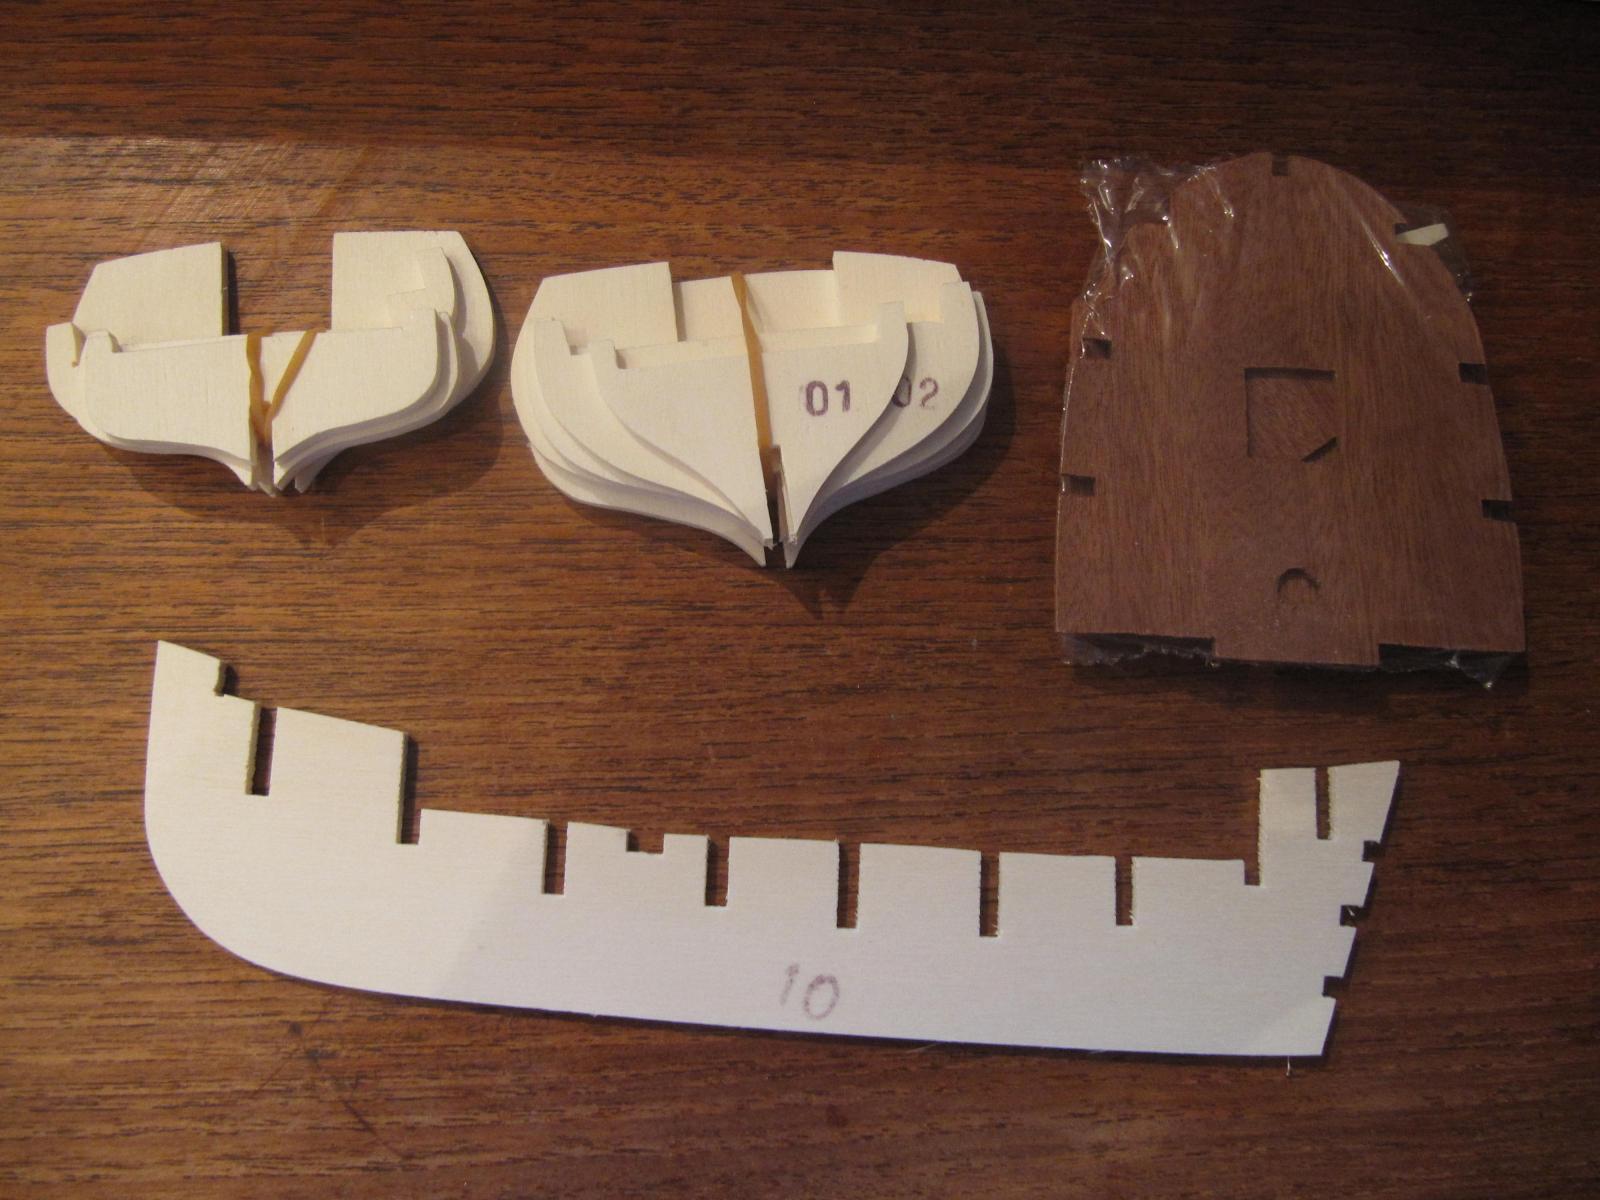
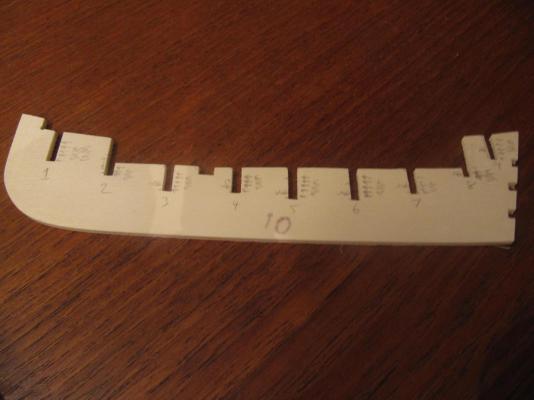
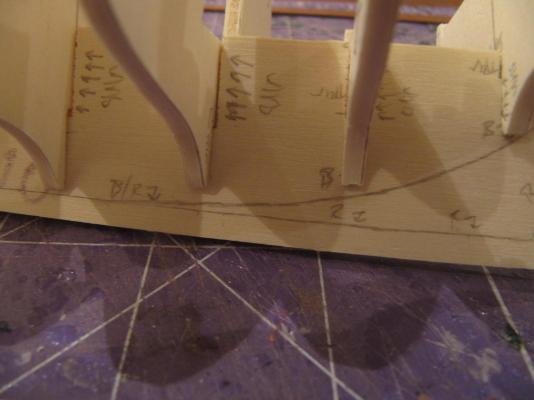
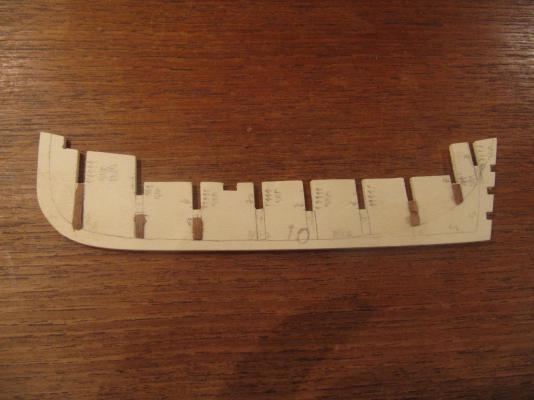
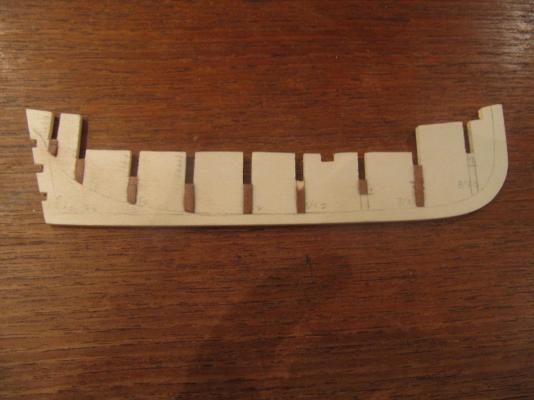
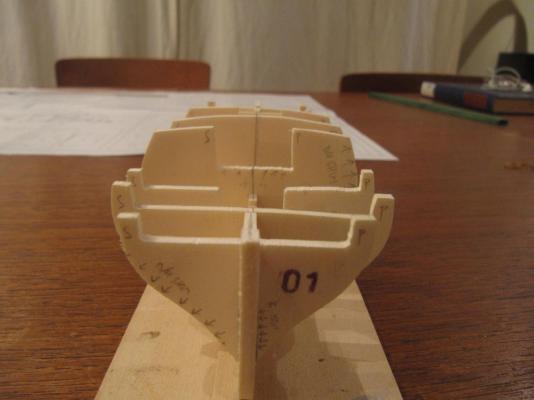
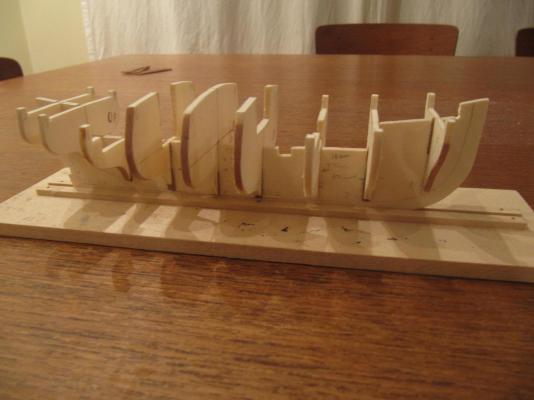
Well, I'd rather be working on America right now, to be honest, but I was late home from work and after time spent with the kids and putting them to bed, it's probably too late to get started now....so on with this Gretel log - if I can't work on a model at least I can write about one! This post will document the substantial fixing that needed to be done on the CNC bulkheads and keel. The following several photos will give you an idea of the problems I encountered - please note, John and Dee Dee, the issues I had with my Gretel may not appear in yours - I'm assuming that a lot of the manufacturers errors may differ between different production batches, so who knows? Your bulkheads and keel might be perfect! Here are some photos A bulkhead way off the pattern a really chewed up bulkhead top - this one was the aft cabin bulkhead with a cut-out for the door another bulkhead slightly off the pattern As I recall there wasn't a single bulkhead that was serviceable out of the box. At the time, I wasn't experienced enough with building kits to know how typical this situation is! The issue is not whether any work has to be done to "fix" things, but how extensive the problems are... Anyway, my first step was to make templates from the bulkhead patterns provided with the kit (Mamoli is kind enough to include these with their plan sheets - not all manufacturers do, I understand, but it is nice when they do, though the accuracy of these needs to be taken with a grain of salt as well, given distortions that can creep into photocopying). Anyway, crossing my fingers I made the templates and then, laying them on the bulkhead pieces marked where shimming and trimming was needed I did the same with the keel by test fitting the bulkheads, all of which had considerable play in the slots..... I also made a template (no photo unfortunately) of the centre keel, one in full profile, the other cut to the bearding line. Here is the line traced on the keel at the "deadwood" and close to the bow. In these photos you can see how loose the bulkheads are in the keel.... I added thin shims made from .5mm scrap wood from I don't know where...shims were added below the bulkhead slots on the keel to stabilize the bulkheads horizontally, and I also added shims above the slots on the forward side of the bulkheads themselves to stabilize them vertically. Here are a couple of photos After all this work the bulkheads fit very snugly, though not yet entirely squarely or fairly, in the keel - the bow shot will show you the amount of work that still needed to be done to even out the bulkheads - specifically to even out the top edges...I don't have photos of this process, unfortunately, but it was a lot of grunt work with a template, a sharp knife and a sanding block.... The last step in this phase was to shim the outer edges of the bulkheads. For this, I used a 1mm wood strip a little longer then the length of the hull to test the run of planking. Here again, it was a balancing act between seeing where the bumps and dips were on the model itself and testing each bulkhead against the templates I made to ensure something approximating symmetry....Here's the finished product So that's that....framework complete (as of sometime in August, 2011....). My next phase was to prep the areas around the cabin and forward scuttle for the detailing I had planned....bye for now hamilton


-
Gretel by hamilton - Mamoli
hamilton replied to hamilton's topic in - Kit build logs for subjects built from 1501 - 1750
Thanks Per: Interesting about the name - I have a German friend who's daughter's name is "Greta" - I always assumed that Gretel was an older form of the name....I'll be interested to hear whatever other information you dig up! hamilton -
Wonderful job so far - very impressive work! hamilton
-
Gretel by hamilton - Mamoli
hamilton replied to hamilton's topic in - Kit build logs for subjects built from 1501 - 1750
Thanks Dee Dee - I hope you find it useful when it comes time for you to dive into the Gretel. There were a lot of little problems with the kit, but nothing that couldn't be solved or that was overly frustrating. By comparison, I'm finding the Mamoli America to be quite a headache - but here the issues are with some aspects of the kit design and some real discrepancies between what is shown on the plans and the construction materials and process suggested....I don't remember this being the case with the Gretel. Anyway, I look forward to seeing your log once it gets started - I've peered in on your Brittany Sloup several times, though I don't think I've commented on the thread - it's a real beauty. hamilton -
Cutter Cheerful 1806 by rafine - FINISHED
hamilton replied to rafine's topic in - Build logs for subjects built 1801 - 1850
Lovely detailing Bob! hamilton- 525 replies
-
- 4
-
-
- cheerful
- Syren Ship Model Company
- (and 1 more)
-
Gretel by hamilton - Mamoli
hamilton replied to hamilton's topic in - Kit build logs for subjects built from 1501 - 1750
No problem John! It's nice to time travel a bit and remember a fun build, particularly when I'm mired in a difficult planking job on my current one! hamilton -
Gretel by hamilton - Mamoli
hamilton replied to hamilton's topic in - Kit build logs for subjects built from 1501 - 1750
Thanks a lot Richard and Mobbsie!! (I guess you must have heard by now that auto-correct changes your name to "Mobbish"!) Anyway, this is a retrospective log - I completed the Gretel in December of 2011!! But since activity on the America has slowed to a snail's pace and since another MSW member expressed some interest in the Gretel and since I don't know of another log on this version of MSW I thought I'd go for it....There was a Gretel log back on MSW 1, I think......I remember checking it out when I was working on the model.....but it's always possible that the other log was on Dry Dock Models, which I was a member of before it closed and before I joined MSW.... Anyway, good to hear from you both - Mobbsie, I've been peering in on your Granado section - it is a real beauty! Bye for now hamilton -
Gretel by hamilton - Mamoli
hamilton replied to hamilton's topic in - Kit build logs for subjects built from 1501 - 1750
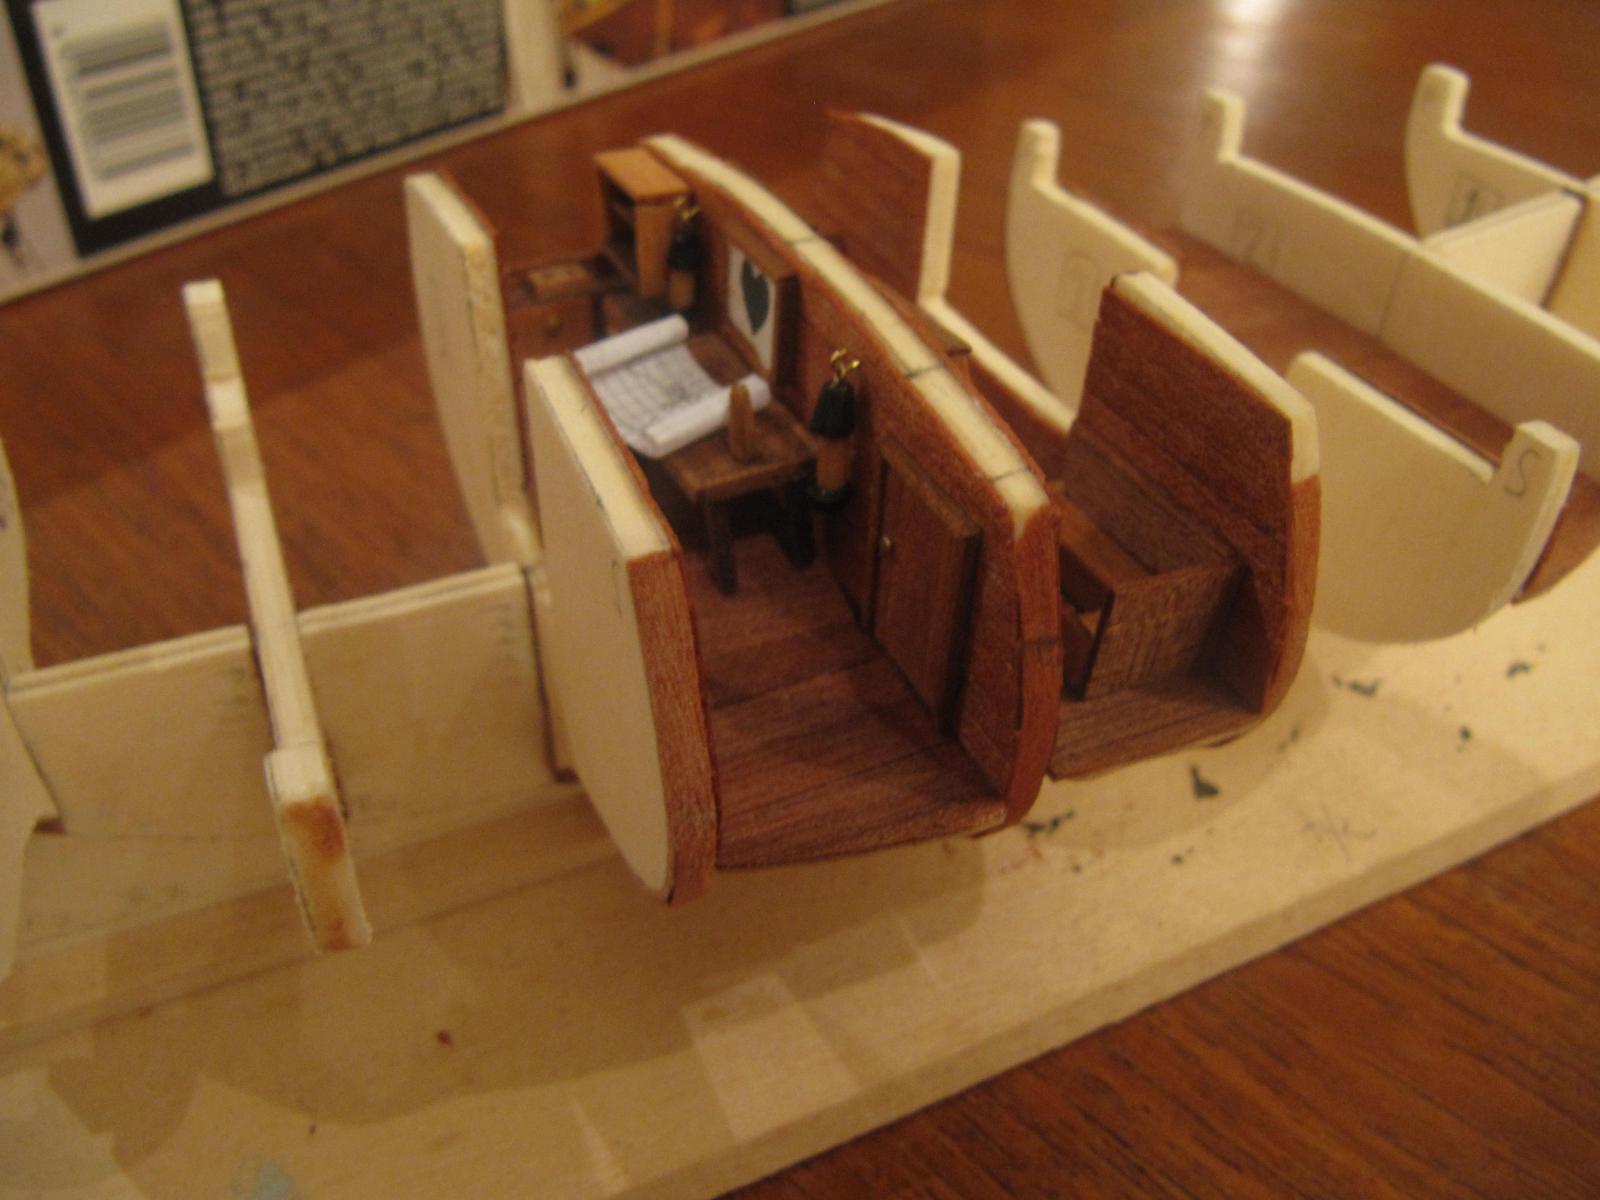
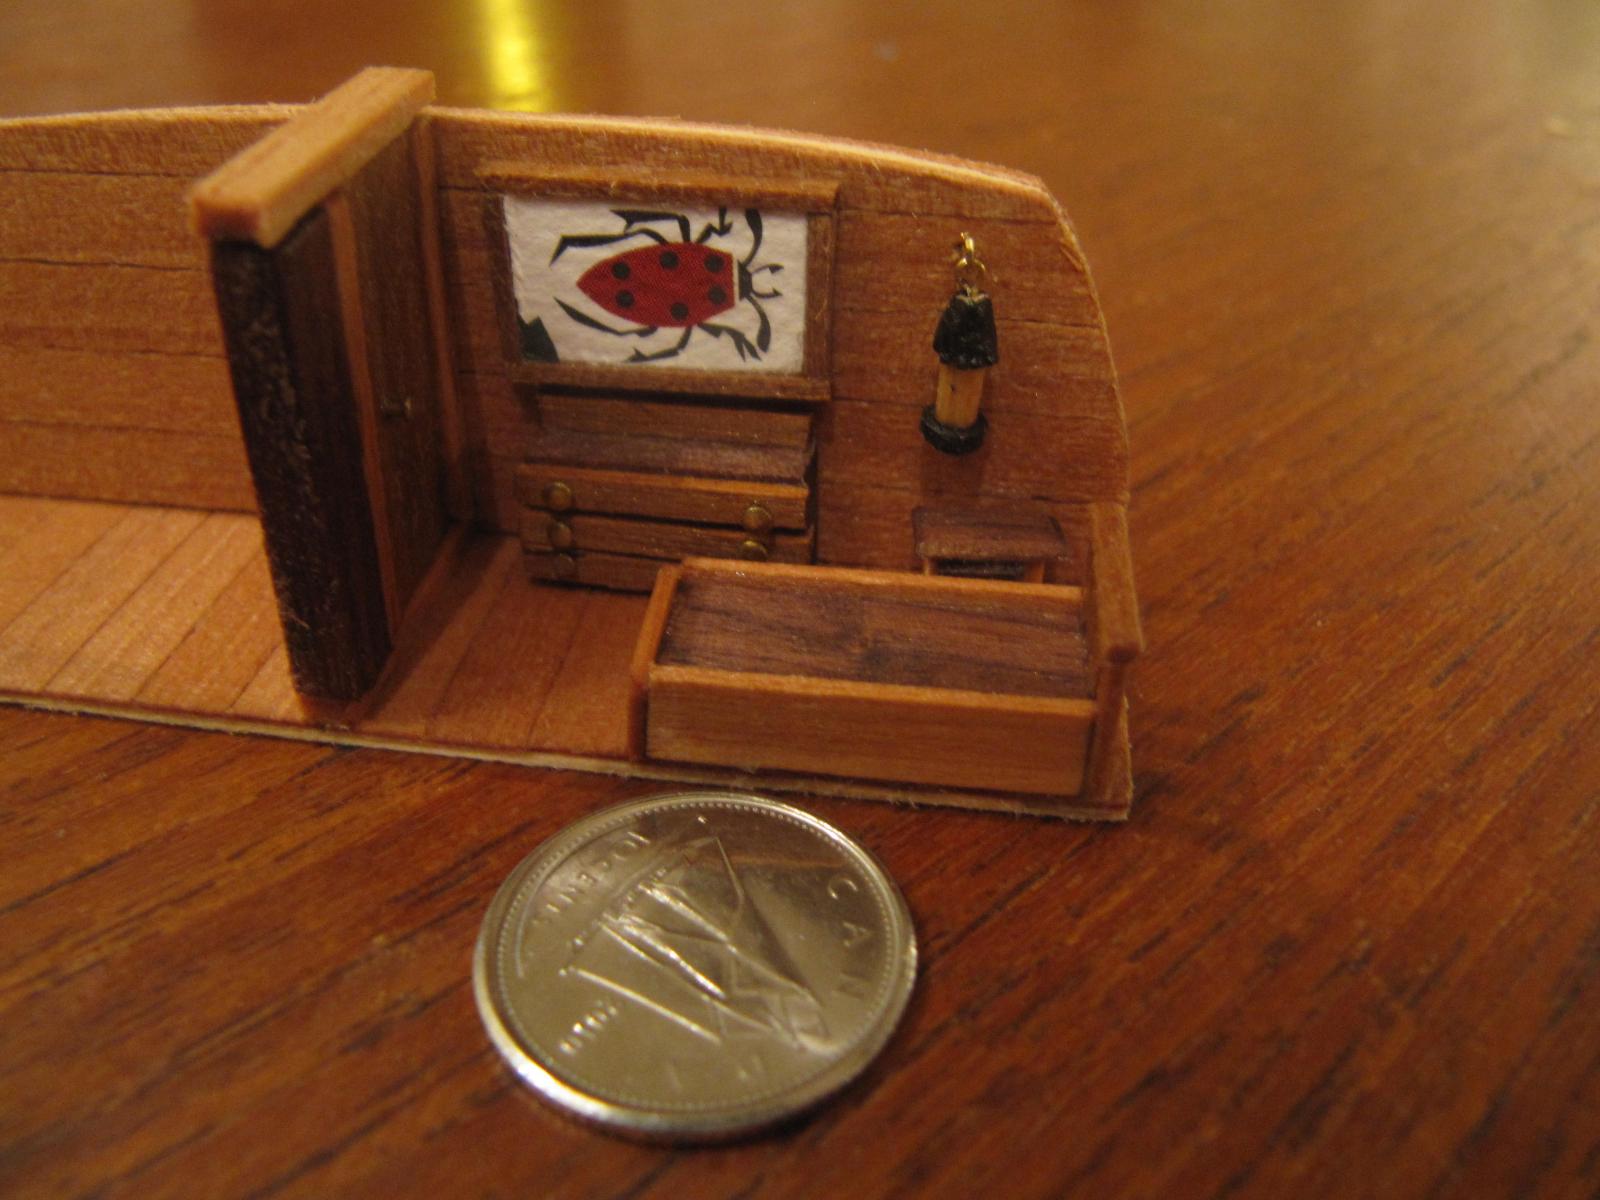
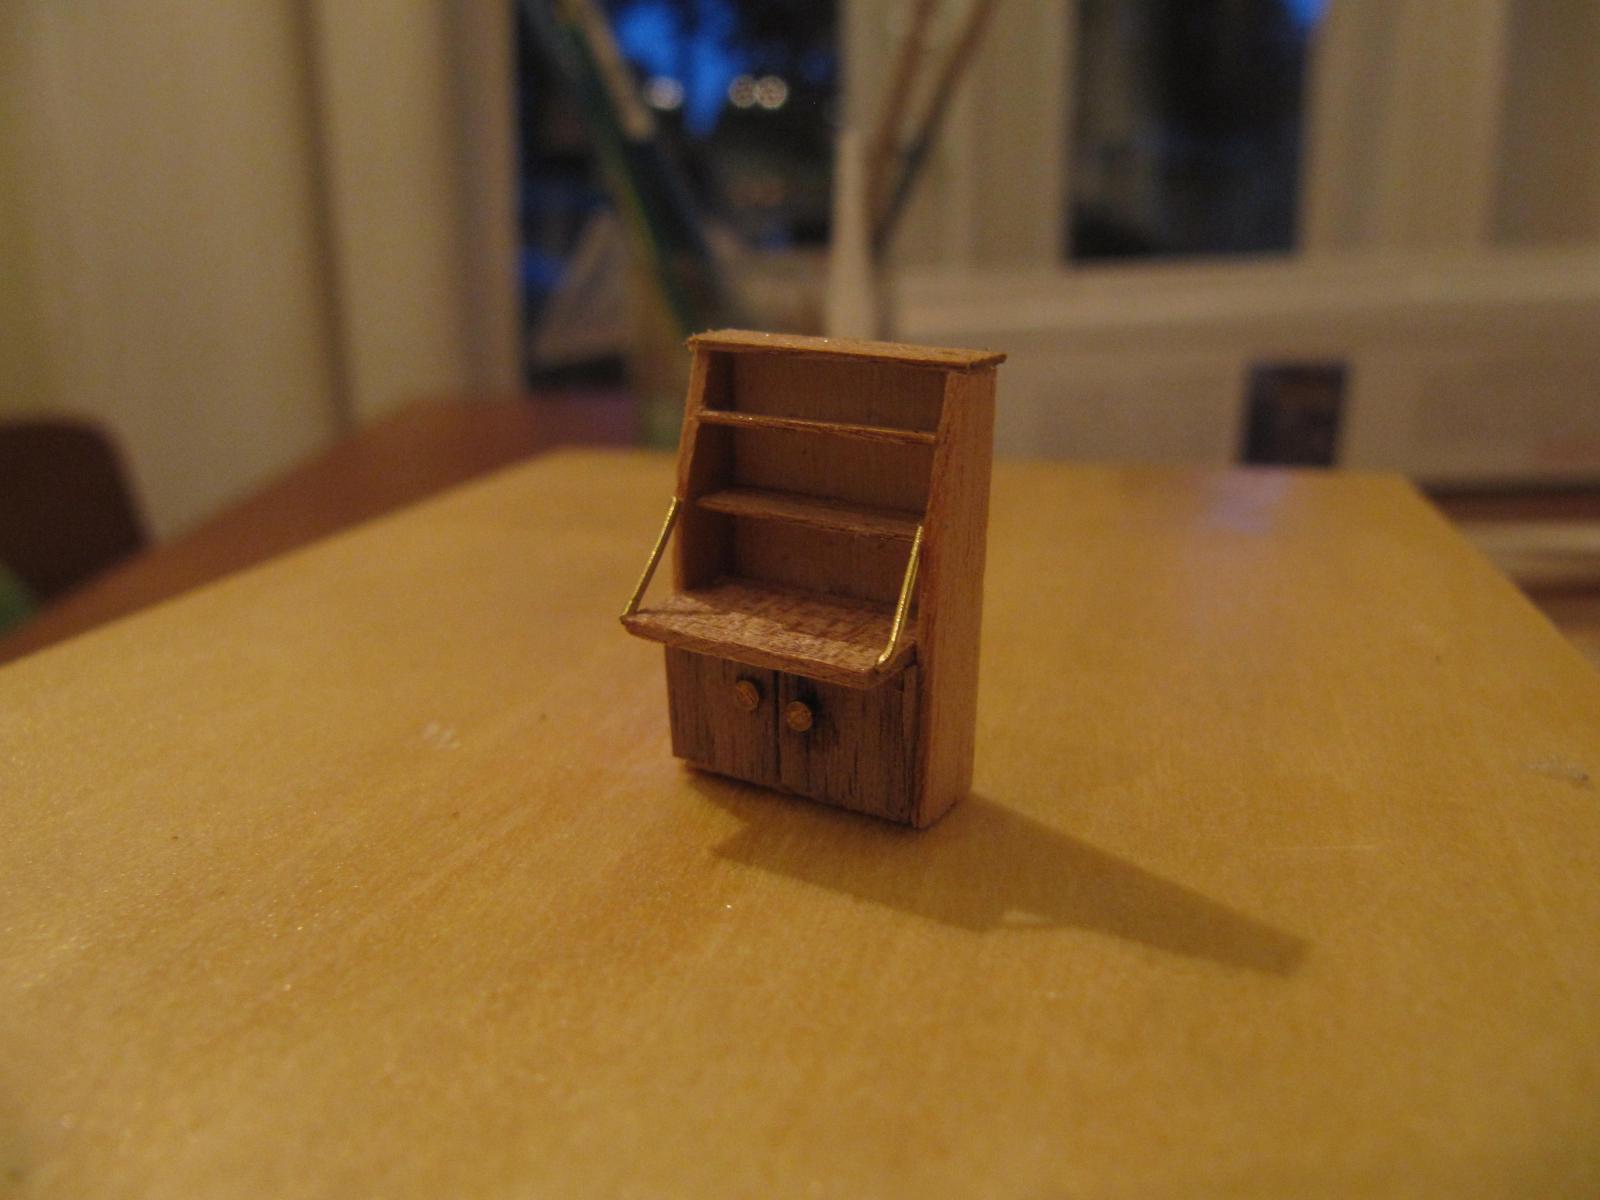
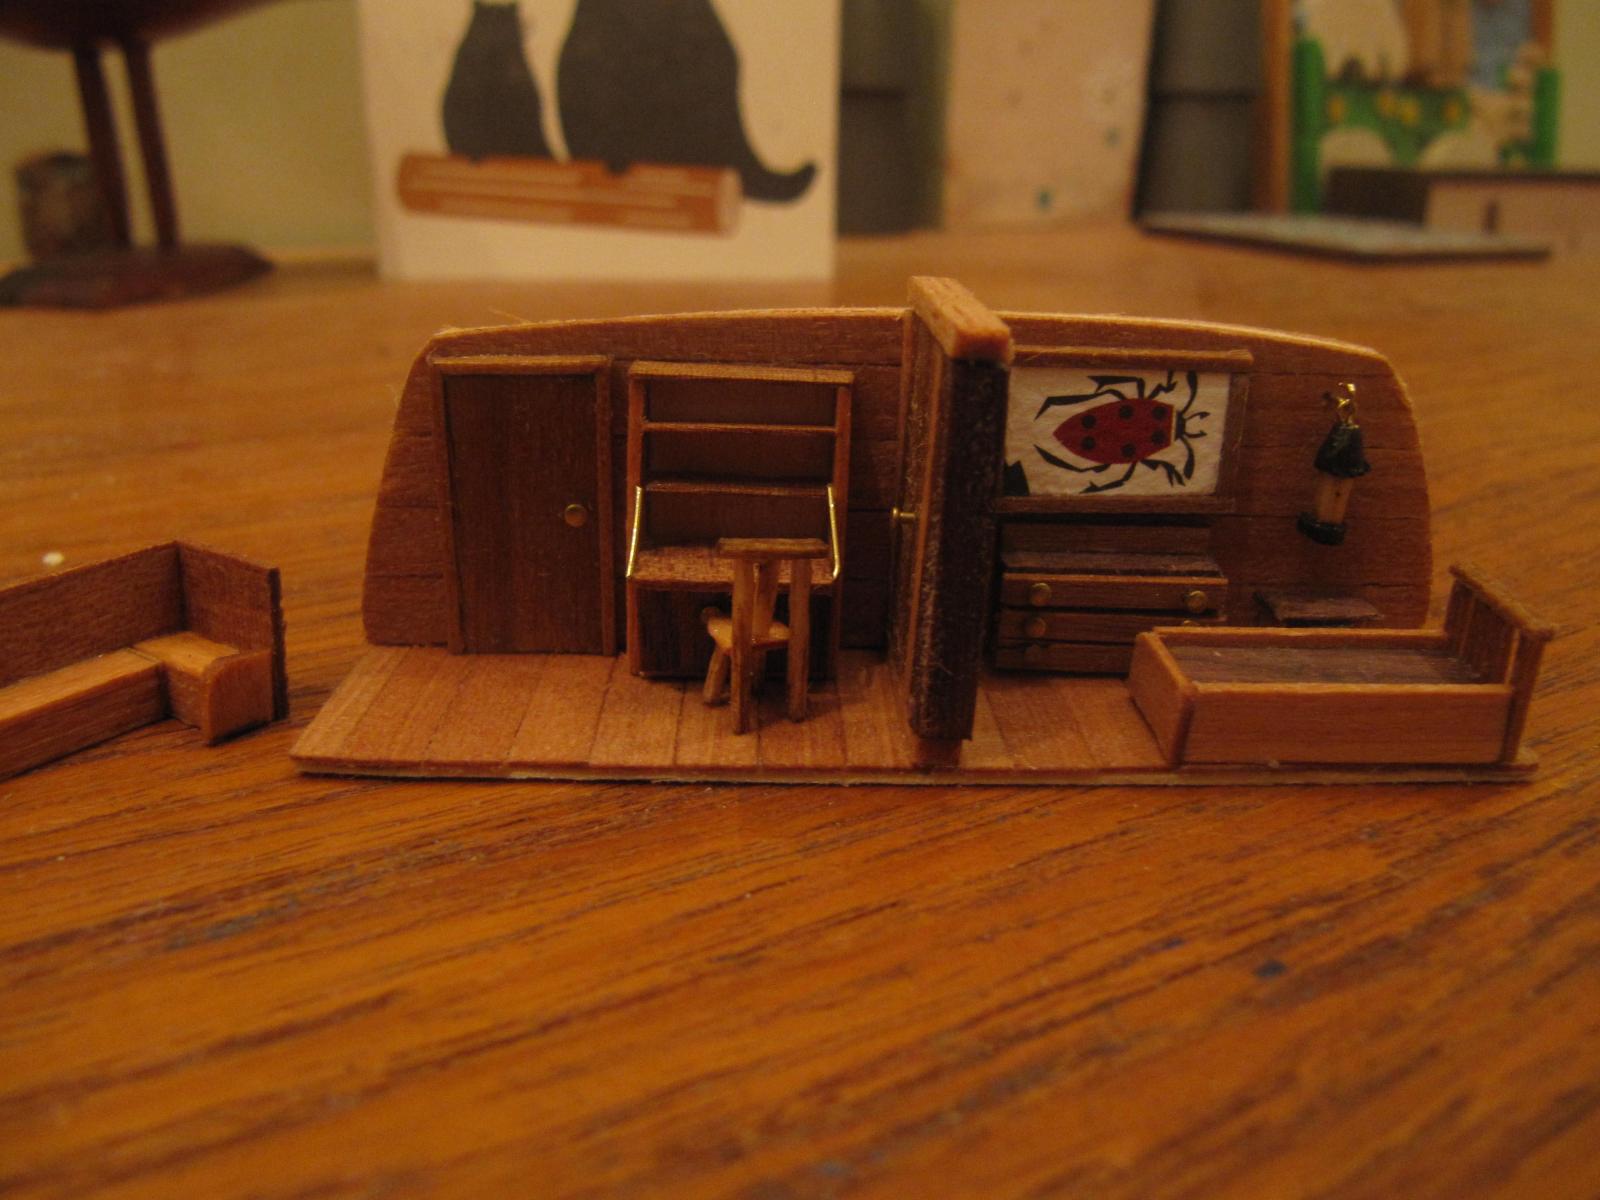
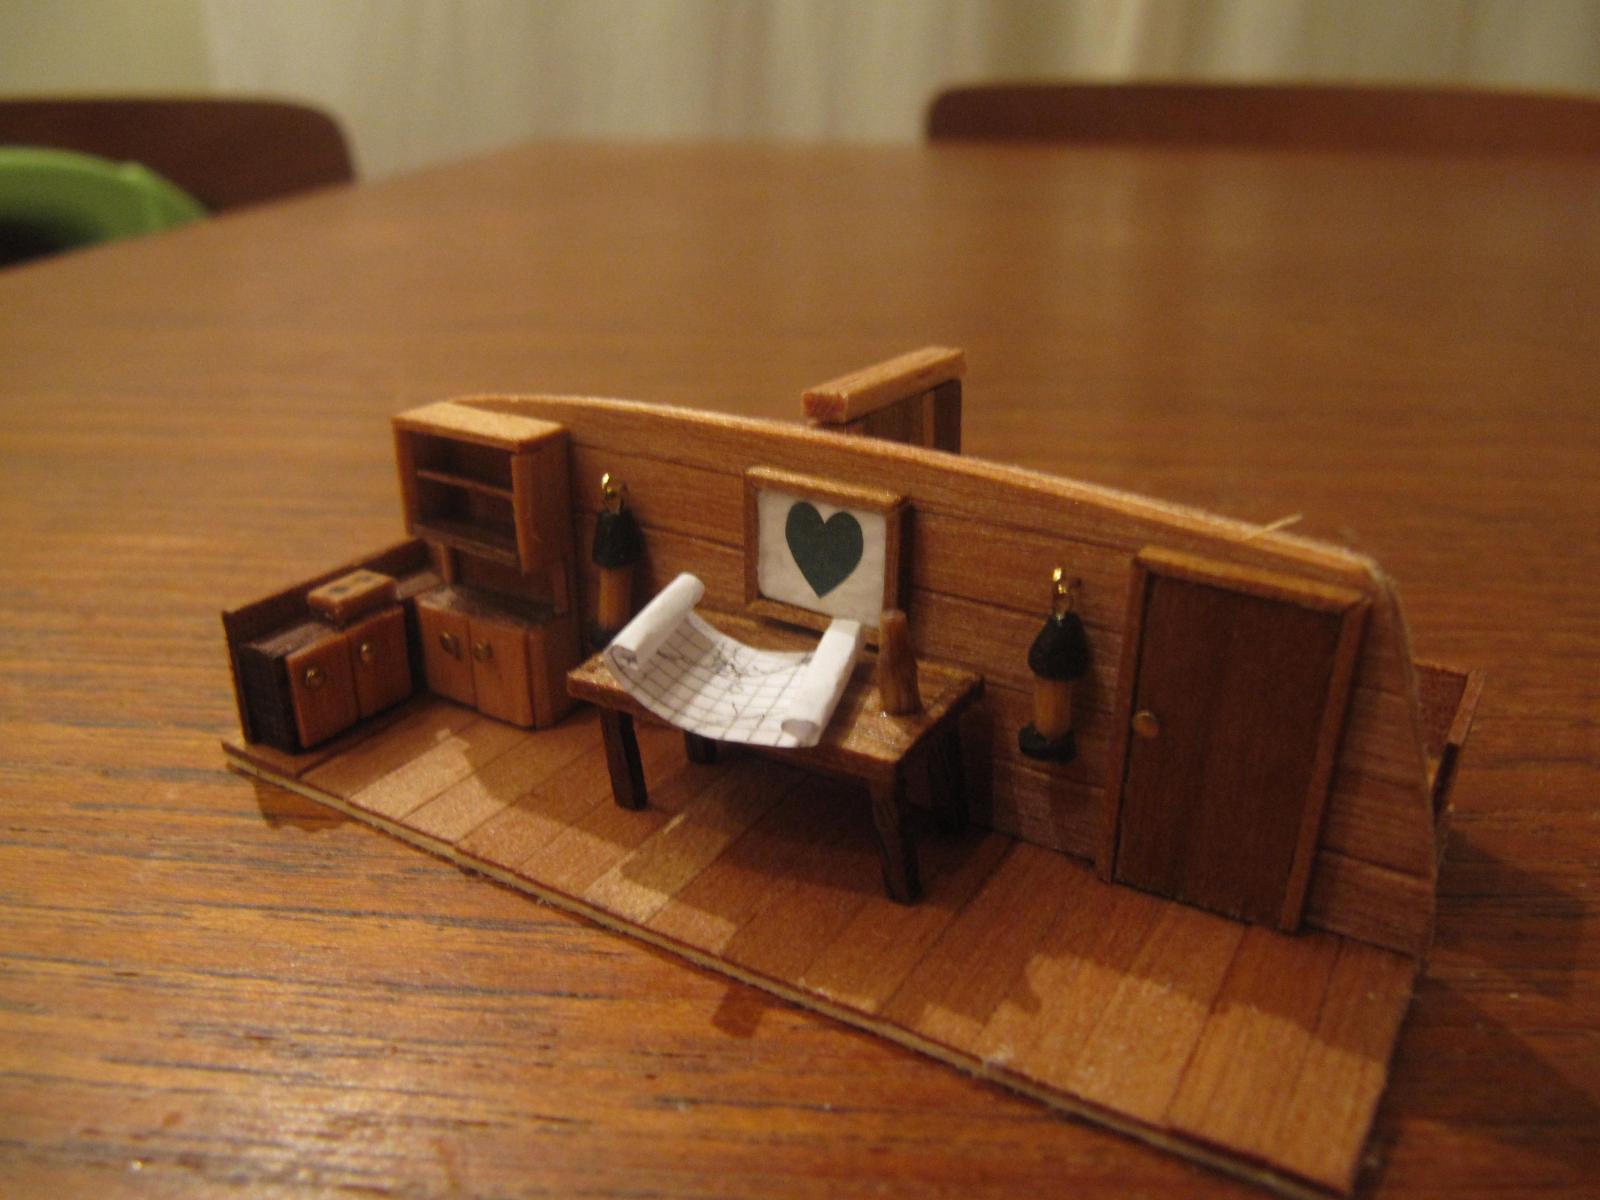
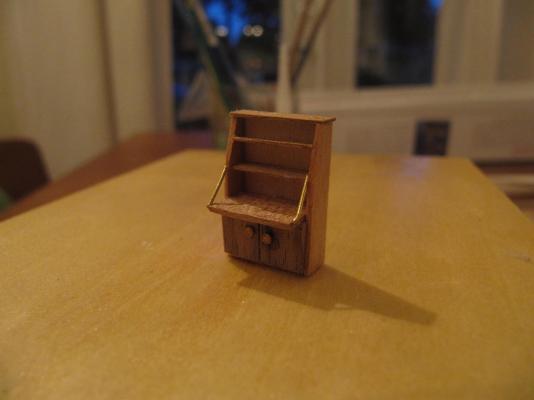
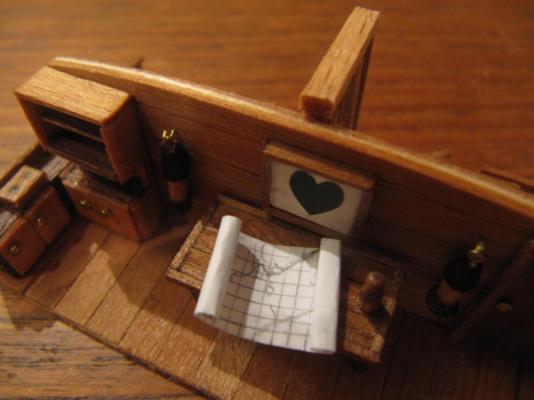
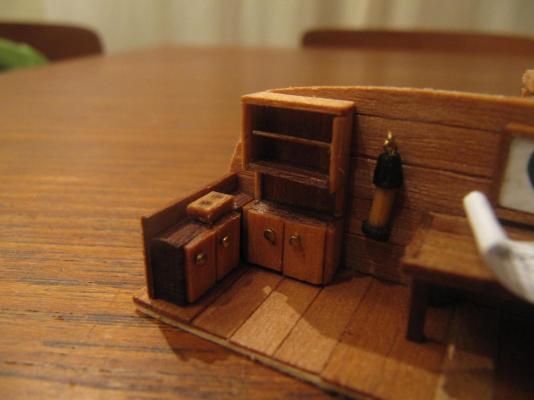
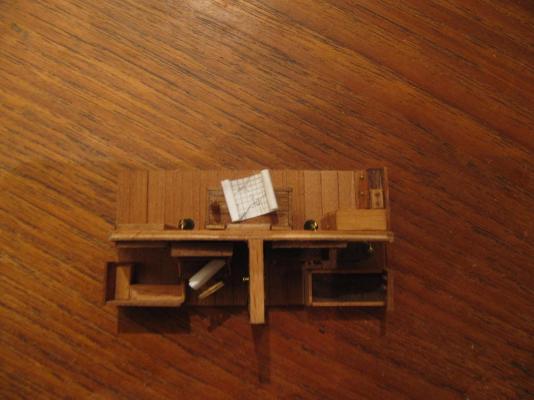
Before I started in on the build, I made a mock-up of the interior cabin so I could get a feel for what details I wanted to add, as well as for this kind of small scale work. I have to admit that I was not aiming for the kinds of fixtures that might actually have been found on a vessel of this period. It was more about trying my hand at something new. I imagine, for example, that the cabin would have sat deeper into the hull - but since this would have required some modifications to the centre keel and the bulkheads for which I was not prepared, I didn't do this. I started by making two separate floor templates out of 1/32" basswood sheeting. I measured the distance between bulkhead slots on the centre keel to get the width, while the length was determined by placing the widths in position atop the centre keel with the bulkheads fore and aft, marking the intersection between the floor piece and the bulkheads to get the widths port and starboard. I then cut another false bulkhead piece to separate the cabin into two sections. This bulkhead was also made of 1/32" basswood sheeting, and was made by tracing the outline of the kit supplied bulkhead frames onto the sheet (all of the bulkhead frames have the same shape on top). The height was the distance between the top of the centre keel and the top of the cabin bulkheads. I planked my floors and bulkhead using scrap .5mm walnut. I then made a rough door separating the forward part of the cabin into 2 sections. Here's a photo I decided, somewhat arbitrarily, that the port side cabin area forward would be a berth, so again out of scrap wood I threw together a bed, dresser and small night stand, along with a (ludicrously oversized) lantern and a painting of a lady-bug. The bed took a couple of tries to get to dimensions that I thought looked ok.... Here's a shot with a Canadian dime for scale comparison In the starboard side forward cabin area I thought to put a kind of study, with a desk/shelving unit, small chair and an L-shaped bench. I had thought to add a small table with the bench, but this didn't end up happening - would have made passage through very difficult....Here's the desk unit And here again with the chair and the bench just visible to the left And with the bench in place The aft cabin area I thought to make into a galley/dining area. Table and chairs, small stove and cabinet (not really ship shape at all....) and another painting, some (also oversized) lanterns and a makeshift chart (not accurate) of the Bay of Fundy - the waters where I learned to sail. And finally here's a not-very-good shot from the top. At the time I was very proud of my work - and I still am. But I think if I were to do this now, I might do a bit more leg work into two things 1. Better period-based representation of the fittings 2. Structural modifications to the kit to enable the work to be more visible on completion.... Anyway, thanks for reading/watching! hamilton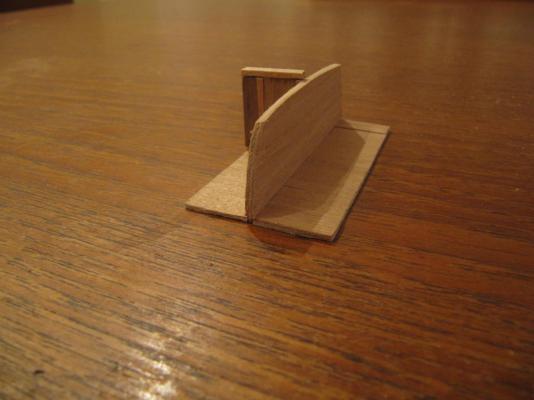


-
Thanks Bob! I'm thinking I'll have to invest in a small paint brush to apply the glue on the thin edges....I use weldbond PVA as my main adhesive for planking and it dries quite firm....but I think if I use a #10 or chisel x-acto blade as a putty knife I might be able to get as clean a result as you've achieved here! Thanks again for the tip! hamilton
-
Gretel by hamilton - Mamoli
hamilton replied to hamilton's topic in - Kit build logs for subjects built from 1501 - 1750
Thanks Mark: This reconstruction of the build was inspired by another MSW member who expressed some curiosity about the model - this made me curious about whether putting a log together for a build from 3 years ago would be an enjoyable experience....we'll see!! hamilton -
Gretel by hamilton - Mamoli
hamilton replied to hamilton's topic in - Kit build logs for subjects built from 1501 - 1750
Hi Per: This is good to know - I was unaware of this during the build - and in fact, I recall another modeller noting the discrepancy between the flag and the notion that it was a "Dutch" yacht....I think both that modeller and I had assumed that "Dutch" referred to the jurisdiction under which she sailed not to the design. This adds a lot of clarity to things, and makes me feel marginally better about the flag! hamilton -
Gretel by hamilton - Mamoli
hamilton replied to hamilton's topic in - Kit build logs for subjects built from 1501 - 1750
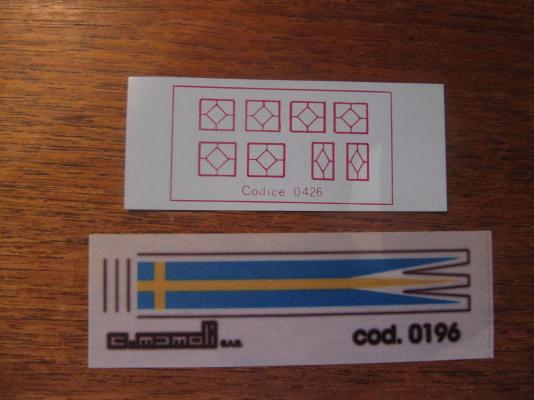
Hi Per: Yes - the flag is wrong on another count too - it's Swedish, whereas the kit is advertised as a "Dutch" Yacht....I ended up keeping the Swedish pennant...but I was not, at the time, too concerned with accuracy, more with learning some new techniques.....thanks for coming along for this reconstruction hamilton -
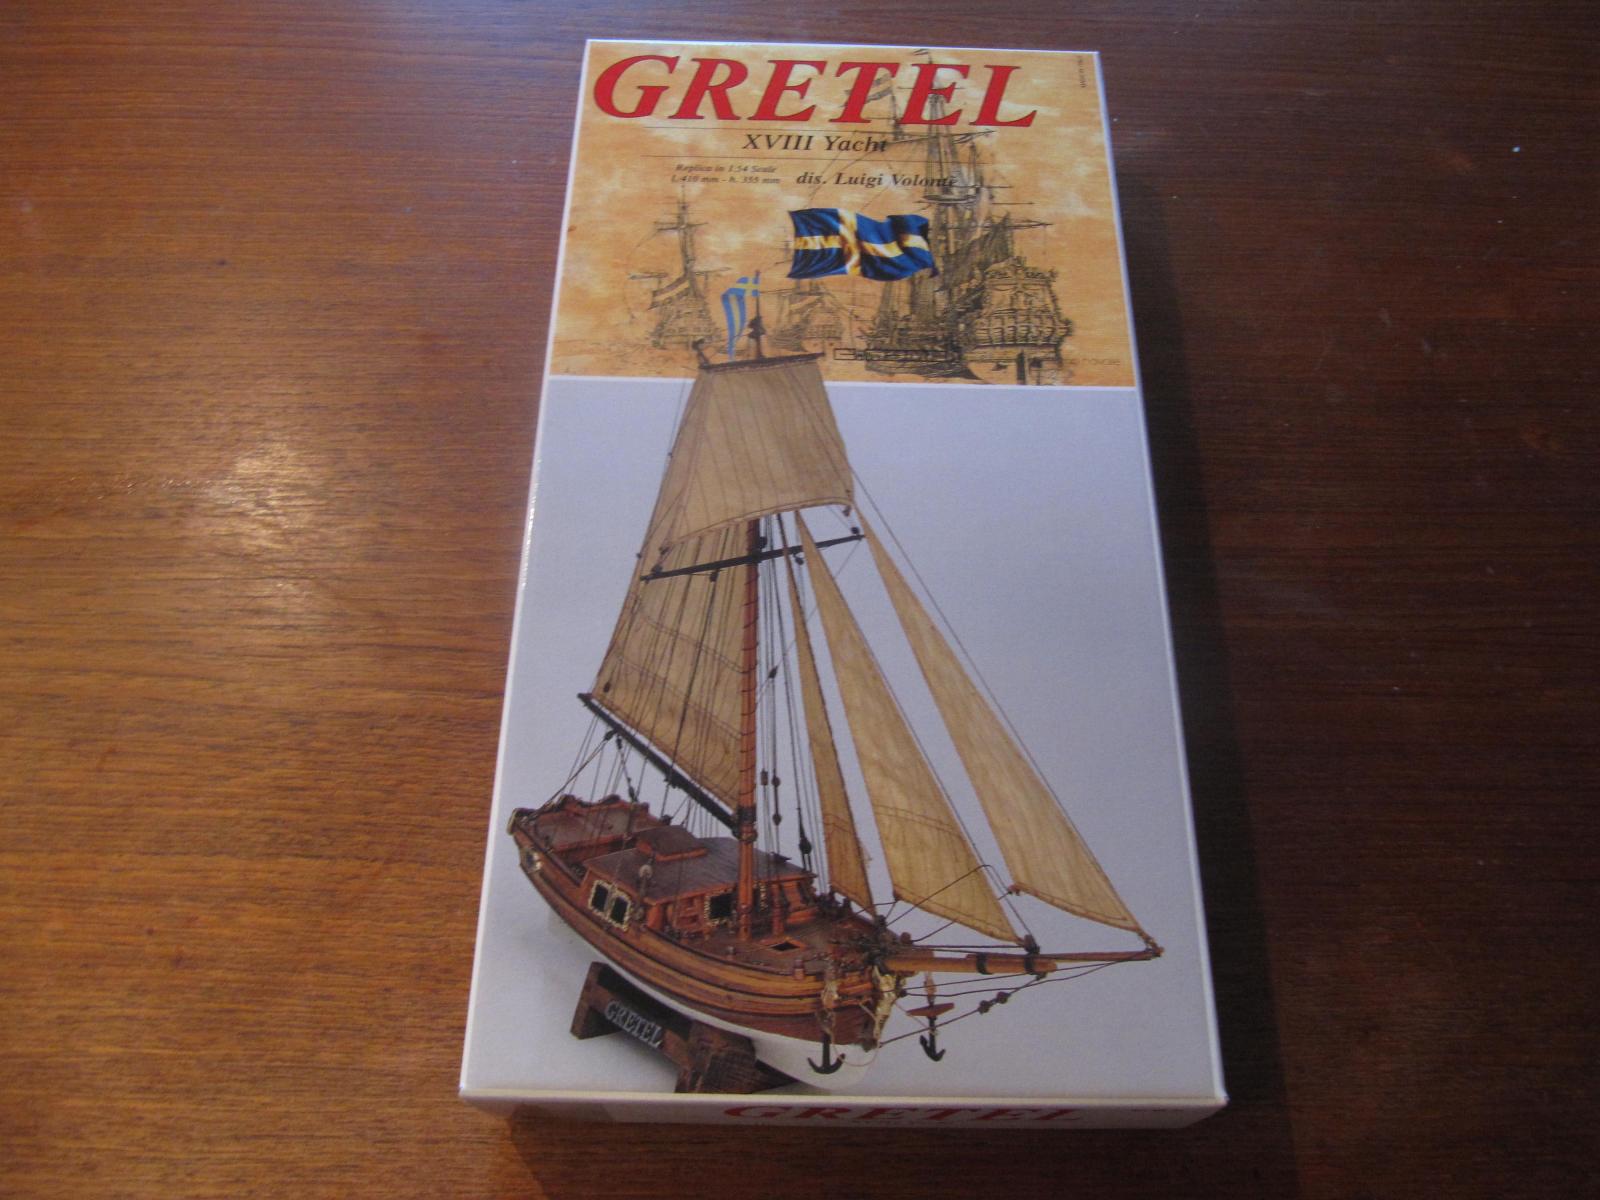
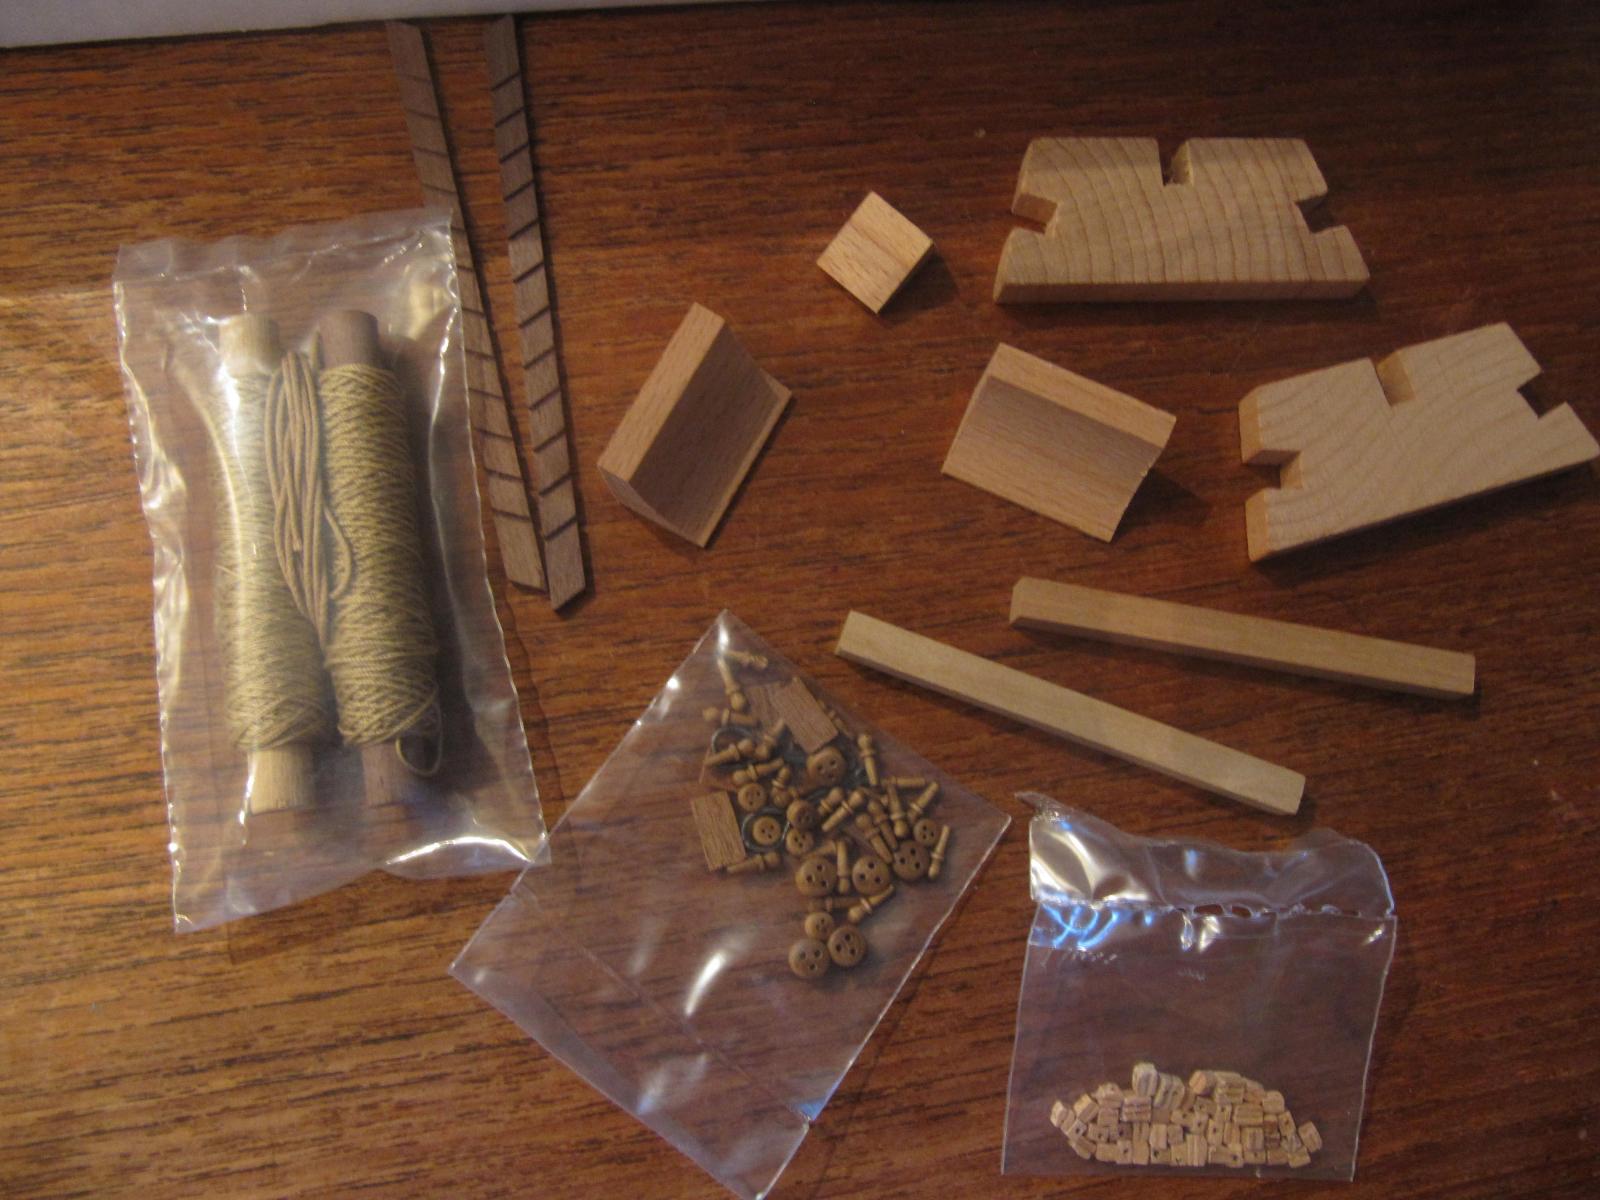
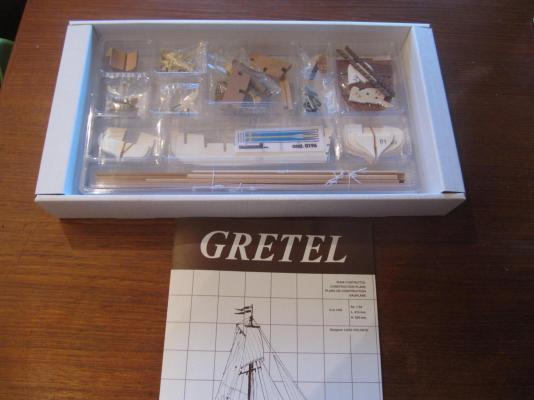
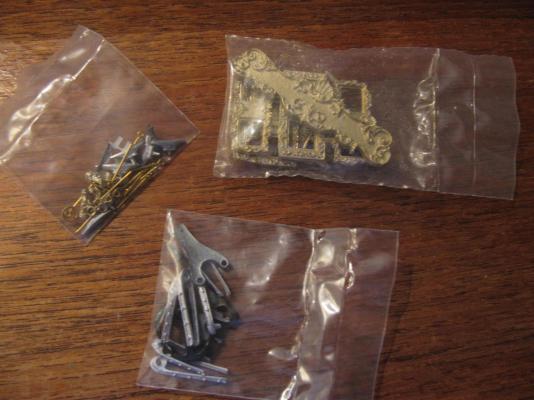
Hi there: For the sake of posterity and as a retrospective, I thought I would post this log of my Mamoli Yacht Gretel. This model was constructed between August and December of 2011, prior to the time when I joined MSW. I might have kept a log of the build over on LSS, when I was a member there.... Anyway, there are many features of the model that I can't recall - including the scale! But I do remember several things about the kit 1. The CNC bulkheads needed a lot of adjustment - they were very loose in the keel and needed significant shimming on their outside edges for the planking to run fair 2. The cast metal parts were very difficult to work with and I found them quite gaudy - I replaced the forward and port/starboard cabin windows, but ended up keeping the transom decoration, though in order to make it fit, I had to modify the transom slightly - the metal part is totally flat but the transom was curved and there was no way to bend these metal parts without breaking them..... 3. This was one of the first builds that I wanted to do some detailing on, despite the very small scale. So I designed, built and installed some cabin details (sadly not really visible on the finished model since I didn't really think about making structural modifications so as to make them visible). These were a lot of fun to make, though true scratch builders will notice a great many flaws in both scale and construction! I also seem to recall that the kit was a lot of fun to build - nice and simple but quite cute and a pretty interesting subject. I'll try to make weekly updates to this log to trace the build as it developed and to remember as much as I can about some of the quirks of the kit and my own construction strategies.....though I still have my Mamoli America to attend to, not to mention other "real world" obligations! Enjoy!


-
Hi Chris: I've coppered a few hulls, but never the Bounty, so I'm not sure I can help with the specifics, since each hull will be different. The main thing to keep in mind, depending again on the hull, is that the coppering would have gone on in sections separated by "gore lines". The gore lines define a band of copper plates working up from the keel - so start on the keel sides and work your way up. The gore will cut across the lower lines of copper plating and define a new line for the plates to follow fore and aft. Others will be more knowledgeable about these features than me - specifically in terms of how many bands might have been used on the Bounty, and how to locate the gore line(s) on a hull....On the hulls I've coppered, the gores have been featured on the plans, so I simply measured up from the baseline and transferred those measurements to the model..... Does the Amati kit contain a plan that shows the coppering? If it's a scale drawing (most likely a full profile) you might be able to lift the dimensions of the plates from the upper line of coppering, which should show the full plates and be at scale amidships. If the scale drawings contain a body plan that features the coppering, you should be able to lift the gore lines from that and transfer them to the model (harder to do on the profile plan, since the curves of the hull will distort the view....)..... Again - other more experienced modellers will have better (and maybe different) advice for you. Best of luck - Coppering is a very repotting business but rewarding when it's done! Find yourself some good music or podcasts to listen to while you're doing it! hamilton
-
Very nice work with the spilled planking Jason. It took me ages to wrap my head around the process and I still don't have it dialled - mostly I think because I may not be fairing to very exact lines.....but you can really tell the difference in your last photo - the amount of edge bending that would accumulate into the planking would make for a very messy job if left alone.....anyway, the hull is shaping up very nicely and that boxwood looks great! hamilton