


hamilton
-
Posts
1,933 -
Joined
-
Last visited
Content Type
Profiles
Forums
Gallery
Events
Everything posted by hamilton
-
 She's coming along nicely there Bob! I have a (selfish) question about your gluing - I'm almost at the stage of bulwark planking on my America and face a similar challenge having to edge glue quite thin 1mm planks that will be exposed inboard. I'm kind of at a loss as to how to apply the glue and install the planks in a way that won't mar the inside faces of the bulwarks. In your case, was it just a question of lifting off glue as it squeezed out from between the planks? Was there a technique you used for applying the glue to the planks? Sorry to pester, and thanks for any advice! hamilton
 -
Hi Bob: I've always been curious about this kit - followed the recent build mentioned by Brian above with great interest and will follow this one too. I have to say that's the worst warp I've ever seen in any kit supplied materials! When I saw it I immediately imagined one of those 16 ton weights I used to see falling on wile-e-coyote - hopefully you have some more practical solution to fixing it! hamilton
-
Hi Nigel: She's shaping up very nicely - the said will really liven her up hamilton
- 270 replies
-
- 2
-

-
- red dragon
- artesania latina
- (and 1 more)
-
I have the Corel kit on the shelf and am excited to get to it at some point in the near future, but a 1:64 scale version would be amazing - especially given what I've heard of the quality of Chris Watton's other Amati kits.... hamilton
-
I thought there was talk of a 1:64 Bellona as well - there are some tantalizing shots at the beginning of this thread.... hamilton
-
Great precision on the planking and the stern ports, Jason hamilton
-
Excellent job Brian - a real beauty - be very proud! hamilton
- 831 replies
-
- 4
-
-
- Armed Virginia Sloop
- Model Shipways
- (and 1 more)
-
Beautiful work on the stove - great improvement over the supplied part! hamilton
- 306 replies
-
- 2
-
-
- armed virginia sloop
- Patrick Henry
- (and 2 more)
-
Off to a good start with the coppering - it'll really bring some life to your model! hamilton
-
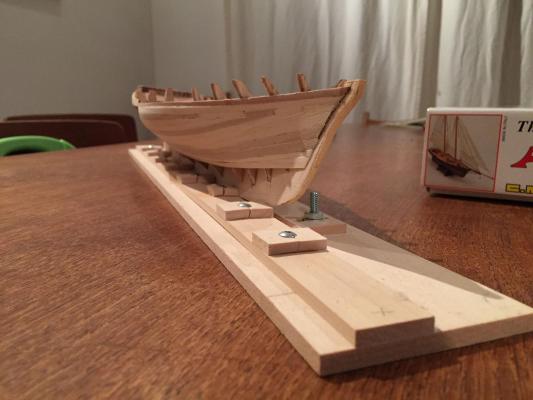
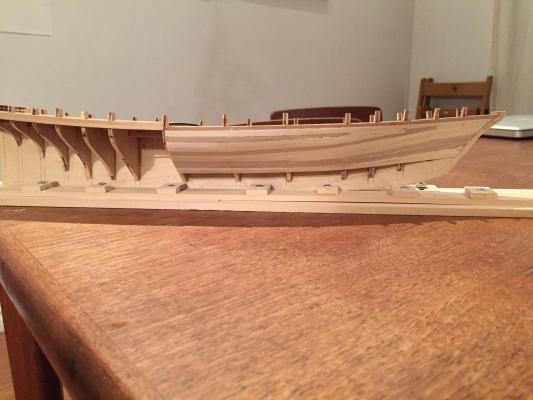
So I've not been idle, which means very little work has been done on America....I've managed to proceed somewhat on the planking, but it is very slow going....I can only work one evening a week which is just enough time to fit 3 planks on each side - and I'm planking forward from mid-ships first and then the stern section after.....At this rate, it'll be 2 weeks till the forward half of the hull is done (1st planking) and likely another 5-6 weeks for the stern.....things will pick up after Christmas, since my Spring semester is a bit lighter than the Fall, but who knows! Anyway, the planking has gone alright so far. I've had to do some little tricks to get everything to run nicely and the wood is pretty splintery and soft which does not make it easy. After the first two strakes I noticed that the strakes really bent upwards, given the very sharp twist that each strake makes as it moves from the round mid-ship to the more dagger-like bow. The same will be the case in the aft section, where up to the turn of the bilge the strakes run from vertical to horizontal where they tuck in at the counter. The issues I keep turning over in my mind as the planking proceeds are: 1. Should the keel, stem & sternpost be planked with thin strips to form a rabbet for the first planking, or should the planks thin out and taper into them? The plans show the keel planked with the same material used on the hull, which makes no sense, since if I followed through on this the keel would end up being 8mm thick!!! I have thought of ending the first planking at the bottoms of the bulkheads and then using the .5mm second planking to line the hull including the keel, stem & sternpost. This would produce, I think, a more even and much more realistic result. 2. How to do the bulwarks. The first layer of planking is 1mm walnut. But I have to edge glue this to the hull planking to fit the strakes since I will have to remove the bulkhead extensions and can only dry clamp the strakes to the extensions to achieve the proper run. The inboard face of these planks will be exposed and if possible, I would like to leave them natural, which means I can't get any PVA on them....I'm at a loss as to how to apply the glue in such a way as to prevent it squeezing out and drying on the inboard face of the planks...any suggestions here would be most welcome. Anyways, here are a few shots of the progress to date - please keep in mind that the planking has not been worked on at all, so it looks pretty rough. Once the whole thing is planked I'll work it over with some filler and sandpaper and hopefully it will shape up nicely..... hamilton

-
Absolutely gorgeous work. This is such a fine kit - it really makes me wish I lived in a larger space!! hamilton
-
I guess with the wale extension you won't be adding the fashion piece? Either way she's looking beautiful. What are your plans for finishing the transom outboard? hamilton
- 306 replies
-
- 2
-
-
- armed virginia sloop
- Patrick Henry
- (and 2 more)
-
I've been following emelbe's (sp.?) build log and I'll tag along with this one too - this looks like a really really nice kit hamilton
-
Cutter Cheerful 1806 by rafine - FINISHED
hamilton replied to rafine's topic in - Build logs for subjects built 1801 - 1850
Very nice detailing on the companionway - the cambered hatch coamings also look nice - did you need to make any adjustments to the camber based on your particular model? Thinking about investing in some of these for my Bellona and for Constitution when the times come..... hamilton- 525 replies
-
- 3
-
-
- cheerful
- Syren Ship Model Company
- (and 1 more)
-
That mast is huge! But overall this looks like such a fun kit to build.... hamilton
-
The outer transom and counter planking look really nice - she's shaping up! hamilton
- 306 replies
-
- 1
-
-
- armed virginia sloop
- Patrick Henry
- (and 2 more)
-
I found those little things to be really tricky! Yours came out great! hamilton
- 831 replies
-
- 4
-
-
- Armed Virginia Sloop
- Model Shipways
- (and 1 more)
-
Ferit!! It's great to hear from you! You know, I invested in the Corel Berlin a little while ago, so at some point the "factory" will start processing that Brandenburg beauty....though I can't imagine matching your work! hope to "see" you again soon hamilton
-
Well this is just a brief place-holding note to say that I've begun the first planking on America - or rather begun again, since I ripped off my first minor attempt a little while ago. So far it's going well. I'm using the kit-supplied planking material after all and planking the forward section first and then I will plank aft - an approach I've taken before with the first planking on my last several builds, and which helps a lot with getting a nice base for the second planking (in my opinion). I'm still a bit befuddled by the bulwark planking....I will have to edge glue the planks and try to avoid gluing them to the bulwark extensions, since these have to come off, while at the same time using the bulwark extensions to ensure that the planks run fair (particularly at the bow where the bulwarks flare outboard - not sure if there's a correct term for this.....). Edge gluing them will be difficult since the planks are thin (1mm) and because the inner face is the exposed inboard bulwark planking and should look neat and tidy......I'm sure I'll find a way to muddle through it, just hard to wrap my head around it at the moment.... More on the weekend when hopefully I'll have a chance to sit down at the bench once again hamilton
-
Looking forward to seeing the sails on your KC. She's shaping up really nicely hamilton
-
Hi Dave: Great start on the Phantom - the paint job looks great! Makes for such a nice finish on the hull. Good luck as she progresses hamilton
- 28 replies
-
- 1
-
-
- phantom
- model shipways
- (and 1 more)
-
Great fix on the aft cant frames! She's really shaping up! hamilton
- 306 replies
-
- 2
-
-
- armed virginia sloop
- Patrick Henry
- (and 2 more)
-
Just found your build log and perused through it - beautiful work at such a small scale. This is a very interesting vessel - looking forward to seeing more of it as she comes together hamilton
-
What a beauty! Excellent craftsmanship on a lovely boat! hamilton


