HOLIDAY DONATION DRIVE - SUPPORT MSW - DO YOUR PART TO KEEP THIS GREAT FORUM GOING! (Only 24 donations so far out of 49,000 members - C'mon guys!)
×


Mirabell61
-
Posts
7,407 -
Joined
-
Last visited
Content Type
Profiles
Forums
Gallery
Events
Everything posted by Mirabell61
-
 Robert, what about an update on your bone-made Royal Caroline ? "still ruht der See" since May 2014... Nils
- 241 replies
-
- 1
-

-
- royal caroline
- yacht
- (and 1 more)
-
Hello Peter, your rigging Looks very well, and I again took a dive into your log...... I have two questions, a) noticed that you install a jib stay attached to a traveller (neighther shown nor mentioned in Amati drawing). Is the seperate jib stay always used in combination with the jib sail, instead of attaching the jib to the fore topgallant stay ? I can imagine that Setting the jib (Access to...) is easier when it is hauled out on the jib boom per outhauler lineand over sheave roll in sprit-boom tip. Also the common sail lateral Point can be set a Little Foreward or aft to trim the ship on course by opperating the traveller as the seperate jib stay (when the traveller is hauled out) would require some additional length compared to inhauled Position, you probably have arranged for a sheave roll in the upper foremast, for allowing the appropriate jib stay tension as well as an block supported tackle down on deck ? Nils
- 431 replies
-
- 1
-
-
- pegasus
- victory models
- (and 1 more)
-
Thank you Jeff and Omega, please feel free to to click ( in my signiture) into my "Gorch Fock" build log if you have interest for that tallship..... Nils
-
What a nice Model Alexander, beautiful craftmanship... on the Fitting out Nils
-
super work on the masting sheaves Danny, Nils
-
Very nice Framework Jack Nils
-
Saettia Genoese by maurino
Mirabell61 replied to maurino's topic in - Subjects built Up to and including 1500 AD
Looks very promissing Mauro, Interesting rigging with those latin sails Nils -
lovely done stay collars Bob, your bow rails and gratings look very nice Nils
-
Thank you Popeye, Nils David, all These applications are done in normal soldering (soft soldering below 400 Degr. C), I trust they will sufficiently withstand rigging tensions Nils
-
Thank you very much Omega, Nils
-
Hi Peter, thanks very much for your comments regarding the Yard bracing. There was an answer from Mark, mentioning a loostening of the leeward formost shroud by means of a block tackle in the shroudline, an just this tackle can be seen, wonderful done, in one of Doris`s recent pics on the Royal Caroline rigging on all three masts. Its too late now for me to do it this way, but l`ll adjust the truss tackles accordingly nevermind to the gap Mast / Yard. That book you are Holding of John Harland seems to be quite informative for looking up answers to questions.... as there are hardly 18th century model squareriggers with braced sails shown, this Detail does not Show up accordingly, wether in plans, nor in modeling Performance. perhaps Chris Watton may put a remark on the Amati Plan, which in all I find quite good. I have even missed it in Lennarth Peterssons book "Rigging Period Ship Models" for bracing Details. I often look into your rigging, when I ask myself, how did he do it? Its always good if someone is ahead of you with nice performed build Cheers Nils
-
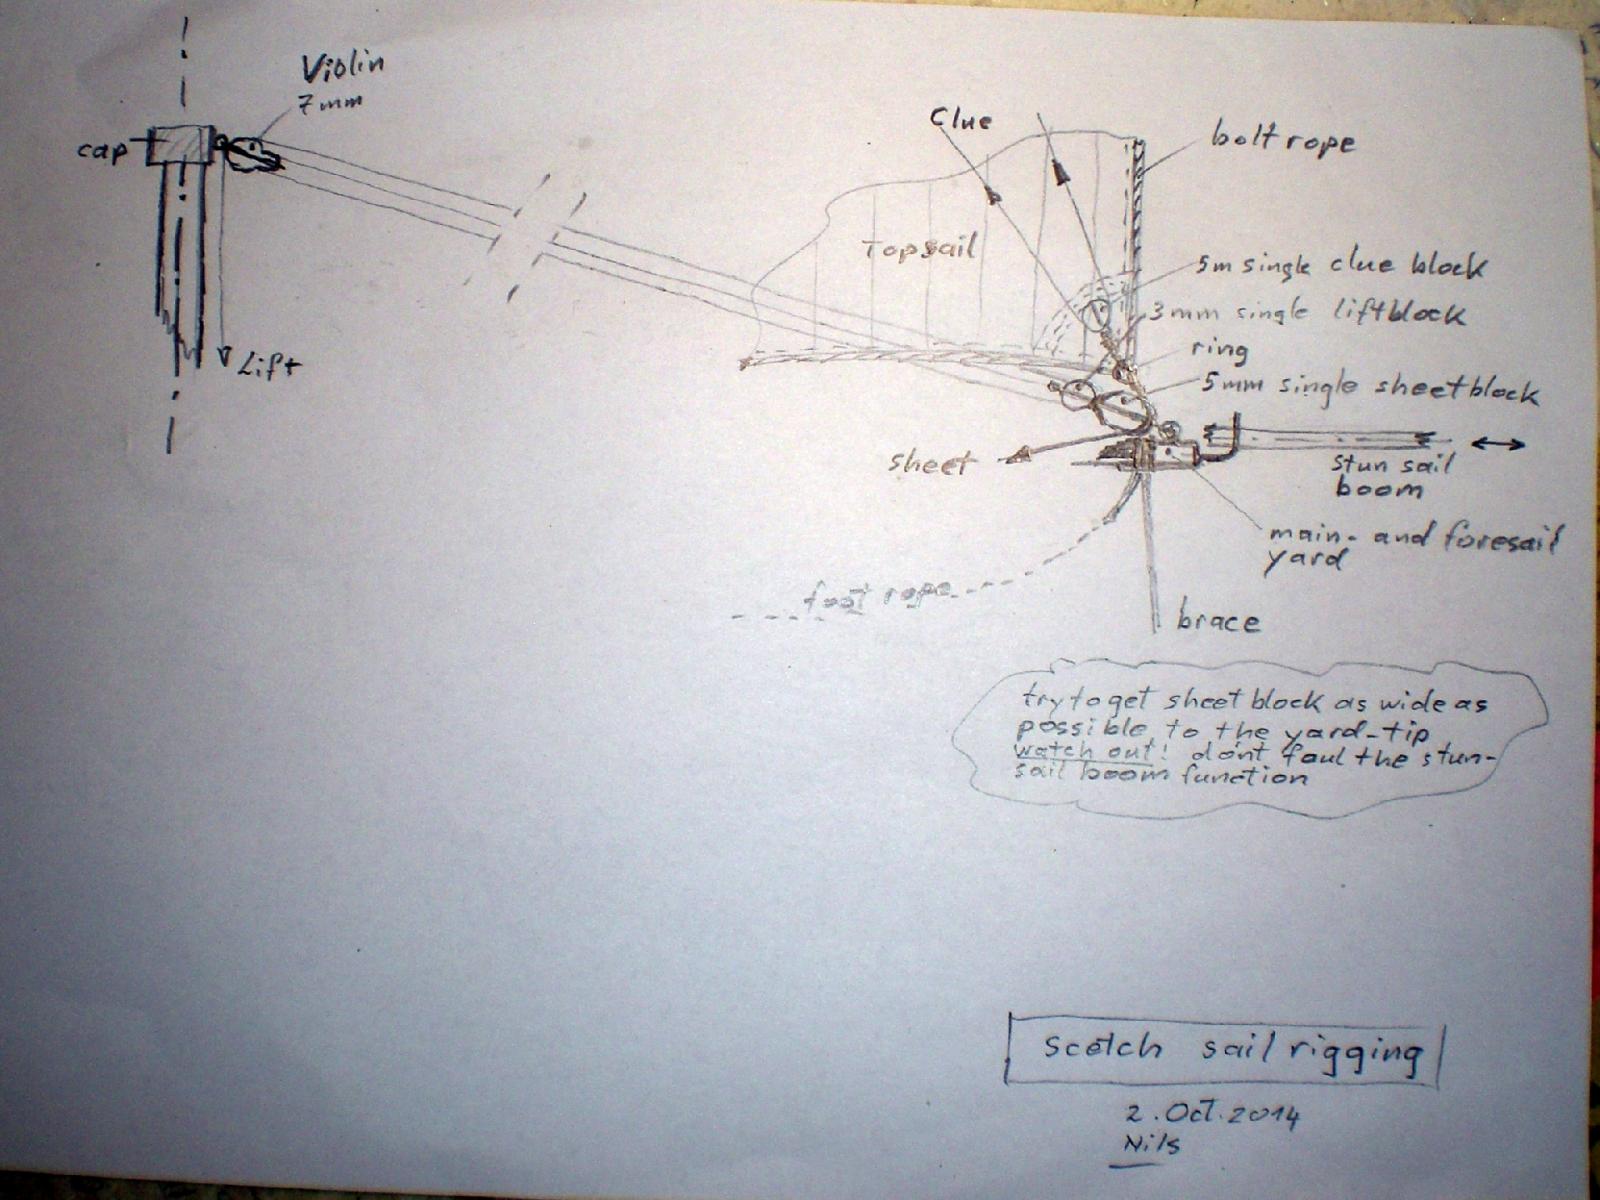
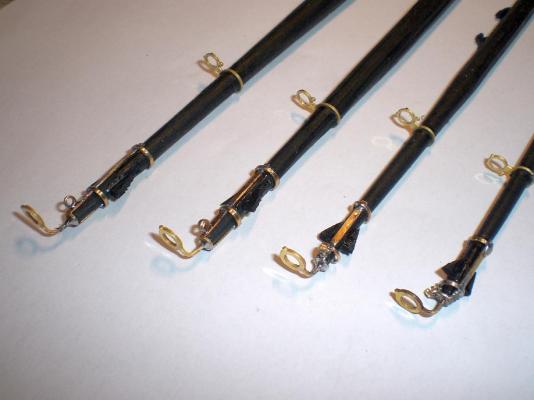
Main- fore- and topsail yards These Yards with their soldering work at the yardtips were the most difficult. today I received the ordered 3,5 mm deadeyes for rigging the upper shrouds and some backstays, shall continue with that sequence next Nils


-
Wunderbar ! Nils
-
beautiful ship Bob, the rigging with all those fine Details I lke very much it Looks very authentic Nils
-
Book "Rigging Period Ship Models" What I like in Petersson`s book and can recommend, are the lots self explaining scetch Pictures (actualy illustrations only, no text), in all very informative and in Addition to the shipmodels rigging plan, in every way worth its Price and is fun studying. What I was missing is the rigging of Yards in braced Position, maybe Petersson would like to make an appropriate ammendment in the follow issues of this book Nils
-
Tom, interesting build method, and a very nice result with the two hull halves well done ! Nils
-
ROYAL CAROLINE 1749 by Doris - 1:40 - CARD
Mirabell61 replied to DORIS's topic in - Build logs for subjects built 1501 - 1750
Doris, wonderful Job on the Standing rigging like all your work. I noticed that you have fitted a block tackle between the foremost shroud length of every mast. Super Detail, I have learnt that this is the means to loosten the shroud when bracing the lower Yards. Wish I had known this earlier, I would have adopted that one for my own rigging. Nils- 883 replies
-
- 2
-
-
- royal caroline
- ship of the line
- (and 1 more)
-
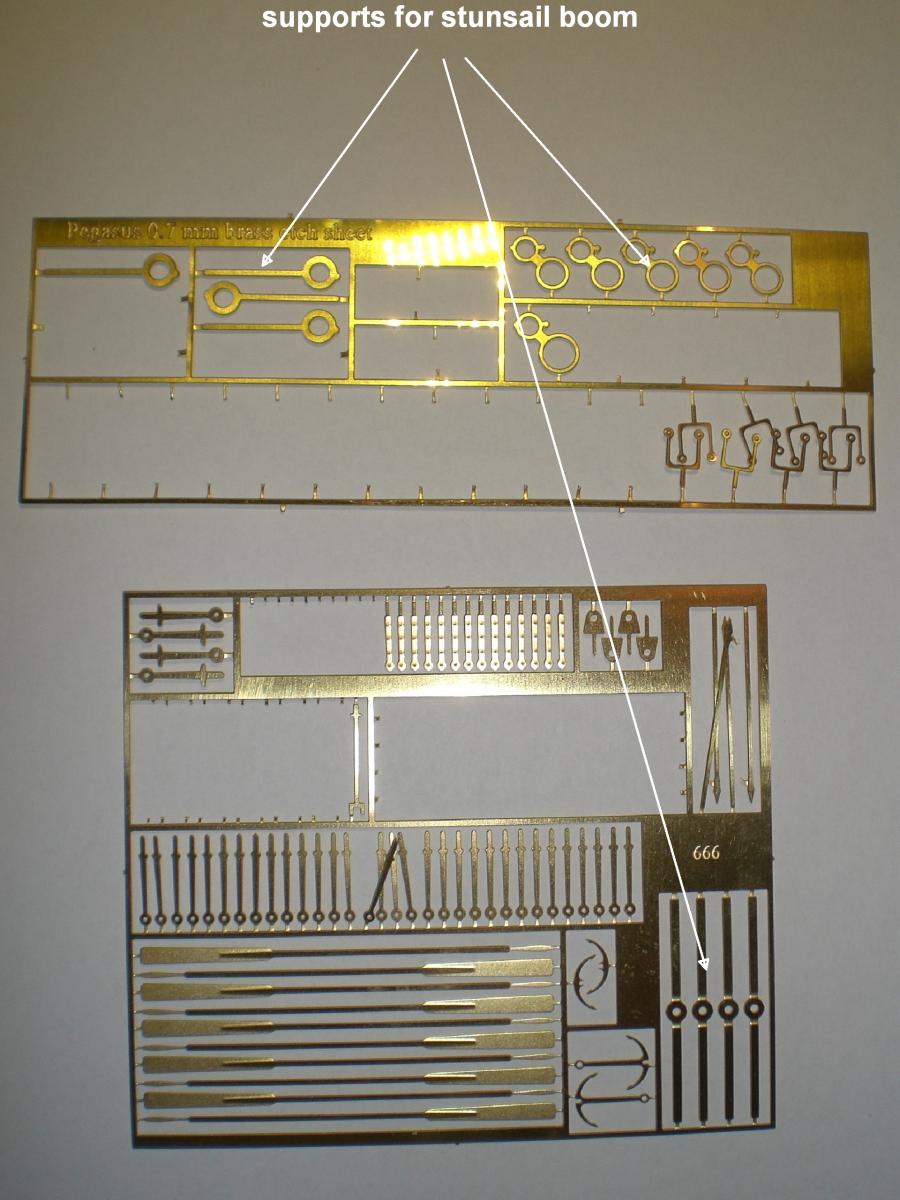
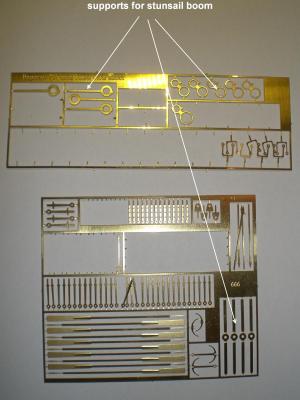
Hi and thank you Jason, I have not used all the etched parts yet, as they are picked from the 9 Panels in total as required. But every time I do use the one or other item I`m very pleased with the good Quality and precise fit. I do`nt know if the fellow builders doing the "HMS Fly" have These etched parts for "Pegasus" in their kit Content, but asume that they can be used there just as well Nils
-
Mike, what a delight to watch this build, superb in all Details...,I love this one.. Very well and masterly done Mike Nils
-
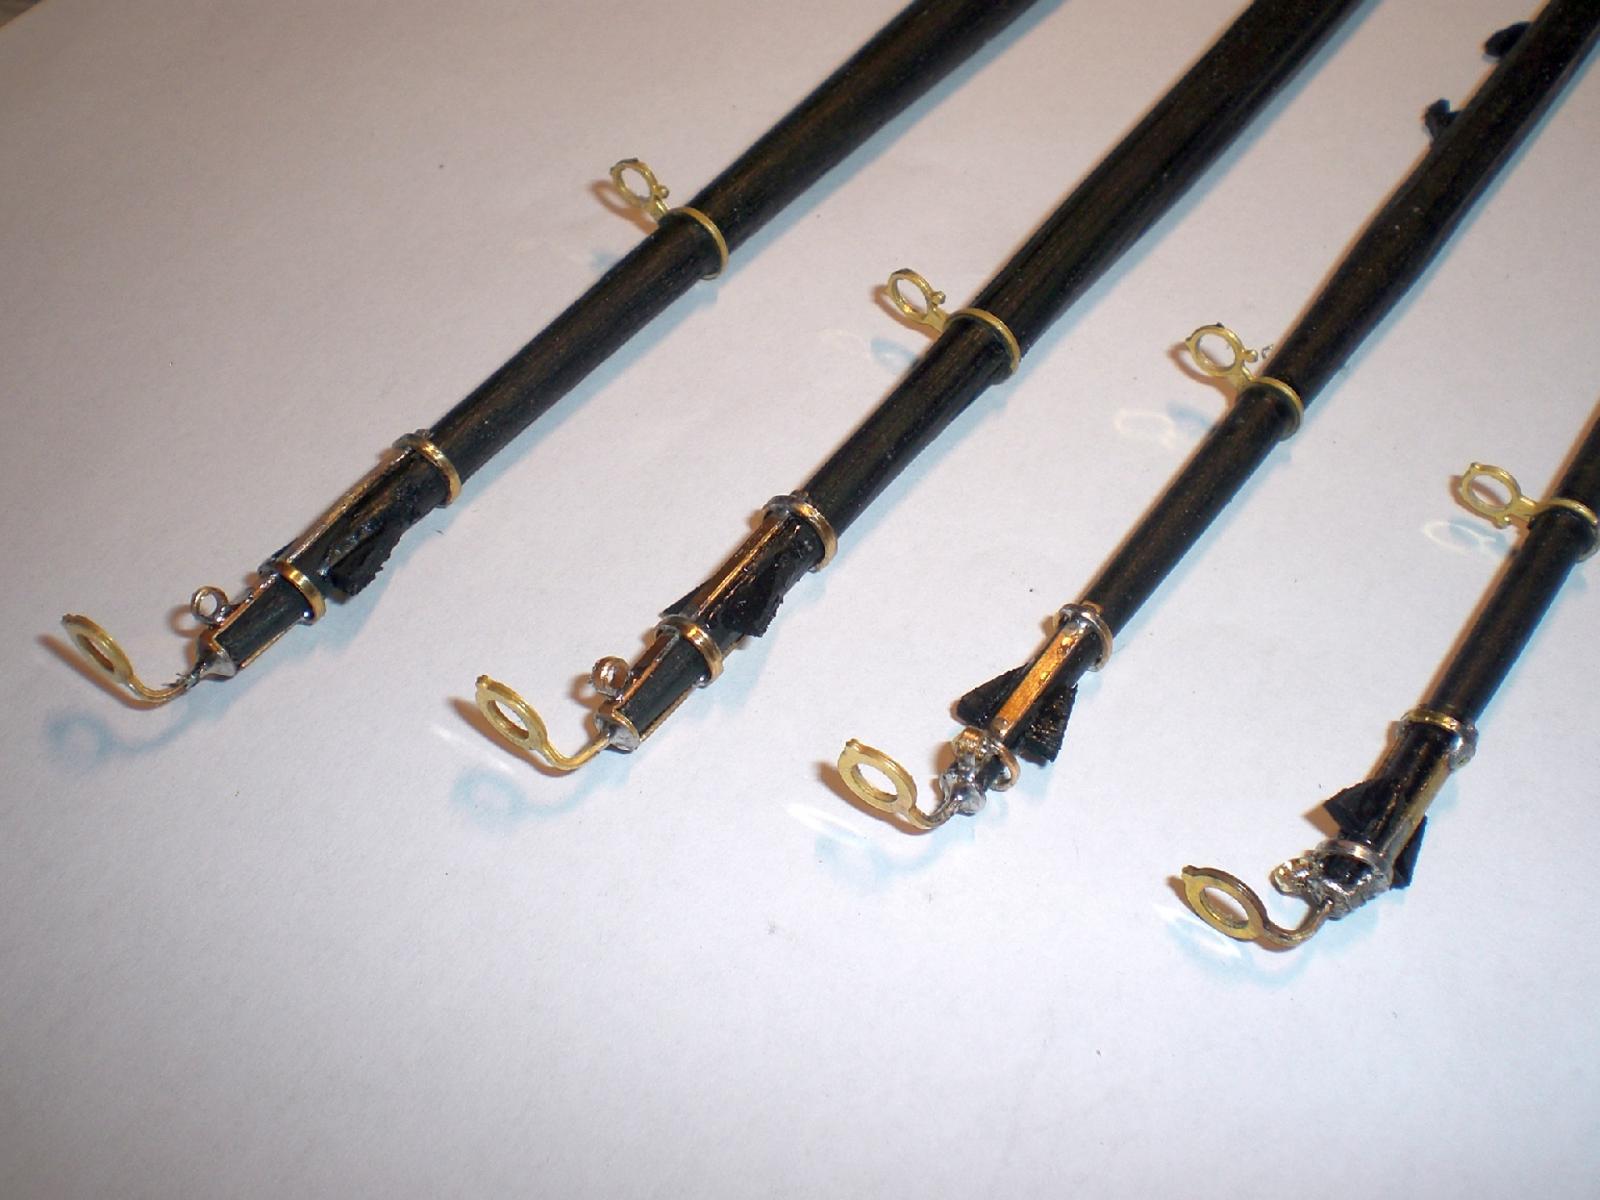
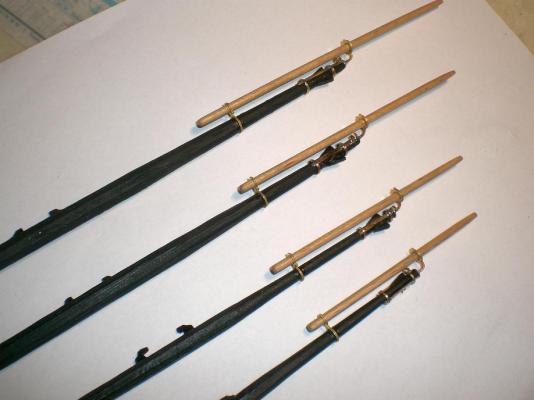
Bob, Mike, and Martin, thank you for your comments on the metal work.... basicly the parts are from the Amati photo etched plat set which I bought together with the plan. The two rings soldered to each of the mast-end tips are sliced off brass tubes 5,5 x 0,5 and 5 x 0,5 Martin, the upper plate in the pic is 0,7 mm thick the lower one is 0,5 mm thick Nils
-
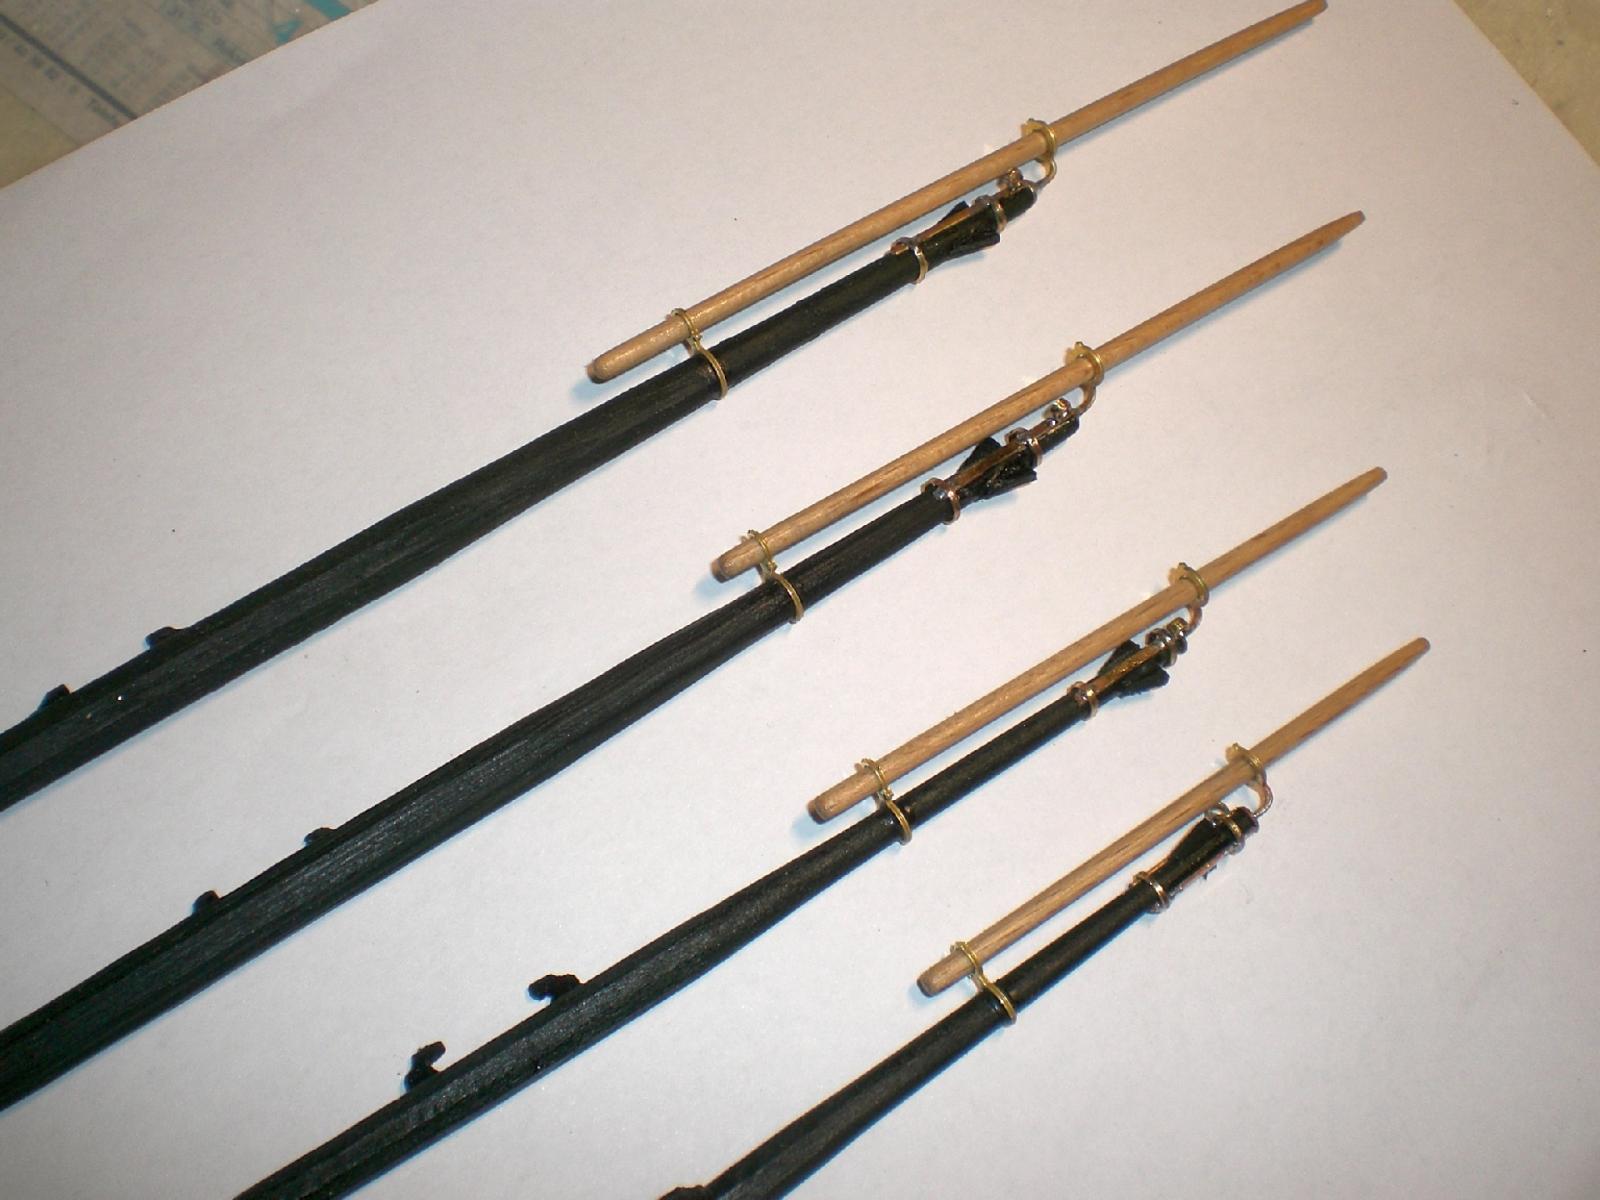
Hi Karl, Hi Bob, I had some doubts with the Yard ends but I think ist allright now. I`ll leave the Fittings in brass, to give a Little contrast, blacken the yards, and leave the stunsail booms in natural Wood to suit the blocks color of the rigging Nils
-
Bob, thanks for your appreciation Nils
-
Geoff, thank you very much, I`m happy if it is liked and to share this with others.... Nils
-
Wappen von Hamburg by andy - Corel
Mirabell61 replied to andy's topic in - Kit build logs for subjects built from 1501 - 1750
Hi Andy, thanks for helping Xander along with posting all these log Posts. Regards to her, its a beautiful build Nils -
Omega, very nice Progress on the manyfold Details I Like that railing is going to be a tough Task... Nils