HOLIDAY DONATION DRIVE - SUPPORT MSW - DO YOUR PART TO KEEP THIS GREAT FORUM GOING! (Only 13 donations so far - C'mon guys!)
×


Mirabell61
-
Posts
7,407 -
Joined
-
Last visited
Content Type
Profiles
Forums
Gallery
Events
Everything posted by Mirabell61
-
 Your "Lulu Belle " Dan, a wonderful build, from keellaying through to fittoing out and paintwork. Even the Little clinkered Dinghi Looks superb, thanks very much for sharing These pics..... Nils
 -
Bob, next to your excellent HMS Essex, that boat lashed to the supports Looks so great and admirable, it realy is inspiring for me to do hopefuly alike for my HMS Pegasus, at least I left an adequate space in hight for it under the main stay sail. Your boat has all it takes to look like a propper work- and traffic boat, no fancies, but Color, Wood tones, Fitting out and the general apeal are just wonderful Nils
-
Thank you matija, thats what I love to hear, I`m curiously looking out for those announced Details to come......... cheers Nils
-
Hi Matija, even if its a few years ago, many thanks for sharing your build log of this wonderful schooner. Also nice planking job 1:50 is a very nice scale and with appr. 98 cm length the model will require an adequate place in your home. hopefuly you are rigging the sails... Hope to see more soon...... Nils
-
Beautiful build Hans, Looks great in scale 1:35 you are having plenty of space fir all the Fitting out Details. I`ll be watching out as it deveöps further on Nils
-
Thank you very much Michael, I`m busy with the sails now..... Nils
-
Thanks for dropping in Keith, I`m glad you like it, but it all needs some time now Nils
-
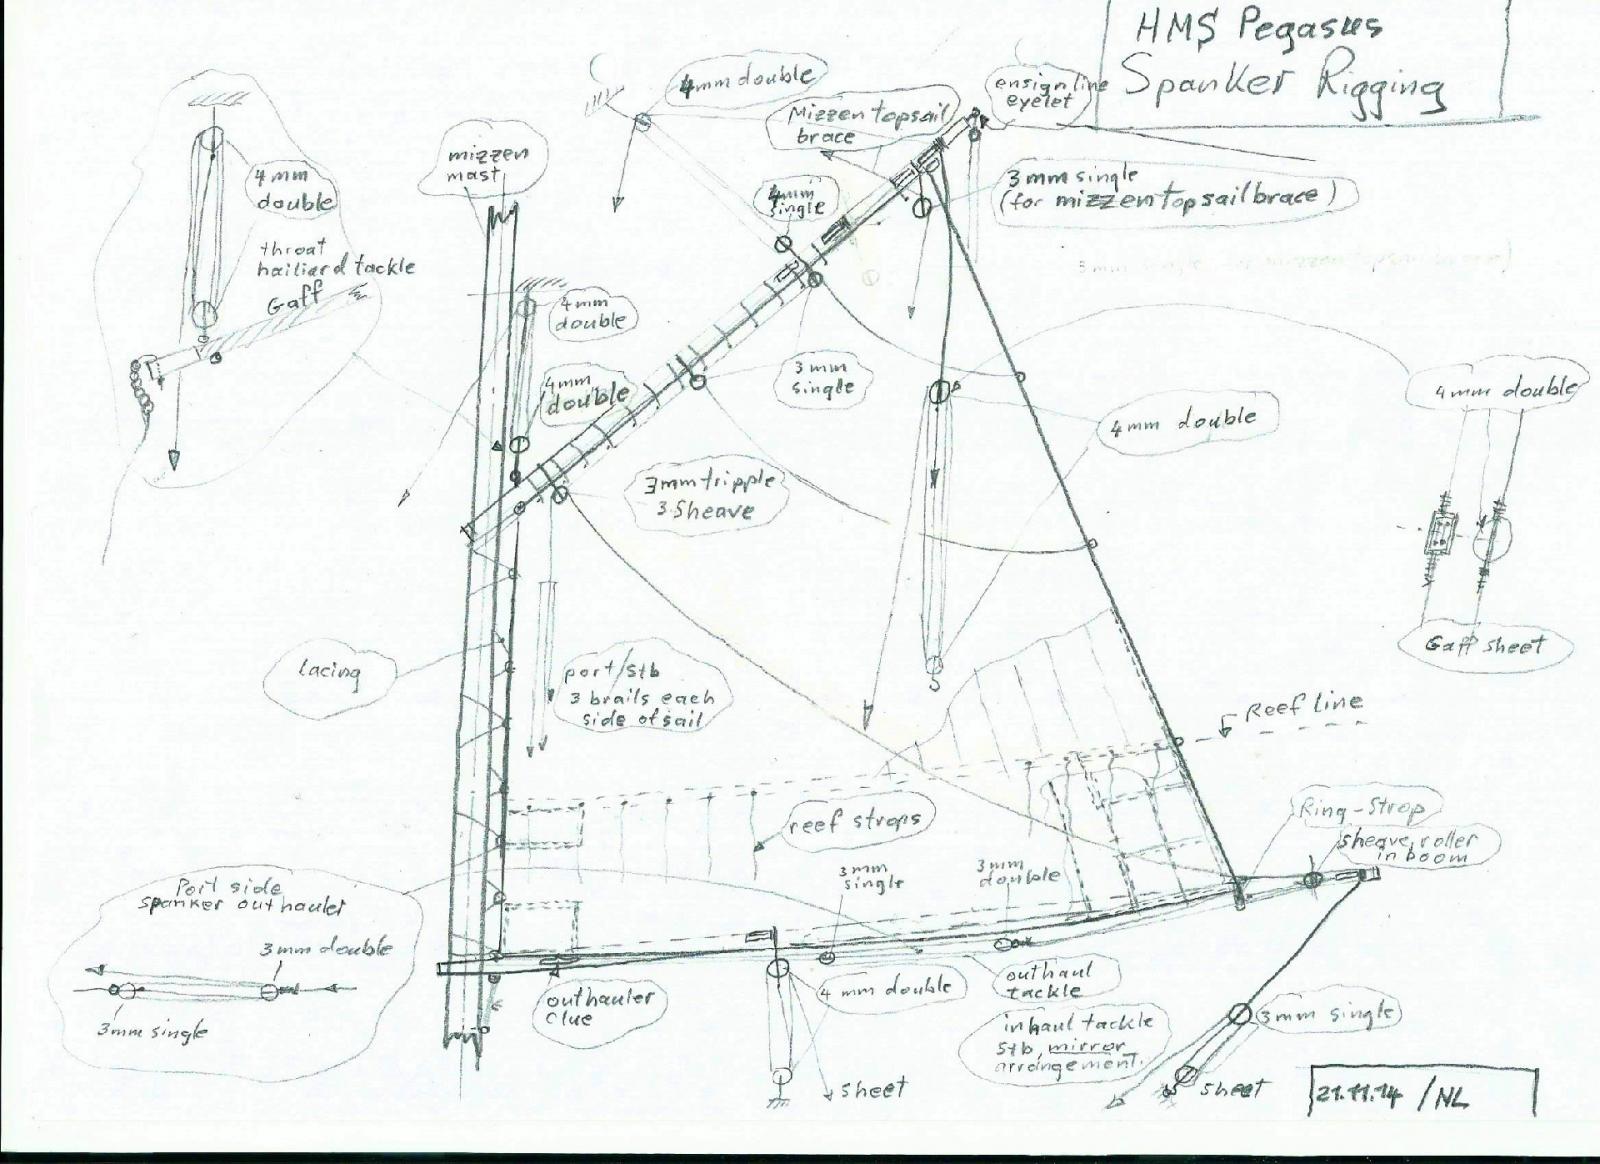
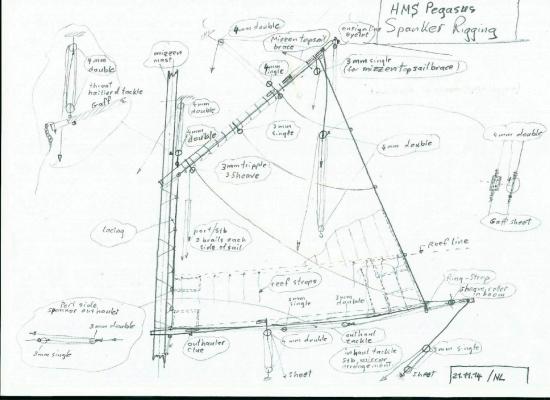
Many thanks Bob + Bob, for your appreciations now is the time for sharp scissors, tweesers, and all sorts of thread sizes. Ist quite a bit of fiddling to get the threads through the blocks sheave holes. I work with Polyester thread by which I can thin out the Ends by heating them over the gastourch. I decided to work with Hand scetches to have have the sail rigging Arrangement before my eyes, whereby the Details are from the books I mentioned earlier. (like done for the enclosed sample) This also helps to sort the blocks, determine their sizes, and the tackle types for those sails that are reefed to a certain grade from deck I shall be adding brail-lines and the appropriate belaying points Nils
-
I love that boat Bob, That dull black color is just right, looks great... Nils
-
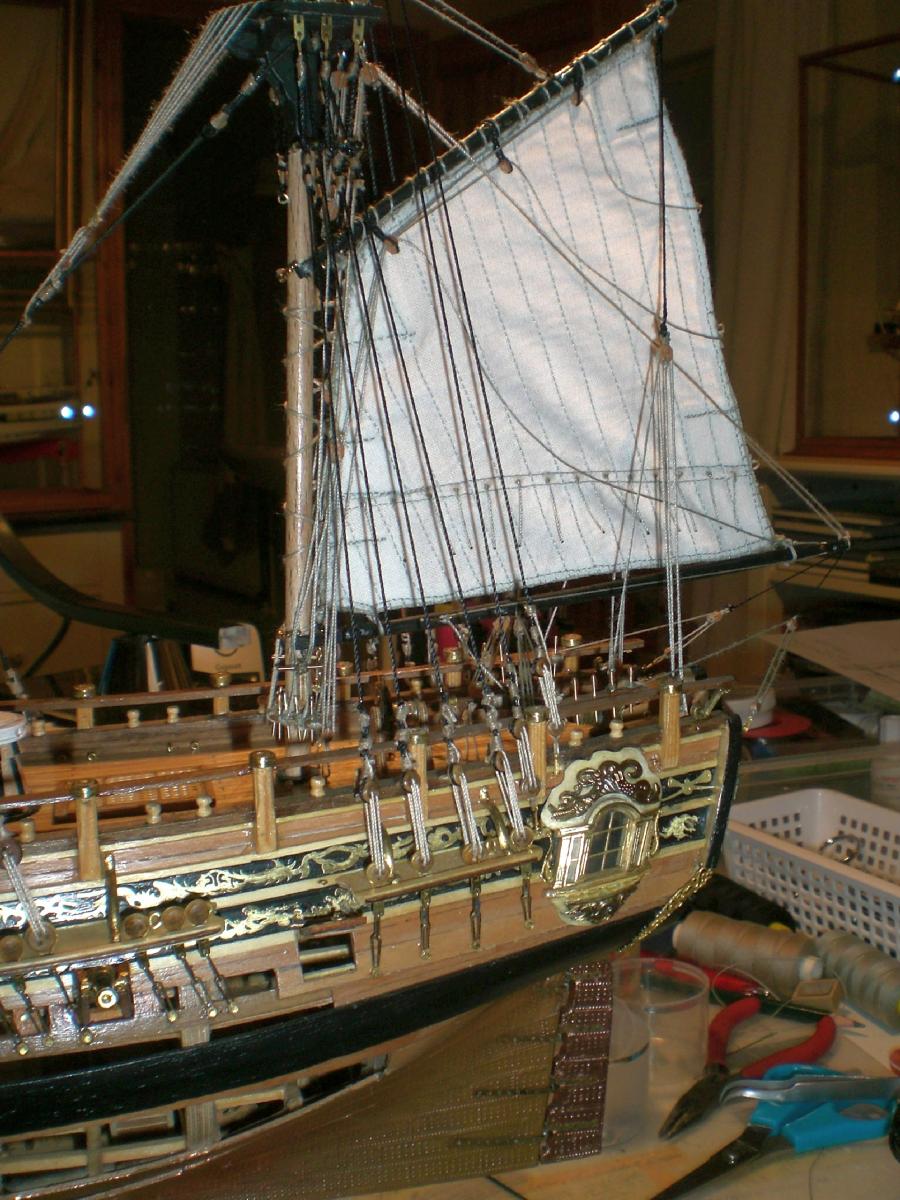
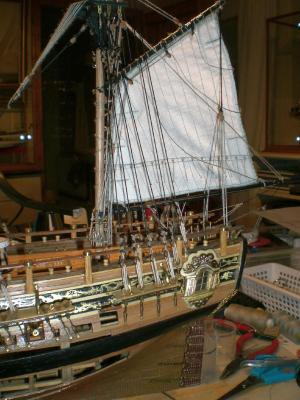
After receiving the ordered blocks out of Chucks store today I put on the first sail (spanker). Except for the in- and outhauler tackle and the ensign that should be complete now. There are some extra lines and belaying points for these at the base mizzen mast . Will rig the the ready stay sails next and their operating lines . leave away the ratlines and the last backstays and ensign until later the horizontal driver boom is about 3mm (scale 1:64) over the catains head / hat Build log part 68 to follow Nils
-
Hi Peter, beautiful work, that sprit netting Looks great, did you have to take the fore topsail stays off and install them new through the netting again ? or does the netting lay between those two topsail stays ? I just put on my first sail today (started with the spanker. I`m looking into your rigging now and then, this is being of help, and in combination with the plan and the two books I trust I`ll get along quite well. I intend to put on all the stay sails first and the square sails last Nils
- 431 replies
-
- 1
-

-
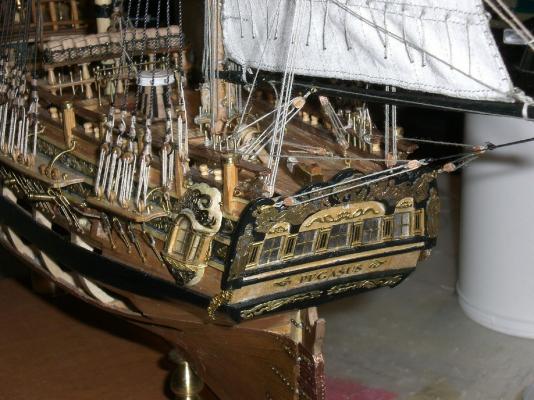
- pegasus
- victory models
- (and 1 more)
-
Thanks Geoff, in fact I had some orders for repairs already, trust it will stay within Limits..... Nils
-
Great looking furled Spanker Peter, also the hoisted ensign looks very nice (hangs naturaly) Nils
- 431 replies
-
- 1
-
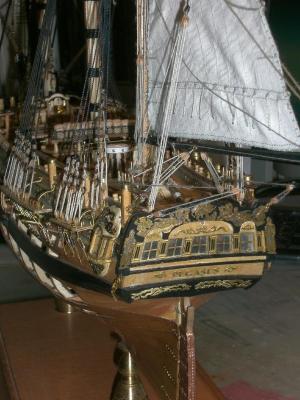
-
- pegasus
- victory models
- (and 1 more)
-
Gefeliciteerd Sjors ! What a lovely trio ( last pic of your post ), I love those vessels under sails, and the "San Ildefonso" as your flagship is a beautiful looking model you can be proud of.... Nils
- 1,873 replies
-
- 2
-
-
- occre
- san ildefonso
- (and 1 more)
-
Hi Peter, yes, thanks to your recomendation I followed, I have Lees book from a dutch antiquariate since a couple of weeks, and thats also where I read about the holes (spanker) arrangement for the head lacing to the gaff on page 155. I also have Lennarth Peterssons " Rigging Period Ship Models" , that publication is a great help for my rigging process and sail making I just wrote this by using "Google Chrome explorer" first time, and now at last I can answer by using the quote button again, Chrome also works for posting pictures and commenting them like it was before. Nils
- 431 replies
-
- 1
-
-
- pegasus
- victory models
- (and 1 more)
-
Congratulations to the Launch of your "Lettie" Bob, thats a wonderful schooner build and a pride in sails. It realy is looking for a Special place in your home. Very well done ! Nils
-
Hi Peter, that sprit-Yard rigging Looks great, also with the White wall as background Are you going to rig the sprit top sail Yard as well ? What was the reason you Chose to rig for a mizzen sail instead of a larger spanker sail with the Long Driver boom, like the Amati plan Shows ? I noted that you (in your scetch for the mizzen sail) arranged the lashing to the gaff boom, one per Cloth width, two per next Cloth, one per next Cloth, two.....etc..., I remember reading that somewhere but unfortunately I ca`nt remember where, but I think it is an nice authentic note Nils
-
Hi Mark, thanks for your appreciation, its nothing Special, but in the Moment its the best I could do in this 1:64 scale. You may be right with that "far off sail thinking Thing", but I lost my anxiety to "learn by doing" with my wifes sewing machine, when the tallship sails were sewn for scale 1:96 Nils
-
Hi Peter, thanks for your words, but there is still quite a lot of work with the sails, those cringles and the Multi rows of short reef strops are claiming their time. It realy is a pitty that with so many Swan Class builds here at NMSW there seems to be not a single one with full rigged sails, so it Looks like I will possibly "push out the boat" in scale 1:64 if it works out OK. There is an exception though, its the introduction of (non member) Tom Cummings well built "HMS Atalanta" in scale 1:48, by member Greg (dvm27) link, fully rigged with sails ! First model Swan Class vessel I ever saw rigged under full sails. Hopefuly Greg can persuade Tom to join in to the comunity Nils
-
Hi Peter, yes it as a bit quiet from your side and its nice that you`re back on stage. Welcome to the pensioneers Club, it must be wonderful to have time again for all that gives pleasure to life. I did`nt know that you were Pilot, must be a nice Profession. I have a question to you, probably may be able to answer Peter...... I`ve asked myself how the sprit-Yard, when the sail is pushed Forward by the wind, remains in that Position...., and for instance what lines or tackles are taking over the part to prevent the Yard from moving Forward ? The other way round there is a fine tackle with violin block from the sprit-cap to the Yard, can be seen well on your pic... Nils
-
Thanks very much Kees, a very smart way of producing the hull. I was just thinking and imagining of Popeye`s Holiday Harbor fleet following your idea and producing a whole Harbor full of fishing Trawlers. Please continue to share youre great modeling ideas I like so much. I asume you have some more surprizes "up the sleeve". A great enrichment for this Forum, Cheers Nils
- 205 replies
-
- 1
-
-
- kw49 antje
- trawler
- (and 1 more)
-
wonderful Jack ! a lovely boat and also superb taken Pictures...... congrats to this beautiful build Nils
-
Hi Kees, Thanks for sharing this.... thats a very short but not less impressive Video of the vacuum shaping of the styrene plate. What are you using as a heater in the heating box.... ? With what styrene thickness have you achieved this result ? Thats also a good Demonstrator to Keep in mind, in example for other vacuum molding objects Nils
- 205 replies
-
- 1
-
-
- kw49 antje
- trawler
- (and 1 more)
-
Ultra good work Danny ! its now the most interesting part for the final apearance of the shipmodel, the rigging and perhaps (the sails ?) Please would you kindly also Show some pics of a view into the hull outcuts from external view, as you have spent so much wonderful Fitting out on the internal decks and their Details. Your Vulture is such a delight to see in all stages of build Danny , you`re Setting the mark very high and I love it... Nils