HOLIDAY DONATION DRIVE - SUPPORT MSW - DO YOUR PART TO KEEP THIS GREAT FORUM GOING! (Only 13 donations so far - C'mon guys!)
×

ZyXuz
-
Posts
429 -
Joined
-
Last visited
Content Type
Profiles
Forums
Gallery
Events
Everything posted by ZyXuz
-
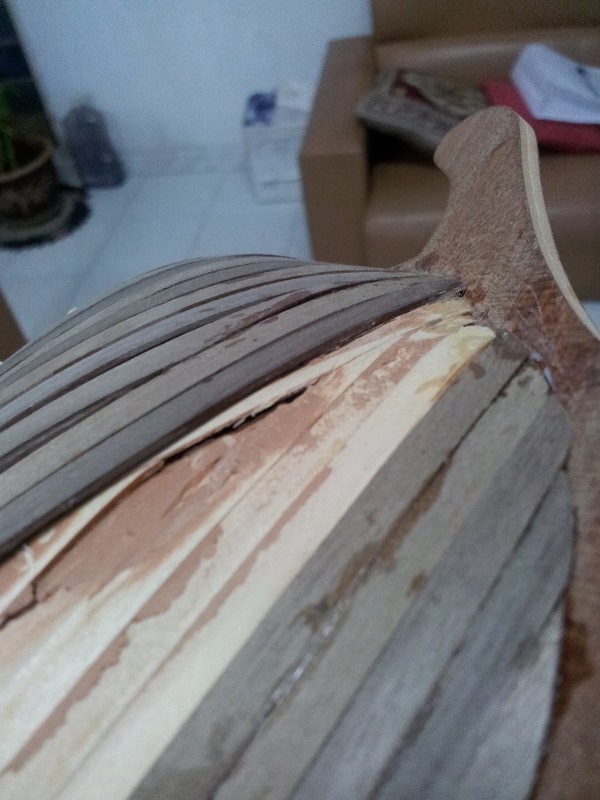
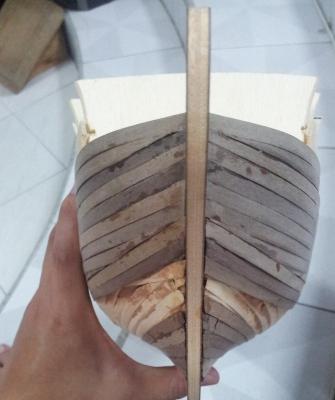
 Mike, Thanks for sharing your thoughts! I love the thick black wale of the Pegasus, might change my plan instead of using separate wales.. Just scan thru Victory models, and found that they can be good references. Anyway, here's a bad news of mine.. and I've no idea how did I make that kind of silly mistakes. I screwed up my hull planking and I think there's no coming back.. Here's some pictures of my planking... =.=" I think I did a lot better on my previous ship!! just awful 1st and 2nd planking are like done by different person! OMG from the first strip (1st layer) to the last strip laid (2nd layer) took me only 5 days... completely lost patient (still my greatest weakness) it's really a disgrace to waste all those nice pieces of woods! I was in a bad mood that time, should have occupied myself with other activities like sport instead of modelling... I think there's seriously no way back, besides to remove all, and rework.. I don't want to give her up I've already ran out of wood strips, not sure if you guys have any good suggestion? It will take few weeks to reach Malaysia, should have enough time to cool myself down... Hull planking for this ship is in 600mm.. I've tried CMB, they provide only 1000mm in length, and will cut into half for intl' shipping.. So, I think I'll need to find another company, like Lumberyard and hobbymill? Hope anyone here can help.. Thanks!
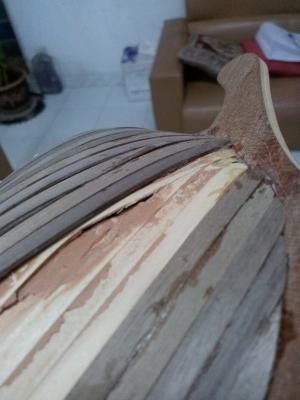
-
well done, Ian! Modification is always the fun and nervous part.. I agree with Ferit.. enjoying modelling is always the first! every second spent on the stove was well worth! I bet you will make another scratch build vent, and I'm looking forward on it :) I was planning to add a riding bit too.. mind to share the dimension?
-
oh, my second planking is walnut... mahogany will be used on deck planking.. seems like Corel have changed a lot. . Thanks for the info anyway
-
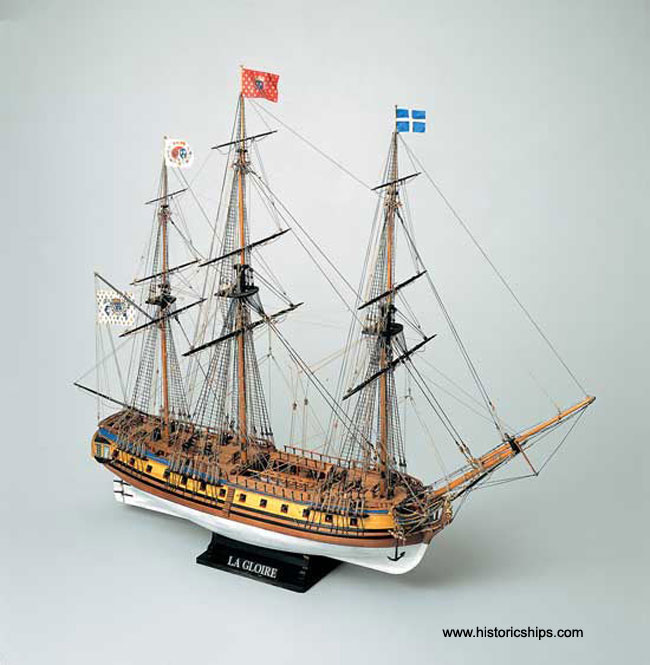
Colour Theme Selection I've been selecting colours for my ship since the ordering is placed, and till now, I've successfully narrowed them down to two final choices. Picture below shows how the original kit colour of the ship looks like (Sorry Ian... hope you don't mind the angle is actually perfect for me to make references before I start painting them ). Original kit instruction suggests a natural finished by using 3 different colours of woods: walnut, maple, and ebony. The original natural colour for the ship is actually nice already, but I really would like to put on the colours I want to my ship. So, the 2 pictures below show how I hope my ship looks like: 1st Version: Blue Strips + Yellow Gun port + Black Wales + White Waterline The gun port 'frame' will be coloured to red. And, compared to original colour, the yellow gun port area is actually widen. This is where the inspiration comes from La Gloire (so.. am I applying a French Ship colour to an English Ship?? ) And second version with red stripe on it. I'm still choosing between these 2.. I thought it'd be an easy modification until I learned that the width of the wood strips are actually different! The walnut strips are 5mm in width; while the maple and ebony strips are just 4mm in width! And even the thickness are different! Walnut strips are 1mm in thickness; while the other 0.6mm! So, if I'm going to make a smooth hull without sunken gunport, I'll need to use all walnut strips for the hull planking. It's certainly workable, but I might run out of wood strips. This is now what troubling me... Still a far way to go though, since I haven't started my first planking.. Anyway, I'm going off for a short vacation (4D3N) tomorrow to Sumatra, Indonesia.. with all my crazy friends :D It's gonna to be a fun trip! Thanks for viewing & hope you can help me selecting a colour theme! See you guys soon! (I got to start packing now!!! :P)

-
brilliant work Ian! it really looks great on the ship!
-
very good demonstration, Mike! Thanks for sharing it!
-
Ferit, Thanks! I actually worry every time I do a modification.. fear it might ruined the whole ship.. haha Anyway, so far so good.. jz minor ones.. Ian, Thanks for the notice! It's really safe making this kit parallel with you! Mike, Thanks for your kind words. You're too finishing your Badger soon.. really hope to see you join us by end of this year
-
Here comes a short update.. Ladder Making Ladder has to be done before the hull planking, so that it's easier for me to check whether the feet of the ladder 'landing' correctly from outboard. The kit provides the materials of the ladder, with pre-cut ladder slot for the steps. Anyway, they are not as good as expected. As you can see from the picture above, the slots of the ladders are not aligned. I've tried switching them, but still only a pair matches. For the 'surroundings' and steps, I used these: I made the wider strips inside the narrow ones, so that it acts like plug to the deck. After some measuring and checking, here's the result: It's a bit terrible, isn't it? lol Especially at lower right corner.. I remade one anyway. And then insert the steps into the slots.. steps are in 20mm length. Just glue them together and they're completed. View from this angle, the extended part can be seen clearer. It also helps covering the ugly plywood cross section. As seen from deck.. Picture below shows how I check the angle of the ladder from outboard. I haven't made the handrails of it, because the stanchions provided by the kit is way out of scale in their height. I might adjust the upper deck higher, or remake the stanchions. Thanks for viewing!
-
really neat works on the gratings..
-
good job on the cannons weathering! they turned out well
-
nice job on the launching way
-
OMG!! the blocks look almost like real ones!! well done!!!
-
Ferit, Thanks! The middle bulkhead now is just acting as a 'planks guider', I'm planning to trim it off after the hull planking is done. Anyway, by mentioning thinning it gave me another idea to add some fake frames on the cabin wall Ian, Thanks for precious info about the height of the quarter deck. You know what? I've just done the ladder yesterday, and was about to put the handrails (or stanchions) on.. and the stanchions are almost as tall as the quarter deck LOL! which is totally out of scale I'm now moving the deck up higher to the black dotted line showing on the bulkhead (very left side of the pic).. not sure is that also marked on your kit? If not, then I think Corel had concerned about this too I didn't even notice about this line until now : (since I always view my ship from the bow..) really thanks for pointing that out Thanks all for your comments and ideas!! They really help me on this ship before everything is glued on
-
Some works over the weekends... (late updates) Stern Modification Again, like what I did on my previous ship, I'm going to make a Captain's Cabin with furniture in it. But this time, I'm hoping to make the cabin able to be viewed from the skylight on poop deck. Picture above shows how the kit provided skylight looks like. I'm gonna extend it to the shots garland, making the skylight in long rectangular shape, so that there will be more angle to view the cabin from the deck. So, it will be around in such length: Hope you can see the marking... Another few modification to make are the bulkheads and keel that block the view to the cabin. Picture below shows how the overall modification roughly looks like: So, as you can see.. The blue box indicates where the cabin should take place; and the yellow line shows where the skylight roughly is; while the shaded red area will be the keel part and bulkhead (middle) to be cutoff. The 'stern block' that I'm holding is provided by the kit, and that will use to hold the last 2 bulkheads together. I started it with the keel... And then the bulkheads... With the whole upper piece cut off, the hull planks will no have guide from this bulkhead.. so, they will be on 'their own way' to the next (last) bulkhead. The little piece of board glued on will be the support of themselves. 'Stern block' glued in place... Bulkhead 17 glued on... There should be actually 'holes' for the windows on BH17, but I haven't cut them off because I still need to border of it to guide the hull planks. Finally, the whole piece is now in place... it's not accurately fit comparing to the kit's plan, slightly lower I think. Anyway, it shouldn't affect that much.. will just need to check from the stern whether the hull curve coming correctly. I've then sanded the keel a bit lower and added all these UGLY looking filler to it.. And then, a big checker carpet to cover them Hate the wrinkles Might change a new 'carpet' in the future. As long as the upper deck is not fitted on, it'll be still good to change. I really love the big space of the cabin. It really gives me a lot of space to design my furniture. Anyway, it's still a long time to go... I'll start them only when the hull planking is done. Comments and critics are welcomed
-
nice painting job!!
-
Congratulation on your accomplishment well done! and hope to see it soon in the gallery!
-
superb planking job! well done
-
Ian, oh ya.. how did I miss that point??! LOL I don't have to glue it on.. just make sure it fits first.. then, glue it on when hull planking is done! Thanks for the idea!! Ferit, Thanks! hope you enjoy it
-
Thanks for the link, Ian I was still searching for more references on making stair.. Dafi's method is certainly one good example to follow with
-
wow... well done on the pinnace! like what Alistair said.. nice job on the clinker effect
-
OMG! Brilliant carving works!!! I missed your build log for a while and then when I get back, all the carvings are already there I really love the carving at the bow this is really one masterpiece! well done!