
Check out our new MSW Sponsor Innocraftsman
×

ZyXuz
-
Posts
429 -
Joined
-
Last visited
Content Type
Profiles
Forums
Gallery
Events
Everything posted by ZyXuz
-
 Thanks Ian. Regarding the bits... yea, I've taken some ships as reference like Pandora, Diana, and Pegasus on those bits at the belfry area.. Corel one looks a bit rash on that part.. I'd most probably make them align to the belfry For the stern, I still haven't made a decision on what to fill in there, but my first thought was to add 2 more cannons. Anyway, if I do it so, that might affect the design of my stern galleries to fit in that 2 port holes. Is it the doorway u mean? it sounds like a good idea too, but that might need a lot of works Thanks for the tips on the beakhead. I think u done it well, Ian.. and I love the 'jaw-ed' rail at the top most. I really prefer the way u did compared to the Corel's plan which looks bit 'curly' for me. Thanks Mike!
 -
welcome back Nick... nice work on the filling blocks
-
HMS Peregrine is really a nice model to build, and she was among my wish list.. until I learned that its length is just 432mm according CMB website, which is so difficult for my big fat short fingers Anyway, you started it well and hope to see more from you soon
-
very nice work on the lid seizing beewax is certainly the best solution, hope you got them solve soon
-
Sorry to hear about your friend... The hull looks good to me, you've started it well
-
Thanks Anja and Mark Mark, No, I didn't... in fact, I just googled what a sanding sealer is.. LOL Learned a new thing today Anyway, the other colours worked well.. only the yellow bother me
-
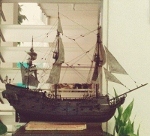
Hull Painting The whole painting process has been uncertain, and it ends up to a result not even close to my previous planning. After a real lot of times of painting and sanding and painting and sanding and painting and sanding, this is what I end up to.. An 1824 HMS Unicorn colour scheme. Comparing to the real ship.. which is quite close to USS Constitution and HMS Trincomalee also I always think that showing the natural wood colour will be best for this ship, but due to my hull planking mistakes I'll really need to use dark colour to cover those errors. Here shows the progress: Hull is painted to white as previously planned. Around 6-7 layers are applied. A thick black wale is added by using 4 x 4mm black wood strips, and the 'nose' is painted to black too. Anyway, when I wanted to paint the gun port area, the yellow paint that I bought couldn't paste on the wood equally, and caused all the clouds and prints all over the area. I sanded and repainted, but still return the same result. So, I thought of changing a colour scheme... I found that the 1846 HMS Unicorn would be nice to follow too, so I started to work it out on port side. I started by extending the wale area, so that it's touching the waterline; and narrowed the gun port area down to the height of gun port. Here's how it turned out. At this point, I still couldn't get a good mix of red ocher. Two-face I searched through my store room, and thank God there is still a unopened of red ocher paint in it I applied 2 layers on it. When I was think about what modification should I do to the bow, I found another inaccurate plan about this kit. The bow that showing on the box is different from the instruction plan. As you can see, there are actually 2 gun port lids instead of the ladders. I'm currently planning to follow this one. Anyway, after long hours and days of working on the colour scheme... I've finally done it. Although it's not the scheme that I want the most, but this is the best result I can get. I will continue on the beakhead and stern modification next. Thanks for viewing. ^^
-
impressive details!
-
very nice work on the spars, Gil
-
Dave, Very cool hobby room you have there! nice progress so far, keep up the good work
-
Nice work on the hull planking, David
-
Mike, Thanks for the good call.. again Really feeling great to have you working on this ship together, and Ian I opened up MSW in the morning, and then read your replies... OMG those links!!! They are all superb models! I can stare on 1 ship for like 10-15 minutes!! and I watched them all using my office hours! (yea.. I'm a bad employee ) Really thank you for sharing us the links, and they are certainly good references for my colour scheme Anyway, I think you posted the same link on some different ship models... I think they should be 4. Thames: http://collections.rmg.co.uk/collections/objects/66457.html 7. Minerva: http://collections.rmg.co.uk/collections/objects/66278.html 8. Diana: http://collections.rmg.co.uk/collections/objects/66303.html Ya, I can see the thick black wales in the plans wonder y Corel skip that part I actually bought a boat from CMB, but I'm not gonna just paint it and put on my ship.. instead I'll treat it as a 'mould', and build one from scratch Ian, haha.. modelling is now part of my life, I really have no idea what else to do besides that oh ya, maybe it's also because i'm still single so, I'm always free Anyway, I'm now pondering on the color scheme.. progress might go slow Thanks for the compliment I think many ships have their port surrounds painted to red Hope to see yours soon!
-
Hey Sam, Coppering was my first thought before the white hull, and then I gave it up due to the difficulty and long hour working of coppering.. Anyway, now it seems like a better idea than the white hull since the planking is not perfect now, I can treat coppering on this ship as a practice for my future build Really thank you for bringing this up.. I'll seriously put that into consideration Thanks!
-
Thanks Mike ah... this is what still pondering in my head.. Looking at those fine texture of the woods really make me to change my mind. But I haven't decided yet.. However, the white waterline I think is no matter how needed to cover the messy planking For models with white waterline which I can find in CMB, HMS Fly looks the best for me..
-
Hull Planking and Gun Port Making Well, after days and hours fixing the terrible planking.. I've finally done them... phew~~ (Thanks again Ian and Mike for your advises! If not, I might now still sitting at home waiting for the timbers.. or worse gave up) And thank God that the curve can still go correctly. This is how she looks like now. Still looking good from a distance, but if you watch it closer you can see a lot of flaws between planks. For smaller flaws, I used the method suggested by Ian, which is to fill them with saw dust and it works well!! (Thanks Ian!) Anyway, for larger ones (around 1mm) I think I might need to fix them by wood putty. I then continued to cutting off the gun ports. The gun port size is 10mm * 11mm, and I made a 'mold' out of plywood so that I can marked all of them in equal size on the hull. I done them in some hours, but the edges of the gun ports don't look smooth, even after sanding.. so, I decided to make gun port frames to cover them. I made a rectangular block which is 1mm smaller in both dimension than the gun port to help me produce the frames quicker. For the frames, I used 0.5mm * 3mm walnut strips. Since they are thin enough, I did not cut them into four pieces and glue them on, instead I just bend them. Gun ports in place and glued. And then I painted them to red with tape below to prevent unwanted paint to the hull. And then, finished them with 2nd planking. Those 'clouds' on the bow are caused by CA glue... I used it because it dries faster than wood glue, but the marks really screw up the ship's exterior. Another shot on starboard. Thanks for viewing!
-
nice work on the destruction Ian! And enjoy your trip
-
OMG! Those are amazing!!! I really love how you decorate the Cabin Even with Cello and foods!! Brilliant!
- 7 replies
-
- 1
-

-
- patric obrian
- jack aubrey
- (and 2 more)
-
You started it well, Nathan keep up the good work!
-
hi Joe, you started it well.. keep up the good work!
-
unboxing is always the happiest moment all the best on your build!
- 45 replies
-
- 1
-
-
- syren
- model shipways
- (and 1 more)
-
Landlubber Mike's technique for furled sails
ZyXuz replied to Landlubber Mike's topic in Masting, rigging and sails
good to see you sharing here, Mike -
wow! the barrel is just amazing!! great job!
- 803 replies
-
- 3
-
-
- colonial cutter
- modellers shipyard
- (and 1 more)
-
nice work on the boats, Danny
-
Gabe, I really enjoy reading your build log, and you made her a nice model now! keep up the good work! and hope to see more updates from you soon!
-
Thanks Mike and Ian for your advises.. I almost placed an order of timbers which cost around £30, and then I read your replies... really appreciate the quick respond. My problem was that I've forced the strips to bend too much and cause it impossible to put the next strip on in whole piece. Well, I don't know why I didn't come up with this simple solution which is to cut the rest into shorter length.. It seems very workable now, but need more patient than doing 'normal' planking. A lot of tapering works needed.. will start working over when I have a good mood. Mike, Thanks for reminding me on the beakhead area It really helps covering a lot, and the wales too! for the area below the waterline, I think a thick white painting is unavoidable now. It has to be so thick that the strip borders couldn't be seen. I remember Dubz did the same for his Syren on the wale area (well, of course he didn't do that to cover his superb planking job ): I really like how he finished his painting, just brilliant! I've also just noticed that most of the Victory models have the upper stem painted to black, which is quite a good idea to cover the plywood structure. I'm not quite sure whether my color theme fits the black upper stem, but I think it's good to find a way to cover it, either painting or wood strip Ian, Thanks for the idea on the sawdust! I'll try work it out this few days. Anyway, I'll need to fix the planking first and 'switching tasks' sounds good too! so I won't easily get bored doing same work for a long time I might now consider switching my annoying job too! haha