


BANYAN
-
Posts
5,540 -
Joined
-
Last visited
Content Type
Profiles
Forums
Gallery
Events
Everything posted by BANYAN
-
 Hi Adrieke, good luck with your build. Great to see that you have spotted the errors and have a chance to correct these before you assemble the skeleton. You have identified the slot in bulkhead 5 - what is the error there - is it that it doesn't align with the top (flat) of the spine at that fitting point? Mine (the flat) was actually a little high and simply had to e sanded down. Also is this a 1:80 (as stated in your title)? That will make some of the scaleconversions for some of your fittings quite interesting Look forward to seeing her come to life. cheers Pat
 -
Good luck with getting the Admiral's OK Mike - now, I just gotta put some more pressure on getting the OK for the fridge Hopefully you will find what you need down at DCC cheers Pat
-
Byrnes table saw accessories
BANYAN replied to Neill's topic in Modeling tools and Workshop Equipment
Hi Neill, My thoughts align with Rusty. I bought the micrometer stop but rarely use it (Eric has obviously found a good use, I haven't for the cutting methods I use), and I use my Byrnes sander to create bevel angles so the angle table is simply a "nice to have" for me. I have several blades with different kerfs (to assist in cutting grating stock etc) with a zero-tollerance insert for each. You can make up your own from wood - but Jim's are purpose made, fit properly and are relatively cheap. Due to the distance, I have also invested in a spare belt (not needed yet) so that should I need it, there is no delay in shipping time cheers Pat -
Hi John, in his tables (first column - description) he uses these terms. I don't have a copy with me so will respond later when I can scan ad show). For some he uses the term Cabled (I think for preventer) and for other Cable laid (shroud?) This may be the other way around so I will need to check to be specific. cheers Pat
-
Could I please seek the opinion of the more experienced members in determining the diffence between the terms Cable laid and cabled used by Steel in his tables. When refering to some ropes he states "cabled" while for others he states "Cable Laid". Initially I assumed it was the same thing stated differently; but why, within the same table would he do so - there had to be a specific purpose ot reason for using the different terms? Many thanks Pat
-
Plain laid ropes from 0,2 mm up to cable laid ropes 2 mm
BANYAN replied to dafi's topic in Masting, rigging and sails
Very nice scale-rope wrk Daniel; and very timely for my build also - Thanks. cheers Pat -
Hi Paul, my apologies mate, I had not noticed the rebirth of your excellent log before this. I will now be following along in your wake again as this wonderful model progresses. i do hope you will reshow how you achieved some of the great detail you achieved on the radar installations? cheers Pat
-
Hi Alex; Now that is a very clever idea about the angled pin part - thank you for sharing. cheers Pat
-
And the lady shows her lines Great to see these pics again Gary; thanks for taking the time to repost them. cheers Pat
-
Take your time with the reposting Ed; although I can understand your need to finish and progress. It has been very beneficial rereading your posts on this second iteration, as there is so much useful information that I have missed or forgotten from the first time around. Many thanks for perservering with this. cheers Pat
-
Dust collecting on Byrnes Machines
BANYAN replied to stantona's topic in Modeling tools and Workshop Equipment
Just luck of the draw I suppose but the standard flexible vacuum hose (shopvac machines) fits neatly into the ID of the Byrnes machine here (no adaptors needed). Whereas we pay (very high) transport costs to get Jim's machines here, I suppose this is a small off-set saving - the eternal optimist... cheers Pat -
ancre LE BONHOMME RICHARD by Jeronimo - FINISHED
BANYAN replied to Jeronimo's topic in - Build logs for subjects built 1751 - 1800
No matter what your profession Karl, that is some seriously good and expertly finshed detailing. The furniture itself would make some very good models in their own right. IMPRESSIVE! cheers Pat- 662 replies
-
- 3
-

-
- bonhomme richard
- frigate
- (and 1 more)
-
Almost there Popeye - the paint job is very 'neat'! WRT the Aztec airbrush, does it take the interchangable tips/nozzles? if so, there is one for doing fine lines (can't remember the colour code for it off the top of my head - sorry) cheers Pat
-
Mark, in addition to your comments, I think most examples highlighted are the owner's own photograph of the box /graphic etc rather than a direct lift of a graphic; which is then the copyright? We are also non-profit so there is no commercial gain .... I am no lawyer but I think these companies would see this as a cheap way of advertising? cheers Pat
-
Thanks for looking in Dave, and well spotted. Nope I have erred and only realised it too late. This is my first major build (and these masts are from scrtatch) and I have a lot to learn yet I have ben telling myself that this is ok, but one of these days soon I will get the urge to remake them as while everything else is OK, the alignment of the sheaves in my masts is incorrect. cheers Pat
-
Don't under-estimate what you are doing mate; very nice work and a very interesting log. cheers Pat
-
ancre LE BONHOMME RICHARD by Jeronimo - FINISHED
BANYAN replied to Jeronimo's topic in - Build logs for subjects built 1751 - 1800
Even better viewing the second time around - very impressive workanship Karl. I look forward to your further installments. cheers Pat- 662 replies
-
- 1
-
-
- bonhomme richard
- frigate
- (and 1 more)
-
Thanks John, appreciate the offer. I would be most interested in the deatils of the fitting on each of the lower masts, and the quarterdeck bulwarks (inner details) especially cleats and the like. The AOTS and the replica are similar in many respects, but the replica appears to make use of many more cleats on the masts and bulwarks (in lieu of belaying pins for the latter). For example, the AOTS does not show as many cleats on the lower main mast as is evidident in a phopto of the replica I have from a few years back. It is the only photo of that sort of detail I have, so your offer would be greatly appreciated. cheers Pat
-
Great to see her again Rusty; a very nice build. This will make a very beautful display model. cheers Pat
-
Thanks John, nearly missed the 'double intende' - can only go upwards now Biggest issue I am having at the moment is determining what fittings/furniture to attach to the lower masts - the AOTS, kit plans and replica differ so much cheers Pat
-
coloring handmade rigging line
BANYAN replied to davec's topic in Rope Making/Ropewalks's Discussions about Rope Making
.........and it will only cost you a very small fee Brian - you know, knock with your elbows cheers Pat -
coloring handmade rigging line
BANYAN replied to davec's topic in Rope Making/Ropewalks's Discussions about Rope Making
Thanks Chuck, will have to look into that. Sorry to trouble you with a further question, but could you please explain the mixture and method of dying you use (if it's not giving away a trade secret ). Do you use it straight out of the can, dilute it etc to ensure the tack-free uniform finish; and do you simply soak it in the solution and let it hang to dry. This is a great finish and I would really like to try and replicate it if I can find it, or something of the same type over here. cheers Pat -
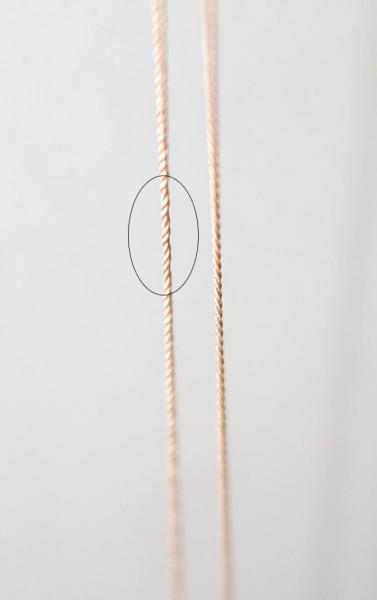
Here you go Jim, a first up photo of LH vs RH rope made on your machine. The LH laid rope is shown on the right. Ther RH laid is formed from RH stock as I have not made up sufficient small stuff yet - just seeing if I could short-cut the process; but, it looks like I have to make up the smaller stock in LH first. I need to get a macro lens for this type of photo I think - this photo is taken at short notice and really does not 'cut the mustard' so to speak - sorry for the poor quality. Only a bit of each scale rope is in focus, but it shows the uneven lay of the strands in the RH laid rope (to the left) within the circled area. cheers Pat
-
Hi again folks, another small update. I have started to dry assemble the mast components to check for fit, alignment etc. The following photo shows the start of the Fore Mast. Thanks for looking in Dave and for your most kind comments - still learning quite a bit as I progress

- 517 replies
-
- 2
-
-
- Endeavour
- Artesania Latina
- (and 1 more)
-
Hi Jim, have taken a photo and sent it to you, will repost on here when I am home (site was down yesterday and didn't have a chance to post it online). From what I have achieved so far, LH makes up nicely; still having some problems with RH. I should be more specific in that I am attempting to make RH from RH stocvk thread without going throught the interim process of making LH first - call me lazy! If anyone finds a stockist of LH threads please give a holler (as I asked first..... ) cheers Pat

