BANYAN
-
Posts
5,951 -
Joined
-
Last visited
Content Type
Profiles
Forums
Gallery
Events
Everything posted by BANYAN
-
 Hi Ulisis, seems like you have got a solution. My approach would have been to make a jig that represented the finished planking thickness (plus a smidge) with a square hole the size of the ports. Place the jig over the ports as they are now up against the framing and sand the metal ports down to approximate depth based on the jig. After planking and fitting the barrels there wouldn't be much sanding involved to fair the planks and ports which should minimise the risk of damage to the cannon? Just one approach - many other Looking good BTW cheers Pat
- 786 replies
-
- 2
-

-
- Royal Louis
- Finished
- (and 1 more)
-
Sounds like you have it well in hand mate; I'll follow along with great interest. cheers Pat
-
HMB Endeavour by mikec - Eaglemoss
BANYAN replied to mikec's topic in - Kit build logs for subjects built from 1751 - 1800
Hi Mike, I don't know how I missed this. Started likes only to realise I was right at the start - so jumped to the end. That is a very nice build mate and looks great in the photoshop you have done - jest need to had some photoshoped figures and you'd swear it was the real thing cheers Pat -
She looks real good Ulisis; coming along very nicely. Will you be painting these red before applying the planking?
-
Sorry Mike, my poor word use. I intended open as in a hole in the middle vice three lead (small holes). The Marquardt AOTS shows the heart as closed (as in a fully enclosed with single large aperture or 0 as you have asked). I hope this clarifies the issue? cheers Pat
-
Hi Mike, page 100 of the AOTS shows the bobstay collar (item 8 of drawing H3/3 and also drawn separately on the same page) and other collars as open hearts. I would assume as that the Fore stay (item 2 of drawing H3/2), and fore preventer (item 1 of drawing H3/2) collars would also be open based on this. cheers Pat
-
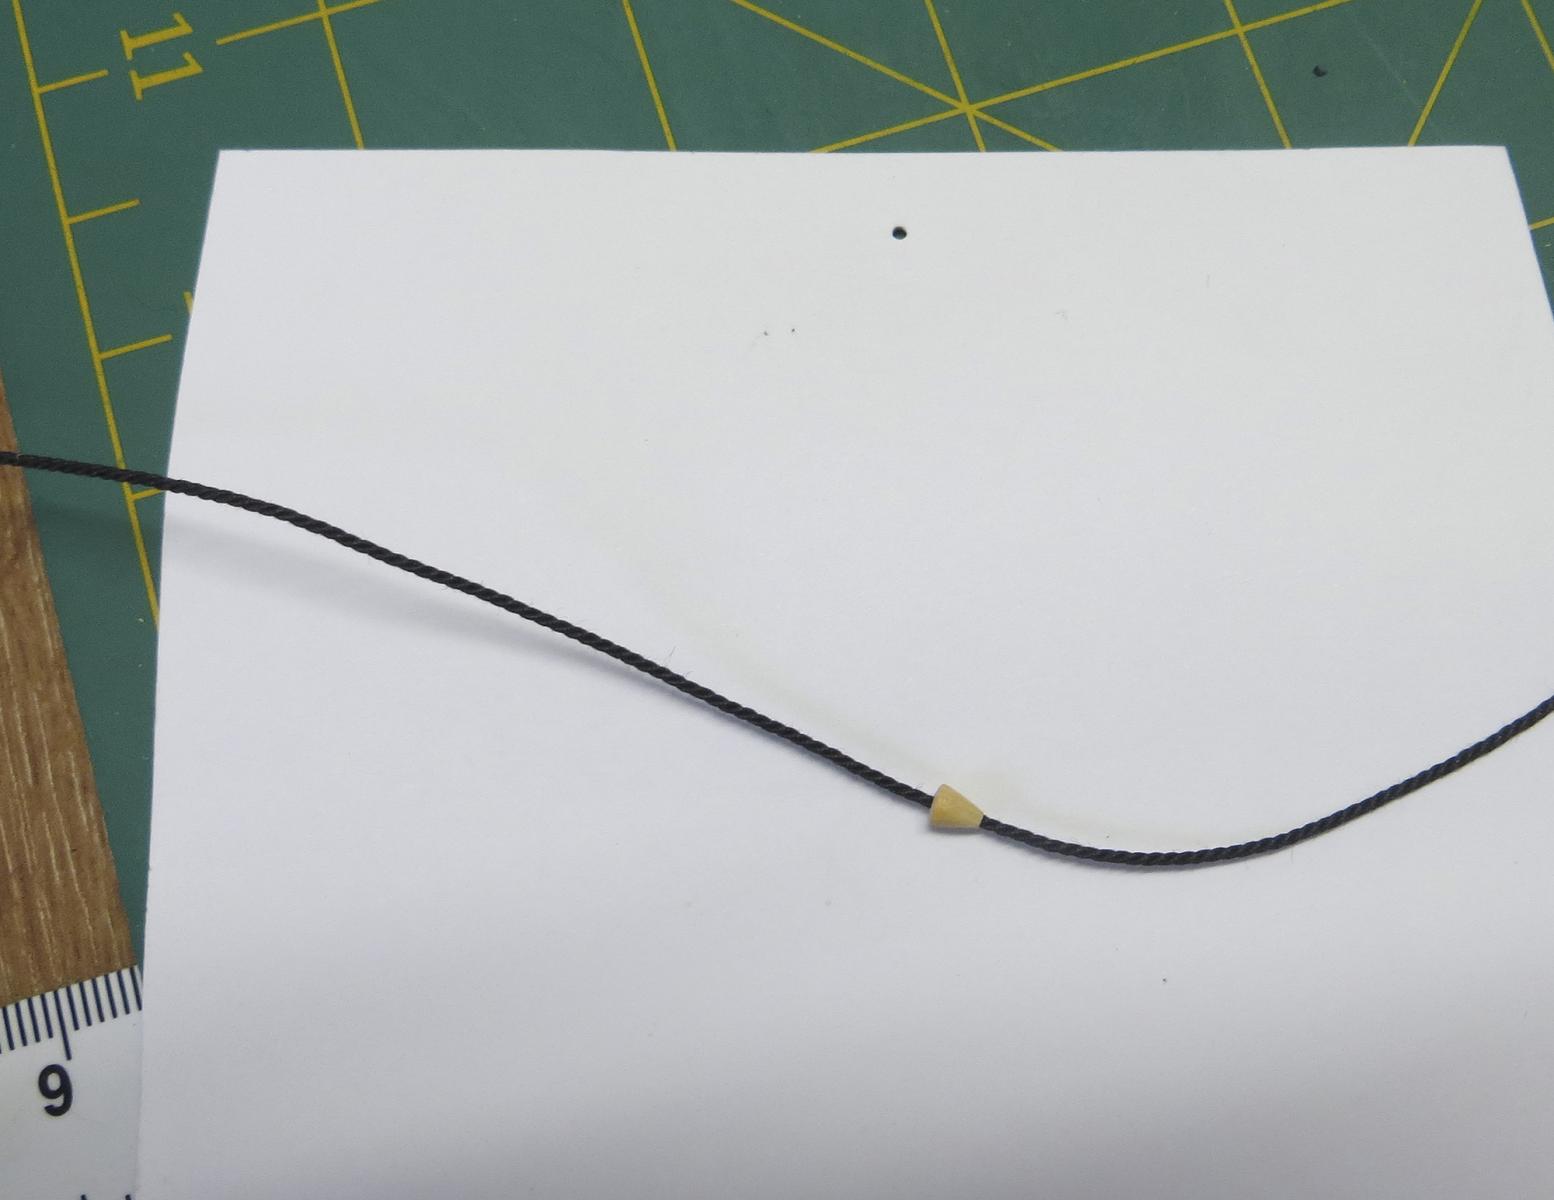
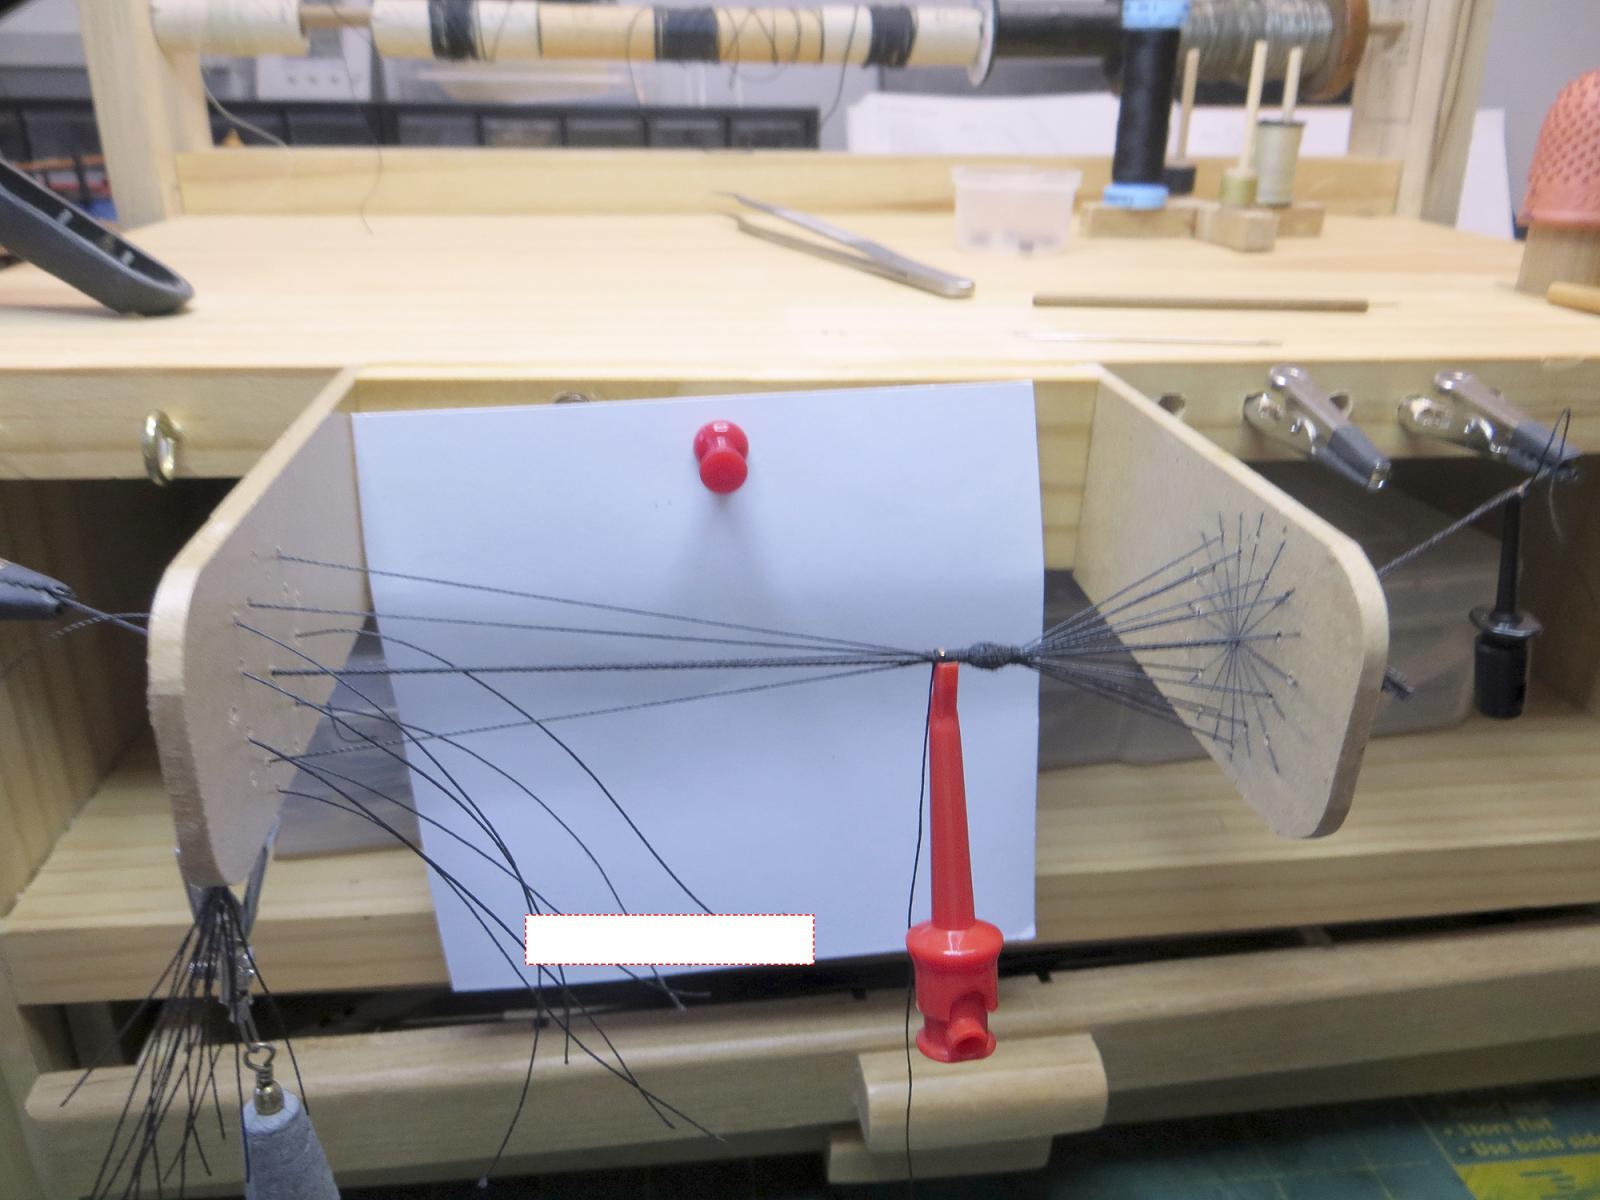
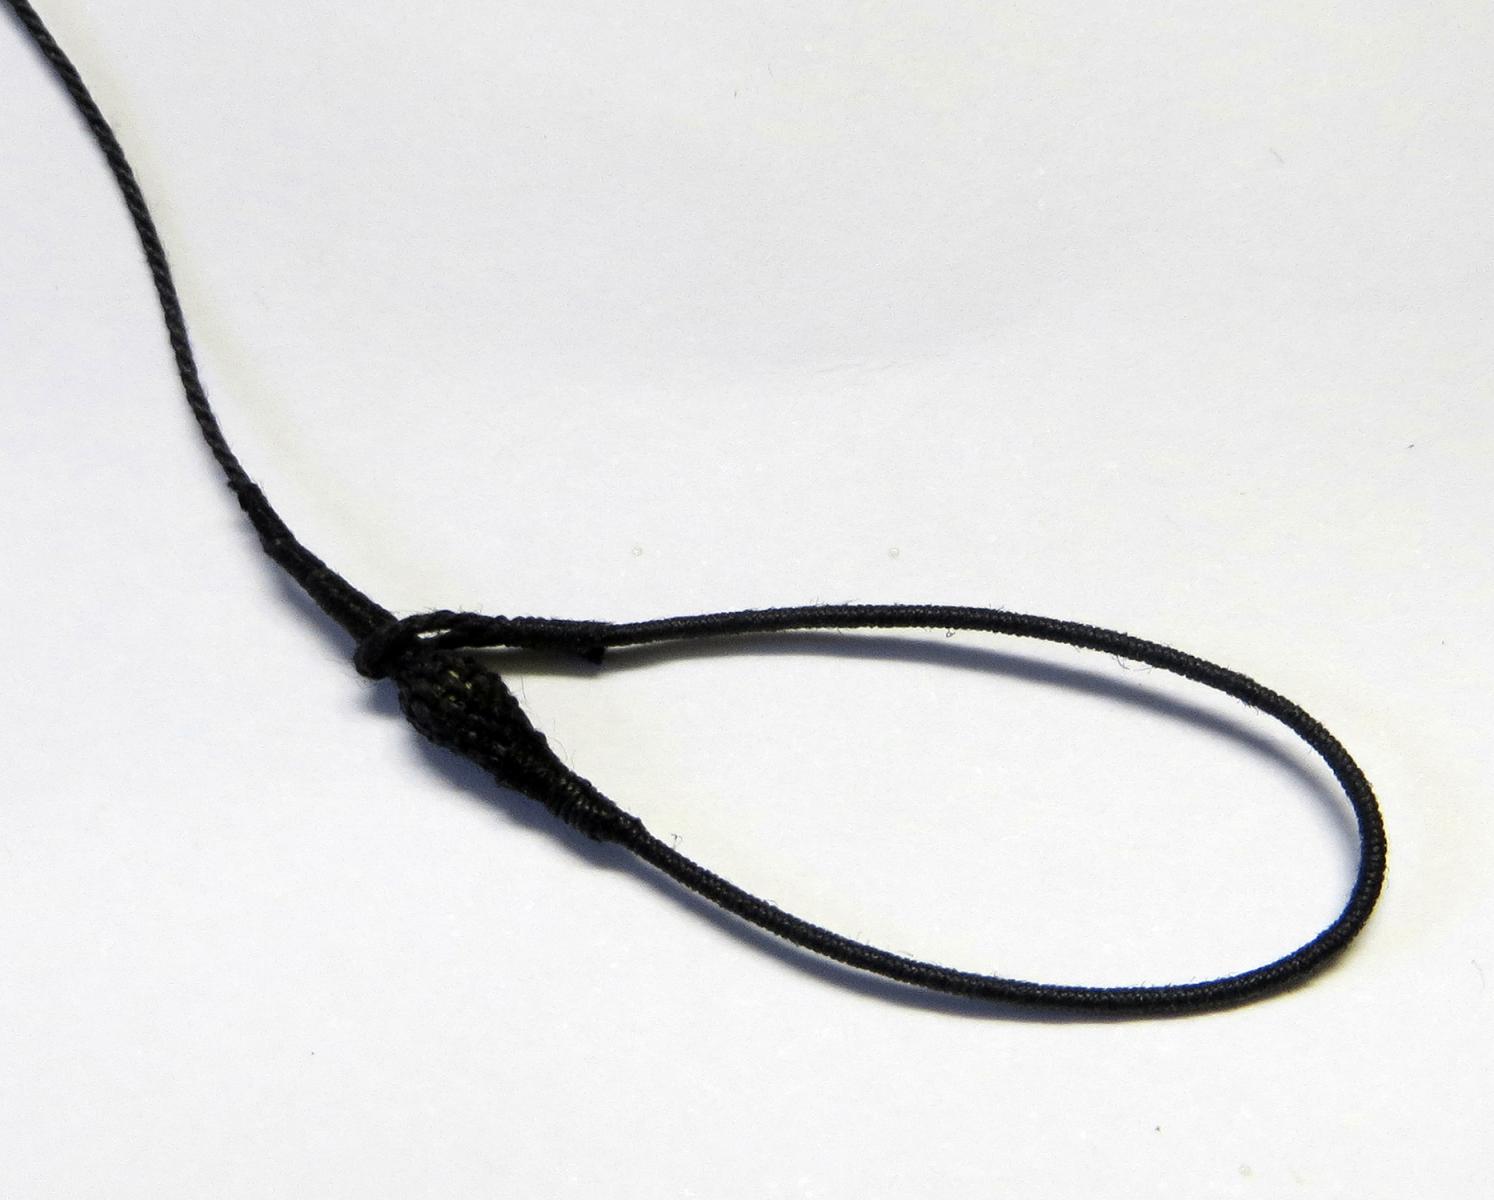
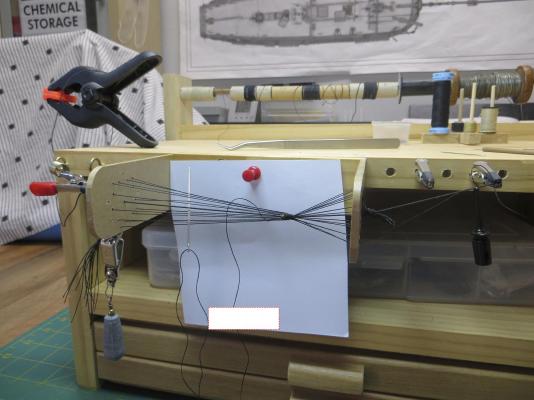
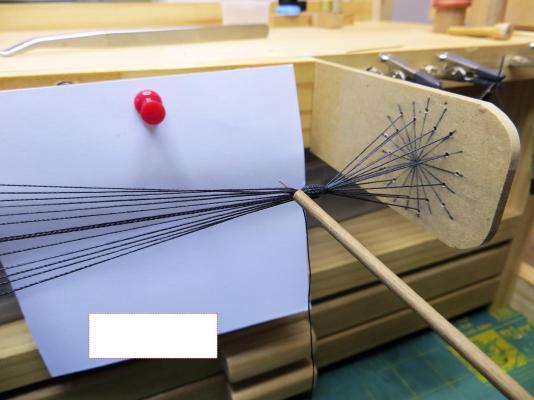
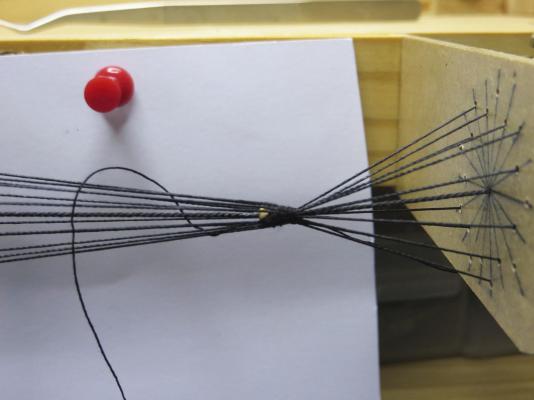
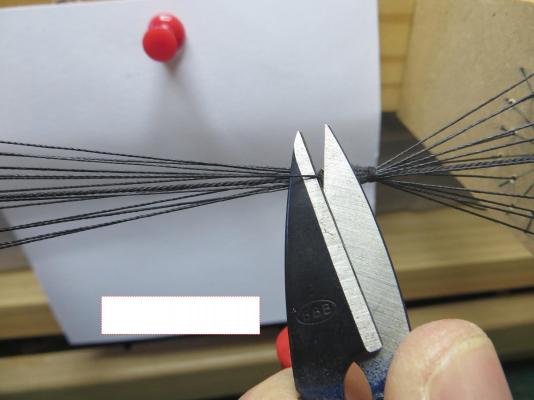
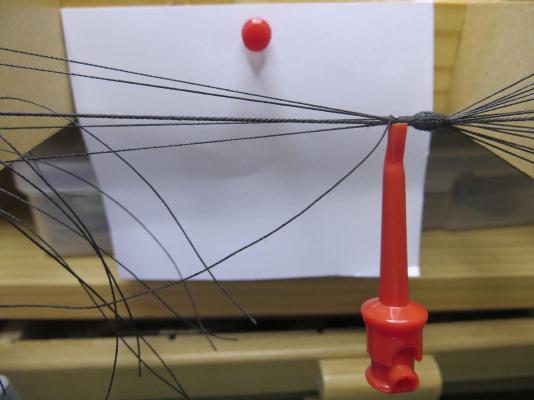
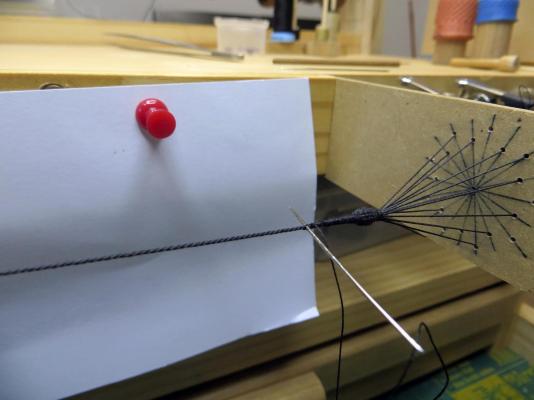
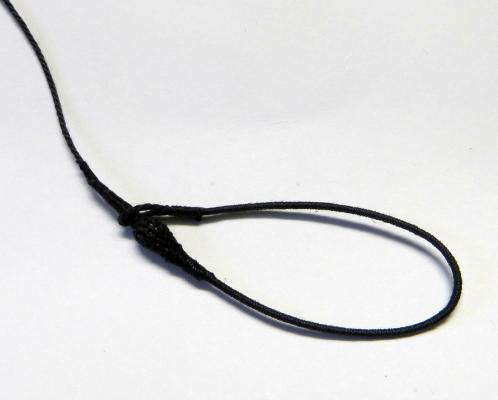
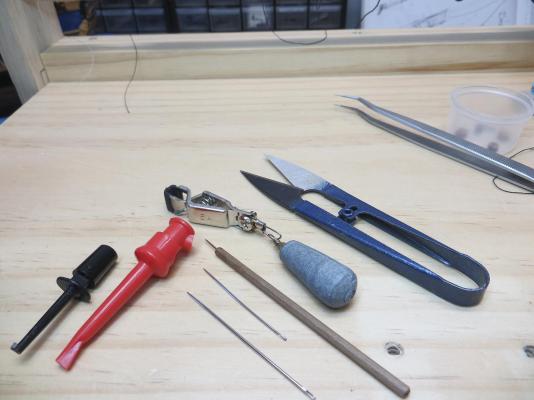
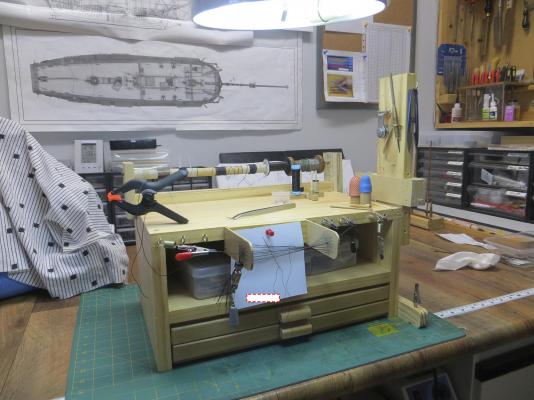
Hi folks, I think I have finally settled on a method and technique that works for weaving the mouse for my HMB Endeavour (1:60). The following sequence of photos shows the rigging station I use, the jig itself and the various stages of the weave process. The finished product still has to have the furries removed and I still need some further practice to ensure the weave is uniformly formed on both sides of the cone. I use a couple of electronics wire clamps for temporary holders and a couple of needles for the rigging and weaving. I have found that using 13 strands of 0.25mm thread (horizontal threads) provides the best effect at this scale, while 19 (with larger thread) would be better at 1:48 etc. An odd number is required to keep the under/over sequence going. I start by positioning the former (turned on the lathe) on the rope (Stay in this instance - therefore LH laid and 1.0mm at this scale) and holding it with the alligator clamps (shrink wrap on the teeth to protect the rope). The alligator clamps/clips are fitted to springs to create a 'bowser' to I don't over tension and damage the rope. I hold the former in place with a dab of glue then I use the needle to pierce the rope as close as possible to the former (thin end of cone) and feed the weaving thread though the rope twice to anchor the weaving thread leaving a tail of sufficient length to serve the combined/bunched horizontal threads back a sufficient distance down the served rope - the long end of this thread is used to weave between the horizontal threads. I then tie a knot in the combined horizontal threads (13) at one end and then feed them individually through the holes in the jig in the sequence of 3 a space, 3 a space etc. When complete I recombine the threads at the other end and put some CA on that to hold them together and the use a fishing sinker on a swivel as a weight to keep some tension - not too tight as you need to pull the threads together. I then start to weave doing about three or four complete circuits of the weave each time using the needle. I found that weaving with the needle coming towards me such that I work from the bottom up and behind the rope (stay) worked best for me as a right hander. I kept losing track of the under/over sequence trying to work downwards behind the stay but experiment to see what works for you. After each group of three or four turns, I tension the them individually using a pin in a dowel to push the threads back (similar to how a loom would push each row of knotting/weaving) and to pull the threads to tighten the turn. When I have completed the weaving turns I use the finer needle to again take two passed through the rope (stay as close to the wider end of the former that I can, ensuring to tension the thread (careful not to break the thread) after the first pass and using the second to lock it. I then start the reduction process thinning by a third, then a half etc) and serving with the long end of the weaving thread over the reduced threads and using the electronics wire grips/clamps to temporarily hold the thread as necessary. I again finish passing the long thread through the rope/stay using the finer needle to finish the serve. I then finish thinning and serving the other end the same way. The weave (very close) up will have some 'furries' which I get rid of later. I now using my serving machine to finish serving the loop/strop (short end) of the rope finishing the serve at the appropriate place to form the eye and leave enough serving thread (having secured with the needle the same way) to use as the serving/whipping on the eye's end. Trim and clean up the finished product. I hope this explanation and the photos adequately show the technique but please fire away with any questions or suggestions/improvements to my jig or technique. cheers Pat


- 16 replies
-
- 36
-
-
HI Salvatore, thanks for showing us that little gem - but now you have whetted all our appetites That is just the scale I am working in. As Guy has alluded to, is there any chance that these photo etch drawings, or a photo etch kit might be made available by your fellow modelling friend? If the drawing would be handy to purchase as I have a local photo etch place I can use. regards Pat
-
I got mine a couple of days ago; a vast improvement on trying to read Steel etc - Well done Allan (and those who helped). This will make a very useful addition to the library. cheers Pat
-
what is the ideal modelling table?
BANYAN replied to AON's topic in Modeling tools and Workshop Equipment
That's looking top-notch Alan; a very versatile work platform that could also be utilised as a drafting table with a clip on extension for larger drawings/plans cheers Pat -
Hi Danny, I have a similar set-up for bench-top tools and about to undertake an upgrade suggested by a club member. Not a biggie as you say but could be useful in circumstances where you are using several tools together (saw/sander/thicknesser perhaps). He purchased some kits from a vacuum spare parts shop (for wall access of centrally plumbed vacuum systems) that auto-starts the vac as soon as you plug the hose into the tool. Just a further consideration of you think it helpful. cheers Pat
-
Hi Ulisis, that is taking shape nicely - these hidden fillers don't have to be neat just serve a purpose; the shaping is the more important. You are probably aware (but just in case) that balsa is very porous and as a gluing surface for planking can be problematic. The solution I was made aware of (I use balsa fillers also) is to coat the balsa with a diluted PVA / water solution to seal it but retain a good adhesive surface - I used 50/50 but this may not be the optimum. cheers Pat
- 786 replies
-
- 4
-
-
- Royal Louis
- Finished
- (and 1 more)
-
Hi Mike, I made a rough bending jig from scrap wood with rounded guides placed where required - the gentler the curve of the 'round' the better - which I simply clamp to my workbench or place in a large vise. I then soaked the wood in boiling water for about 20 minutes and then used thin clear rubber hose (fish tank type) off-cuts which I sliced in half longitudinally to place over the dowel where the holding 'bits and bobs' would be to minimise any wood bruising/marking. I had to repeat this about 3 times to get the bend. I will try to take a photo of the jig etc tomorrow when I get home from work. I use a cheap single burner camp stove (butane can) burner with an old dish shaped pan (pinched from the Admirals stock - shhh! - well she did get a new one out of it ) I am not sure which woods are available to you but I have used walnut ( a beast to bend but you do get there ) and Huon Pine - I use the latter exclusively for my masts now - a tad softer than hardwoods but more dense then most pines and a joy to 'work'. For harder woods I found the longer the tapered dowel the easier to bend (but there is a limit before it becomes prone to snapping - trial and error I am afraid) and I could afford to slightly damage the very ends with greater pressure if require (cut off later) - the greater length is the trick I find (but it has to be pre-tapered) and I have been able to bend dowels up to 18mm max diameter of taper) successfully without resorting to undercutting, grooving or crushing the wood etc One thing though, and apologies if this is telling you how to suck eggs. I found that it is better to not try to fully shape the jib boom/sprit. I tapered it then bent it, then cut it to length and shaped the joints with the deck and for the bees etc. I tried it the other way (doing all the shaping first but just could not accurately predict the overall length, joint angles etc before the bend was applied. cheers and good luck Pat
- 517 replies
-
- 1
-
-
- Endeavour
- Artesania Latina
- (and 1 more)
-
what is the ideal modelling table?
BANYAN replied to AON's topic in Modeling tools and Workshop Equipment
That's an impressive table Alan, I look forward to seeing the completed version - gives me some food for thought cheers Pat -
Great job Ollie, always nice to see the final product as it gives you a real sense of achievement. I look forward to seeing the job you do on the Endeavour! cheers Pat
- 803 replies
-
- 2
-
-
- colonial cutter
- modellers shipyard
- (and 1 more)
-
Just ordered my copy and looking forward to getting it in my hands. Great effort in compiling this Allan, it will be much easier to use and more comprehensive than your source materials. cheers Pat
-
A good pick-up there Ollie - as you say it suits the model. cheers Pat
- 803 replies
-
- 2
-
-
- colonial cutter
- modellers shipyard
- (and 1 more)
-
Very nice lines for a fine lady, even without the meat on her 'bones' - nice work John, this will make into a very nice model. cheers Pat
-
That all came together very nicely Piet and makes a very fine enhancement to the presentation of the model - BZ and three loud Huzzahs! cheers Pat
-
I am Considering a Plastic Build and Need Advice
BANYAN replied to BANYAN's topic in Plastic model kits
Hi folks, and very many thanks for the very useful feedback. Based on Nigel's advice I will let his kit go through to the keeper - I'm glad I asked Nothing wrong with plastic at all I must agree as it offers some great detail especially for the 'steel navy' ships. Chris, many thanks for the pointer to card - I will follow that option up. Thanks again to all cheers Pat -
Hi all, I am a wood modeller but built plastic aircraft and a couple of ships in my youth. I have an opportunity to purchase a ARII Yamamoto 1:250 kit at a reasonable price (second hand but still in box and plastic sealed bags) and am sorely tempted to build this little monster (41") . if I go this path though I would like to fully detail it. I have found that GMM do a photo-etch kit for this ship at 1:250 but I have not been able to find a wood decking kit for this scale (unless I missed it at ArtWox, White Ensign etc). I would also like to upgrade the guns (barrels at least) to brass and pther potential enhancements (yet to decide to build as designed or in final sortie configuration with all the AA guns). I have also heard that Pontos (Korean company) does some really good PE but have been unable to find a 1:250 for Yamamoto so far. I would very much like to establish what accessories and detail upgrade kits are available for this kit before committing - any feedback and advice would be greatly appreciated. cheers Pat
-
Hi all; Greg, Jeff et al - I have the utmost respect for people running small business; especially those catering for specific needs. However, as an International purchaser of many bits and pieces I have come to the point where "No PayPal - No Purchase". This is a result of the security issues surrounding hacking etc so I will no longer use a CC payment as you never know who is retaining/not retaining CC details on their servers (secure or not). I am not saying that PayPal will never be hacked (let's hope it never is though), but it is easier to fix passwords etc in one place only. The hoops to jump through and additional costs arising to the buyer in trying to sort out cheques and bank transfers etc usually far exceed the costs of PayPal to the Trader and I for one, am more than happy to accept the additional/added fees for PayPal convenience added to an order than try and do it any other way. Just for consideration cheers Pat Edit: When purchasing I usually prefer to buy (and pay) for a quality product rather than the cheapest - adding PayPal etc handling charges is but a very minor consideration (from my point of view).
-
Love this sort of detail Piet - she will be a very interesting model to view when completed. cheers Pat