BANYAN
-
Posts
5,965 -
Joined
-
Last visited
Content Type
Profiles
Forums
Gallery
Events
Everything posted by BANYAN
-
 Those 'repairs' are looking good Steven; lovely progress. cheers Pat
- 740 replies
-
- 1
-

-
- Tudor
- restoration
- (and 4 more)
-
No probs Pat. the replica is somewhat different in some areas as they had to make some compromises to register/accredit the ship to carry passengers. this has resulted in a slightly longer ship, and some minor changes to the 'tops' to accommodate the rader and machinery etc. cheers Pat
-
Sorry Vossie, you need to get used to us Aussies - our typical response to being asked 'how are you', is "not half bad mate" - so 'pretty good' is a 'real compliment' - Glad I didn't say 'That's not bad mate' - I may have been run out of town cheers Pat
- 714 replies
-
- 6
-
-
- lady nelson
- victory models
- (and 1 more)
-
Hi Pat, thought I would check in and see how you are progressing. Nice build; the hull looks very nicely faired with a great finish to the planking. If you have any questions just holler (I'm just across the ditch ) For some alternate build/finish options check out the builds by Dave Rowe, Dashi and Shipaholic also. cheers Pat
-
Thanks Pat, much appreciate your kind words. I am happy to hear that you have found the build log useful. cheers Pat
- 517 replies
-
- 1
-
-
- Endeavour
- Artesania Latina
- (and 1 more)
-
Looks great Rob, boy you work fast with rigging (shows your experience with this) cheers Pat
- 1,208 replies
-
- 2
-
-
- great republic
- clipper
- (and 1 more)
-
Seems you have a very workable solution there Keith; and being nicely done (as Michael has already pointed out). cheers Pat
-
How to make pintles and braces from brass
BANYAN replied to woodeater's topic in Metal Work, Soldering and Metal Fittings
Thanks for sharing Woodeater; a couple of very useful techniques. I am a little ways of trying them yet but I have noted them cheers Pat -
Ummm.... I forgot GR had four masts when i said you are near the end..... sorry. That said, you really are in the home stretch though. She's look great Rob. cheers Pat
- 1,208 replies
-
- 2
-
-
- great republic
- clipper
- (and 1 more)
-
Thanks mate, seems like our two vessels of interest may have a lot in common then. I'll keep you in the loop on anything else I find. The particular rig does seem to be 'steamer' related and most commonly referenced as a "Barque/Bark" rig. The main point of difference I am finding, at the moment at least, is that the upper masting in some ships with this rig were the more usual 'lower + topmast+ pole (combined topgallant and royal'; whereas, Victoria and many other had the two 'stick' configuration. Further to my find re the Survey Records Book for HMS Arrow (1854), I have now unearthed one for HMS Vigilant (1856), and both have the same rig and mast combinations. I will see what else I can derive from those records and let you know. cheers Pat
-
Thanks Eberhard, that is exactly what I am seeing in Victoria (the two stops); which begs the question which one . Apart from a discussion in Kipping (1854) about the combined topgallant/royal as a pole, there is precious other that I can find. Would appreciate seeing anything else you may turn up. cheers Pat
-
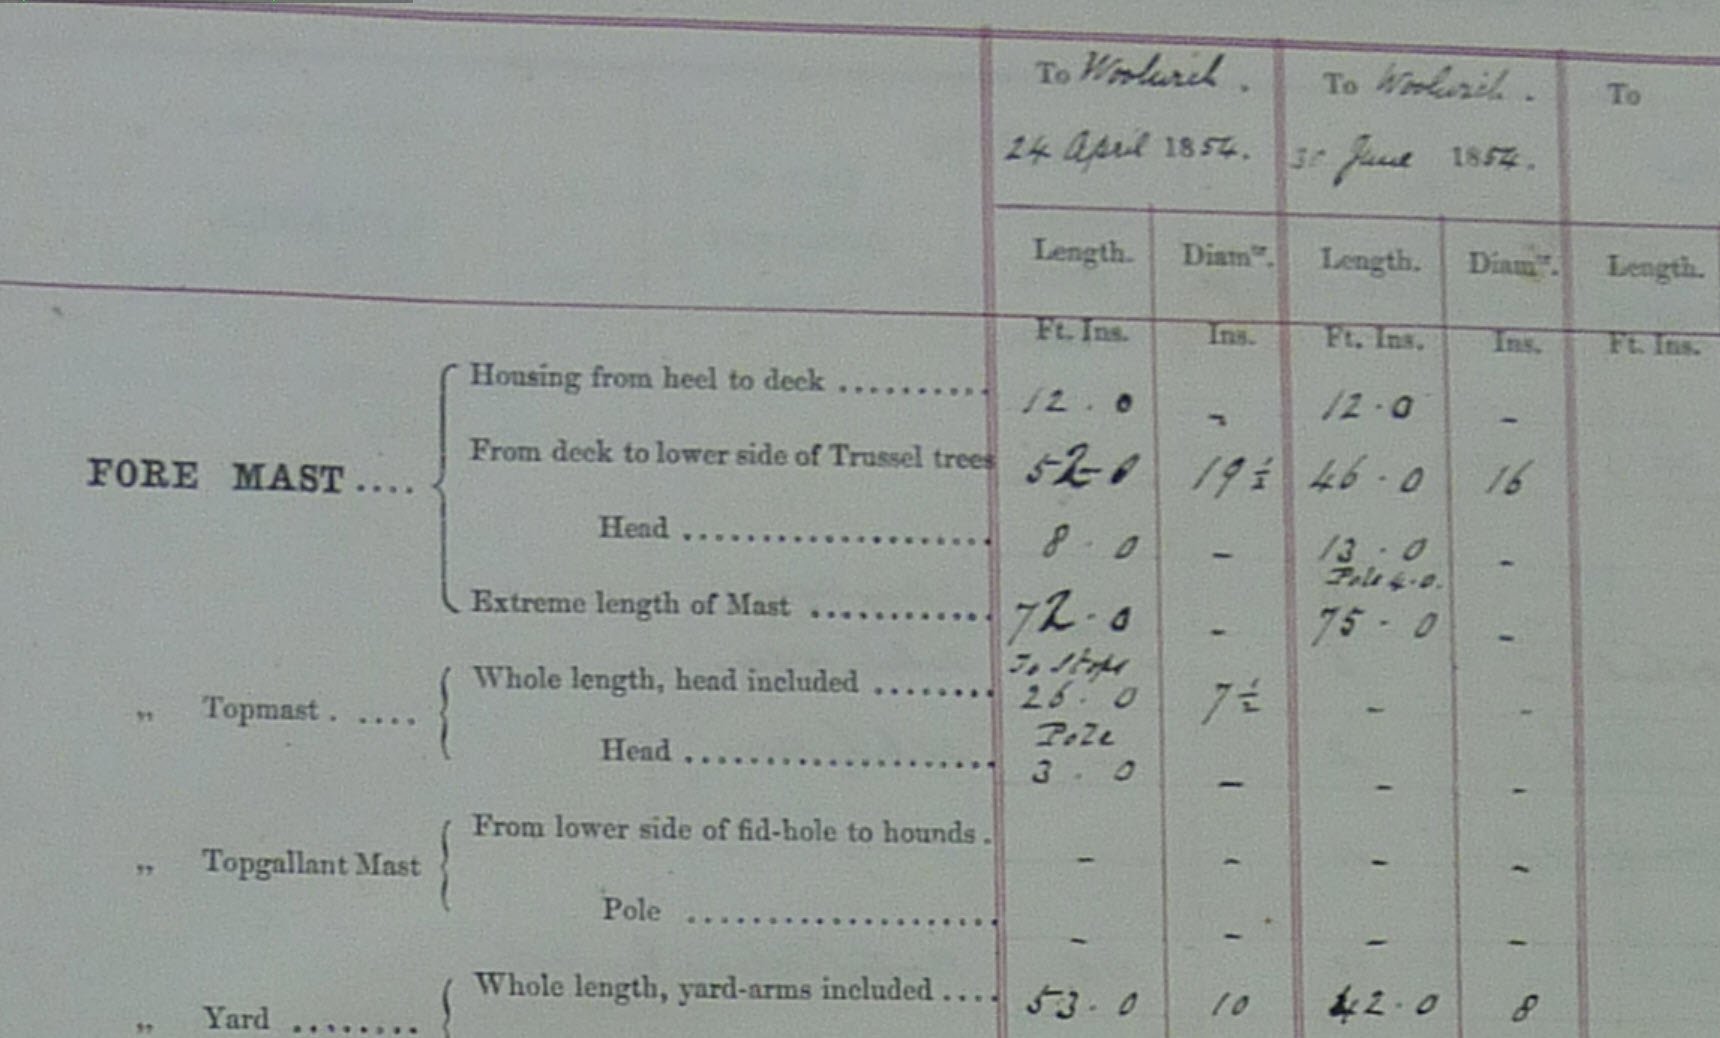
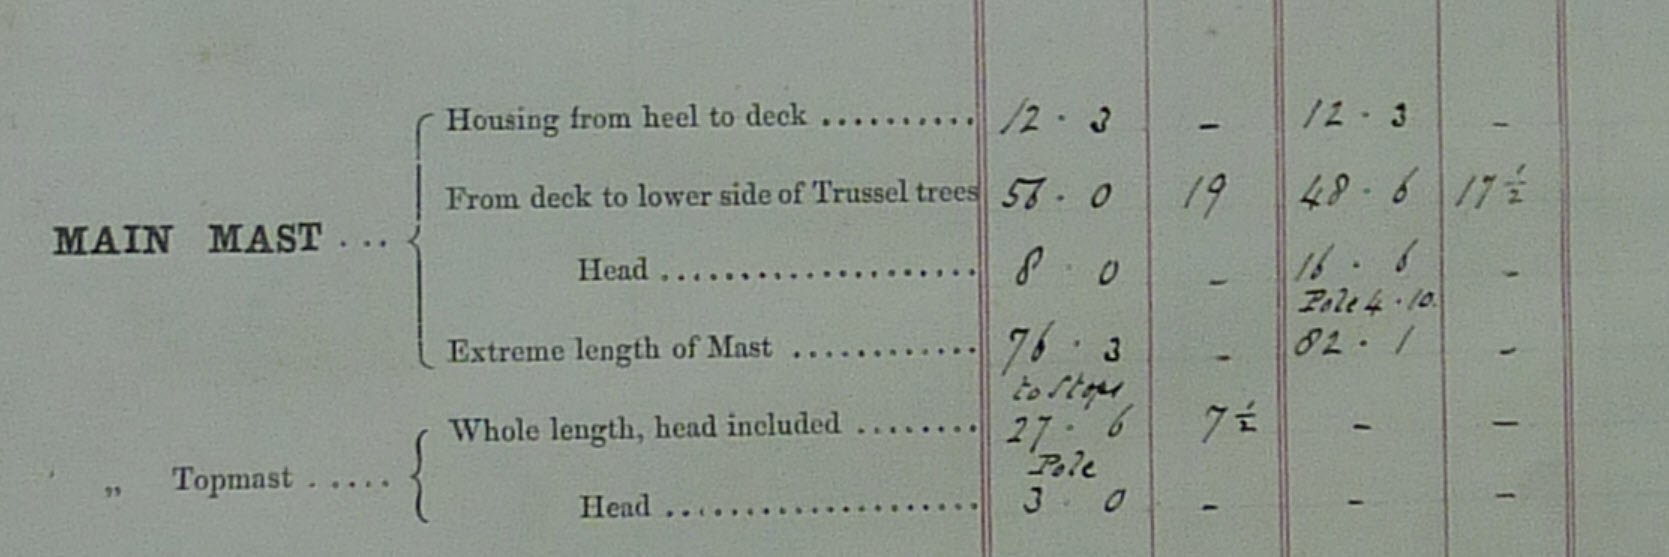
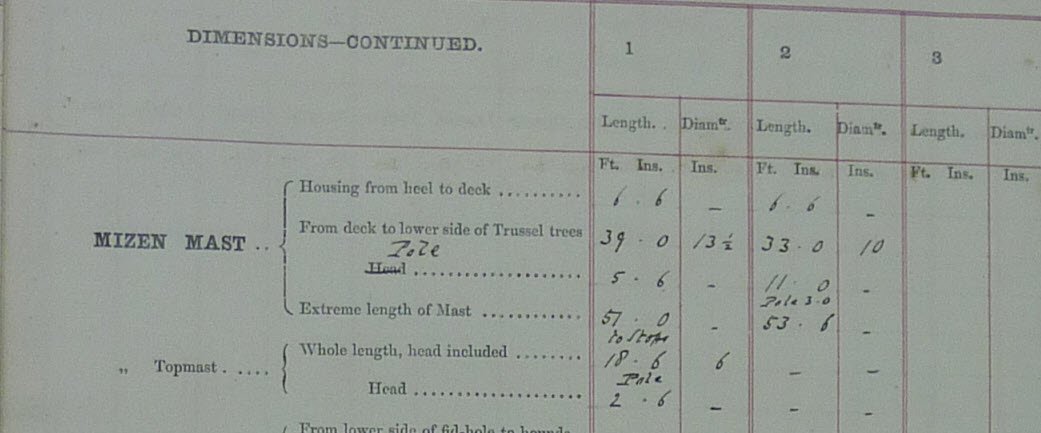
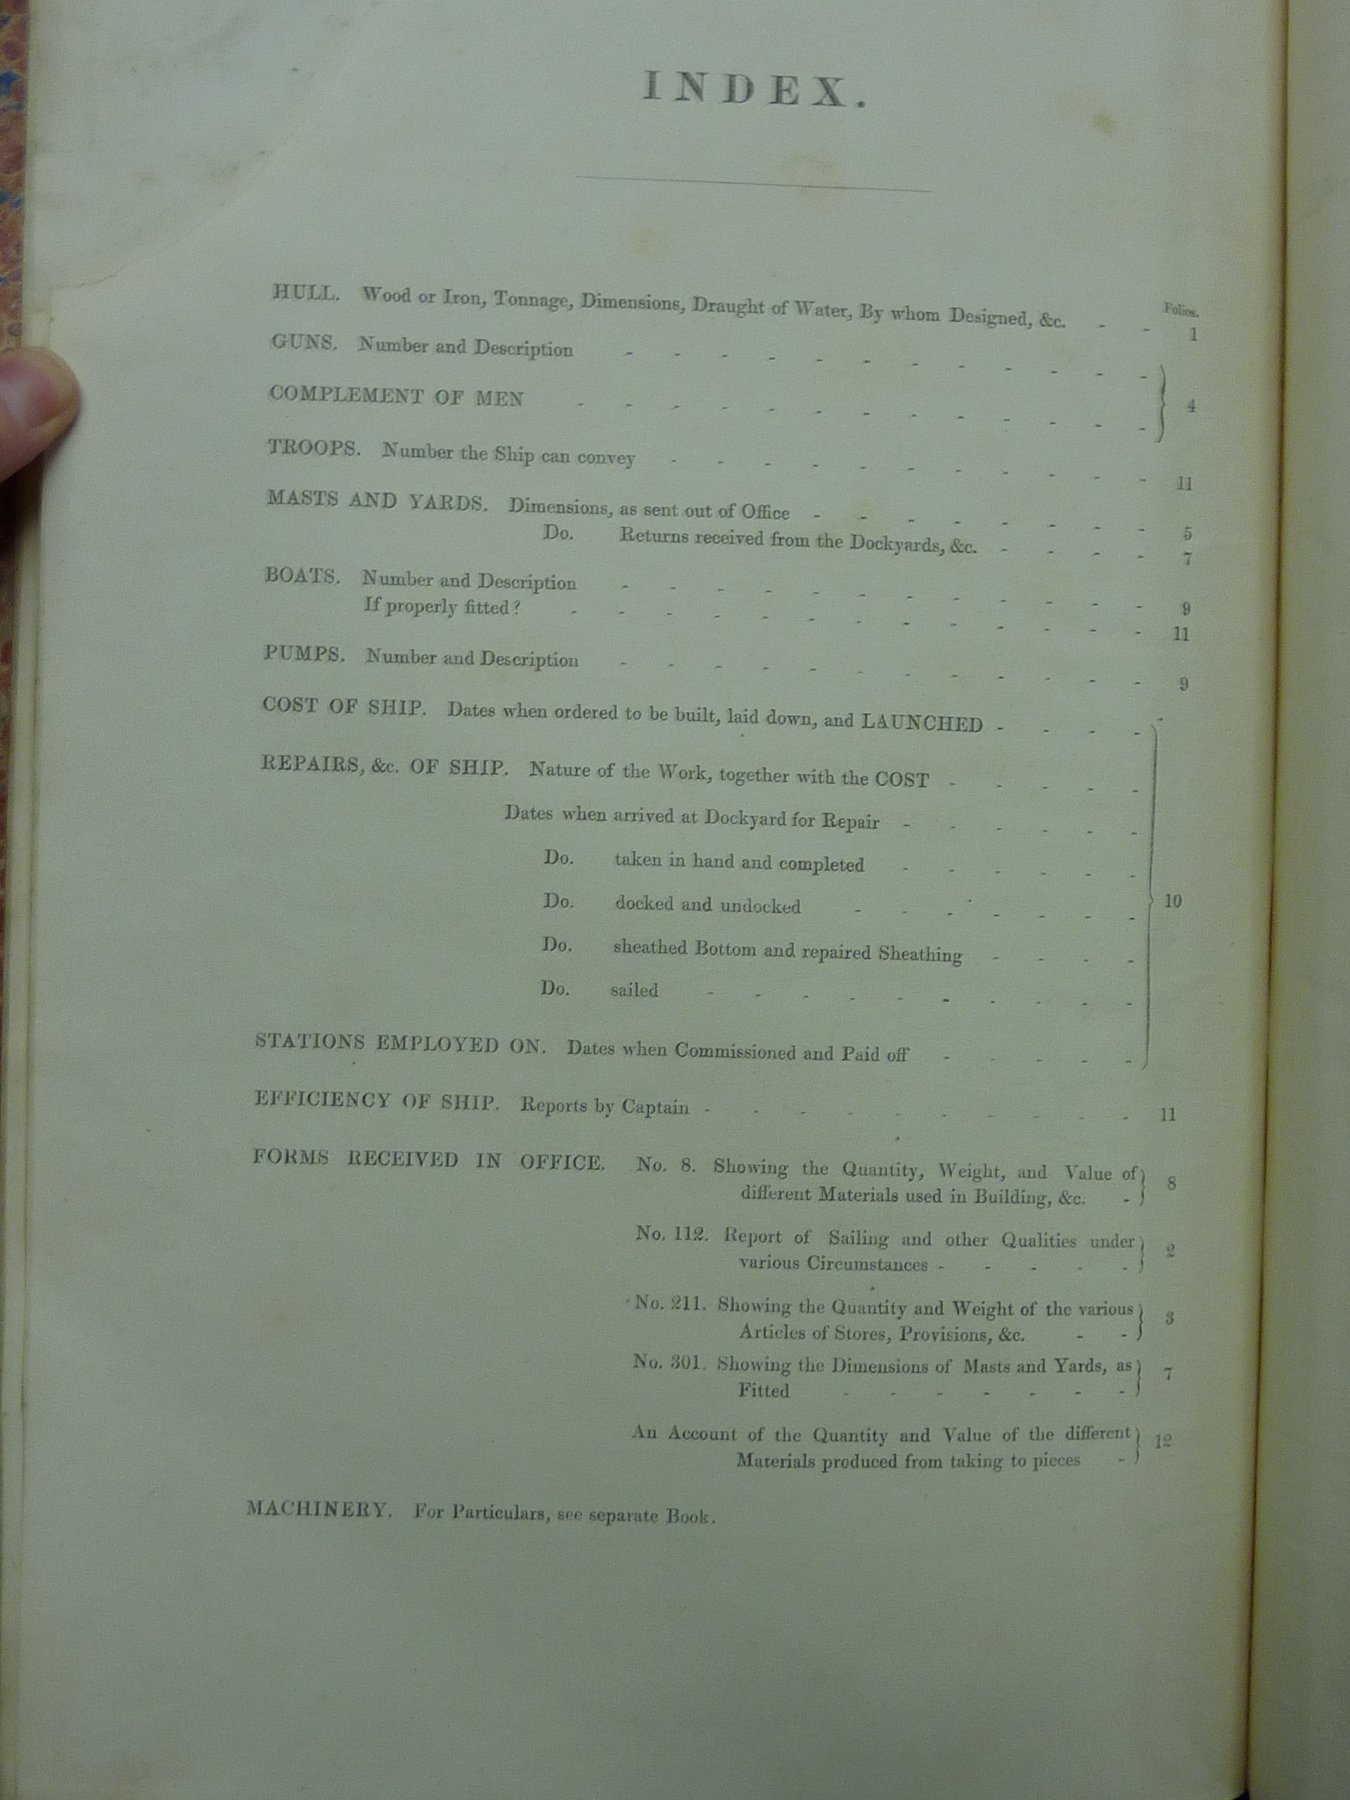
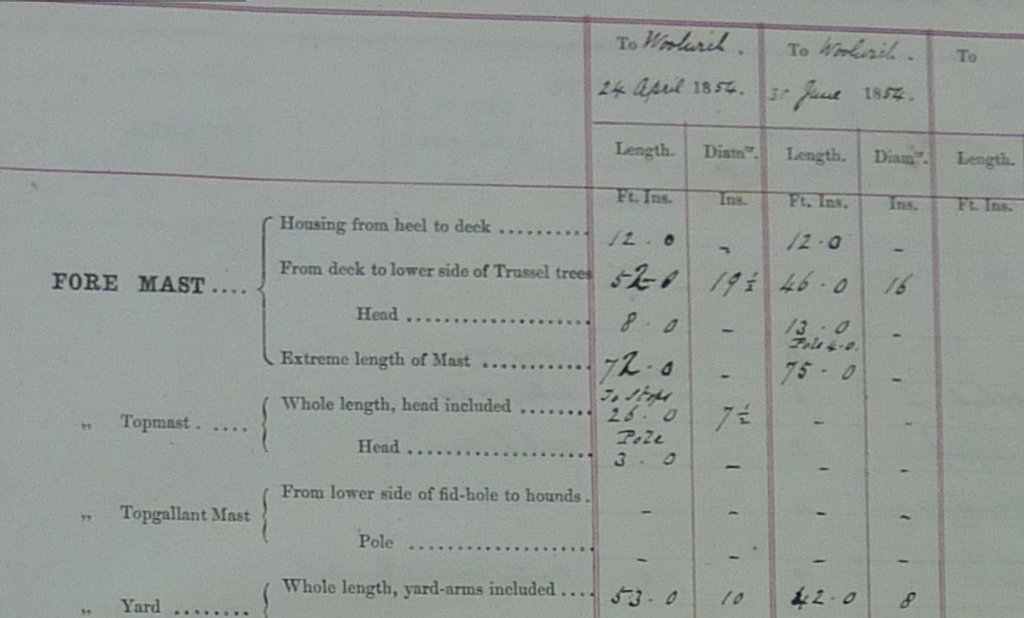
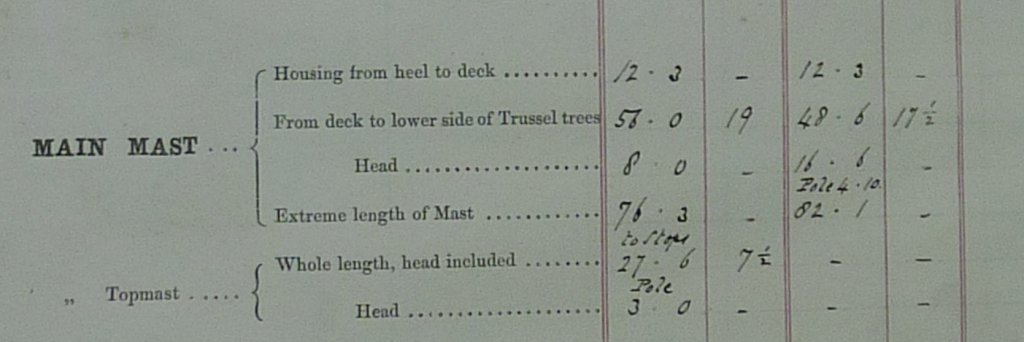
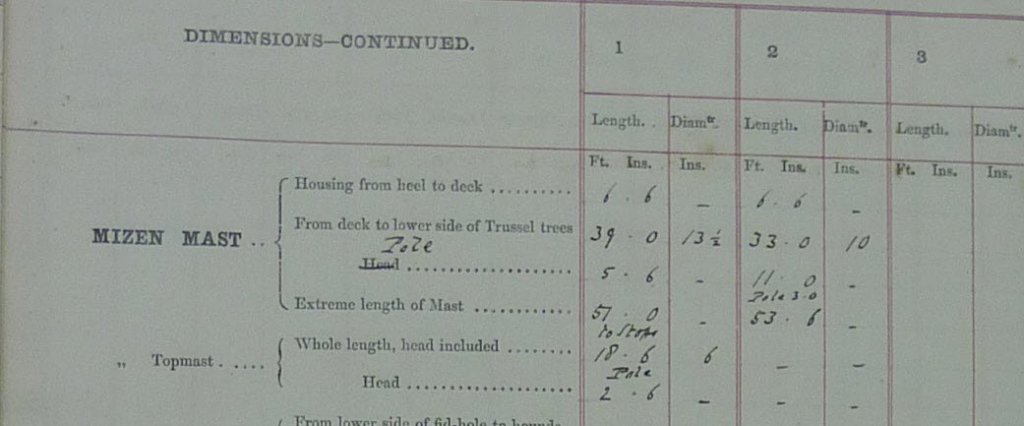
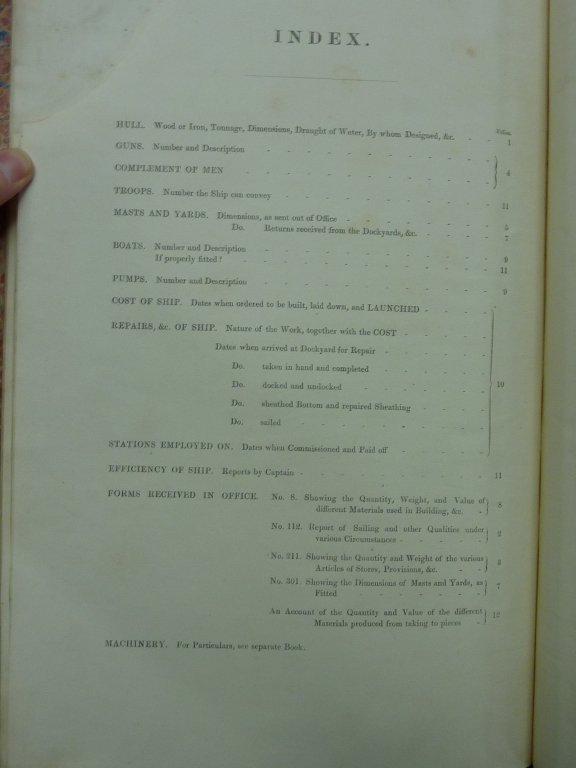
Hi again all, going back through my research materials I found an interesting (possible) link with the Arrow Class vessels (1854). These were a very slightly smaller version of the same type of vessel, as can be seen by comparing the specifications: HMCSS Victoria specifications: · Length: 166 feet (between perpendiculars). · Beam: 27 feet. · Depth of Hold: 16 feet. · Tonnage: 580 tons (burthen) - 880 tons by displacement. HMS Arrow specifications: · Length: 160 feet (between perpendiculars). · Beam: 25.4 feet. · Depth of Hold: 13.3 feet. · Tonnage: 476 tons (burthen). One of the items a researcher turned up for me was a 'Ship Survey Reports' book (my naming as there is none given) for HMS Arrow - the contents include. Note the following extracts for the three masts, which all refer to a pole style mast above the lower mast, so this confirms this masting convention was used in steam screw sloops at least. This description though better fits what Marquardt describes as a lower mast with tall pole. What I would like to determine from the listed parameters/dimensions is what is meant by: 'to stops' in column for length (first set of dimensions) of Fore and Main mast for the topgallant - there would have been two stops? Why different lengths between two dates very close together - probably as a result of first sea trials but looking for alternate possibilities? slightly different description in second set of dimensions Many thanks Pat
-
For some new information please see my other thread on masting at: cheers Pat
-
Hi Pete, according to the 'Nautical Dictionary' by A. Young - 1863 (pdf copies of this dictionary are available online) A heel-rope is applied through the heel of anything, particularly that which is rove through a sheave at the heel of the jib-boom, or of the bowsprit, for the purpose of hauling it out. The ropes which are used at the heels of topmasts and topgallant masts are termed mast-ropes. I hope this clears it up? cheers Pat
-
Hi Ilhan, where you may require risers (for bulwarks) it may have been the same construction technique as for my build. HMCSS Victoria did not have rising timbers which were extensions of the frames etc like other ships built with the normal practice of construction. Rather, rising timbers (roughtree timbers as they were called) were added as 'stout' timbers to the hull at the appropriate places - these looked similar to, but were smaller, than the usual timbers; in Victoria's case the maximum size was 8 x 6 inches for major timbers, and 6 x 6 inches for minor roughtree timbers. As Eberhard points out though, you may not need many. cheers Pat
-
Nice reconstruction Steven. That scalpel foil does the job nicely; I will have to file that away for the future. Unfortunately, no joy finding that other article yet, but I have not given up just yet. cheers Pat
-
That's looking very ship-shape Keith; I think the yard's master-shipwright would have considerable difficulty finding fault with that effort. The run of the planks looks spot-on so your planning and adjusting have served you well. cheers Pat
-
Thanks Rob and John. Nondescript rig for a Steamer it will be then. John, that sort of explains why they keep referencing it as Barque Rig, but in this instance, she was initially planned (and masted) as a three-masted schooner. The initial plan was to revert to that rig after delivery, but I think the sailing qualities of the Barque-styled rig were too good to lose, and she retained it for most of her career. I think she finally reverted back to the three-masted schooner rig when permanently assigned to "The Survey" in late 1878. Now to just find that masting configuration somewhere cheers Pat
-
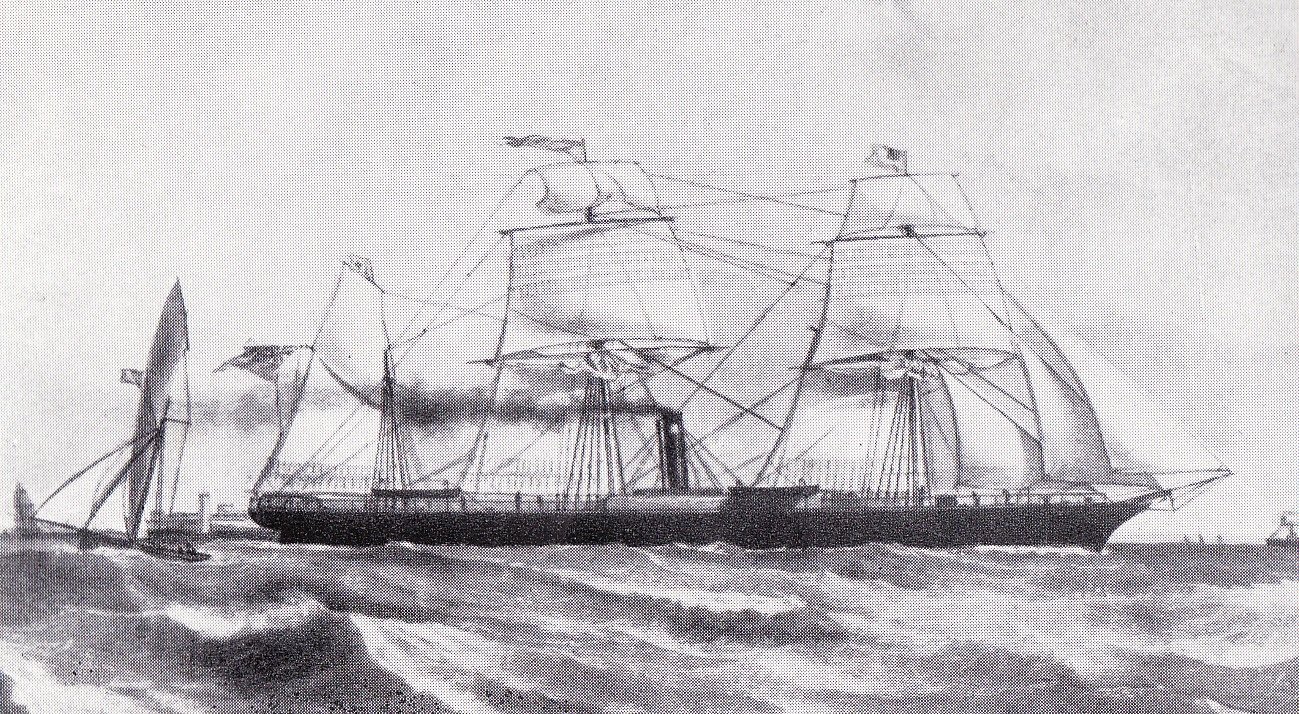
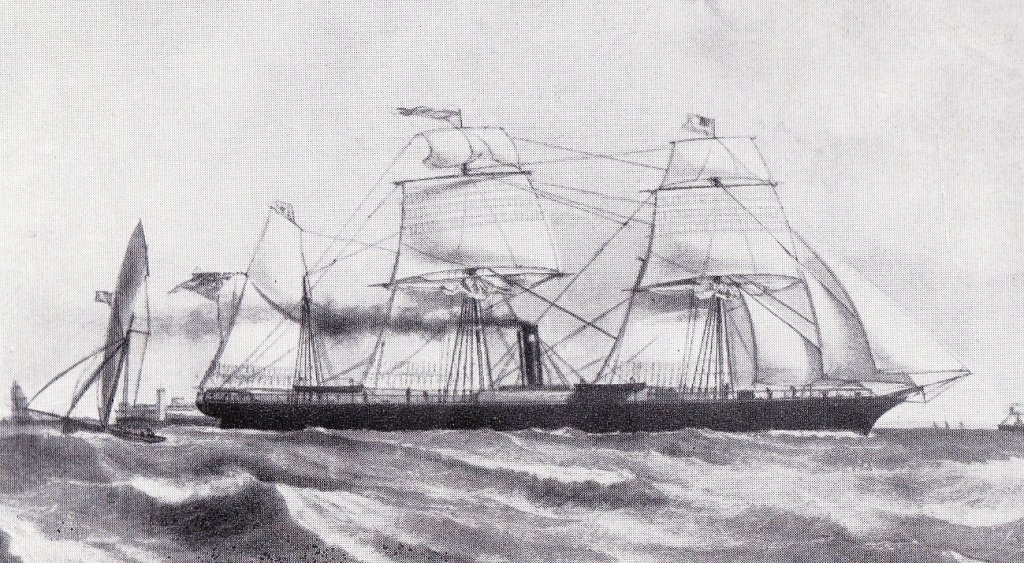
Hello again all. With the hope of trying to get a better definition of this sail plan, I have investigated further (again) and find this rig was quite common in the mercantile ships (especially steam assisted clippers etc) of the 1850s. See line drawing of City of Glasgow below (from Wikipedia). It appears yet again that even back then there was no name convention for the sail plan as it is most commonly referred to as "Barque Rig" while not accounting for the differences. It also further confirms the usage/configuration is associated with steam screw vessels. This is exactly the same sail plan (cannot confirm mast configuration) as for "Victoria" Just to be sure i am not going the wrong rabbit hole, does a barque rig include the fore/aft (gaff) sails? So in the absence of correct terminology I think I would have to find the belaying plan of a ship that had this rig/sail plan. In the absence of such, I think I will run with Barque sail plan and rigging, and modify it to accommodate the gaffs etc. Highly unusual that such a common rig (as it is proving to be) has not been covered with any detail or even named - perhaps we show simply run with Kipping and called it a "Steamers" rig? cheers Pat
-
Hi again all, following some ideas elicited from the above comments, I relooked at some plans in the NMM and came across the sail plan for the Alert Class Gun Despatch Vessels (one of the designs that heavily influenced Victoria's design - assumption) and found her sail plan (ZAZ6663 - Boxx 66 7418A). This plan (sail wise) is exactly the same and as she was a steam screw sloop; I think it is now safe to assume that this particular sail plan was designed for these type of vessels. There are no details on the mast construction, but I think I can now lean a little more on Kippings drawings and text for the masthead and fixtures as fitted for a "steamer" - now to try and find a name for that rig Also, I would greatly appreciate any pointers/ideas towards that combined pole mast used in this plan (combined topmast, topgallant and royal masts) cheers Pat
-
Nice progress there Steven even with the tribulations along the way - and what better excuse to add the Lion's head - cool it is cheers Pat
-
The end can't come quick enough sometimes can it Up to your usual very high standards Ed; you can't be too far off with your next volume now also? cheers Pat
- 3,618 replies
-
- 1
-
-
- young america
- clipper
- (and 1 more)