

Gregory
-
Posts
3,176 -
Joined
-
Last visited
Content Type
Profiles
Forums
Gallery
Events
Everything posted by Gregory
-
 The FA is on my to-do list for a semi-scratch build someday... I have bookmarked your log, It will provide inspiration and expertise. Keep coming with the details!
 -
Zap this if you feel it clutters up your topic Chuck, but here is a little iron I found ant Michael's. It gets hot enough to make steam, but haven't charred any wood so far..

- 1,784 replies
-
- 1
-

-
- winchelsea
- Syren Ship Model Company
- (and 1 more)
-
Just because that is what happens to copper plates on a floating ship, it doesn't seem to me that it is a good reason to try to model it.. I don't think I have seen any model ships with barnacles on them, and if they exist it wouldn't be something I would find appealing.. Here is a thread I came across: The Best Copper Plates? Has some impressive examples..
-
My only question in a roundabout way, was if Hahn was in error for drawing it this way? Apparently he was.. Thanks for your detailed and informative ..reply...
-
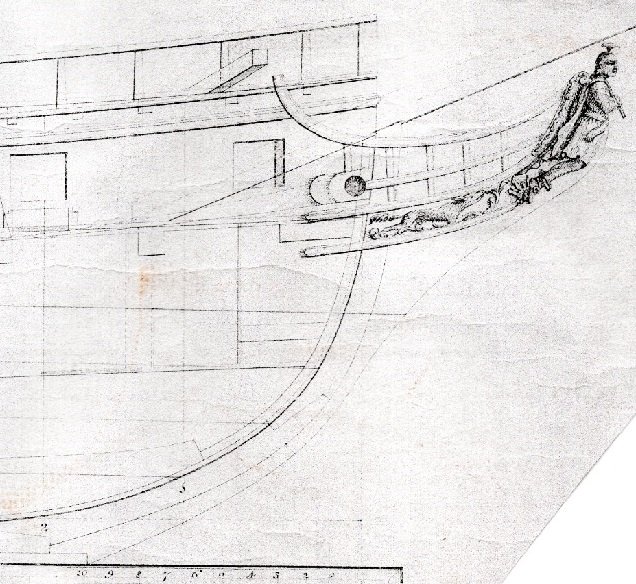
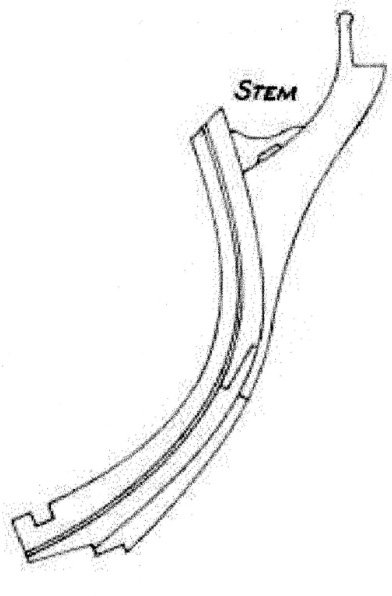
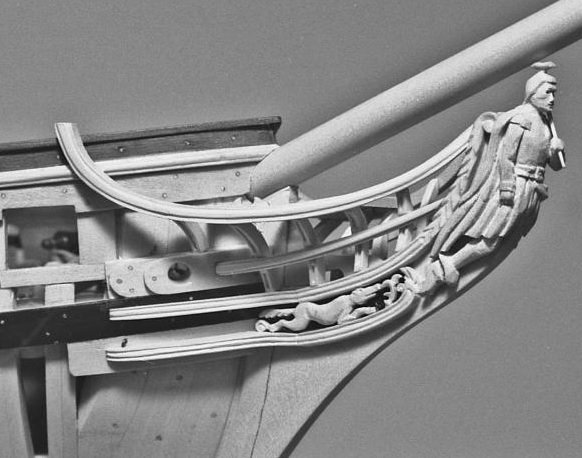
I have just started working on a build of the Mamoli/Dusek Rattlesnake, and hope to start a build log soon. I am working on fabricating a built up stem/keel assembly beyond what the kit provides. I have other plans than those provided by Mamoli. I have the Harold Hahn plans from an article in the NRG Journal. I also have the Admiralty drawings from the NMM, and then I have the plans from ModelExpo which are based on drawings by George F. Campbell, which were based on the drawings from the NMM.. The NMM drawings do not show the gammoning slot.. For no particular good reason I was using the Hahn drawings to fabricate my stem, which pretty much matches the NMM and the Campbell/ModelExpo drawings as far as they go. A questionable interpretation is how Hahn depicts the gammoning slot. So, my question is; wouldn't that piece that includes the gammoning slot in the Hahn drawing be wrong? It seems to me that the stresses involved for this structure would not make for a workable configuration as drawn by Hahn. When all is said and done, that joint is not ( readily ) visible on a complete model with the head rails in place. But my question remains: Would that separate piece, not be a realistic working design?
-
It sounds like it was a sale by and for Modelexpo.. If you have already contacted Mark, I would be surprised if he doesnt respond. A good 2nd route is their contact page : ModelExpo, I'm sure they will make it right..
-
I wouldn't be surprised if there was considerable difference in appearance between groups of sheets at the time of installation. I recall seeing a model a while back where the builder used a propane torch to change the color of random plates, to create a sort of brickwork pattern..
-
I can't think of anything to add to what you have said, which I feel pretty much echoes my sentiments on this subject. I don't know if you are familiar with the coppering technique that is suggested with some of the Mamoli kits, but it consists of applying green wood strips that are cut to the supposed length of copper plates. Some of the finished examples I have seen, look a lot like the image of the Constitution you provided..
-
Because " Terror " sounds way cooler than " Erebus " .. ?
-
uploading pictures
Gregory replied to David56's topic in Using the MSW forum - **NO MODELING CONTENT IN THIS SUB-FORUM**
I would like to see more resolution in most pictures.. So many of our members' pictures are small and lacking in detail.. -
uploading pictures
Gregory replied to David56's topic in Using the MSW forum - **NO MODELING CONTENT IN THIS SUB-FORUM**
I thought I read somewhere on the forum that the max was 1200 x 1600.. Has that changed? -
uploading pictures
Gregory replied to David56's topic in Using the MSW forum - **NO MODELING CONTENT IN THIS SUB-FORUM**
There is an add image interface at the bottom of the " Submit reply " box.. See: " Drag files here to attach, or choose files ... ", which will open a dialog on your PC/device .. Maximum is 1600 x 1200.. -
Original Rigging for Cutters of 1763: with a Jib boom?
Gregory replied to Gregor's topic in Masting, rigging and sails
Mortice and Tenon -
That angle is common with laser cutters that have not been focused properly.. There will always be a slight angle, but negligible on a finely tuned laser.. You can diminish some of the effect of the angle by reversing adjacent parts...
-
When you get up to speed with your new camera, here is something you might try. I have found, that with a still camera, phone or whatever, it can be tricky to get just the shot you want with regard to light, focus & etc without a lot of planning and setting up. I will often take a short HD video; moving around, zooming in and out and so forth, then open the video in media player, full screen HD, skip through and find the shot I want, then take a screen snip. I then open it in an image editor to crop it ( I often just use " Paint " ), which does a great job of resizing.. Might seem like a bit of extra effort, but you might be surprised at how it helps to get the exact shot you want.
- 1,784 replies
-
- 1
-
-
- winchelsea
- Syren Ship Model Company
- (and 1 more)
-
It looks shiny as if it is polyester or nylon. What happens if you put a match to it? Does it melt? Unless you have a glue that has a solvent in it like old time plastic glue it wont bond.. Just like putting a dab of non solvent glue on a plastic surface. When it dries, you can peel it off..
-
I wonder if all the Winchelsea builds have caused a run on .030 blades at Malco? I ordered one, and was told there would be a 1-2 week delay while they were being produced... ( Very nice people to work with. Good communication. ) P.S. At least it probably wasn't Chuck, since he is not doing the strip wood..
-
I really hope you make a video of that! 😄
-
Chris, did I miss where you named the last prototype you were showing pictures of ?
-
So far, I don't believe Triton has raised any flags with the Admin here. The work they are doing appears to be totally original.
-
Just a question for the experts here.. I remember reading somewhere that studding sails were only set in light wind conditions in order to make as much speed as possible under those conditions. However, some recent discussions about clipper ships, and also recalling numerous paintings of various ships with all sails set, with what appeared to be heavy seas and strong winds; sometimes with the ship heeled over as if it were going for America's Cup, made me wonder if such depictions were realistic. I does seem logical to me, that under strong winds and heavy seas, setting all that canvas would not be a good idea, but I'm willing to be educated..
-
The Alert from Trident Model may not be too far in the future..
-
Nice looking start on the Enterprise..
-
Dave, I think the main basis for the criticizing of these books, is when they are suggested as a go-to refernce for new-comers who want a definitive source, without clarifying that he was documenting models as he found them.. I personally would not have a problem building a model and following Petersson rope for rope, because my target audience will never know the difference..
-
kit review 1:35 Viking Knarr - Dusek Ship Kits
Gregory replied to James H's topic in REVIEWS: Model kits
At that scale, some of Chuck's built up blocks would really look good..
