
HOLIDAY DONATION DRIVE - SUPPORT MSW - DO YOUR PART TO KEEP THIS GREAT FORUM GOING! (Only 13 donations so far - C'mon guys!)
×


Barbossa
-
Posts
509 -
Joined
-
Last visited
Content Type
Profiles
Forums
Gallery
Events
Everything posted by Barbossa
-
 Fantastic ! Aside the very high quality, it appears you are working at the speed of light . How do you cope ?
 -
Hats off. Notwithstanding the 1/110 scale . Any chance for adding some Tahitian girls in your diorama 😜 ?
-
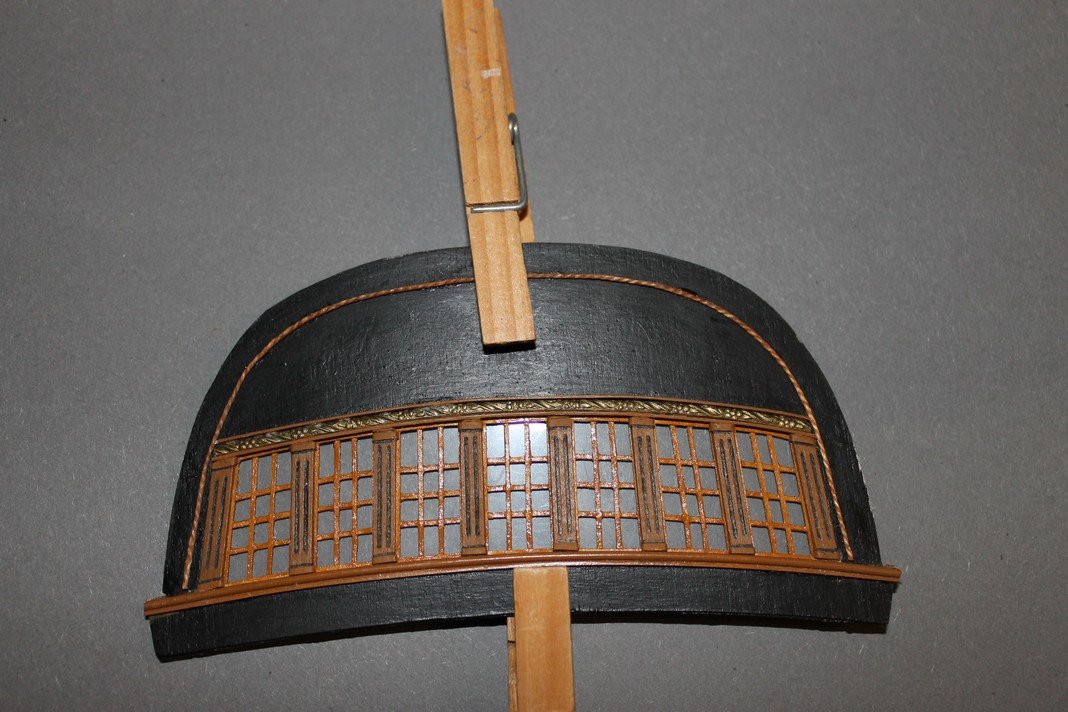
You're welcome, Jason. The colors are a bit of a lucky shot. Applying some coats of (water-)dilluted PVA-glue made painting of the windowframes redundant. The arch above the windows = same story. This is a decorative thread which I firmed up with cyano glue and guess what's happened ? A nice looking brown which was pretty close to a warm (woodish) color. Talking about woodish effect : for painting purposes I often use AV New Wood 311. For the pillars, the Artesiana Latina scrapping tool is an object of necessity. The grey paper behind the windows was the only option left because obtaining a real window effect was far beyond my skills. Regarding to the latter I'm giving it some thought using the same technique for the sternlamp.
-
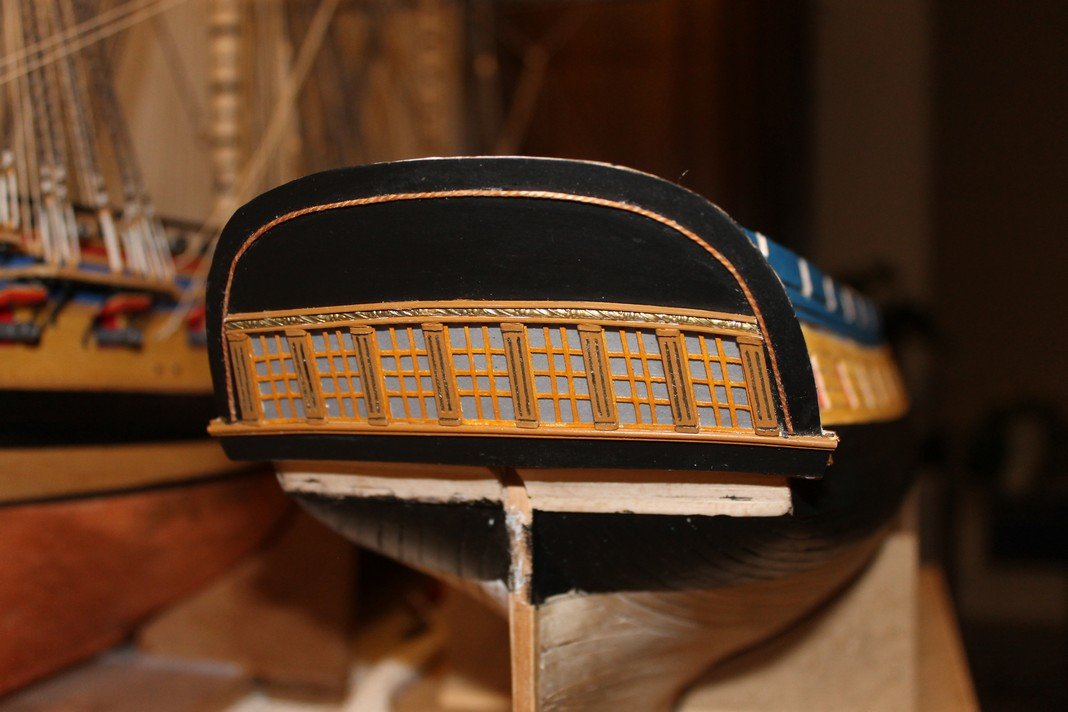
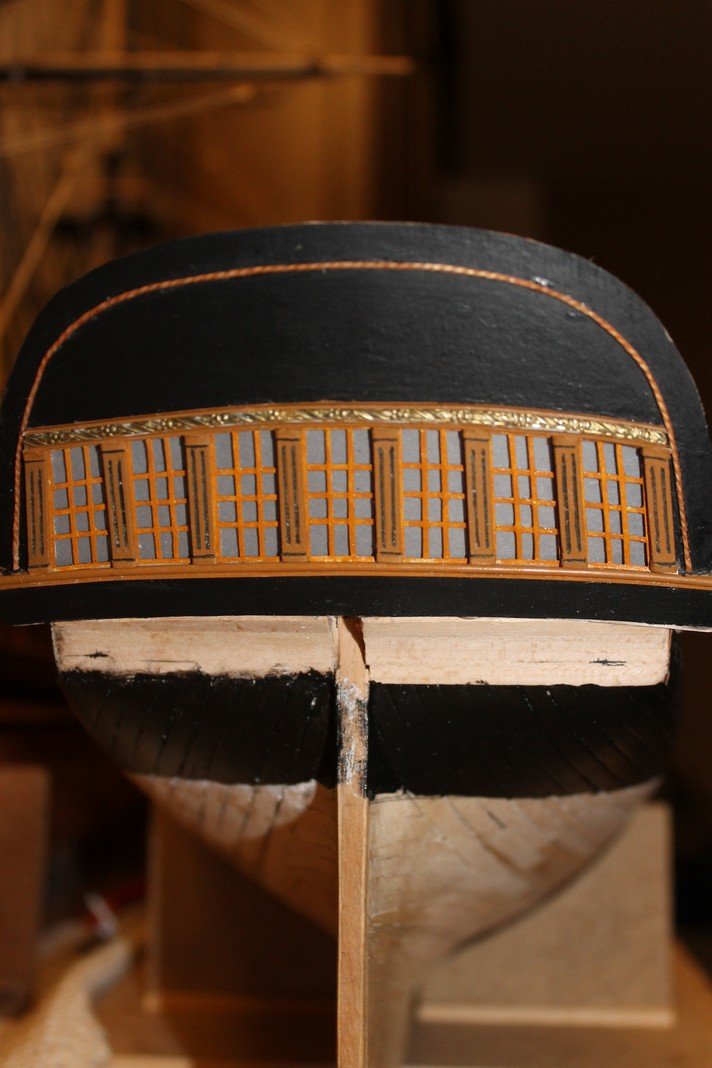
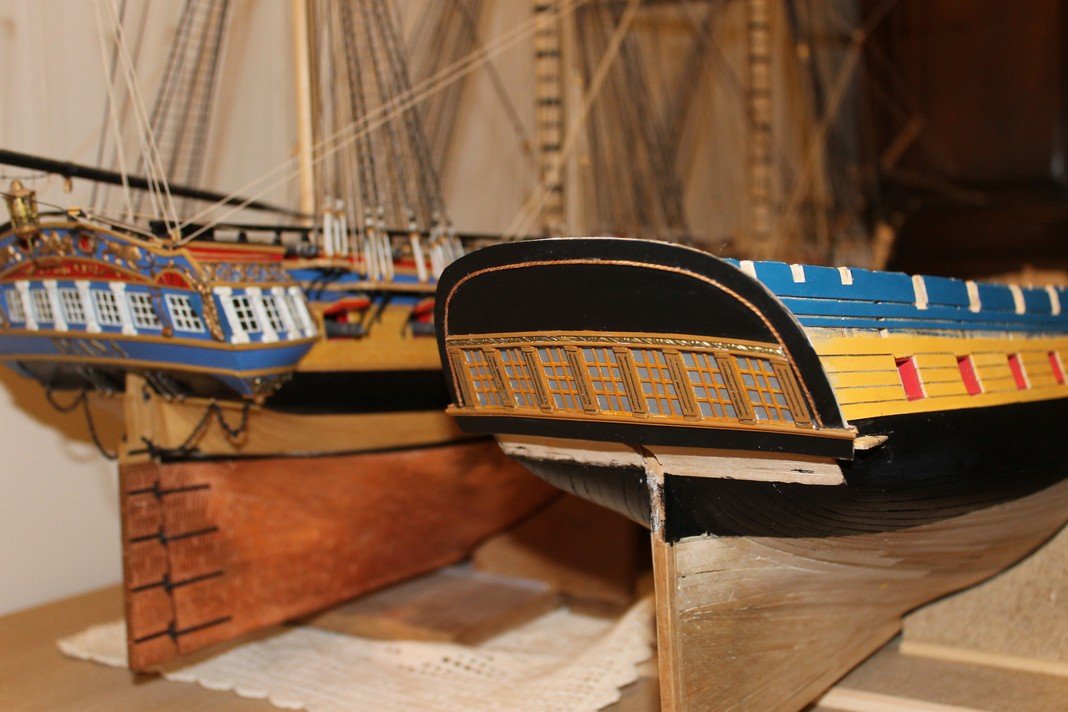
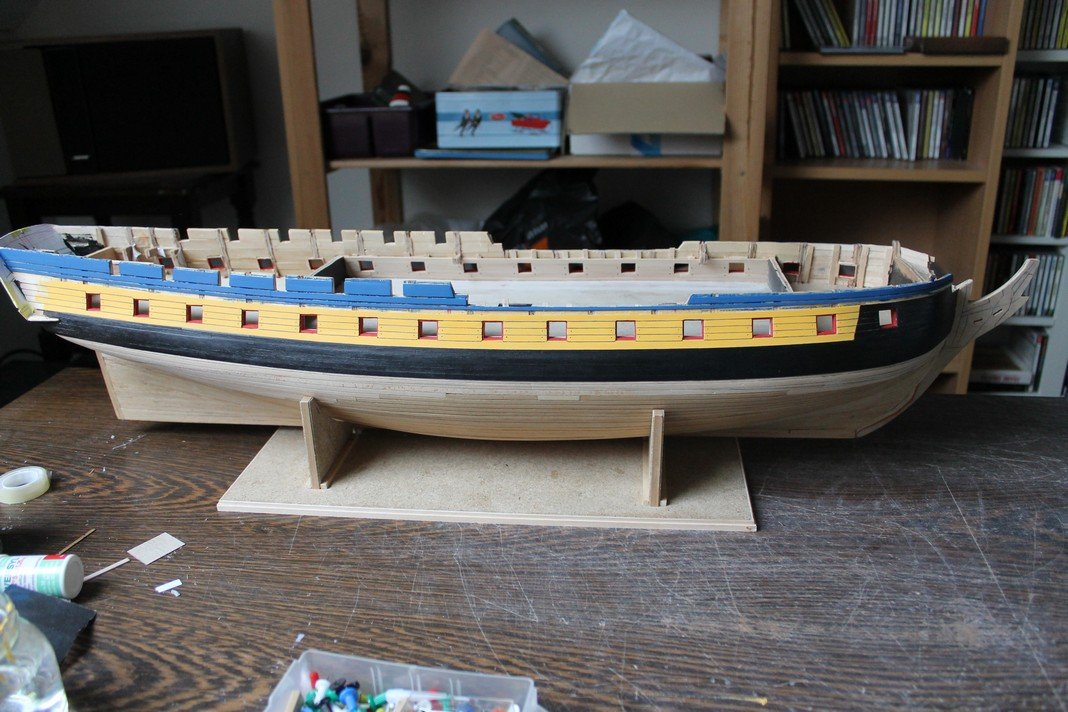
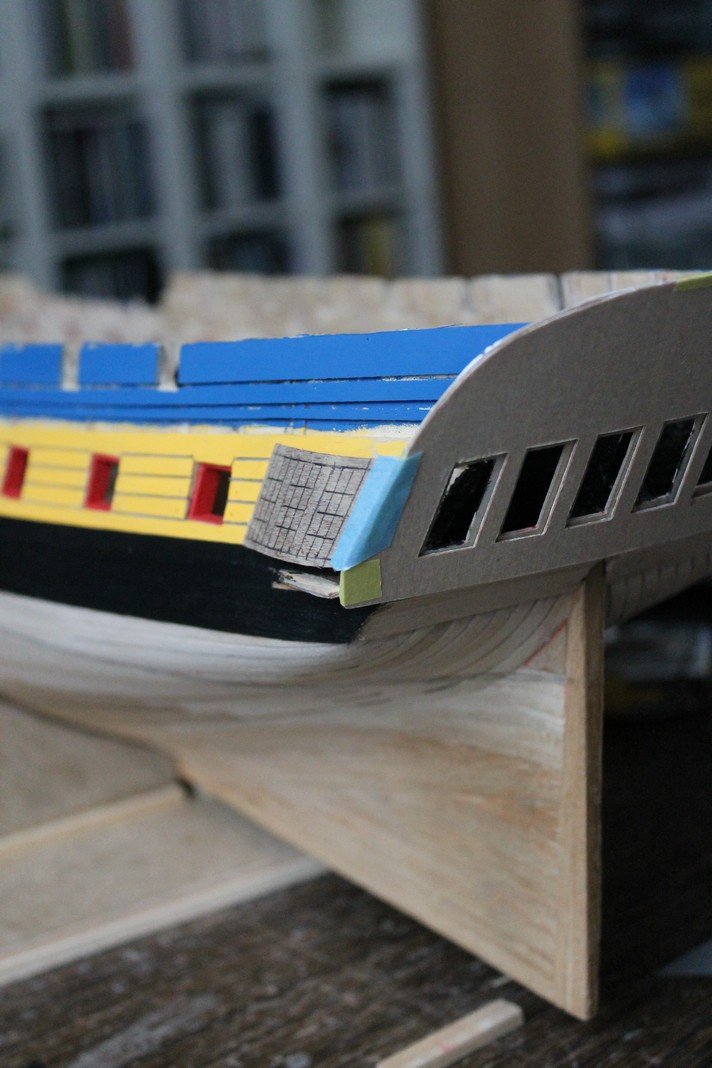
Hi, At last some progress. Mark, your remark refering to the stern shifted priorities. As the stern at both extremities dictates the position of the quarterdeckgalleries, why not seize the stern gallery? Well, after quite some trouble, hesitation, different approaches, here it is. Still some finishing required, not perfect and most of all, not by the book but I an settle with it.
-
What a lovely lamp. The addition of talent, tools and most of all lot's of dedication and you get another stunning B.E. buildlog. No further rocket science involved, here.
- 261 replies
-
- 2
-

-
- muirneag
- vanguard models
- (and 2 more)
-
From easthetical point of view and given te scale ( 1/110) just wonderful ! Historical accurate ? I have no clue ... you know the saying : Never let the truth go away with a good story.
-
Glad you're back with us, Chris Looking forward to see more pics
- 144 replies
-
- 3
-
-
- corsair
- bermuda boat
- (and 1 more)
-
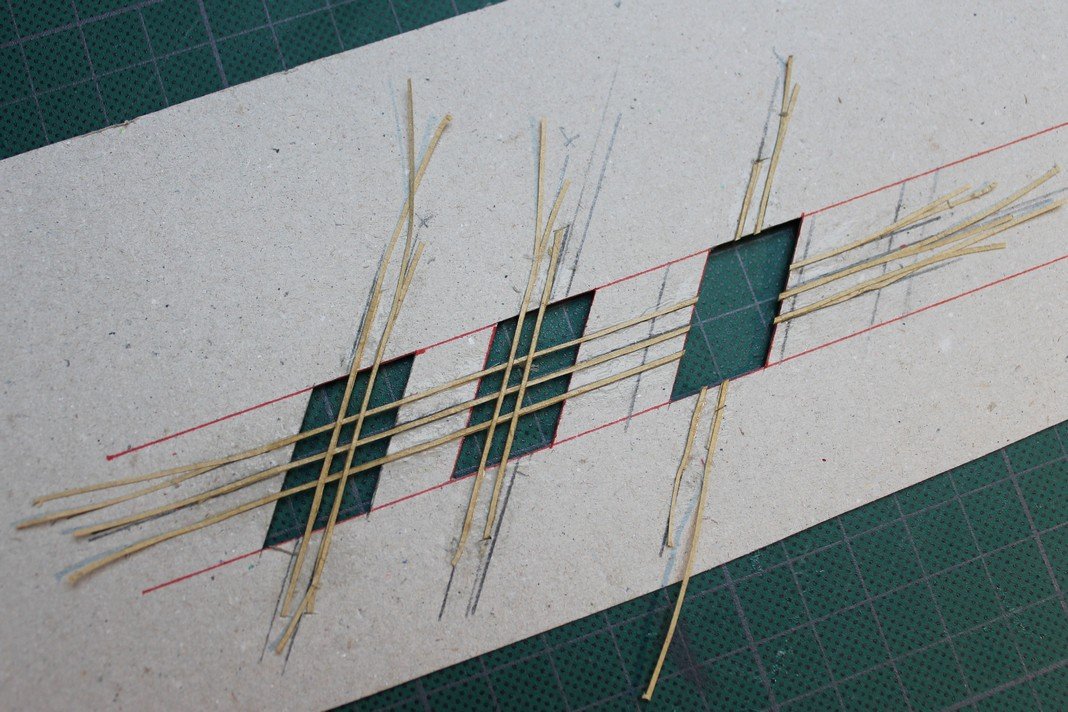
Good morning Mark, You certainly have a point there. Indeed, the installation of the quarterdeck will involve some awkward curves that might jeopardize this. Although the frames are made of 2 x 2 paper strips ( see first pic , the lightbrown one ) and received a coat of water diluted PVA glue, I can still bend them a bit but they still have a minimal strength. But if my understanding is correct, the addition of the frames inside the solid quarterdeck piece , a full plastic piece and black paper behind the plastic might cause some troubles. In previous attempts, I made some incisions in the quarterdeck piece : this allowed an easy installation. Convenient detail : a decoration covers the place where the incision is to come ( between the windows ). By consequence, I'll fix separate plastic + black paper behind each separate window. My assumption is that the stern will cause less trouble, on the other hand : there's 7 windows to realize. But as mentioned regarding the Q'deck windows : I'll produce more than necessary and make a selection afterwards. It's fun !
-
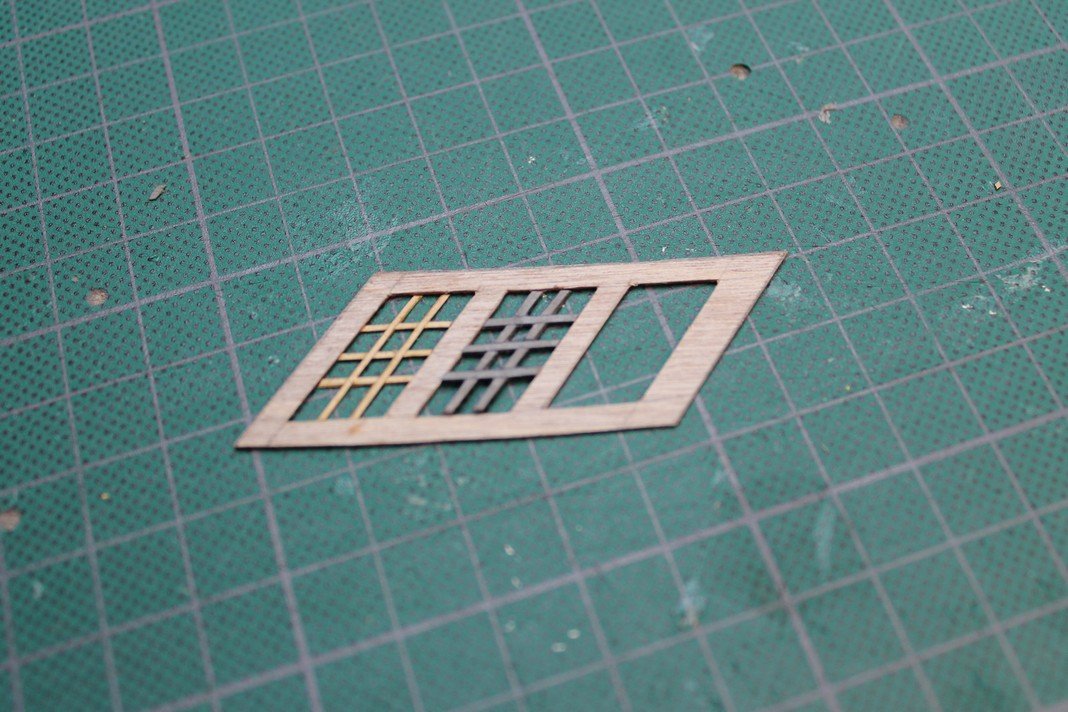
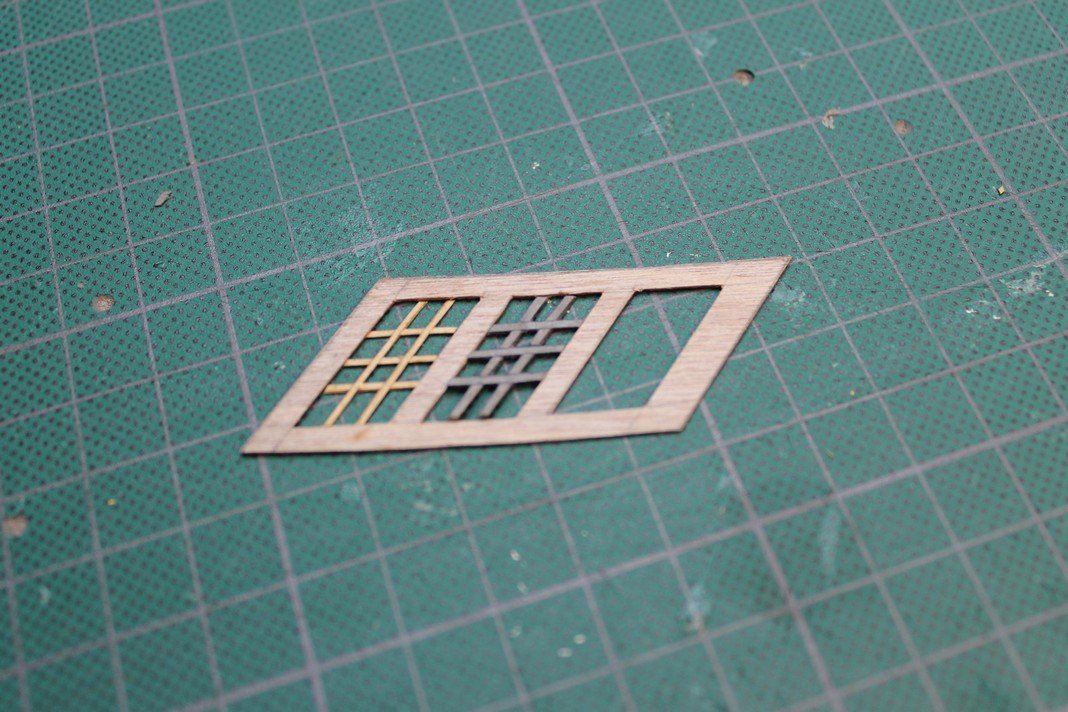
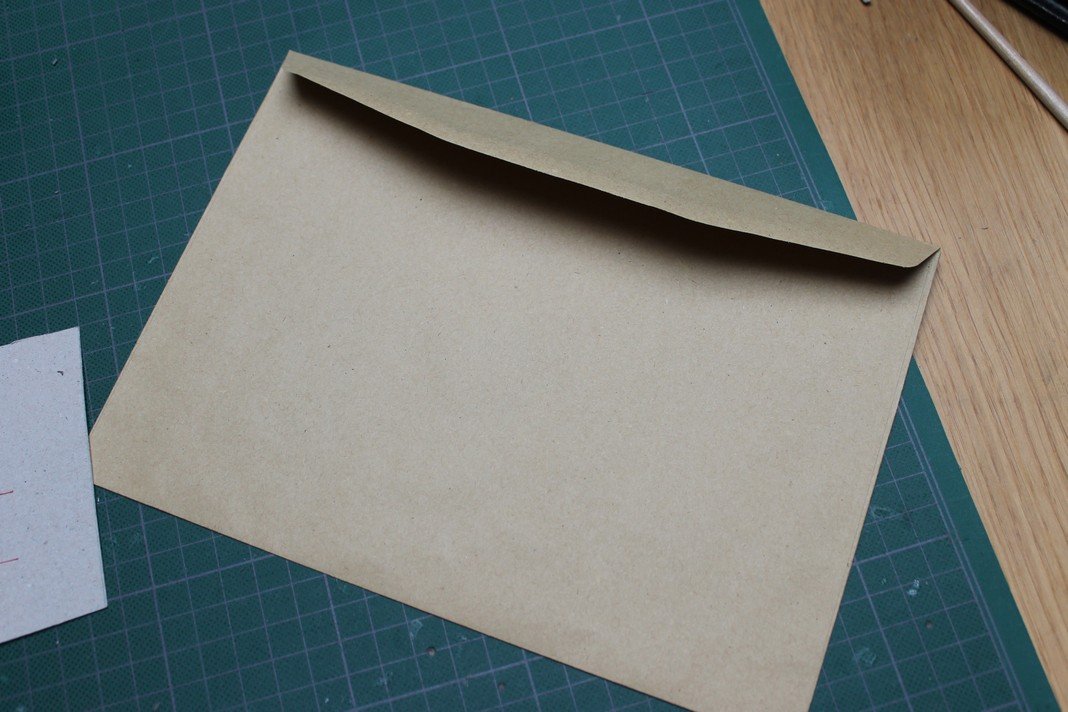
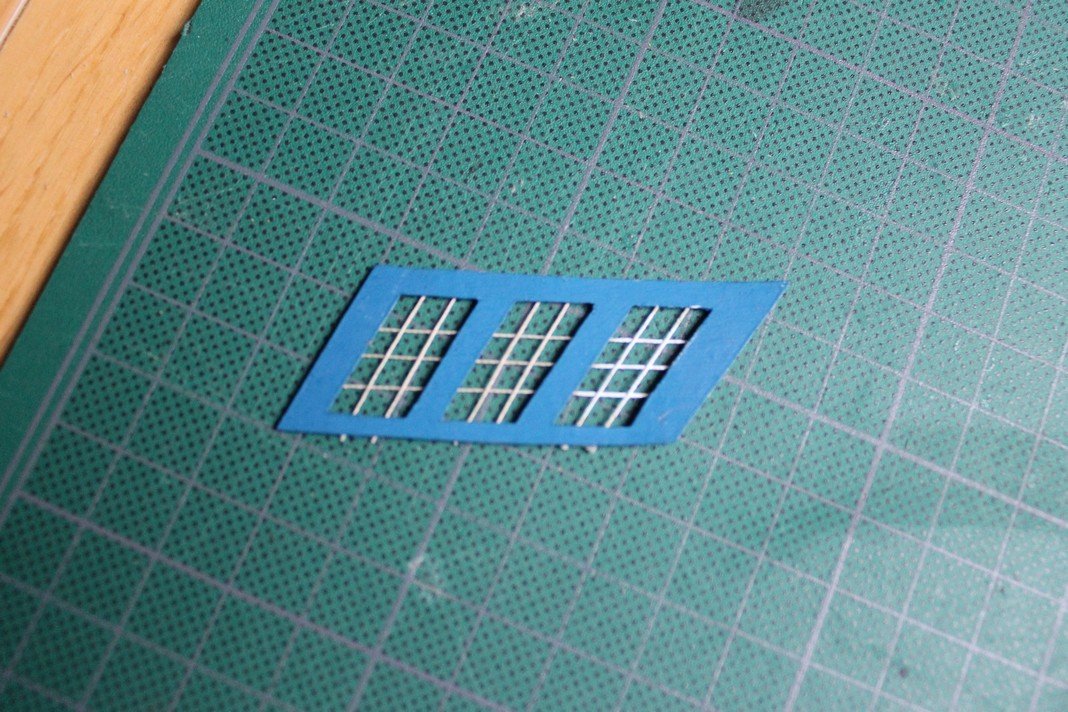
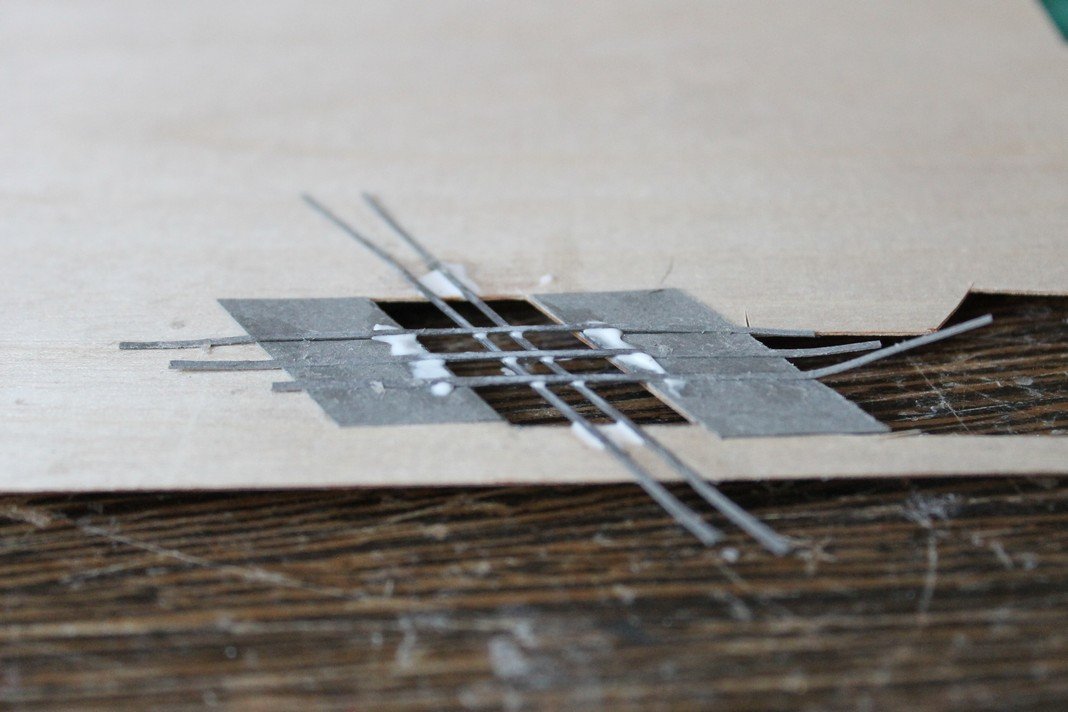
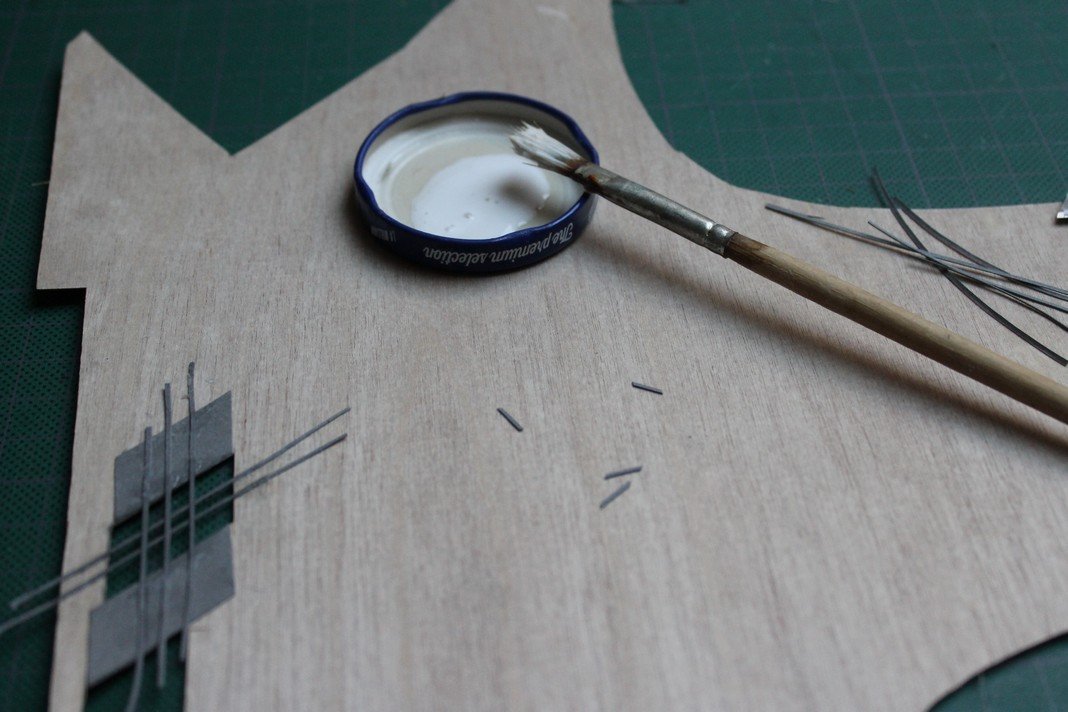
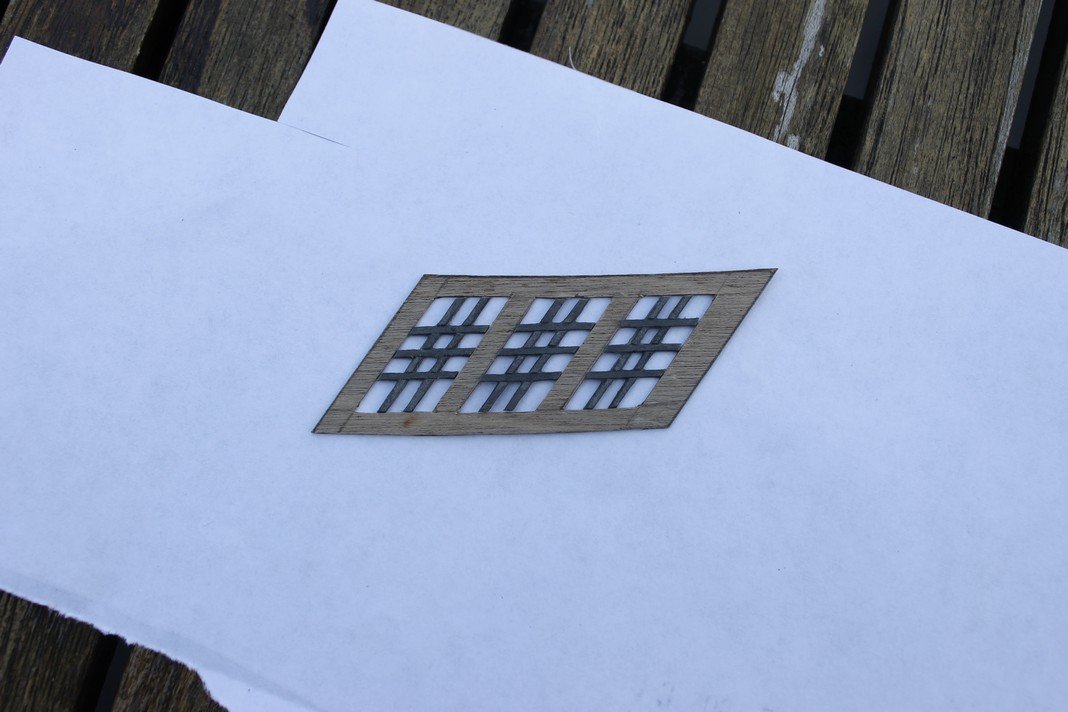
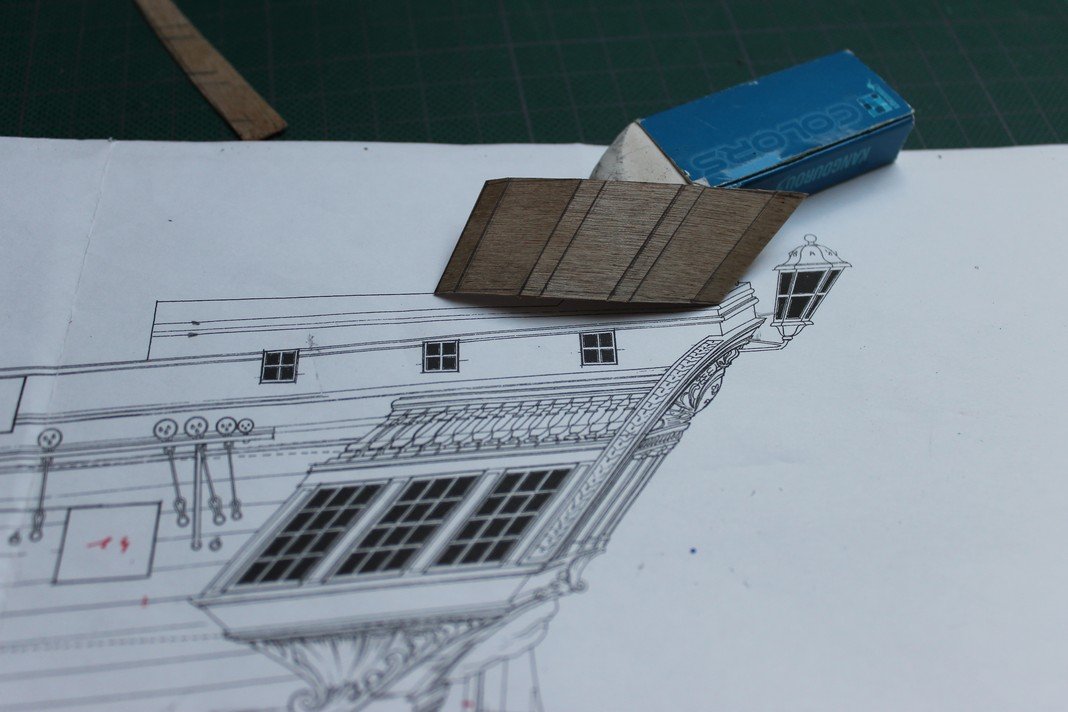
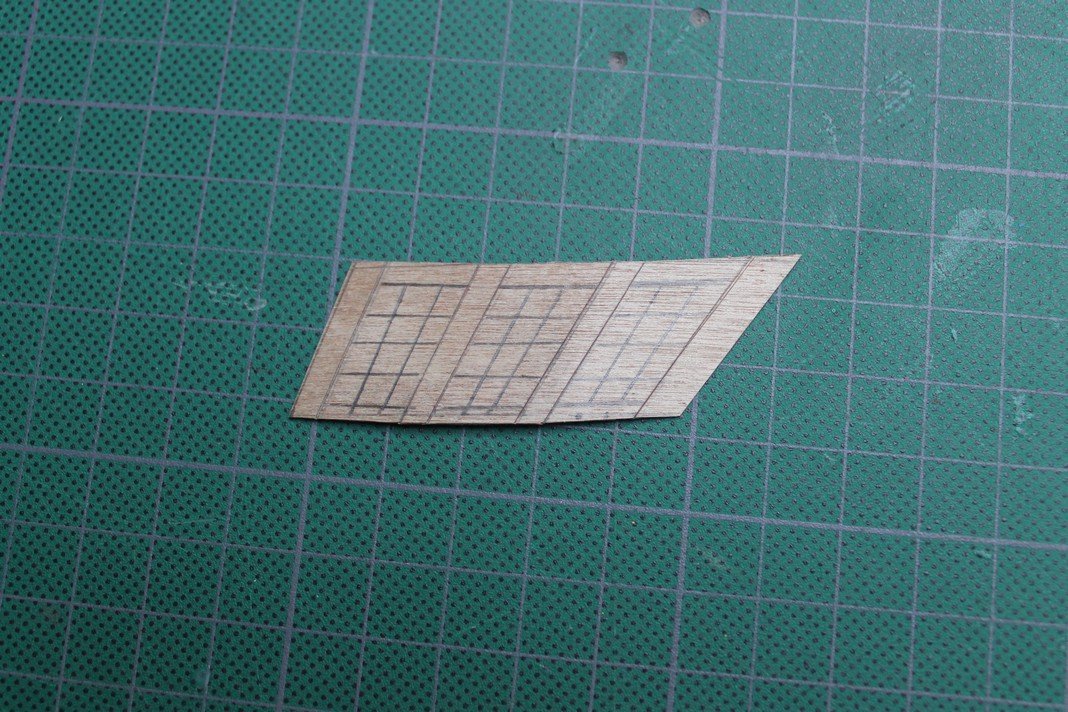
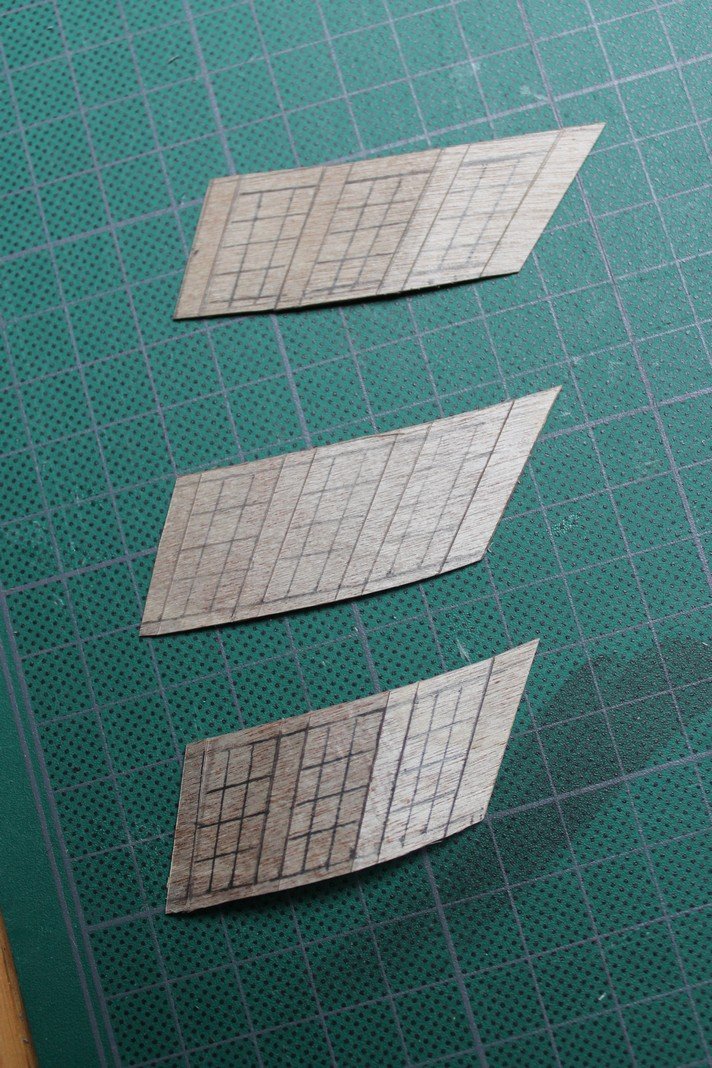
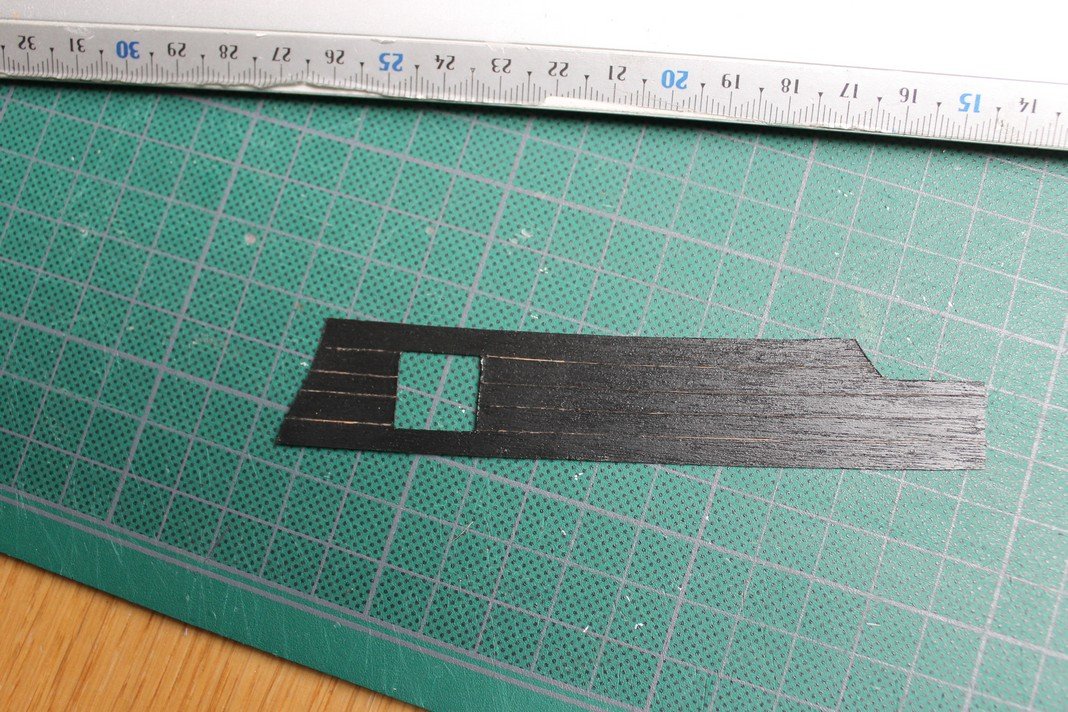
Hello, You're welcome Sjors. the moreover : You have been missed. Thanks for looking in B.E. : even if this project were to fail, I'm happy I got this far. Still, this is a semi scratch build : gunnery and other stuff were purchased straight from the market. Back to the windows and dare I say we have a breaktrough ? Before I was trying to resolve this problem and go the "plastic way", I made an attempt by using enveloppe-paper. Because -perhaps- no painting was required. I sincerely hope you notice the difference. The process is quite simple : cut small strips and fix them one above and across another, then repeat this action. End of story. I'm planning to realise more items than necessary, so I can pick out the better ones
-
Another impressive achievement, sincere congrats. If I may : what's the next project ?
-
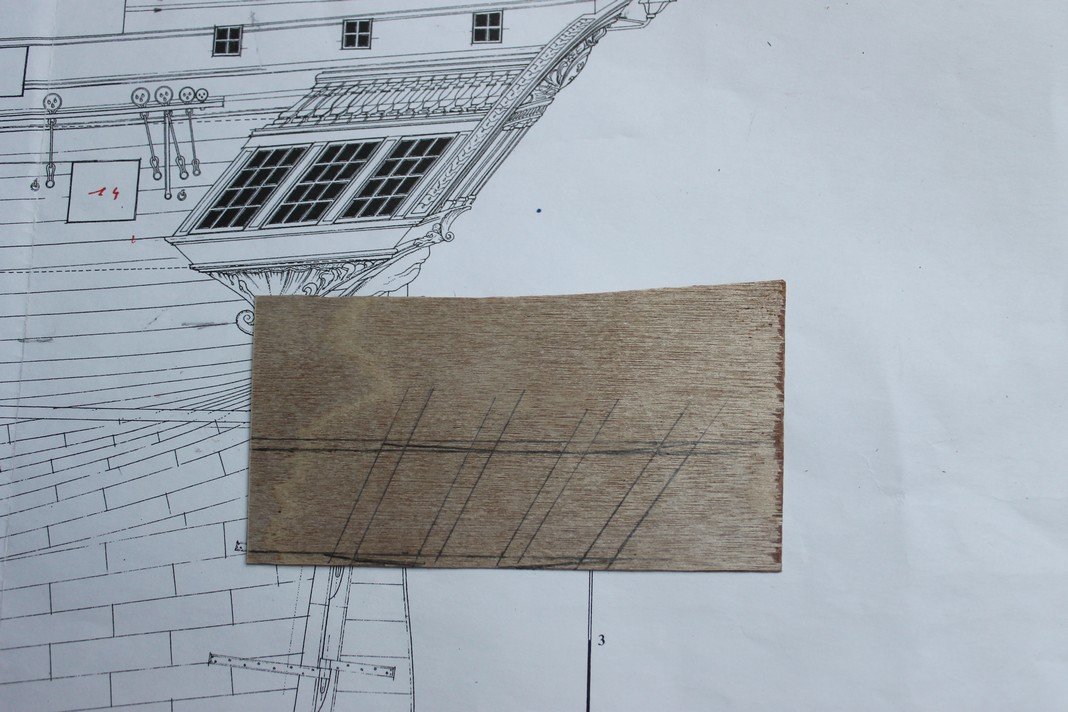
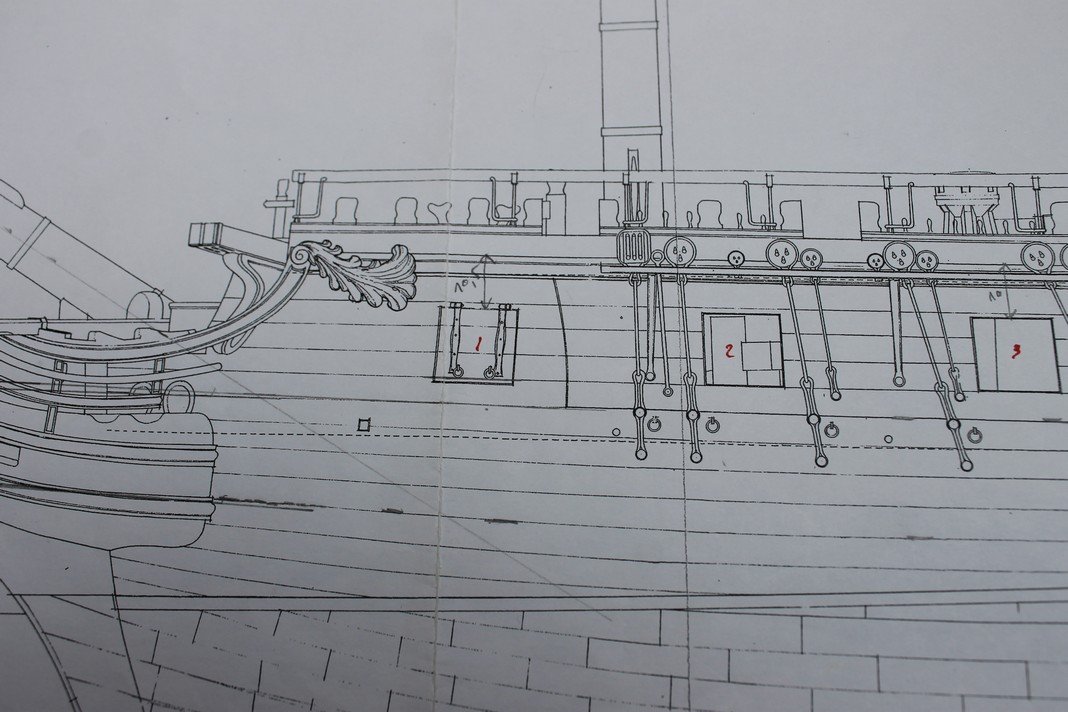
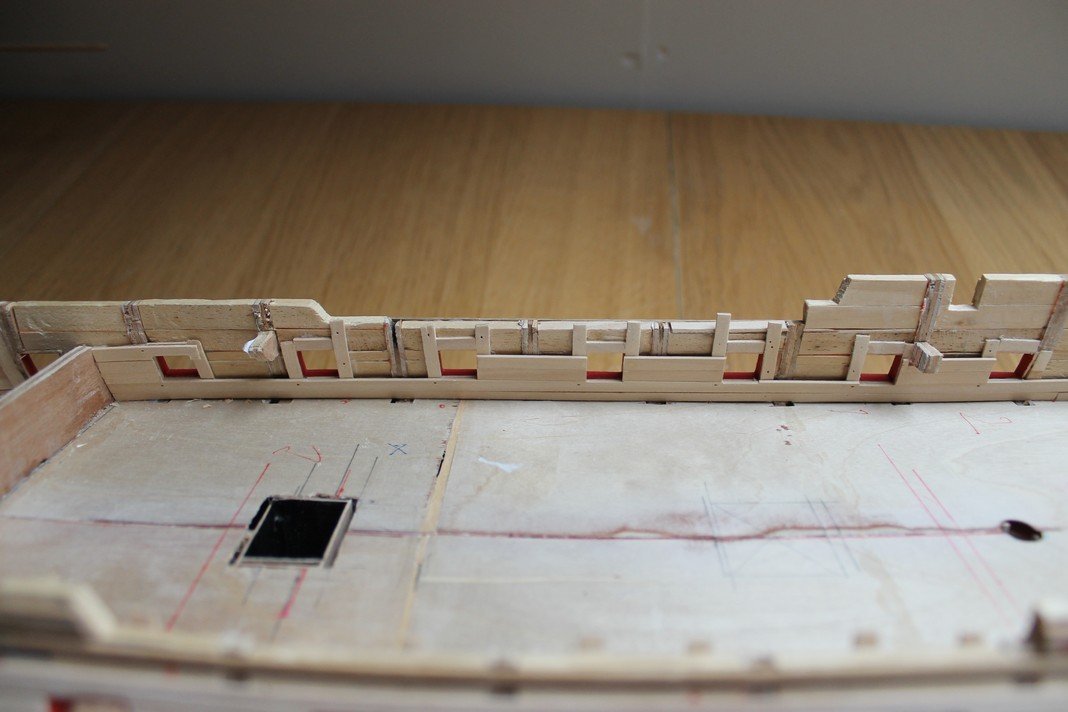
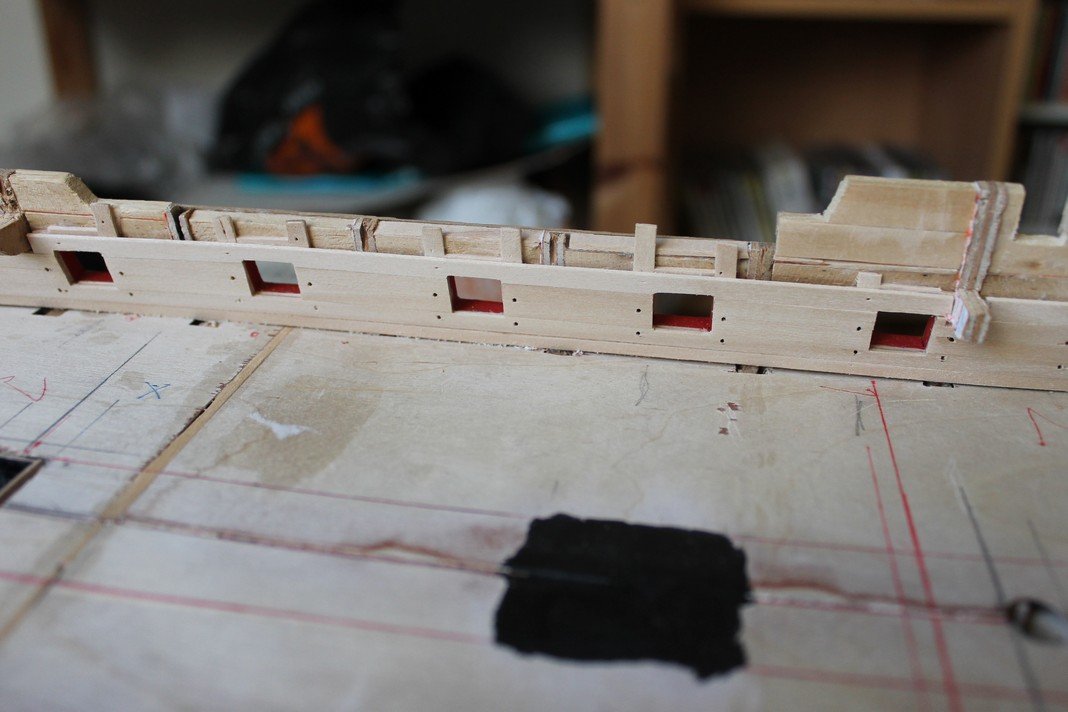
Hi, Among the stern& quarterdeckgalleries, windows are a challenging detail at which I have been struggling quite a bit, lately Tried different approaches and attemps ( see first pic), but last pic shows my best shot so far and until now. Although the appearance seems rather a prison bar than a window frame . The material is light card that received several coats of dilluted PVA-glue for reasons of strength. This was a necessary preacaution as you may notice in the penultimate photo : one arm was slightly warped while sanding. I'd like to give it another try by using smaller card strips but I'm anxious to avoid any warping. All feedback is welcome.


-
What a wonderful and interesting build (as always). Thanks for sharing the historical context. So inspiring as it shifts my attention towards the "smaller" ships. And I'm very aware I'm unfair by using the term smaller.
- 195 replies
-
- 2
-
-
- lady eleanor
- vanguard models
- (and 1 more)
-
Roter Löwe 1597 by Ondras71
Barbossa replied to Ondras71's topic in - Build logs for subjects built 1501 - 1750
Hello Ondras, Received loud and clear 🙂 So let's order some maple strips this evening. -
Roter Löwe 1597 by Ondras71
Barbossa replied to Ondras71's topic in - Build logs for subjects built 1501 - 1750
Hi Ondras, Outstanding job on the deck. I understand you used maple strips. Do they allow a clean cut when you need to narrow them? As I'm looking for alternatives for boxwood but nonetheless good quality. -
Very nice. Your buildlog is both a source of insipration and a benchmark for my own project, certainly when it comes to the finishing touch.
-
Thank you very much, Johann If I were to reach your level of shipbuilding (which I seriously doubt), for me this would be a long way to go, I'm afraid. Also thanks for all the likes : this may sound funny but now matter how this project will evolve, building a proper hull without the usual kit support is already an achievement for me. Finished the wales at both sides but as I haven't made my mind up about what color of paint I should apply starting from the wales to the waterline : - white = aesthetical very nice or -black = historical more correct according to most French ships, I decided to make some drafts to prepare the quarterdeck galleries and as I got along I found out the difference between the 2-dimensional plans and the 3D reality. However everything fits (until further notice, off course). As there's some curves and different shapes involved here : therefore the windows are slightly wider on the upper side compared to the under side. However, these are only drafts. Before I forget : the gaps between the blue painted planks are made in anticipation for some decoration strips

-
Hi Giampiero This is one of my favorite frigates , I'll follow this build with great interest. First pictures obviously show this is far beyond my skills, I have no trouble in admitting.
-
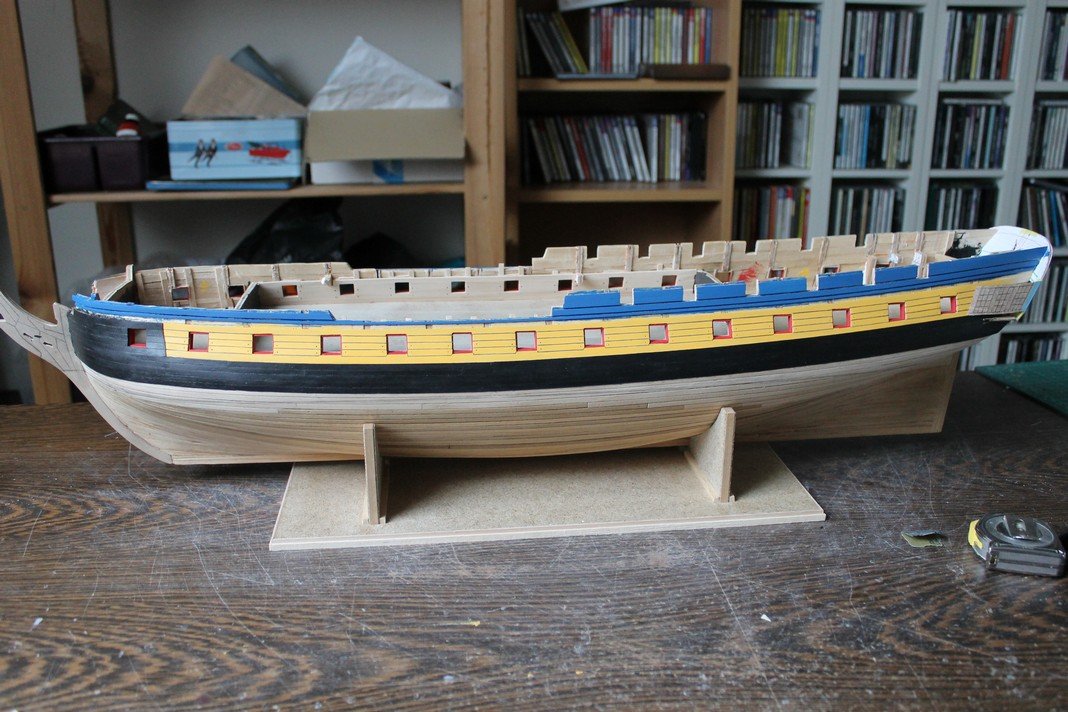
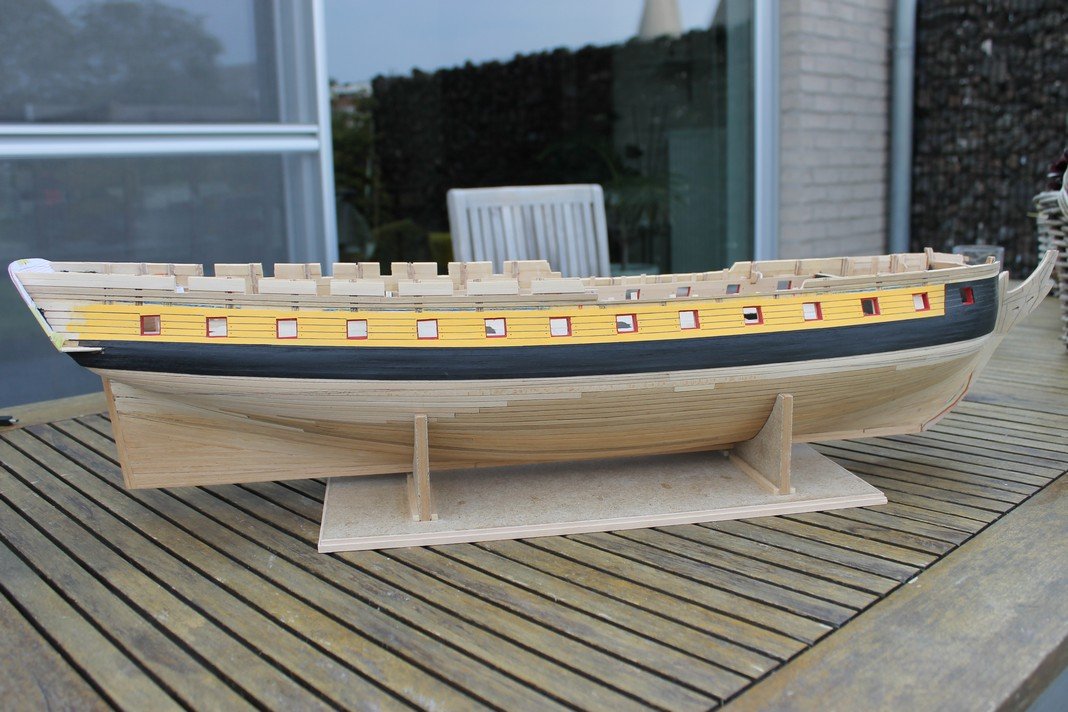
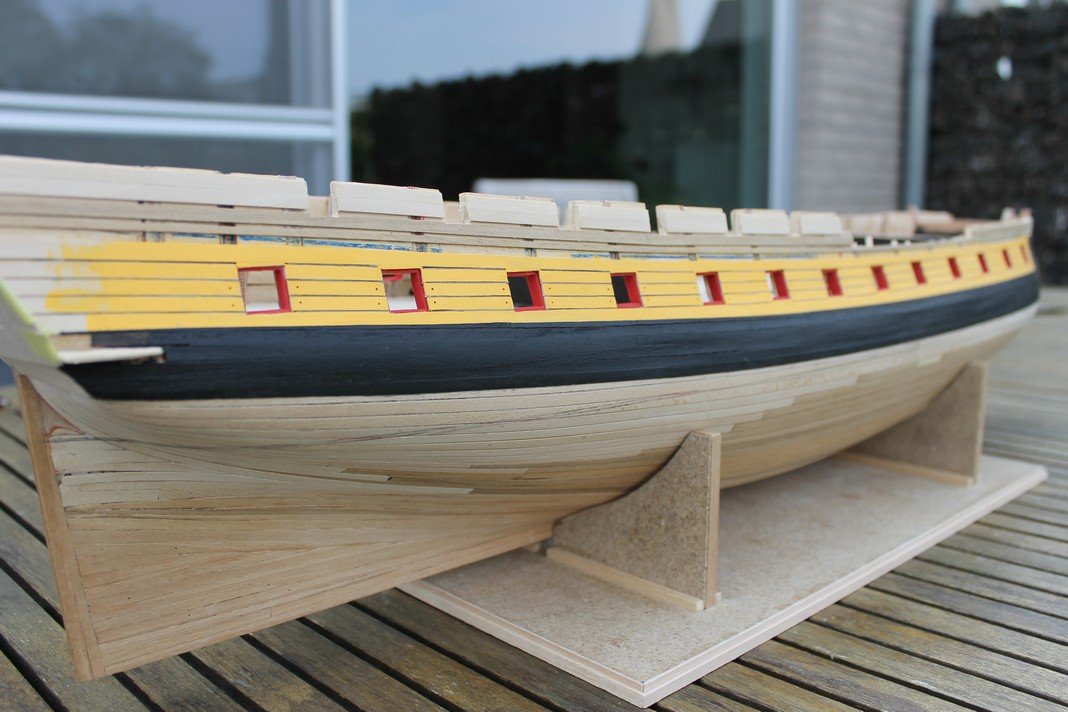
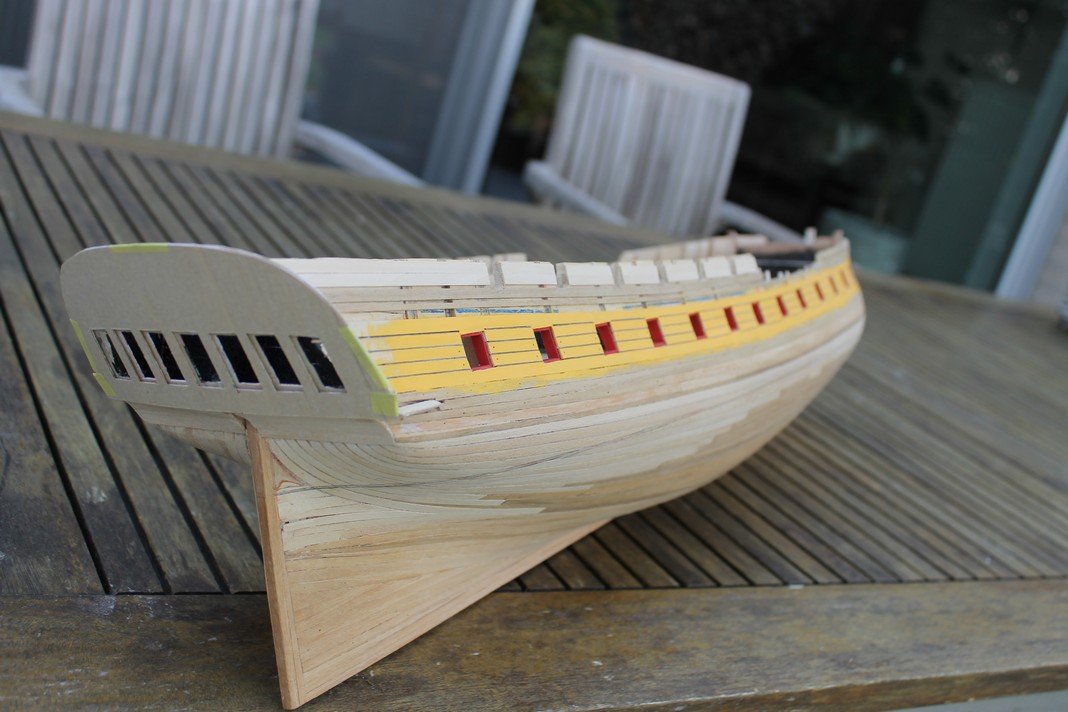
Update related to the wales and so : Added a belt made of extra 0,5 x 4mm walnut strips + sanding with grit 400 sanding paper. As highlighted you may notice some space between the belt and the piece that covers the bow section + first gunport (see previous posts). It allowed me a nice transition between the yellow gunport area and the black belt as I used 0,5x2mm pre-painted strips to cover this. The black paint was purchased in a DIY-store ( Hobbyrama for the curious, but meanwhile the local shop went out of business for reasons not related to Covid-19 ). So no AV-paints involved here. Although totally (from historical point of view) erroneous I personally find the approach with the white paint below the wales quite appealing. I know most of the French ships had everything painted in black instead of white (see last pic) in this area. I'll have to make my mind up about the matter.


-
Hi Patrick, wonderful work indeed and bring on the sausages and the skewers as already suggested . Is this piece of art to be covered , thus hidden forever ?
- 756 replies
-
- 4
-
-
- galleon
- golden hind
- (and 2 more)
-
Many thanks Edward, I appreciate the historical input Thus a brief retrospective update : why the yellow painting ? I notice there is much a do about the use ( dare I say upgrade? ) of boxwood in kits. In addition, I have no clue about the availability of this item ( I mean boxwood strips 1x4 mm or 1x5mm )in the UK but I'm afraid it seems rather hard to find in the old continent. I had a stock of yellow wood of which I didn't even know if the coloring was natural, that I used in my previous build. But : 1) I wanted something different 2) It's obvious in the pic : compared to a 1x4 mm plank the yellow planks seem a bit out of scale 3) also compared to my stock of lime the cut was anything but clean

-
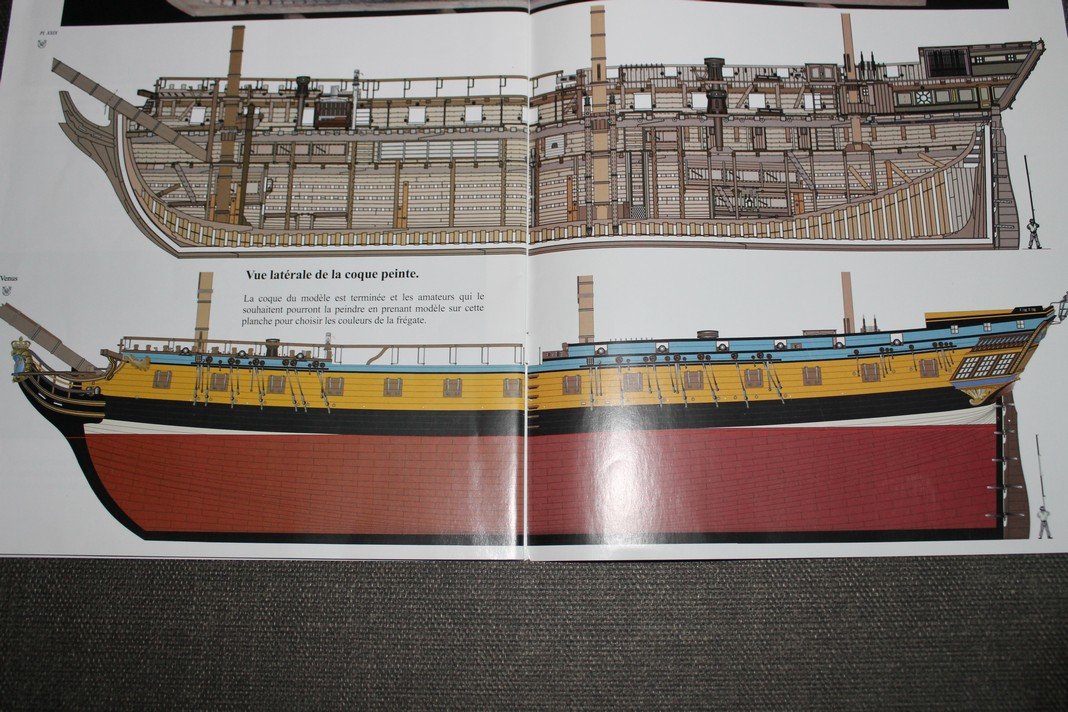
Many thanks for your input Mark But as often, one answer brings on another question, can we assume that french ships in general were built lighter than their british opponents ? Back to my previous post related to the strange pattern between 1st and second gunport My first pic : what tell my plans ? I deviated a bit and made one piece ( second pic). My painting skills are average so I went for this option as it allowed me to cover one single surface decently in black color. Second : Instead of a flat line on the side, i went for a small curve, which made the hole thing a bit more elegant. The lines suggest different planks. Yes one might call this cheating but I can live with it. Finished inserting grey strips between yellow painted planks.( one side) I'm happy with the result as this shifts the focus from the yellow to the separation of the planks which was my intention. With some blue above and more black beneath the gunports + decent copper plates... must say I have some expectations reagerding the color scheme.

-
Wonderful work (as always) Patrick, thanks for sharing as you introduce me in shipbuilding from the (end of)16th century.
- 756 replies
-
- 2
-
-
- galleon
- golden hind
- (and 2 more)
-
Hi Patrick, Thanks for looking in and resolving this mistery. Although this may sound logic, I was wondering why we notice this feature ( mostly ) on french vessels only such as : La Belle Polue (1765 ), L'Hermione, also on many pics I found on the internet related to La Venus.... Thank you, all fine people, for the likes and showing interest
-
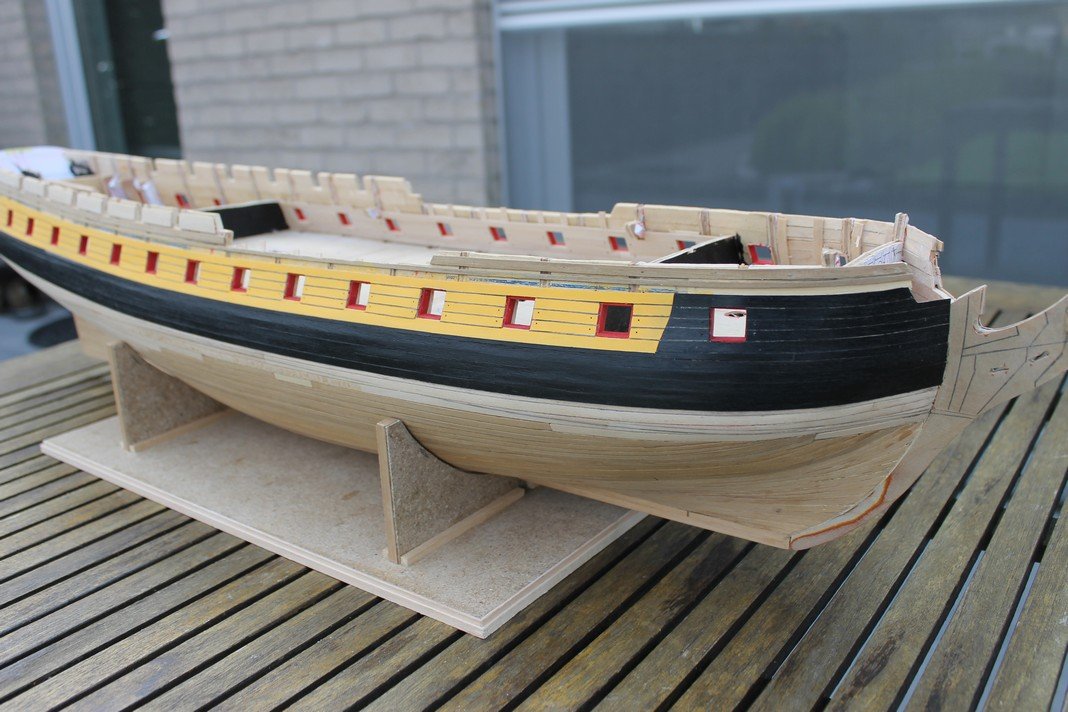
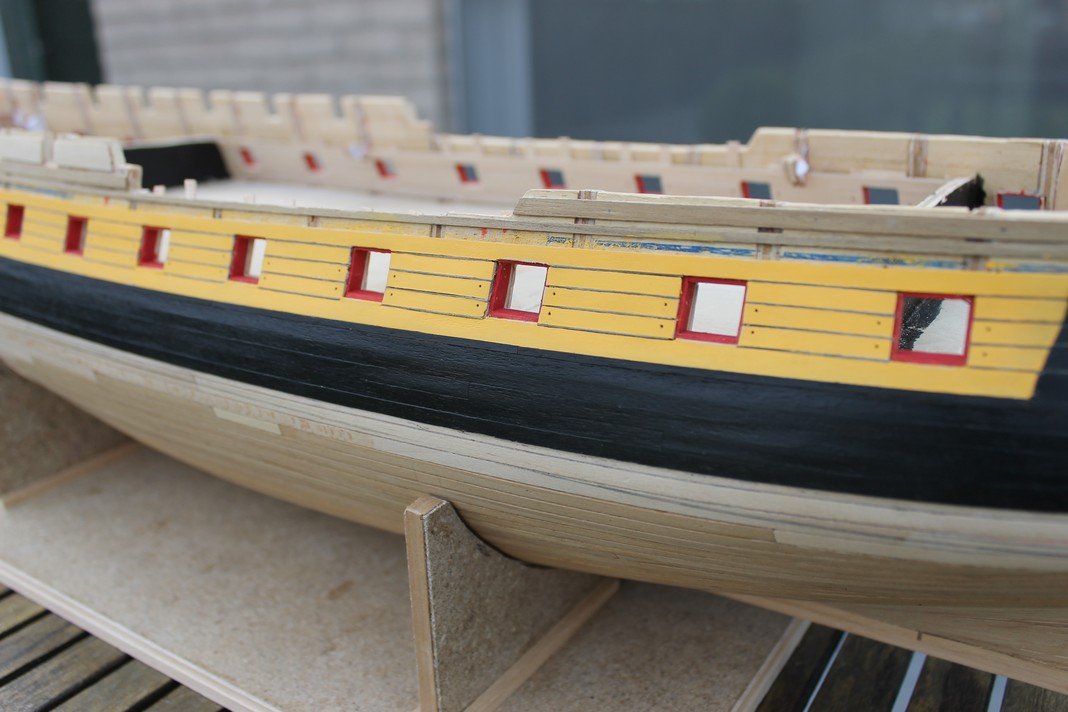
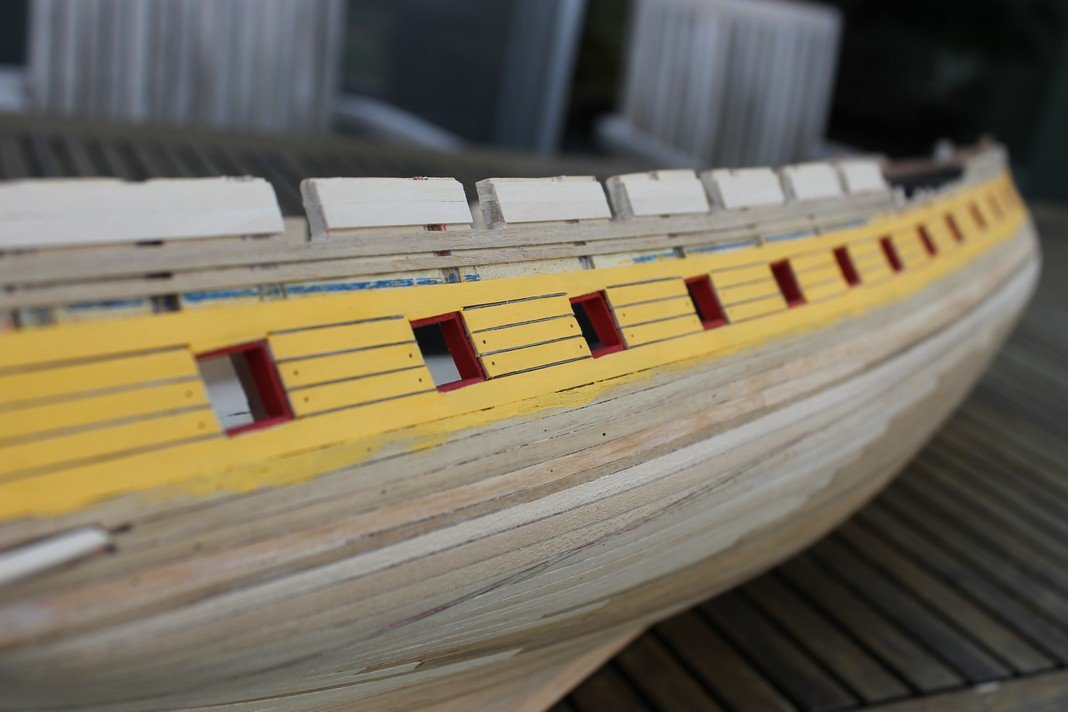
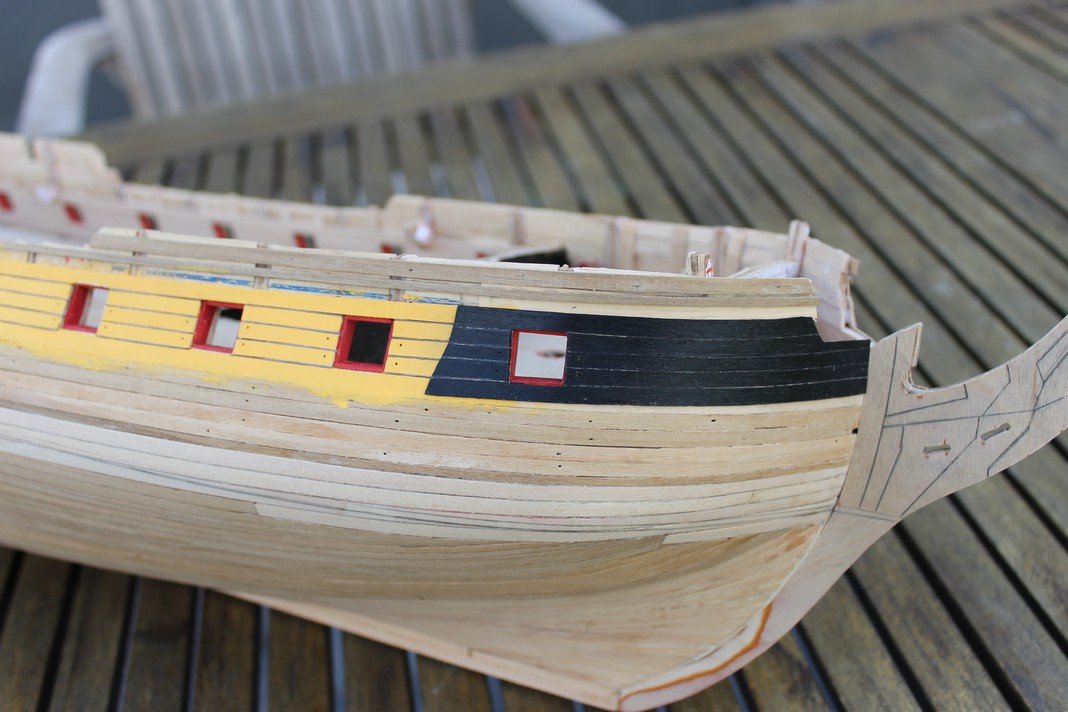
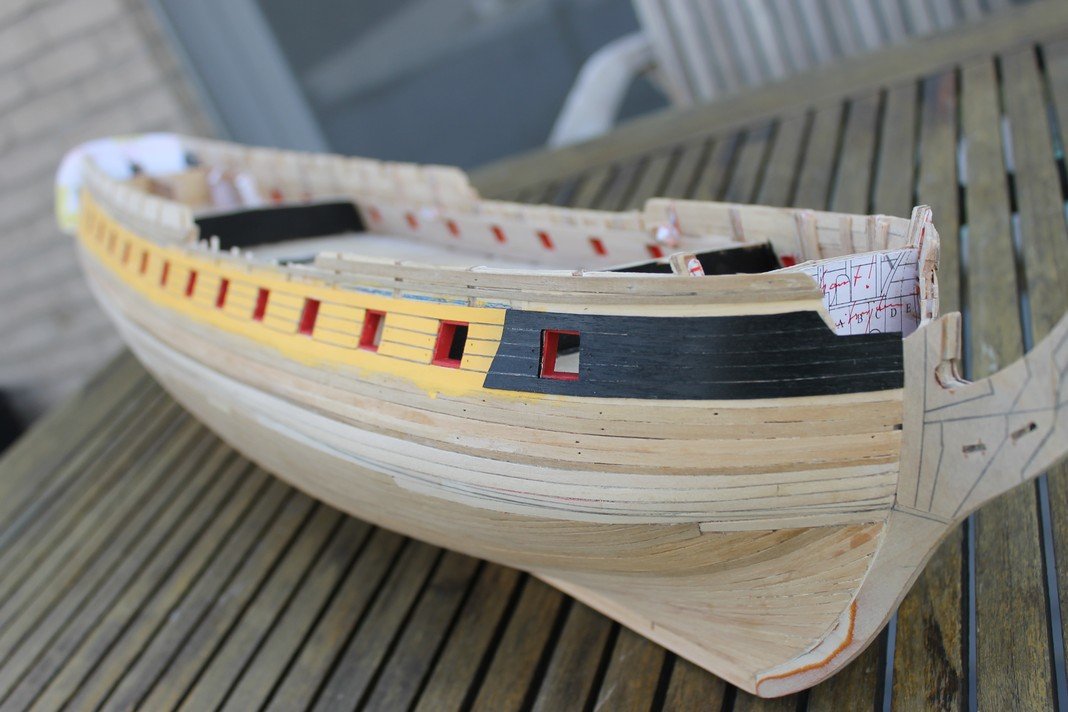
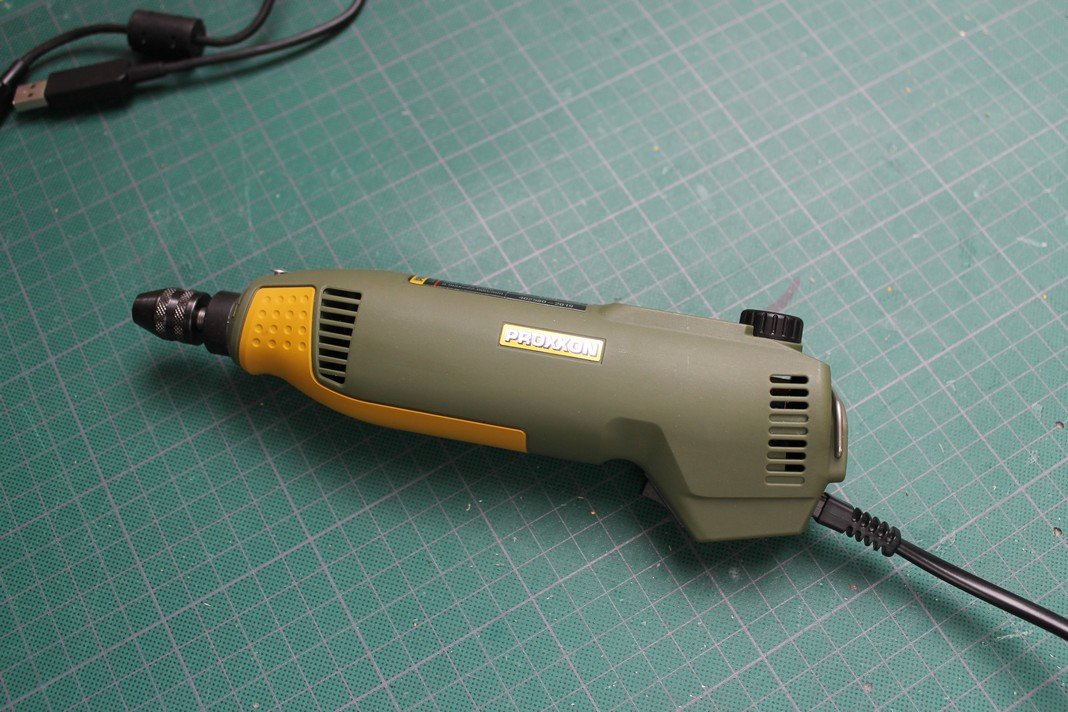
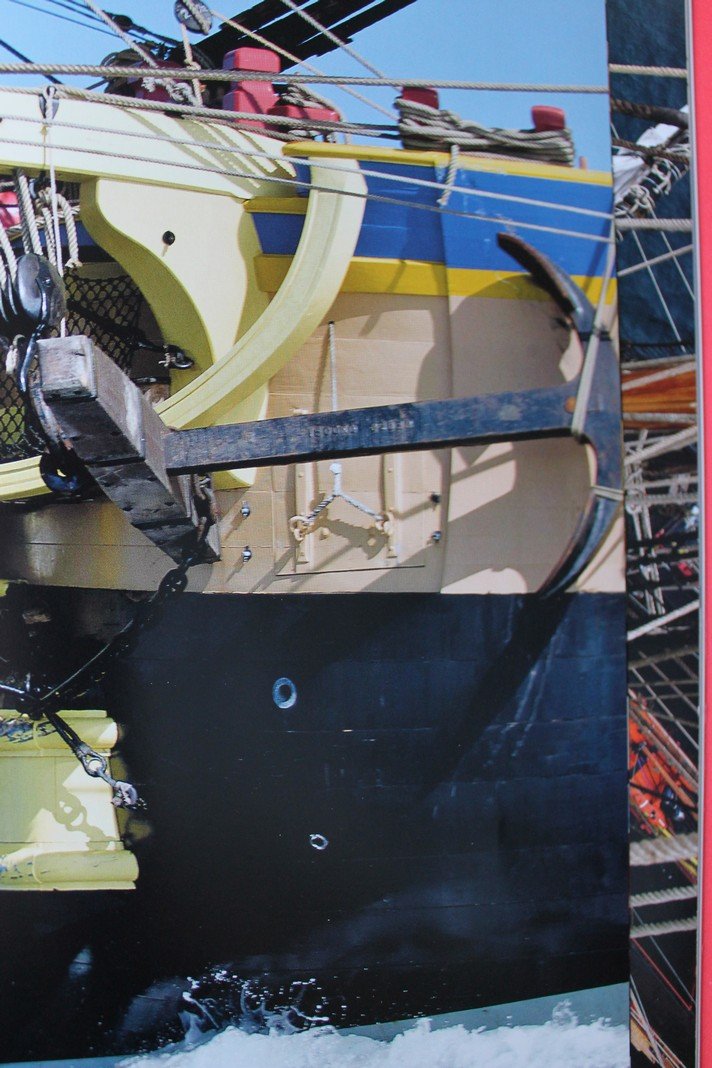
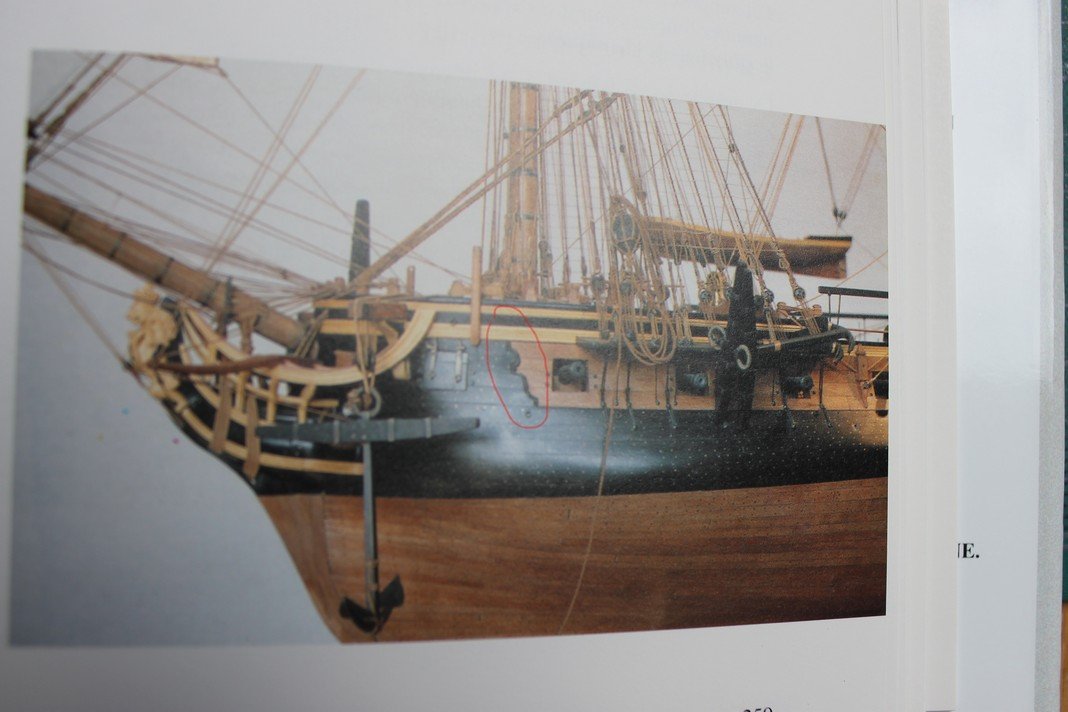
hello, an update just to introduce you to a new friend of mine : a (brand new) hand drill tool and this new purchase already proved to be very useful Now move on to another topic : The difference between french frigates and their british counterparts ( at least in the 18th century ) While executing some research on the internet I noticed the absence of a distinctive wale belt (most french frigates) Beneath the gunports, the wale area seems to continue unto the waterline Furthermore, towards the bow area, the firt gunport is also covered and separated from the second one by some kind of strange pattern ( see pics). Things to bear in my mind. Now finished working on the inner (visible) bulwarks and fored 4 holes for rigiing the guns in a far future. This area is to be painted in red. Also painted the outside bulwarks ( AV golden yellow 70.948 ), you may also notice the fored holes. I gues these are to receive a kind of bolts. ( see pics ) As mentioned in previous posts, planks were a bit separated : this allowed me to insert grey paper.


-
Welcome back Jean-Pierre. Looking forward to this resumption and accordingly, the photo's.
