HOLIDAY DONATION DRIVE - SUPPORT MSW - DO YOUR PART TO KEEP THIS GREAT FORUM GOING! (Only 20 donations so far - C'mon guys!)
×


dvm27
-
Posts
2,457 -
Joined
-
Last visited
Content Type
Profiles
Forums
Gallery
Events
Everything posted by dvm27
-
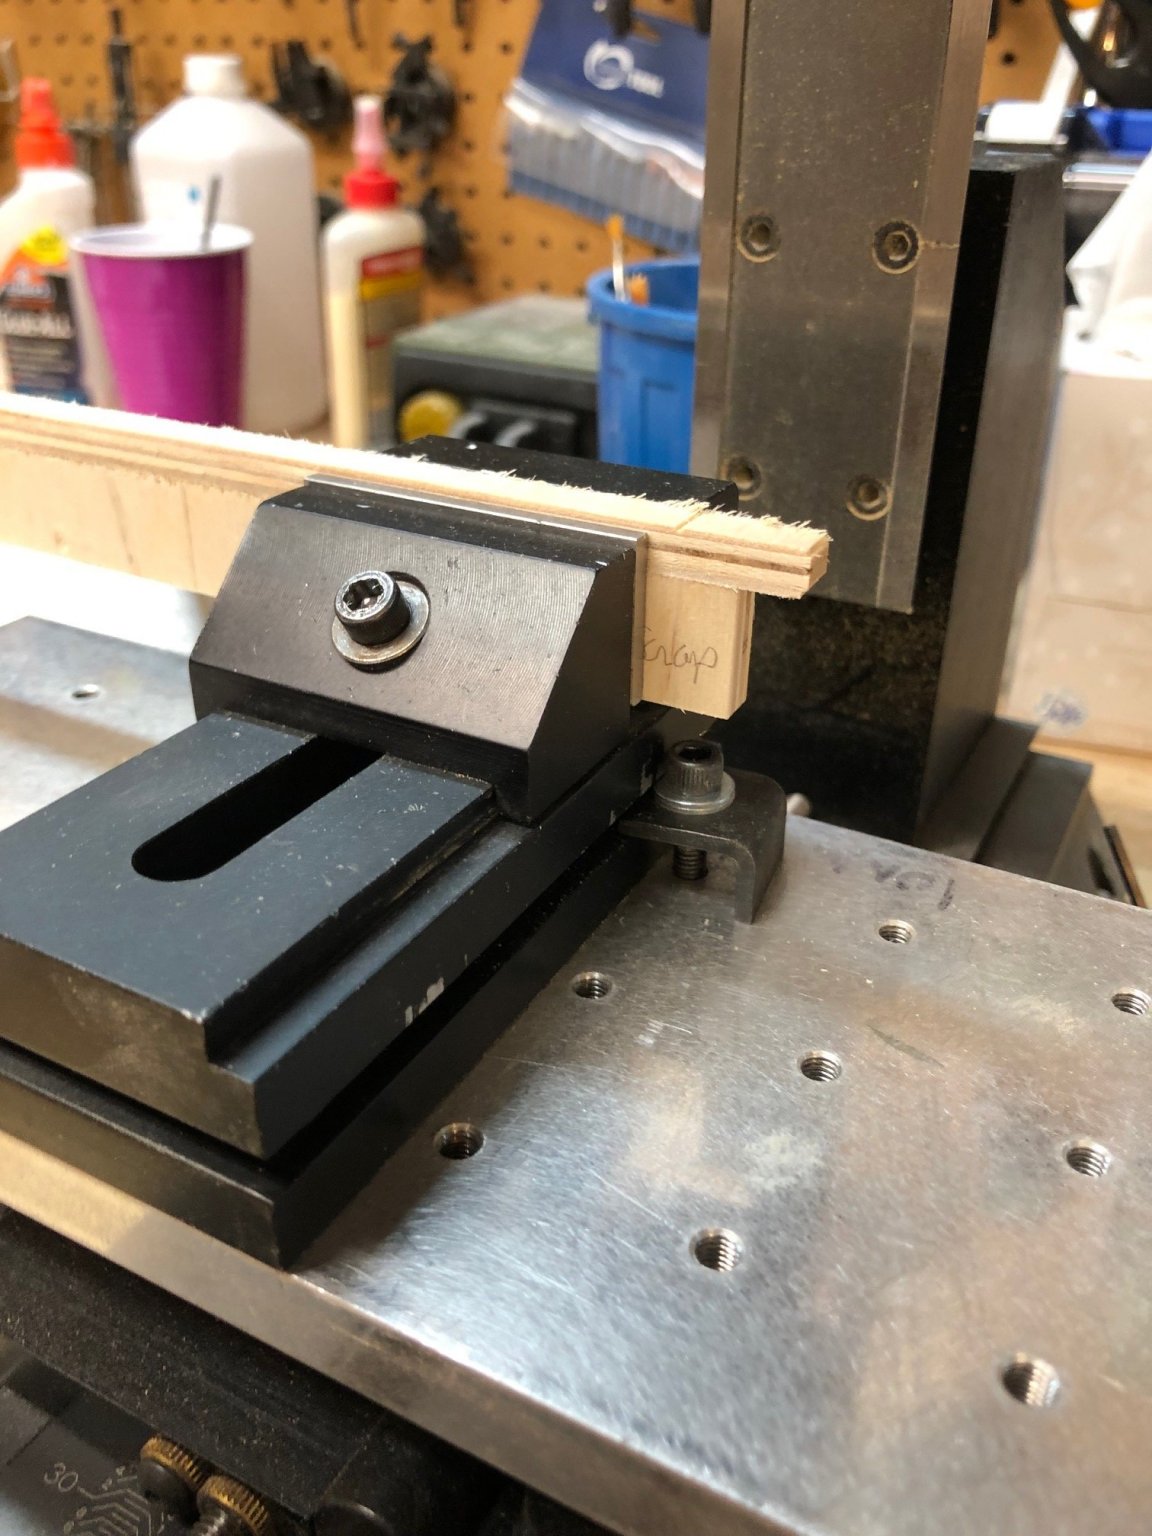
 Good result Kevin. Persistence pays off! When milling it is best to have small pieces like the bitts sitting on a base of the same diameter which extends to the bottom of the mill vice. This base serves as a positive stop so that each face can be rotated without worrying about aligning with the top jaw of the mill vice. In addition, when milling small pieces of wood the tightening of the vice will frequently squeeze the bottom of the vice slightly narrower that at the level of the top of the jaws. This can loosen the grip and cause milling errors. Below is a quick mock up of what I have described.
-
Looking great Clay. Just curious as to how you plan to add the keelson with those bolts secured on top of the floors? As well I found that I needed four bolts (two pairs) to adequately secure the model once all the other elements were added. It gets surprisingly heavy.
-
Thanks for the book recommendation, Druxey. I am very much enjoying the read on my Kindle. Of interest to this forum will be the fact that Moore's first command was aboard the Bonetta, a 14 gun Swan class sloop of war. It was launched in 1779 and broken up in 1792. She's not one of the Swan class I've seen modeled though as no plans of her exist.
-
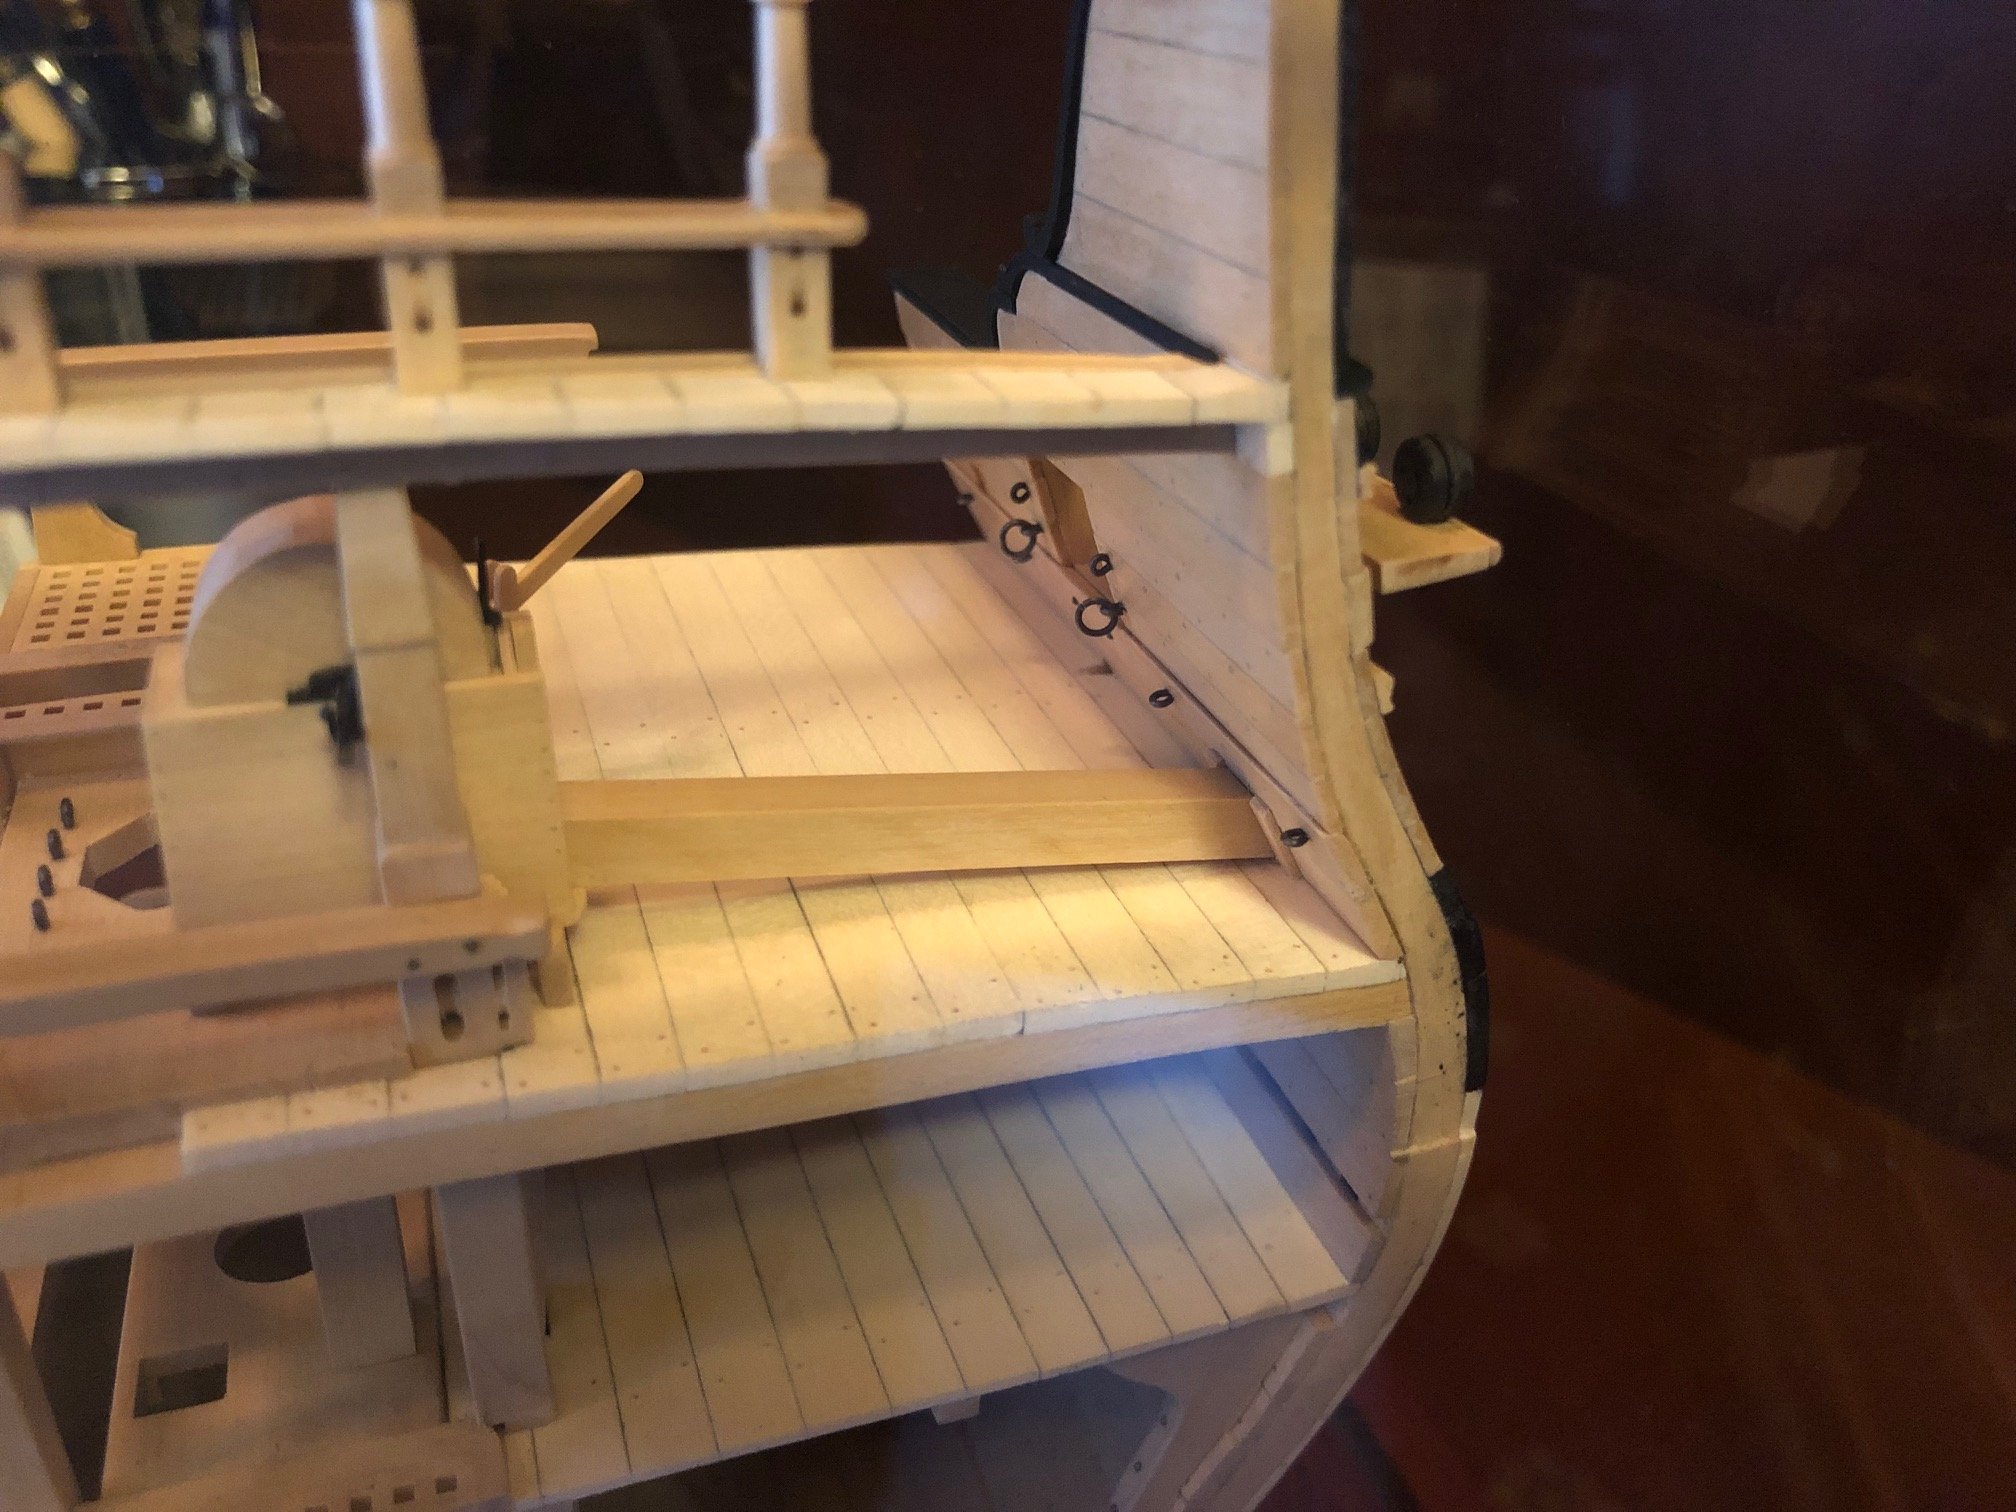
Brian - the pumps were fixed but the pump dales were removable and stowed elsewhere when not in use. Typically there would be a scupper where they discharge from the hull. They are rather unattractive wooden boxes so are seldom modelled along with the more elegant pumps but here is an example from my Echo cross-section.

- 607 replies
-
- 16
-

-
- winchelsea
- Syren Ship Model Company
- (and 1 more)
-
NAIAD 1797 by Bitao - 1:60
dvm27 replied to Bitao's topic in - Build logs for subjects built 1751 - 1800
Your work puts a smile on my face. I would love to see detailed photos of every step in the machining process. A YouTube video would be ideal but I'm sure very time consuming. -
Not only do those blackened caps look nice they also help hide the very difficult to perfect joint with the scrolls/hancing pieces. Of course Chuck's joinery is perfect but difficult for the rest of us!
- 1,784 replies
-
- 6
-
-
- winchelsea
- Syren Ship Model Company
- (and 1 more)
-
Lovely job of fairing the hull. As you said, you can feel when it's fair and it's a real knuckle buster! And yes, leaving those spacers just a little wide create way too much extra work. You may wish to rethink the steel/bronze wool finish. I think 240 grit or so looks great. The steel wool creates an almost unnatural polish to the wood but maybe try it on some scrap to see what you think.
-
Get a couple of paint mixing sticks from Your local paint store. I usually cut them to about 6” lengths. Cut some sandpaper strips of different grits #80 to 240. Use white glue or 3m adhesive to join them. Trim excess off the edges with a blade. Make sure to label them with a Sharpie. FA was my first kit bashed model. Do you have the monograph by Clayton Feldman?
-
Your meticulous attention to detail has resulted in a beautiful model Ryland! I’m sure your kids will fight over who gets it.
- 263 replies
-
- 1
-

-
- Medway Longboat
- Syren Ship Model Company
- (and 1 more)
-
My method of fairing is to apply pencil marks to the edges of the bulkheads and use flexible sanding sticks across them until the pencil marks disappear. The low spots will retain pencil marks so keep reapplying lead until all the marks are gone. I start with 80 grit and work up to 150 for planking.
-
Well, your sequencing may not always be ideal you are obviously very skilled in carpentry. Your framing looks superb!
-
HMCSS Victoria 1855 by BANYAN - 1:72
dvm27 replied to BANYAN's topic in - Build logs for subjects built 1851 - 1900
Looks like someone didn't have a rotary table for the test piece. The holes are not equally spaced at 30 degrees. This where a lathe and mill spoil you as the spider band could easily be turned and reamed on the lathe then drilled in the mill. But certainly not cost effective for just one fitting.- 1,005 replies
-
- 3
-
-
-
- gun dispatch vessel
- victoria
- (and 2 more)
-
Sweet work G. You're doing a great job keeping all those sweep and port sills in alignment. I thought of using brass pins to transfix the frames to the keel but with the keelson and temporary blocking they were amazingly rigid during fairing. As well if you plan on installing the fillers between the lower frames this creates additional rigidity.
-
Looking forward to your take on this model in Navy Board fashion. The Marshall paintings are very inspirational!
- 857 replies
-
- 4
-
-
- Sphinx
- Vanguard Models
- (and 1 more)
-
Portuguese Val Boat
dvm27 replied to michael mott's topic in Building, Framing, Planking and plating a ships hull and deck
Fascinating Michael. Not sure OSHA would approve of the heat bending method. Thanks for the link! -
Well your first POF model looks a far sight better than mine did! You appear to be a perfectionist and I know how hard it must be for you to leave a little extra but just keep in mind that a part of the building process of the real ships was fairing the hull. One frame slightly out of alignment can affect the symmetry of every adjacent frame. My personal preference has always been to fair the hull, especially the bow and stern, after all the frames are raised. Maybe a slight pre-bevel in the curviest sections but never to spec. Fairing a hull is quite fun (and satisfying) after all the frames are raised and supported by blocking. Just one opinion - others have achieved great results fully pre-beveling the frames but they are far more skilled than I.
-
Wonderful work, Mark! I think most plank on frame builders raise their frames from fore and aft towards the center to help overcome cumulative error. However, your precise notching of the rising wood should prevent this. Really enjoying your build.
-
We are all missing your updates, Michael, whatever the project. You’re in an elite league when it comes to model building. Here’s hoping you will get the medical attention you need soon.
-
You can only cut so much with any blade. Surgical blades (such as a no.11) maybe sharper but are somewhat flimsier and designed for single use only. They're designed to cut tissue, not wood. I've had no trouble scoring and cutting thin strips of wood with x-acto blades and I do recall them selling a gold series which seemed to cut better. You might wish to check out the thread by Gaetan Bordeleau on knives though. A proper knife may be more suitable for your needs.
-
NAIAD 1797 by Bitao - 1:60
dvm27 replied to Bitao's topic in - Build logs for subjects built 1751 - 1800
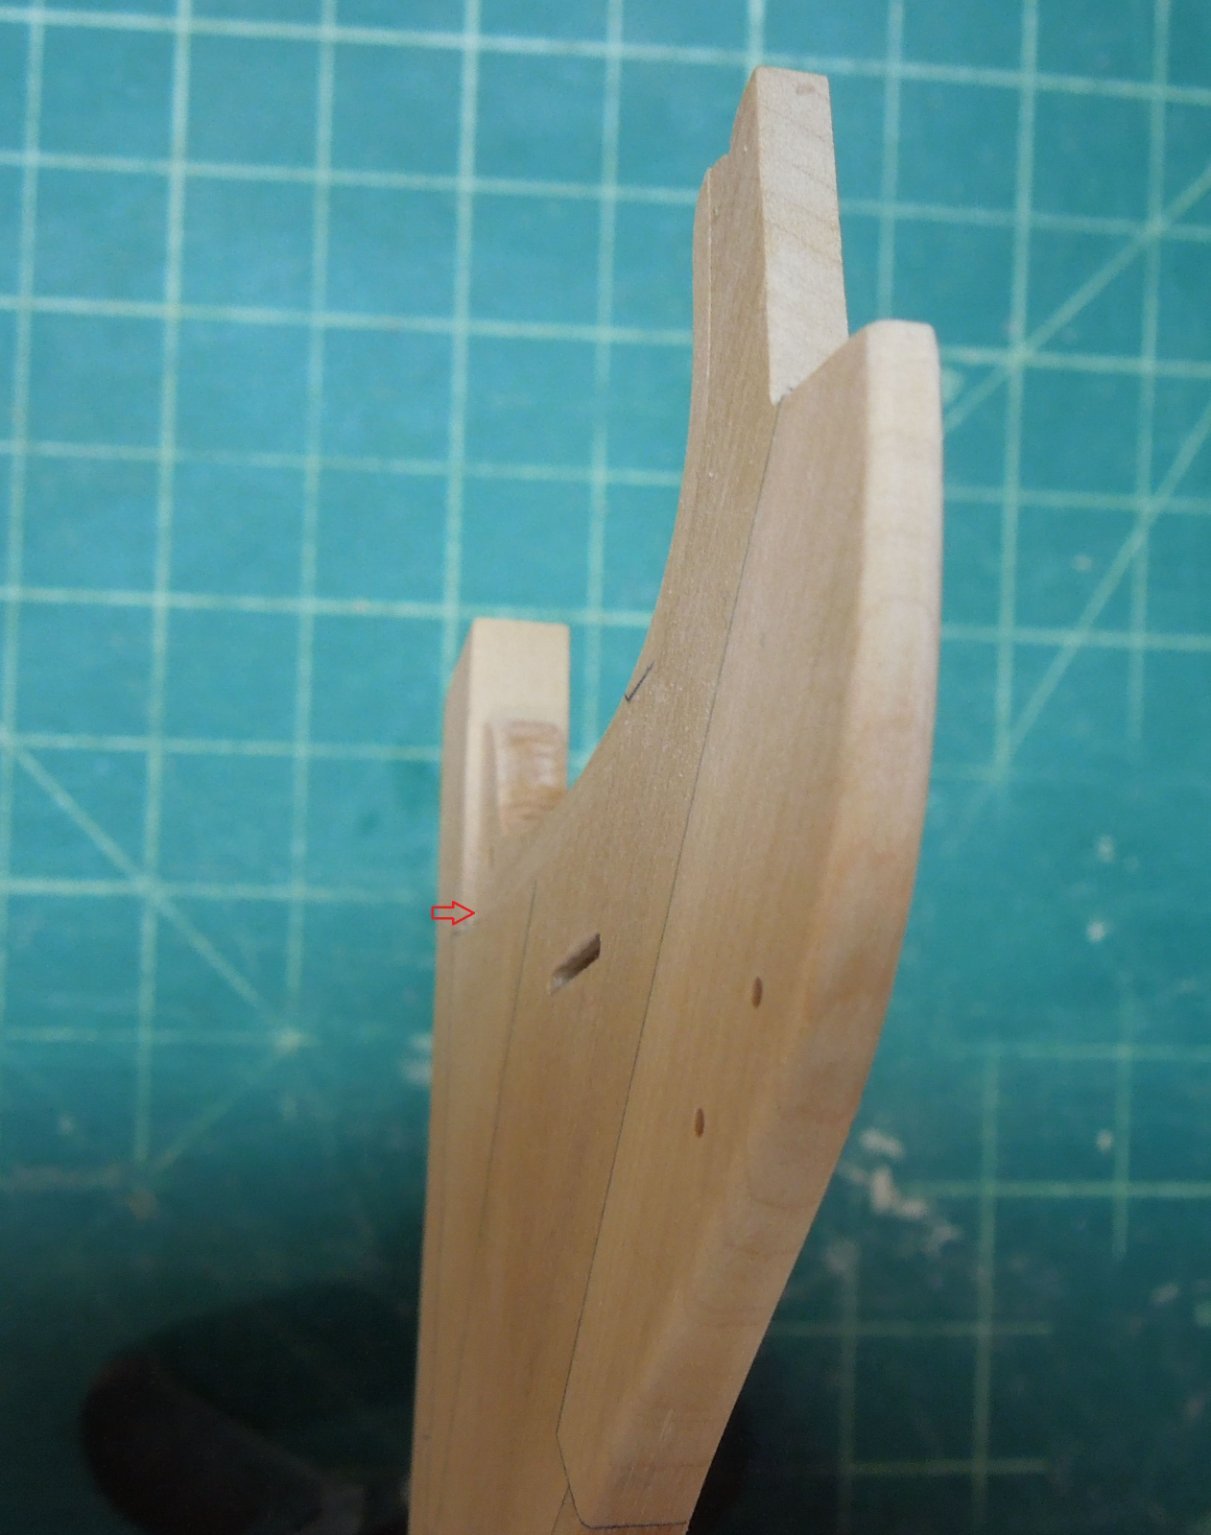
No, Bitao. Those are the hawse and bollard timbers. Look at the photos below. In the first one the black arrow points towards the upper end of the knee of the head. It is where the figurehead sits and tapers to about 6" in width on the Naiad frigate. If you look carefully at Sheet 2 of Ed's plan you will see this taper. The taper also extends down to the lower part of the knee. Ed also discusses this on page 71 (volume 1) "Tapering the Knee of the Head". In the second photo the red arrow points at the standard ("gammoning knee") which sits atop the knee of the head. Note that it is narrower then the stem and knee of the head. Ed mentions it briefly in volume 2, page 272. It would difficult for most people to add this taper once the knee of the head is attached to the model but if you have already done so I believe your skillset will find a way to do this. Hope this has clarified things for you.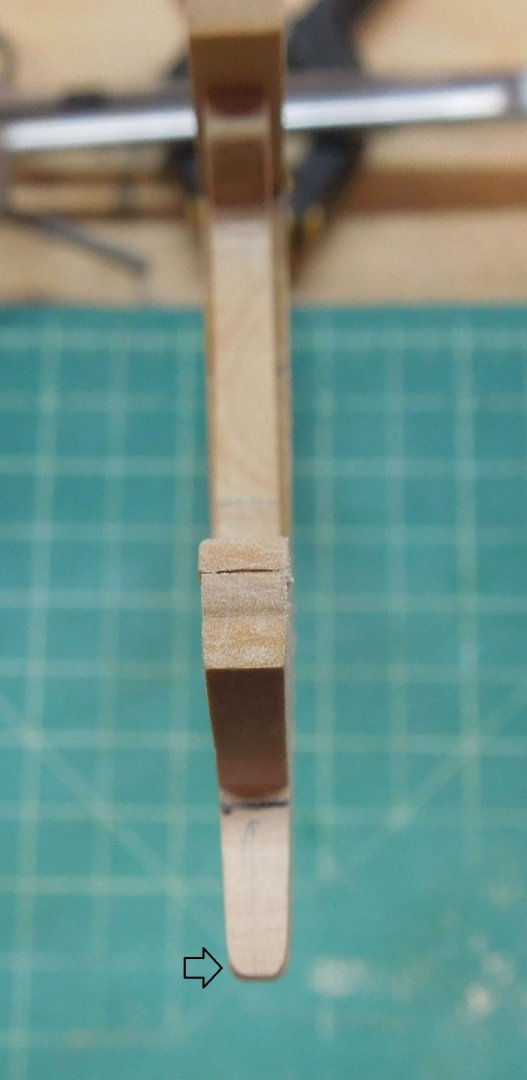

- 371 replies
-
- 11
-
-
NAIAD 1797 by Bitao - 1:60
dvm27 replied to Bitao's topic in - Build logs for subjects built 1751 - 1800
Lovely remake Bitao. Just curious - is the knee of the head permanently affixed to the stem or just temporarily fitted? I'm asking because the knee of the head is usually tapered aft to fore and from the lower to the extreme upper tip. As well the standard usually narrower than the upper knee/stem junction. -
While I applaud the innovation in these POF "kits" there are just too many variables that are introduced including the quality of the laser cutting (or CNC), wood quality and a dozen other factors. A clinker style hull is especially challenging and unless the notched frames are perfectly cut and aligned the average builder is likely to become extremely frustrated with the results. It's been my experience that planking expansions are just a rough guide to the final shape of the plank which can only be determined once the hull is faired. So inexperienced (and experienced) builders should have some reservations about pre-cut planking and framing (unless for a less complex project such as the Syren Models barge)
-
Great fix Kevin! Enjoy your holiday in T&T. You can go with a clear conscience now. Two observations: Part of the difficulty in building a fully framed model for the first time is that it is a learning process. We inevitably make mistakes early one due to inexperience with the techniques that come back to bite us later. Knowing how to fix them is part of the learning process. I believe your use of the heat gun on the aft frames does not bend them so much as to soften the glue. After removing the heat the glue resets in it's new position. Check the centerline again after your time away from the shop to make sure it is still to spec. If it has drifted slightly to starboard again you may need to place a truss rod as Druxey did in an inconspicuous location.
-
That's a very fine and realistic looking coppering job Rob!
- 3,560 replies
-
- 1
-
-
- clipper
- hull model
- (and 2 more)