HOLIDAY DONATION DRIVE - SUPPORT MSW - DO YOUR PART TO KEEP THIS GREAT FORUM GOING! (Only 51 donations so far out of 49,000 members - C'mon guys!)
×


dvm27
-
Posts
2,459 -
Joined
-
Last visited
Content Type
Profiles
Forums
Gallery
Events
Everything posted by dvm27
-
 Naw...I'm not throwing down the gauntlet to Remco. I just thought he'd appreciate the beautiful detail. It's certainly possible that the molded detail might be an embellishment on the part of the ship modeller.
 -
Ben, I use a 6-32 tap and a no. 36 drill bit.
-
Beautiful detail on the gallows cross-piece. Just for fun, I've attached the gallows cross-piece on the Navy Board version of the Swan class model in Annapolis. Note the beautiful beaded detail on the bottom edge. Difficult to do, I'd think, even with a scraper.

- 1,215 replies
-
- 3
-

-
- sloop
- kingfisher
- (and 1 more)
-
Nice job on those intake chambers. And they are certainly visible on the finished model...with a high intensity focused light aimed at a precise angle. Any of your ENT illumination devices should do nicely. Make sure the bottom of your pump tubes fit into the chambers. Mine were a bit fat at first and wouldn't fit between the rollers.
-
Echo by Maury S - FINISHED - Cross-Section
dvm27 replied to Maury S's topic in - Build logs for subjects built 1751 - 1800
Maury, On the port side I just added the clamps and a couple longitudinals. On the starboard side I've added all the planking. The updated text file on the Admiralty Models website has a few photos of this. I would add the upper and lower clamps first as their placement is crucial, then add the filling planks. -
Echo by Maury S - FINISHED - Cross-Section
dvm27 replied to Maury S's topic in - Build logs for subjects built 1751 - 1800
Everything is looking perfect Maury. Now is the time to decide how you are going to finish her. Fully planked insideand out? Planked on one side only? Interesting questions. -
There's nothing cooler than a submarine model. I look forward to seeing how one is built.
-
Do the moderators have a policy on members adding photos or illustrations to others builders logs? For example, Mark Sloane mentioned an issue he had making gratings so I posted my solution but under a new topic elsewhere. Perhaps some builders may take exception to others posting photos to their log. Opinions?
-
ancre Le Fleuron 1729 by rekon54 - 1:24
dvm27 replied to rekon54's topic in - Build logs for subjects built 1501 - 1750
Your work is much appreciated by everybody! -
Beautiful start, Adam. I look forward to your build.
-
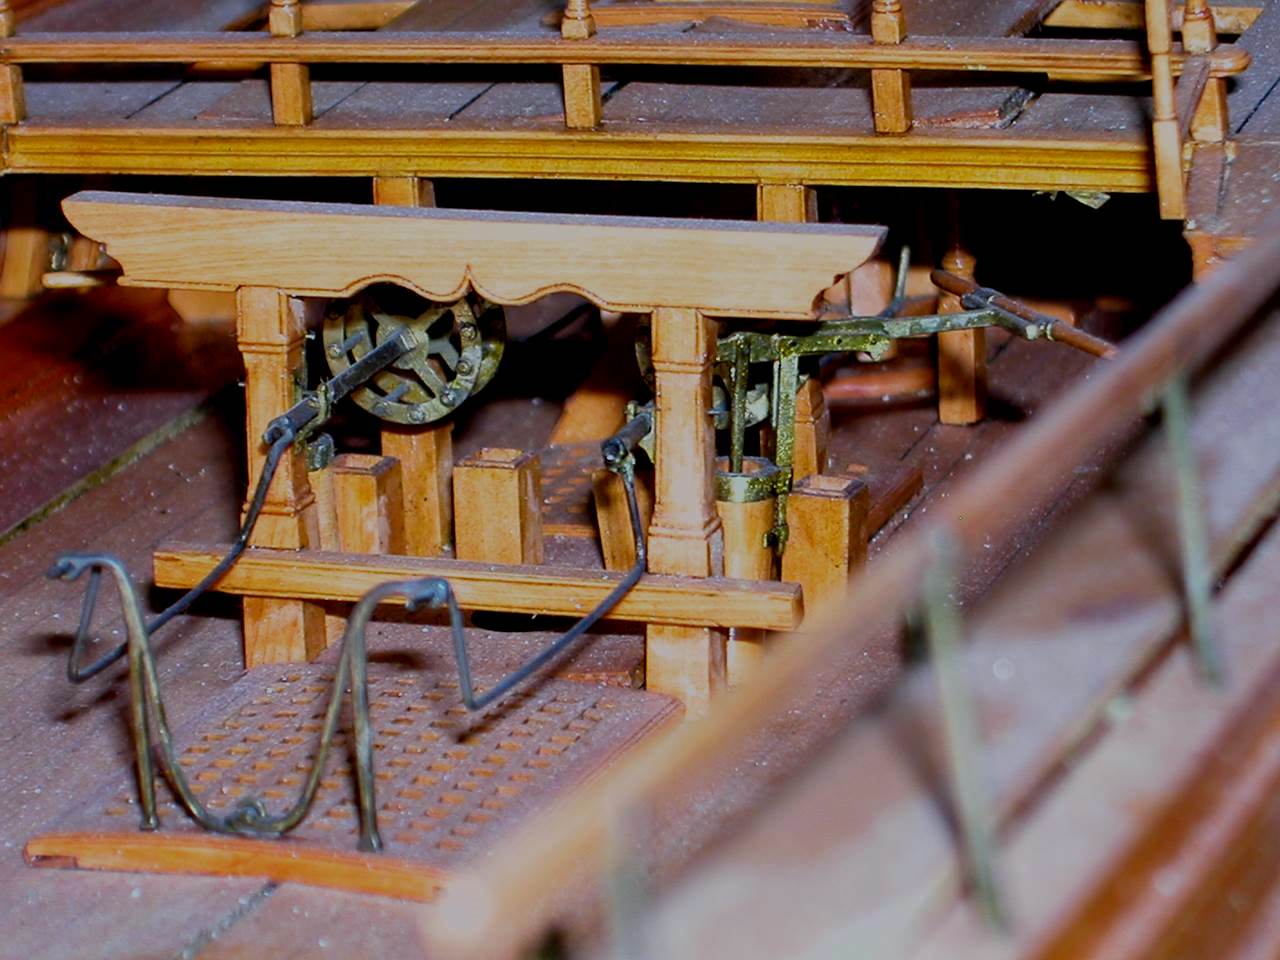
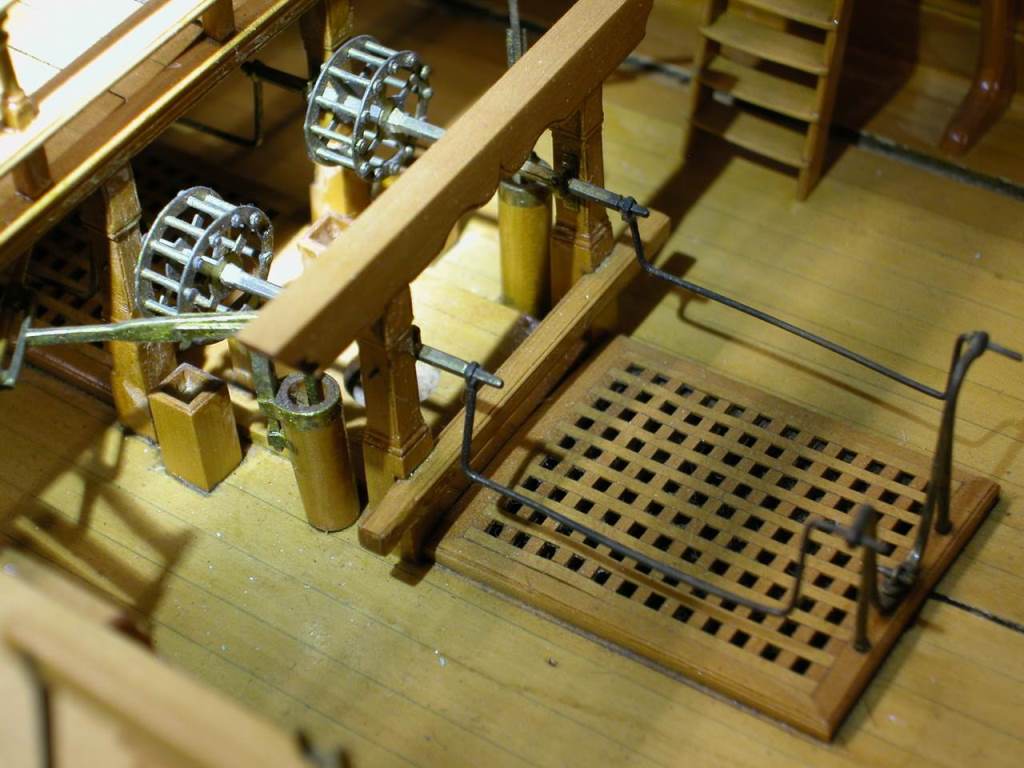
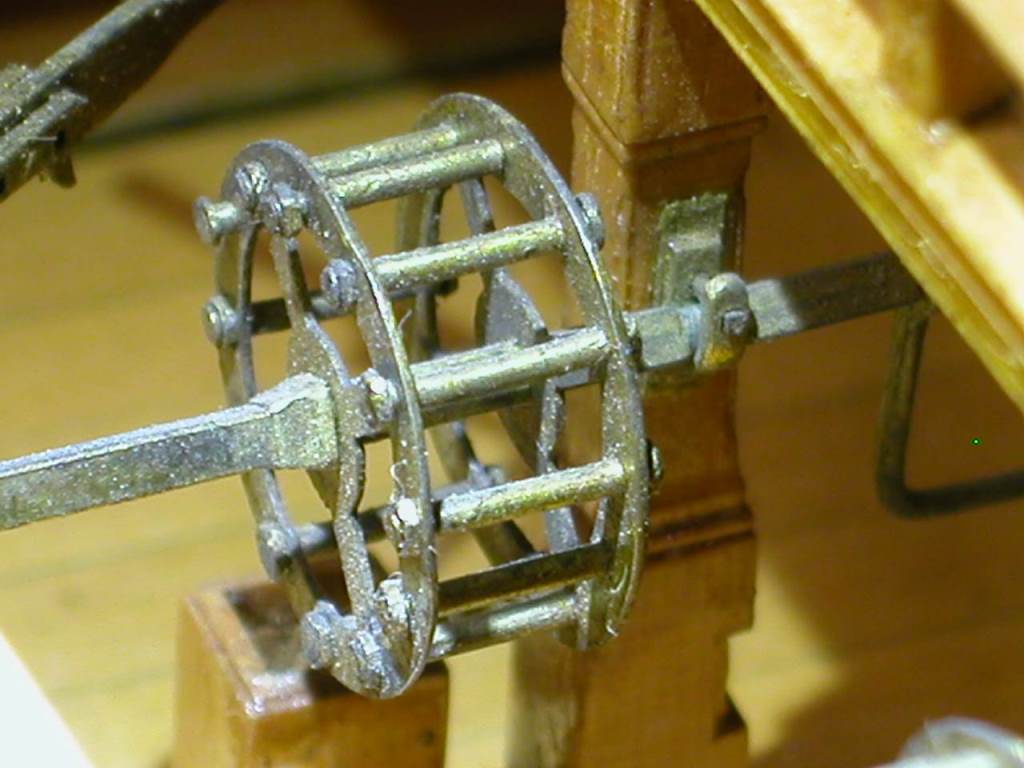
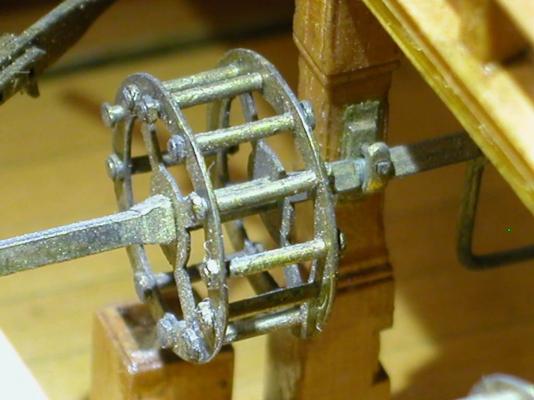
Dan's excellent work on his chain pumps prompted me to post these photos from Model No. 43, the Swan class model in the Naval Academy Museum collection. Keep in mind these chain pumps were made over 250 years ago by hand. No photo-etching. Of course these Navy Board models were built by teams of the best craftsmen of the time and the chain pump was no doubt made by a master jeweler.

-
Excellent, Remco! My Swan was O.K. but I believe yours may be the definitive version of the class.
-
Looks very good, Ben, but a bit hard to tell from the photo. And end on view might show it better. Here's how the garboard fits into the rabbet.

-
Perfect work, as always, Remco. Are you going to go a step than I did and add the recessed faces to the angled tops of the bitts?
-
Lovely carvings, Bill, as always. It looks like some of the details are very small and thin in the final versions. Do you repair breakthroughs or is your scrap box rather hefty?
-
Spectacular work, Ed. Two questions. Did you show construction of those long clamps which you used to secure the bottoms of the riders while gluing? And who makes the paint Euro Boxwood?
-
Great job on those pump chains, Dan. They were indeed very labor intensive.
-
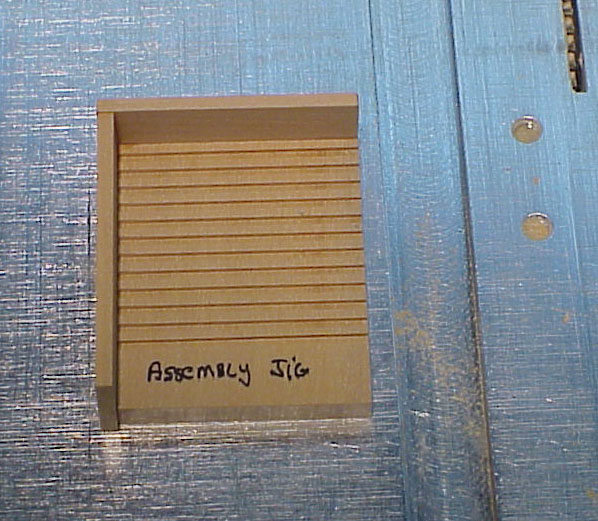
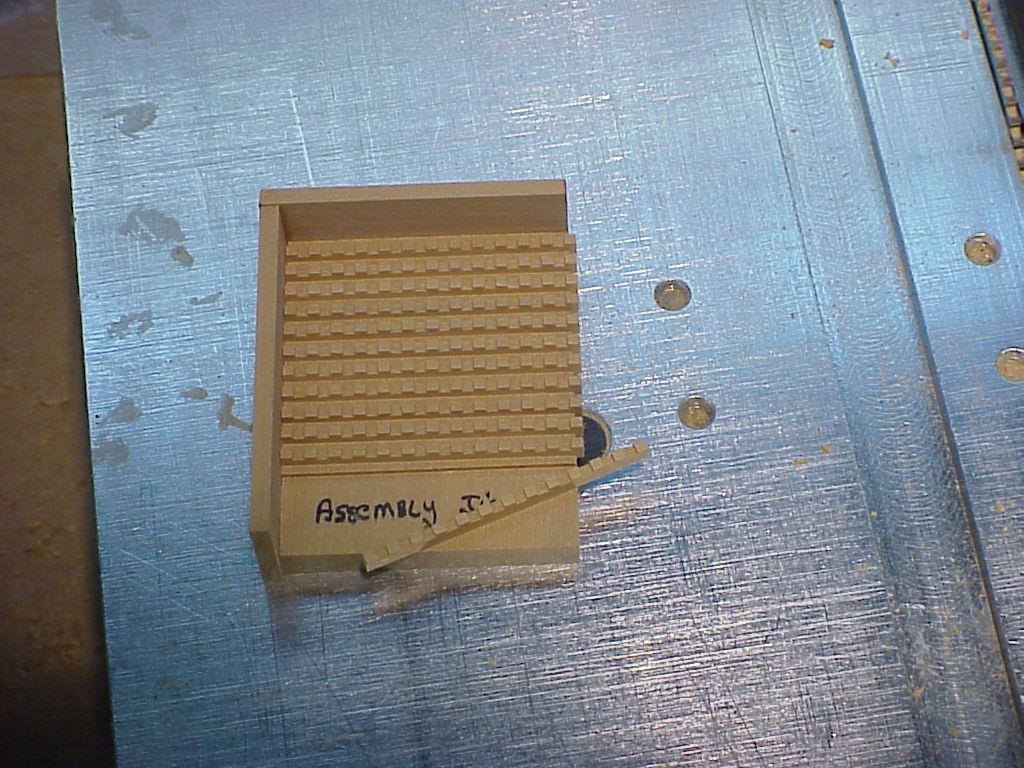
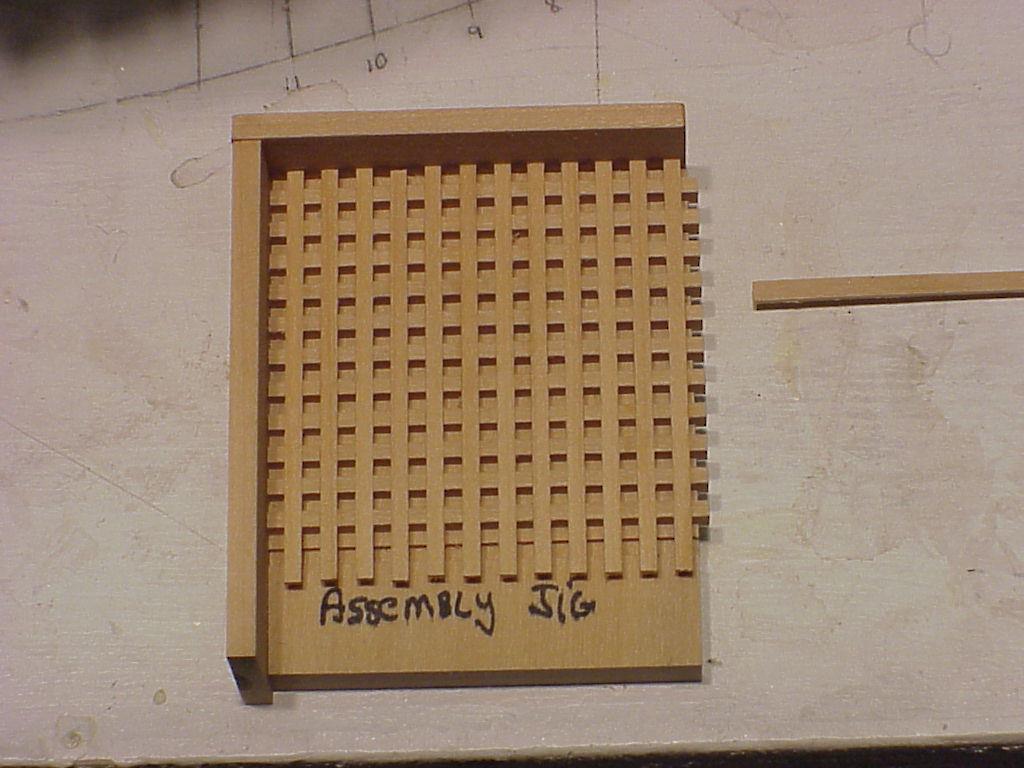
Making gratings
dvm27 replied to marius's topic in Discussion for a Ship's Deck Furniture, Guns, boats and other Fittings
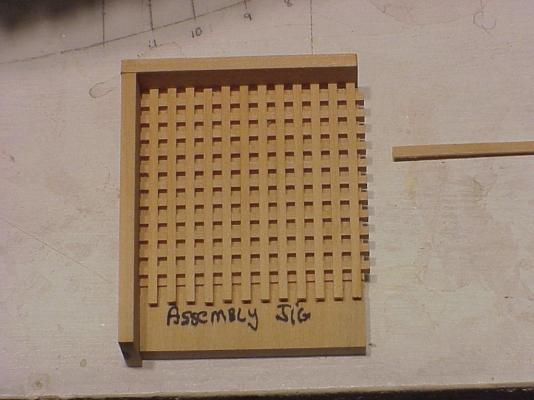
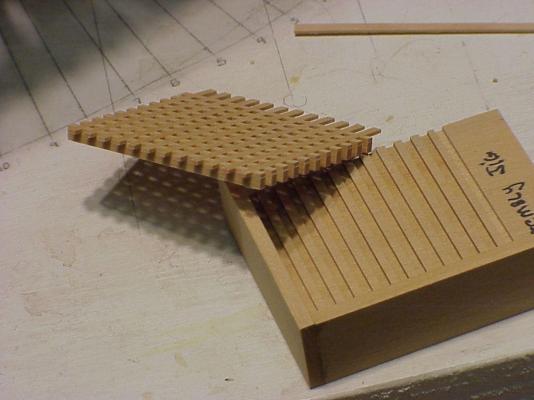
Mark mentioned in his Bellona post that he had had some difficulties aligning the strips of gratings during assembly using the traditional technique. I've attached a few photos of a simple jig I made to keep the grating ledges in alignment while gluing up the gratings. The jig consists of a square of wood with slotted recesses for the ledges. On two sides stops were added. The gratings ledges are placed in the slots. The battens are now glued in place. I use dilute white glue as they are a press fit. The assembled gratings are removed. The round up has yet to be added.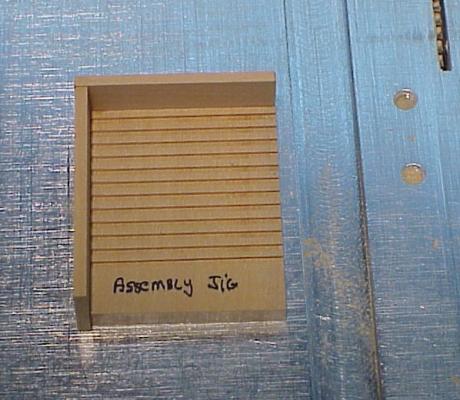

-
Let me know how they turn out, Mark. I've done it that way also (Clay Feldman published the technique many moons ago). It worked fine but I realized I didn't make the scores deep enough to accommodate the round up the first time.
-
Not sure how you found this list Archjofo but I'm very happy you did. Your work is beautiful, both wooden and metal.
-
That's a great start, Ben. make sure that when drilling and inserting the treenails you position them below the rabbet as per the illustration.
-
Echo by Rustyj - 1:48 - cross-section
dvm27 replied to Rustyj's topic in - Build logs for subjects built 1751 - 1800
Great job Rusty. if I may make a suggestion - make a port template out of scrap wood. Use that blank of wood as a guide when raising the cast frame 3 aft. It is very important to get the spacing between the toptimbers 2 fore and 3 aft exactly correct and this spacer really helps. -
The paper I use is thin, acid free paper. I'll see if I can thickness it later.
-
Damn but your work brings a smile to my face Remco!
-
Papegojan 1627 by mati - FINISHED - 1/48
dvm27 replied to mati's topic in - Build logs for subjects built 1501 - 1750
Brilliant work, Mati!