augie
-
Posts
4,669 -
Joined
-
Last visited
Content Type
Profiles
Forums
Gallery
Events
Everything posted by augie
-
 Looks good from the outside. But it REALLY looks terrific from the inside on that last photo.
 -
Hey Keith----- looks like we beat that horse to death
-
A little tough to tell from the photo what bow you refer to. As a general statement the deck usually has a gentle curve when viewed from the side. This curve will follow the sheer line of the hull so the low point is just about amidships. Usually the scuppers or drains were placed there to allow any water to drain from the low point. Also, most decks have a 'crown' at the center much like a highway. That high point down the centerline allows any water to drain off to the sides of the deck and then out those same scuppers.
-
It's good to have an impartial ship inspector in residence. Another pair of eyes. I can't tell you haw many hours I've worked around a glaring fault without seeing it. The my Base Commander comes by and notices something. It ususally starts with 'is this supposed to look like that'? Now some unsolicited advice. DO NOT, repeat, DO NOT open that Syren box. You saw what happened to Adrieke when he just took a 'peek' at his new Gorsch Fock!
- 773 replies
-
- 1
-

-
- san francisco ii
- artesania latina
- (and 1 more)
-
I didn't know they were going to have a 'Modern Impressionist' section of the calendar. 'Yards on a Paper Towel' or 'Dreams on Terrycloth'. Hmmmm.
- 1,668 replies
-
- 3
-
-
- syren
- model shipways
- (and 1 more)
-
Sherry - send me the bill for postage to the Netherlands!
-
Mercury by DSiemens - FINISHED - BOTTLE
augie replied to DSiemens's topic in - Build logs for subjects built 1801 - 1850
She's a really nice touch Daniel. -
ME TOO! :D
-
26 out of 261. Rivals doing ratlines
-
Rod- Come on ---- Chuck has some great photos on this!!! Lambsbk - thanks for stopping by. Yes, there's something about wood. But don't knock plastic or card. Check out Paul Salomone's build on the Scharnholtz! Keith- Wire was Chucks idea. I'm just a the technician over here
-
Looking good Robbyn.
-
You're a pefectionist JP. Never give up!
-
OK, she's got a slight bend. The technique you used should work. As a firefighter (thanks for that by the way), you're probably the only person on the forum strong enough to lift those weights . Give it plenty of time to dry....like a full day. If it's still out of whack you can repeat the process and even 'overbend it' just a little by placing something under the center and weighting down the ends. Plywood is notorious for springing back so usually overbending will allow it to relax to the straight position. The filler blocks you saw in another forum are your last line of defense if the warp comes back after the bulkheads are glued in. A little 'creative clamping' can come in handy at that point. Getting her straight is important as you don't want a 'banana' when your 6 months down the road. This problem is more common then you would think.
-
Don't feel bad Andy. Took me 3 hours to strop on 6 brace pendants this morning. It's how you get your money's worth out of a kit
- 153 replies
-
- 1
-
-
- constitution
- revell
- (and 2 more)
-
Sherry -- they are really neat and easy. Just pick the proper scale for the wire. I'm @ 1:64, you @ 1:96. Sjors -- Next year sounds good. And yes, another foot of snow coming tonight (that's 0.3m for you folks on that weird system). By the way, what are you cooking for dinner? I heard Anja was pretty busy
- 1,668 replies
-
- 1
-
-
- syren
- model shipways
- (and 1 more)
-
Darn it David ------ that's one of our 'secrets'. You didn't get that far yet They do make the frame stiff, straight and strong. And they keep it that way. In fact once you do the planking you could use the hull as a Louisville Slugger.
-
Nice looking stuff Hamilton. You need to make 36 of those. May as well enjoy it as there is plenty of stuff you'll need to make 128 of
-
Great to see you up and posting again Paul. Great stuff!
-
Nice work there Jason. I used laminated blocks myself and it worked out well. Really take your time on fairing, checking constantly with a plank to make sure the run is smooth. Fairing is the foundation for what's to come. Well done!
-
Thanks David. Looking forward to progress on your Corsair soon.
-
Thanks Andy, Wayne, Popeye, JP, John, Mark, Robert, Tex and Daniel for your interest and encouagement! Bob- I'm not worried about the last storm --- I've first to get out of the fog and get hanging the yards square in my head. Grant- I'll send you a PM
-
OK, just because I like you, here's the secret chart: http://www.jetpens.com/articles/Article:_Picking_the_Perfect_Pencil_Lead_Hardness Be wary that 'harder' doesn't necessarily mean stronger. Your 0.5HB is what we mere mortals call a #2. A #3 would be 'harder' but might be more brittle. You could also try getting a pencil that uses thicker 'lead'.
-
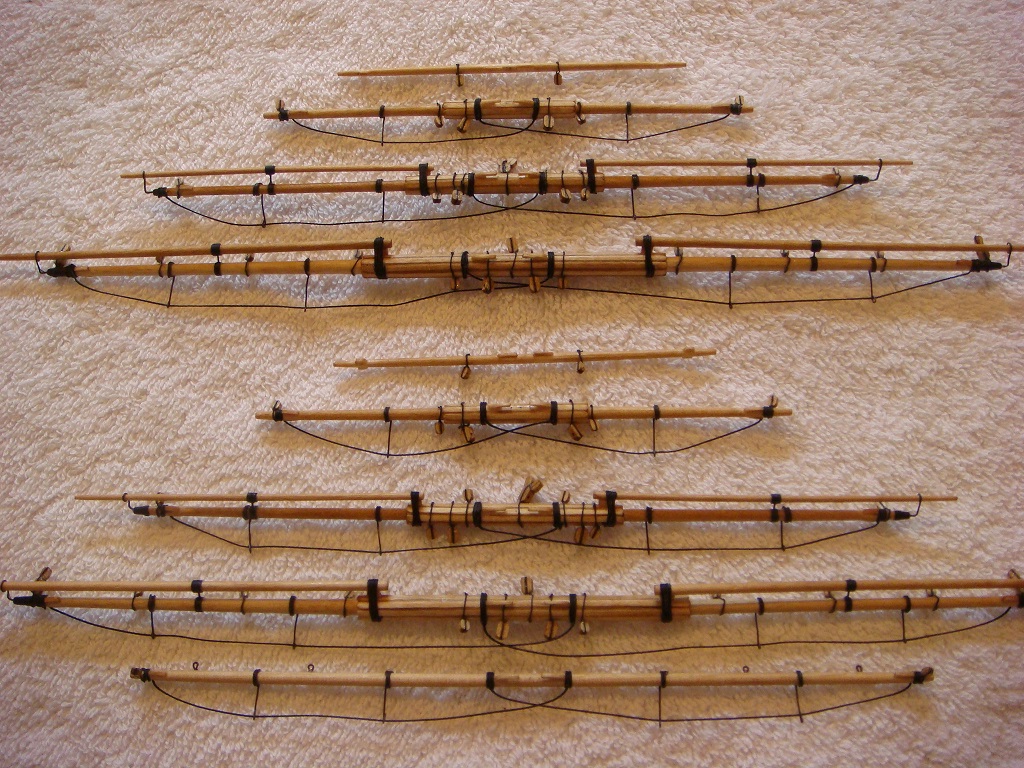
Take a few sticks, some wire, a piece of copper tubing and some line. Add a lot of sweat, some tears (but no blood) and you have rigged yards!!!!! The footrope stirrups are 28 gauge wire, the footropes were wiped with 50% PVA to add just enough stiffness and the boom irons are 1/8" copper tube sliced into 1/16" sections and drilled for the wire joiner. Frank (riverboat) confessed to sneaking into my shop and adding extra blocks to the plans for the yards each night ---- but I finally caught up with him I'm taking a day off to watch the next snowfall then we'll see if these babies actually fit on the ship. Finally, for the first time, we'll be adding that important 3rd dimension ...... width !

- 1,668 replies
-
- 8
-
-
- syren
- model shipways
- (and 1 more)
-
Yes, pencil 'leads' vary in hardness. It's an alpha-numeric system but to make it simple for us there is the commonly used numeric only system 1-4 with 1 being the 'softest' and 4 the 'hardest'. So a #1 will tend to smudge more than a #4. I'll bet that's more then you ever wanted to know about graphite pencils
-
Check it the way Adrieke suggested. If it's not flat, use his technique. If that doesn't work, we have other sophistcated methods (like brute force). But first things first....let's see the extent of the problem if any. Now RELAX!