HOLIDAY DONATION DRIVE - SUPPORT MSW - DO YOUR PART TO KEEP THIS GREAT FORUM GOING! (83 donations so far out of 49,000 members - C'mon guys!)
×


augie
-
Posts
4,669 -
Joined
-
Last visited
Content Type
Profiles
Forums
Gallery
Events
Everything posted by augie
-
 Thanks for the nice comments everyone. Yeah, yeah......moose and antlers follow me around. Thanks Mark . Patrick - yes, I'll be staining the frames. Probably just a little darker then what I might use on the lower hull just to give them some nice definition. I'd like to leave the lower hull natural but not sure I can pull off a neat enough job on the single planking. That is a decision for the deep, dark days of winter.
 -
Looking forward to it Andy. You do great work.
-
Richard....wait until you get more input. But it looks to me as if you've already spiled or tapered the two lowermost planks. If you wish to get into true spiling you may want to get some wider plank stock.
-
Looking great. Can't see if you've actually drilled the holes in the black painted portion of that one hatch. Check to make sure the specified rope fits nicely in there as you'll need to bend it 90 degrees into the hole to make it sit right. By the time you need to do that the deck will be very busy and the rigging will be busy as well.
-
No problem, Adam. Life happens. And we're a patient bunch (well, most of us ).
-
Thanks for stopping by, Chuck. OK, back they go....simple enough. I never allow sleeves in the workshop --- I'm too clumsy even without them. By the way, ME did a great job on the laser cutting of the frames and box pieces. I would lose my mind trying to cut those from scratch.
- 2,191 replies
-
- 2
-

-
- confederacy
- Model Shipways
- (and 1 more)
-
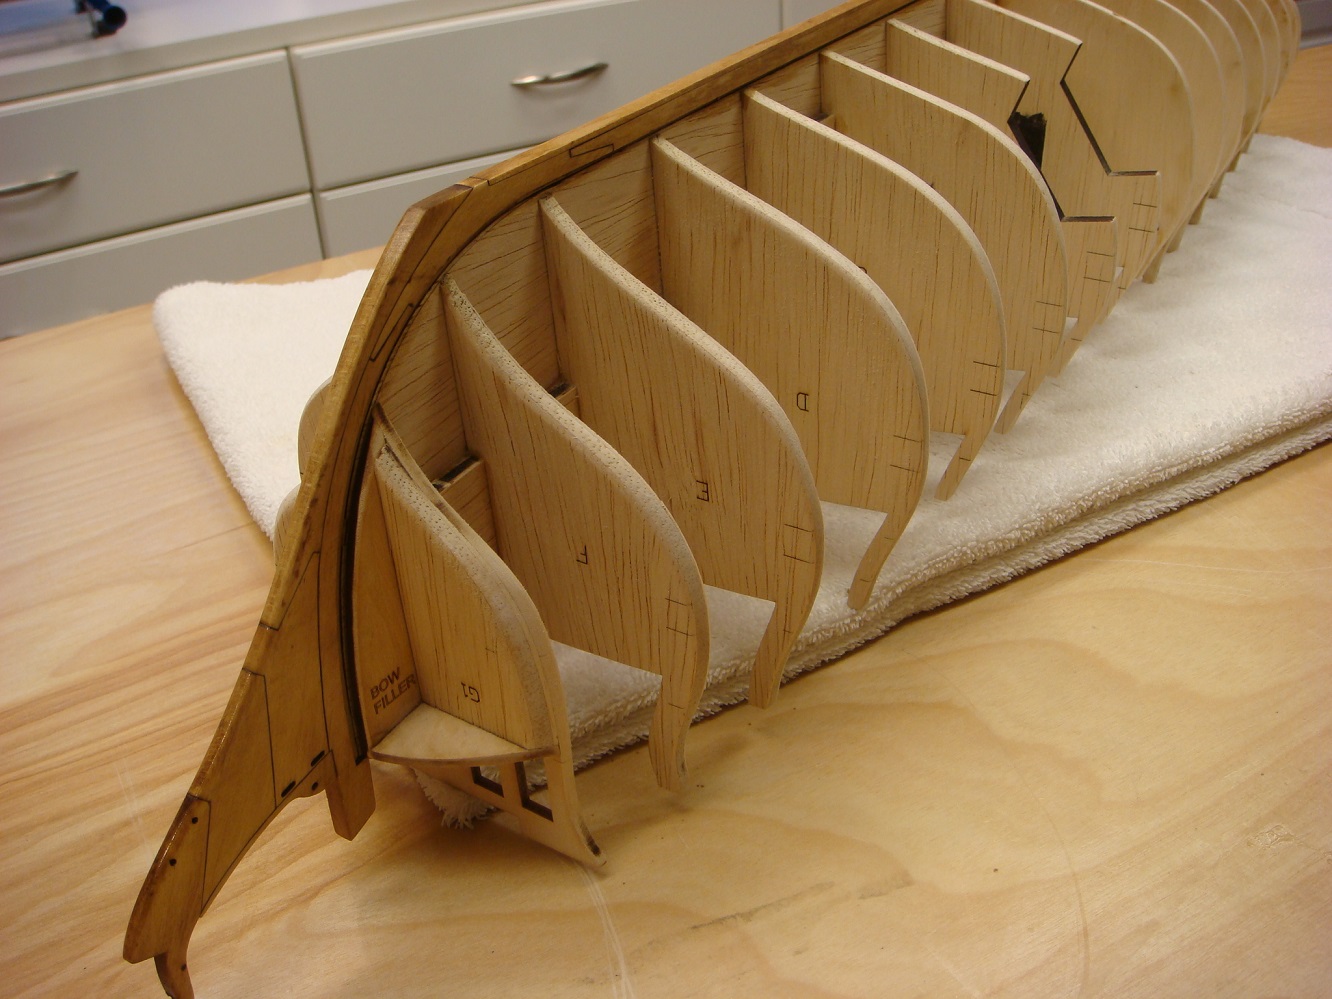
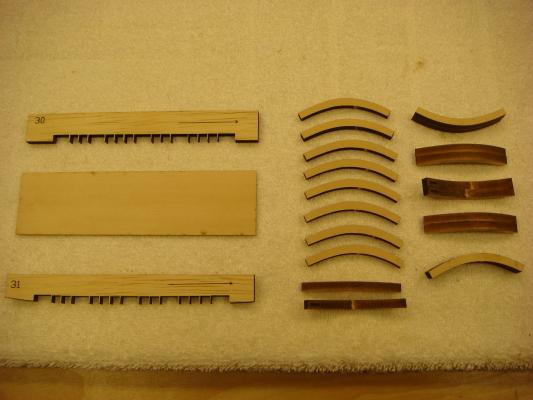
Fairing of the hull bulkheads has been completed. I am happy to report that the safety timbers installed on the bulkhead 'horns' served me well and no pieces were broken during the sawdust festival. The safety timbers have been removed and reserved for possible future use. I will now begin to construct the 'shadow box' on the starboard side which will serve to show the exposed 'frames'. This next photos shows the laser cut shadow box pieces and 20 identical 'frames', 10 of which have been doubled up. The interior of the box will be painted black. The laser burn on the side of the frames to be exposed shall be removed in a mini-fairing operation after they are installed (they are cut over sized).

- 2,191 replies
-
- 13
-
-
- confederacy
- Model Shipways
- (and 1 more)
-
Good to hear from you, Paul. And best of luck with the 1:1 construction.
-
Good luck with the move. GOOD TIMING! PLEASE be careful moving you ship models!!!!
- 116 replies
-
- 1
-
-
- finished
- Lackawanna
- (and 1 more)
-
I no longer have the photos Sjors, but on page 3 of my Syren log, post #19, you'll see two photos of gammoning on the bowsprit. One from above and another from the side. It's those tightly wound ropes that go around the bowsprit then down to the head of the stem and back.
-
Popeye, I can't tell you how many times I goofed...especially when it gets really confusing with all the running rigging about. Just be sure before you tie anything off. Then one day.....it's done! Looks great.
-
You've heard the old adage ...... measure twice, cut once. Good luck
- 1,756 replies
-
- 1
-
-
- constitution
- constructo
- (and 1 more)
-
She looks even more spectacular outside . But you have two problems: 1) If you wait to start on Confed until I'm finished, you will open the box to a pile of petrified wood. And..... 2) I think you deserve some 'warning points' for taking unfair advantage of we poor landlocked souls on MSW. In that middle photo, she looks full scale !!
- 116 replies
-
- 2
-
-
- finished
- Lackawanna
- (and 1 more)
-
Finally....someone who thinks like me! I was thinking more like 589 pages --- thanks to all my friends on here. Actually, Chuck's instructions are fabulous. He makes me smile often as he will sometimes devote an entire page to creating a gun port lid hinge and then one sentence to 'the starboard side is planked the same way'. It's a great practicum.
- 2,191 replies
-
- 9
-
-
- confederacy
- Model Shipways
- (and 1 more)
-
Ah.....I see you found the obligatory pie-plate size penny. I think Model Expo sells them But seriously, you've done a great job on this lady. The wood and metal work are most attractive and the overall color is perfect. She is a proud addition to the MSW Gallery and your own collection. Can't wait to see the final shots. CONGRATULATIONS
- 116 replies
-
- 2
-
-
- finished
- Lackawanna
- (and 1 more)
-
Come on, Sjors. If you keep doing such nice work we will have nothing to kid you about
-
Hahahaha...... a CANOE!!!!!! OK, I'll admit it. I built the Midwest Peterboro canoe a few years back. It was a fun little project. I needed it to strap onto my 25% scale Piper Cub that I fly off floats. It is a fun project ---- but it takes more than a weekend!!!! Great planking/finishing practice.
-
A lot of kits supply metal frames and some have you build a square wood frame and these are built in before planking. But what's wrong with the one all the way on the right? The method is a little rough but careful filing should handle it.
-
Thanks to all on the flood issue. We came out fine. No, no fishing from the porch Keith. Besides I think all the fish washed to Nebraska. Rich- Above the wales, the bending jog I showed gives the curvature you need. As Chuck mentions, below the wales edge bending is needed if you plank with the kit-supplied 1/8 x 1/16th inch planks as a technique to emulate spiling. A scratch builder would use wider planks to begin with and spile them as there are less planks needed at the bow. Once the edge bending is complete, you still need to curve the plank around the bow - so you're creating a compound curve. I haven't gotten to this yet so we'll see how it works out.
- 2,191 replies
-
- 1
-
-
- confederacy
- Model Shipways
- (and 1 more)
-
I'm truly disappointed for you Bob....and Sam as well. I have seen this happen before on newly introduced airplane kits. Hopefully the technical issues can be resolved and everything set right all around.
-
Good luck with the salmon :)
-
Wow ---- you've got a great friend! Oh ---- now you need to BUILD her :D No pressure
- 1,616 replies
-
- 4
-
-
- caldercraft
- agamemnon
- (and 1 more)
-
Those line drawings are just terrific. Thanks John.
-
I'm glad if any of this stuff helps anyone or sparks an idea. I know that's what MSW does for me. That's why I love reading other's logs rather than just whacking away in the shop and then coming away with 'gee, I coulda/shoulda'. I know I look back at my Syren now and wish I could start over. Hmmmm......... Sort of on hold right now as we've had some tremendous rains out here and things are just out of whack totally. Tough to concentrate when you have fish swimming on the roads
- 2,191 replies
-
- 2
-
-
- confederacy
- Model Shipways
- (and 1 more)