


popeye the sailor
-
Posts
16,007 -
Joined
-
Last visited
Content Type
Profiles
Forums
Gallery
Events
Everything posted by popeye the sailor
-
 hello Samson....sorry for the late reply.......I've been doing other projects. funny too.......I had an urge to assemble the large winch, and gallows. I should be getting back to the ship end of modeling real soon......starting to miss it the weather is starting to warm up {I hope}.......got filler work and more sanding. it would be good if I did it in the garage. thanks for look'in in and the good word
 -
hey there........good to see your still working on her sounds like you can see the finish line.....keep it up, your getting there. she's a beautiful model
- 1,319 replies
-
- 4
-

-
- caldercraft
- Victory
- (and 1 more)
-
I have a couple models where the rudder actually moves........but that's only because the Ca didn't hold taking me a while to catch up.........nice to see your making good progress never worry about speed in model building..........nothing kills a model quicker than rushing and making a mistake.
- 714 replies
-
- 2
-
-
- lady nelson
- victory models
- (and 1 more)
-
super find on the book!
-
I know what you mean about the mahogany.......I have the bundle from this second Nordkap kit. I just couldn't justify using it......I will wait till I come across a sailing ship. you just don't paint good stuff like that that's a coincidence.......I happen to have some odds and ends from a Danmark kit. I have the two sets of bulwark hull panels, the keel spine, and a few other wood bits. I down loaded the instructions and enlarged the panel diagrams by 150%........this got me within 1/8 to the model. the parts are in good shape......I hate tossing them out. you are using some of the original wood, which is good..... the Obechi is a bit rough to be sure, but will sand out relatively easy......I use it all the time. what's the name of the Billing distributor in Richmond?
-
look'in fabulous......cockpit looks awesome
-
....this damn weather is gett'in old I'd rather have warm instead of cold...... ....too much of an overtone. to make matters worse.......I've come down with a nasty cold {what a metaphor}
-
when planking, I have never cut a rabbit.......but I usually build Billing's kits, which use a pre cut rabbit that you cement the planks to. I copy the angle that the bow stem is set at, cutting the end of the plank at the same angle. then, bevel the end edge, so it will sit flat against the stem. as I proceed with the rows, it's easy to line up the ends along the stem. the same can be done at the stern as well. you should get a straight line all the way down the stem. if there are any that don't follow the line, they can be easily trimmed and sanded to blend in.
- 131 replies
-
- 2
-
-
- santa lucia
- panart
- (and 1 more)
-
sorry to hear about your loss Jesse........condolences to you and the family
- 1,306 replies
-
- 7
-
-
- syren
- model shipways
- (and 1 more)
-
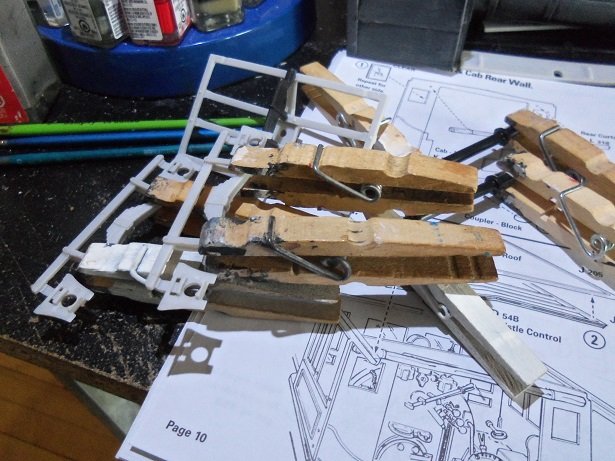
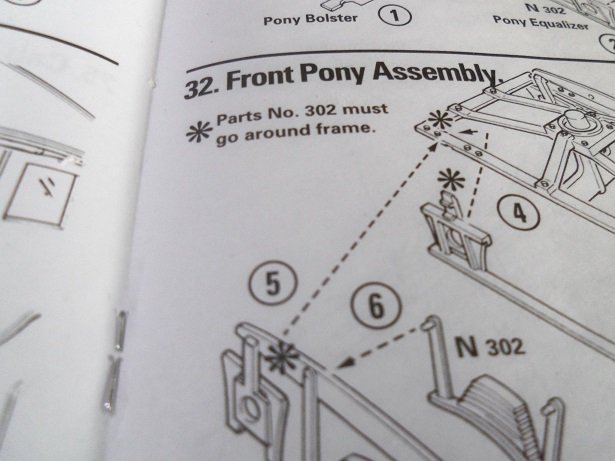
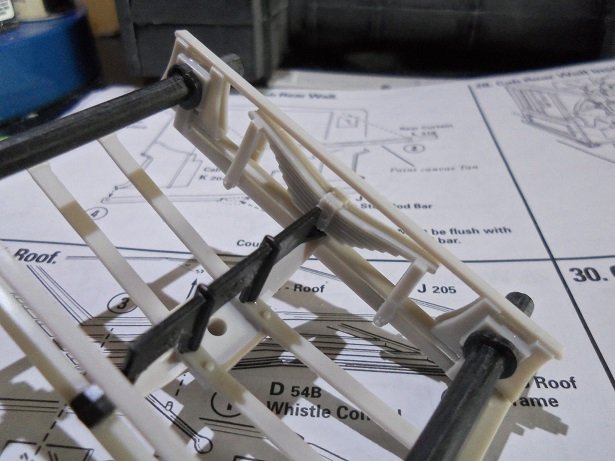
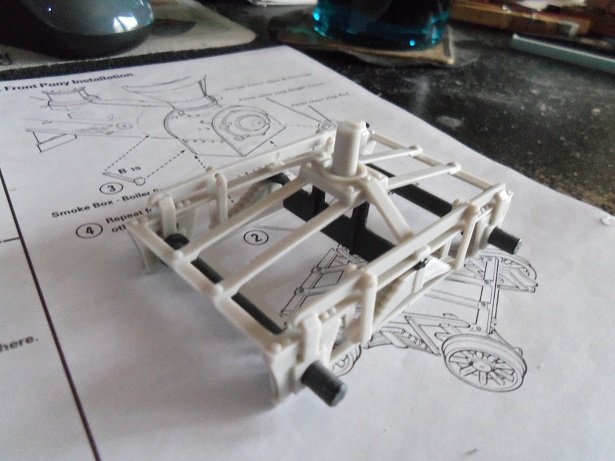
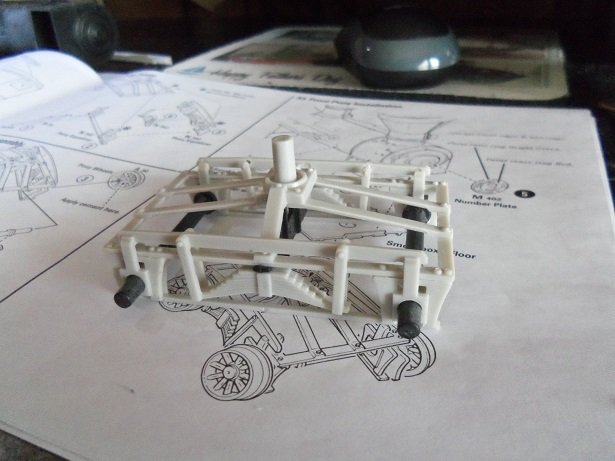
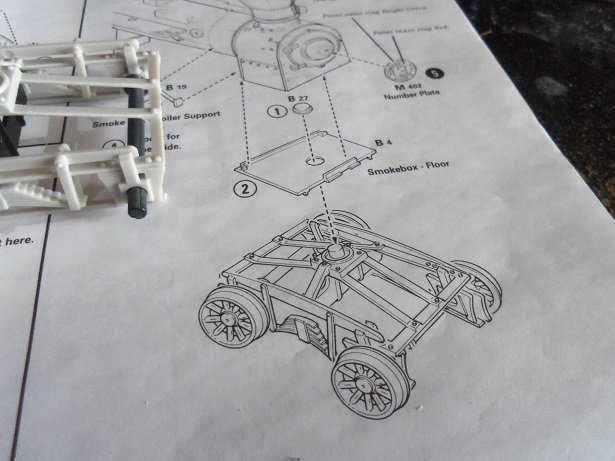
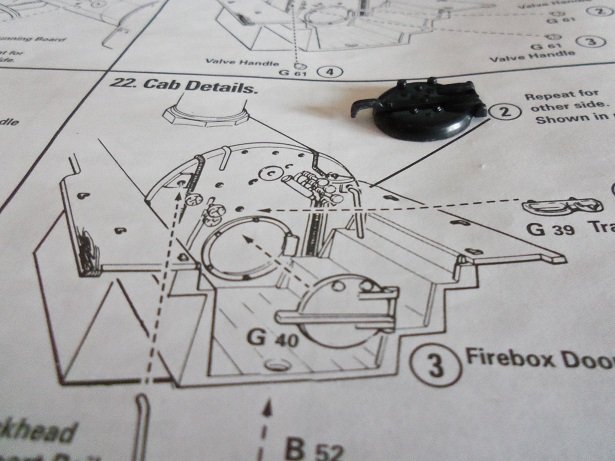
I didn't do much yesterday...concentrated on putting some of the basic assemblies together. I also did more sanding to the joints on the boiler, getting them to the point that they aren't so noticeable. firstly......for you Ken, the options for the couplers the civil war and the post civil war styles. the cylinder & valve chests could be assembled and painted as a unit. the front covers are a different color, but I can easily mask them off. there is a left and right.........not too tough to do. again.......as will be the case for the entire build, there was a lot of sanding to get rid of the flash and flared edges....there is some mold puckering too, but unless I want to go nutz with the filler, they shouldn't impact the model too much if brought down with sanding. I was browsing through pictures of the actual loco, and of the model online. amazed with the different takes of her.......some looked as if there wasn't a lot of painting {just detailing}, and some that went with an entirely different look. I saw one as a Christmas train that really looked nice some left the gray/white plastics show......some blacks and greens.....especially concerning the truck frames and equalizers { I liked that}. there was another that was done in what looked like a metal flake blue and gold, that looked really nice too. I was going to add more to the boiler and noticed that the side boards on the boiler has wood grain detail to them....so does the floor in the cab. dark brown appears to be the answer here, but I'll see how others painted these parts. the parts for the front pony frame was brought together, and cleaned up for the next bit of assembly. I'll try to keep the wheels ability to turn in mind. I did make one mistake with this assembly, and that pertained with the springs and shackles. I cemented the inner half to the outer side of the equalizers, without thinking that they also need to wrap around the frame too. the equalizers are a two part assembly, and they need to wrap around the frame when I realized the problem I created, I cut between the shackle and frame it was cemented to.........thankfully, they hadn't fully cured. this might not be seen on the finished model, but I think if I were to cut thin slivers of sprue to fit between the shackles, it will solve the problem. unlike the tender trucks, the axles must be put in place when adding the equalizers.......the opposite side must be done in it's two piece form, since the equalizer shackles must wrap around the frame. the outer side was added to the opposite side, making sure that cement doesn't touch the axles. ....and unlike the tender trucks, this one was designed to pivot {note the stem in the middle}. the wheels are to be cemented on the outside of the truck, rather than trapped inside, like the tender trucks. I looked into making the tender trucks pivot....sad to say I may not be able to do it. dummy me cemented in the top plates and king pin plates.......and of course I had to make them nigh impossible to remove without damaging them. it doesn't look good for the pivot. I did make one small contribution so far though on the fire box door. the handle for the door looked thick and squared when placed in the opening. I sculpted out the handle so it has is thinner and has sort of a hook to it. it looks like a handle now, rather than a thick plastic appendage. gett'in ready to do some painting

- 245 replies
-
- 12
-
-
never thought of doing it that way........pretty ingenious
-
thanks Carl.........interesting poem here is my all time favorite song from Queen......... one of my smaller hobbies is writing......haven't written a meaningful poem since the Susan A {the old Regina build}. in my younger days, model cars were my biggest subject.......until I got into the larger scale Revell ships. glad you liked this jaunt off the beaten path J & CDW...........love your car.....from what I can see of her, she must have been a looker me....I was a confirmed Olds Cutlass / Chevelle fan..owned many of both ....looks like a rainbow.......very nice size indeed! I haven't done any looking yet........if I find the two ingredients, I may get them and try putting them together. there was only one time where the admiral got between me and a car........there was an Olds Cutlass on the side of the road with a for sale sign on it. I saw potential...she saw a train wreck. got out to look at it......she was complaining all the way......and when I opened the trunk and saw that there was no trunk {floor rotted out}.......that pretty much ended the tour right away. one hates it when they get that 'told ya so' looks on their face! of course, I will have to pose my idea to the budget director, but I think I can pork barrel it through thanks for the many likes and onlookers.....I'm glad you enjoyed my little tangent into the mechanical world. I'm sure there will be more. well.......we got about 4-5 inches of snow last night.......guess I should mossie on out there and clear the driveway
-
looking very good Glenn........some folks simply use a darker filler for tree nails, but I have seen a few do it in the method. gonna look great when you get 'er all done
-
welcome back Caroline..........Peg looks just as great, as when you last touched her
- 161 replies
-
- 2
-
-
- pegasus
- victory models
- (and 1 more)
-
I tend to rough them up too......I'm finding more kits don't have "square" edges. could be something with the plastic too.
- 77 replies
-
- 3
-
-
- icm models
- Markgraf
- (and 1 more)
-
you can also wind a bit of rope around where the rope attaches to the pulley {the eye}.....to make it look more period to the model. the pulley assembly looks good.......no crossed ropes allowed great job!
-
really gett'in into the thick of it eh?!?! looks like a really neat project Jack.......I'll pull up a seat too
-
thanks J.........I still made a couple mistakes, but it came out better that the English Leather. even though I filled the void with this one, I'd still like to find another kit.......then I could do more than I did back then. the underside shot is odd........something not usually photographed. I promise to keep her on all fours I don't usually do a top coat.....the times I have, the decals were flat, not gloss, and I did it to even every up. I'll have to look through the old model kit site.......I could have sworn I saw an accessory kit for 1:16 scale cars. I've seen them around still.........it would be cool to buy one and soup it up. if I can find it.......either the Chevy Bel Air, or the Nomad. pipe dreams........us guy would be lost without 'em