


popeye the sailor
-
Posts
16,007 -
Joined
-
Last visited
Content Type
Profiles
Forums
Gallery
Events
Everything posted by popeye the sailor
-
 well, for one thing....you won't need those rollers to be honest...I've never heard of the manufacturer, but it looks like your doing a super job so far! got a kick out of the paragraph.......at least they have a sense of humor yes......if the walnut planking doesn't go from bow to stern, most likely, you'll have to do scale planking, or some form of it. there are tutorials here on the site, or do a search and you'll find plenty of material on the subject. you've probably done some tapering of the planking, with the first planking.......your familiar with that.....it's a very good start. there are also many fine books out there, that have good information on clipper ships. research is key.......most models lack detail that will enhance the model. adding extra detail not only gives good results, but it make ya feel good, cuz you pulled it off I'm sure others who have more knowledge than me will chime in along the way.......post plenty of pictures and ask any question you encounter...no matter how odd..........there's no such thing as a silly question. I'm pull'in up a seat........this looks like a neat look'in build. I'm off to go look'in up this company great job so far.........remember......daunted is not in the modeler's vocabulary
 -
thanks Bob.......very kind of you. there are many who are way better than me........I just like to have fun my keyboard died today.......developed a bad case of sticky keys. .........guess you can't drop an English muffin with marmalade on it.. cheap US crap!
-
very nice start. what's the story with the scratch built side heads?
-
Thanks Kevin......and thanks for the likes every one
-
awesome job Mark! the galleries are going to compliment the transom wonderfully! big step forward
-
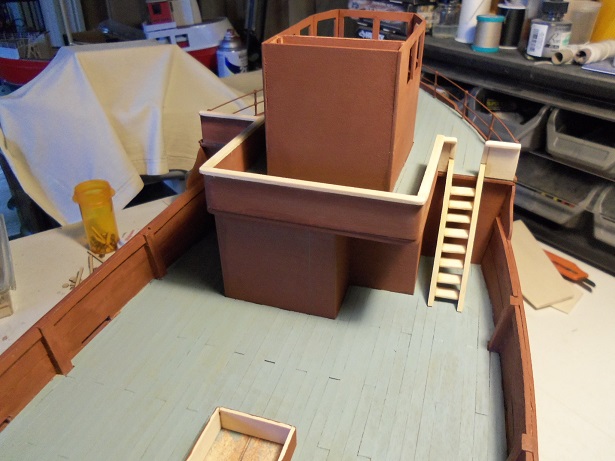
thanks Gerhard and Patrick.......thanks also for the likes I got a chance to do the primer work on the stairs. now that the railing is done, I can pull the structure back off to do a few more things before the color goes on. I want to get the cap railings on the bulwarks, before the hull gets painted. better weather is here........I should have more free time tomorrow.

-
deck is getting more populated.........super job!
- 1,350 replies
-
- 1
-

-
- constitution
- model shipways
- (and 1 more)
-
Bounty's look'in sweet..........rigging is very well done. I do believe that some of the sheet rigging is left up........simply tied off somewhere to aide when the sails are hoisted back up. glad to hear Jerry's on the mend
-
I cannot even put a like to that bit of news my friend..........then I have lost a friend as well Keith and I got to know one another .....PM chat every once in a while. out of the blue, he sends me a Popeye lunch box..........but not long after it explains why I'd send cards and never get a reply. I hope he gets better, or finds relief......and I wish the same for you as well. thanks for the update.........grim news to be sure. positive thinking my friend
- 1,306 replies
-
- 11
-
-
- syren
- model shipways
- (and 1 more)
-
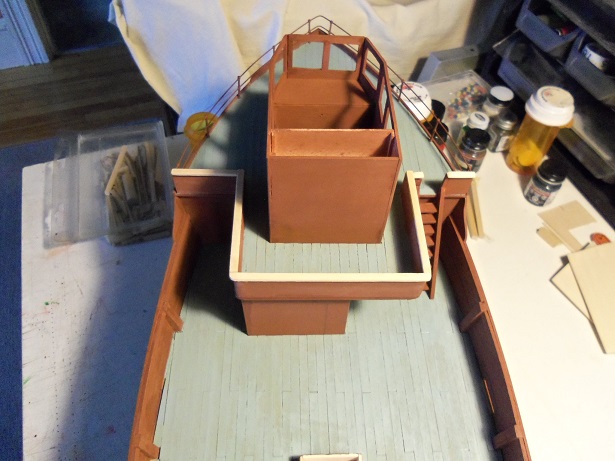
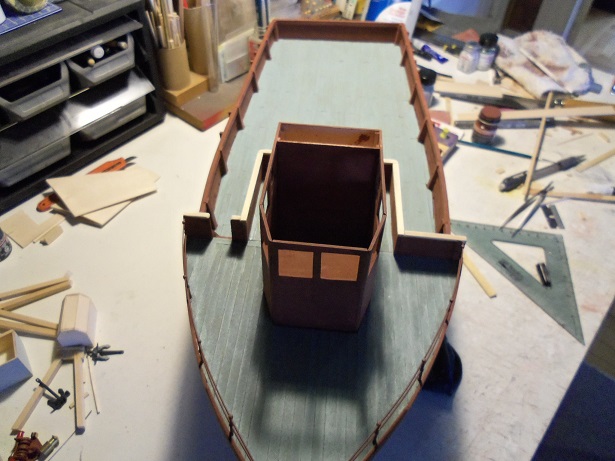
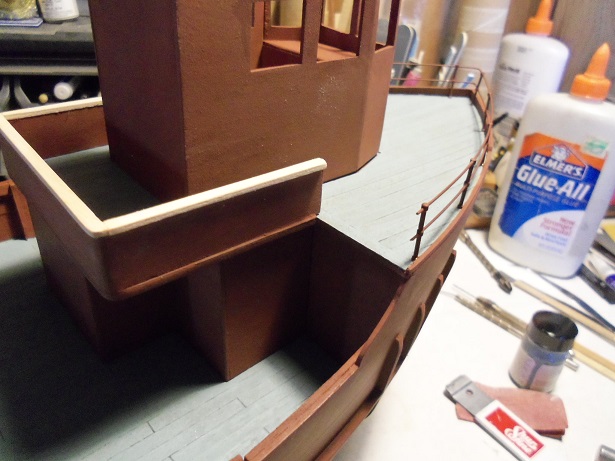
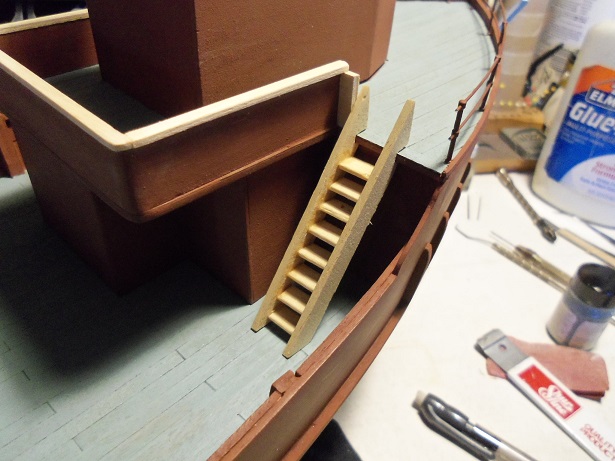
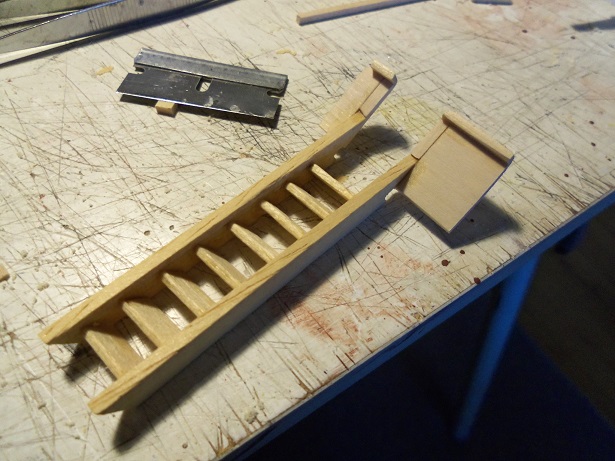
Yippee! the work week has ended! I have been thinking about this all week end. I got up at 5:30 this morning......I have some chores to do. but, before I do the drudgery, I'm going to have some fun taking a 1.8 x 8 mm strip, I took some eyeball measurements, and got to work on it. the space I need to fill is here, on the starboard side. after cutting one side, the other side was made.........the treads will be 1/2 inch. the treads were then glued to one side of the stairs........later sanded so they will all be equal, for when the other side is glued on. the notch at the top will fit over the lip along the fore deck. the rest of the ladder was assembled.......the railing wall on the left side will be this short piece.......enough to bring the ladder part more toward the center of the gap. it was fitted in place at this time.......a little spot of CA was used to cement the wall to the side of the ladder. any excess that sticks out past the wall, will be cut off and sanded flush with the ladder. the other side wall was cut and fitted at this time. later, after it was sanded and trimmed......the short deficit was filled in with square stock.......and that too was sanded flush and smooth. the whole assembly was sanded, and the cap rails were cut and glued on. more sanding........ here you can see the parts that I'm referring too.......they stick out past the walls. this will be removed. the excess was cut off.......and more sanding was done to flush out the stubbles. the cap rails were rounded to take the edges off. the rest of the railings need to be sanded a bit more to round them out as well. fitting the assembly in place, I can see that I will have to trim the structure railing a bit more, but as a whole, it all fits together quite well. when I can do the color paint work, then the structure and the walls can be cemented in place permanently. still a bit more to do th the structure itself.


-
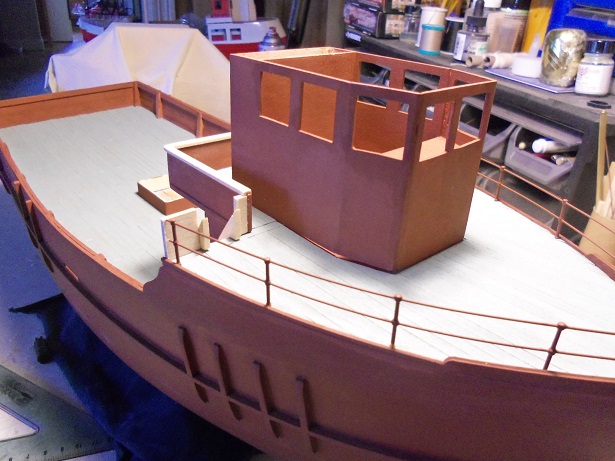
the Maine Lobster boat has rails on the roof of the helm.........I used some 1.8 x 3 mm and glued on some same size square stock pieces, equally in segments. then I sanded and rounded all the edges........makes for some really nice rails. check out my 'Lobsie twin build'. check these out: https://gundalowdrydock.wordpress.com/2013/01/25/midwest-maine-lobster-boat-part23-2/ https://gundalowdrydock.wordpress.com/2013/01/31/midwest-maine-lobster-boat-part-25/ depending on what you need, or how long you need them, this same method can be used.........I believe this is shown in the plans. looking very good so far. never be apologetic about touch ups........they are a way of life.......alllllllllllll the way to the end of the build!
- 250 replies
-
- 3
-
-
- willie l bennett
- model shipways
- (and 1 more)
-
looking sweet Casey......good idea for the windows. I built the Maine Lobster boat........I used clear cello, since with the roof on, nothing can be seen anyway another fellow on the site turned me onto something else......the film from floppy disc. it had two sides......a flat side and a glossy side, depending what you wish to show. great job on the boat ..........very well done!
- 34 replies
-
- 2
-
-
- chesapeake bay flattie
- Midwest Products
- (and 1 more)
-
tuning in a bit late myself.....sorry to hear that your illness has kept you side lined it's great to see folks give of themselves to others.......to me, this world has turned much too complacent {I'd go into it more, but it's nothing more than a huge debate ......trust me}. kudos to the friend that sent you the new tool........quite an addition to the workshop. I would have to learn all about turning.......haven't done it since school. I do hope you feel better my friend, it would be so good to see you making sawdust again BTW.........any news on Keith?
- 1,306 replies
-
- 9
-
-
- syren
- model shipways
- (and 1 more)
-
wonderful progress on your Bounty klimi! the ship's boat came out looking really sweet! your almost ready for masting.........very well done!
-
I see where you get your enthusiasm from.......very nice looking vessel is that a kit, or does he do a lot of scratch building as well? your progress is really good as well......I like the detail you put into the parts you make....... very nice !
- 434 replies
-
- 5
-
-
- pelikaan
- beamtrawler
- (and 2 more)
-
thank you all very much sorry to say I haven't done much else........work pulls me away. I have something in my head that will do nicely.........I just have to convert it into wood. this rainy spell we've been under has got to come to an end....I hope it's soon. thanks also to everyone who hit the like button
-
looking super Russ........layout is getting better and better
-
Cutty Sark by NenadM
popeye the sailor replied to NenadM's topic in - Build logs for subjects built 1851 - 1900
glad to see you had a great trip..........I love the history and lore. too bad I'd probably never see it in my life time.........but I did get to see it......though you look at lamp chains ans pull cords.........there you may see a better resemblance of a bell. not that I don't like what you've done, but I think it lacks the shape. gonna look great to see all these sub assemblies together on the deck- 4,152 replies
-
- 7
-
-
- cutty sark
- tehnodidakta
- (and 1 more)
-
that's right .........ramp everyone up for a pillow fight! totally awesome! feng shui?!?!?! who's you interior decorator?