popeye the sailor
-
Posts
16,007 -
Joined
-
Last visited
Content Type
Profiles
Forums
Gallery
Events
Everything posted by popeye the sailor
-
 well......that's good to hear! nice when things go your way there's a few bleeds.......but no matter, your going to paint there anyway well done
 -
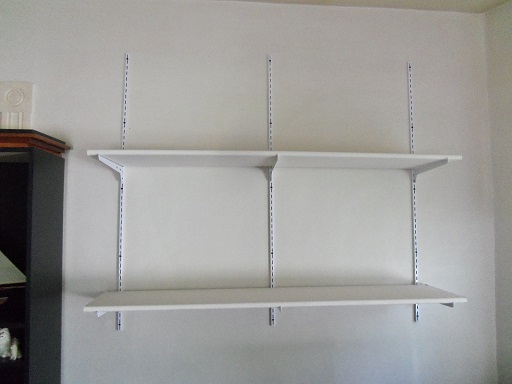
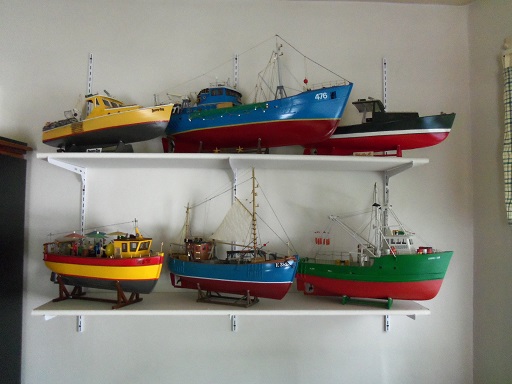
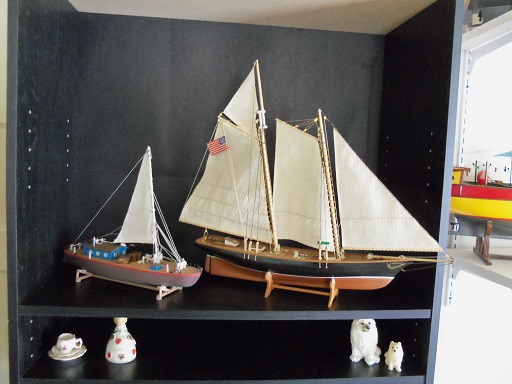
holy cow!!! thank you all for the good wishes........really don't know what to say! the admiral and I are very close...we do for each other all year 'round, so when a day like this come up, we never know what to get for one another. we did spend the day together........later in the day, we went for ice cream {of all things}. she wanted a hot fudge sundae. I'm not a big ice cream fan.......I like it, but it's no match for buffalo wings and beer we got to the place...she wants to take it home......I say.....fine she puts in her order, I order a banana split......freak out the admiral {predictable huh.....I'll show you!}. I'm asked if I want the regular banana split.........not knowing that there was a sub-recipe for one, I say ....yes! the girl hauls out this 12 inch plastic boat, splits a banana in half lengthwise, and put it in the boat. then, three huge scoops of ice cream........vanilla, chocolate and strawberry. then the pineapple and strawberry garnish, topped with whipped cream, nuts and cherries. she put the lid on it and locked it down. we no sooner get out of the place, when this thing starts to leak.......the mad rush to get home begins! I get her in the car with them, and we start the drive home........while this is going on, the thing is leaking on and down her legs, and onto the floor mat {glory be the floor mat!} we get home.......Get her and the 'thing' out of the car......I grab the floor mat and hang it off the porch railing and park the car. I come in to find her standing in the shower, washing off her legs. I told her to leave me a spot.....I won't go into detail as to what her reply was she told me it was on a paper plate in the freezer....the mess was contained! we ate them a short time later...........it was all I could do to eat 3/4 of the darn thing! but, it was very good ! our life together so far has been a fun one.......I do my best to keep it interesting . I calls her Olive in me popeye voice.........and to this day, she'll still tell me that she ain't Olive! she also likes to let me know what's going on {this just today}........"they're putting up a new telephone pole up the street." I answer: "oh, really.............why?" she gets all flustered and says......shudup! now.........I did mention putting up a shelf in the living room. like I said, it's nothing fancy......the admiral didn't want a book case style unit. I was tired of having the other boats in the hallway closet.........the Nordkap has been in a box, ever since I built it.......the Mary Ann and the Gundalow followed suit....they were in boxes as well. time for all these boats to come out, I think.........so this is what I put up. just the metal frame....the shelves I had painted while I was reorganizing the living room. the admiral was watching keenly as this was going on........she keeps telling me that it was crazy to have the boats in boxes........but my reasons were purely duly aimed at dust collection. I never thought I'd see it.....but when I took the Nordkap out of the box, there were cobwebs in the rigging! amazing!!! it been in that box since late 2010....I believe {might even be 2011}, only taken out for short periods of time. when all the boats were on the shelf........I had a hearty laugh for myself. you know, you build 'em, not really thinking about the size of these models, until you have them in a group. the admiral is happy......her two favorites are up on the wall........I was surprised to hear that one of them was the Nordkap......the first vessel I ever built. sadly, the America and the Gundalow will have to reside in the black book case. this is all the hobby oriented stuff I've done this week.......get through this next work week........and I'll be on vacation again......I'll try and make up for lost time for the Titanic, I did dry fit the rest of the boat deck. now to figure how the two decks will work together, paint and set up the funnel rigging. well, the admiral wants to go for an errand.......I'm to come along {maybe I'll suggest ice cream again}.........this time we'll be across town..... thanks again for the good wishes..I told the admiral.........she says thanks as well!
- 573 replies
-
- 18
-

-
BRAVO!!!! looks good KP!
-
much can be said about lighting......a handy aide to be sure. tell this to a sailor who's been doing scrimshaw in his quarters by candle light, and he'd probably look at us funny this week has not been too productive.......the past couple of days has been eaten up with chores around the house. I have a couple of things to do today, but it's our 28th anniversary, so I might not get flogged if I sluff off. I did manage to put up a huge shelf in the living room. it's nothing fancy....metal shelving with wood shelves that I painted to match the walls. the living room is a low dust area.......only the dog and I go in there. it will be neat to see them all in one place. hope to have some progress soon
-
sad to hear my friend....perhaps one can be found cheaply on E-bay, or a local craft site. you can also consider trying your hand at making them from scratch. they can be made of wood or even plastic {there are resources where materials can be found}. please don't trash it....you have done some really good work........hate to see it all for naught
-
super progress David
-
whew........glad I made it here in time! count me in to watch as well Bob!
- 127 replies
-
- 1
-
-
- dragon class
- yacht
- (and 1 more)
-
nice work on the interior so far.........the engine looks great, by the way! the louvers look alright........just need to be evened out a little I was looking at some of the railing parts to my Titanic build.......cripes, even that would have worked well {based on your idea Ben}. your doing a super job! if your interested in some of those parts, let me know.......there is a list of the unused parts on the back page of the instructions
-
planking looks really nice on there Nils. the admiral one days asked me why I don't try to make my own planking.......I'm always getting basswood flat stock sheets. I told her that it's because I don't have that kind of saw {is that subtle enough of a hint} too late for father's day though I'm trying to get her over to the local hardware store {Home Depot}, so I can show her. going to be interesting how you'll do around the screw tunnels. you could use flat stock fillers, bent to shape. I have no doubt that you will do well with them.
- 2,625 replies
-
- 2
-
-
- kaiser wilhelm der grosse
- passenger steamer
- (and 1 more)
-
good luck on the move Bob!
-
before 2009 Lawrence, plastic was my medium.........see what a wooden kit can do to a person?!?! this is the first plastic ship I've done since then. amazing how foreign something can be if you leave it awhile but I'm having fun these bulbs are energy savers {getting the package...........} the early halogen bulbs that were out there were of bad design........they had mercury in them, making them harder to get rid of. they had to be treated as hazardous waste........but as human nature goes, they just chucked them in the regular trash. I just bring them to work......we have a bin for disposal of these mercury bulbs the bulb I had in the light gave off 560 lumens. these bulbs I have here give off 750 lumens....quite a big difference. that's what it says on the box.......the bulb itself says 785 lumens. they have a 60 watt equivalent, but only use 43 watts........saves $5 a year. not a whole lot in the grand scheme of things, but I guess it's something. I just changed the bulb in the main table light.....I'll see if it makes any difference there too
-
now......THAT's RED!!!! I agree.......when it cures fully, it will lose some of the sheen. it's good to see your still going on with it.....looks good!
-
thanks every one for the good word work beckons at the moment.........after next week end, I be on vacation again. I'm going to try and make the most of it yes Sam........I think there are duplicate part to be used for the railings. they do give quite a list of the parts that will not be used. I'll look into it Jack.......thanks a lot!
-
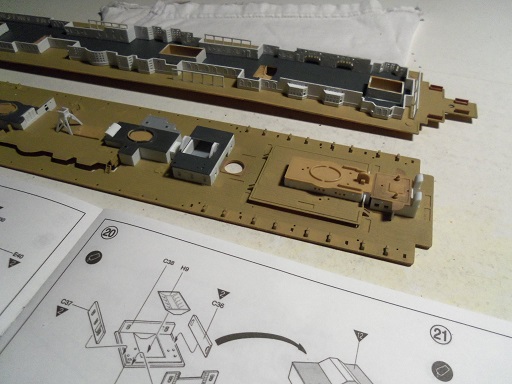
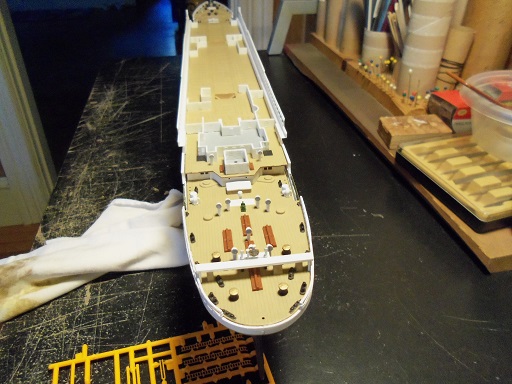
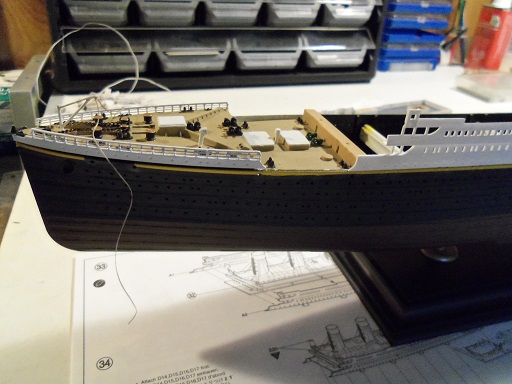
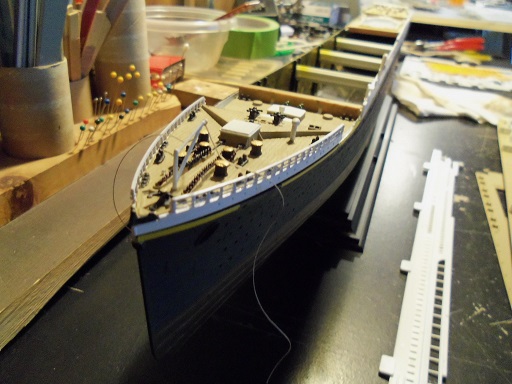
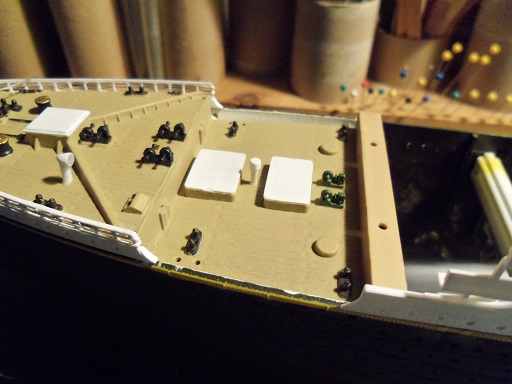
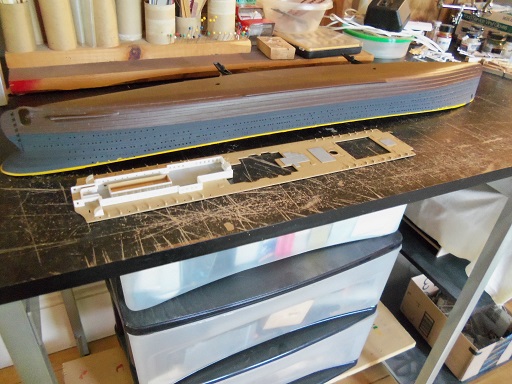
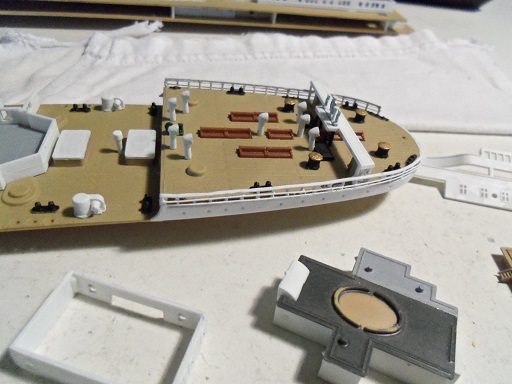
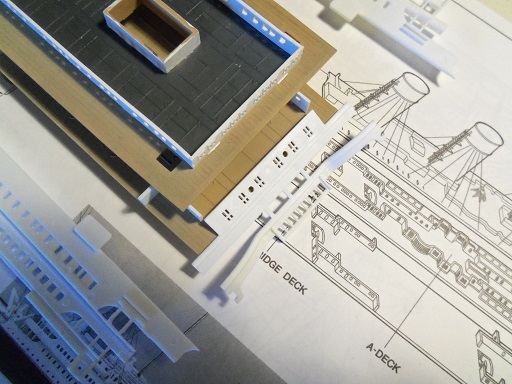
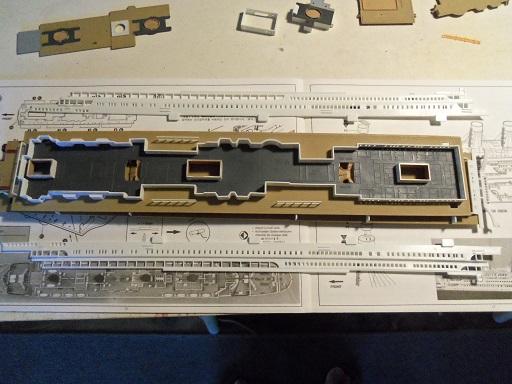
well.......got snagged away again today.........more window blinds and made some repairs to the family car. I did manage to do a little bit though.....got started on the mock up. the first structure has already been cemented in place...I put the roof on. now the A deck and the boat deck are like a Siamese twin...two sections of decking rise up and are part of the A deck structures......these two decks need to be assembled together. but it's hard due to the funnel rigging. so, this changes the plans a little. I really don't like putting all this tiny stuff on the decks before assembling the whole she-bang........something is liable to get knocked off..........a couple already did. so, the mock up for the bridge, bow and stern decks, may look like this. I just have to figure hoe to keep the bulwark walls upright. I changed that pesky light bulb with one of those halogen bulbs...........big difference! here are the parts that still need to go on the funnels. there is one ladder not shown.........it's being repaired at the moment......broke while I was trimming it. the railings are all in small parts and pieces.......they all need to be assembled. as for the two pieces for the bow and stern, I have two of each........in fact, I have quite a few duplicates. the kit comes with two sprues that are the same. it's almost as bad as photo etch.........except, I've never done P.E. before I did a bit more on the mock up, assembling the last two structures. that other piece of deck fits over the square opening. the thing about these two sections of decking {roofs}........if I cement the rest of the structures to the boat deck, it will be very hard to get them into position......it's really tight. this thing is a real jig saw puzzle


- 573 replies
-
- 14
-
-
i'll keep it in mind Jack........haven't tried the first idea yet, but I will. thank you very much hi Nenad...glad to see your up to posting I do hope your doing well....thank you thanks Patrick.....wood modeling has changed a lot of ways that I did things. having to revisit plastic again is really testing me......especially paint thanks OC........I hope so thanks to all who hit the like button.
-
I'll give it a try Jack......thanks I did find out that I had some small weird bulb in there........probably an appliance bulb. I have some 60w halogen incandescent bulbs.......I'll have to see what's in the main table light. I changed it ..........I'll try a few pictures later. I wonder if spraying the card silver would work? I almost forgot again...........thank to all of you who hit the like button. I really appreciate your looking in
-
I have a Kodak easy share......just a simple camera. it does have auto focus, so I have to wait the min or so, for it to focus in. it will even adjust lighting to a certain degree. I had one of those energy saving bulbs in the crane light, but I didn't like how it made the pictures come out. I have since switched it over to a regular bulb, but I'm going to look at the main table light to see what I'm running in that one. it seems to make a difference if it's a cool white, or a frosted bulb. as far as background goes.......yea, it's kinda busy...........on my table with wood grain paneling. I will find a solution........but first, I moved the hull over to the main table. I think you'll see a difference. the first one came out a little blurry.......I didn't add that one
- 573 replies
-
- 14
-
-
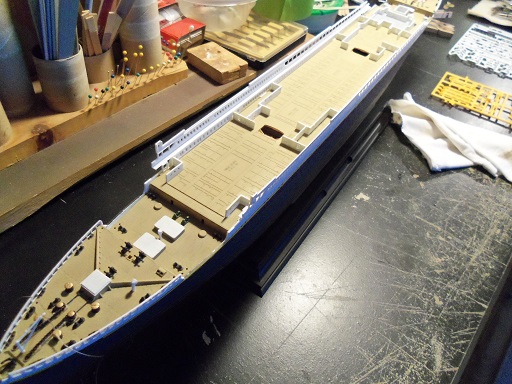
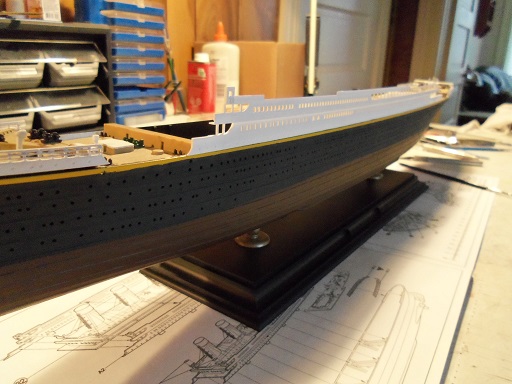
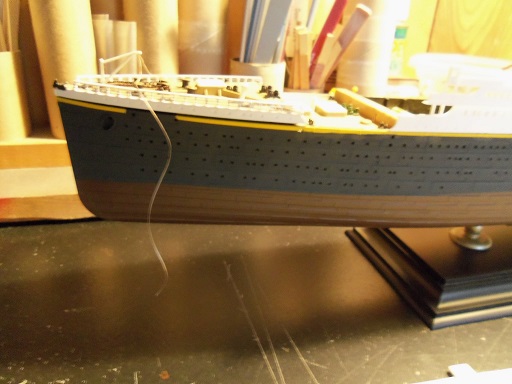
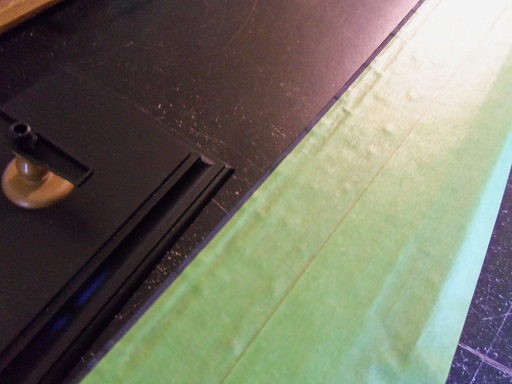
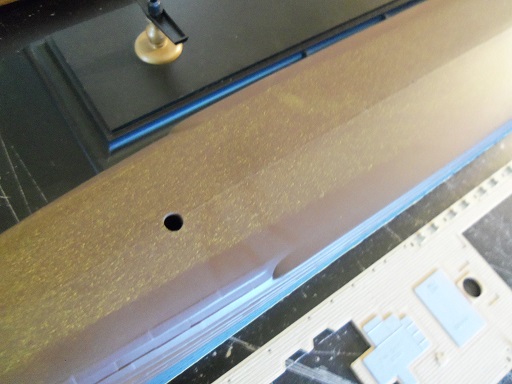
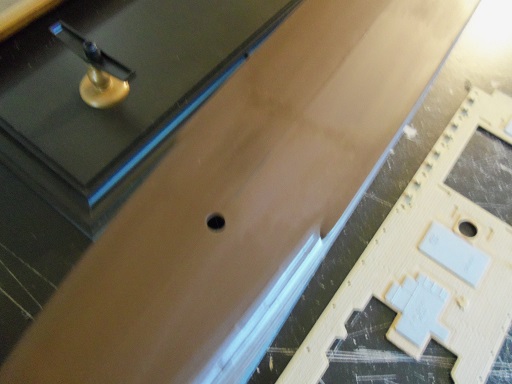
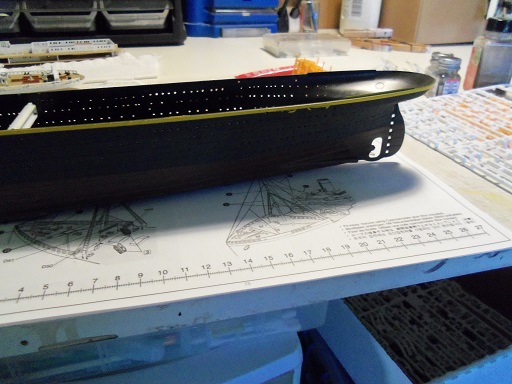
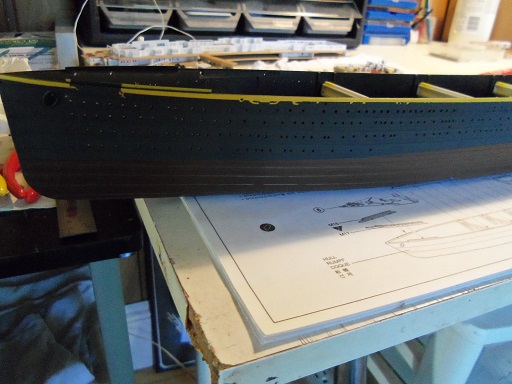
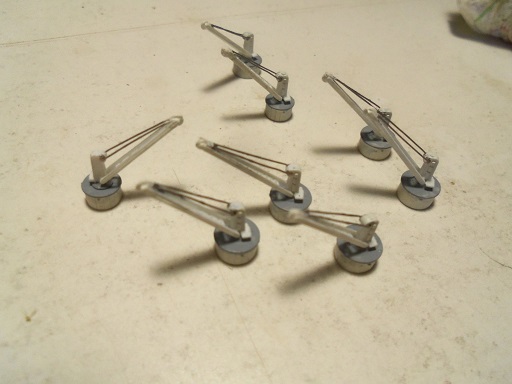
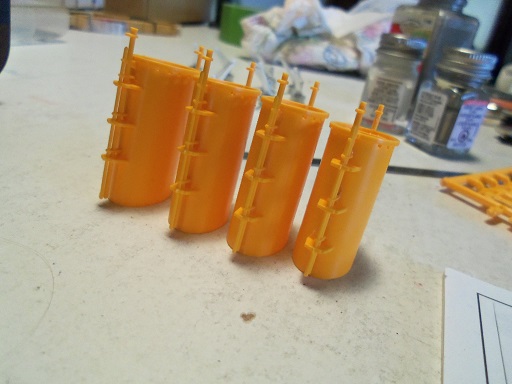
I think that may be the reason why they are slanted to the degree they are, is to give the smoke direction, and decrease fall out onto the aft decks. I will be concentrating on getting a mock up of the boat deck together. here is a good diagram as to how they look I did manage to clean up the stripe yesterday.........but sadly that's about all I could do. ended up mowing the lawns, trimming the back yard trees, running errands, and putting up window blinds. then my pesky neighbor.....{I still believe he was watching for when I got home}, stopped the admiral and asked if I'd come out to diagnose a lawn mower problem for him. you know the drill.........by the time I was done explaining it to him, the mower was in my garage, to wait till I had some spare time to look into it further. sounds like simple tweaking, but it needs a primer button....I can get it for him and put it in. I do have these as well to show you......just contrasting pictures of the stripe to deck {bulwark} mating. it also uncovered another minor problem that I'm weighing out. here is a shot of the bow section. I'm using the small table crane light {remind me to shoot that bulb}....lighting is terrible! you might be able to see the tip of the railing, that is missing. same for the stern section. the stripe may look a little thick.......but looking at the hull in it's entirety, it looks better. here is a better picture.......not sure if it would be worth trying to retro...it's a very small part. when the bow and stern sections are in place, a small section of the inner hull can be seen. these I painted white. you will notice that on the starboard side of the aft section, there is a touch of black. this is the aft section of the hull being slightly warped. I'm wondering if cementing these sections to the bridge deck, would straighten all this out, since there are tabs that the sections slide onto. well gotta take the dog out............perhaps I'll snap a couple better picts for you.

- 573 replies
-
- 13
-
-
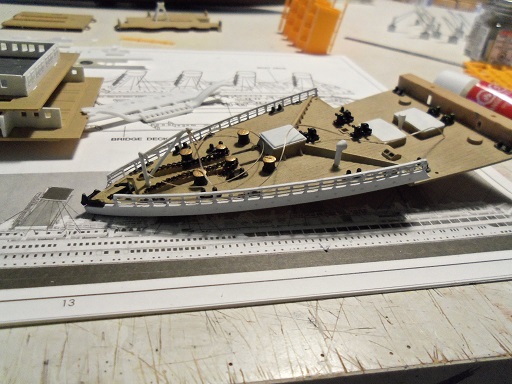
thanks you for the good comments and the help yea......I have the last structure to assemble for the boat deck, and then I can do a mock up with the funnels. at least one of the structures is taller than the others......I will need to figure out which one. as I look at how these decks assemble, the boat deck will have to be done later, due to the rigging of the funnels anyway......the problem that I was looking at that made me change the way this deck is assembled, is the two lower level structure roofs that lie in between the funnels. I was thinking that when these funnel;s are rigged, it will be very hard to get these structure roofs in place. we shall see I agree Mobbsie......there are differences between wood and plastic, but the process taken between the two mediums.....and the problems that arise, are so similar, that it is quite hard for either one to boast that they are the more complex medium. plastic does tend to lean on paint more for it's added detail, than wood does. wood also suffers less with miss - measurements........that is, unless the laser cutter person is sleeping on the job. it is up to the modeler to make most of the educated cuts. it's my belief that the manufacturer is doing a pretty good job of keeping us fit and trim.......keeping our mind sharp, with all the thought that goes into these models.........and body, with all the pacing, jumping up and down, fist waving, and model pitching
-
thanks for the good word gents! I recap the comments from the previous posts John: we see this all the time......it's not really a surprise. the build was going too good.......there had to be a chink in the armor somewhere. I wish I could say that it's seen less in wood modeling, but I've heard my share of sad tales, where measurements were off and laser cutting had gone awry. the two wall pieces {as for most of the wall parts}, sit in a slight impression of a slot in the deck. they have the tabs as well, so there only one way to fit the parts. it's a pretty easy fix....... Sam: that's my thought on the funnels as well. I'm going with that in mind. I haven't looked at the link yet......I wonder what scale it's in? George: I've done kits before that also had the numbers on the parts.......never gave it a thought. just chalk it up to me being me I got lucky with the over spray.......I had a few occasions where it didn't go as planned. it was worth a try....what would have been the worst thing....a repaint? I only mixed up 1/4 oz of the paint..........I have very little left. also...thanks to all of you who hit the like button
-
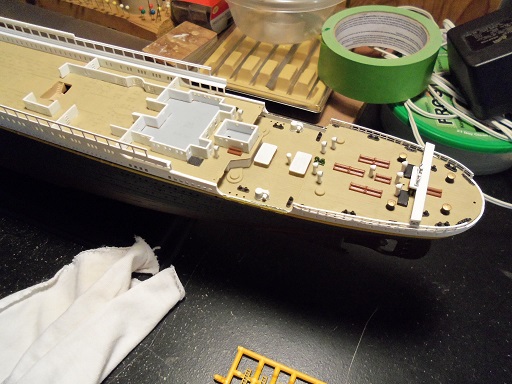
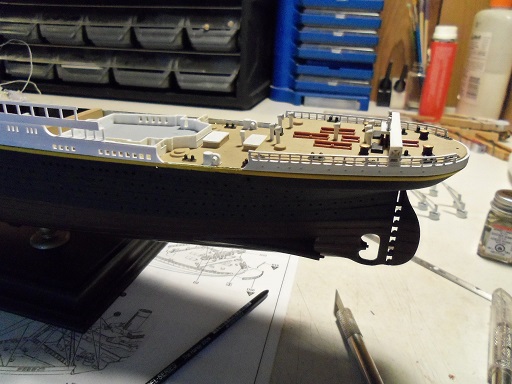
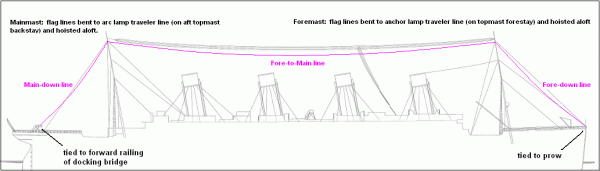
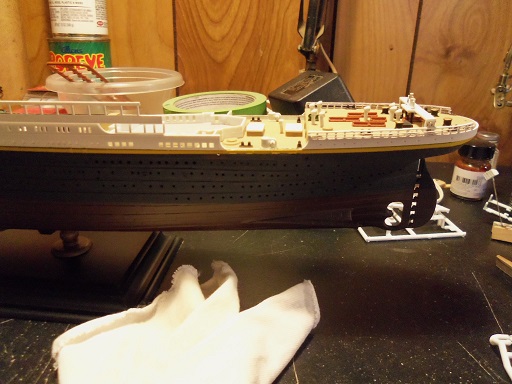
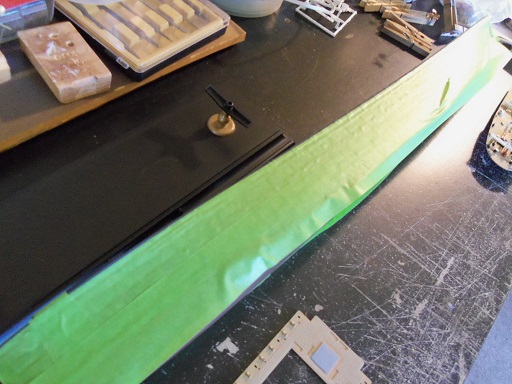
you think I was finished with those railings????? ohhhhhhh noooooo, this kit isn't through running me through the ringer yet I found out that there are two other parts that go along with the bow and stern railings. the railings were cemented on the bow section.......minus the tip of the railing. on with the stripe.........the hull was masked and redied for paint. man.....I pressed the living crap out of the tape.....to insure that the plastic's detail was sealed away, to give me a good line. and then my heart stopped! since it was such a small area to paint......I figured that I didn't need to mask up the entire hull. I think this should be a warning to those who are just starting out with their airbrushes.......never misjudge over spray! I put into action, a technique I used to do long ago. got a clean rag and some thinner and gave it a gentle wash over. the bottom paint has been on there about a week now.......plenty of time to cure. the yellow overs pray is new and hasn't cured yet.....as long as you don't scrub, it should come off very easy. gentle strokes in one direction and move very fast.......don't dwell on any part of the hull, this is what it looks like now. the stern railings were cemented in place at this time. you can see the section that's missing at the very aft there is some repair and touch up to be done with the stripe. I tried so hard to get the tape to stick completely. I made the stripe a wee bit wider than it probably should, but I think once it's touched up and the deck / bulwark assemblies are in place, it should look OK. I left the name plates at the bow open for the name decals.
- 573 replies
-
- 14
-
-
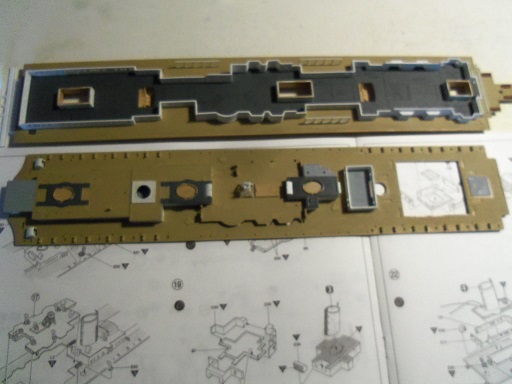
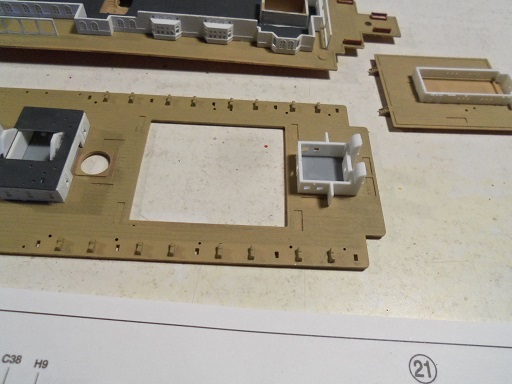
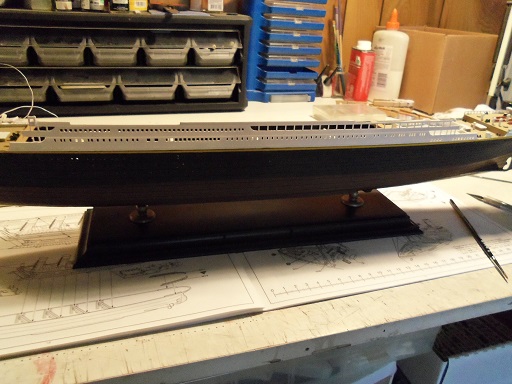
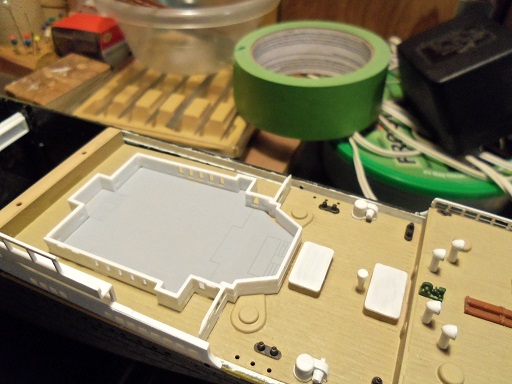
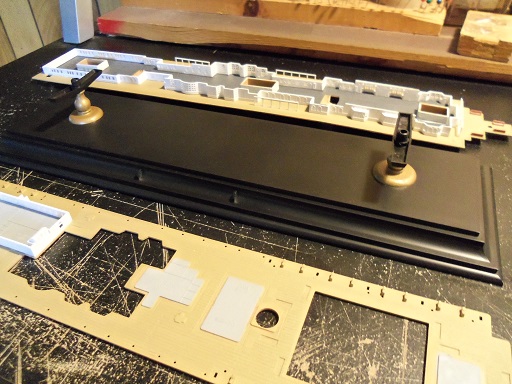
with the remainder of last week liquidating into one complete bummer {getting pulled away from the table to do other chores}, I figured I'd try and redeem myself. Tuesday though, revealed a few things I wasn't pleased about. I guess i'll just have to figure it out when I get to them. looking ahead in the instructions, I still find the way they want me to do the deck assembly, a bit weird.......I'm not seeing a good outcome. so I decided that I would work on getting the decks on the hull, and do the railings and stuff afterwards. first thing I did was get the stand together. once the yellow stripe is done, it can be cemented on the stand. the wire additions on the cranes were painted Steel........a bit more touch ups need to be done yet. ....and this is where thing started to get muddy. I assembled the main parts of the funnels.......I didn't add the other parts yet due to paint reasons. I wish I had. as we know, they are numbered 1 through 4. I took it for granted that there might be embossed part numbers on the insides of the funnels.......there aren't. they are not all the same either, so now it's pretty confusing as to what order they are to be at. I did find one saving grace......I noticed that one of the ladders was a tad shorter than the others. I'm thinking this is #1. the others differ in height as well.......a very tiny increment.... .5 to 1 mm. this changes my plans just a little bit, since they all need to be rigged before the decks are assembled. the other bummer is with the front fascia of the decks. there are two small sections of wall that the base of the fascia is to be cemented to. the problem here, is that the width of the base doesn't match the wall spacing......it falls short about .5 mm the bridge deck and A deck can be assembled along with the mid bulwark parts.......I'll have to figure a way to fix the width problem, before this can be done. the railings on these two deck can also be done after they are assembled.
- 573 replies
-
- 11
-
-
I think it's cool that you have a room dedicated as an art gallery...........can you talk to my admiral and convince her to give me the living room? your modeling is so awesome......I really enjoy the little things you instill in your builds. really beautiful work!
- 883 replies
-
- 5
-
-
- royal caroline
- ship of the line
- (and 1 more)