
HOLIDAY DONATION DRIVE - SUPPORT MSW - DO YOUR PART TO KEEP THIS GREAT FORUM GOING! (Only 24 donations so far out of 49,000 members - C'mon guys!)
×


druxey
-
Posts
13,302 -
Joined
-
Last visited
Content Type
Profiles
Forums
Gallery
Events
Everything posted by druxey
-
 Well played, sir! I have occasion to splice lines in place. A fairly imperceptible way is to fray the ends to be joined by separating out the strands and 'combing' them, them cutting them diagonally. A small wood block in one hand and a sharp scalpel blade in the other achieves this. A small amount of white glue on one end and (with clean, dry fingers) roll the two ends together to make a nice tapered together faux splice. Once you have the technique down, it is a reliable and surprisingly strong method of 'splicing' at small scale. I use this technique extensively for eye splices as well: they hold nicely under tension.
- 3,618 replies
-
- 4
-

-
- young america
- clipper
- (and 1 more)
-
A very well put-together video. Just don't set your planes down on their soles as the guy did with some near the end.
- 13 replies
-
- 2
-
-
- rabbet
- bearding line
- (and 4 more)
-
Well done on getting the belaying pins proportionally correct, rather than the inflated chubby-handled ones that are seen on most kits and some scratch-built models.
- 421 replies
-
- 11
-
-
- medway longboat
- Syren Ship Model Company
- (and 1 more)
-
Nice dovetails, Michael. Enjoy hauling out tomorrow! End of season is always a little sad, I find.
-
Open between the treads and two carriage pieces to make the sides of the steps would be more likely.
-
Can you be more specific as to the 'dark glue' that you used, Paul?
-
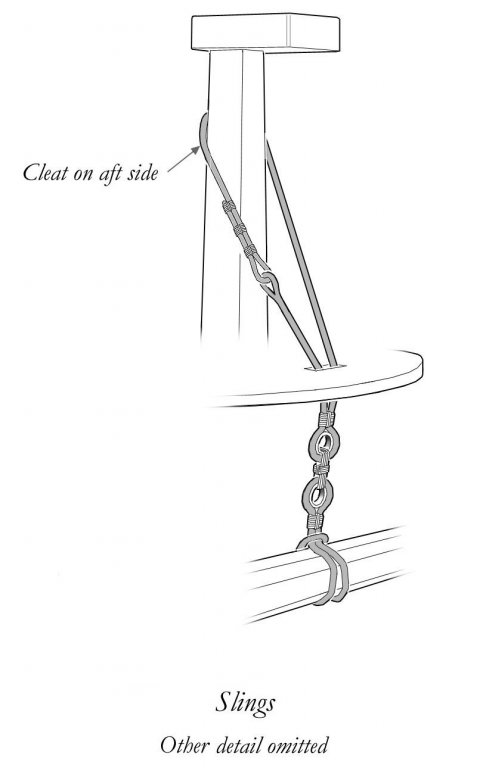
This detail is seen in the attached illustration, taken from The Fully Framed Model, Volume IV:
-
Brig USS Enterprise 1799 info gathering
druxey replied to CharlieZardoz's topic in Nautical/Naval History
That "Salvini" draught has a number of anomalies. The most striking is that the station lines and port sides are parallel to the waterline, (hence by inference the framing), not the keel. This was very unusual at that time period. There are many draughts of small ships with greater keel drag: all have framing set at right angles to the keel, not waterline. Compare this with the brig of war taken from Steel, and the 14 gun schooner, also illustrated above. It makes me a little suspicious! -
15' Dinghy by Bedford - FINISHED - 1:1 scale
druxey replied to Bedford's topic in Non-ship/categorised builds
Luvverly work! -
I suspect your gut feeling on spar sizes will be as near correct as dammit is to swearing!
-
This is an interesting side discussion. Some years ago I had a protracted discussion with a knowledgeable person over shroud laniards. I had built a model that he otherwise found impeccable, but he took me to task over my light colored shroud laniards. I countered that these were running lines, hence not 'standing' color. He insisted that the laniards were dark. I have since been converted to brown line for these lines!
- 3,618 replies
-
- 3
-
-
- young america
- clipper
- (and 1 more)
-
Usually brass wire, blackened, is used to make eyebolts. If you have a pair of needle-nosed pliers, it makes the job fairly easy.
-
Oh, my. Fancy framing! Those through timbers are tricky, but you succeeded very nicely.
-
The advice above by Russ is right on, Dave. Also check the planking tutorials on this site.
-
Thank you for the detailed information, Bob. Certainly it is nice to carve (I've used it for half hulls), but the fine dust produced when sawing or sanding is a serious issue to control. One person I know has become allergic to yellow cedar.
-
Where is the best place to get good quality ships flags?
druxey replied to Lucius Molchany's topic in Wood ship model kits
I hand-paint mine on SilkSpan - it has wet strength, unlike tissue paper. -
You have excellent advice above, Malcolm. We all start inexperienced and unskilled. It's a good place to start - it can only improve from there! You'll find good answers to your questions as you go along. There will be mistakes, but that's all part of the process. Have fun!
-
Very nicely done!
-
Superb!
-
Never leave masking tape on for a moment longer than needed - but you know that, now. Glad the fix-it worked out well!
-
I've seen models of centerboards showing a chain to a horizontal drum and two-handled winch. (Look for 'centreboards' on the RMG 'Collections/ models' site, but note the English spelling!
