


Bob Cleek
-
Posts
3,374 -
Joined
-
Last visited
Content Type
Profiles
Forums
Gallery
Events
Posts posted by Bob Cleek
-
-
44 minutes ago, Beef Wellington said:
I'm pretty sure that copper plates would look exactly like the photo when first mounted (although I do agree these seem to perhaps be a little more slapdash, but who knows). The copper sheets are simply too thin to mechanically maintain a flat profile when a nail is driven through. Simple water pressure and forces when afloat would very quickly flatten the plates to be absolutely flush with the hull given coppers great malleability.
Nails weren't driven through the copper plates. The holes were pre-drilled. Copper nails weren't much good at piercing the copper plate. The plate was too thick for that.The copper had no problem maintaining a flat profile because it was backed by solid wood. The thin Irish felt underlayment is relatively hard as well and essentially is what we would recognize as roofing tar paper material. (It's not soft "felt" like felt cloth. The term "felt" here refers to the method of making it by compressed matrix, rather than by weaving.)
"Simple water pressure and forces when afloat would very quickly flatten the plates to be absolutely flush with the hull given coppers great malleability." And you know this how?
 The copper plating used by the Royal Navy weighed between 20 and 32 ounces per square foot, depending on the size of the vessel. That's two pounds a square foot for a large ship. This isn't the copper roofing flashing they are putting on Constitution.
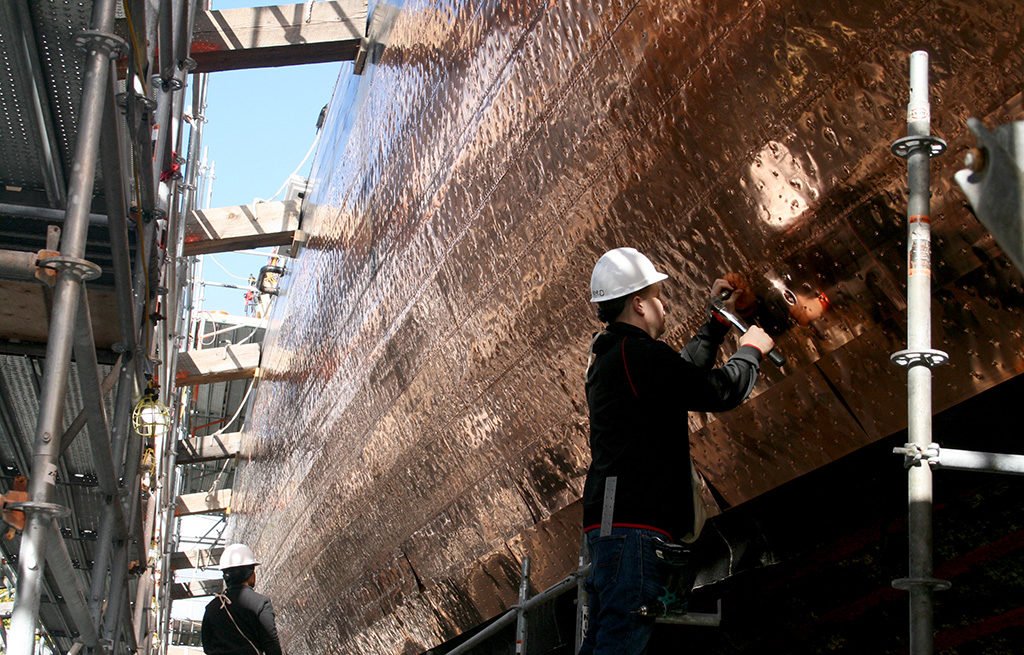
Here's another photo of Constitution's 2015 coppering job. (Note that the shipyard worker here may be using a proper coppering hammer.)
And here's a photo of Cutty Sark's newly coppered bottom in her new below-the-waterline-enclosed exhibition building without weathering exposure. (It has since darkened to a copper penny brown.)
 Cutty Sark has apparently been properly "coppered" with "yellow metal," one of the alloys that quickly replaced pure copper (which apparently was used on Constitution) as it had greater longevity and anti-fouling properties.Neither bottom had seen a drop of water when these pictures were taken. Notice any differences between the surfaces of the two?In defense of the U.S.Navy, though, given the cost of copper today and the fact that Constitution will not be doing any extended sailing at this point in her long life, their apparent use of roofing flashing is understandable.
 -
On 8/28/2019 at 12:35 PM, Y.T. said:
Heads would not be seen but the dents from nailing surely will.

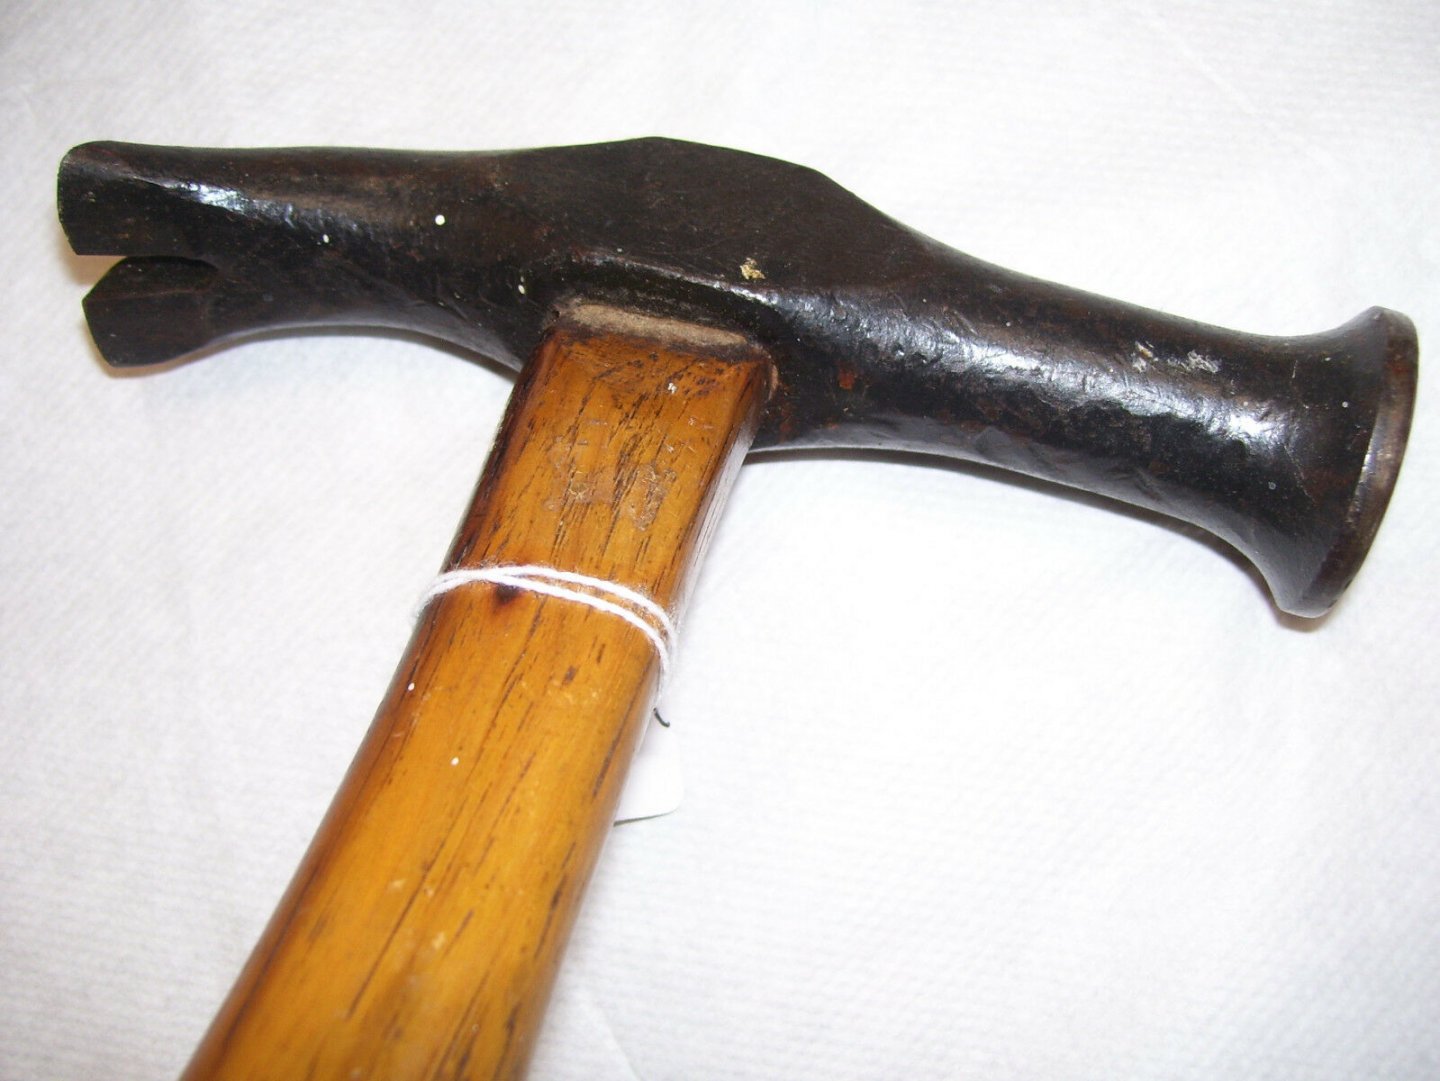
Certainly not dents like these! A hundred years ago, these monkeys would be sacked on the spot for this job! Obviously, and perhaps understandably, they have never done it before and don't know what they are doing. Copper plate was fastened to ships' bottoms with a coppering hammer, not the carpenter's hammers that these clowns are using. Note how the dents have sharp edges, creasing and weakening the copper sheet. Look at the dog's breakfast the guy on the left has made of the area above his left shoulder. They are using modern copper roofing flashing in long pieces off of a roll and have not shaped the copper to fit the curve of the surface. (Note the "ruffling" at the edges.) A proper coppering job does not look like this.
Coppering hammers have a large slightly convex face which permits setting the nail practically flush with the surface without the sort of excessive dimpling from hammer strikes obvious in the picture above. The coppering hammer's face is also designed to be used to shape the sheet at the edges to accommodate the curved shapes of the surface. The claw was designed not only to pull copper tacks and nails, but also to get under the edges of the copper sheets for their removal. Their handles are relatively short and designed to drive the copper nails with a series of lighter taps that won't bend the soft copper nails, unlike a good whack with a long-handled carpenter's hammer, designed for hard iron nails, is likely to do. Coppering hammers came in different weights to suit the weight of the copper being hung.
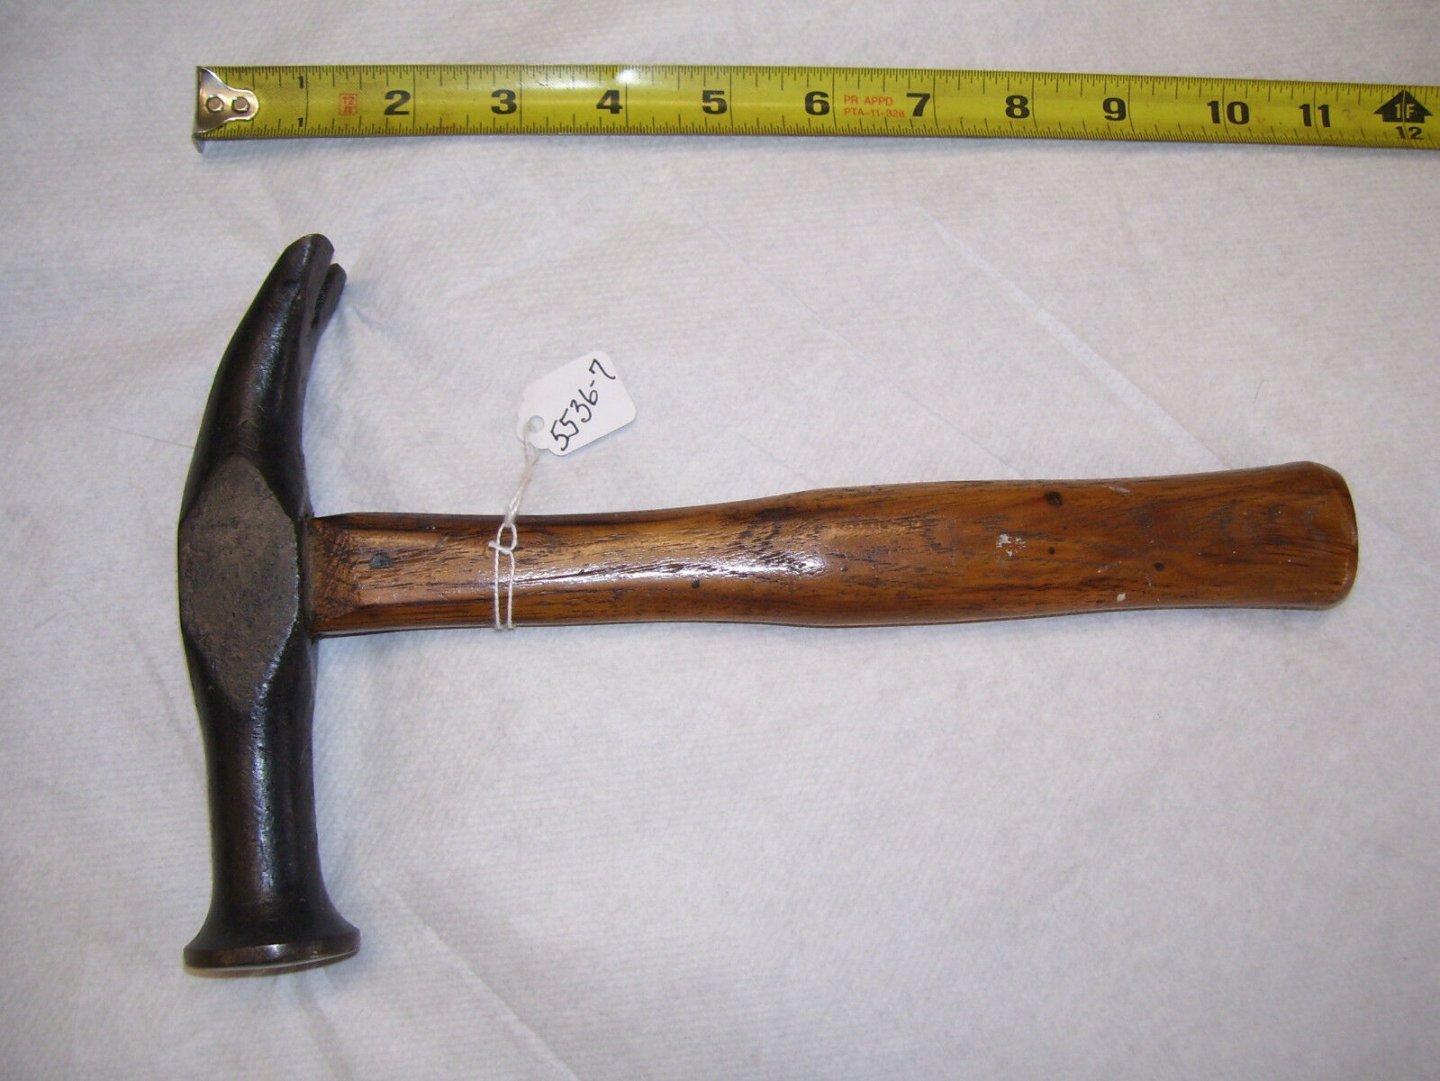
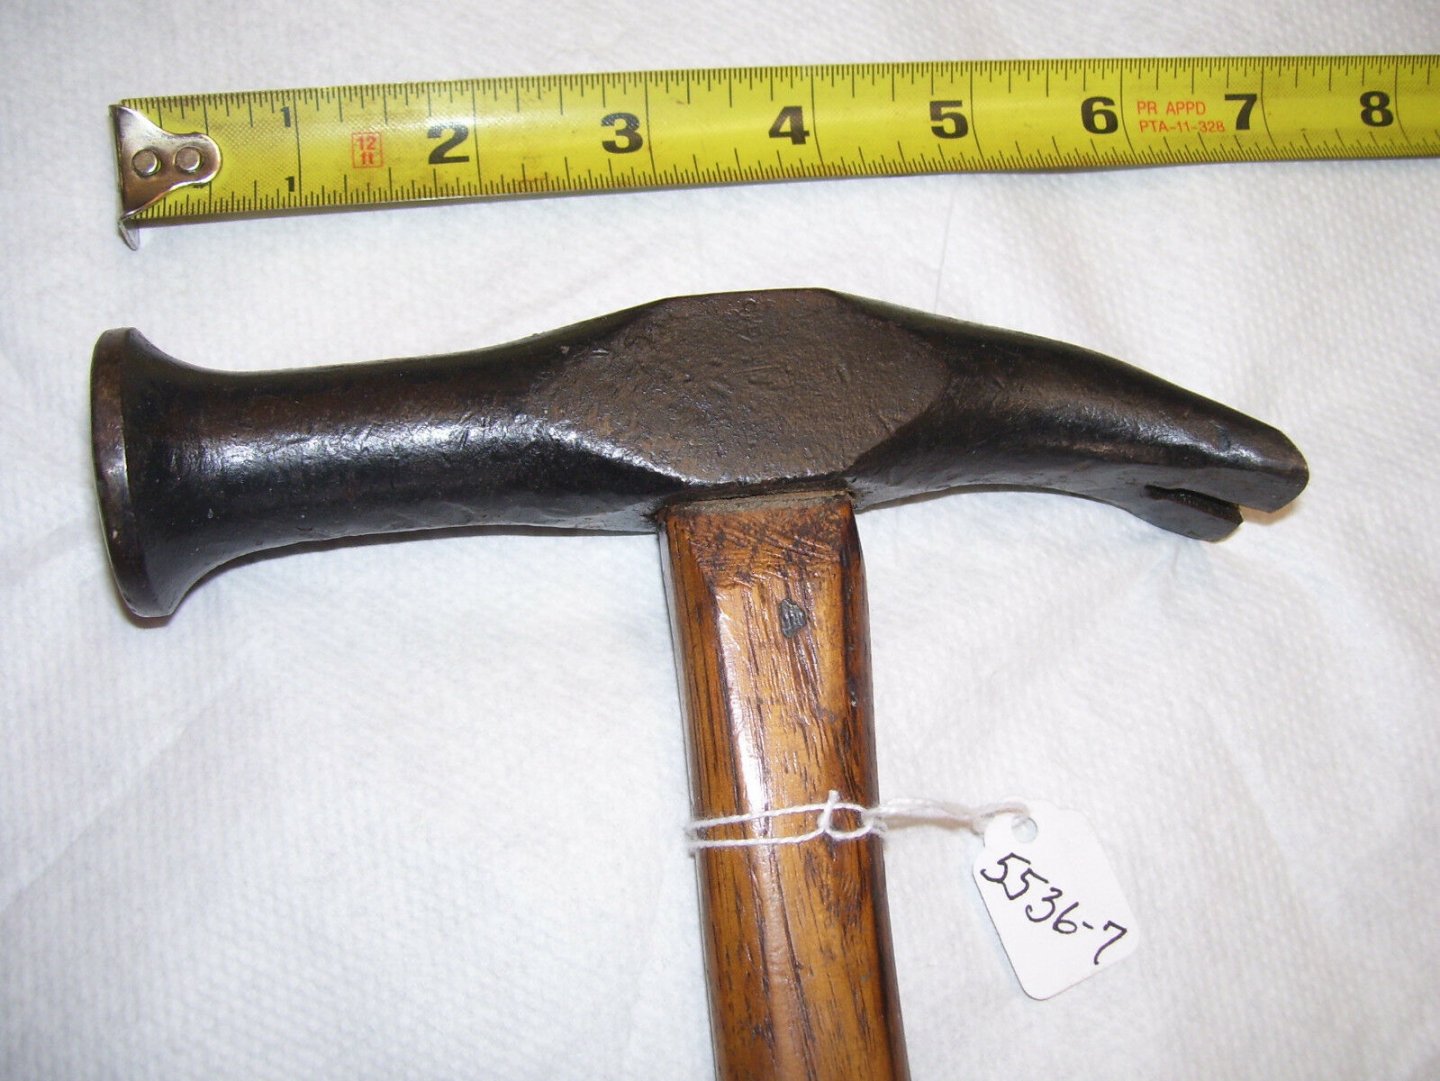
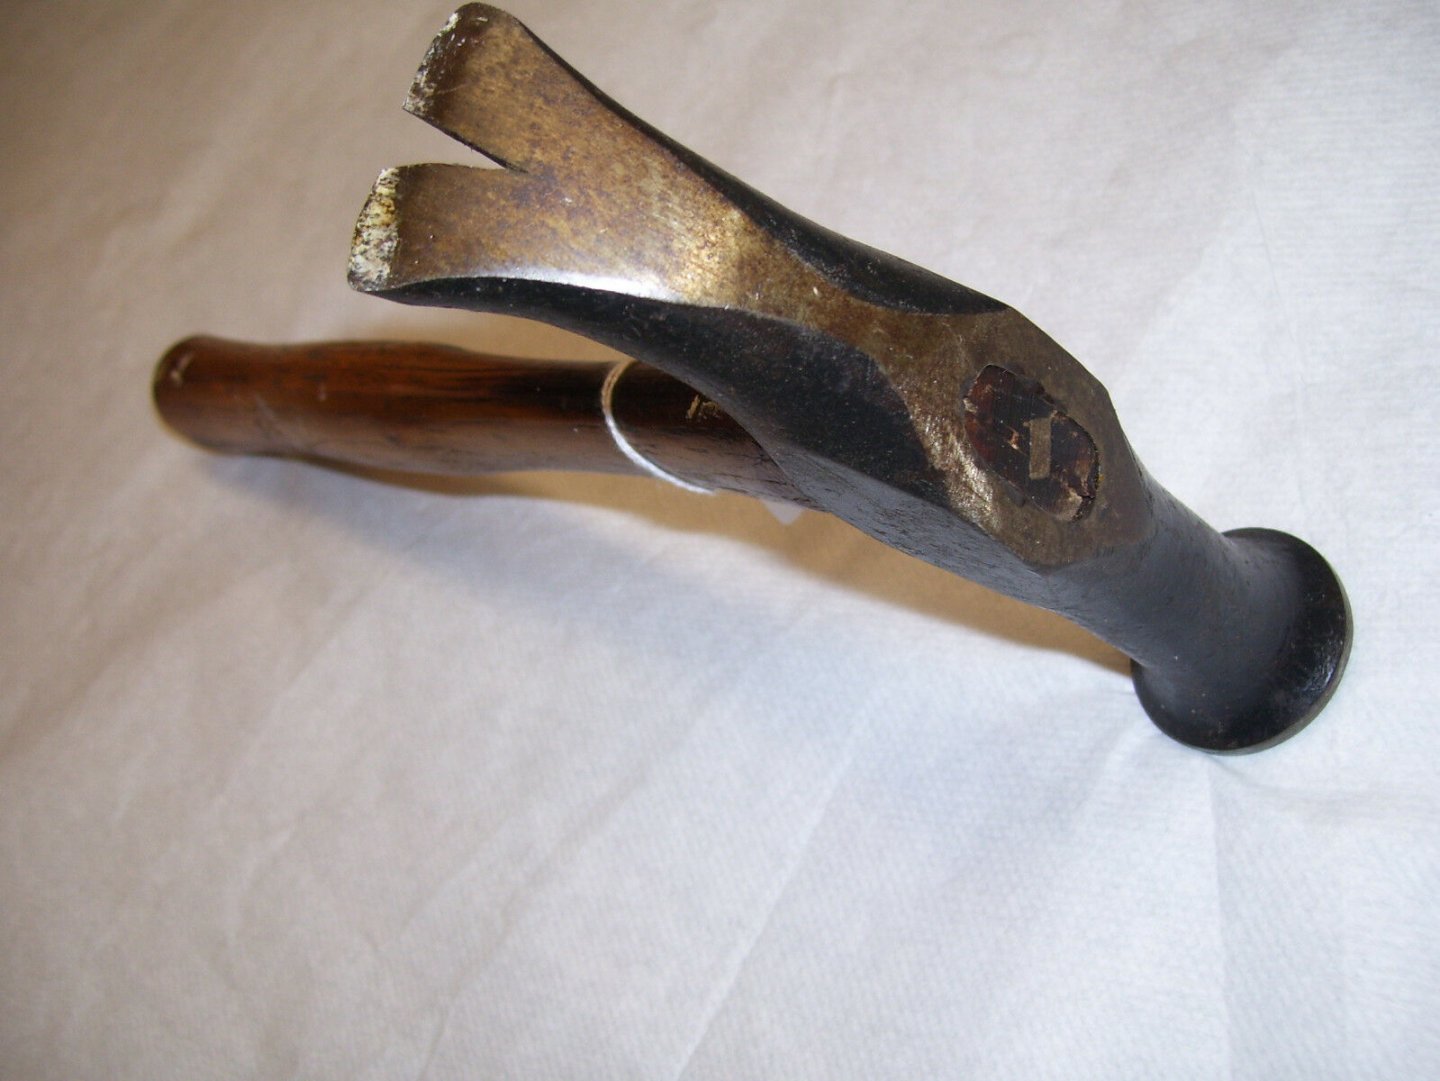
C. Drew and Co. were America's foremost maker of traditional shipbuilding tools in the age of wooden ships. Here are pictures of a Drew coppering hammer:
https://www.ebay.ie/itm/252074819437?ViewItem=&item=252074819437
More photos and information re: Drew coppering hammers and other shipwrights' tools:
http://www.numismalink.com/drew.note6.html
If anybody wants to read an academic paper on the history and practices of copper bottom sheathing, check this out: https://www.academia.edu/358814/The_Introduction_and_Use_of_Copper_Sheathing_-_A_History
- paulsutcliffe, mtaylor and Gregory
-
 3
3
-
1 hour ago, Jaager said:
Might that depend on how long the plates had been kept after delivery from the rolling mill? Our "just in time" system is a very recent development.
The mills were probably lower in rate of production, delivery time and weight per load, the inverse of now.
Exactly. The purity of the copper varied as well. Smelting techniques weren't as technologically developed then as now. Impurities affected the appearance of the patina as well.
-
6 hours ago, Jaager said:
The photos of HMS Victory and USS Constitution in dry dock - the copper - did not seem to be dented
like that in the photos here in previous threads about this subject. Did I miss that?
Nope. A real coppered bottom looks like the pictures you've seen of the real thing. It's the models you've seen that inaccurately portray their subject. At "model scale viewing distances," it's actually practically impossible to discern any 3-D surface detail on a coppered bottom. Step back from a real vessel as far as you need to so you can take in the entire ship in your field of vision, as when viewing a model. You lose a lot of surface detail at that distance. This picture is maybe twenty-five yards from the ship's bottom, no? No "dents," no "rivets." The copper plating seams are barely visible and only because they are either still damp as the dock is in the process of being pumped out, or perhaps because there's some dark colored sealer on them.
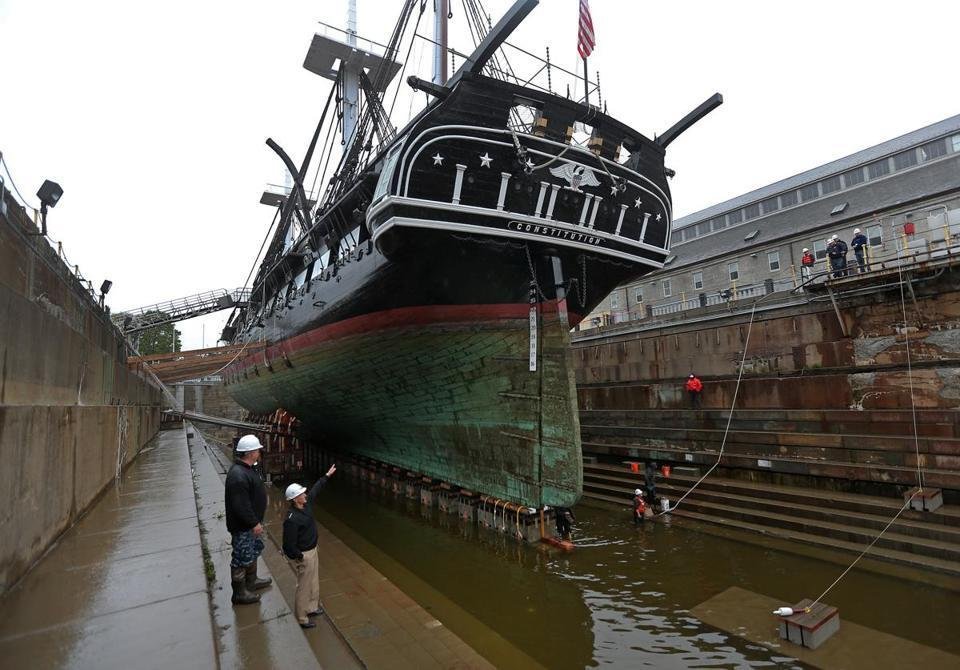 An accurate portrayal of a coppered bottom on a model requires little more than a competent "weathered" paint job. The bottom of a model is actually best appreciated for its lines and not its detail. In my not-so-humble opinion, It is counterproductive to draw the viewer's eye to exaggerated out-of-scale "detailed" coppered bottoms on a model when the viewer's eye should be drawn to the far more complex details of the deck and rig.I realize that I may tread on some toes saying this, but I think the sort of coppered bottoms we see on so many models in recent decades are affectations foisted upon modelers by manufacturers who found including some copper foil in their kit boxes allowed them to claim "Real Copper Bottom!" as some indication of quality and sophistication. Somehow or other, some modelers believe this marketing hype and believe it's necessary to put "real copper" on the bottoms of their models if they are to do a proper job of it. Too often, we see wildly exaggerated and over-sized "rivets" standing proud of the surface, sometimes carefully spaced to show the fastening patterns dutifully recorded in some dusty tome of nautical lore. If one felt compelled to do so, the above appearance of Constitution's scrubbed down coppered bottom could be far more accurately depicted to scale with overlapping pieces of thin paper, glued in place and then primed with thinned shellac and painted as seen in the photograph above. That is really what a scrubbed coppered bottom looks like in real life. Even when a bottom is freshly coppered, it never really looks evenly "brightly polished" as many try to depict. The copper plates may be shiny at first, but exposure to the elements (particularly salt air and salt water) quickly oxidize the surface and plates at the top of a pile will have their exposed faces oxidized to a greater degree than those in the middle of the stack. In short order after application, though, the elements even it all out and what we see above is what you get. Coppered bottoms simply don't shine like polished brass. (And I have no idea why folks go to the trouble of trying to get their copper foil to develop a patina like the real thing, either. Such products are often treated in one way or another to stay shiny, so trying to patinate them is pretty much a fool's errand anyhow.) I have seen my share of real coppered bottoms in the boatyards and I've seen a lot of contemporary models in maritime museums and, while there may be some out there, I can't recall ever seeing any sort of coppered bottom on a contemporary model.This is just my opinion, so nobody should have hurt feelings if they've got a different one. I just offer this comment as grist for the mill. I'd be interested in hearing what others think in this regard.
 -
Try using a wider piece of wood to plane so that your shavings are much wider. An inch or an inch and a half is good. make sure your iron is sharp. Roll them around your dowel (with plastic wrap beneath, so they won't get glued to the dowel) and put a rubber band around them and let the glue dry. When dry, cut the hoops to the desired width while they are still on the dowel and then slide them off the dowel. You can in that way get four or five hoops from a single laminated shaving. If you have a lathe, or even a drill press, spinning the dowel and cutting them with a jeweler's or other fine toothed saw makes it a piece of cake. Very little sanding is required after that.
- thibaultron, druxey, mtaylor and 1 other
-
4
-
On 8/26/2019 at 9:36 PM, mtaylor said:
Would this be the tarred flannel used between the hull and the copper plates?
Tarred flannel has never been used between the hull and copper bottom plates, as far as I know. The standard material for that is Irish felt which is still made and sold for that purpose, although you really have to look for it. It's very similar to roofing felt. You won't find it at Home Depot! These guys sell it, but seem to be asking an arm and a leg for it: https://schoonerchandlery.com/shop/vintage-traditional-boat-gear/a-traditional-materials-and-tools/irish-felt-ships-felt-barge-felt/ Admiral Ship Supply in Port Townsend, WA carries it, along with all the traditional materials for wooden boat construction and maintenance, all at reasonable prices. http://admiralshipsupply.com/
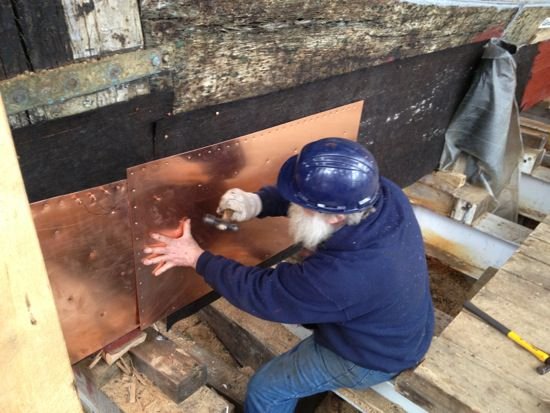 The use of canvas, flannel, or any similar cloth, the weight of it corresponding to the scantlings involved, is used when bedding the faying surfaces of large scarfs and timber joints, as well as fittings, in traditional ship construction. The purpose of the fabric was to hold the tar in place so it didn't run all over the place when the parts were assembled and to provide a bit of cushioning to fill the joint when the faying surfaces weren't perfectly flat and aligned. Irish felt and "Henry's" brand roofing cement is still commonly used to bed outboard ballast to wooden keels, as well as underlayment for copper sheeting and traditional canvas deck and deck house roof covering. In a lot of ways, the old methods and materials work best on wooden boats.In the applications discussed above, the fabric and tar would be applied to the entire faying surface of large timbers. It would definitely not be used only below the waterline. In fact, there's more need for a good joint seal above the waterline than below. Below the waterline, the wood swells and stays swelled, forming tight joints. Above the waterline, the wood moves much more as its moisture content changes with the ambient environment. Open seams above the waterline fill with fresh rain water which causes rot, unlike salt water, which does not cause rot.On the other hand, Irish felt is used beneath copper plating and painted canvas deck and deck house covering to provide a fair and flexible surface with a bit of cushioning between the plate or painted canvas covering. Without it, when the wood beneath the canvas moves, the painted canvas will crack and leak at the deck seams, causing rot, when the deck planking below expands and contracts with the cycling of the wood's moisture content. As for the copper, the tarred Irish felt provides a smooth surface for the copper and holds the tar in place. with a bit of cushioning, the heads of the tacks will naturally depress to be more or less fair with the surface of the plate rather than standing proud. It also cushions the copper and prevents punctures and tears when minor impacts occur. (As can be seen in the picture above, the old stripped bottom above the area being coppered is pretty groaty. A smooth bottom is a fast bottom.)Some seem to think that irish felt and tar, or in the old days, hair and tar, prevented terredos from eating into the wood, but in my experience I doubt that made much difference to the ship worms. They find any small hole or depression they can, bore in and then take a 90 degree turn and eat through the endgrain, creating long tunnels in the wood. That's where they do the damage. A few small holes in a plank often indicates that the whole plank it like a hunk of Swiss cheese, even thought there's little damage visible on the surface.
- paulsutcliffe, allanyed, el cid and 5 others
-
8
-
I wonder whether or how often in wartime ships may have temporarily carried a painted name of another vessel in order to confuse the enemy. Spies would certainly be gathering information on the comings and goings of various vessels and especially their captains and the admirals. Some might be readily identifiable, but scrambling the names could be a pretty good ruse. On the other hand, I may have been reading too much Patrick O'Brien!
-
I have my doubts about it being Spanish Cedar. Spanish Cedar is getting close to being on the "no-no list" due to deforestation. It's traditionally been used for wooden cigar boxes due to its aromatic qualities. A lot of amateur modelers in "the dark ages" used recycled wooden cigar boxes for ship modeling. Wooden cigar boxes were plentiful in the days when many smoked cigars but you'd be hard-pressed to find one today. It's closer to a mahogany than a cedar. I find it hard to believe Lowe's is importing Spanish Cedar fence boards. I bought three fence boards at Lowes about a year ago to repair a fence. They were your basic domestic crap cedar fence material. Suitable for the use intended, as they say, but nothing I'd waste time trying to use for modeling. Making a silk purse out of a sow's ear may be possible, but in this instance, I'd not think it would be worth the trouble. We use so little wood in modeling, it's a false economy to work with really cheap construction grade lumber. Your time and skill are worth more than that.
-
3 hours ago, donrobinson said:
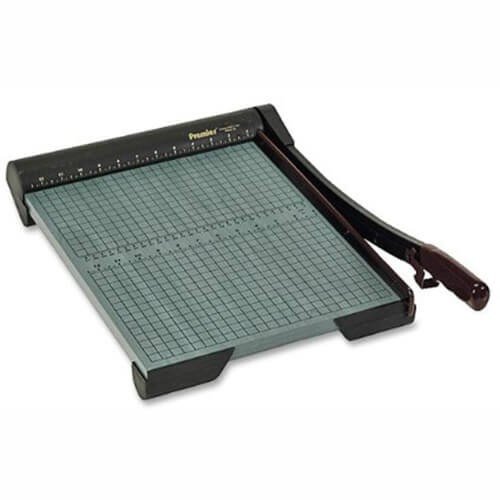
I then cut this using a guillotine paper cutter, works great and very accurate, also much cheaper.
Yes, I do the same. I've used a paper cutter for cutting thin copper and brass, as well as paper and card stock, and even veneer strips on occasion. Since I got my Byrnes saw, I run the wood through it now.
A paper cutter does "curl" the metal, but that's easily dealt with by doing the old "stretching" trick. I use a vise-grip pliers held in a vise to hold one end and another pair of vise-grips to hold the other end and pull. The strips straighten out without problem. I primarily use copper sheet, which I find easier to work than brass, but I suppose that's mainly a matter of taste.
I have a couple of them, one small and one large, both garage sale items. I just checked, though, and almost lost my lunch over the cost of them today. $100 on average for a new smaller one. Still, if you have the chance to find one cheap, grab it. Mine are very frequently used and very handy. They don't replace a good table saw, but for thin stock they come pretty close. Measurements are by eyeball, but you can be sure they will cut a dead straight line as long as you hold onto the workpiece when cutting it. They are great for cutting very narrow strips of paper and card for things like mast bands. If you didn't have a Jim saw, you could cut planking strips from veneer sheets fairly easily, as I've done before, but the blade has to be sharp and the veneer thin. Perhaps a paper cutter would be a low cost alternative to a mini table saw for folks getting into what I'm expecting will be the increase in "semi-scratch" kits like Syren is presently bringing onto the market.
- mtaylor, thibaultron and Canute
-
3
-
-
You really can't ever have too many books!
I really don't think there is an "essential" book for modelers. There have been many published over the years, many, if not most, repeating information written in their predecessors' books. Some are better than others, of course, but none are "essential." Reading any or all of them will provide a "tip" here and a "trick" there, none "essential," but together all helpful. A lot depends on the type of modeling you want to do. There's no point in buying a bunch of books on masting and rigging sailing ships if you want to build modern warship models.
If you are like most and want to do sailing ships, I'd say you could probably do well picking up any of the better "how-to's" written in the last twenty years and you'd probably have the "basics." Then I'd suggest one haunt the used bookstores and online for good-condition used books at bargain prices.... The Anatomy of Nelson's Ships by Longridge (which has a lot of methods and techniques information in it,) anything by Charles Davis, anything by Howard I. Chapelle, and anything by Harold Underhill. Pick up copies or paperback reprints of Darcy Lever on seamanship and rigging, The Art of Rigging by Biddlecomb, Masting and Rigging in the Days of the Spritsail Topmast (? this from memory.) Once you had most of those, you'd have a basic collection of the "classics."
- EricWilliamMarshall, BobG, JpR62 and 4 others
-
7
-
1 hour ago, JimArr said:
Wanted to get a few opinions on working with poplar for planking and staining.
Poplar is a very good "secondary" or "utility" wood but it is not a 'finish" wood and isn't known for it's "looks," stained or otherwise. It's often soft and "fuzzy." Notwithstanding its many good uses, trying to make poplar look good with a bright finish is pretty much like trying to polish a turd. It also darkens quite a bit over time when exposed to UV light.
-
42 minutes ago, JimArr said:
Thanks for the responses.
I live in a small town in East Texas. Lots of yellow pine in our local hardware stores. Only other woods available are red oak, poplar, and cedar.
Jim
If you can find some clear, tight ringed pine or cedar, that can work. Your sweet gum trees should produce good modeling wood. There is also some holly growing south of the Piney Woods, I hear, Do you have cherry or apple around? How about Osage Orange (Bois d'arc) or acacias and locust? Modeling wood often grows on small trees and there is a limited market for it, so it won't be found in general lumberyards.
I'm not sure if you are set up to mill your own modeling wood or not. The tools for that are becoming increasingly necessary, certainly for any sort of scratch or semi-scratch building. The online sources for milled modeling wood are drying up. It's just not available much of anywhere "off the shelf." That doesn't have anything to do with what wood is "available" nearby anywhere, but the economics of selling to a specialty market and the amount of work milling it just isn't a viable business model anymore.
Living in a small town has its pluses and minuses. On the minus side, you'll have to travel a bit to source specialty woods other than construction lumber, or order pieces of stock from online suppliers (at what, IMHO, are premium prices.) Either way, you'll probably have to mill your own planking strips.
-
6 hours ago, JimArr said:
It is the only hardwood that I can get locally.
There's nothing magical about hardwoods as compared with softwoods. The difference between a "hardwood" and a "softwood" isn't that the wood is harder or softer. Hardwoods are "angiosperms," trees that reproduce from seeds that are covered by a shell, a pod, some sort of husk, or in a fruit, like maples, balsa, oak, elm, mahogany, red gum, apple, cherry, olive, and so on. Softwoods are "gymnosperms," trees whose seeds have no covering and just fall to the ground, like pine, cedar, redwoods, and larches. Another rough, but not absolute distinction is that hardwoods usually drop their leaves annually, while softwoods keep their leaves year round. Hardwoods do tend to grow more slowly and therefore are often denser and heavier than softwoods, but that's not an absolute distinction. In picking modeling wood, pick your wood for it's qualities without regard to whether it's a hardwood or a softwood.
I don't know where you are located, but it's hard to believe you wouldn't be able to find some suitable planking wood just about anywhere other than areas where there simply isn't any vegetation. Research any wood that you have available that looks like it might be suitable. Use The Wood Database, which should be on every modeler's "favorites" list: https://www.wood-database.com/ This invaluable site will allow you to identify wood and then look up its appearance, grain structure, hardness, bending qualities, resistance to decay, and so on. If you are intending to finish the wood "bright," (oiled, shellacked, or varnished to show its natural color and figuring,) you can check pictures in the database that will show what the wood looks like bare and when sealed. There's no reason to use expensive exotic figured woods if they are to be painted nor to use expensive exotic very hard wood (e.g. box, ebony, persimmon) unless it is to be carved or worked in very small pieces. Remember, too, that lots of the wood seen in kits is chosen for it's commercial availability and lower cost and isn't always the best choice anyway. A lot of very good modeling wood is available in smaller amounts not favored for large scale commercial production and marketing. Tree services throw that stuff in their chippers. I once rescued a nice piece of holly from a chipper. I asked for it and they said, "Sure, take it!" Another often overlooked source of good modeling wood is recycled wood. I've used old paneling, wooden Venetian blind slats, broken walnut and mahogany furniture (solid tabletops!), and even some maple bowling alley flooring all scrounged while "dumpster diving." Old wood like that is always dry and fully seasoned and sometimes very tight-ringed "old growth" quality that is virtually unobtainable on the market today. Creative use of the wood available is a good way to make your model stand out as uniquely yours. You aren't limited to what's on the hobby shop shelves at all.
I suggest you post the woods you do have available. I'm sure somebody in the MSW forum will have first hand knowledge of how suitable just about any wood is for any particular modeling use.
-
Sorry to hear of your troubles. Been there, done that, got the tee shirt. This, too, will pass. Life will get better. We move on and grow. Rely on your therapist and your friends.
You'll be okay, but it does take time to grieve a bit and heal. Be good to yourself. Remember, "Boats get you through times of no love better than love gets you through times of no boats! "
You are not alone. If you're wondering "How the hell does he know?" Well... I've been a divorce attorney for forty years.
- EJ_L, marktiedens, Canute and 5 others
-
8
-
Sorry, I just noticed that you're located in Stockholm. Your access to some of the tools (e.g. Byrnes Model Machines, Foredom flex-shaft rotary tools, and Dremel rotary tools) may be limited, or the shipping and import duties prohibitively high. You do have Proxxon in Europe, of course and I expect there are plenty of European companies offering high quality tools outside of the modeling market. Like the language, I guess we have to "translate" our tool recommendations, too!
-
17 minutes ago, Vane said:
Proxxon seem to be the way to go I guess.
Proxxon appears to be a relatively decent mid-range-quality product line designed for and marketed to amateur modelers. If they serve your needs at your price point, go for it. However, there is always the tendency to "over buy" when it comes to tools. Sometimes fewer of the better, but higher priced, tools is the wiser way to go. You have to get your priorities clear. If you are going to only be building kit models and plan to use the materials in the kits you buy, you don't have to buy power tools that are essential for milling your own scale strip wood. If you expect to be planking with higher quality wood than what is found in most kits, or even building the new "semi-scratch" "modular" kits (see Syren's new kit business plan post in here,) you will need a mini-table saw and there's really only one that's so far above the others that the small additional cost is well worth it, so you'll want a Byrnes. If you are going to be doing a lot of shaping small parts, you'll probably want a good disk sander. (See the recent thread on disk sanders.) If you will be doing any sort of metal work, there's a whole other category of tools, lathes, mills, jeweler's torches, and so on, that will tempt you. Everybody needs a small rotary tool. Personally, I consider the Dremel moto-tool to be the minimum of what's worth spending money on, but most eventually graduate to a Foredom flex-shaft rotary tool or a "dental engine" eventually. If you are going to be cutting your own frames and bulkheads, you'll want a decent scroll saw. A small drill press is always worthwhile. The list can go on and on.
The best advice I was ever given is to never buy a tool until you actually need (not just want) one and then only buy the absolutely best one you can afford. In this way, you can eventually build a good collection of what you need that will last a lifetime and once you've got them, if they are high quality, you won't be buying the same tool over and over again as the cheap ones wear out.
In the modeling game, remember that many of the best and highest quality tools are adapted from other trades and professions, notably jewelry making, electronics assembly, dentistry, surgery, and the like. Often such tools can be purchased used in good condition for much less than the "hobby grade" tools marketed to modelers. (Micro-Mark and Model Expo catalogues, while seductive, are the worst offenders in this regard.) Search this forum and read through the "tools" section and you will see the same machines mentioned time and again. You can rely on the store of experience of MSW members.
-
On 8/15/2019 at 10:45 PM, Dr PR said:
Biddlecombe's "The Art of Rigging" shows serving over the splices in a cont splice. Maybe I will just use extremely small diameter copper wire to sieze the splice and paint it to simulate serving.
Perfect solution! If you have a serving jig, the job would be a piece of cake. Fine thread, as sold for fly tying, should work fine at that scale, as well. Apply shellac to the serving and it should hold quite well.
-
Somebody's selling this "vertical lathe" drill press attachment on eBay for arouind $65.00. No comment on it. Just passing it along for those who may be interested. Looks like it could be easily shop-built for less than the $65.00 they're asking. My concern would be the far (unsecured) end of the round rod "rest" getting a bit whippy when you got out towards the end. Model spars are a bit too thin to turn with regular lathe tools without a back rest, or so it's always seemed to me. It might be handy for resting a sanding block on. "Shopfox" branded: so it's probably not total junk.
(For some reason, my firewall won't permit me to post a copy of a photo of it from the eBay page.)
-
Bluejacket Shipcrafters has two very nice, highly detailed, America kits, one in 1/8" scale and the other in 1/4" scale. These are plank on frame kits with all the interior framing and may be built "Admiralty Board style" with exposed frames, or not, as the builder wishes. http://www.bluejacketinc.com/kits/america.htm
If memory serves, one or both of these models was designed by the late Portia Takakjian from whom one can expect a very high degree of accuracy and detail.
- thibaultron and mtaylor
-
2
-
2 hours ago, Dr PR said:
I wanted to use this for the breeching lines for the cannons, and I wanted to create a cut splice to fit over the cascabels on the cannons. This was common practice in the 1800s for cannons that did not have a breeching ring.
It was also common practice in the 1800's for the word "cut" in "cut splice" to contain the additional letter "n." "Cut splice" is a fairly recent Bowdlerism that was certainly never used by seamen in the age of sail. I know of only two common uses for this splice. One was, as you note, to keep a breeching line over the ball of the cascabel, and the other was on a lifeline with the splice being pierced by the outer ends of weather deck capstan bars. This kept the crew manning the capstan in heavy seas from being washed overboard.
I don't know what scale you're working in, and hence the size of the line you have there. In the photo it appears white, which wouldn't be the actual color of hemp cordage, which was the standard in use and is fairly dark brown. From the photo and your description of its gluing characteristics, it's likely a synthetic and that's the cause of the problems you're having. If and when you find something that will stick to it, I suggest you splice the ends, each into its opposite's standing part, using any of the customary techniques for "faux" splices. Without some "weave" of the strands into the standing parts, you'll find little success trying to glue the end of one line to the side of another and getting a sufficiently strong bond to do much of anything for you.
- thibaultron and mtaylor
-
2
-
Why remove her engines and steam plant. There's lots of room on her for engines and everything else you've contemplated. The "steamboat casinos" of the Prohibition Era had to have operating engines to travel on the interstate waterways and stay exempt from local gambling regulations. (Alcohol prohibition was federal, of course, so that applied everywhere except "out side the three-mile limit.")
-
14 hours ago, Mark P said:
Good Morning All;
The best method I ever used for making mast hoops was with an ordinary hand plane.
This was to set the blade to a slightly coarse cut, and then carefully plane a long shaving off the edge of a plank of pine (no knots being present) The shaving will have a natural tendency to curl. Weight it down flat and coat the inner side with glue, then roll it around a suitable sized dowel, with a rubber band around the outside, and leave to dry.
Once dry, this will give a perfect tube, from which hoops of the desired height can be cut with ease. This works for woldings and hoops for sails sliding up and down the masts.
This was a tip I saw long ago in (I think it was) Underhill's 'Leon' book. But it works wonderfully well, and is quick.
The plane needs to be sharp, of course.
All the best,
Mark
That's the only way to fly when it comes to mast hoops. I wrap a sheet of paper, and then a sheet of "Saran wrap" (plastic kitchen wrap) around a dowel of suitable diameter to make a mandrel. The plastic wrap keeps the glued shavings from sticking to the mandrel. When the laminated shavings wrapped around the mandrel are dry, I mount the mandrel on my Unimat lathe and sand the laminated shaving rings to a uniform thickness and then part them to the desired width on the lathe. When done, I slide the wrapped paper off the mandrel and slide the individual rings off the paper sleeve. Voila! Perfectly uniform laminated wooden mast hoops.
- Landlubber Mike, mtaylor, BETAQDAVE and 5 others
-
8
-
13 hours ago, Tom in NC said:
Sheer genius. I'll build that idea into the story. I'm still working on the engine problem. While trying to ascertain what type of engine and HP the Chaperon boasted I ran across your exceptional thread about steamboats. I'm pretty sure that my off-the-cuff idea about four Model T engines would provide way too little power. Four of them could only reach about 80-100 HP @ 1600 RPM, and if you multiply their torque (83 ft-lbs @ 900 RPM) by 4 you're still not getting a lot of ooomph. Knowing you're watching me, and what your level of expertise is, I'll need to be careful not to too carried away with my fantasies. The steam engine is irrevocably gone on this boat, so maybe Jezebel will wind up being a wharf queen after all. By the way, I'm a cat lover too so go easy on me.
It's a good yarn, but, like Patrick O'Brien writing his Aubrey and Maturin yarns, you have to do a lot of research to make sure you get it right. The credibility of the fictional yarn depends on that. I'd suggest that you study steam engineering before going further with your re-powering theories. Steam (external combustion) horsepower does not equate with internal combustion horsepower. Steam is all about tremendous torque generated by the compression energy of live steam expanding in a pressure vessel (i.e. a boiler.) Steam power generates torque. Internal combustion, on the other hand, generates speed, but not so much torque. A paddle wheel demands large torque forces to turn it, as does a steam "wheel" (propeller. There is a lot of difference between a steam wheel and an internal combustion engine propeller.) The paddle wheel doesn't have to turn fast because of this. The internal combustion engine makes up for its inherent lack of torque with speed. It's propeller takes a smaller "bite" of the water, but spins much faster. Gearing down high speed internal combustion engines to produce sufficient torque to turn a paddle wheel on a vessel that size would be a very inefficient use of power.
On the other hand, while I'm not sure whether your prototype (Chaperon) used a condensing steam plant. Condensing recycles the the steam back into fresh water. Salt water cannot be run through steam plants without causing damage over time. Ocean-going steamships can't carry enough fresh water to supply their boilers for long voyages, so they condense their steam back into freshwater for reuse. Condensing essentially is the same process as distillation. If fermented mash were boiled in the boilers, the alcohol in the mash would boil before the water did, because alcohol vaporizes at a lower temperature than water. Condensing the alcohol vapor in the steam plant's condenser and draining it off would cause the steam plant to operate as a still ! When the alcohol had been distilled from the mash, the water in the mash could then be boiled to produce steam in the ordinary fashion and thereafter condensed and run to the "hot well" (condensed water storage tank) as usual. The only catch would be that the mash would have to be cleaned out of the boiler, which would be a nasty job. It would be easier to use a separate boiler for the mash, not operated at any great pressure, and run the vapor to a separate condenser. These could be disguised as an auxilliary boiler and condenser to fool the "Revenooers."
I just don't see the Model T engines being a workable solution. A 5 HP steam engine will push a 25 foot displacement hull at hull speed, while it takes around 25 HP out of a gas or diesel engine to do the same. The torque requirements of the paddle wheel would stall out the gas engines.


Hock knives
in Modeling tools and Workshop Equipment
Posted
Beautiful work there! I particularly like the knives and the Hawaiian wood pens. Spectacular figuring!