


Bob Cleek
-
Posts
3,374 -
Joined
-
Last visited
Content Type
Profiles
Forums
Gallery
Events
Posts posted by Bob Cleek
-
-
As a beginning ship modeler, a good quality, simple model, elegantly built, will teach you more and give you far more satisfaction for years to come when finished than a good quality, highly complex model, inexpertly built, if you even finish it at all. Kit manufacturers sell dreams that only come true if the dreamer has the skill to make those dreams a reality. As Dirty Harry said, "A man's got to know his limitations." Trying to learn how to swim by jumping into the deep end of the pool straight away rarely ends well.
- mtaylor, JeffT, mtdoramike and 1 other
-
 4
4
-
-
As the others said, it's probably possible, but you might as well build a new one again. Then, all you have to do it put it together. No need to take it apart first. Taking one apart and rebuilding it is sort of like re-marrying your ex-wife, don't you think?

Besides, blowing up old models you don't like anymore is why God made cherry bombs and M-80's!
-
-
Thanks, Frankie! A picture's worth a thousand words. I really don't know why there's so much error, confusion, and controversy among modelers when it comes to cordage colors. Could it be that many have never actually spent any time around sailing ships?
(P.S.: Just to avoid further confusion, the "white" or gray running rigging in the picture is apparently modern Dacron. Pre-synthetic cordage would have been of lightly tarred hemp and thus dark brown.)
-
Gee, if I were in Palm Beach, I'd be there with bells on!
How many are there, actually? I wonder what they'd cost to ship cross-country at "book rate" with the US Postal Service. That book rate for printed material used to be surprisingly cheap. Do you have an inventory of what you've got?
-
8 hours ago, shipman said:
''Then the high explosives were put into shells.
It was noted: “This is done by women workers.
“It is done firstly by hand, with the use of a boxwood rammer, and finally
under hydraulic pressure.”
That's it! God only knows why I had been reading that article, or how I ever would have come across it, but there it is. Yep. they used up all the boxwood that was large enough to turn a rammer that fit inside a heavy artillery shell. Boxwood doesn't grow that big and takes forever to do so when it does. We're still waiting for the post-WWI boxwood to grow that big, One guess as to why boxwood might be that it is so tightly grained and hard, the powder didn't work its way into the wood. Knowing the British Government, there's probably a "mil-spec" for boxwood rammers and perhaps some studies on it in an archive somewhere.
Actually, what we really need is some GMO (Genetically Modified Organism) boxwood, modified to grow ten times as fast and in the worst of conditions.
- paulsutcliffe, Mark P, GrandpaPhil and 1 other
-
4
-
Interesting bit of trivia I came across once and have never been able to find it again to investigate further:
I read somewhere that fairly large pieces of boxwood were used in the manufacture of a particular tool used by artillerymen, a barrel rammer or cleaner or something. Boxwood's properties made it essential for the manufacture of this tool. Around the turn of the last century, when the clouds of war loomed over Europe, there was a "boxwood rush" as soon to be warring nations cut all the boxwood they could lay their hands on and virtually stripped Europe clean of harvestable boxwood. As it is so slow-growing, boxwood has been hard to come by ever since.
I have not been able to follow up on this because i can't seem to find the original piece where I read it. I could have dreamed it for all I can say now. Has anyone else ever heard of this?
- thibaultron, mtaylor and Mark P
-
3
-
5 minutes ago, Erskine Childers said:
Unless Ebay rectify matters I can see myself taking legal action for replacement of my property.
My guess is that if you ever find and read eBay's "Terms and Conditions of Use," you'll find a clause way down somewhere in the double-digit pages that says something like, "By participating in the eBay platform, the user hereby covenants and agrees that any legal action the user may bring against eBay shall only be filed in the Superior Court of North Dakota in Minot, ND, on February 29 of each Leap Year."
-
I don't know if it's the same in Europe, but in the US, I don't think anybody does any business on eBay without using PayPal. Some sellers list on eBay and then make a side deal with the eBay "winner" to pay by cash or check. Then they tell eBay the buyer never paid and they don't relist the item, thereby avoiding paying eBay its commission. eBay bans sellers for this. PayPal is the only way a buyer has any protection, as far as I can see.
-
I think the main reasons people begin scratch building are:
1. They can build whatever they please instead of the four hundred and sixty-fifth example of the same model everybody else has built.
2. Many models are hugely over-priced for what the are. Aside from an eventual investment in tools, scratch building can cost practically nothing.
3. They enjoy the challenge and the sense of accomplishment of building a good model which is unique.
4. Quality scratch-built models tend to bring far more in the marketplace than even the best kits.
5. There's a big difference between researching a particular vessel and building it from scratch and just opening a box and assembling a model by simply reading the directions. Basically, it's the difference between painting an original oil painting and a "paint-by-numbers" kit. People scratch build for the sense of accomplishment it provides.
6. When somebody admires your model and inevitably asks, "Did you build it from a kit?" You get to answer, "No, I built the whole damn thing. There is nothing you see that was store-bought. I made every part from raw materials. You may even be able to say, like a few, that you grew and harvested the wood yourself, too.
Maybe others can add more reasons.
-
For general machining techniques, check out the huge number of YouTube videos by a guy named "Tubal Cain" or "Mr. Pete 222" (His real name is Peterson.) He's a retired high school metal shop teacher who teaches his machining classes on YouTube now. He's entertaining and really knows his stuff. Master craftsmen like this guy are really getting scarce these days.
-
Lots of good options in the above posts. For some reason, "Murphy's Law," perhaps, the shop vac hoses never fit the connectors you want to attach them to. It doesn't matter which or how. My Byrnes tools owrk great with a piece of plastic pipe connector fitting sanded down a slight bit on the outside lip. That just happened to be luck. As with many other such problems, duct tape is a quick and effective, if inelegant, solution.
File this one under "there oughta be a law" that all vacuum hoses must be of standardized sizes suitable for use with standardized adapters, both metric and Imperial.j
-
The problem with cutting plywood on a scroll saw is 1) the plywood and 2) the choice of blades. A bandsaw will tend to cut plywood cleaner because the cutting is only running in one direction rather than up and down. However, the proper blade, the proper cutting speed, and, if necessary, sacrificial pieces of thin stock above and below the "sandwiched" cut should eliminate any tear-out of the thin ply. A reverse skip toothed blade should be used on a scroll saw when cutting plywood. The reverse skip toothed blade is specifically designed to cut thin plywood without splintering and they do work fine for that. On the other hand, plywood is a poor choice for frames because fastening and gluing plank, etc., to the edges of plywood is difficult. No plywood was ever intended to be fastened through its edges. A piece of solid wood is the proper material to use for frames. Where a curve causes cross-grain that weakens a solid wood piece, a scarf is better to correct grain orientation, as with full sized sawn frame construction.
A bandsaw is very handy to have, but there are limitations to its versatility. Only with very good bandsaws with very narrow blades can one cut very narrow curves and reversing direction is problematic, unlike with a scroll saw. Obviously, a bandsaw cannot make inside cuts in solid sheets because the band cannot be passed through a hole drilled in the middle of a piece. There are many more narrow blade options available for scroll saws than bandsaws. There are even sanding strips designed for scroll saws so they may be used to sand small pieces. The variety of blades available for scroll saws is quite remarkable. (See: https://sawshub.com/scroll-saw-blades-types/ and https://www.woodcraft.com/blog_entries/choosing-scroll-saw-blades and http://www.sloanswoodshop.com/PDF/blade chart.pdf and http://www.sheilalandrydesigns.com/articles/scroll-saw-blade-selection)
One distinction not mentioned is that the top quality scroll saws saw in a straight up and down motion due to their "parallel arm" linkage engineering designs. The less expensive ones don't. The less expensive machines' blades don't saw "straight up and down," but move in an arc that creates a "galloping" motion which tends to lift the piece off the table if not held down tightly, often a difficult task with small pieces, and creates vibration. The sawing motion of ordinary scroll saws tends to cause tear-out, while the parallel armed scroll saws cut straight down, like band saws do. Perfectly vertical sawing direction makes for much cleaner and more easily controlled cuts and, most importantly, far less vibration. Vibration is the critical variable in scroll saws. The less vibration in operation, the better the saw cuts and the easier it is to use. (e.g. http://www.pswood.com/scroll-saws/ and https://www.hegner.co.uk/products/machine-tools/scrollsaws.html and https://www.grizzly.com/products/DeWalt-DW788-20-Scroll-Saw-with-Stand-and-Light/H7414)
That said, tear-our shouldn't be a big problem when cutting plywood, even on a less expensive scroll saw, if the correct blade is used. The day will come when one will want a bandsaw, but for making a lot of curved cuts on small pieces, I think the first choice would be a scroll saw over a bandsaw. Others mileage may differ, of course.
-
The cost of less expensive power tools is the far lower level of accuracy generally found with most of them. POF scratch building can be done with hand tools, even, but as you've found out, the labor involved takes a lot of the fun out of it. IMHO, at the very minimum, you really need a stationary scroll saw, a micro-table saw, a small thickness sander, and a small stationary disk sander. You can get by with a Dremel in a good (e.g. Vanda-Lay) drill press adapter, but a dedicated stationary bench top drill press is a far more useful choice. If you get a drill press with enough height, it can double well for tapering spars. If you are an "in for a penny, in for a pound" kind of person, you should get the drill press and a Foredom flex shaft rotary tool with a couple of handpieces, at least one with a chuck on it.
I have to confess I've never used one, but from all indications, the Proxxon jig saw (The terms seem to vary. some call them saber saws.) is "hobby quality" and, while servicible, really doesn't do the trick for accurate modeling for all the reasons noted in the previous post above. Additionally, what power tools are all about is power and the lightweight hobby quality tools really don't make the grade over the long haul compared to the top quality stuff.
Just as it's pretty much impossible to build a traditional wooden boat or ship with dimensioned lumber, it's pretty difficult to accurately build a wooden ship model with scale dimensioned modeling wood. There is just too much variation in the pieces to build a boat, both in full size version and to scale, to find what you need "off the shelf." This does mean that you are looking at investing as much as a couple grand in quality tools, but, as the saying goes, "You get what you pay for." The general rule for buying tools is to only buy a tool when you have an immediate use for it and then always buy the best you can possibly afford. With scratch modeling tools, you can easily spend the cost of a couple of big kits "tooling up," but it's a lot less painful if you buy them one at a time and try to find used tools of high quality that haven't been abused. They are often far less costly than the hobby quality tools which are generally just under-powered reduced-size versions of common power tools, but not really tools designed for building miniatures where you will be working to tolerances of hundredths, if not thousandths of an inch.
As costly as quality tools are, they are an investment, not only in your craft, but also will retain their value and in some instances over a period of time maybe even appreciate in value. These are tools your grandchildren will be able to use when you're dead and gone. A small amount of money that can be regularly saved without unbearable pain will quickly add up to enough to buy the good stuff. When you consider that, where I live at least, the cost of a drink in a bar is pushing ten bucks, doing your drinking at home out of a half gallon bottle from the Big Box Store will save enough to easily buy that Byrnes saw, and thickness and disk sander before you know it. (Although your mileage may vary in that respect.
)
I'd strongly encourage you to invest in a good quality scroll saw. If you need an argument to justify the cost of these power tools, just think about how much money you will save on modeling wood when you can quickly turn out your own stock to any size necessary from whatever wood you can pick up laying around. (e.g. an old maple butcher block counter top snagged at the dumps or from a friendly kitchen remodeler will last you for years.) These are tools that can really set you free to jack it up a notch. If you can't afford to drop five or eight hundred on a top of the line scroll saw, at least get the best you can afford. You can always sell it and get a fair bit of your money out of it when you are ready to move up to the next level in quality.
-
Wow! Ninety bucks for the set. That's pricey for three pieces of piece of sheet metal cut out with a laser. They had zero research and development costs. (The curves are in the public domain, of course.) The sheet stainless isn't all that expensive. Maybe I need one of those laser cutters after all.
-
55 minutes ago, abelson said:
Thanks. I think you misunderstood me. I’m talking about knots on the bowsprit and boom foot ropes. Another builder suggested to simply use separate line to tie each knot. That seems like a good approach. That way the knots can be slid on the rope to achieve the desired spacing and then secured with AC. I’ll try it.
I did misunderstand you, thinking you were talking about ratlines and called them foot ropes, then I realized you were talking about foot ropes for working out on spars, sometimes called "horses." I thought I deleted the post, but I guess it survived. Glad it was of some use to you! (Did I mention that tying ratlines is one of the biggest PIA's in all of ship modeling?
)
-
31 minutes ago, abelson said:
The issue is how to knot the ropes so that the knots are evenly spaced on the foot ropes.
I'm no authority on rigging of this period, but I've never seen, nor ever stood on, a foot rope or horse with knots in it. All the ones I've ever seen are simply parceled, wormed, served, and tarred. It would seem that the knots would prevent sliding your feet along the rope continuously as you move on it. You'd have to lift your foot off the rope every time you came to a knot. "Stepping" on a foot rope (as called out "stepping on starboard" or stepping off port," as applicable, to alert all the other crew on that rope that you're shifting everyone's balance) isn't something you want to do any more than necessary.
-
17 minutes ago, abelson said:
The issue is how to knot the ropes so that the knots are evenly spaced on the foot ropes.
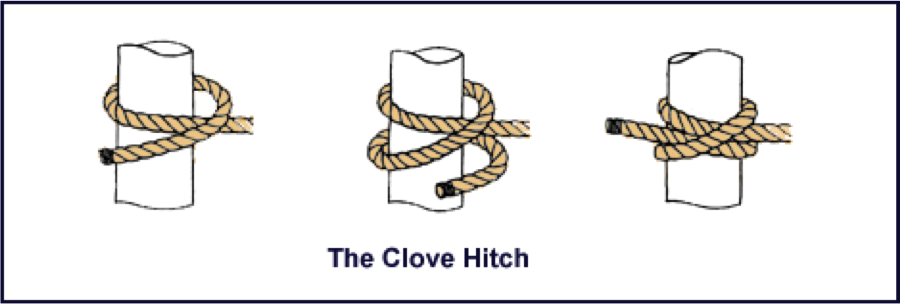
An eye splice is simply lashed to the outermost shroud and the line thereafter clove hitched around each successive shroud until you get to the last one in the line, where another eye splice is lashed to that shroud. The clove hitch is easily adjusted when tying it so the length between the shrouds is even between each shroud. When all is done, a drop of thinned nail polish, shellac, or thinned PVA is applied to each knot to secure it.
-
6 hours ago, Old Collingwood said:
Am I reading this correct - when the canon is not in use the tackle is frapped and secured from the carriage to the bulkhead, but when In use the tackle would be hooked up to one of the lashing points mid deck with the rope going through a block and hauled into possition after firing.
Would this then tidy up and not leave a coil of tackle rope by the canon (or is that rope for another purpose)?
OC.
It could well be a case of "different ships, different long splices." A variation from ship to ship. My guess is that there were at least two attachment rings on the bulkheads, two on either side of the gunport and two farther out, so that the inner ones could be used to most efficiently simply run the gun straight out, as when firing broadsides, and the outter two were used to train the gun from side to side from a better angle of purchase. The training tackles would be detached from the carriage when not in use and stowed along the bulwarks along with the rest of the gunners tools, which were hung on the bulwarks as well. Remember, too, that a gun also necessarily had a third gun tackle attached from a ring on deck to the after end of the carriage which was used to pull the gun inboard for cleaning and loading. This required the breaching line be cast off the button and forward over the barrel and then replaced when the loaded gun was again run out for firing. I don't frequently notice this third "charging tackle" depicted on models. These would almost certainly be removed when the gun was not in operation.
-
I'm sure there are contemporary records for the procedures involved in firing the guns. Somebody in this forum must have that information to contribute.
Wrapping the falls of the tackle around the tackle has been done before in modern times, but perhaps incorrectly.
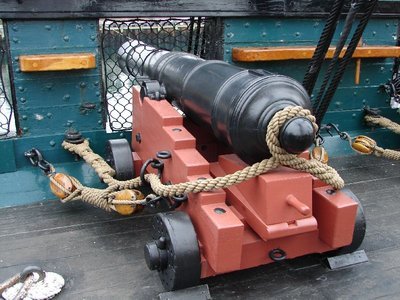
 As said, wrapping the fall tightly like that would tend to ruin the cordage, as anybody who's had the dubious pleasure of unwrapping a hank that had been frapped like that. Perhaps, like Flemished coils, it was an occasional affectation seen only when the ship was "dressed." I note from the top picture that the wheels are chocked and the tackles and breeching line are loose. The breeching line is merely wrapped around the button rather than through a c*nt splice. Those chocks appear to be rather inadequate for the purpose intended were the shlp to be in any sort of seaway. The gunport netting around the barrel seems intended to keep curious little boys from falling overboard, more than anything else.
It must be kept in mind that the gun tackles were only for training the guns. They were not for halting the recoil, which was the job of heavy breeching lines. If the training tackles were attached when the gun was fired and the breeching lines looser than the training tackles, the tackles quite possibly wouldn't survive the recoil and could pull their fastening rings out of the bulwarks. If they were left to run free upon recoil, the chance that a hockle on the running fall could fetch up and jamb was a distinct possibility, not to mention that a line running free like that underfoot would be a hazard to the gun crew. There is also the chance that a carriage wheel could end up on top of the training tackle fall upon recoil, which would then require horsing the carriage off the wheel so the training tackle could be used. In any event, I've not seen any indication that the hooks on training tackles were ever moused (no reverse curve at the end of the hooks,) so that indicates that one or both ends were cast off after the gun was trained.
While I haven't researched it, my guess is that the training tackles were thrown off the carriage once the gun was trained and probably laid out in the waterway, or otherwise secured, prior to firing.
- Old Collingwood and JesseLee
-
2
-
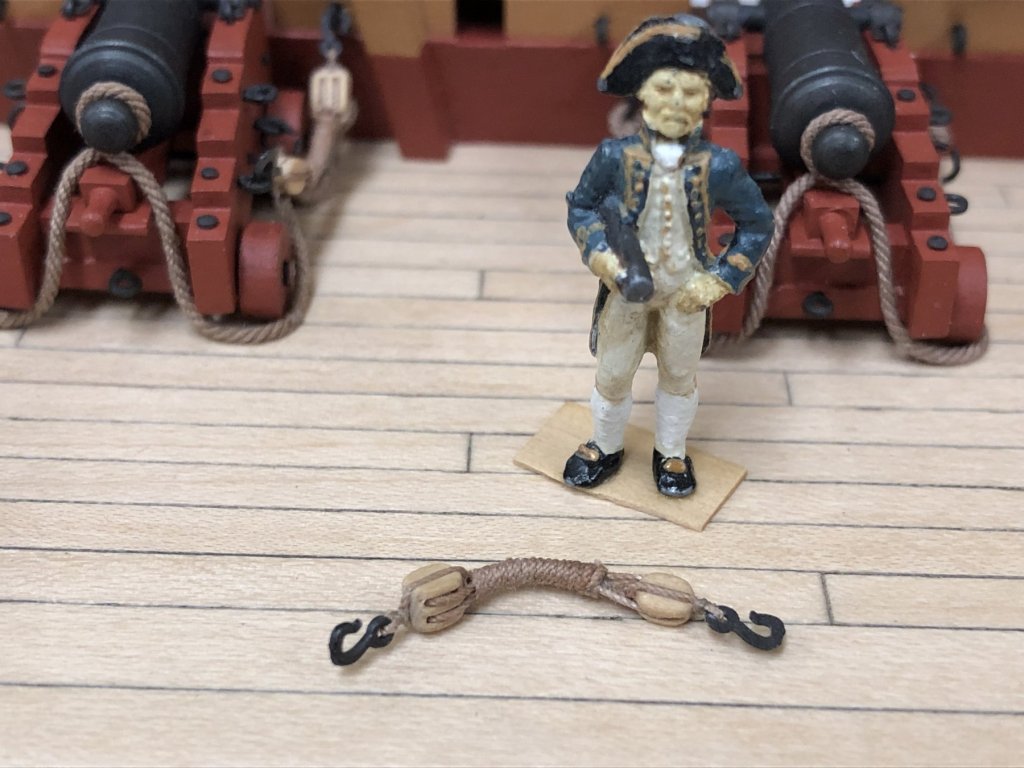
Beautiful workmanship! Thanks for sharing it.
I saw this treatment of the gun tackles, which I believe you called "frapping." Is there some historical authority for this practice in the old days? It seems lubberly. Unwrapping and untwisting what would end up being "kinky" cordage if stowed in that fashion would be the last thing one would want to be doing as they "beat to quarters." (The same goes for "flemishing," coiling tackle falls into coiled flat mats on the deck. That would get you a real chewing out by the chief bosun's mate.
)
-
44 minutes ago, Bob Blarney said:
Your lathe is a versatile tool. Here I'm polishing and washing 50 small parts. The pill vial is held in the pen-blank jaws, with a dead-center rod to give it a small offset for tumbling the parts.
Wow! I've never seen that trick before. Thanks for posting it. Offsetting the pill bottle is brilliant.
Now I've got an answer the next time my wife asks me why I'm always saving those pill bottles.
-
HMS Triton Cross Section by Edwardkenway - 1:64 probably more like 1:60 - FINISHED
in Cross Section Build Logs for HMS TRITON
Posted · Edited by Bob Cleek
If you haven't done so by now, may I suggest you consider using a much smaller and finer toothed blade on your coping saw. Really good coping saws cost as much as a cheap scroll saw, but you might find a better coping saw, if not a scroll saw, a good investment, considering the amount of use you would get out of it on this build and in the future. An investment in such tools could well pay for itself in money saved on sandpaper! A good cutting tool is always a better option than sanding in terms of overall cost, efficiency of use, and quality of the result.
Watch the Knew Concepts saws video on their web page: https://www.knewconcepts.com/Coping-saws.php A bit pricey, but you get what you pay for. For around $100 USD, one of these will change your life. I don't know if they are readily available in the UK, but they should be easy enough to order on line. You're doing great work with the one pictured above, but it's got to be a bit like trying to sharpen a pencil with a broad axe !