


Bob Cleek
-
Posts
3,374 -
Joined
-
Last visited
Content Type
Profiles
Forums
Gallery
Events
Posts posted by Bob Cleek
-
-
2 hours ago, rwiederrich said:
The area she will be mounted won't be able to accommodate that extra width.
I thought of that myself. It would likely require a space in the center of a room to permit walk-around display. The case would likely be just too wide to place up against a wall. As it is, the case is going to have to so large it will probably dominate most any room in the average home, unless you've got a big place with a large entry foyer, or something like that.
-
She sure is coming together beautifully. The studdingsails look great.
Now, on the "in for a penny, in for pound" principle, might we see sails bent to those yards sometime in the future? Looking at the photograph above of the vessel with 'all flying," and imagining the model canvassed the same, that would really, really take it up to the next level and beyond.
I expect you'll hate me for saying that, but I just couldn't stifle myself.

-
A true masterpiece, Ed. You have finally definitively answered the question, "What is 'museum quality'."
Thanks so much for so generously sharing your work on her with us.
-
On 4/22/2019 at 2:23 PM, Chuck said:
Thanks for saying...
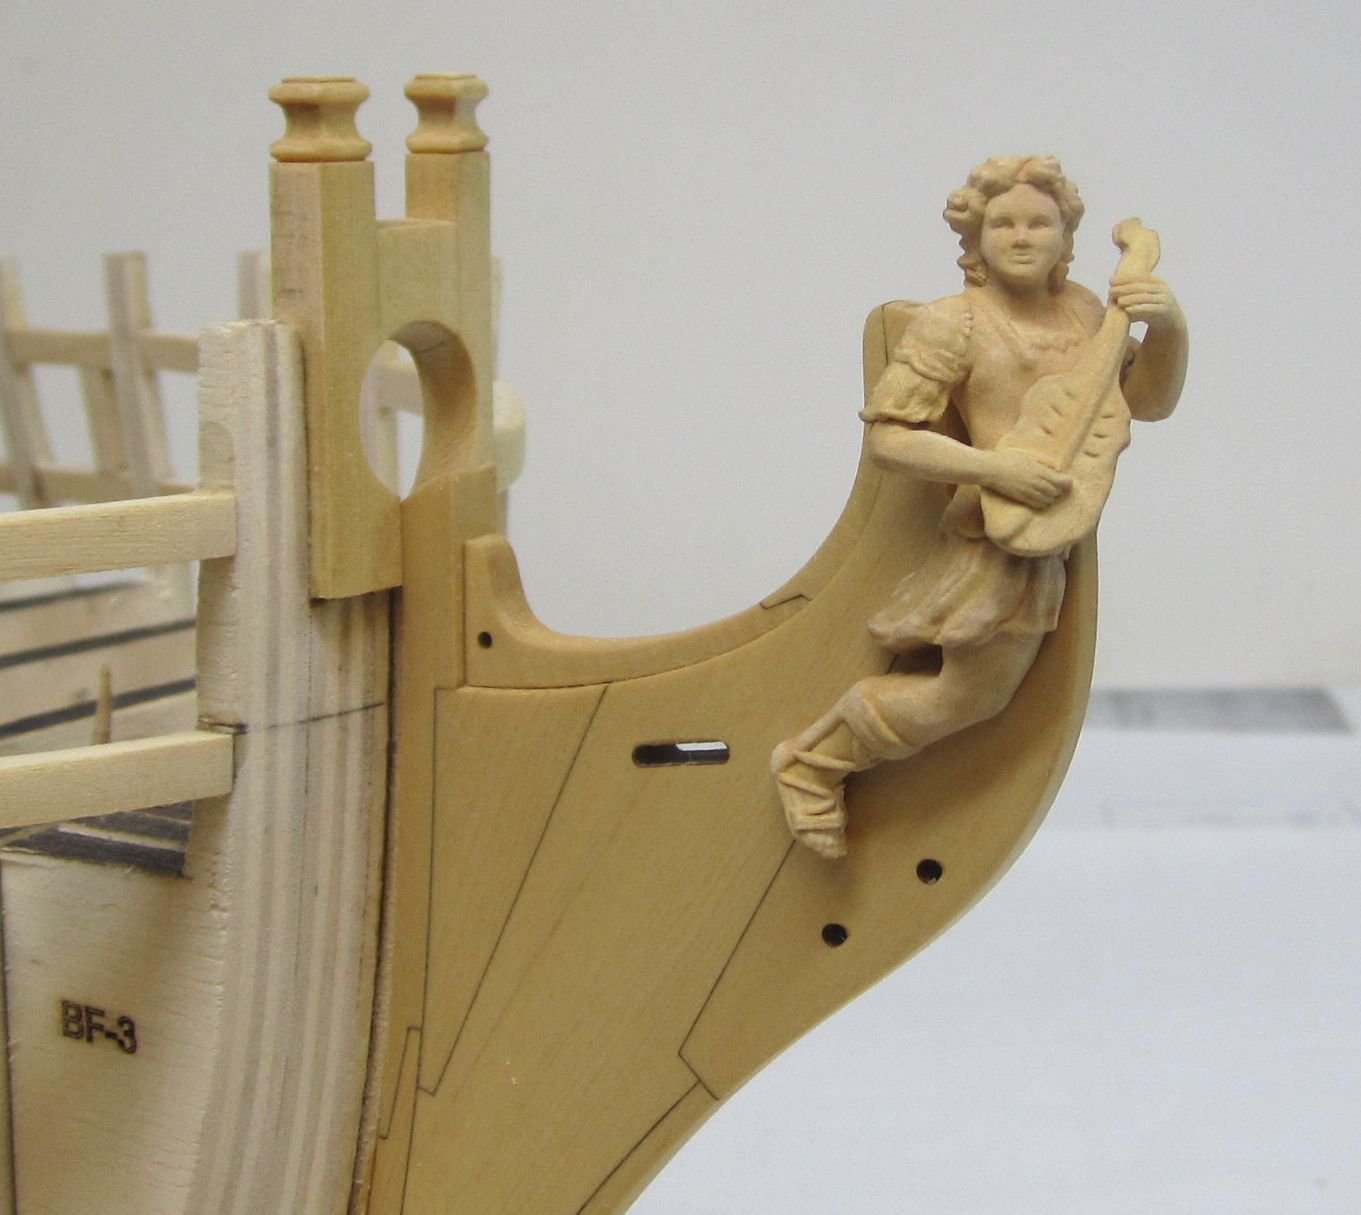
For those who asked, here is a non blurry photo of the figurehead. It was getting dirty do to handling with dirty fingers. So I cleaned it up and applied a coat of sanding sealer. It looks really good in person but is surprisingly hard to photograph in focus. The color matches the stem quite well and its still hard to believe this was carved by machine. I didnt use wipe on poly because I dont want it to darken too much. The stem where it sits will be painted black eventually. Compare with the contemporary model. You can see how crude it was carved, I dare say that Jack did an excellent job improving its appearance.
Actually the knee is painted blue and black below it. I am not sure if I will do the same. I may just go with black. Note the headrails. They are not carved. Instead there are friezes painted on them. That will be an interesting detail to replicate.


Chuck
That is a truly masterful carving and hard to believe it's machine-reproducible. Just one thing, though. Sailors are a superstitious lot. An evolution of the oculi even now still painted on the bows of fishing boats the world over, the figurehead represents the "eyes" of the ship and is always posed as intrepidly looking forward, ever scanning the horizon directly ahead, ensuring the ship follows a true and safe course, as with the original example. That new guy there isn't watching where he's going and he's endangering the safety of that ship!
(I know. I know. People just hate me because of stuff like this.
)
- Erebus and Terror, Nirvana, Gregory and 6 others
-
 9
9
-
On 5/15/2019 at 2:18 PM, vaddoc said:
Might work: Heat with a torch to red hot, using gloves or forceps leave in pickling solution (or just warm vinegar), polish with steel wire wheel on Dremel. You should now have bright polished brass that should blacken well.
Disclaimer: My few previous attempts at blackening brass were pretty much disastrous, admittedly years ago.
Well, yeah, but wouldn't it just be easier to simply buy some uncoated wire and use that?
- Canute, Keith Black and thibaultron
-
3
-
In the context of building full-sized boats and yachts, the late, great, naval architect and part-time philosopher, "Pete" Culler, answered similar questions with the sage wisdom: "Experience starts when you begin."
- Roger Pellett, CaptainSteve, Canute and 2 others
-
5
-
Try liver of sulphur gel. If that doesn't do it, nothing will.
- mtaylor, Canute and thibaultron
-
3
-
14 hours ago, catopower said:
However, I found that as I accumulated dedicated equipment, the Vanda-Lay stuff got used less and less. The main problem with the Dremel attachments is that you have to reconfigure your setup when your needs change.
So very true. The trade-off with multipurpose tools seems to be that, at best, they do one thing pretty well, and the rest only fairly... if you are lucky. The downside is always that the more the "multi," the more the set-up time. The advantages are in cost (although you get what you pay for) and shop space savings. The more involved your modeling becomes, the more we seem to gravitate to dedicated power tools.
-
I have the drill press with the adjustable table attachment. I find it's a quality tool that does what it claims to do. I bought it from a fellow who was liquidating his shop. If I were in the market for a micro-drill press and cost was no object, I'd opt for a decent micro-milling machine. The Vanda-Lay drill press is head and shoulders above the Dremel product which lacks the stability for the accuracy we're looking for. For the same reason, were I in the market, I would spend the relatively few dollars more for the Vanda-Lay mill-drill combo. Their drill press lacks the XY table of their milling setup and if you don't already have a drill-mill, you're going to miss that. They are essentially the same machine, so you might as well get the whole enchilada for a few bucks more.
I have to say that the Vanda-Lay rotary tool powered products are the best of their type I've seen on the market. They are a family-run business and they've been very quick and accommodating the one time I emailed them for information. Keep in mind, however, that the "weak link" in the concept of Dremel-powered tools is the Dremel Moto-tool (or equivalent) itself. Dedicated drill presses and milling machines of any quality will have more powerful motors and their tooling will exhibit far finer and more consistent accuracy than the Dremel products. You do get what you pay for, but the Vanda-Lay products afford the maximum value one could hope to get out of a Dremel moto-tool.
- Canute, BETAQDAVE, Roger Pellett and 1 other
-
4
-
Yes, but it is nonetheless a fine modeling species. In fact, it's one of the most versatile species around. Get a manicure and you won't have any problems with it.
I suggest you put The Wood Database in your "favorites" file. I haven't found a more valuable resource tool for wood identification and properties anywhere on the internet: https://www.wood-database.com/
Here's the Database's "Wood Finder" page entry for AYC: https://www.wood-database.com/wood-finder/?fwp_wood_type=softwood&fwp_location=north-america&fwp_color=f4ade6dcf8b10d9a9934c5cf9b49be51&fwp_decay=durable
And here's the entry for boxwood: https://www.wood-database.com/wood-finder/?fwp_genus=buxus&fwp_wood_type=hardwood
The Janka hardness test (from the Austrian-born emigrant Gabriel Janka, 1864-1932) measures the resistance of a sample of wood to denting and wear. It measures the force required to embed an 11.28 millimetres (0.444 in) diameter steel ball halfway into a sample of wood. https://en.wikipedia.org/wiki/Janka_hardness_test
The Wood Database information on the pages cited above indicates that AYC has a Janka hardness rating of 580 pounds, while boxwood's Janka hardness rating is 2840 pounds.
If you want a harder and probably less expensive modeling species than AYC, you might consider "sweet gum," also commonly called "satin walnut," which is the wood of the liquidambar tree. A fine, interlocked-grain hardwood with a Janka hardness in the 800's, it's considered a very good modeling wood by some. This relatively fast-growing species is widely planted as an ornamental shade tree throughout the U.S. and is often cut down when trunks reach about a foot in diameter because it's roots are shallow and wide-spreading and so tend to push up sidewalks and patios. Retail availability is probably limited, although it is used commercially for furniture and gun stocks. It can often be had for free at municipal corporation yards or from tree services, but you'll have to mill it yourself, of course.
-
1 hour ago, macmac said:
I have tried to contact a few museums but just get (Sorry we don't comment on individual items) so don't know what to do
Many of the larger auction houses have complimentary "appraisal days" when you can bring in anything and get their opinion on what it is worth. You might check out Sotheby's or an outfit like that.
- Keith Black, mtaylor and macmac
-
3
-
On 4/29/2019 at 7:49 PM, thibaultron said:
How did the old Dremel saws stack up?
If they are as "all things Dremel," they're probably not even in the same zip code. The Dremel concept is great and their product line is extensive. I relied upon a Dremel tool for decades as my only powered modeling tool, as well as for a lot of other things. The problem with the Dremel products, IMHO, is that, while fine for light duty work that doesn't require a lot of accuracy, they lack power once I try to push them much past balsa and bass wood. The problem with most of the "mini" saws on the market is that they don't have the muscle for the tougher hardwoods, and, of course, aren't capable of the accuracy needed for consistent production of hardwood modeling stock. The bottom line with all accurate machine tools is "mass." Accuracy and power depend upon weight (stability) and a powerful motor. That's why the good stuff costs more. Manufacturing to close tolerances for accuracy is expensive. Weight, which limits vibration and flexibility, is also expensive. Plastic parts and 12 VDC motors are cheaper, but you get what you pay for.
Longevity is another important factor to consider. If properly cared for, a high quality machine tool, actually any tool, for that matter, should perform well and provide pride and satisfaction of ownership for a lifetime. Moreover, high quality tools maintain their value much better, particularly so with machine tools. There are lots of good machine tools that are thirty, forty, or more years old that are worth more today than what they sold for originally. A good example is are the Unimat DB and SL modeling lathes. They haven't been made since the early Seventies, but are still selling used on eBay for three and four times what they cost new. In our arena, I'm sure the Byrnes tools are the same. I wish Jim Byrnes a long and healthy life, but when the Byrnes saw is no longer made, you can bet they will become more expensive and sought after.
While it depends upon how much modeling you do and for how long, keep in mind also that a high quality mini table saw will eventually pay for itself if you mill your own stock with it. Cutting your own stock from larger billets, particularly if the wood is sourced for free from tree services, garden prunings, old furniture from the dumps, and such.
Anybody who's in the market for a mini table saw and is hesitating on "pulling the trigger," should consider that the difference in price from a "hobby grade" Dremel, Micro-mark, or Proxxon, is at most a couple of hundred bucks. (Granted, that doesn't consider the cost of overseas shipping and import duty for those outside the U.S.) Even if one were to save as little as a buck a day, they could have the Byrnes saw instead of the others in six months or less. Throw your pocket change in a jar every night before you go to bed and you'll have the scratch for the Byrnes before you know it!
- thibaultron, mtaylor, marktiedens and 1 other
-
4
-
5 hours ago, John Allen said:
Clark,
I agree with you on first time buys. I have shallow pockets and have purchased items at harbor freight most builders scoff at but have served a purpose. In time when my personal wealth improves I will upgrade if I feel the need.
I believed your purchase over a Proxxon saved $ 200.00, since I cant afford Chateau Briand and a fine wine that's 175 dinners at McDonalds with a coke.
") your saw I am sure will fill your needs at this time, happy modeling.
your saw I am sure will fill your needs at this time, happy modeling.
That's very true, Clark. When it comes to tools, and particularly tools for a hobby, economics always force compromises. Rarely, however, do such compromises impair the quality of modeling. What the pocketbook cannot attain, the skill of the craftsman can always exceed... and often does.
- John Allen, bruce d, paulsutcliffe and 8 others
-
11
-
There's more information about it on Amazon. https://www.amazon.com/NovelLife-Mini-Table-Saw-Adjustable/dp/B07CHLQYXN/ref=asc_df_B07CHLQYXN/?tag=bingshoppinga-20&linkCode=df0&hvadid={creative}&hvpos={adposition}&hvnetw=o&hvrand={random}&hvpone=&hvptwo=&hvqmt=e&hvdev=c&hvdvcmdl={devicemodel}&hvlocint=&hvlocphy=&hvtargid=pla-4584413735823383&psc=1 Examination of the photos there suggests the Chinese took some "inspiration" from the Byrnes saw, but a Byrnes saw it certainly ain't. It's not a piece of precision machinery.
For US$ 100, it may meet the very basic needs of some. It's probably fairly priced for what it is, but, IMHO, I'd keep saving up until I could afford a Byrnes saw, rather than settle for this one. My concerns with it are:
1. It has no provision for blade height adjustment. This eliminates use for cutting slots and dadoing (without the use of sacrificial spacing material.) It makes ripping thin stock very dicey without "hold-downs." "Kick-backs" may be likely. Taking multiple passes to cut types of wood which tend to clog the blade gullets isn't possible.
2. It has no throat plate and so no provision for zero-clearance table inserts to ensure fine, smooth cuts.
3. The blade arbor is an uncommon size, limiting blade availability. It may not be possible to find properly-sized slitting blades to minimize kerf wastage on expensive material.
4. It has no port provision for dust collection.
5. It has no provision for fine fence adjustment (like the Byrnes' micrometer option.) The ruling on the table top is reportedly inaccurate. The fence is not "self-squaring" when moved.
5. It has but one miter gauge slot, thus precluding the use of a sliding cut-off table and other fixtures one might wish to employ.
6. The miter gauge slot is to the right of the blade and the fence to the left. The fence ruling is on the table top to the left, but not the right of the blade. You're on your own if you want to use the fence to the right of the blade, if that's possible at all.
7. In order to change blades, the entire table top, held on with four flat-head hex screws, must be removed.
Perhaps it's unfair to compare it to a Byrnes saw, although it tries to look like one. You do get what you pay for. I agree, though, that if one were somewhere in the world where the price of a Byrnes saw was doubled by import duties and shipping costs, this saw becomes a lot more attractive when compared with those much more expensive mini-saws on the market which sacrifice quality of materials and accuracy to cater to the "hobby" market.

- Canute, thibaultron, druxey and 2 others
-
5
-
4 hours ago, rpeteru said:
Depending on where you are there is also the chance some individual has use the tree for target practice. Have seen many clips of people milling local timber only to find lead pellets or shot in the felled trunk.
A saw should go through a lead bullet or shot like a hot knife through butter, but iron nails will make a believer out of you!
- pontiachedmark, Canute and mtaylor
-
3
-
2 hours ago, lmagna said:
I also suspect your local firecracker regulation has as much to do with the same compulsion to regulate rather than anything to do with fire danger.
Yes and no. Firecrackers used to be regulated at the local level, counties and towns. Of course, the rural areas were a lot more liberal than the big cities when it came to blowing stuff up. After a while restrictions spread from the cities to pretty much everywhere with the firecrackers, cherry bombs, and M-80s that once formed such a central part of our young summers going the way of the dodo bird first. Eventually, they outlawed anything that blew up, working down from the M-80s, cherry bombs, "quarter sticks." Now, even "safe and sane" fireworks like sparklers and fountains are only allowed in a very few smaller towns, all of which, it seems, require them to be fired off in wide open spaces like the fairgrounds parking lot, with police and fire department supervision and they can only be sold with a local permit in those towns.
It was always bottle rockets that really were the big fire starters. As July approached and then through the summer, we'd have all sorts of small grass fires in Northern CA, and throughout the state. About half of them were "started by bottle rockets" or "kids playing with fireworks," or so they said. That really caused the snowballing of widespread regulation, but there was often a "wink and a nod" by the local cops if parents were doing it prudently with kids on the Fourth. That ended a few years ago when the huge firestorms stopped being a "once in a hundred years" sort of thing and since we started losing several thousand suburban homes at a crack when the firestorms came roaring through, not to mention lots of lives lost. Most of the firestorms have been started by a combination of high winds and sparking high tension electrical wires, or errant State and National Park campfires, not fireworks. Still, people are really afraid of fire these days, and with good reason, so, as much as I regret the restrictions, it's understandable.
- CaptainSteve, lmagna, mtaylor and 1 other
-
4
-
I recently bought by seven year old grandson a slingshot. I always made mine starting about his age, but I came across a really neat aluminum and surgical tubing one made by the Daisy BB gun company at Harbor Freight for only $4.99. Then we grabbed a bag of dried beans at the grocery store and spent the afternoon plinking with it. I of course gave him the usual lecture about how it should never be used to shoot at animals or old ladies. When his parents got home, as promised, he gave it to his mom to hold because it was only to be used with "adult supervision." To my surprise, as I thought I was being quite appropriate with all the "slingshot safety" admonitions, his parents had a triple-distilled conniption fit. You'd have thought I gave him a hand grenade to play with. I was in the doghouse with them for a month at least. I suppose he learned one of life's valuable lessons that day: "If it might put your eye out, it's definitely fun!"
With the fire danger in California, it's now a serious criminal offense to even possess firecrackers of any type. If you set a few off, it's certain some neighbor will be immediately phoning 911 and you'll have the sheriff or a cop car in your driveway in minutes. (Don't ask how I became informed of this.
) Another sad consequence of climate change.
-
It's not that people aren't helpful and so aren't responding, but perhaps simply that a lot of them were asleep!
I haven't built this model, but there are very detailed build logs of it in the "kit build log" section. You may want to repost there.
Generally speaking, and not knowing anything specific to this model concerning the issue you've raised, I'd say that you'd probably be better off disassembling what you've done incorrectly and reassembling correctly. If you've used yellow wood glue, it should dissolve in isopropyl alcohol and free the parts you've already glued. I believe the planking on your model is very accurately laser--cut, so if one plank isn't fit right, none of them will be. Uncorrected errors like the one you've described usually have a maddening tendency to compound as the build continues.
Don't feel bad. Most modelers have made mistakes like yours at one time or another (Some of us a lot of times!
) and I think most would agree that when a mistake is discovered, the best course is usually to undo it and redo it right.
- Gregory, CaptainSteve, allanyed and 2 others
-
5
-
Floquil, (God rest it's soul.) once made great weathered wood stains in various colors for "weathered oak," "driftwood" and so on. Sadly, it's no longer available. (Environmental concerns, don'tcha know.) There are commercial weathering stains. Another approach is to use thinned colors... blacks, greys, browns, to suit your taste. Apply the thinned color thickly on horizontal surfaces (lay the piece down and paint the top side) and let the solvent soak in and dry. That should carry more color into the deeper grain pockets. It looks like that's what you've got going already in your pictures. What you've done looks pretty good, if that's what you were looking for. It sure looks like weathered wood to me!
- mtaylor, pontiachedmark and Canute
-
3
-
On 4/14/2019 at 4:49 PM, kurtvd19 said:
I used Simple Green on a model that I think spent years in the engine room of the full size boat. Nothing was cleaning it and with the permission of the museum I tried the Simple Green. Applied with a swab and then wiped off with another and then rinsed with distilled water and dried. Came out great - and clean - and still looking good almost 20 years later.
Kurt
Yes, Simple Green is great stuff. However, it is apparently mildly acidic. Two caveats:
1) It will bleach some woods. Teak for sure, at least. Not as much as, say. citric or oxalic acid, which are used for serious bleaching (and in often-too-strong a solution in many commercial "teak bleaches.") I used to use Simple Green regularly on my teak decks when washing them down. It kept them looking great.
2) More critically, strong solutions of Simple Green may dissolve yellow metal (copper, brass, bronze) patina, which then can end up running to adjacent areas and staining them. (Such as white topsides on a yacht with bronze deck hardware.)
The moral of the story with Simple Green is to use it judiciously in a weak solution and experiment first in an area hidden from view to make sure it isn't going to cause problems. It smells good, but straight out of the bottle, it's pretty strong stuff.
- thibaultron, lmagna, mtaylor and 2 others
-
5
-
On 4/7/2019 at 2:21 AM, wefalck said:
Still looking for the real 'super-glue', something that you can apply at your leisure, position the parts at your leisure, and then 'tell' the stuff to cure now. The UV-curing acrylics that dentists use and that have appeared in DIY stores some years ago, go into that direction, but only work, when the UV-light can get to the stuff.
In search of such a unicorn, I have a mind one of these days to experiment with Titebond and heat. I have an Aeropicola plank bender and another small (and cheap) soldering iron sort of tool with a round, flat disk on the end that was originally made to heat vinyl repair material (colored goop in a jar) for automobile seats. The hypothesis is that heat, but not so much as to scorch the wood, applied to the unglued side of thin pieces, at least, such as planks, using one of these tools might accelerate the drying of the Titebond sufficiently to permit the Titebond to "tack" the planks to the frames without the usual drying time of Titebond.
I've heard of people heating epoxy laminations to speed curing. I expect that would work, because head does affect the cure rate of epoxy. On the other hand, with Titebond, it would be a process of "cooking off" the moisture in the glue.
Has anybody ever tried this?
- thibaultron and mtaylor
-
2
-
15 hours ago, Mark P said:
Thank you for the mention of the book on lofting. I have modern versions of several old volumes on this subject, but I will get hold of a copy of Alan Vaitses' book, as it might help to fill in some gaps. This is a new one to me, as I have never heard of it before, despite numerous searches on the Internet.
Here are a couple of sources. I didn't know it's available in hardcover for $45 USD from Amazon, but I have the paperback, which is spiral-bound, and that is quire convenient for folding it over and laying it flat when I'm using it for reference on my workbench or drafting table. It's copiously illustrated with full text explanations. It is also helpful for clarifying what one needs to loft to build a boat versus what can be lofted if for some reason one wants to develop higher levels of detail.
Like any language, fluency in lofting is more easily acquired by "immersion," rather than from books. I'd urge anybody who's interested in it (which should be all modelers who remotely contemplate working from anything other than plans drawn for modeling purposes to the scale they desire) to get some basic drafting tools and "just do it" with a book open at the same time.
I'd say the minimum equipment required would be a board, a T-square, a triangle, a compass, some battens (which could simply be flexible strips of wood, plastic, or even a length of broken bandsaw blade) something to hold the battens in place (weights, pins, etc.), a good rule for measuring, an eraser and erasing shield, and some hard pencils and a sharpener (which could, at the very least, simply be a pen knife and a piece of sandpaper glued to a stick.)
The picture on the cover of the book below shows the use of a batten to lay out the shape of a plank on the stock with a batten after the shape had been transferred from the loft floor. It illustrates how a batten is used to develop fair curves on the drawing board, as well, although on the board, the batten would be smaller and held in place with weights ("ducks") or pins, rather than the ice picks and joggle sticks shown in the picture below.)

https://www.woodenboatstore.com/product/book_Lofting/boatbuilding - $20 USD
https://www.amazon.com/Lofting-Allan-H-Vaitses/dp/0937822558 - Used $15 USD
Lofting a Boat: A step-by-step manual (The Adlard Coles Classic Boat series) by Roger Kopanycia has also been highly recommended by some whose opinions I respect. I have not seen a copy myself. It may be more readily available in the UK.

-
11 hours ago, CDW said:
Until reading this explanation, I had no idea my early (decades ago) career in land and construction surveying had so much in common with ship modeling terminology. Almost everything you said here about ship modeling/terminology mirror the principles, practice, and terminology of land surveying. 🙂
Yes! That's certainly true. Each field of technical drawing has it's own refinements and they can often get very complicated. With nautical drafting, developing rolling bevels or curved elliptical transoms, for example, can be quite involved, but at the end of the day, the "grammar" and "vocabulary" of the "language" of drafting is pretty much all the same. At the risk of being accused of setting this thread "adrift," I'll offer the observation that since US high schools quit teaching drafting (often called "mechanical drawing" or "technical drawing") a generation ago, we've become an increasingly "drafting illiterate" culture. I doubt many under the age of fifty know what orthographic projection is.
I think the lack of knowledge of technical drawing basics is one of the biggest stumbling blocks for many modelers who otherwise would be able to seamlessly transition from kit-building to scratch-building, and with that, the reason we lack a greater diversity of subjects being modeled. So many feel limited only to kits, or at best, to subjects with available "model plans." Yet, our maritime museums and other archives are chock-full of incredibly interesting modeling subjects which are rarely, if ever, modeled because many are intimidated by the full-scale lines drawings and tables of offsets. The Historic American Engineering Record (HAER) has detailed drawings and photographs of tons of historic vessels, available in TIFF format, which can be enlarged without loss of definition, all for free on the internet. You have to do some searching on their search engine, but if you are looking for an existing museum ship in the US, you can probably find it by name. For example, HAER has dozens and dozens of photographs of all the details any modeler could possibly want, together with exquisitely detailed modern drawings of the sailing ship Balclutha on display at the San Francisco Maritime Historical Park. See: http://www.loc.gov/pictures/search/?q=Balclutha&sp=1&co=hh So many ships and so little time...
Anybody who wants to expand their modeling horizons need only pick up a used "Mechanical Drawing" or "Technical Drawing" high school textbook and a copy of Alan Vaitses' book Lofting, still in print, do a little reading and have a go at it!
From HAER:
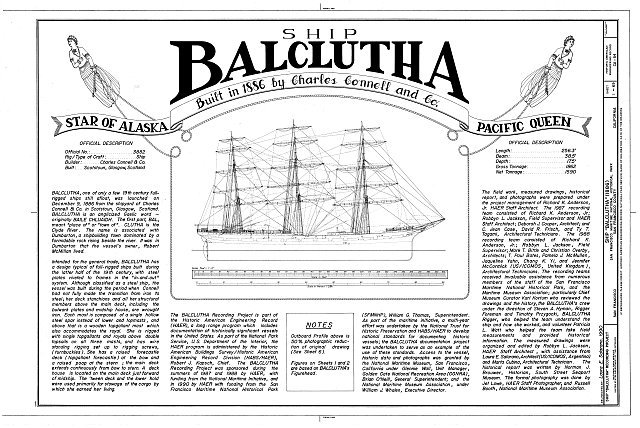
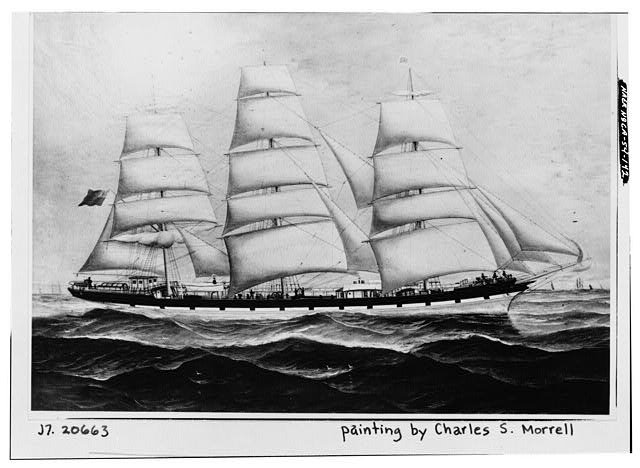


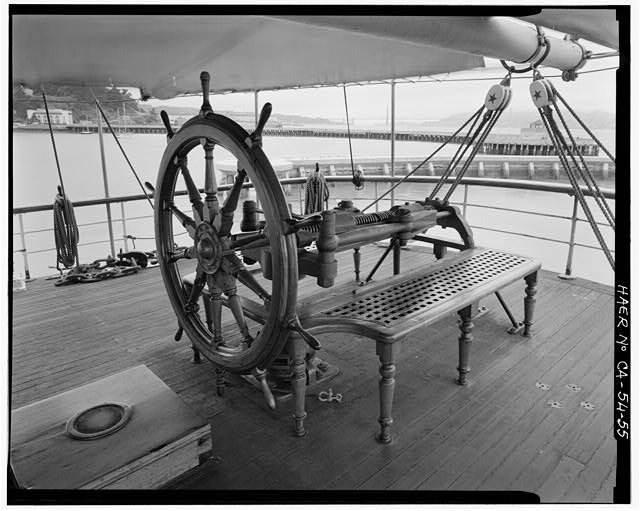
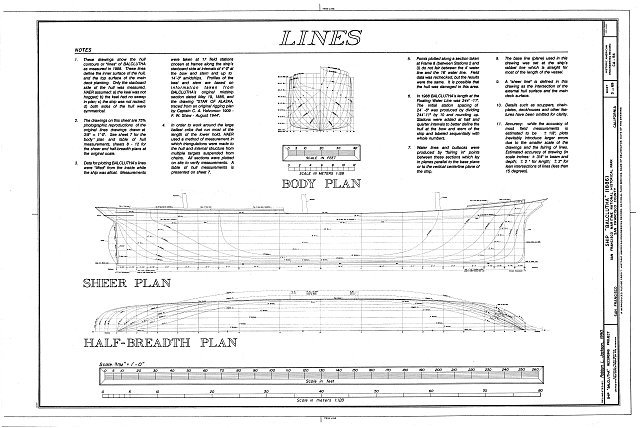
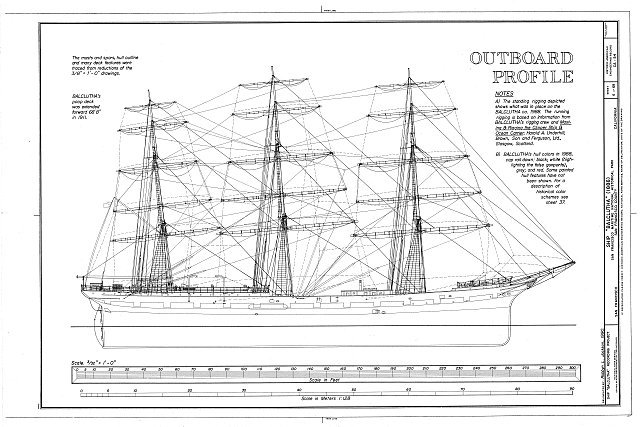
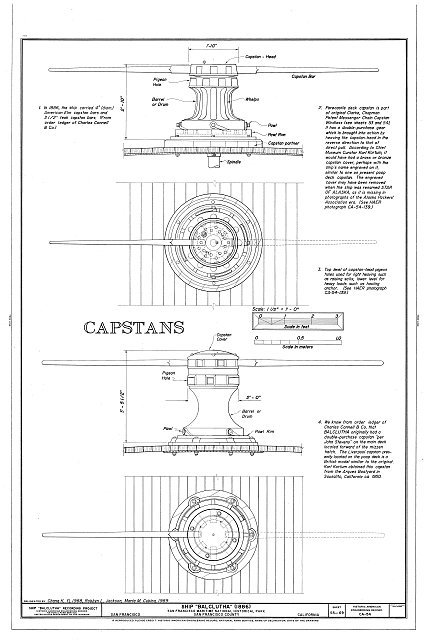
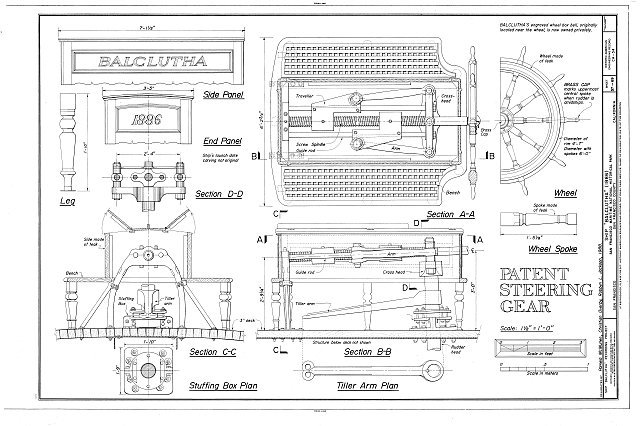
Balclutha's HAER historical documentation file contains sixty-nine pages of plans drawings and well over a hundred (I didn't count) photographs, some old and some current, covering every square inch of this vessel. All the research possible has been done, "our tax dollars at work" and in the public domain, ready to download. What isn't anybody modeling her?
(If anybody wants to study the photos or plans up close, click on the "TIFF" pixel option on the individual image page after clicking on the thumbnail, and then use your PDF page "tools" icon to enlarge the image to whatever size you want.)
-
Thanks for the fascinating detailed information, Mark! It is most interesting. Of course, we are a rather small family of "wonks" who would have the slightest interest in such trivia when measured against the population as a whole, but I expect most of us have long ago gotten used to the fact that the level of historic detail and leaning we find so rewarding escapes most of the rest of the world.
And thanks for the tip on the John Franklin book!


Newbie paint questions...
in Painting, finishing and weathering products and techniques
Posted · Edited by Bob Cleek
A selection of decent quality brushes is sufficient. Learn to keep them properly cleaned after use and they'll last a long time. If you are using "water-based" acrylics, buy synthetic bristle bushes. If using oil-based paints, use a natural bristle brush for the best results.
I don't know whether your acrylic paints thin with water or alcohol. That you'll have to find out, or perhaps somebody in here knows. Although I very much prefer old fashioned oil based paints, with acrylics I always look for the type that can be thinned with alcohol. Alcohol evaporates much, much faster than water.. This is an advantage whether one is using a brush or an air brush. Most all paint used for modeling needs "conditioning" as the professional painters call it. That is, it has to be properly thinned and "conditioners" added... or that's how it goes with oil paints... a bit of turpentine here, a bit of Japan drier there, some linseed oil, all make the paint flow well off the brush and "lay down" so there are no brush strokes. (Japan dryer regulates the drying time.) It's one of those things you have to learn by doing. It's easier for models than for full-size boats because you aren't so bothered with temperature, wind, and humidity in a home or heated workshop. Acrylics are often much easier to work with than artist's oils out of a tube. (Acrylic paint manufacturers often sell conditioning materials to suit their line of paints. They'll be called "retarder" and "thinner.")
Practice and experiment before putting any paint on the model itself. Make a "test panel" to determine the color you will get after the paint has dried and to experiment with thinning and "conditioning" the behavior of the paint. The best paint job will be the one that goes on very thin... even like "water thin," and is laid up of several coats. It depends on the solids in the paint and other variables, but a decent topside job may take between five and eight coats or even more. Multiple thin coats are much better than fewer thick coats. (If you get brush strokes after the paid has dried, it's definitely going on too thick.)
Make sure whatever you are going to paint is "operating room clean," as well as the area where you are working. Dust in the air and on the surface of the model will ruin the perfect surface you are trying to achieve. Also wash and dry your hands well, at least,... or better yet, wear clean nitrile gloves. Oily fingerprints can often adversely affect paint adhesion. Remember, it's going to be a paint job that is viewed from a foot away, not twenty feet away, so it has to be perfect if you want to do the job right. Using a painter's "tack rag," which are available at any paint store, is a good practice. It will pick up the dust. Needless to say, large surfaces, like hulls, must be "smooth as a baby's bottom" before painting. (I sand basecoats to at least 300 or 400 grit, making sure the surface is perfectly smooth. Any defect will show up big-time once the paint goes on.)
If you want to get razor-sharp edges, use one of the "fine line" tapes sold for this purpose. 3M makes a "Fine Line" tape which is a green plastic stuff that stretches and sticks well, but is not difficult to remove. If you have complex shapes to mask, "frisket," plastic tape in sheet form that can be cut to shape with an Xacto knife is good stuff. It's used by air brush artists and can be found in any decent art supply store. Regular "painters'" masking tape can be used where sharp edges aren't critical. I often will mask a sharp edge with 1/4" wide Fine Line and then lay blue painter's tape on top of that. The Fine Line tape isn't cheap and a roll will last a long time if it's cared for. BTW, one "pro tip" I should mention is to always open a new roll of masking tape and place it in a plastic "zip lock" bag immediately and without laying the unwrapped roll of tape on it's side down on any surface. Obviously, you can take it out of the plastic bag to peel tape off the roll, but never, ever lay it down until it's back in it's zip lock baggie. This is a good habit to get into if you are doing finish painting. It really doesn't matter with blue painter's tape if you are painting the spare bedroom at home, but for fine finish work, if a roll of tape is laid on just about any surface, and especially if done so repeatedly, the sides of the roll will pick up all sorts of dust and dirt like a magnet and when the tape is unwound, all that dust and dirt stays right on the edge of the tape and renders it basically useless for producing a sharp edge. The baggie will also keep rolls of tape from drying out over time, so you won't be having to try to peel dried out tape off a roll before giving up and throwing it out ever again. Finally, although many people may know this from painful experience, don't leave masking tape on for long periods of time. For regular masking materials, I'd say never more than overnight. (There are specialty masking tapes which are designed to stay on the work for longer periods, if need be.) Masking tape will dry after a while (much faster outdoors in the sun, of course) and can become near impossible to remove after a time. Even short of that, when applied on painted surfaces, every hour it stays stuck down, the odds of it's pulling paint up with it when it's removed increases.