


Bob Cleek
-
Posts
3,374 -
Joined
-
Last visited
Content Type
Profiles
Forums
Gallery
Events
Posts posted by Bob Cleek
-
-
On 8/11/2019 at 5:53 AM, Y.T. said:
I believe you mean bending at sharp radius? I made a notch in bending template, soaked strips for 30 min and very slowly bent them with sharp end of plank bender.

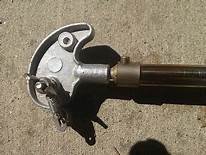
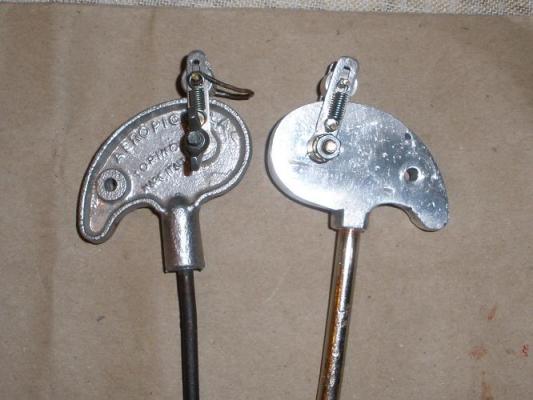
I'm not sure if you are aware of it or not, but the Aeropiccola plank bender pictured above is missing the spring-loaded roller bracket that mounts in either of the two holes in the iron head as pictured below.. The purpose of the bracket is to slide the strip under the spring-loaded roller "stirrup" so it can be held while the plank is bent to the desired shape. The plank strip can be slid against the edge of the iron while the roller maintains pressure against the iron edge. The bracket is placed in either hole and swung into position along the edge of the iron according to the shape of the bend desired. The use of this "holder" and the "French curve" shape of the iron pretty much eliminates the need for separate shop-made shaping jigs like the one pictured, which is what makes the Aeropiccola plank bender so desirable. (They are no longer in production.) Obviously, if the strip-holding fixture is missing, the shop-made jigs are required, or the tool has to be held in a vise so that both ends of the planking strip can be held, one in each hand, and the strip bent over the iron head in the vise. With the holder, the iron can be held in one hand while the end of the strip can be held in the other and the bend worked to suit using the roller bracket.
-
 The "French curve" shape of the iron and this holding device is head-and-shoulders above anything sold today for the purpose. I don't know why somebody hasn't started selling them again. I suppose there's some sort of patent on the design, although it's been around for close to fifty years that I know of and has to expire one of these days. Aeropiccola is out of business, I believe, but they do still have a website and facebook page for their fans.
- Y.T., thibaultron, GrandpaPhil and 1 other
-
 4
4
-
-
1 hour ago, Tom in NC said:
If there’s a God Of Boat Models, maybe someday someone will come up with a great model of the Delta Queen – arguably the most famous sternwheeler our great inland waterways ever saw. Believe it or not, after serving many years as a floating hotel in Chattanooga, TN the old girl is being refurbished to go back into service. Hot damn.
Don't forget that the sister ships Delta Queen and Delta King were California Delta riverboats in packet service between San Francisco and Sacramento, CA. They were built in Scotland up to the second deck, brought to California, and finished from the second deck up. They were taken over by the government for the war effort and later returned to service. Delta King went up to British Colombia where she was used as housing for lumberjacks or salmon cannery workers, I forget which. It was only after WW II that Delta Queen was towed down and around through the Panama Canal to run in the tourist trade on the Mississippi. Delta King was brought back to in the San Francisco Bay and Delta, by a series of investors planning to put her in the tourist trade like her sister, but she languished for a long time and deteriorated, sinking at her dock. She was eventually purchased by a colleague of mine, Charlie Coyne, who had the resources to restore her for use as a floating hotel in "Old Town," in Sacramento, CA, where she has been a big success now for close to forty years. She is not operational under her own power (IIRC, her engine has been removed.) Charlie used to have a very nice, large, professionally-built cased model of her in his office. I haven't in his office in years, but I expect the model is still there. He still owns Delta King, as far as I know.

Photo credit: By J.smith - Own work, CC BY-SA 3.0, https://commons.wikimedia.org/w/index.php?curid=5008173 c
- Altduck and Landlubber Mike
-
2
-
The first decision is whether you want a wood lathe or a metalworking lathe, which will also serve for wood, but at a higher price, of course.
As said, if you are going to turn a spar, you will need a back rest, preferably one that travels with the carriage. This is a metalworking lathe item. On a metalworking lathe, you'll also want a tapering attachment of some sort unless you are going to taper it by eye, in which case you might as well use sandpaper. On a woodworking lathe, you'll end up sanding to create the taper anyway, not cutting. In that case, a drill press will serve as well.
If you want a metalworking lathe, I concur with Biltut's recommendations. I have a Unimat DB/SL, but would advise a new buyer to go with the Sherline. The Unimats are great, but they now have a "cult following" and are expensive on the used market. They are no longer manufactured. Unfortunately their tooling is somewhat unique to the Unimats and sometimes hard to find. You can easily spend more on tooling for a Unimat than for a Sherline which not only has a lot of proprietary tooling available, but also accepts a far wider selection of after-market off-brand tooling than the Unimats do. If someone hadn't given me the basic Unimat DB/SL that I have (the DB and SL model designations are different, but the machines are identical,) I'd have gone for a Sherline. I spent almost as much as the Sherline would have cost on Unimat basic tooling and attachments on eBay.
Bed length is an issue if you are turning spars. Most mini-lathes don't have bed lengths of more than eight or ten inches, so that will limit the length of spars you can turn. Allowing for "chucking waste" at either end, the spars you can turn will be a bit shorter than the maximum bed length, although bed extensions are available for some models, or can be shop-made. There's a limit to how long and/or thin a spar can be turned anyway. Too long or two thin and they'll start whipping as they spin if they don't have a rest of some sort. (i.e. support in the middle of the stick.)
-
On 8/6/2019 at 3:55 PM, BETAQDAVE said:
I would think that the very fact that they were in a museum would lead me to believe that they must have had some measure of accuracy and quality to be there in the first place.
And one more thought here, as far as historical accuracy goes, who would know better how it actually was on that particular ship anyway,……a model builder from the same era of the ship, or someone else critiquing that model centuries removed?
Well, it's not unreasonable to believe that, but "some measure of accuracy" is a relative term. Sometimes they are just old. There's often no way to determine if they are actually entirely contemporary or have been modified over time when it comes to small details. And, of course, there's no way to know for certain that the mistake wasn't made by an original contemporary builder, either. There's one well-publicized old (18th Century, I believe) model of great quality which has its anchor buoy strung up a third of the way up the fore shrouds with the buoy pendant coiled and hung up there, too, fifteen feet or so above the deck. I've seen a number of well-built present-day models slavishly duplicating this stowage arrangement. I'm sure the modern modelers were certain this was correct because they'd seen it on the contemporary museum model. The best way to really know the difference is to have some nautical miles under your bottom. Anybody who spent any time "aloft" on a sailing vessel will instantly realize that climbing up the ratlines to stow something as heavy as the anchor buoy and its coiled pendant way the heck aloft out of reach from on deck is just plain wrong. Way too much work dealing with it that way to no purpose whatsoever. Way too much hassle getting it up there... surely a two-man job because you can't hardly climb the ratlines carrying a big anchor buoy, and a lot of unnecessary windage aloft. A serious hazard in heavy weather or combat. Any sailor would know an anchor buoy was an item that would be stowed below or on deck somewhere out of the way until it was needed and when it was about to be used, it would be positioned where it could be deployed with the lease amount of hassle. No question about it, though, that really spectacular old contemporary model in that famous maritime museum (I can't remember which) surely does have its anchor buoy hanging way up there on the shrouds.
The problem at the other end is that the older an artifact might be in a museum, the greater chance there is that present-day analysis is subject to all sorts of inaccuracies, ignorance, and misinformation. I don't know how many times I've seen exhibit cards in maritime museums with gross inaccuracies. That's generally not the case with the great museums of the world, but the farther one gets from those, the worse the problem can become. I've seen museum directors and administrators working for outfits like the NPS pontificating about maritime museum exhibits and maritime history with great authority, but whose last assignment was cataloging Hopi pots in New Mexico. No wonder some spend more resources on "sea chantey sing-alongs" than they do on curating historic vessels and quality models!
Okay, rant over. The point was that a modeler should learn how vessels work and with that information, spotting and correcting the errors should come easy.
- thibaultron, druxey and BETAQDAVE
-
3
-
2 hours ago, svein erik said:
hi,
i cant get any minwax here in norway(wipe on poly)
but if i take 50% lacquer and 50% paint tinner will this work as same??
svein erik
Most likely not. lacquer is quite "hot" in that it dries quickly. "Paint thinner" (mineral spirits) may not be compatible with many lacquers which often use much more volatile solvents such as acetone. You can certainly experiment with lacquer and paint thinner on a test scrap of the same wood species and judge for yourself how it performs.
It's not clear from your post what finish you wish to achieve, but you may which to try 50% boiled linseed oil and 50% turpentine and see how you like the results of that. If you want to add color, you can add a bit of ordinary oil-based stain to the mix to suit your tastes.
-
A wooden pencil with an eraser on the end makes a good push stick for small pieces on mini-saws.
- Canute, BETAQDAVE, thibaultron and 3 others
-
6
-
What the others said. In actual practice an oar would never be anywhere other than 1) stowed aboard the craft, or 2) in the hands of an oarsman either a) being extended outboard or b) "tossed" being held in the vertical position. It's your model and you can display it as you wish, but you may consider whether oars displayed any other way wouldn't appear odd. That said, while it would be a significant undertaking, carving a crew of figures at the oars, perhaps at "attention" with the oars "tossed," would be really spectacular.
-
I'm enjoying your great work on your Mary Taylor. Almost 40 years ago now, I built Bluejacket's Mary Taylor, then a 1:48 scale version. I'd estimate the kit was around fifteen years old when I got it. (I'd be interested to know why they went to 3/16" to the foot scale on the new version.) In those days, Bluejacket enjoyed a great reputation, but all kits were far more "primitive" then than they are today. There was a solid hull machine-carved to shape, quite accurately, in fact. There were the plans, some blocks of wood for the boats, some strips of wood and dowels, and a few cast parts, including the blocks and deadeyes. That was it. Today, many would consider it close to a scratch-build, but for the hull. I have to admit to taking some "poetic license" with her in my less-sophisticated earlier days of modeling, but enjoy her still to this day.
I'm happy to report that this model has never exhibited any signs of "lead bloom" on the metal fittings. High lead content fittings were common back then, but perhaps Bluejacket was a pioneer in going to Britannia metal. I don't know, but I'm happy they didn't crumble to dust over the years.
It's interesting to compare the two versions. Notably, I see where the later version has a skylight aft of the mainmast, a binnacle, and iron-stocked anchors. (The sails were my own "scratch" addition... and out of scale in some details.) No doubt the current version benefited from additional research over the years. The below (old and poor quality) photos of my Mary Taylor build are below. Don't rely on them as any authority for historical accuracy, but I thought you might enjoy seeing what the earlier version looked like.
Thanks for sharing your build log with us!
- GrandpaPhil, jgodsey, Blue Pilot and 1 other
-
4
-
On 7/10/2018 at 4:20 AM, Koa4225 said:
I heard back from the National Maritime Museum in the UK. They have a total of 8 drawings from the Endurance. They are all of Polaris before she was converted for the expedition. I've asked for pricing of those not availabe on the website; I'll repost when I get that back. Drawings in red are available on the site now:
Endurance (1912)
Line
Plan
Scale
1
Lines (Profile & half breadth) 14013
1:32
B
2
(J9265). Body Plan, March 1914. 14012
1:32
B
3
(J9266). Longitudinal Section, as Polaris. 14011
1:48
B
4
(J9267). Midships Sections, as Polaris. 14009
1:24
B
5
Rig, Profile & Decks. 13973 (part very faint)
1:96
B
6
Decks Plans. 14007
1:48
B
7
Prop. Convers. from steam to 'Bolinder' Motor.13960
1:24
B
10
Prop. Shaft & stern gear. 14010
1:24
B
The NMM now has a database of selections from their collections. I gather this "digitization" project is ongoing. Here is the link to the "Endurance (1912)" page containing some pictures which I expect most have already seen. https://collections.rmg.co.uk/collections.html#!csearch;searchTerm=Endurance_(1912);start=0 One might consider checking the site every so often to see if anything more gets posted on Endeavor.
The NMM has digitized some draughts which are available on line, but a lot of these are of the large drawings common in naval architecture (some as much as six or seven feet long) and hence the high cost of copying. (I couldn't find any of Endurance.) The copies, which I presume are "state of the art," are still only copies of the NMM's original. I expect "buyer beware" is the order of the day, because if what they've digitized and posted on their online data base so far is any indication, a lot are in rough shape and some, indeed, appear barely readablel. They often appear quite faded (as they notedfor item 5. in the above listing.) Some are very dirty, folded, torn and otherwise well-used. They are, after all, just old paper and, in some instances, very old paper that endured long periods of indifferent handling and storage and zero conservation. I wouldn't expect to get anything more than "what you see is what you get." Most all will require re-drafting and perhaps re-scaling for modeling purposes. I'd sure want to get some idea of what any NMM plans looked like before pulling the trigger on ordering a copy. That said, they are in many instances "the only game in town."
-
A close look at the end grain directions should reveal if it's sawn or peeled. If you can add heat to the equation, you may be able to bend it back to flat again. Simply getting it we won't likely do much. Given the thickness, it should be capable of being bent to where you want it. Myself, I'd keep it, stored flat, perhaps with some weights on top, and see how it goes. When it came time to use, I'd heat-bend it to where I wanted it to go.
- Clark Griswold, mtaylor and Canute
-
3
-
4 hours ago, Y.T. said:
This particular model of a table saw from the pictures looks as solid quality tool. As such it is very moderately priced. Are you saying it is a ripoff copy of some US manufacturer?
Not particularly. The Aliexpress page was cited simply as an example of the number of "mini-table saws" recently hitting the market. All one needs to do to do is note the 12V "wall wort" power cord to know this saw almost certainly lacks the power of a serious saw. The price is another give-away. How can anybody build a quality saw for that kind of money unless they're government-subsidized to knock out the competition or it's real crap. Producing highly accurate tools is not a cheap endeavor. Try as the best manufacturers might, it costs a lot of money to build tools to .001 tolerances reliably.
In recent decades, the machine tool industry has been flooded with cheap Asian goods. It looks like the recognized name-brand stuff we are used to and it claims to be the same, but you put a DTI on it and you're lucky if you get one that just happens to be within +/- .002 with the average runout being closer to +/- .005. That's the difference between the $5 collet and the $25 collet. When the $25 collet guys are run out of business, where are we going to find collets without runout?
- Canute, mtaylor, thibaultron and 1 other
-
4
-
1 hour ago, Chuck said:
The old kits can now be considered semi scratch in my opinion....especially if you ditch the castings. Very few parts were laser cut and designed with ease of construction in mind. And all this for a smallish kit of a longboat. Folks dont even want to learn to plank anymore. They want even larger kits to have all of the planking pre-spiled and laser cut......but they only want to spend $250.
So very true! This explains the low "kits bought to kits built" ratio of the old kits. The kit companies "sold the sizzle, not the steak," relying on the seductive lure of box cover photos of professionally nearly-scratch-built versions of the kit contents. There remains a solid market for quality kits like Syren's, especially for the discriminating folks just starting out who want to learn to build quality models, but the four-figure-priced Seventeenth Century floating gingerbread castles marketed to the uninitiated without regard to building up repeat business from those who found trying to build them enjoyable are slowly fading away along with the brick and mortar hobby shops that once sold them.
Given all the societal changes wrought by the "digital age," people aren't looking to modeling as a hobby as they once did. I don't see it dying out, but the direction it certainly seems to be going is, IMHO, a positive thing as more and more modelers graduate to scratch building. The commercial end of the market seems to be tending towards parts and materials, and away from boxed kits. Where there seems to be an unfilled market demand today is in the area of plans and instructions to enable potential scratch builders to get over the hump of research, scaling, lofting, and assembly scheduling. Those are among the steepest learning curves in the craft. People want that information spoon-fed to them and will probably pay a good price to buy that if the market (and prices!) for good "how-to-build-it" books are any indication. The good books on the subject have all been in print for decades and demand for new quality titles remains high.
- thibaultron, Mike Y, AlleyCat and 3 others
-
6
-
15 hours ago, Roger Pellett said:
On the other hand, the MicroMark catalog for many is a one stop shop, and the Chinese issue is overlooked because buyers are used to things coming from China. In the case of propriety items like the Chopper, If it is in the MicroMark Catalog many would not recognize it as a knockoff and look for it elsewhere.
It seems inconsistent to me to boycott all mention of pirated plans and kits, a practice I strongly support, yet give a pass to outfits like MicroMark who do the same with tools and materials. We have seen a number of long-established manufacturers of modeling tools and ship model kits go out of business of late. Obviously, competition from unfair trade practices and widespread marketing of "knock-offs" and counterfeit products is a significant factor. That is to the disadvantage of modeling consumers who can no longer source the quality tools, kits, and materials we need to pursue our craft. How long can the small "mom and pop" specialty manufacturers like Syren Ship Models, Vanda-Lay Industries, and Bynes Model Machines survive the same pressure of government-subsidized competition producing cheesy copies of their products mass-marketed by highly capitalized vendors? (e.g. see: https://www.aliexpress.com/popular/mini-table-saws.html )
Maybe it's time to give MicroMark some of the "Keeping it Real" treatment!
- thibaultron, davyboy, bruce d and 3 others
-
6
-
For everybody's information, from the NWSL website:
"NorthWest Short Line will be closing its doors August 30th, 2019. We will not accept any new orders after July 1st; we need the remaining 8 weeks to fill back orders. We hope that someone might pick up the line and continue, but to date that has not happened and so the shutdown schedule remains. Our sincere thanks to all our supporters and customers over the last 60 years!"
Sounds like the same old story we've been hearing about other specialist hobby on-line retailers: "We'd hoped somebody would want to continue the business, but no takers."
This seems to be a pattern. I wonder if the Chinese knock-offs are putting these smaller outfits out of business.
See: http://www.nwsl.com/
- Chuck, Landlubber Mike, mtaylor and 1 other
-
4
-
2 hours ago, grsjax said:
Interesting thing about this is that Seeley introduced the first fence that was clamped from both ends. For it's time it was a major improvement.
I didn't know that. The way mine works, the back end of the fence is hooked over the table top with a set-bolt against the edge of the table. The front end of the fence has a cam lever that when pushed down pushes against the front fence track, pushing the fence towards the front and causing the hook and adjustment bolt on the back end of the fence to fetch up against the back edge of the table. In theory, it works, but the adjustment bolt at the back of the fence is always needing adjustment so that the cam lever will place pressure properly to make the fence tight. If the bolt isn't just right, the cam lever won't go all the way down and hold, and if not tight enough, the cam lever will go down, but the fence will be loose. Additionally, care has to be taken to make sure the fence is parallel to the plane of he blade and this must be checked every time the fence is moved. All cut width measurements have to be taken with a rule and transferred to the fence. Accuracy is dependent upon the operator's set up skills more than with modern table saws.
- mtaylor, Canute and thibaultron
-
3
-
17 hours ago, grsjax said:
Another table saw option if you are willing to do some searching is the old Sears 8" 103.21040 series sold under the Craftsman, King and Seeley names. I believe they were manufactured by Seeley. They were produced in the 50's and are all cast iron and machined steel, belt driven and come with full size motors. I picked mine up off of Craigslist for $50. They show up on Ebay from time to time and parts seem to be available. Bigger than a Dremel but small enough that they can be used in a small shop. Only down side is the arbor diameter is only 1/2". So far I have not had a problem finding blades that fit but it is harder than finding saws with 3/4" holes.
Good point. I have one, too. It was my father's. He bought it in 1951. I still have the sales papers from Sears and Roebuck. It cost $50 new, which was serious money back then. It's set up so that the motor mount slides on a rail and the belts from either the saw or the 4" jointer can be driven from the same motor. It's been pretty much replaced by my 10" Delta Unisaw, but I still use it for milling trim occasionally because I have a set of milling heads for it. It's particularly scary, given it's 1950's era total lack of any safety devices. I walk around it to switch on the motor and never reach over the table and blade to do that. Caution is the watchword for any table saw, of course. The fence is quite primitive and setup is fiddly. It's got plenty of power, though. Very well made "old 'arn."
- mtaylor, Canute, thibaultron and 1 other
-
4
-
I concur entirely with your evaluation of the options. I bought a new Horror Fright mini-saw as you described years ago. Fortunately, I got it with one of their coupons, so I don't think it cost me more than $25 at the time. It's still in the box, used once to see what it could do, and never touched again. Gutless and totally lacking in the accuracy needed for modeling. Totally useless for ripping strips.
Ahem, ... well, ... yeah, .... I know nobody ever wants to hear, "I told you so." and i didn't, so I won't, but I sure wish I had the opportunity to do so before you bought the used Dremel you've got now. I agree with your assessment that it's "second best," albeit by a long, long ways far behind the Byrnes saw. I also agree that at less than $200 used, it's probably better than a poke in the eye with a sharp stick and surely better than no saw at all.
That said, as you note, it can't hold a candle to the Byrnes saw, which, by the way, now offers a really snazzy super-accurate sliding table (cross-cut miter sled) which probably doubles its usefulness and accuracy on repetitive cross-cuts, particularly mitered ones, as an optional extra for around $135. I had never seen the "guts' of a Dremel table saw. What's remarkable in comparison to the Byrnes saw is 1.) The motor is about a third the size of the Byrnes saw. 2.)) The "mechanics" are nowhere near as "beefy" as the machined aluminum plate mechanism of the Byrnes, and 3.) there's no provision for effective dust collection (or parts of it have been removed.) Hooked up to a shop-vac, the Byrnes saw leaves virtually zero dust!
On the plus side, if, and only if you ever have a use for it, the Dremel does have blade-tilting capability and since the Dremel was once upon a time the best available, it still has a decent reputation among the general consumer population and half-way decent resale value if you can find somebody like yourself, which you probably can.
I agonized for years over whether I could justify treating myself to a Byrnes saw. It wasn't that I didn't have the money, but rather whether I could justify spending it on a "toy" for my "hobby." That didn't have anything to do with the machine. It was just my own sicko "psychology." Ultimately, I had the opportunity to buy a barely-used like-new Byrnes saw from an unfortunate RC airplane builder who had serious health problems that caused him to abandon his RC airplane hobby entirely. He also was selling a Byrnes disk sander and a Byrnes thickness sander, similarly like-new, and he was asking half of their list price exclusive of shipping. He was "local" and shipping wasn't a consideration for me. I took a deep breath and "pulled the trigger" on all three. I've never regretted it for a moment and I derive pleasure from them every day, even just by looking at them sitting there in my shop.
I won't tell you, "I told you so." but I'll say this:
Your Dremel saw will make you feel even better when you eventually get a Byrnes saw. The hungrier you are, the better food always tastes.
In the meantime, you can get some practical use out of the Dremel saw and have fun trying to tweak it to perform better.
You can always keep the Dremel for its blade-tilting feature, so you don't have to ever feel "buyer's remorse." The only thing cooler than having a Byrnes saw is also having a Dremel just for making angled ripping cuts!
You can probably get back most of what you paid for the Dremel, maybe even more, if you resell it. (The same is true of the Byrnes saw when your dearly beloved pries it from your cold dead fingers. except that she'll have a lot easier job of selling the Byrnes than the Dremel.)
No question, the Byrnes saw is a costly piece of precision machinery, relatively speaking, but think of it this way, if you're $100 shy of affording one, all you have to do is find a way to set aside a buck a day and in about three months you'll have that hundred bucks. We're talking about throwing your pocket change in a Mason jar at the end of the day here. It's not going to change your life. Heck, if you're really in a hurry, start bringing a sandwich from home for lunch every day and skip buying your lunch every day and you'll have the full price in a less than three months. (Ha! And this is me giving you advice, the guy who couldn't bring himself to spend it for years even when he had it!)
Thanks for the pics of the Dremel. Please do keep us apprised of your experiences with it!
- paulsutcliffe, Rik Thistle, Canute and 2 others
-
5
-
It depends on the vessel.. Signal flags are sometimes rolled up and put in "pigeon-holes" when stored out of the weather. (There's plexiglass in the locker doors, if you look closely.) These are aboard the British Royal Yacht, Britannia.
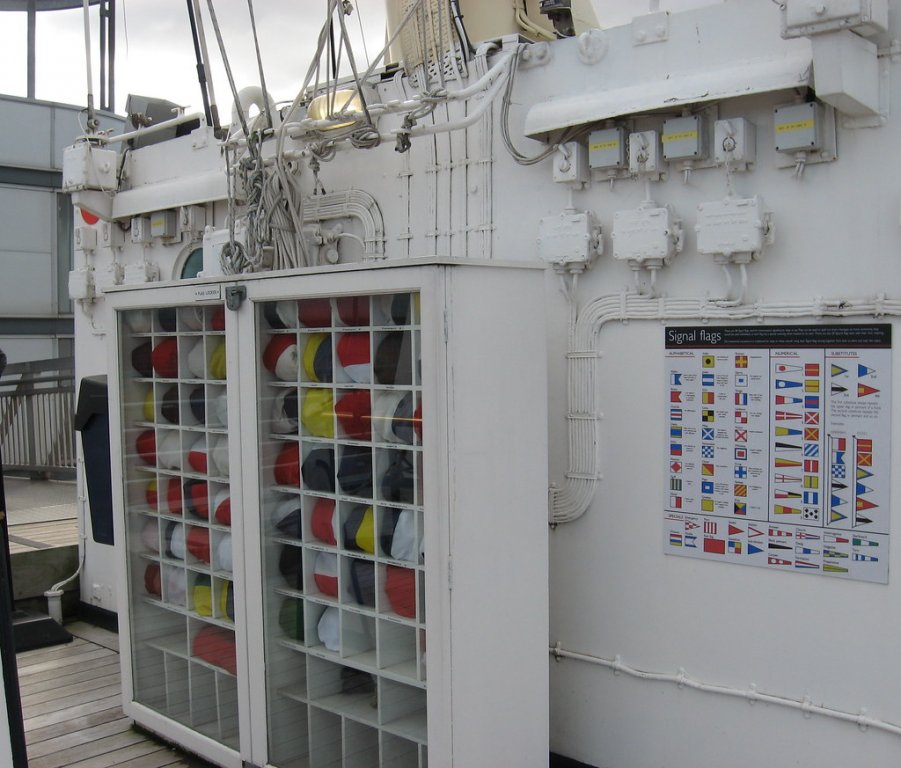 WW II era U.S.Navy practice on most all larger vessels would have been, as now, to store signal flags hanging in a purpose-designed flag locker at the base of the signals masts. These lockers permitted the flags to be attached to the flag halyards, and to each other in a hoist, while they were hanging in the flag locker, and when the hoist was raised, they would deploy directly from the locker.Good photos of the port and starboard flag lockers on the signals bridge of USS New Jersey can be found here: http://ussnewjersey.com/wrk_10-3.htmFlag locker: SS Lane Victory as restored to WW II configuration:
 Flag locker in use aboard USS Maryland, BB-46, during WW II : See: http://navsource.org/archives/01/046/014600l.jpg
 USN Flag locker design varied a bit from ship to ship, but all worked the same way. Larger vessels had larger lockers holding more flags. You'll have to research the ship you are modeling to recreate the flag lockers aboard her. Follow the flag halyards down to the signals bridges and that's where you'll find the flag lockers.
 -
It appears that the material pictured is veneer, rather than sawed wood. Veneer is cut from a rotating log by means of a sharp blade. It's like an apple peel, rather than a cut piece. As a result, when veneer "relaxes," or re-absorbs moisture after kiln-drying, it will look exactly like the wood you've pictured. Sawed wood strips will hold their shape far more reliably, as they are cut with the grain, rather than being peeled from the log by slicing across the grain and then flattened out. In short, it is under stress from the git-go.
If you can "moisturize" it by increasing its moisture content (which means increasing the moisture throughout the piece, not just getting it wet on the outside,) it can then be put in a press of some sort and left to dry some. That should flatten it pretty well, although it will always want to "go its own way" if it reabsorbs moisture when the humidity rises. That may not be a problem if it is by then well-fastened, but it's hard to be sure. The forces generated by moving wood are surprisingly high. For this reason, I only rarely use veneer-cut wood on models and then only small pieces that are well secured.
- Canute, pontiachedmark and mtaylor
-
3
-
I'm a bit late to the party on this interesting log. I didn't see it mentioned that the PBR Training Center was located in my "cruising waters" up until around 1997. I wouldn't think your initial impression that most all of them were left in Vietnam was accurate by a long shot. (Somebody may have confused PBRs and Vietnam with PTs after WWII.) PBRs on training exercises were all over the Bay and sloughs around Mare Island in Vallejo, CA. Mare Island had a whole flotilla of them. I believe there was also a PBR base in Subic Bay well after the Vietnam era.
Mare Island, the first Naval Shipyard on the West Coast, established in the mid-Nineteenth Century is now decommissioned, but has preserved its extensive historical record. They have a good museum there which covers PBRs. and They also have one on display at the Mare Island Museum. The Mare Island Museum may well be a good resource for you.
There's a lot of information on the restoration of a very early (Hull #2 out of the Uniflight plant, I believe) now privately owned in New Zealand. There's a ton of photos and plans on their website, including a photo of a builder's model with the owner of Uniflight. See: https://www.pbr722.com/history#!
 PBR training flotilla at Mare Island Riverine Training Center. (All PBR and Swift Boat crews were trained there through the late 1990's.)
-
I find that a good material for covering models under construction, particularly during the rigging phase, are the thin plastic bags dry cleaners use to cover cleaned clothing when you pick it up. They can be cut on the sides and opened up to a fairly large size and taped together if need be. They cost nothing and are very lightweight, so there's little chance of them damaging the model.
-
1 hour ago, shipman said:
If I was (improbably) gifted an obscure, original 18th century model of a Cutter by the NMM collection, I don't think I'd have the discourtesy to say, 'Well, that's all well and good, but aren't you going to have the forestay re-rigged first?'
You probably wouldn't say anything but "Thank you!," but the real question would be whether you started thinking about correcting that forestay as soon as you got it home or not.

- thibaultron, davyboy, mtaylor and 2 others
-
5
-
What mtaylor said. I find wax, even when applied thinned with turpentine and run between the fingers to work it in, is a dust magnet. I'm not just talking about models left out of cases. It's a problem while it's being built. It does serve to "knock the fuzz down," though. Using thinned white glue or shellac may require some running the line under a flame before coating.
- thibaultron and mtaylor
-
2
-
More experienced machinists than I will probably have more specific recommendations, but I'd note that it will in the first instance depend upon the scale and the materials you are working with, which is probably obvious. If you are planning on working primarily with wood, I'd expect that you wouldn't be needing to mill any large flat faces. That would be addressed by a hand plane, thickness sander, or table saw. Again, obviously, the various end mill shapes you'd want for woodworking would be determined by the shapes you wanted to cut. Considering that one can easily pay $75 for a 1/8" carbide end mill, I'd suggest that you buy them as you need them rather than by buying a fully incrementally-sized set of them unless you are sure you will find a use for all the pieces in the set. A pass and a half with a 1/8" bit will yield a 3/16" cut, two passes 1/4",and so on, so the number of end mills one needs to buy can be reduced in that fashion by the occasional user who can afford the time to make multiple cuts, a luxury not enjoyed by the master machinist working in a production shop where "time is money."
Some hobby catalogs offer lower quality "sets" of miniature mills and router bits at somewhat reasonable prices, but you'll be lucky if you ever have a use for more than three-quarters of the bits in these sets, so they aren't particularly economical in my opinion. If you are working in wood, you may find some low-quality mills and bits that are adequate for modeling use, but you get what you pay for. A mill or bit that dulls and must be replaced in short order is a poor investment. If you buy mills and bits as you need them, as the professionals do, the insult to the pocketbook is less and your collection will eventually build to the point where you are well-equipped for the specific sort of work you generally do without having spent money on tooling you didn't need.
Some of the bits and mills marketed by Dremel and their equivalents are adequate for limited hobby wood milling. Don't expect them to last for long, but if the job is small and you are not likely to ever need that bit again, there's no need to pay the big bucks for the professional grade products.
There are lots of on-line mill and bit retailers. Below are a couple with particularly large selections. Shopping around is often worth one's time. Quality bits are made by a few companies and the retailers' prices often vary for the same item. If other forumites have personal experience with retailers they can recommend, their posting those links would be most helpful.
https://www.toolstoday.com/router-bits/miniature-router-bits.html
http://www.harveytool.com/cat/Miniature-End-Mills/Browse-Our-Products_254.aspx
- Canute, mtaylor and thibaultron
-
3

Bending African Walnut
in Wood discussion...Where to use it? Where to get it? What types are best? How to Finish it?
Posted · Edited by Bob Cleek
If it works best for you that way, by all means, do it that way. It's a challenge bending walnut in any event. Some woods are suitable for bending and others really aren't.
When I use the spring-loaded strip holder, I progressively work the curve desired into the wood by repeated small bends along the curve desired with the holder holding the strip in various points on the curves on the iron. Sometimes the workpiece doesn't fit under the holder roller because the fixture was designed for the straight, narrow strips of "planking" commonly found in kits in the days before laser-cut kit planking and I'm using it to bend something differently shaped. As you do, I don't use the holder when I find it isn't helpful.