


Bob Cleek
-
Posts
3,374 -
Joined
-
Last visited
Content Type
Profiles
Forums
Gallery
Events
Posts posted by Bob Cleek
-
-
1 hour ago, wefalck said:
I knew most of the drawing instruments presented above and have several sets, one was given to me, when I started in secondary school and it is still in mint condition, the others I inherited.
However, I never came across the Barch-Payzant lettering pens, they must be an US American speciality. In Germany we used for this what would be translated as 'funnel pens'. They are indeed tiny funnels that can be attached to a penholder in a way to keep the pipe of the funnel vertical on the paper. They were made in standard diameters to fit lettering templates. A thin wire ran through the pipe to keep it from clogging. They were essentially the forerunners of the technical drawing pens with an enclosed ink-reservoir or cartridges.
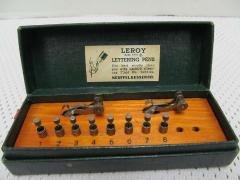
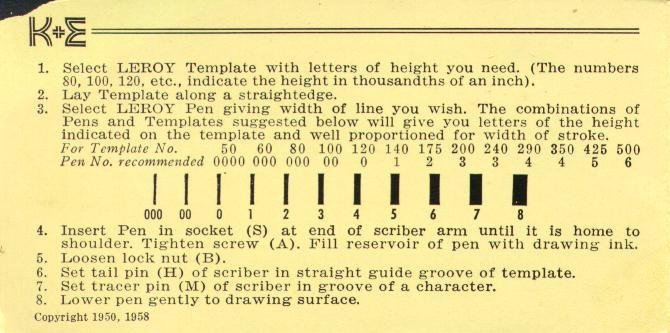
In the US, the pen points your describe were marketed by Keuffel and Esser under the their trademark "LEROY Lettering System." (The "LEROY" was always written in capitals, but I don't know why.) K&E manufactured a huge number of templates in various sizes and fonts for use with a pantographic planchet that traced the letters inscribed on the template and inked the letters with the pens you describe. The system later used Rapidograph technical pen points instead of the "funnel pens" when those came on the market. (See below.) There were a variety of planchets available. some were adjustable to yield slanted letters and others to vary the size, height, and/or width of the letters on the template.The LEROY system was the most popular lettering template system in the US in the 20th Century. They are still easily available on eBay. The most common templates, by far, were the those in the standardized ISOCP engineering lettering font and these were provided in the boxed LEROY sets (below.) (In the last half of the 20th Century, the US government required all engineering drawings submitted to them to be lettered with the LEROY ISOCP font.) There were, however, templates in nearly every font imaginable, including Greek, Cyrillic, and other foreign alphabets. There were also templates for making musical notation, electronic schematic drawings, cartographic symbols, and the like. Keuffel and Esser also had a custom template service that would produce templates of corporate logos, individual signatures, and anything else a customer wanted. The manufacture of the LEROY templates was actually quite technically involved and K&E's patents on that process made the LEROY products some of the most profitable in their line for many years. (A fascinating monograph on the history of the LEROY system and the innovative machines developed to manufacture them can be found here: http://www.mccoys-kecatalogs.com/KELeroy/LeRoy_Production/LeRoy_Soper.pdf I suppose you'd have to be an engineering wonk to be all that interested in it, but anyway...)
I have no doubt that the LEROY pens were made by the same company in Germany that made the "funnel pens" mentioned above. With a very few exceptions, most all of the mechanical drawing instruments sold by US retailers in the "Golden Age" of manual drafting, Keuffel and Esser and Dietzgen being the largest, were manufactured on contract by German instrument making companies and branded for the retailers selling them in America. There were a few English, Swiss, and French instrument makers whose products were sold on the American market in the 19th Century, as well, but the Germans were the world's preeminent instrument makers, as the German names of the immigrants that founded the American companies indicate. Interestingly, when WWI and WWII occurred, there became an instant shortage of drafting instruments which were essential to combat engineering, land, air, and sea navigation, cartography, and artillery ballistic calculations. K&E responded to this shortage by developing an easily machine-manufactured line of instruments for wartime production and turned out a huge number of their "MINUSA" line of instruments which often appear on eBay and other collectors' markets today. Interestingly, "MINUSA" stood for "M-ade I-n USA." The fact was, though, that when it came to technical instrument making and optics, Germany set the standard for the world at least until the aftermath of WWII.
Today, we lament the demise of these once great instrument companies and blame it on the development of CAD software, but really, CAD only finished the job. The mortal wound was the development of electrostatic copying technology. The companies had enjoyed great profits from their copying systems lines, beginning with blue print technology and moving forward up to the advent of the Xerox Machine, with which they simply could not compete. They limped through the sixties and seventies, but the decade of the eighties saw the end of all of them.

-
I agree with wefalck that heavy corrosion on the copper plate should be investigated, and the cause identified and eliminated. No ship ever had a shiny copper bottom. The actual appearance of coppered bottoms has been discussed at length in other posts with many photos posted. Some modelers do still cling to "shiny bottoms," along with other stylistic affectations. Every artist presents their work to the world and the world decides whether it's worthy of appreciation or not. It's a chance we all take. It's your call to make.
If you want to remove the green patina, oxalic acid crystals dissolved in warm water (sold in paint stores as "wood bleach") will remove it effectively. (Wear rubber gloves, as prolonged skin exposure to the solution, particularly under the fingernails, can produce extremely painful skin injury. Don't ask me how I know this.) Alternately, there is a product marketed in hardware stores for cleaning bathroom fixtures and coffee makers called "CLR," (which stands for "Calcium-Lime-Rust") which is very effective in removing copper oxidation, as well.
-
-
5 hours ago, kurtvd19 said:
Eric:
You will never regret buying one. I would get the extension bar for the miter gauge. There is a plain one for $8 or the adjustable one for $30. I add a longer piece of hardwood to the $8 bar when I am doing angled cuts - attached with double faced tape. If I have occasion to order something else from Jim I will probably pick up the $30 adjustable one - but I haven't had any issue with just adding another piece with the tape. But you really need one or the other. The extended fence is a very good - must have - addition. I think the std fence is just too thin - but I also use a big Bissemer (sp?) style fence on my 10" saw. A couple of zero clearance inserts so you can have one matched to each blade you use. The other accessories are luxuries.
I purchased the tilting table and have used it one time in several years - it paid for itself on that job but it hasn't been used since.
Kurt
I agree with Kurt wholeheartedly, but I'd add a bit more to the list.
1) If the eight buck cost is a consideration, you can make your own zero clearance inserts from wood or thin plastic for less. Jim's $8 ones will fit perfectly, however. Your own mileage may vary. Jim's won't.
2) Buy the "spare nuts and bolts" kit. I think it's $8 or so, but it's cheap. There are a lot of rather small fasteners and you will probably drop one at some point or other and need replacements. They are standard fasteners, but don't expect to run down to Home Depot and find a blister pack full of them. The same goes for an extra belt. You may not need these immediately, but the expense is minimal and the savings in the cost of shipping separately if you have to buy one later will pay for them alone.
3) I'd spring for the micrometer adjustment on the fence. It's a few bucks, but if you have a piece of equipment that is accurate to .001", you really ought to have the option to set the fence to those tolerances. A spacer can be used for set up, but the micrometer is better. Kurt's "stop block" is beautiful. I've been making do with cobbled up equivalents, but I'm going to make one for myself as soon as I have the time. This is essential if you want to efficiently rip a bunch of strips for planking, etc.
4.) I'd really, really take a hard look at the new aluminum sled Jim is selling now. I agonized over it and finally got one and I'm really glad I did. It's true that it's easy to make your own from wood or plastic sheet material, but I doubt it is going to be worth anybody's time and effort to make one themselves that is equivalent to the accuracy of Jim's sled. The Byrnes sled is "bulletproof," like the rest of his machines. Most importantly, it's CNC-milled aluminum and every bit as accurate as the rest of the saw. Repetitive cross-cuts are simple enough on your own sled or shop made jigs, but if you have occasion to want to cut notches to make gratings or make miter cuts that are perfectly accurate, which is pretty much essential for any small scale woodworking, particularly for making model case frames, the "store bought" Byrnes cross-cut miter sled is worth its weight in gold. You don't really need it if all you are doing is ripping strip wood, but if you are using the saw to cut wood parts for assembly, I think you will be glad you got it. I have found it increased the usefulness of the saw exponentially.
5) Talk to Jim on the phone and tell him what you are planning to do with your saw. Ask him which blades you should get. TAKE HIS ADVICE! He won't steer you wrong. Be aware that kerf thickness isn't the only consideration. The depth of cuts you will be making and the finish you desire on the cuts are dependent upon the type of blade used. His stock carbide blade is great for general purpose use. If you want to turn out finished strip wood in thin dimensions, you'll probably want to get an additional specialty blade for that work.
If you had read the 300+ posts in this thread, I believe you would never, ever, have found one complaining that they bought a Byrnes saw and found they never had a use for it or was ever dissatisfied with the machine or the service. I can't think of any other products that have that level of customer satisfaction rating. All the Byrnes Model Machine products are "finestkind." They are the gold standard for what they are. There are none to equal them. For what they are, I am sure you will consider their purchase price to be one of the best bargains around.
- RichardG, gjdale, Ryland Craze and 8 others
-
 11
11
-
1 hour ago, Torrens said:
Hi Anthony
As the Bryne saw is made in the USA, is there a problem with the difference in voltage between the USA and the UK? If so, how did you resolve it?
They're available with 110 VAC or 220 VAC motors, as the buyer wishes. There are also available step-down and step-up transformers to convert one voltage to another.
-
The above appears to be a Keuffel and Esser Anvil line one-bow compass set. It's a quality set just below the Paragon line. It would likely bring less than $50 on eBay and is a bargain at that price. Below is a Paragon three-bow compass set in comparison.
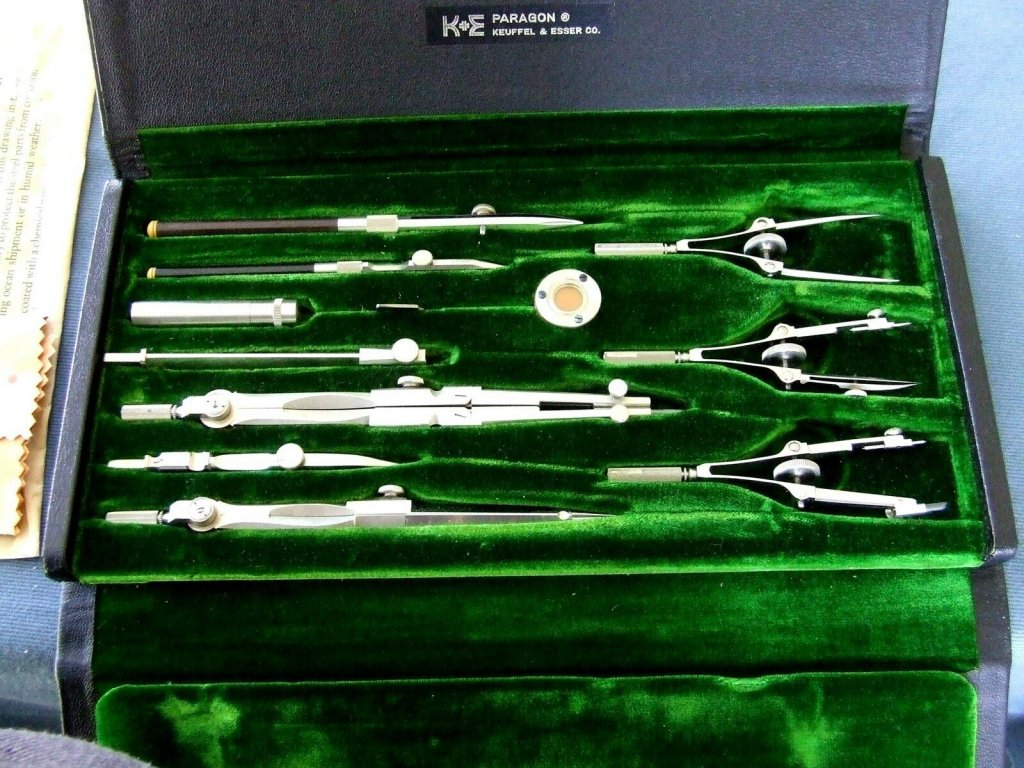
And a ten inch Paragon decimal-scaled proportional divider.
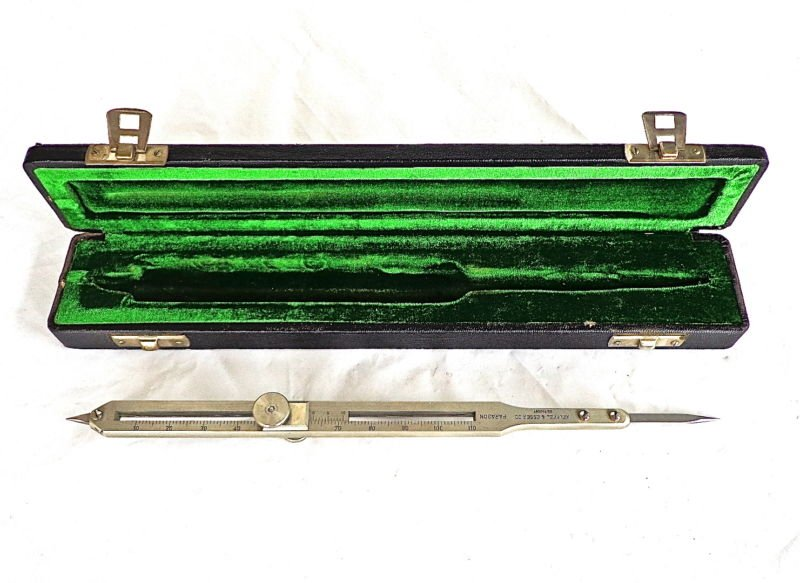
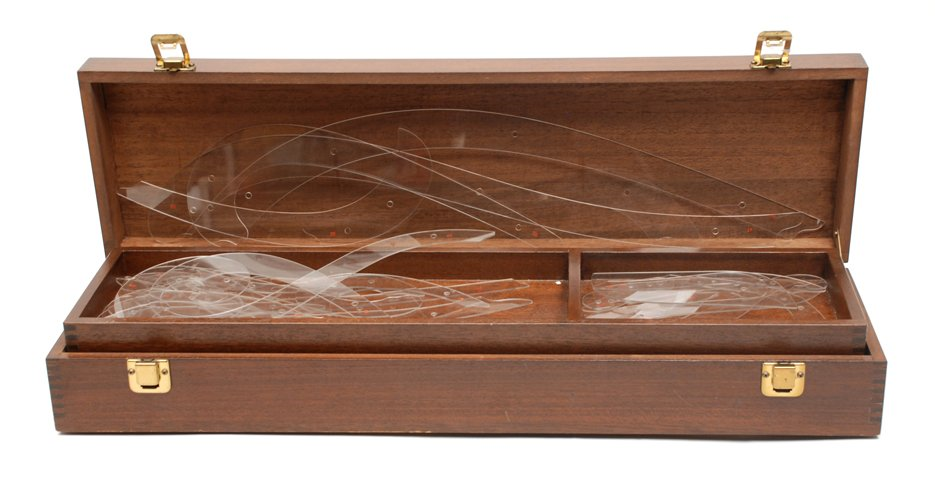
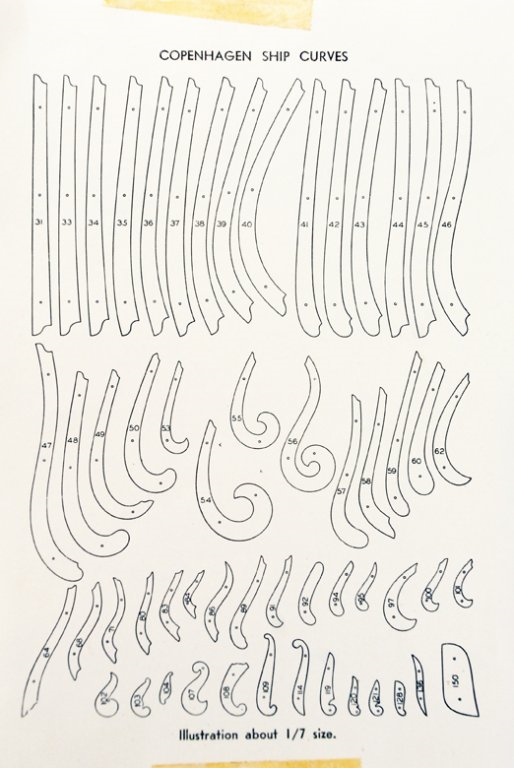
The major differences between the various product lines is the type of "union" or joint at the hinges of the large compasses and dividers, which is important for wear and accuracy, and the fact that the top end lines are hand-machined from solid billets of rolled German silver and all the instrument parts bear matching serial numbers, rather than being cast or stamped. This makes a big difference in "fit and finish." Note that the Paragon large divider also has an adjustment screw on one leg to permit fine adjustment of the width measured, which is an "extra" feature. I find I use these two items the most in ship modeling, together with my Copenhagen ships' curves and French curves.
Nice tools make their use a special pleasure. As these once common tools pass from general circulation into the world of the collectors, there's still a window of opportunity for those of us who still have a real use for some of them to obtain them at a price we can afford.
-
27 minutes ago, EricWilliamMarshall said:
Wow, I’m left speechless (or wordless?) Thanks for the deep dive (or perhaps, more accurately, the tip of iceberg)!
Bob, how did you become so interested in this corner of the world?
Well, I loved "mechanical drawing" class in high school. They actually taught it as a trade skill back in the days before "CAD" came along. It then became another skill in my "bag of tricks." I enjoyed building and designing stuff and used it frequently, but never for a living. I loved the instruments, but never could afford anything other than a basic "student" drawing set.
Some years ago, I decided I wanted to acquire a planimeter (an instrument that mechanically calculates the area of irregular plane surfaces) to calculate displacement on a boat I was designing. ("Playing with" was more like it!) I started by Googling "planimeter" and identifying which were the best models in my price range, then moved on to eBay from there to see what was available. To my amazement, eBay was flooded with technical drawing instruments, many even "new old stock." Among these were some of the finest drawing instruments ever made, with which I'd become acquainted in my school days, but only from a distance. There was a Keuffel and Esser store in San Francisco where I grew up and I'd go in and drool over the professional-quality hand-fitted German silver top-of-the-line Paragon line of products. Back then, I could only dream of buying instruments like that, but I discovered them on eBay in mint condition, or even new, for really what was to me now "spare change" prices! I started with a Paragon planimeter and a basic set of Paragon drawing instruments. After that, I'd pick up whatever struck my fancy if the price was right and pretty much bought one of all the best drawing and measuring instruments Keuffel and Esser ever made. There are still some really rare things that I'll never pay what the serious collectors will on eBay, but I'm quite content to now own the instruments I only wished for as a kid. I guess it's a lot like the old farts that buy the muscle cars they couldn't afford when they were young, except with me it's tools!

It just became a sideline hobby and I've found it very enjoyable. The old instrument catalogs are on line and I learned a lot from reading them. None of the good quality stuff is made anymore and even very little of the cheap junk is manufactured today at all. If the on-line auction prices are any indication, the prices are going up and my widow will enjoy the return on appreciation when she sells off my stuff, but even now, the stuff is amazingly cheap when considering what it cost new. I did a calculation some time back and figured that my basic Paragon drawing set sold new in today's dollars adjusted for inflation for about $750 and I picked it up in mint condition for about $150. I haven't seen one in that condition in a few years, but I'm guessing now they'd be bringing around $250 or so, at least. Even K&E's mid- and lower-range lines are better than anything that can be bought new these days and they sell for a lot less than the highly collectible Paragon stuff. It's a great time to score some "user" instruments if anybody's interested. I use mine all the time on the drawing board when building models.
-
21 hours ago, EricWilliamMarshall said:
There is great potential in the bow pen.
Indeed, the classic draftsman's ruling pen in all it's variations is of great use to the ship modeler who discovers these instruments and uses them correctly.
There are various types of "ruling pens," each designed for a specific purpose for which each serves well, but none serve much at all for uses for which they were not intended. Ruling pens reached the height of their evolution in the "Golden Age" of pen and ink technical drawing and are today of interest primarily to collectors of drafting instruments, although the artists and calligraphers have discovered some of them and revived their popularity to the point that some are now back in production and retail sales. http://www.dreamingdogs.com.br/en/tools.html
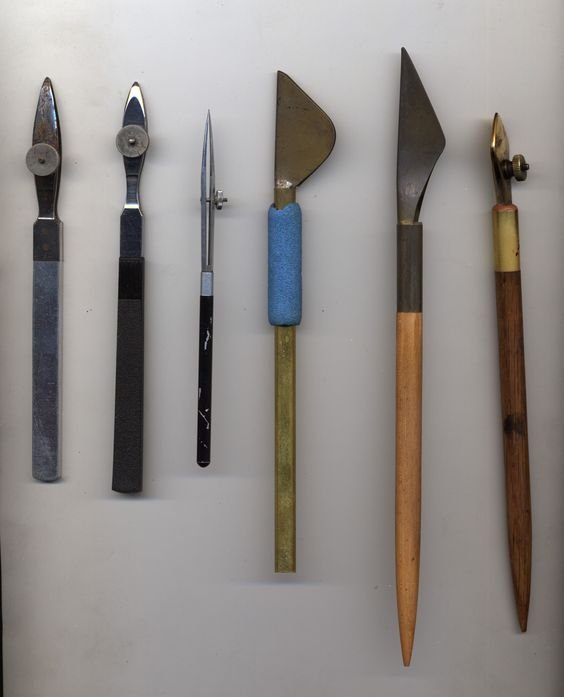
In addition to common ruling pens as pictured in the post above, there are "detail pens" which are designed to hold enough fluid to draw a quite long line without running out of ink and requiring the joining of two strokes in a given line. This is important because it is very difficult to make a perfect "joint" in a drawn line without making a mess of it. From left to right below, two adjustable line width "Swedish type" detail pens, a standard "German style" ruling pen, two "folded" long line pens of fixed line widths, and another smaller long line pen.
The Keuffel and Esser "Marathon" ruling pens (below) are for making particularly wide lines and are made in fixed widths. These pens have multiple "leaves" that will hold the considerable amount of fluid required to draw a long wide line and will draw a wide line without the "bead" of ink at the tip of the pen separating as it otherwise would on a two-bladed ruling pen due to the distance between the sides of the points being too wide to hold the ink by capillary action.
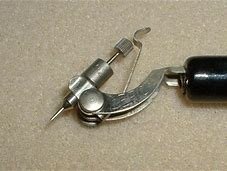
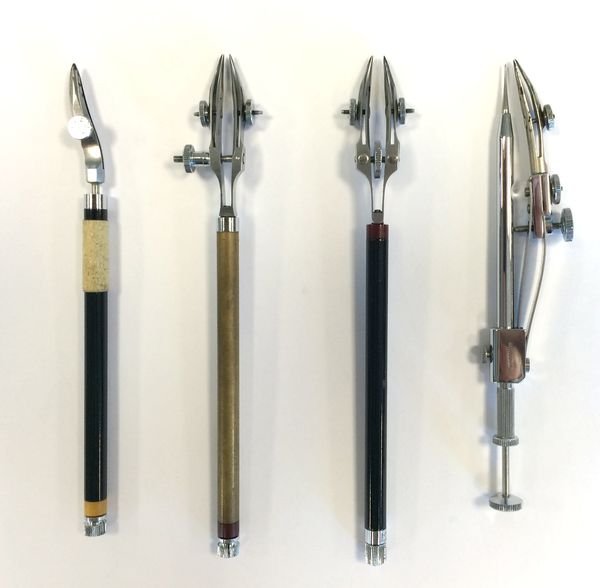
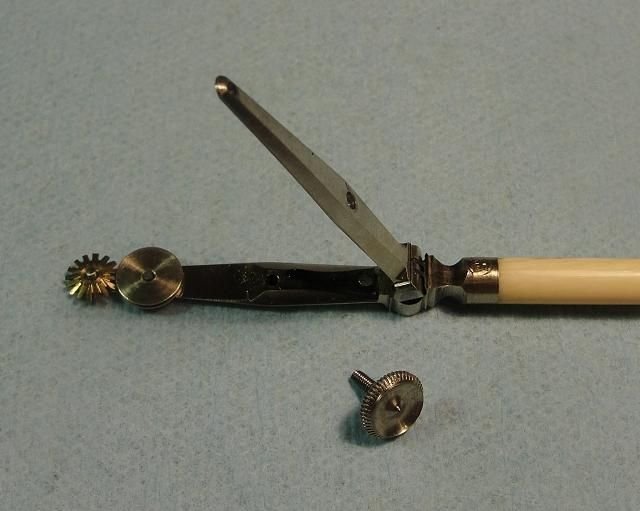
The above ruling pens are properly used only to draw straight lines with the use of a straightedge or "rule." To obtain a curved line of uniform width, the pen must be rotated as it follows a drafting curve in order to avoid the line narrowing if the pen point isn't kept perpendicular to the curve's radius. In order to draw curved lines of uniform width, curved ruling pens are made which swivel in use when drawn along the edge of the drafting curve. There are also "railroad pens," so called because they are used by mapmakers to draw railroad tracks and road curves, which are curved ruling pens with two points which draw perfectly parallel lines an adjustable distance apart. These swiveling curved ruling pens will double as straight ruling pens by tightening a set knob at the end of their handles which will prevent them rotating on the handle. Below from left to right are a single-line curved ruling pen, two "railroad pens," and a "drop point" or "rivet" compass with a pen point attached. The "rivet compass" is not a ruling pen but is used to draw very small circles such as were drawn in the days before welding to indicate the placement of rivets on drawings.
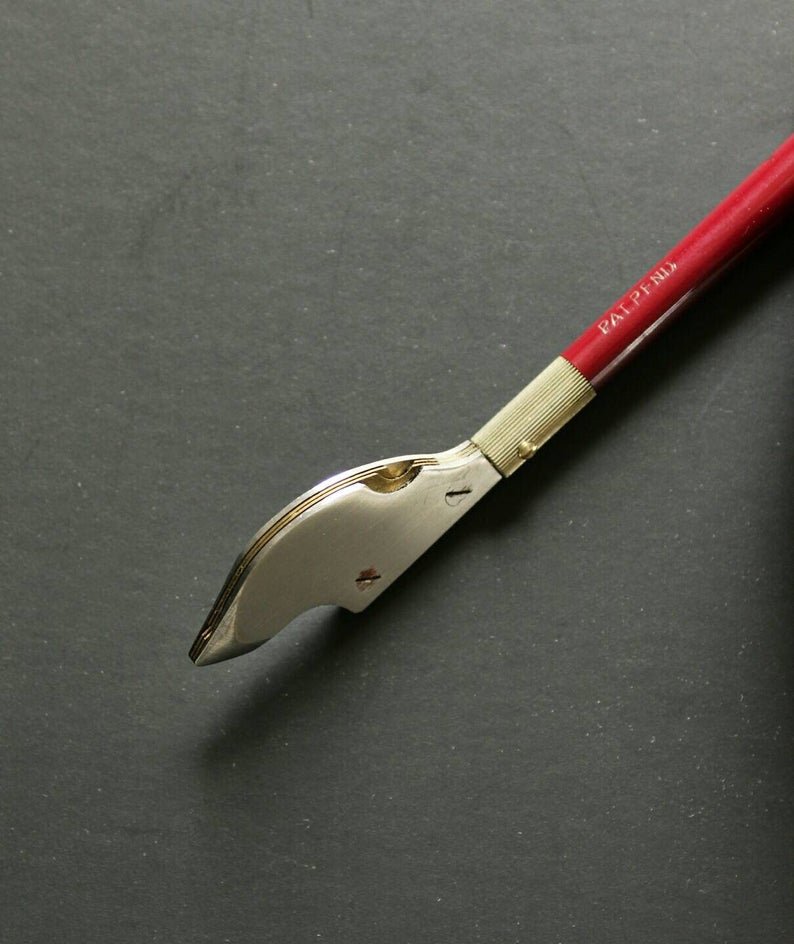
Keuffel and Esser Barch Payzant lettering pens are designed for freehand block lettering using strokes in any direction, including curves. They hold a good amount of fluid in their wells and have round, flat nibs. These are useful for freehand lettering with paint or India ink in scale sizes and can be used for drawing straight or curved lines against an edge, but care should be taken to use an edge which is relieved on the bottom to prevent the fluid from wicking beneath the edge. They were manufactured in sets of pens with various line widths. The adjustment knobs are not for varying the width of the pen's line, but rather for adjusting the width of the space in the nib to regulate the amount of fluid flow given the thickness and viscosity of the fluid used and to facilitate cleaning.

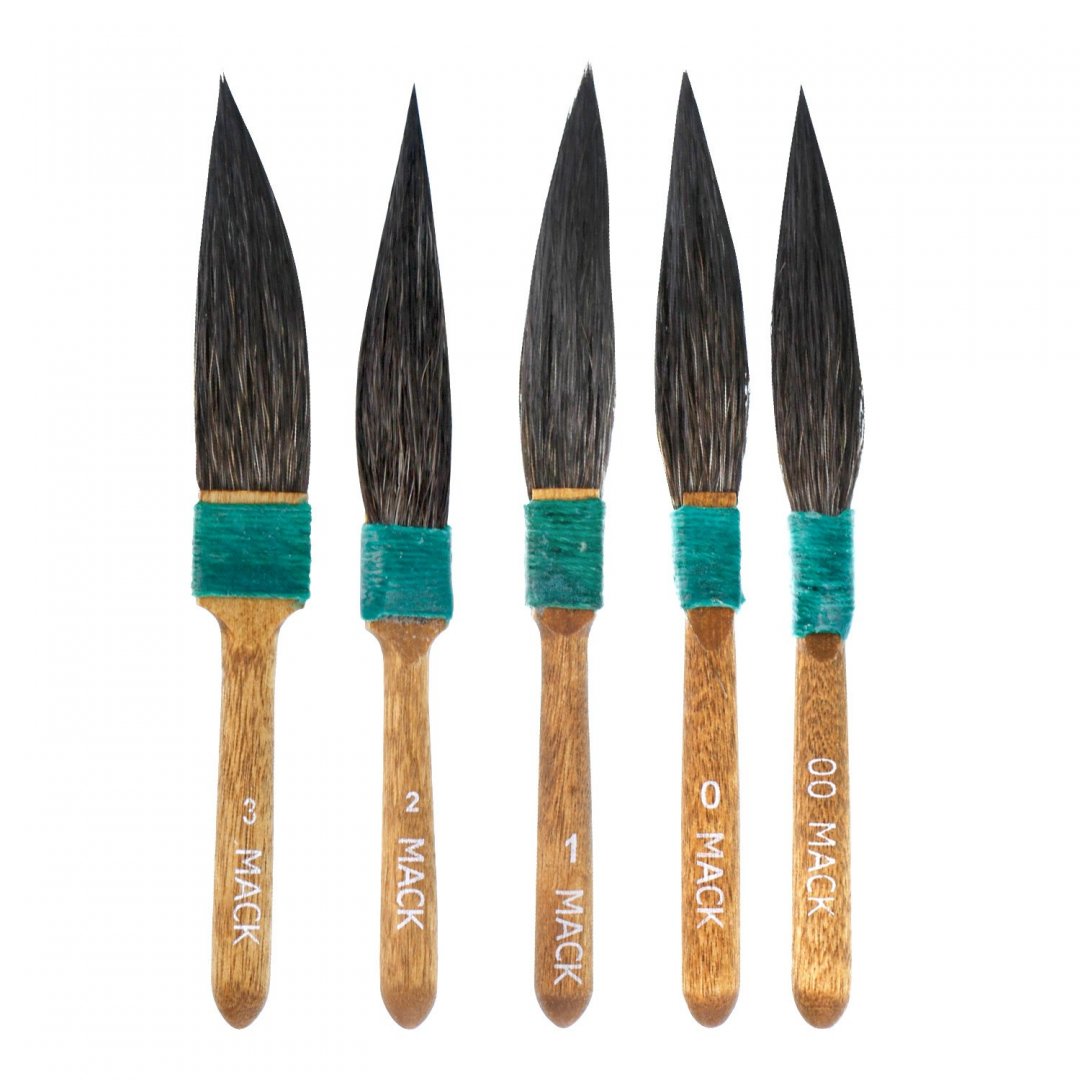
As for brushes, striping and lettering is far easier when done with the proper tool for the job. Lettering brushes are made to carry a lot of paint or ink and to hold their shape. Fine line lettering and striping brushes will have long bristles relative to the width of the brush. "Pin-striping" brushes are dagger-shaped to carry a lot of fluid and also to vary the width of line by varying the pressure on the brush when in use. Using these "sign painters" and "pin-striping" bruses makes all the difference in the world, although using them for freehand lettering and pin-striping work of professional quality does take considerable training and practice to master the proper techniques. Straight lines are far less demanding, requiring only a steady hand. It should also be noted that with brush work the qualities of the fluid, particularly its opacity, are very important. It is far easier to make a line in a single stroke that covers sufficiently. Having to go over it again with another coat, or more, makes a good job nearly impossible. (It's for this reason that the industry-standard brand of sign painters' and pin stripers' paint is called "One Shot." http://www.1shot.com/One-Shot/Home.aspx )

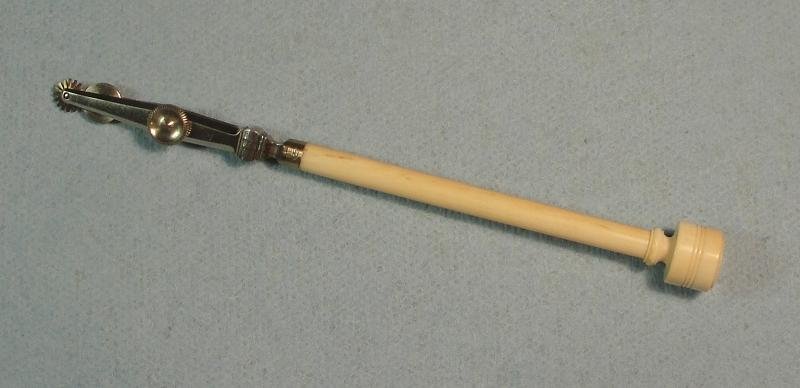
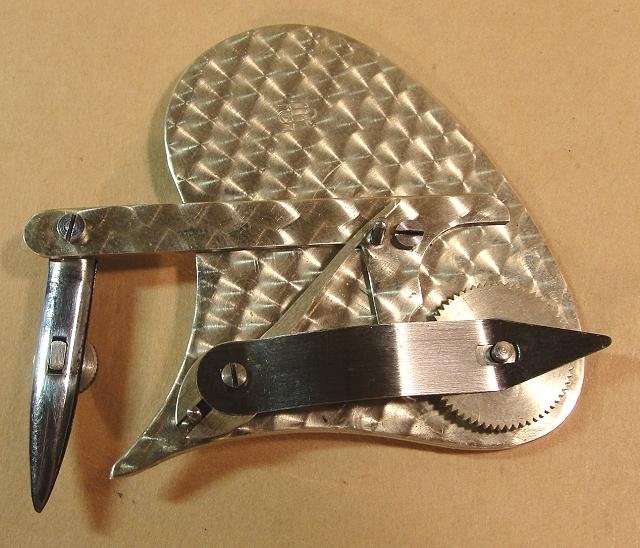
There are even types of mechanical pens that produce broken or "dotted" lines. By swapping various gears, patterns of dots, dashes, and combinations of both can be produced. While these pens are prized more by collectors of drafting instruments today, they are handy "users" for some modeling applications such as drawing "stiching" on sails.

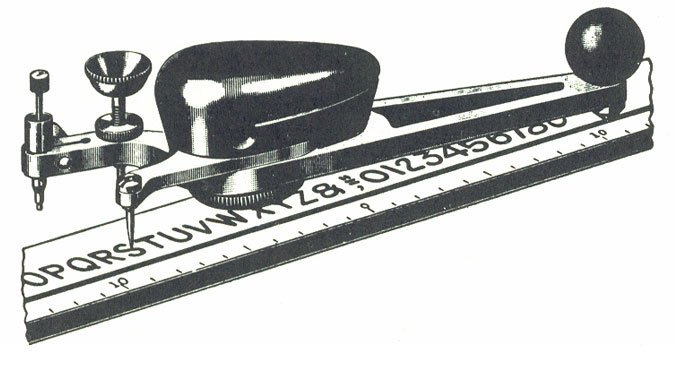
It's important to note that ruling pens are never "inked" or "filled" by dipping the points into the ink bottle. Rather, the pen is "charged" by depositing a drop of ink or paint on the side of the pen points above the points so that capillary action draws the fluid between the inside surfaces of the points, filling the space between the points for about a quarter inch up from the points. Over-charging will risk "flooding" with ink running all over the drawing. Dipping the pen will over-charge it, as well as get ink all over the sides and promote ink running under and all over the straightedge or drawing curve used. Charging ruling pens with a drop of ink is the purpose of the small eye-dropper found in the cap of the classic Higgins drawing ink bottles. When ink was king, draftsmen used a clever mechanical inkwell for applying a drop of ink from the end of a spring dipped in the standard ink bottle with a single hand. These were once a common thing and now have become scarce as buggy whips. Should you have one, it's as useful today as it ever was if you are going to use a ruling pen. (See below)
How it works: The thumbscrew at the top of the "head" adjusts the depth that the tip of the spring goes into the ink in the bottle, which drops as the ink is used up over time and its level drops. The dipped spring sheds all surplus ink until the tip of the spring stops dripping ink. At that point, touching the side of the pen against the end of the spring causes the correct amount of ink to flow by capillary action into the space between the blades of the pen points.
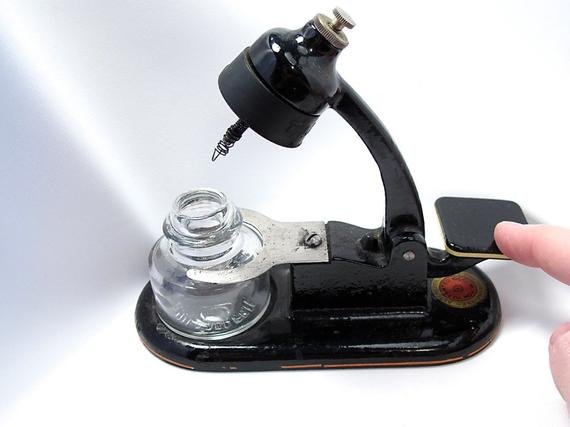
How it's used to ink a pen with one hand.

Ruling pens must be kept clean and dry when not in use. Their points need to be sharpened when they dull if they are to draw sharp, accurate lines. (Many types of paper are remarkably abrasive.) Sharpening instructions can be found in most old high school "mechanical drawing" textbooks or on line.
I expect this is more information than most would have interest in on the subject of ruling pens and deserves an "Okay, Boomer!" but if anybody has their grandfather's drafting instruments kicking around, you'll be surprised how useful they can be in modeling if you know what they are and how they were used. If they are in good condition and of high quality, as most professionals instruments were back in the day, they are probably worth a few bucks and so not something to toss in a junk drawer and leave to be kicked about, or given to the kids to play with. (Then there was the fine ivory-handled ruling pen I found a friend's wife using as a "spear" to fish cocktail olives out of the bottle...
)
-
-
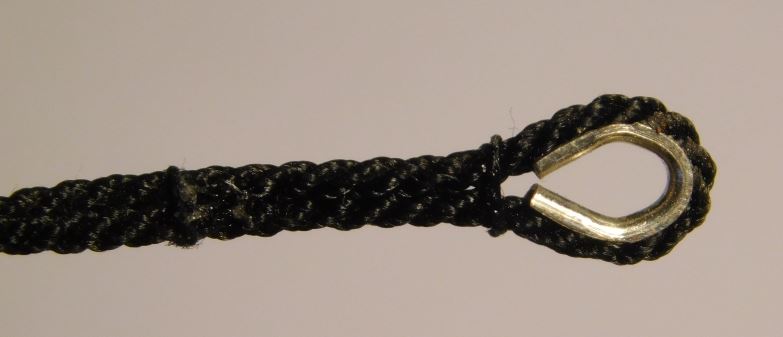
Very nice work on the splicing! Working a splice in scale line is really difficult.
These are admittedly "picky" comments, but I share them with the thought that some who may be contemplating showing their models in competition or hoping to sell them for a good price may find them of value. The type of "tear-drop" shaped thimble, bent open-ended as shown or closed-ended when cast in bronze, is of relatively modern design and intended for use with wire rope (cable,) not with fiber cordage. It's shape is designed to avoid the sharp bend in the wire rope that would be required at the throat seizing on a closed, round thimble which would cause a fatigue point that would weaken the wire rope and could result in catastrophic failure under load. These tear-drop shaped thimbles appeared concurrently with wire rope and cable coming into use.
Modernly, the tear-drop thimbles are frequently seen used with fiber cordage simply because the round thimbles have become somewhat difficult to source. Their disadvantage in that application is that, as the eye "works" to and fro, the open edges of the tear-drop thimble tend to chafe and cut into the line, leading to catastrophic failure under load.
Round metal thimbles are themselves a relatively modern thing, although I'm not sure when they were first available. They are generally made of yellow metal, or sometimes of hot-dipped galvanized steel modernly, as rusting of ferrous metal promotes rotting of the cordage in contact with it. On period rigging, they were of turned wood, generally lignum vitae, if available, or locust and similar tough species if not. The cordage forming the eye should be served before the thimble is inserted because the outer edges of the cordage around a thimble is particularly susceptible to damage from chafing, especially if shackles are placed through the eye.
This isn't a criticism of the workmanship, to be sure, but these "museum quality" details are the sort of thing that may be worth a few points with an eagle-eyed model judge or museum curator. They may not be particularly noticeable at smaller scales, but would surely be noted by judges on the full-sized classic yacht concours circuit these days.
-
18 hours ago, druxey said:
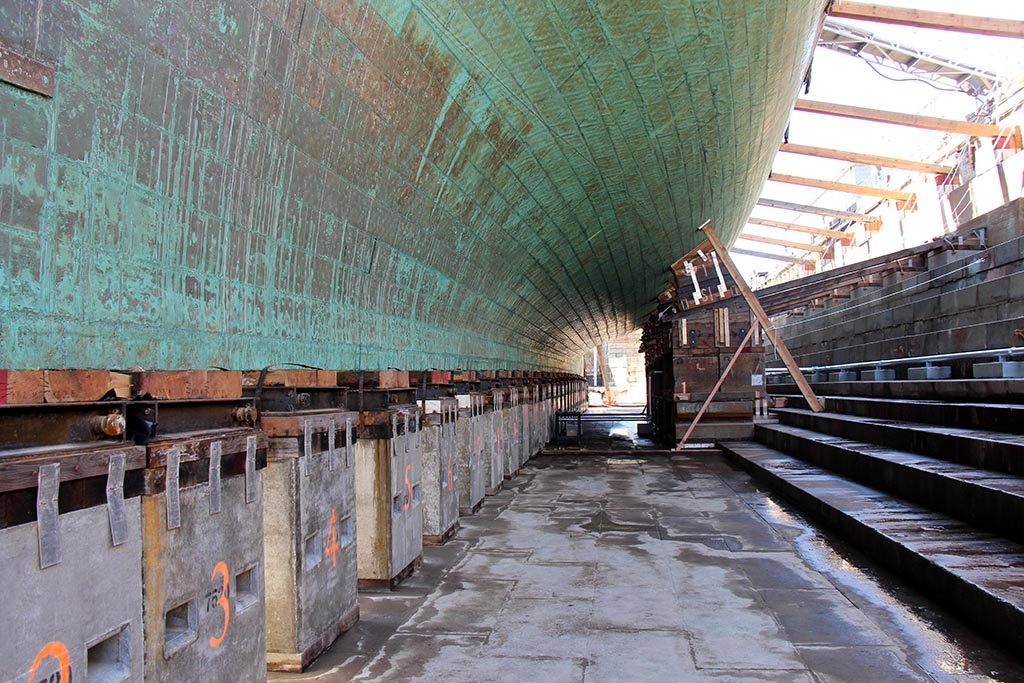
I understand that verdigris develops in the presence of air. Underwater, however, there is less oxygen. Scouring, as well as possible electrolytic action, takes place leaving the copper relatively bright. Only the area of copper near and above water, exposed to air, will turn green. Comparing a dry-docked copper bottom with copper submerged in water is not a good analogy.
Yes, oxygen is required for the oxidation process to occur and there's more oxygen in the air than in the water. There will always be a green band at the waterline on a coppered bottom for that reason. Scouring or electrolysis, for that matter, don't seem to brighten the copper at all. In my experience, upon haul out, coppered bottoms are pretty much indistinguishable from bottoms painted with cuprous oxide anti-fouling paint when viewed from a distance of twenty-five yards or more. You really have to walk up close to most of them before you realize they are coppered. There aren't as many around these days as there used to be, but forty years ago, we'd see coppered bottoms on British-built yachts fairly regularly when they'd come through the brokerage where I worked. Many were painted over with anti-fouling paint because, while the copper provided a mechanical barrier to marine borers and a somewhat inhospitable surface for barnacles to grow, it does little or nothing to inhibit marine vegetative growth on a hull which will slow a boat down as much, if not more, than any marine critters.
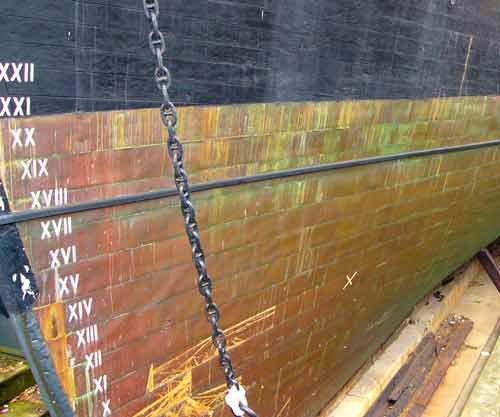
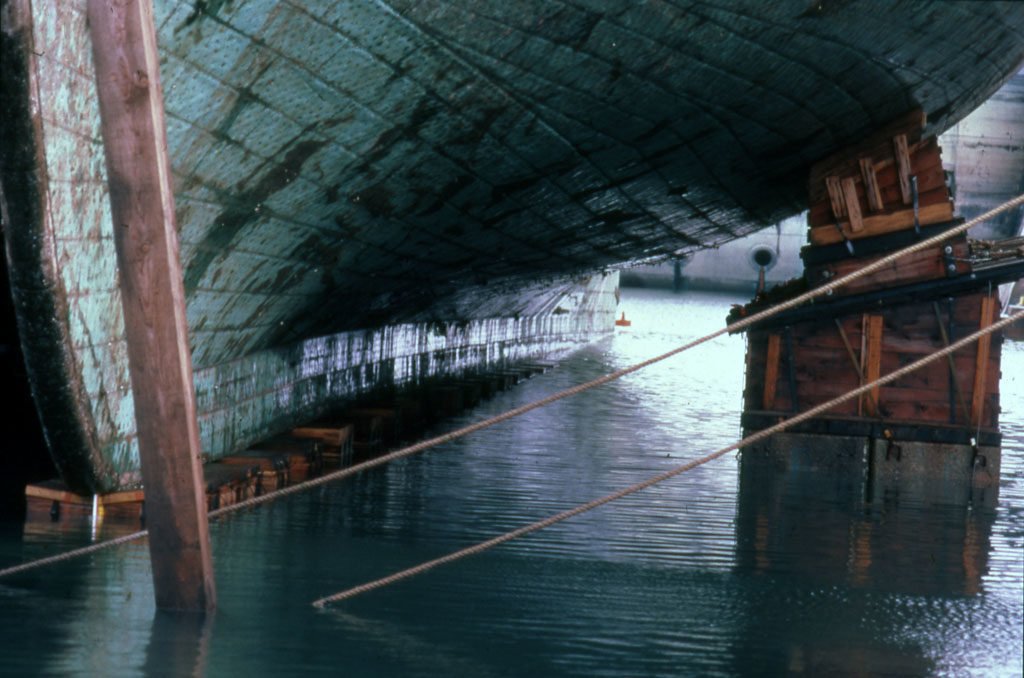
The point of noting what a dry-docked copper bottom looks like is relevant if and when a model is to portray a vessel hauled out. I've seen my share of coppered bottoms coming out of the water when hauled out and I've never, ever seen one that looked "relatively bright." Not even close. They look just as groaty as a bottom painted with copper bottom paint and are often not even distinguishable at first glance. Even after a high pressure wash down, you don't ever see bright copper color. A "bright" copper color is only seen when the plates are first applied and that only lasts a short while before it turns brown (or green, if it gets wet.) The models which show bright, shiny copper plating all around aren't true to the prototypes. The plates on the top of the stacks, as they come from the rolling mill, are oxidized already, and the bright ones below them oxidize rather quickly, producing something of a harlequin pattern as they are applied. In practice, especially on a large vessel, by the time the last plates are nailed down, the first applied have lost any semblance of a shine. (Brass plating, as with the Muntz metal on the newly restored Cutty Sark oxidizes much more slowly, and stays bright longer, as seen in the photos of Cutty Sark's new bottom.)
Compare Cutty Sark's never-launched Muntz metal bottom to the photos of the newly-coppered Constitution posted above.

By Cmglee - Own work, CC BY-SA 3.0, https://commons.wikimedia.org/w/index.php?curid=19898346
-
18 hours ago, rwiederrich said:
Sutty's old bottom as of the picture I posted probably never saw salt water....but the point I was making is that the plates on her and on my Great Republic where NOT copper as was probably the Constitution...evidenced by the verdigris green oxididation, but Muntz metal....which began its life as shinny yellow and quickly turned brown...… The Cutty image was to demonstrate the color of the muntz when it was oxidized.
As for the Original posters questions....I could not find muntz metal to *copper* the bottom of the Great Republic....so I treated the shiny copper foil to look like old Muntz metal plating.
Rob
As I mentioned, I gathered, and agree, that the Muntz would probably appear more brownish, rather than green like copper. Muntz metal is a brass, about 60% copper and 40% zinc with a bit of iron. While verdigris green oxidation on brass is not as pronounced as with pure copper, brass does form a green patina, as do also most bronzes, all due to their copper content. The green copper patina isn't very hard and wears off easily. A good example is the US penny coin, which is now made of zinc plated with pure copper. Pennies, if left out in the weather will often turn "copper green," but when handled in circulation invariably end up colored brown.
-
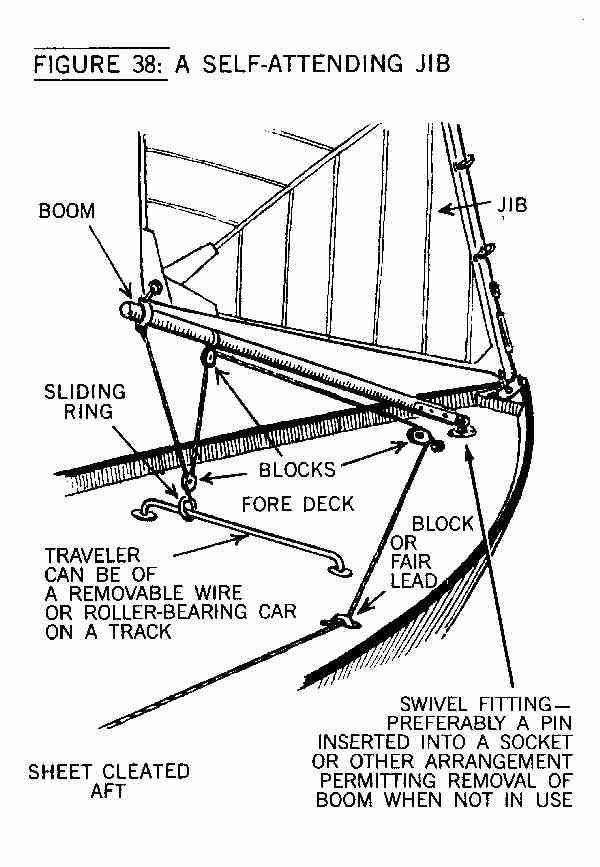
Usually referred to as a "club jib," "self-tacking jib," or "self-tending jib," actually. It is a jib bent to a boom hinged at the stemhead, and sometimes sheeted to a traveller or track, which permits tacking without casting off the working jib sheet on each tack and belaying the other sheet on the opposite tack. The jib boom is what is sometimes referred to as a "club," owing to it's tendency to give the inattentive sailor a good whack if he doesn't stand clear of it when the boat tacks. They are real labor-savers, but more popular on cruising boats than on racing boats, particularly those that may make frequent headsail changes.
boats,
-
Being into scratch-building before Syren came on the market, I've never built a Syren kit, but I'm familiar with the competition and have built kits by other American manufacturers, which are generally quite good. (European kits aren't even in the same zip code, IMHO, so we just won't go there for now!) I've studied Syren's kit instructions on line and the Syren kit build logs on this forum and followed discussions regarding their after-market cordage and blocks. Considering the quality of Syren's instructions and materials, and, to me, at least, the impeccably accurate historical research that goes into each Syren model, I've concluded that dollar for dollar, on all points of comparison, Syren's kits are the finest ship model kits that have ever been offered on the market. Additionally, the availability of invaluable build logs and "real time" building assistance on this forum is not to be matched by any other kit offering. For a modeler just starting out, that's a huge advantage.
I expect like most who have "gone over to the dark side," I eventually found myself scratch-building so much of the kits I was building that buying a kit started looking like a waste of money. Few kit manufacturers other than Syren (and, granted, there may be some I'm not familiar with) sell a "kit" that will produce the level of model most builders aspire to without requiring a lot of specialized tooling and replacement fittings and materials, not to mention research and deviation from the kit plans. Syren kits may be a bit more expensive, but keep in mind that with a Syren kit, you won't be spending more money buying Syren's after-market wood, cordage, and blocks to replace the sub-par stuff found in most other kits!
- Canute, Ryland Craze, Chuck and 1 other
-
4
-
On 11/7/2019 at 11:34 AM, SHIPSCAT said:
Hello Popeye
Thank you for your comments.
Bob was mainly talking about distance and weathering, but he made a comment about the deck, it was plain to me that he never read what I wrote, I said I finished the deck in DANISH OIL but he said I finished it in gloss varnish and it would be like a skating rink (ring), yes I know that the hatch lid straps should be an iron colour but I think the polished brass looks nice 👍.
I know you cannot see it in the video clips but in the video you can see the water reflecting on the white gloss paint and gloss varnish, if the Associazione Amici Del Leudo (Amici Del Leudo Association) painted and varnished her that way then that is Ok with me as they should know.
Anyway as everyone keeps saying it is my Ship.
Yippppppppeeeeeeeeeeee I have ordered my new ship kit it is about 500mm long x 700mm high x 110mm wide, should receive it on Monday or Tuesday.
Giorni felici
Jo.
Sorry, I read what you wrote, but I misunderstood it. You wrote that you were "...just wondering what I should finish the masts with, gloss varnish or Oil like I have done with the deck." I thought you'd finished the deck in "gloss varnish or oil." My mistake.
You asked and I answered. I am not a fan of glossy anything on small scale models. That's just a matter of taste. "Your mileage may vary." as they say.
- mtaylor, SHIPSCAT, popeye the sailor and 1 other
-
4
-
On 11/5/2019 at 11:09 AM, rwiederrich said:
I would only assume that you are using a small jig to accurately and consistently drill all these treenail holes symmetrically? If not...you have more time and patience then almost all of us marvelers combined.
Rob
It's truly refreshing to see trunnels and plugs depicted at the proper scale, in the proper places, and with an appropriate species of wood. Too many otherwise well-done models are marred by improperly placed, over-sized trunnels and plugs of contrasting color.
These are so good, I bet the grain's even running in the right direction!
- Obormotov, paulsutcliffe, mtaylor and 2 others
-
5
-
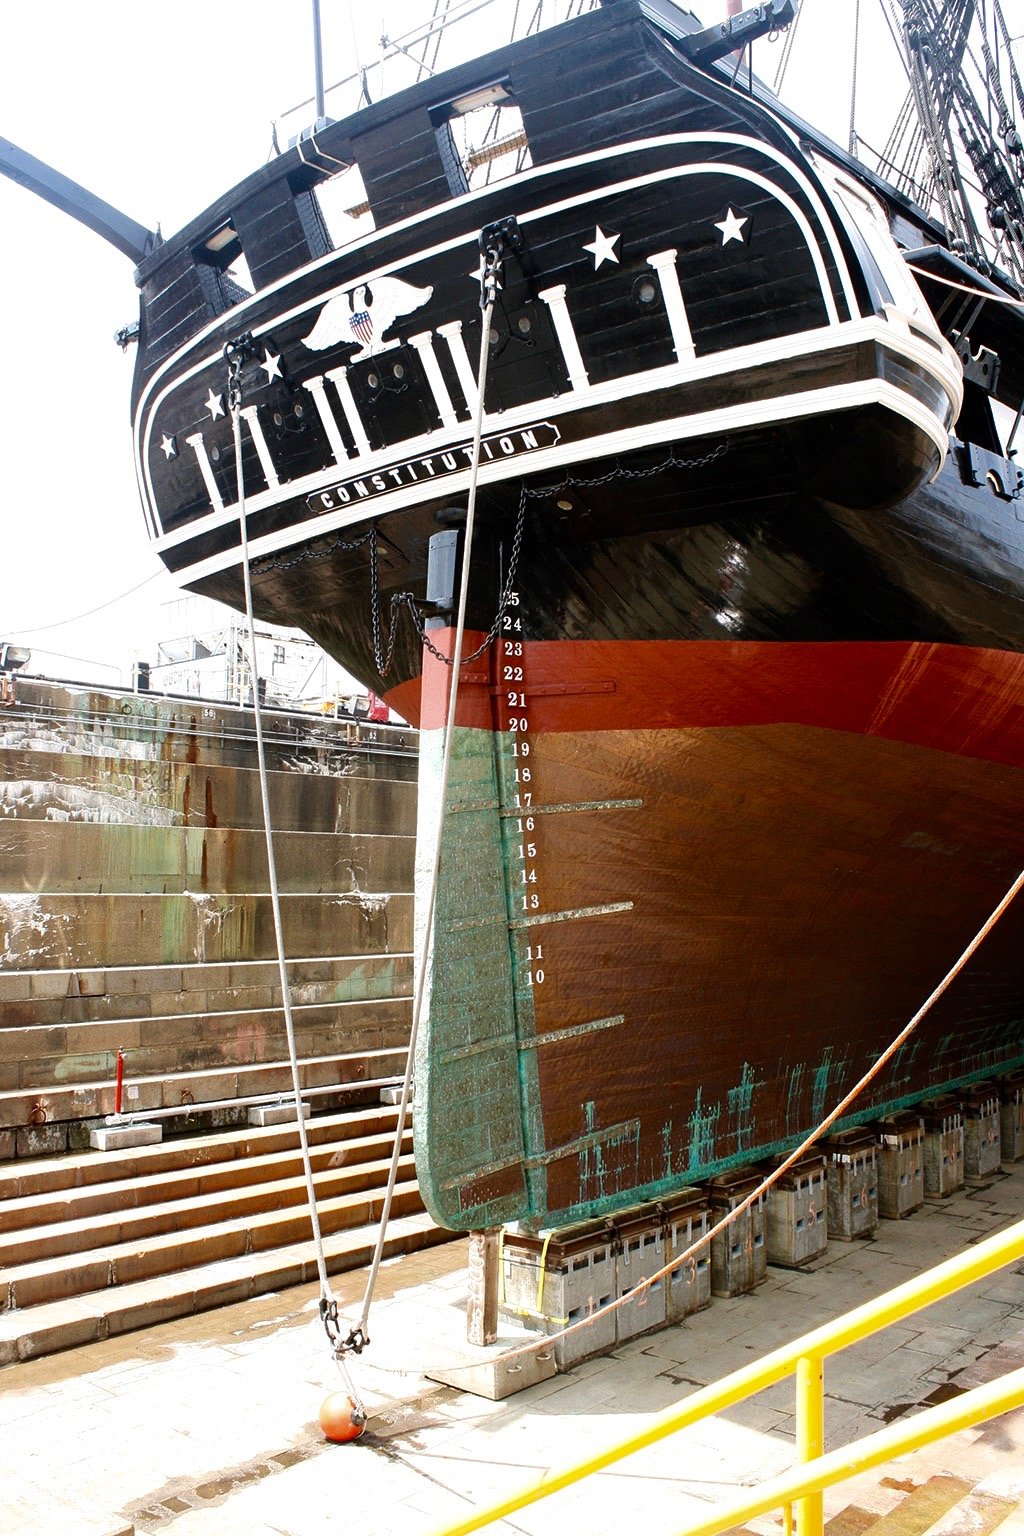
12 hours ago, rwiederrich said:
Then, because I don't like shiny copper.....and I wanted a real muntz metal oxidized look...I weather it. The real muntz metal was yellow..new, but when oxidized turned brown. Note the old Cutty Sark bottom.

I doubt if that "old" Cutty Sark bottom ever saw the sea. The below pictures are of USS Constitution, just out of the water and after the coppering has dried, plus a shot of her newly coppered bottom before return to the water with the previous coppering on the rudder, which was not renewed, save for one plate which is quite apparent. However, it should be noted, I believe, that Cutty Sark was "coppered" with Muntz metal, as noted, and it does turn brown, rather than the verdigris green seen with pure copper oxide.

Note at the aft end of the keel how the "bleeders" (water leaking out between the seams) have turned verdigris green, giving an idea of how quickly the oxidation takes place.
- GrandpaPhil, paulsutcliffe and mtaylor
-
3
-
On 11/16/2019 at 7:12 PM, archjofo said:
Hi,
first of all, I would like to thank you for your interest.
How I'm doing the hook, I explained elsewhere in the report.
Here I show again the corresponding picture: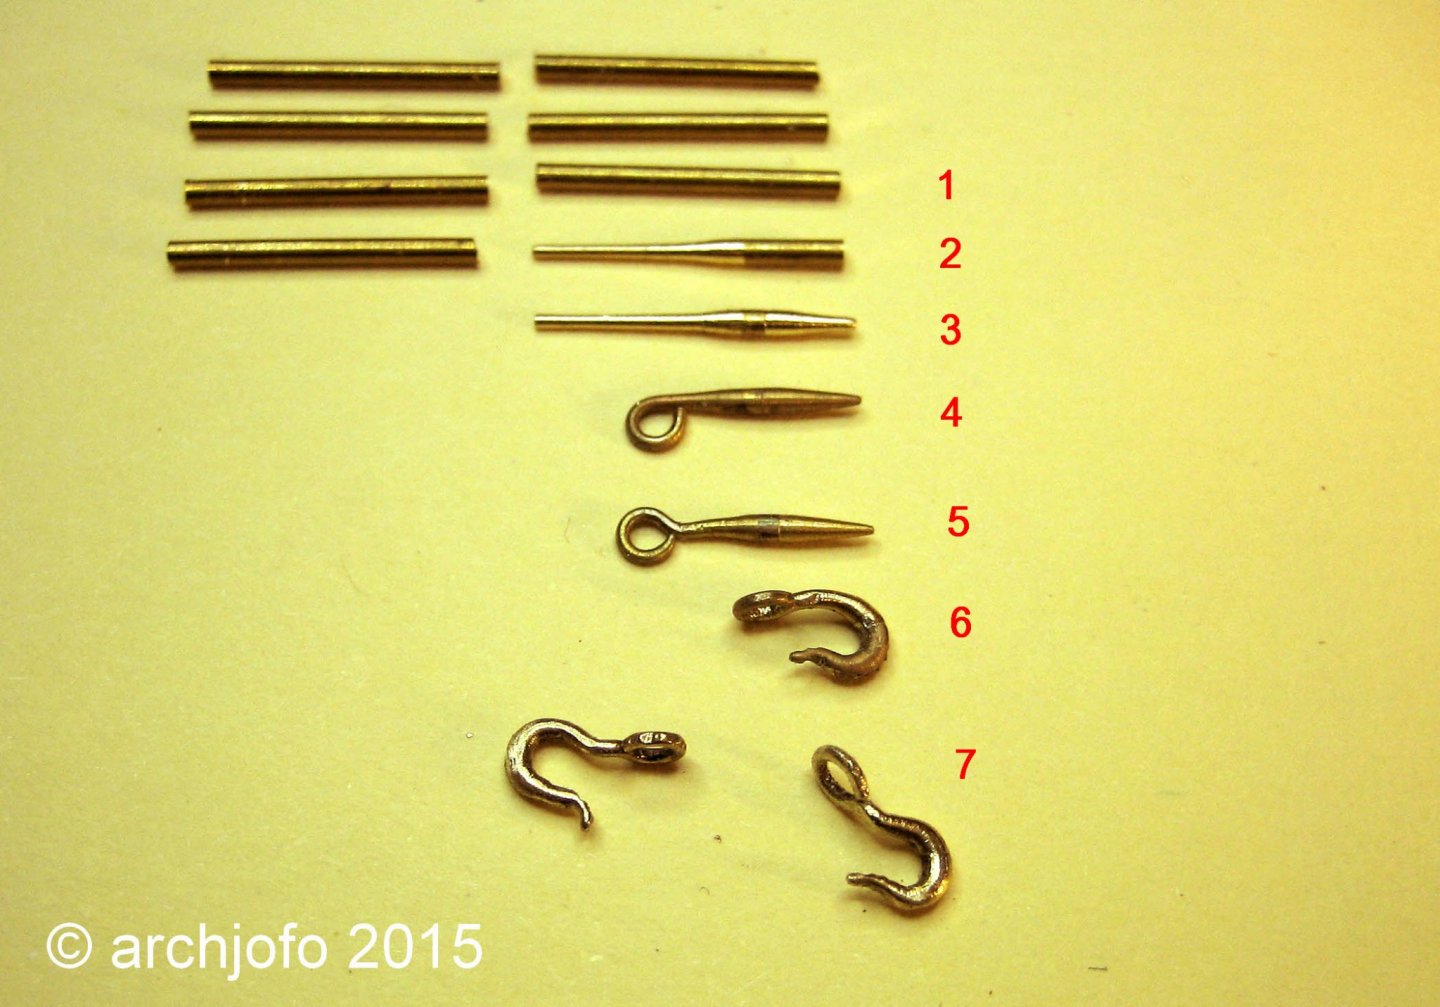
Your hooks are beautifully done. One thing I've noticed, though, is that it doesn't appear that you've "moused" any of them. "Mousing" is taking a few turns around the body of the hook between the bottom of the eye and under the outward turn of the point of the hook and then seizing the turns with a series of half hitches. This is done when hooks are used. It served to keep the hook from unhooking from the ring if and when the line goes slack. Perhaps you are planning to mouse your hooks when all the rigging is done, so as to avoid having to undo any of them along the way.
It's a small detail, and certainly not meant as a criticism at all. I hope it won't be the "last straw" that sends you over the edge!

-
12 hours ago, James H said:
Jeweller's rouge is Iron Oxide (FeO) mixed into a paste with water. 'Rouge' because of the colour of the oxide. Aluminium Oxide (Al2O3) is typically white)
I work in science and use it FeO regularly.
You're absolutely correct. Iron oxide is rust colored and aluminum oxide is white-ish colored. People who work in the jewelry trade, however, often refer to all polishing compounds as "rouge," regardless of the color. Technically, I suppose it's only the iron oxide polishing compound that's "rouge," which means "red," but you'll see terms like "green rouge" and "white rouge" used frequently by the manufacturers.
-
22 hours ago, RickyGene said:
Here is a tip and I promise it works. Find or dig out that old belt you no longer wear. Cut a six inch length off it, I square both ends and glue using contact cement the smooth side facing up on a block of wood. Now, while you are cutting and using what flavor blade you prefer, every now and again, reach over and swipe that blade, sharp side across the leather. You will find your blades go a whole lot further before you need to change. Works on scalpel blades as well. Remember straight razors, you kept sharp with a razor strap, and I bet there might be one or two here who remembers one being put across that back side by Grand Pa. 😥
Rick
Charge the leather strop with jeweler's rouge (green or white aluminum oxide) and the blade will sharpen when you strop it.
-
38 minutes ago, EricWilliamMarshall said:
Would some kind person point me to some info on basic ship model knots?
It’s to quite possible I’m approaching that part incorrectly as well!
Basic overhand and square knots and hitches generally serve for most all model rigging purposes. I'd recommend that you do a search on YouTube for "surgical instrument knot tying" or "surgical knot tying with instruments" and you will find a large number of instructional videos designed for teaching suturing techniques to medical students. The principles are easily grasped. Once you learn how to tie tiny knots with fine thread using tweezers and forceps like a trained surgeon, you'll be amazed how much easier model rigging knot tying will be!
- EricWilliamMarshall, mtaylor and Moab
-
3
-
12 minutes ago, EricWilliamMarshall said:
I actually have some shellac in the house! Does the color matter (I.e. white vs. orange)? The string in question is what came in the box from Revell. Thanks, Bob for taking the time to help!
If the shellac is thinned (use alcohol,) it shouldn't make a huge difference. Clear shellac is better, as it has no color. "Orange" shellac has an orange cast when thinly applied. As coats are built up, as in French polishing furniture finishing, orange shellac will build up to a rich, dark brown color, which may, or may not, be desirable, depending upon your intentions. As always, when in doubt, run a test and see if it suits your purposes before applying it to the model itself.
-
45 minutes ago, EricWilliamMarshall said:
Do all knots themselves need to be glued or soaked as well? The kit’s string is slippery and untie when jostled lightly making impossible to tie more than one string to a single location.
Generally, yes. A lot depends upon the knot tied, of course. They can loosen over time with changes in humidity and so on. When they come loose, it can often be very difficult to reach them to re-tie them if access is blocked by later construction. I use thin shellac, which is easily and neatly dissolved with alcohol if a knot later needs to be undone. It doesn't take much to hold a properly tied knot fast with a touch of thin shellac. Shellac, which is malleable as it stiffens, also permits forming lines into proper coils and curves so the thread appears to hang like real rope. It is invisible when dried.
The thread provided in your kit is quite possibly junk and out of scale, as well. This is a common thing with kits. You'd probably find the scale cordage sold by Syren Ship Models to be a huge improvement. (Click on their advertiser's bar on the forum home page.)
- mtaylor, Moab and EricWilliamMarshall
-
3
-
The problem is inherent in "one size fits all" "off the shelf" parts. You don't mention the style of your pedestals. Are the essentially "cradles," or are they "posts?" Not everything needed can be bought pre-made. Go your own way and make some of your own. One simple solution are mounting posts, which make for easy adjustments when setting up on a base, although drilling holes and putting in blocking as necessary on a hollow hull are problematic if not attended to while building the model. "Cradle" stands are fairly easy to adjust by removing material at the bottom or on the bearing surfaces, or by shimming in the same way, but appearance suffers.


Copper Plates
in Metal Work, Soldering and Metal Fittings
Posted
Yes, exactly so! And I wouldn't advise cleaning a coffee maker with oxalic acid, either!