


Bob Cleek
-
Posts
3,374 -
Joined
-
Last visited
Content Type
Profiles
Forums
Gallery
Events
Posts posted by Bob Cleek
-
-
54 minutes ago, Roger Pellett said:
The book that I found most useful was Tom Cunliffe’s Hand, Reef, and Steer that deals with traditionally rigged fore and aft sailing craft. While this does not give explicit directions for rigging a longboat, it does explain in detail the various lines required to control a flying job, jib foresail, and gaff mainsail, the way that these sails and their controlling lines work, and practical advice for handling the rig. This was a great help in achieving what I believe is an accurate representation of the rig.
Yes, it's pretty difficult to build a model of a boat if you don't know how it works! There are many excellent books like the one you've mentioned that go into great detail addressing full-sized rigging and hull construction details. They won't have the word "model" in the title, but they are often more accurate in many details than the books written for the modeling market. Rigging errors in full-sized applications are a lot more apparent the minute you try to sail the thing!
Other similar "full-size boat" books that modelers would find helpful are Gaff Rig, by John Leather, Building Small Boats, by Greg Rossel; Lofting, by Alan Vaitses, How to Build a Wooden Boat, by Bud McInosh, Boatbuilding and Yacht Designing and Planning by Howard Chapelle, The Whaleboat, by Willits Ansel, The Ashlely Book of Knots, by Clifford Ashley, The Sailmaker's Apprentice, by Emilliano Marino, and The Complete Rigger's Apprentice, by Brion Toss. While these books primarily address traditional wooden small boat construction, the construction and engineering principles for small boats are essentially the same as for ships, just smaller. An understanding of traditional wooden ship and boat building practices is essential for building really good wooden models.
-
I recently picked up used hardcover copies of Petersson's books after reading some discussion of them. I had other original sources, such as Steel, as well as many of the "usual suspects," books of varying degrees of reliability and utility that have been published over the years. I found Petersson's books to be as Frankie described. I share Frankie's annoyance that the industry of ship model publications is one where the accuracy bar seems too often set unacceptably low and particularly so in the area of material marketed for "beginners." A "bad ship model kit" only causes pain for a little while, but bad information in a ship modeling book can bedevil a reader forever.
In the Age of Sail, it was the captain's prerogative to rig his ship as he saw fit (or delegate the same to his chief bosun.) There was a wide variety of rigging arrangements with the choice of one over the other simply a matter of style or opinion. As the saying went, "Different ships, different long splices." Those variations, however, do not entitle those who hold their work out as being accurate miniature representations of the real thing to simply "make it up as they go along" regardless of the principles of physics and engineering. I sometimes see errors in rigging or construction details published in otherwise artistically beautiful and often expensive books. I often also see the authors of such beautiful and expensive books representing to the book-buying public that their books contain detailed instructions for building historically accurate models of this or that particular vessel down to the last drift and trunnel when, in fact, there is no contemporary data upon which to base such certainties. Indeed, most of such details were left to the discretion of the master shipwrights, shipsmiths, and riggers and no historical record ever existed of them in the first place. At best, these "super accurate" models, technical modeling tours d' force as they may be, can really only represent the expert modeler's interpretation of the original construction and rigging details based on contemporary manuals, specifications, and "rules of thumb." The same is true of most, if not all, "contemporary models" found in museums and respected private collections.
In recent decades, much credence has been given to the accuracy of "contemporary models" and we see errors obvious to the mariner's eyes in these doggedly replicated despite constructive criticism because "that's the way it is on the contemporary model." (A critical consideration is always what restoration or modification may have been done in the hundreds of years since it was built!) One may find that to be acceptable if one is building "a model of a model" rather than a model of a vessel, but that risks polluting the historical record going forward. Anyone who has done academic historical research using primary sources knows the frustration of encountering inaccurate threads in the historical narrative which have been perpetuated far into the future by author after author because somebody somewhere way back when was too lazy to check their sources. Somewhat uniquely, ship models often become part of the "historical record" as we see with the Navy Board and builder's yard models. We should, to the extent we are able, respect the fact that it is possible, however remote, that three or five hundred years from now, that Constitution or Cutty Sark we build today may be the only record posterity has of those ships. Striving for excellence should be appreciated as a characteristic of our hobby.
Ship modeling, if it is to have much meaning or offer much satisfaction at all, must be subject to standards. Absolute perfection may well be only a theoretical objective, but it is really the object of the game. Every effort, however much it falls short, should be applauded and encouraged, but let's face it, in any endeavor in which skill increases with practice and experience, nobody is done any favors by withholding constructive criticism and outright damage is done by publishers who print technical books for the profit of it without regard to the quality of their content.
-
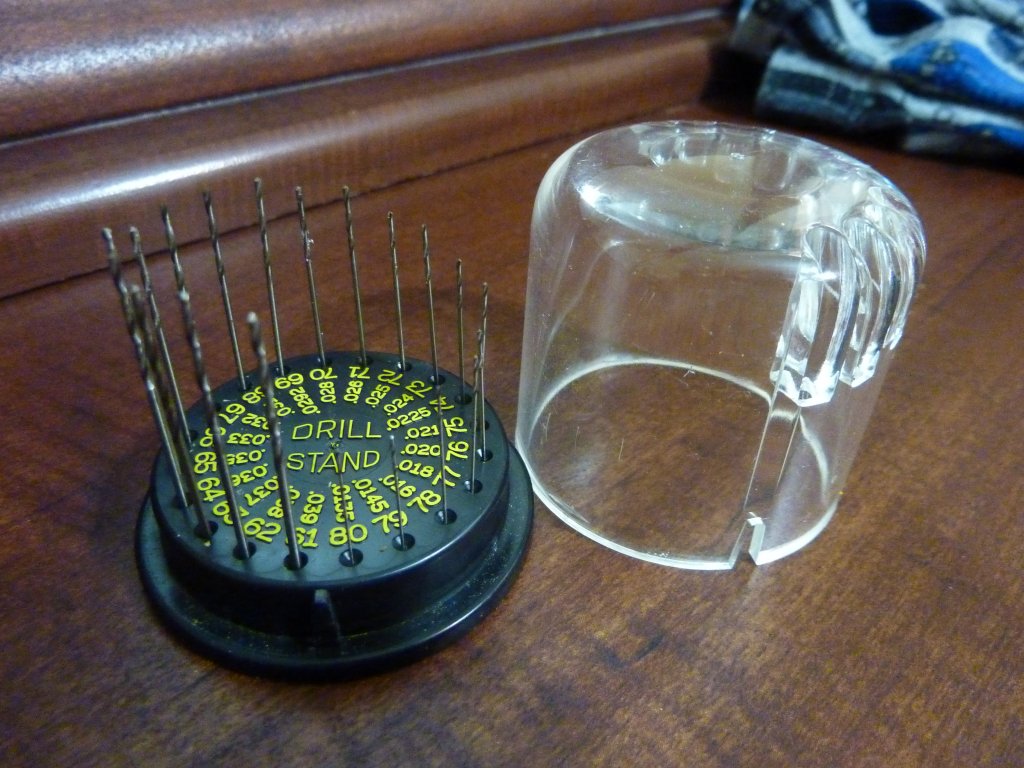
Ditto on the Starrett pin vise, although the ones I've seen on FleaBay lately sometimes cost almost as much as the new ones!
As for bits, I'd recommend starting with a Rogers bit set (about $25,) which comes in an indexed stand with a plastic protective cover. (Without the cover, if you drop the stand, I guarantee you'll be unable to find at least three of the bits that spill out all over the floor!) Thereafter, I'd suggest you subscribe to the MicroMark and Model Expo email catalogs. They will pester you to death with "sales," but if you keep an eye open, they sometimes have really good clearance deals on drill bits that come in tubes of ten or twelve of the same size. When they come along, stock up on the sizes you use the most. You can then refill your drill index as you break bits... any you will. You will.

-
2 hours ago, kurtvd19 said:
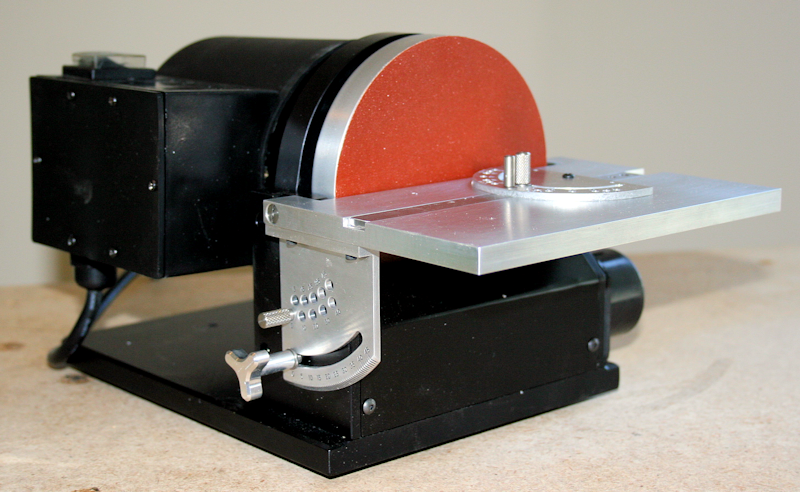
I have the Dremel disc/belt combo - kicks up a dust storm - relegated to the wood shop where the dust doesn't matter.
Got the Byrnes disc sander - it captures 99.9% of the dust, and is a world apart from the Dremel unit. I was impressed that the Byrnes unit keeps spinning for darn near a full minute after killing the power - that's a matter of mass and great balance. The disc runs true with no movement along the axis - the Dremel quits spinning in about 3 seconds and there is very noticeable movement along the axis.
The Dremel disc will never be used on a model again - the belt is OK for non-model use but when the last belt I have is worn out the garbage guy can have the unit.
All that said I personally think it's a better unit than the one that started this thread.
Kurt
I have to agree with Kurt. I've broke my own tool-buying rule more often that I'd like to admit: "Never buy a tool until you actually need it and then buy the best quality tool you can possibly afford." Like Kurt and probably most serious modelers, I have a "collection" of small power tools that I bought before I knew better, or when I was trying to save money, and which turned out to be a waste of money rather than a savings. A lot of them are still made and sold by companies that offer them for modeling use. Some, such as the Chinese-built knock-off sanders mentioned above, are "adequate" for those who haven't had the opportunity to know the difference. Quality tools do cost more, but when one considers how long they will last, the value of the work they can do, the pleasure to be had in using them, and even the resale value if one loses interest and wants to unload them, they are a wise investment and a bargain, considering their intrinsic value.
I've highlighted the differences Kurt notes in his post above. I'd opt for any of the three power tools Byrnes makes, the table saw, disk sander, and thickness sander, over any other for the fact alone that they are virtually "dust free" when hooked up to a shop vac. You could use them in your living room and never have to think about dust. There's more to it than that, though. For the purpose of scale modeling, accuracy is everything. Fine tools cost more because they are manufactured to operate at close tolerances.... in the case of Jim Byrnes' machines, tolerances of a thousandth of an inch and even half that, consistently and dependably. They have considerable mass because weight equals accuracy. For that reason, their working surfaces and adjusting mechanisms are made of CNC-machined solid aluminum plate, not stamped sheet metal and plastic or pot metal castings. Their fit and finish is impeccable, like a fine scientific instrument. They have expensive bearings because those also ensure accuracy. They have expensive motors because horsepower again means accuracy. If you examine the lower-priced products, you will note that their miter gauges and fences are often plastic, which wears and soon becomes useless for producing highly accurate work, The indexing on the low-priced tools is stamped or cast into the plastic parts, rather than machined or photo-etched into metal parts. There is no way a plastic setting knob is ever going to be capable of dependably holding a position to a fine tolerance.
Plenty of ship models have been built with a razor blade and a tack hammer, but if you are going to spend money on tools, cheap ones are the most expensive ones in the end.
- thibaultron, MEDDO, RichardG and 6 others
-
 9
9
-
$225 is a fair bit of change for a hand-cranked sander (apparently) without an accurate tilting table for compound angles and only a rubber disk pad. For another $100, you get a 1/3 hp motor and a highly accurate miter gauge and tilting table with preset angles and variable angle setting and with a thick (1/2" IIRC) disk plate that stores a lot of momentum, so no lagging when the piece connects with the disk. The Byrnes sander has a larger table of CNC machined aluminum. The Byrnes sander also has a very effective dust collection system that hooks up to any shop-vac. Then, too, the Byrnes sander has solid resale value and a manufacturer that stands behind it with a long track record of superior customer satisfaction. Just sayin'.
http://www.byrnesmodelmachines.com/discsander5.html
- MEDDO, thibaultron, Canute and 3 others
-
6
-
If they are three inch "logs," and you have a planer, why not just plane down one face until it's wide enough to lay flat against your planer fence and then plane another face, and so on, until it's square. You should be able to then cut what you need off the billets with your band saw or table saw. Let them dry with sealed ends, one year for each inch of thickness.
-
4 hours ago, bruce d said:
I have an iron bed early model, two mazac bed later models and a bastardised iron bed that was cut in half and 'stretched' by mounting the two halves on a long bed for making drumsticks! I have no idea what I will eventually do with this long-bed beast but I felt sorry for it and gave it a warm home. Maybe masts?
Definitely masts! You could also take the tail half of it and creatively mount it on a base so you could have not only an extended bed, but also a tailstock that could be offset for tapering!
-
20 hours ago, bruce d said:
Hi Bob, just a detail in the history of this marque: the Unimat lathes were designed and manufactured by Maier & Company in Austria. The Elliot Machine Company (EMCO) was the UK distributor for the range and had their name on the badge of the models they sold. There was more than one distributor in North America.
In my opiinion, the fully equipped SL model, marketed as the DB in North America, will probably never be bettered as a modelmaker's lathe.
Yes, you're absolutely correct. Mine was originally sold in the UK by Elliott. They were marketed in the US by American Edelstaal. There is also now reportedly a company in Argentina, ROWIC Unimat, that reportedly manufactures an exact DB/SL copy. http://www.lathes.co.uk/unimat/page15.html I've attempted to contact them via email to no avail.
It's hard to believe that Unimat DB/SLs went out of production, given how excellent they are. I expect that the decrease in hobby machining and the necessary expense of manufacturing high-tolerance machine tools caused them to be unprofitable for Maier to build anymore.
Or it may be that the Unimat DB/SL is just another Austrian that is rumored to be "alive and well and living in Argentina," but cannot be found.
-
2 hours ago, Jaager said:
Right now, we have the great good luck in the presence of Jim Byrnes. The tool functions that you would find practically useful in a multi tool, he provides as single purpose machines that are about a hundred times better.
Ditto again on Byrnes Model Machines. You'll get far more use out of a Byrnes saw and thickness or disk sander than any lathe and save a bunch over buying pre-milled wood. Little Machine Shop. http://www.byrnesmodelmachines.com/
If you want to go the multi-tool route using a Dremel moto-tool, Vanda-Lay Industries has a good line of fixtures using the Dremel at very reasonable prices. Their machined aluminum products are much better than the accessories Dremel markets under the Dremel label. https://vanda-layindustries.com/
Little Machine Shop is a one-stop shopping center for small machining. All good quality and fairly priced, but be careful. The lure of their seductive website can be hazardous to your pocketbook! There will be something in there you just have to buy. https://littlemachineshop.com/?Source=Bing&device=c&keyword=little machine shop&utm_medium=referral
-
Ditto to what the others said. It's a plastic toy, not a serious tool for grownups. Somebody bought the Unimat trade name and is capitalizing on the reputation earned by EMCO, the manufacturer of the original Unimat modeling lathes. The current Unimat trademark owners have a higher quality, and higher price point "multi-tool" on the market now. MicroMark sells it for $750. https://www.micromark.com/search?keywords=unimat It appears to still have a lot of plastic parts. You'd be better off buying a used Unimat DB or SL on eBay (the same tool... the model designations depended upon where it was sold.) They were excellent mini-lathes and passable milling machines. I love mine. The other Unimat attachments were only so-so, as is the case with all multi-function machines. Unfortunately, as is often the case with machine tools, the original Unimat tooling is difficult to find and often pricey. For $750 for a basic lathe, you could get a much larger and more capable machine with readily available, and hence less expensive tooling. China is grinding out millions of them these days in the "7"X" range. Precision machining equipment is not cheap. You get what you pay for.
See: https://www.micromark.com/MicroLux-Micro-Lathe and https://www.micromark.com/MicroLux-7x16-Mini-Lathe
MicroLux is the higher-priced option. Their lathes probably have a bit closer manufacturing specs. You can find the same lathe made in the same Patriotic People's Hobby Lathe Collective factory for much less sold by other retailers. Harbor Freight sells the same unit in a different color, but you may have to bring it back to them three or four times before you get one that is working right out of the box.
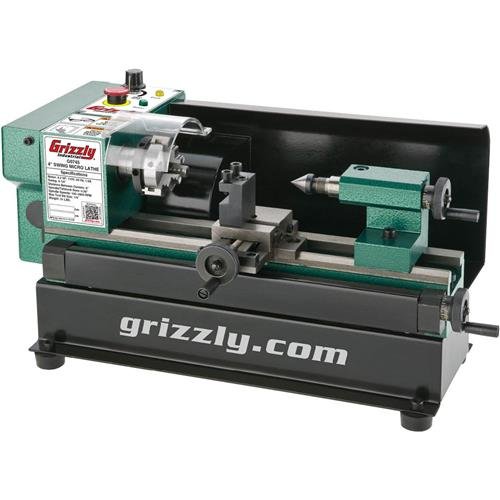
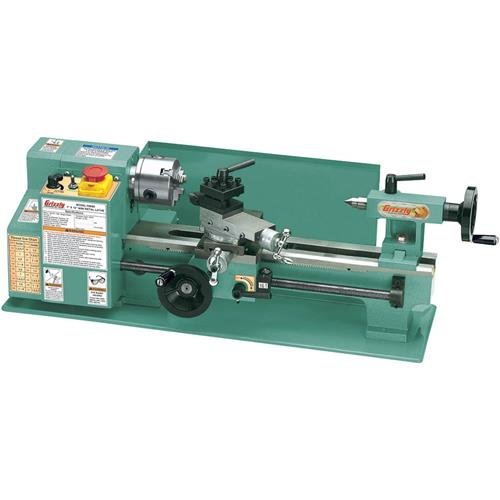
Grizzly sells their 4" X 6" micro-lathe for $440, their 7" X 12" mini-lathe for $675, and their 7" X 14" variable speed lathe for $780, plus a number of variants in the same price range. They usually have pretty good Chinese-made stuff. Those prices are comparable to what you'd pay for a used Unimat DB/SL. The Grizzly Chinese "7" X" lathes all have power-feed and screw-cutting capability for most any threading you'd want. So does the Unimat DB/SL, but it requires a proprietary "threading attachment" with special thread formers and cutters and a power-feed attachment which, if you can find them on the used market, will set you back several hundred dollars and the formers for the various threads will run around $150 each and are only rarely available on eBay. Tooling for the Chinese "7" X" clones is widely available at several levels of quality and price points.
The small Asian lathes are the butt of a lot of jokes and with some justification. The quality of Asian machine tools generally aren't anything close to American or European machine tools, but at half to a quarter the price, they are more than adequate for modeling work. Look for the label, "Made in an ISO 9001 Factory." That is a manufacturing quality certification that supposedly insures you are getting a machine made under International Organization for Standardization monitoring and certified to specified accuracy tolerances. This is a "bare minimum" certification level, but it's better than no certification at all. Your best insurance of quality among these lathes, all of which look the same, is the retailer you buy from. The top-end retailers have their reputation on the line and keep a closer eye on quality control over the stock they sell with their label on it.
-
She's certainly coming alone fine, Rob. It would have been so easy to omit the sails and take a bow, but you pushed it to new heights.
-
1 hour ago, mtaylor said:
I'll have to try the shellac. I'm in the mood to try some different things.
Try it! You'll like it! Fifteen bucks a quart at Lowe's or most any paint store. Grab a gallon of plain alcohol while you're at it. It will last you a lifetime. If the shellac starts to thicken in the can, just add more alcohol, shake or stir well, and you're good to go. (If you add additional coats to dried shellac, they will get shiny. One coat is the best way to apply it if you don't want it to show at all. Two coats will yield a very good scale approximation of varnished wood.) A touch on small rigging knots will keep them in place and a bit of alcohol on a brush will soften dried shellac if you need to untie them. It's also a wonderful all-purpose wood sealer, especially before final fine grit finish sanding.
Blow on it a bit to evaporate the alcohol and it will dry very quickly. Far faster than glue. It can even be used as a glue if you let the alcohol evaporate from a cap full of it until it thickens, although I think PVA is probably a better option. It's been used in the boatyards for ages to glue plugs on top of countersunk screws. It's a lot better than epoxy because you can break the plug out if you have to without tearing up the hole. Epoxy takes the edges of the holes with it.
It's also non-toxic, if you worry about such things. They say it's so safe you can eat it, but since it's essentially beetle crap, I'll pass on tasting it!

- Katoom, thibaultron and mtaylor
-
3
-
On 6/9/2019 at 4:44 PM, mtaylor said:
I cheat a bit with rigging. After lines are in place and properly tensioned, I coat them lightly with a 50-50 mix of white glue and water.
I always have, too, and never have had any sagging problems. Instead of water-thinned glue, I use thinned clear shellac. It probably isn't much difference between shellac and thinned glue, but I find the shellac soaks into the fibers very well and is waterproof, which not only stiffens the line, but perhaps keeps it from absorbing moisture. It's also easy to "work" and undo, since it is soluble in alcohol, unlike glue which, when it sets up, is permanent, short of soaking it in isopropyl alcohol. I also find that I can work with the shellac as it sets up to "fix" rigging in place the way I want it. I can in that way get the catenary I want in my running rigging and make sure my coils hang from belaying pins as they do in real life, rather than having them coiled in gravity-defying circles like a cowboy's lariat! (A detail which is essential to a high-quality model.)
- mtaylor, thibaultron and Bill Tuttle
-
3
-
22 hours ago, Erik A said:
in about 5 weeks i am heading to the states for a visit and one of our ports of call is Washington. we have an air BnB directly across the road from the naval base and one of my must do is visit the naval museum. along with all the smithsonians along the mall unfortunately we only have 2 and a half days there. so going to be a full on period for us
One could spend a month going through the Smithsonians on the Mall and not feel like they'd seen it all. Actually, though, while it's been a long time since I've been there, I recall being disappointed that, relatively speaking, the Smithsonians didn't really have a lot of ship models on display. While the Museum of American History is the repository of the National Watercraft Collection (of models) curated by the late Howard I. Chapelle, there was at the time I went, only a small exhibit with a handful of models to represent that collection. I do think if you want to see models, the place to go would be the Navy Yard Museum in Washington and, if at all possible, you might take a 35 mile drive on the freeway to Annapolis and see the Naval Academy Museum, which has the Rogers Collection, which includes a fair number of Admiralty models, some of the finest in the world, actually, and a few "prisoner of war" models. There's 108 models in the famed Rogers Collection and who knows how many more on display at the Academy Museum. Maybe you can leave your traveling companion to spend a day alone in the fine art galleries while you do Annapolis. If you've seen one Van Gogh, you've see 'em all!
(Just kidding about the Van Goghs and Rembrandts, of course. If you are interested in those, Amsterdam is the place to go.)
- Erik A, paulsutcliffe, druxey and 1 other
-
4
-
Beautiful "star" figuring at the junction of the stem and bowl!
- popeye the sailor, mtaylor, Canute and 1 other
-
4
-
14 hours ago, US-SteamNavy said:
Three years ago, the Smithsonian began a pilot project to do 3D scans of sample portions of its massive collection. Ship models were not on the list, but the actual relic 1776 gondola Philadelphia was. In late 2016, I got backroom access at the SI to 3D scan the 5-foot half hull model of an 1865 steamer. That was after a two-year effort. Most of that delay was due to the model being "lost". After I appealed to the office of the senior senator of California, SI staff located the model within a week. They were very cordial and even arranged parking on the Mall for the several hours it took to bring in my equipment, scan, and reload my vehicle. The majority of East Coast ship model collections opened their storage areas to me because I was testing digital tools of interest to them. I had no academic credentials, but enthusiasm and a focused research interest within this largely neglected historical resource will get one far. I toured the "basement models" of collections at MIT, USNA, USN Carderock, Mystic Seaport, and others.
What an incredible resource a database of 3D scans of important contemporary ship models would be! The HAER ship plans collection, which isn't indexed as well as it might be, struggles for funding to record existing ships around the country. Digitally recording contemporary models rarely seen by the public would be a far more worthy expenditure of tax dollars than what we see being squandered by the government these days.
-
Somebody local will certainly know more than I do, but I believe that in recent years the Royal Museums (National Maritime, Greenwich, Imperial War Museum, Science Museum, and so on) have been undergoing expansions and modernization, if not something of an administrative merger. I have heard that many of the NMM admiralty models have been relocated to the Royal Navy Museum at Chatham. For a while, I do know that many models were removed from display at the NMM and the Science Museum, but I've read that both museums have since opened new displays of ship models. There's a recent post on MSW of a forum member who recently visited one of the museums and was given by appointment a viewing of a requested number of models not on public display. His photos of these posted here are great.
Museum exhibition practices are changing. The days of endless rows of display cases full of artifacts are ending. The modern approach is "interactive" displays with fewer artifacts and more "story telling" exhibits. Conversely, their collections aren't being deaccesioned, necessarily, but rather stored for research purposes. If you go to the Royal Museums' websites, you will find that a lot of their models and documentation are now available and inventoried on line, which is a huge boon to modelers. They still have the stuff, but they are allocating their exhibit space to exhibits that are of greatest, albeit "dumbed down," interest to the greatest number of visitors. We modelers are a "cut above" in terms of sophistication and, in many instances, approach or reach the level of academic researchers who are apparently welcomed to "the back rooms" by appointment only. The days of their exhibiting "everything we've got" are apparently over, but they've still got it all somewhere.
- Roger Pellett, mtaylor, Gregory and 1 other
-
4
-
5 hours ago, CDW said:
Pipes used to be popular, now I never see anyone smoking a pipe around here. I think pipes are cool, and if I smoked again, might try a pipe. Been a lot of years.
Pipes are very popular out here in California. They have whole stores full of hundreds of pipes for sale. Nobody uses them for tobacco anymore, though.
- CDW, popeye the sailor and mtaylor
-
3
-
-
On 6/26/2019 at 1:23 PM, mtaylor said:
Given that crews spent much time cleaning and keeping everything "ship shape", "a taunt ship is a happy ship", etc., wouldn't the brass have all been polished also? Not sure about back then though...
Brass is always polished in the marine environment. Bronze is not. Brass would generally be limited to light sheet metal work trim aboard ship. This would be things like compass binacles and lamps on period ships. Brass, an alloy of copper and zinc, requires constant polishing or it will quickly tarnish, forming verdigris green oxidation in salt air. Bronze, an alloy of copper and tin and other metals in varying proportions, is a far stronger metal than brass and was used for guns and some cast fittings. It oxidizes slowly, forming a patina with a brown color. "Gunmetal" is an alloy of copper, tin, and zinc, used for casting long guns and oxidizes to form a dark grey patina. Some bronze alloys with higher copper content employed in marine applications will form the familiar copper green patina, such as that sometimes seen on cast bronze statues. The color of the patina on any "yellow metal" piece will vary depending upon the proportion of alloyed metals, exposure to salt air, and weathering and friction on the part (i.e. handling, as seen on coins, etc.) The spectrum of color is quite varied.
Iron simply rusts. Cast iron rusts more than does wrought iron. Wrought iron was used for metal fittings fashioned by ship smiths. Early iron-bound guns were made of wrought iron pieces, later supplanted by cast iron guns. Aboard period ships, iron was always painted, generally black, to prevent corrosion.
Yellow metal patina palate:
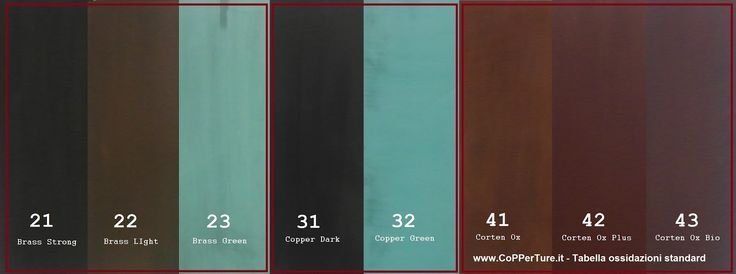
Gunmetal, showing the effect of "new" surface green oxidation from exposure to salt weather and "mature" grey patina where the green has worn off in places.

- Roger Pellett, mic-art, Matrim and 3 others
-
6
-
I'd suggest you find somebody who has a number of them and try them out. It's really a personal preference thing, like buying a fountain pen. I wouldn't buy anything but the best in any event. It's not an item to try to save money on unless you are really short on cash. There are two types, single action and double action. I prefer the double action myself. It permits regulating both the air and the paint by the use of a single button. This permits more control over the flow, That said, many modelers are quite happy with a single action airbrush. I use a Paasch I've had for decades. Keep them meticulously clean and mix your paint properly and you should have no problems. Don't clean them and you'll soon have an airbrush you can't do anything with. I'd shop around. The MicroMark catalog has a selection, but you may find the same model for less in one of the big art supply online catalogs.
Noise isn't a function of the airbrush, but of the compressor. If you have a shop compressor and want to avoid the noise, get a separate five gallon air tank (Harbor Freight has them for about $25 and always has 20% off coupons on line and in their catalogs.) Put a pressure regulator and shut-off valve on the tank. You can then fill the tank in the shop in a few minutes, and then turn off the compressor and work off the air stored in the tank in complete silence. Alternately, you can buy one of the small compressors made specifically for airbrushing. Most are pretty quiet. (Harbor Freight has those, too. HF will take anything back and exchange for another if you have the receipt, which is prudent if you buy anything from them that has any moving parts. Seriously.) Their quality is usually not the best, but if you know what you are buying and have a store nearby than makes returns less of a hassle, you can often get something decent from them, although it make take a couple of tries.
Forget about the aerosol cans sold for use with airbrushes. You'll go broke buying them. A small airbrush compressor will pay for itself quickly, compared to the "canned air."
-
It's not all that difficult to make it on a frame and then attach it to the model. Draw the net, ruling all the cordage with a fine pencil on a sheet of paper. glue the sheet of paper to a scrap of wood block. Drive nails of tacks ("push pins" are handy for this) into the edges of the block everywhere that a line drawn would extend over the edge of the block. Then take your thread and wrap it over the pins in one direction, and then in the other, so that the line, stretched taut over the nails or tacks, forms squares of the mesh size desired. For fine work, you can simply touch the thread with a bit of shellac, thinned PVA cement, or a dab of clear nail polish (perhaps thinned a bit with acetone) and let it all dry. The net can then be cut from the nails or tacks and attached to the model. Depending on the scale, you can alternately tie each intersection of the thread squares with a separate piece of fine thread (a surgeon's knot works well for this) to fasten the intersections.
-
4 hours ago, Griphos said:
I’m used to soaking a plank in hot water and then bending on a jig with nails to hold the shape. Does bending with a hot iron improve on that?
Thanks for the help.
Yes, assuming average moisture content for the wood at ambient humidity levels (e..g. 12-18% water by weight,) bending with dry heat should be adequate and will save you the mess and hassle of dealing with hot water and wet wood as well as using a jig. It's the heat that relaxes the lignin in the wood, making it less rigid and "woody." When the lignin cools, the wood returns to its original rigid and "woody" nature, and the form in which the wood was bent and held until cooled (which takes very little time,) is retained. In many ways, it is like heating and bending a piece of plastic. Lignin is actually a cross-linked phenolic polymer.
Steaming wood is only necessary for larger pieces as a method of heating the wood through and through. Steam is a good conductor of heat that won't burn the outside of the wood piece. The same is true of boiling water. In neither case does the steam or boiling water contribute to making the wood flexible, really. It's all about the heat conveyed by the steam or boiling water. This is not to be confused with the "moisture content" of the wood. That affects the ability of heat to be transmitted throughout the piece. The average moisture content of a piece of wood of the size used in modeling will permit dry heat to travel through the piece sufficiently well for bending purposes. If you are building a real boat with 1" X 2" frames, you have to steam them for an hour to get the heat sufficiently distributed throughout the piece to bend the frame effectively. (Steam is used only because it's the easiest way to generate heat and transfer it to a larger piece of wood in a "steam box, " which may be accomplished as simply as putting the length of wood in a stove pipe with a hose from a "kettle" and rags stuffed into either end.) If it's 1/8" x 1/4", direct dry heat applied to the piece from a hot iron should do the job perfectly well. Experimenting with a microwave oven may also be productive, but the drawback there is that the microwave heats the whole piece, so handling it can become difficult without heat-resistant gloves. The wood has to be too hot to hold without heat-protection when properly bending it. The use of a bending iron permits the application of the heat to be localized so one can hold onto the piece and only apply heat where it is needed.
Remember the similarity to bending heated plastic: the heat and the bending have to be done together. The wood is only plastic when and for so long as it remains sufficiently heated. As it cools, it will quickly become stiff again. Often, the bend must be held in place while it cools so the bend will "set" when it cools off.
-
3 hours ago, Griphos said:
I like the vise idea.
So, basically, I just move the wood over the iron, bending slowly.
Yes, and hold it in the position in which you want it to stay until it cools enough to stay there by itself. There will likely be some "springback," which may or may not require further "over-bending." Experiment with that and you'll get the hang of it.
Finishing a silkspan sail
in Masting, rigging and sails
Posted
Try hobby shops or online retailers that cater to model airplane builders. Silkspan is used to cover stick-built model airplanes. It's what they paint the dope onto.