


Bob Cleek
-
Posts
3,374 -
Joined
-
Last visited
Content Type
Profiles
Forums
Gallery
Events
Posts posted by Bob Cleek
-
-
26 minutes ago, Gregory said:
Imagine the number of people who have followed those AVS plans and never questioned them...
...
Probably about the same number of people who built to those plans and never sailed a boat with running backstays!

There's lots of errors like that in ship models, and particularly in kit models. When one has thought through how the vessel they're modeling was actually sailed... what the rigging does, rigging a model becomes far easier and these sorts of errors much easier to notice. If the modeler gets into the mindset of a seaman on the vessel that's being modeled, a lot of questions answer themselves. Trust me, nobody ever hung an anchor buoy and its pendant fifteen feet up the ratlines on the fore shrouds of an Eighteenth Century ship of the line. Guaranteed!
(There's well documented Admiralty model that has it hanging up there, probably the result of some long-ago mistaken restoration, and the kits of that model have had it that way ever since. The same for the model of a ship's launch in the NMM that has a mainsheet horse which runs beneath it's tiller. That's the way the "model of the model" has it, too, but, hey... who would rig a launch so you had to pull the tiller out of the rudderhead, thereby losing all control of the rudder, every time you tacked? )
-
20 hours ago, Everest said:
The backstays are what's called running backstays. If you look at the photo you will see a block on the backstay on each side,one on the port side and one on the starboard side. When in use the weather side is kept taught and the one on the lee side is slacked off. On a down wind run the lee side is unhooked from the deck eye bolt and run forward to the mast.
I hope this explanation clears up your rigging quandry.
Such backstays are always "running" (i.e. cast off and run forward on the leeward side, set up on the windward side.) This is so regardless of how they might be attached at the hounds (top.) It doesn't matter whether there's room for the gaff throat to swing. Even if they were rigged at the hounds to permit the gaff boom's swing, the lower end of the backstay on the leeward side must be cast off so the main boom (bottom) is clear to run outboard of the leeward backstay. Many a mast has been lost when an uncontrolled gybe caused the boom to fetch up hard against the set up leeward backstay!
This does pose a bit of a dilemma for modelers deciding how to present backstays on a model when the booms are set amidships. Running backstays are a hybrid: "standing" rigging that "runs." A fore and aft rigged vessel will never have both running backs set up at the same time under sail. The only time they would be set up simultaneously might be when she was not under sail with the main boom sheeted amidships, as in port, and then only to prevent chafe or to keep the loose backstays from slatting about aloft. If a model depicts only standing rigging, including the running backs with both set up, it presents a neatly symmetrical schematic appearance but it isn't as the vessel would have looked in actual use. Having both running backstays set up in a model intended to depict the vessel as she appeared in service is a faux pas frequently seen, as is the same error with respect to port and starboard topping lifts similarly simultaneously set up taut.
- Mark P, mtaylor and Roger Pellett
-
 3
3
-
1 hour ago, Jim Rogers said:
Anyone use a bandsaw for cutting strips? Seems it would be easier and more accurate than a mini table saw and having to move the fence for each cut.
I'm sure everyone has tried everything once, but I'd say there's no way you'd ever get better results from a bandsaw over a good (i.e. Byrnes) table saw. (There are ways of efficiently moving the fence for each cut, BTW.)
-
18 hours ago, wefalck said:
Soft polishing pastes (say 'rouge' in oil) would smear around a steel lap and not do anything.
Well, that explains a lot! For all these years, I've simply tested each abrasive stick in my collection until I found one that worked best for polishing a given item. There never seemed to be much rhyme or reason to why one would work well on any particular piece I was polishing. Now it makes sense. I definitely have experienced jeweler's rouge smearing around and doing little on stainless steel ! I learn something new every day. Thanks for the tip!
-
3 hours ago, SHIPSCAT said:
Hello all.
I am sanding the masts and the other dowels down, but I need some advice PLEASE.
I know I have finished the block things in gloss varnish but I was just wondering what I should finish the masts with, gloss varnish or Oil like I have done with the deck.
Thanks
Jo.
Well, some would say it's a matter of taste, I suppose. If it looks good to you, do what you will. That said, you're building a model of a working boat, not a yacht. If working crew had to keep all that brass polished and maintain all that varnish, they'd mutiny for sure, if they hadn't all gone overboard first, slipping on that varnished deck which, when wet, would be as slippery as an ice skating rink! That's not a criticism at all, though. You seem to be working in a recognized style that looks quite nice to many. I love the look of polished brass myself, but, of course, on a real vessel, those hatch straps would never be made of brass (little is on a real boat, since brass corrodes quickly in the salt air,) but rather of iron, for strength, painted to prevent corrosion. (And unless the brass on your model is sealed with lacquer, it's going to tarnish over time. It won't stay shiny bright for long unless it's coated.)
As far as gloss goes, one should consider scale. If you go to a real yacht with lots of varnish and view it from a distance comparable to the "scale distance" from which your model will be viewed, you'll note that the varnish ("brightwork") won't be glaringly bright, but actually rather muted when viewed from a distance. For this reason, modelers generally do not use gloss varnish or paint on their models. The shine from a gloss finish ruins the impression of reality. A glossy model looks like a model, which isn't a bad thing at all, but if you are about creating the impression of reality in miniature, you wouldn't want to use gloss finishes at all. (I think you instinctively realized this when you re-did your barrels after first finishing them with gloss varnish. They look much more realistic with a flat finish.) I'd urge you to use a flat finish on the mast. On real workboats, spars are very rarely finished "bright" with varnish or other clear coats, but rather painted, because paint lasts better in the sunlight and requires much less maintenance than clear finishes.
Gloss finishes also require very exacting surface preparation to look good. Grain and other imperfections are exaggerated by the reflections from a glossy surface. At modeling scales, it's very difficult to get perfectly smooth surfaces. Another problem with gloss finishes is that they tend to build up. To get a good gloss, several thick coats are often required and those thick coats mask the fine detail of the miniature parts.. On good way to smooth semi-gloss painted and varnished surfaces is to hand-rub them with rottenstone and/or pumice. Just take a damp cloth and dip it into a bit of these abrasives (inexpensively available at any paint store) and rub. That will "knock down" the gloss and leave the pieces looking very smooth.
Here's a really good video that explains the concept of creating an impression of reality in your scale modeling:
-
5 hours ago, wefalck said:
Yes and no. With softer abrasives, one needs to also a softer material as a carrier, such as wood. Watchmakers use, for instance, boxwood discs charged with chalk, rouge (iron oxide) etc. for polishing.
I found that a new and unused milling cutter moved at slow speed gave a quite polished surface, at least on the tiny surfaces we are talking about.
Interesting. I never knew about needing to match the hardness of the carrier to the hardness of the abrasive. They look great as they are, of course. There's really no need to be obsessive about it!
I love your watchmaker's mill, by the way. I envy your great collection of fine tools! I'm sure there's a great story to go with every one of them.
-
On 11/4/2019 at 1:12 AM, wefalck said:
Indeed, the technique is quite similar to facetting gem-stones, but there one uses abrasive discs 'charged' with abrasive or polishing powders. I thought of using silikone polishing bit, but they can round the edges of Plexiglas. I do have small polishing discs in brass, but don't have diamantine to charge the discs. Perhaps should look into this, as these hard discs don't round the edges, when polishing. However, diamantine is a bit messy and not so good for the machines ...
Would toothpaste or some sort of household scouring powder work? Not sure. Just wondering.
-
Check your rigging books to determine exactly how it was done on the specific application on Victory to which you refer. There are several ways it was done. "Orphan" shrouds are rather common, actually..
- jeff watts, GrandpaPhil and mtaylor
-
3
-
-
-
-
1 hour ago, mtaylor said:
Here in the States a quick trip the local pharmacy and pick up insulin syringe and needles in various sizes. I have to thin wood glue a bit but it works very well with he largest needle. Also, many craft stores sell syringe like glue applicators for very little money.
Insulin needles and syringes are rather small. I've discovered the veterinary syringes and needles used on large animals are really a great size for model gluing and delicate oiling jobs. My vet is nice enough to save some used ones for me.
-
-
I'm no scientist, but if the scientific studies done some time back by the USN ship model conservation shop are any indication, the heat from light can have an affect on the out-gassing of various materials and wreak havoc with a model. Modern synthetic materials were particularly problematic. This problem is exacerbated in proportion to the lack of ventilation in a model's case.
See: https://www.navsea.navy.mil/Home/Warfare-Centers/NSWC-Carderock/Resources/Curator-of-Navy-Ship-Models/Specifications-for-Building-Exhibition-Ship-Models/ and https://www.navsea.navy.mil/Home/Warfare-Centers/NSWC-Carderock/Resources/Curator-of-Navy-Ship-Models/Lead-Corrosion-in-Exhibition-Ship-Models/
-
I think the Wonder Cutter is the devil's way of telling you that you've got more money than brains.
Perhaps there are production manufacturing applications for a tool like that, but I agree with Chuck. You could almost buy a Byrnes saw for that much money and for sure it would last many times longer than the Wonder Cutter. Or a Byrnes disk or thickness sander, or a relatively decent scroll saw. Or any number of other serious machines that would promise to save money over buying strip wood and expand your scratch-building horizons.
It looks like the catch with the Wonder Cutter is the old Gillette safety razor scam... you have to buy their proprietary blades from the looks of them and they aren't particularly cheap. It appears they only come in one style, too. There's nothing the Wonder Cutter can do to make the blades last longer and, in fact, they probably dull faster, so what are you really getting for your $400 at the end of the day? I wonder if duct taping an Xacto #2 to one of those buzzing things I see advertised for the ladies might not have the same effect for a lot less money.
- No Idea, RichardG, Edwardkenway and 3 others
-
6
-
Most internet rating sites rate the bottom of the line scroll saws and completely ignore the really good stuff. This is because a lot more beginners buy cheap scroll saws than experts buy expensive ones. There is a huge difference in the abilities and ease of use between the cheap scroll saws and the expensive ones. That is always to be expected, but with scroll saws, the difference is exponential not only in price, but also in quality. The "line of demarcation" is the " double parallel-link arm" design, which provides a straight up and down sawing motion, versus the "regular" arm design that provides somewhat of a "rowing" sawing motion. At less than $500, the Dewalt DW788 is the least expensive of the parallel link arm saws and very popular and it gets rave reviews from its owners. It is, however, the "bottom of the line" for "top of the line" scroll saws.
You will likely get a lot of use from a scroll saw and if you ever want to unload it, a quality saw will have resale value far in excess of those at the lower price points which, in many instances, are little better than "toys." If you can spend in the neighborhood of $500 to $750 (or up,) you can move into the "really, really good scroll saw" territory. Go to a good tool store, if you can find one near you, and compare the "good stuff" with the entry level scroll saws by trying them out and you will instantly see the difference. Most importantly, the less vibration, the easier and more accurate the saw will be. (Sigh... and the more it will cost.) Check out brands you've probably never heard of in the "Consumer Reports" reviews, like (pre-Chinese built) Excalibur, Hegner, Sakura ("PS Wood Machines,") King, Seyco, and Pegas. These are the brands the really serious scroll sawyers end up buying after they've outgrown their entry-level machines.
Not only are the more expensive scroll saws better "cutters," with low vibration being very much worth the money you pay for it, but they also offer a lot of features not otherwise found in the entry level saws. The throat and table sizes vary, which may be a consideration, or not. Interestingly, the relatively new Swiss Pegas, among a few others, has a "tilting" head which permits cutting bevels with a head that tilts instead of the table tilting to cut bevels. This is a big improvement which makes controlling the workpiece when cutting a bevel much easier because the table is flat so you aren't working "uphill" and "downhill" as you move the piece on the table anymore. Scroll sawing can be tedious and a really good saw reduces operator fatigue, and hence increases accuracy, considerably.
Scroll Saw Village is a pretty good forum for scroll saw information. https://www.scrollsawvillage.com/scroll-saw-reviews/ The folks on that forum seem to have a lot of experience to share, although there doesn't seem to be a lot of modelers on there.
As always, "you get what you pay for," but a really good tool is a joy forever and even if you have to secretly save for a few months to sneak the purchase past "She Who Must Be Obeyed," it's always worth it. Even if you aren't a master craftsman, you can still be the envy of all your friends with good tools!
- coxswain, mtaylor, Old Collingwood and 3 others
-
6
-
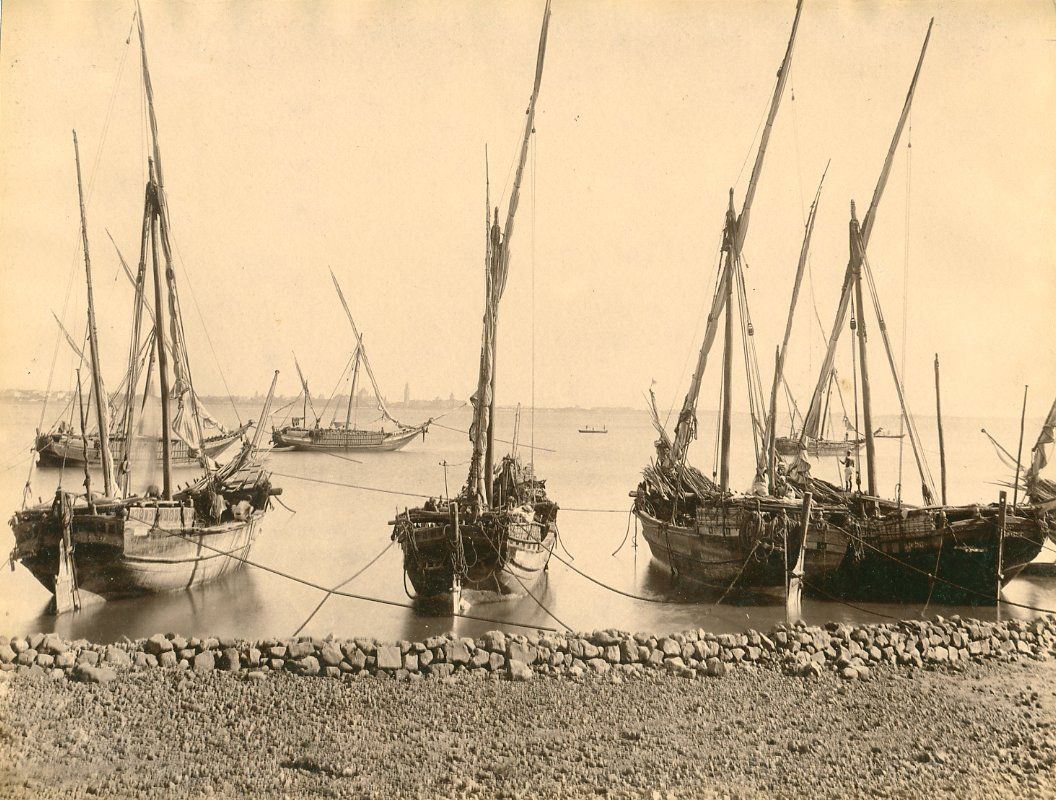
"Dohar" means "jewel" in Hindi. The overall appearance of the boat, and the decoration on the bow suggest that it is not Mediterranean (and certainly not the San Francisco lateen-rigged Italian fishing boat,) but rather of Indian origin. Similarly appearing lateen-rigged vessels were common in the Bay of Bengal and Indian Ocean, trading with the Red Sea area a hundred years ago. I'm not any sort of expert on South Asian and Arabic craft (although I play one on the internet
), so I can't offer much more than that. As ccoyle said, it would take a hands-on appraisal from a knowledgeable appraiser to determine its market value. That said, as ccoyle noted, the "big money" in the auction market generally goes to models of large, well-known American and European naval ships, rather than to smaller indigenous watercraft. (Which is a shame, because there are thousands of models of Nelson's Victory or USS Constitution, yet well-done accurate models of such small craft are as important to the historical record as anything else, and perhaps even more so.) It is nicely built and presented. (With sails furled, which is an entirely acceptable depiction.) Understand that it may turn out to be simply an attractive, but somewhat unremarkable piece made for the Indian tourist trade to sell to Europeans to bring home as a souvenir. At best, it's a well-done scratch-built model, but its appeal may be limited. I don't think there are a lot of collectors of dhow models around!
Ship models are worth whatever somebody will pay for them. If you like it and the price is low enough to warrant the risk, buy it and enjoy it. If the price is high and you are buying it for resale or an investment, you really ought to get a professional appraisal and, even then, with ship models, an appraisal is just a guess by somebody who knows more than you do.
A cursory glance at the model pictured indicates it needs some minor conservation. Any model with the detail of this one that one wishes to preserve, should be kept in a proper case, as well.
See: http://www.columbia.edu/itc/mealac/pritchett/00routesdata/0500_0599/shipping/dhow/bombay1890s.jpg for image of similar vessels in Bombay (Mumbai, India) in 1890.
- Keith Black, ccoyle, grsjax and 1 other
-
4
-
On 10/23/2019 at 5:08 PM, Roger Pellett said:
The following is quoted from an article published in the (US) Naval Institute Proceedings In 1894. The title of the article is Ships Boats.
” In all cases they (gratings) are to be made from seasoned ash and kept bright— shellac, paint, and varnish being objectionable.”
Ash is a light yellowish wood so gratings made from Boxwood and not darkened would be correct. My personal experience with ash is that has poor rot resistance so I don’t know why the navy preferred using ash finished bright.
I've never heard "bright" used to designate only "bare" unfinished wood. The term "bright work" today refers to any wood finished or not so that the grain is visible, includes shellac and varnish. Apparently, that is a modern evolution of the term's meaning. I note they don't include "oil" or "tar" in the old regs cited. I'd expect that they would "oil" the ash with "boat soup," a traditional finish made of pine tar, Japan drier, turpentine, and raw linseed oil. This thin fluid soaks into the wood and protects it, but does not build up a gloss coat. the regulations above list "shellac, paint, and varnish being objectionable" most likely because those finishes can be slippery when wet and should never be used for surfaces that are intended for foot traffic.
I expect that ash was specified for gratings because it wears well and has good strength, allowing for lighter scantlings in the grates' construction. Because gratings are left open to the air on all sides, fungal decay would be less of a concern that would be ash used in other marine construction applications. For the same reason, ash is not uncommonly used for for tillers, block bodies, and belaying pins without any concern about its rotting.
"Bright" has a second meaning, particularly in naval nomenclature, in reference to polished metal and particularly "yellow metals" (brasses and bronzes.) "Brightwork" can include polished metals like brass and bronze which is always kept bare and regularly polished, rather than being lacquered, varnished, or shellacked to preserve its shine. "Shellac, paint, and varnish being objectionable" in that application as well.
- mtaylor, Canute and Roger Pellett
-
3
-
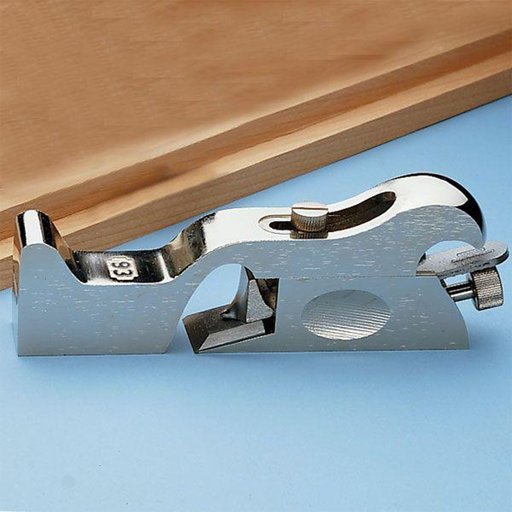
The Veritas rabbet plane and fence look like an invitation to break the old tool buying rule, "don't buy it until you need it." Factory mass production of doors, among other things, spelled the eventual demise of the shoulder plane. It's only in recent times when artisanal woodworking has experienced something of a revival that the versatile shoulder (rabet) plane has been rediscovered and again appreciated. It's a handy tool to have if you have to work rabets or trim tenons across the grain for a perfect fit. Stanley's #90 series rabet planes are again in production (now in a somewhat redesigned version from the original,) as are the pricey Veritas version and others from the new group of "jewelry hand tool" boutique manufacturers competing for the more well-heeled segment of the amateur market eager to pay three times the price and more for fancy stuff. ("Our products won't make you a better woodworker, but we guarantee they'll make you look like one.") The Stanley #90 series and their clones have bodies that come apart so that they can serve double-duty as a bull-nosed and/or chisel plane for working into corners. They are one of those "you don't need it often, but when you do, it's the only thing that will do the job" sort of plane.
Of course, if you have a Byrnes table saw, you'll never have a need to be jointing quarter inch square stock with a plane, now will you?
http://www.supertool.com/StanleyBG/stan11.htm
http://www.oldtooluser.com/TypeStudy/stanno93rptypestudy.htm
-
Great resource! Thanks for sharing your good work.
-
It appears to be simply a fence that permits jointing small stock. I'm not sure what advantage it offers over simply clamping a piece of wood or sheet metal to the side of the plane or sandwiching the sheet of wood or sheet metal and the plane in a vise to achieve the same at no cost to the user. Those are the old "tricks of the trade" for the same application.
- Canute, EricWilliamMarshall, mtaylor and 1 other
-
4
-
I certainly agree with wefalck that a good lathe with a milling attachment, as noted above, is an excellent and far less expensive and much more versatile option for occasional routine milling jobs, albeit less convenient than a dedicated mill. I have the milling attachment for my 12" X 42" Atlas/Craftsman lathe and the milling setup option for my Unimat machine and between those two machines can do just about any milling I'd ever need for modeling and, of course, with the 12" X 42" lathe, a whole lot more. I was lucky to acquire the 12" X 42" lathe and just about all the tooling anyone could ever need at an incredibly low price from the widow of a master machinist. Those "barn finds" are hard to come by. It's an old machine and not "computerized," but it will do just about anything one could want and certainly a lot more than I will ever have the skill to do with it. The Unimat, on the other hand, while a great machine, was something of a "money pit," because, unlike the very common Atlas/Craftsman, the generic tooling for which is widely available at various quality and price points, the Unimat's tooling is practically exclusively proprietary and the Unimat SL hasn't been manufactured since the 1970's, so I had to follow eBay for months and spend far more in the end than I'd anticipated to equip it as I wished with its now-rare tooling in high demand.
Someone once said that the accuracy of a machine tool is directly proportional to the weight of the tool and I've never seen that observation proven to be inaccurate. Dedicated space can be a problem for many. That's understood, but there's a lot to recommend the "old 'arn" machines and used machines in good condition are often the "best bang for your buck." If you can live without the modern digital readout CNC technology, good bargains can now be found with the analog machines.
For me, at least, the two most important factors to consider for machine tools are that 1) you can always do smaller work on a larger machine tool, but you can't do larger work on a smaller one and 2) the more commonly available the tooling, the better. The latter consideration is the most important because the tooling is where the real expense of the lathe or mill is incurred.
Don't assume that every mill can double as a drill press. Most mills lack the range of quill and table movement that drill presses do. There are some mills that are designed to serve both purposes and they are priced accordingly. If you are intending to use a mill as a drill press, make sure you have enough room between the chuck and the table and enough quill range of movement to drill holes deep enough in the size of material you will be drilling.
As much as I hate to have to admit it, the ubiquitous products of the Patriotic People's Revolutionary Machine Tool Collective may well offer the most for the money in today's market. The small 7" to 10" Chinese benchtop lathes with their extensive and readily available generic tooling are among the most versatile machines on the market. Their lathe milling attachments look entirely adequate for modeling milling applications. While many have complained about their low quality, it seems you get what you pay for. For a few bucks more, the higher end retailers, like Grizzly, make sure the "clones" they sell are up to specifications, while outfits like Harbor Freight... not so much.
One thing's for sure: One can easily end up spending as much or more on tooling than on the basic lathe or mill, just to fully equip it for basic work. Whatever the retailers add in their "package deals" is only enough to get you "hooked" on the hard stuff.
https://www.grizzly.com/metal-lathes
https://www.grizzly.com/cutting-tools-and-tooling?page=1
-
I can't speak from firsthand experience, but Sherline is highly thought of for a small lightweight machine tool in their price range. MicroMark just retails Sherline products. I'd urge you to check Sherline's website. Last time I checked, they sold some pretty good packaged deals and if you run into any problems, it's likely going to be a lot easier dealing with the manufacturer directly than going through MicroMark. As you probably know, the tooling can end up running as much as a lathe or mill to equip it well.
I'd also suggest you take a look at Grizzly's line of small mills. They are Asian-built, but Grizzly has good quality control and excellent customer service. https://www.grizzly.com/search?q=(mills)'
As said above, if you have any use for a mill at all, you'll probably soon have a use for a larger one than what you bought. The Sherline is a rather small machine with limited power. It's nice to have the ability to do more with a larger, more powerful machine.
Above all, look for a machine that has common tooling parameters. If you have a machine that requires proprietary or oddball tooling, prepare to take out a second mortgage.
- mtaylor, Canute, Landlubber Mike and 3 others
-
6
-
19 hours ago, wefalck said:
It's these trivia and their absence or getting them wrong that will be picked out by 'professionals' and old tars ... they are difficult to know, if you haven't been part of the story. Luckily, for anything older than WW2 hardly anyone is left, who really knew.
I suppose there aren't a lot of people out there today who know what "boiler compound" is, since it's something particular to steam engines. Perhaps it's still used on nuclear-powered ships today, since theirs are essentially steam turbine power plants. There are a few of us who, in our youth, had an unusual fascination for the subject and sought out those vanishing "old salts." Some were agreeable to sharing a lot of their experience with the "odd kids who were nuts about old boats." I was lucky to grow up in a seaport town with a father who worked his whole life in the shipping industry. You can pick up a lot by "osmosis." It's not easy knowing the difference, though. It's hard not to roll your eyes when you see "glaring" errors in otherwise technically perfect models, but to do so risks causing hurt feelings. I have a hard time getting past "white" colored deadeye lanyards, for example.
- paulsutcliffe, mtaylor, Keith Black and 1 other
-
4

Bristol Pilot Cutter by michael mott - 1/8 scale - POF
in - Build logs for subjects built 1851 - 1900
Posted · Edited by Bob Cleek
At the risk of thread drift, may I recommend Tom Cunliffe's Pilot Cutters Under Sail. https://www.amazon.com/Pilot-Cutters-Under-Sail-Pilotage/dp/1848321546
Also of interest would be Luke Powell's Working Sail. I haven't read it, but it appears to be full of pilot cutter "porn." He's made quite a name for himself building pilot cutter replica yachts of late. You can also go to WoodenBoat Magazine's website and use their index to order back issues with articles detailing his designs and work. https://classic-sailing.co.uk/article/luke-powells-book-pilot-cutters-working-sail
The pilot boat Bible is the two volume set, Pilot, volume one is on pilot schooners and volume two is on pilot boats with other rigs, as I recall. A bit pricey at around seventy bucks a copy, but highly regarded. https://www.woodenboatstore.com/collections/history-books/products/pilots These are also by Tom Cunliffe and are presumably expansions of his original Pilot Cutters Under Sail published earlier.
Malcolm Darch has a great modeling book in its own right, Modelling Maritime History. It covers the builds of models of various historic vessels, one of which is Marguerite, a Bristol Channel pilot cutter. Each chapter offers lines, rigging plans, contemporary photographs, and discussions of building techniques for each model he discusses. What I liked about this book is that the models he builds aren't the "usual suspects," but rather a wide spectrum of subject matter. I'd expect an experienced scratch builder could build a model of any of the subjects in his book, although its not exactly a "how to build it" book, but more of a "how I built it" book. https://www.amazon.com/Modelling-Maritime-History-Malcolm-Darch/dp/0715391380
Then, of course, you've got a beautiful one right here in this thread to whet your appetite!