


Bob Cleek
-
Posts
3,374 -
Joined
-
Last visited
Content Type
Profiles
Forums
Gallery
Events
Posts posted by Bob Cleek
-
-
I love live steam ever since I restored an old contemporary model of a Victorian steam yacht. There's so much more available for live steam fans in the railroad stuff than in boat models. I envy the guys with the live steam locomotives. The full-size "Sipet" model loco is really neat. It's prototype was for hauling cane in cane fields and the like, I presume. It must be great fun to run the model around the garden. Thanks for the video!
-
-
On 6/5/2019 at 5:12 PM, Arthur Wayne said:
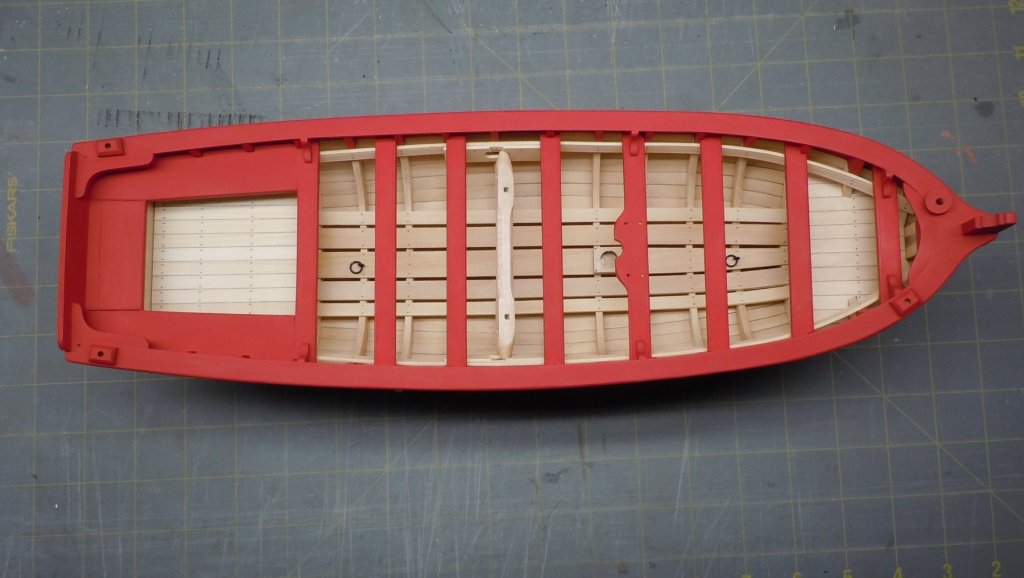
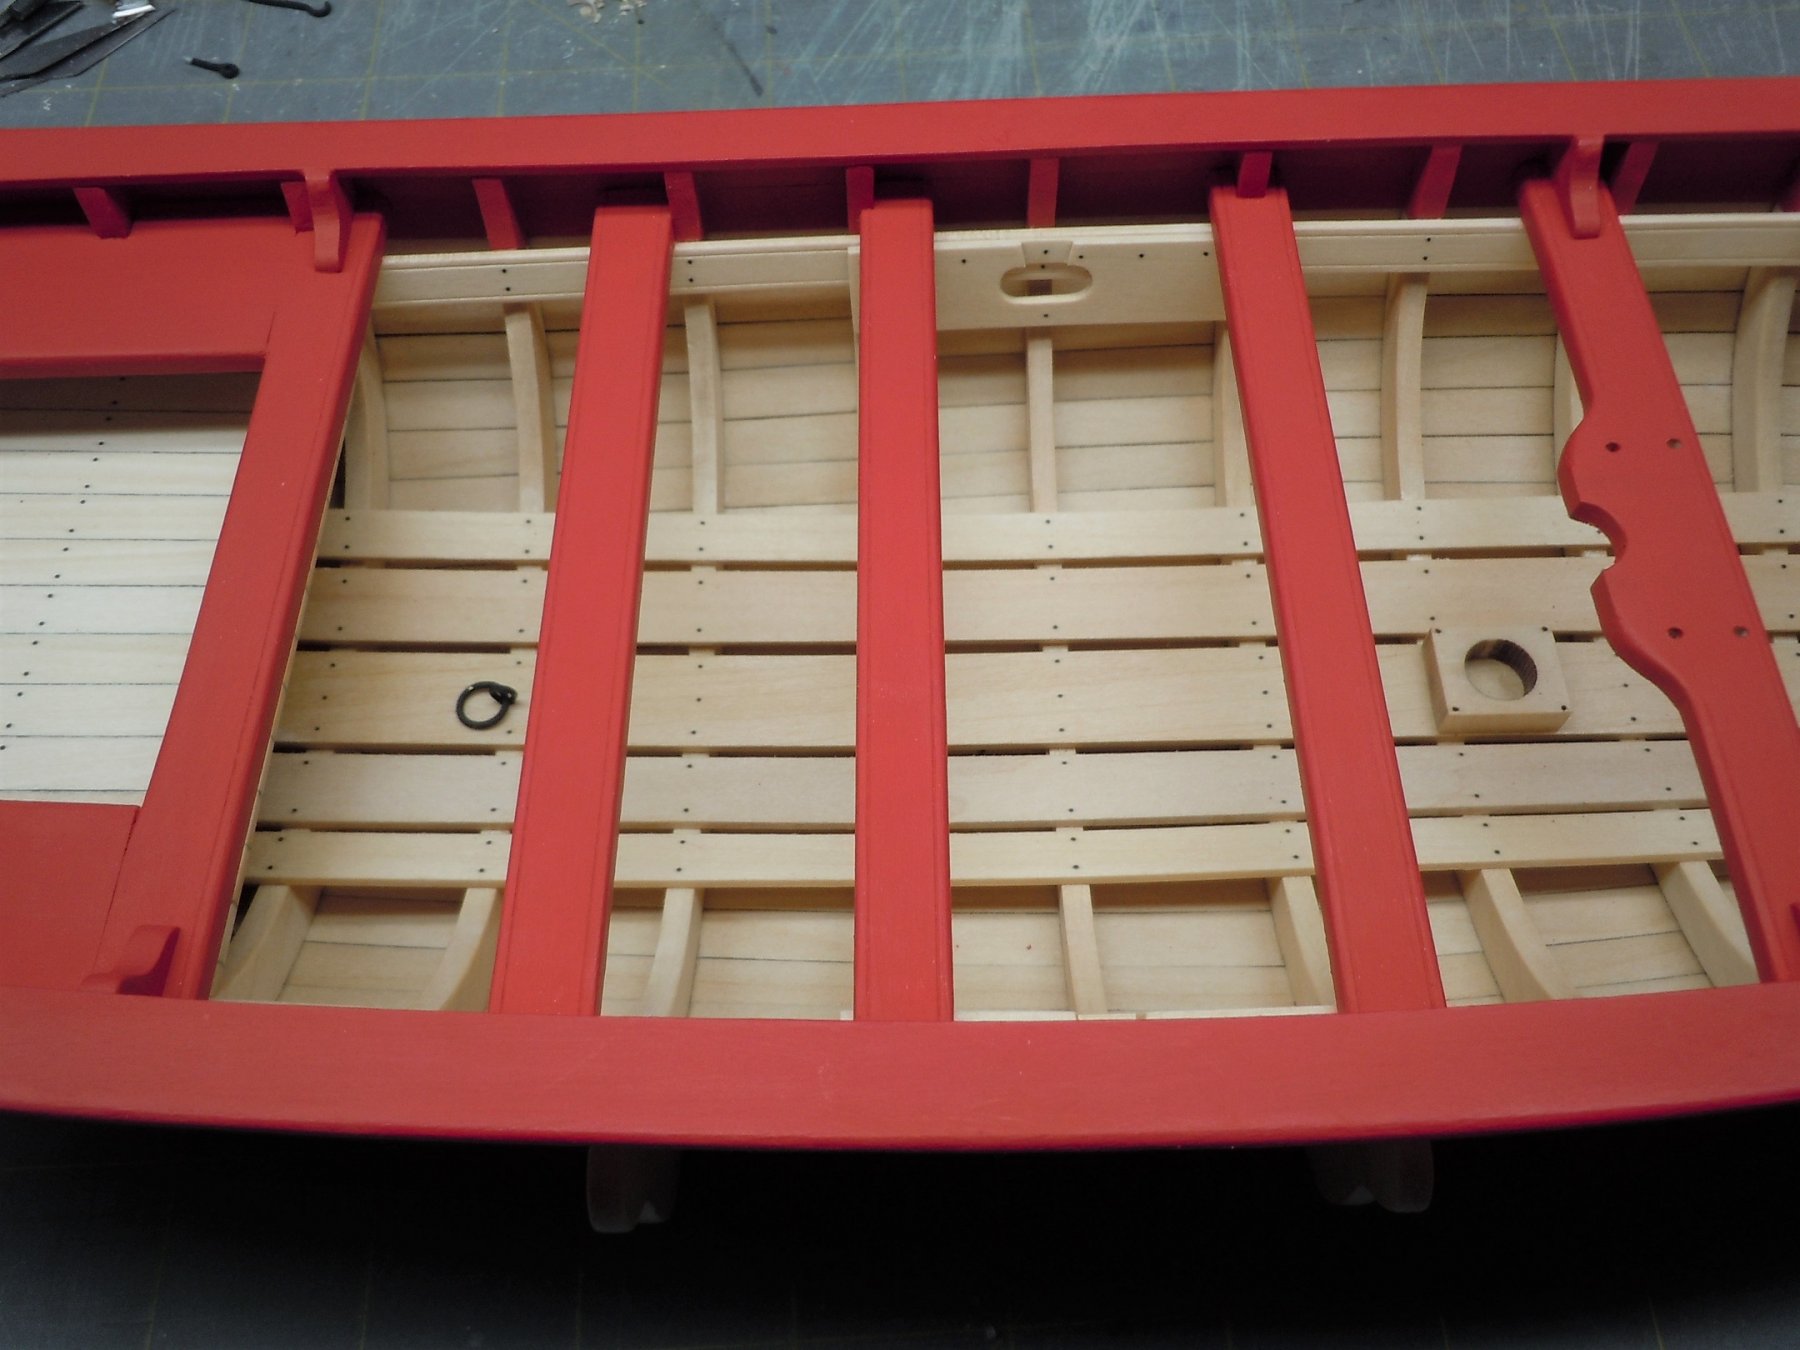
Next I added the lifting rings to the floor. I thought the kit supplied eyebolt mount was kind of chunky and the rings seemed like the brass rod used was slightly oversized. I elected to make my own eyebolts and lift ring from brass rod. After painting they were installed,

Very nice, clean, crisp work! It looks great.
May I suggest that you consider revisiting your lifting rings? I don't know what the kit-supplied rings look like, but, to my eye, at least, being familiar with full-sized boats of this type, the "big, clunky" rings that came with the kit are probably correct. (I'd be surprised if any detail was out of scale on this kit model, considering where it came from.)
The lifting rings must carry the entire weight of the boat, plus her rig, all her gear, and most, if not all of her crew. These boats were not lightly built, either, as they needed to be able to survive a fair bit of banging about in use. The lifting ring eyebolts would have been set in substantial pads and probably through-bolted to the keel, rather than a simple screw-shanked eye. The rings would have been surprisingly large in order to carry the weight they needed to. What I see in the above pictures are rings that appear too small.
It's your model, of course, and a very nice one, so do as you wish. I only mention it because if you were of a mind to rethink it, it's a very easy change to make.
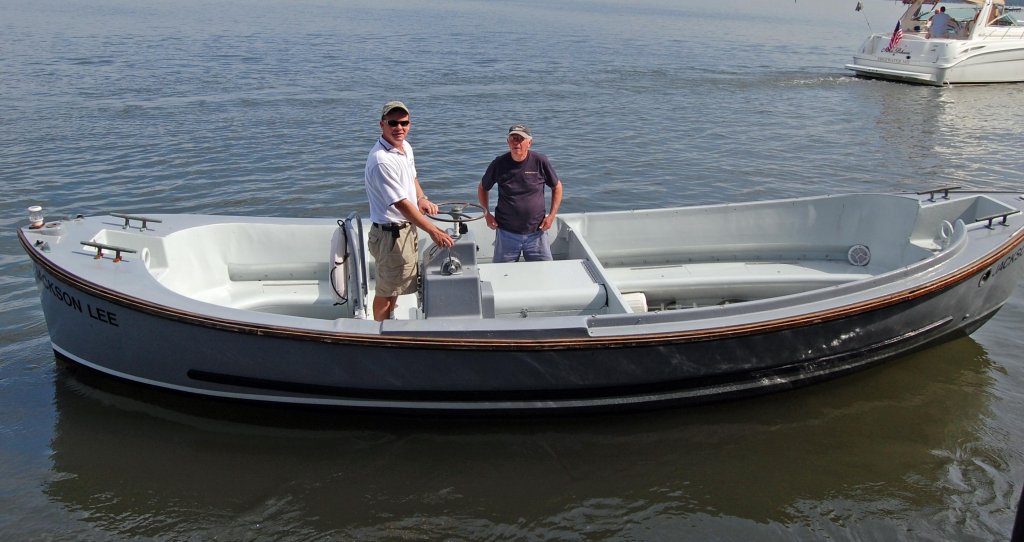
Below is a standard USN motor whaleboat. The lifting rings are in the square, three-sided wells at the bow and stern (between the cleats.) As you can see, the rings are petty husky, and keep in mind that these rings are made of modern materials. The original of the model would have had hand forged wrought iron rings that may have been heavier still.
-
3 hours ago, DelF said:
My old Preac saw still works, but it's no longer in production and I find it very hard to source replacement blades in the UK.
If you aren't already aware, Jim Byrnes will sell you a custom-sized arbor adaptor for any size saw blade you have, so if you have problems sourcing Imperial-sized arbors in the metric UK, your problem will be easily solved.
-
3 hours ago, Kurt Johnson said:
You can’t go wrong with Chapelle as Roger says.
Well, Chapelle's books are great resources (I have all of them,) but I wouldn't go so far as to say "you can't go wrong" with him. Some of Chapelle's published plans and a fair number of the HAMMS ("Historic American Merchant Marine Survey") drawings from the WPA era contain some pretty glaring errors. They were done as a "make work" project during the Depression and some of the work was sloppy and some of it was conjecture. This is particularly true when it comes to rigging. Often, they were taking the lines off of an old hulk that no longer had a rig in it and they'd just pick one and draw it in there.
 In other instances, they'd find but one surviving example of a type and then Chapelle would publish it in one of his books as representative of the type when, in fact, it was perhaps an odd ball outlier but just really all they had to go on, so they used what they had. Still, they managed to save a lot of what would have been lost forever. Take it with a grain of salt, though. If you do your own research as well, you'll spot and possibly be able to correct some of the errors. (This wasn't necessarily Chapelle's fault, but that of the many unemployed draftsmen and architects sent out to find "old boats" and take plans off of them.)
- uss frolick and mtaylor
-
 2
2
-
-
One thing you can do that won't hurt its value any is to lose the ribbons tied to the mastheads. They aren't original to the model and they aren't anything but somebody's idea of a decoration.
BTW, the glass case is a big plus. Obviously, somebody (probably the maker) cared enough to protect it. It was important to them. That adds more credence to the possibility that it was built by someone who had sailed aboard her. Look carefully for a signature, on the keel, perhaps. You might get lucky.
-
You may have better luck at a firm that has printers designed for architectural and engineering drawings duplication. These are specialists and have copying equipment that can accurately copy to scale without any distortion, which is often present in ordinary copiers. The pixel level of the PDFs are important, as well. Enlarging the PDFs will enlarge the width of the lines on the page proportionately. Often, that leaves a line too wide for accurate measurements, or, at best, requires careful measurement from the very center of a wide line. While explaining it is way above my pay grade, there is another digital format, TIFF, which uses a compression format that permits far greater enlargements of files with little or no distortion or line enlargement. If you have that option, it's by far the better one to use for enlarging plans. The ship plans available from the National Park Service on their HAER database offer a TIFF option for those plans.
You can also enlarge them on an 8.5 X 11 inch paper format and print them at home and then paste the pieces together, but you may encounter distortion, depending upon the quality of the original digital image.
- grsjax, thibaultron and mtaylor
-
3
-
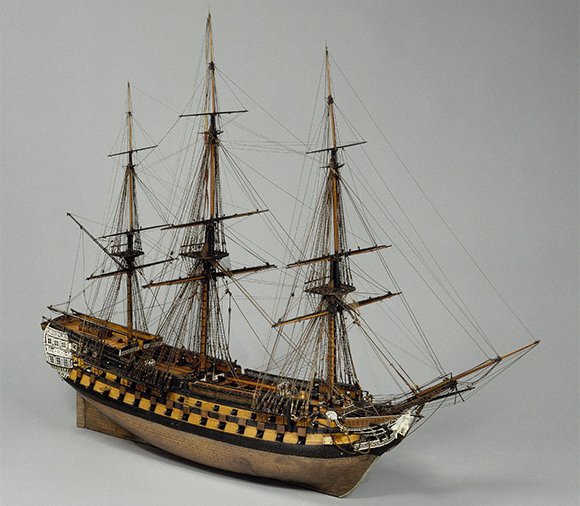
The USS City of Brooklyn this model possibly depicts would have been the Brooklyn launched in 1858. She was sold out of the service in 1891. Her DANFS (Dictionary of American Naval Fighting Ships, the USN's official and definitive history source on all USN ships) can be found here: https://www.history.navy.mil/research/histories/ship-histories/danfs/b/brooklyn-i.html She also has a Wikipedia page: https://en.wikipedia.org/wiki/USS_Brooklyn_(1858)

_at_Naval_Review.jpg.181c902bf1458fc6a1e223aeeb75ccae.jpg)
This, the first of three Brooklyns to bear that name and one of the earliest steam-auxiliary USN fighting ships, had a long career and particularly extensive and distinguished service in the Civil War.
While the workmanship is crude and quite inaccurate, "impressionistic" one might say, the condition of the paint and absence of obviously modern materials indicates the model is old. The apparently printed ensign, having fewer stars in the field than at present, may provide some clue to dating the model. It is clearly neither a kit, nor is it a commercially manufactured decorators' piece. It's almost certainly a "one-off" model and quite likely contemporary (built while the ship existed) or built later by someone familiar with it. Of interest is the detail shown on the propeller and shaft and the smokestack compared to the detail of the rigging and deck furniture. This was one of the first screw-driven naval vessels in the Navy and the modeler seems to have considered those features of importance.
As is, considering its apparent age, it is in good condition and likely requires little repair or conservation. (Which is another topic entirely. Just remember how many antiques have been featured on Antiques Roadshow were worth many time less than they would have been if the owner hadn't refinished them!) From the two photos you've provided, which are much less than would be required for any real appraisal, I'm going to go out on a limb here and hazard a guess that it is a "sailor made" model by a former crewmember, possibly by someone in the engineering department rather than a deck or gunnery department. It was not uncommon for sailors to make models of their favorite ships they'd served on for personal mementos or as gifts for loved ones back at home. Sailor-made models built from memory often emphasize the area of the sailor-builder's posting on the ship, with other areas less detailed.
The value of any antique is always a function of what some collector will pay for it. This is a ship model and it may well be of some marketable value, but not as a ship model per se, but rather as a contemporary historical artifact. If, and that may be a big if, you can establish the model's provenance, that is, who built it, when, and why, it may be of significant value. If not, it remains an interesting curio, but isn't likely to be worth big bucks. If you can connect the model to a builder who served on the vessel, a relative perhaps, and even better if you can then research their military history and be able to place them aboard during some of the famous battles in which Brooklyn engaged, such as the Battle of Mobile Bay, you will have something quite likely marketable on the specialized auction market. There is a niche category for "trench art" and folk arts and crafts pieces made by soldiers and sailors in wartime among militaria collectors. I expect the model would bring a much higher price in an auction of Civil War memorabilia if its provenance can be established linking its builder and his service aboard the ship than simply as a "ship model." That's were I'd see it's value to be. Otherwise, I think it's a very cool old folk art model, but nothing you'll ever see a lot of money out of.
-
Just put a coat of shellac on it and then sand with very fine grit sandpaper until it's as smooth as a baby's bottom. If you sand through the shellac, which shouldn't happen with a 300 grit or less abrasive, reapply the shellac where it's sanded through and sand again until it's perfectly smooth. Shellac comes in different "cuts," and is marketed as, for example, "two pound cut." That would mean two pounds of shellac flakes dissolved in one gallon of alcohol. Shellac can be the consistency of molasses and used as an adhesive in some applications, or as thin as water (2 pound cut) for use as a sealer. If it thickens in the can, just add alcohol and stir well. Don't worry about how much you have to thin it. Just get it to "water" consistency and you're good to go.
-
I think you may be asking which of these two boat models (manufacturer's brands) is the best choice to buy. If so, I suggest you ask this question in a full-size boating forum. You should be able to find someone in one of those forums who can provide some good advice. Sea Ray is a respected American powerboat manufacturer that has been in business for about sixty years. They were the first company to build fiberglass powerboats and probably are one of the largest manufacturers of powerboats in the world.
-
Hervey Garret Smith's book provides a few elementary fancywork knots and is good for beginners. The Ashley Book of Knots is entertaining and "approachable." It's by far the best for one wanting to learn how any knot is tied without starting with the simple forms and building up from there or having any command of the nomenclature, while at the same time quite encyclopedic. Hensel and Graumont's Encyclopedia of Knots and Fancy Ropework is the definitive scholarly encyclopedia which technically describes every knot invented, at least until the time of its publication, but assumes, as the various categories of knots are covered, that one "knows the basics" and understands the nomenclature. Ashley will tell you the name of the know and give a drawing with step-by-step instructions on how to tie it with arrows and dotted direction lines. Hensel and Graumont will show you a photograph of the knot with it's name and describe it technically without the "step-by-steps" instructions, assuming that the reader has read the previous discussion of the simpler versions of that particular knot type and can build upon them to tie the more complex derivitives. The more academic Hensel and Graumont book may be of greater interest to the historic ship modeler, and particularly one who lays up their own scale rigging line, because it contains a detailed discussion of the history of cordage and its use and manufacture.
Ashley's is apparently now in the public domain and is available for free on line at https://archive.org/details/TheAshleyBookOfKnots/page/n19
-
9 hours ago, Bob Blarney said:
O Wise Man - enlighten us as to how you spray in your present workshop.
I won't claim wisdom, but I've been around the block a time or two and still have everything I was born with, minus a few brain cells, I expect.
My present workshop is a dedicated 1500 square foot building with an overhead fan, a large floor fan, and two large moveable pedestal shop fans, I didn't invest money in these. I just picked them up here and there over the years. The shop has a "clean room" where I do my drafting, rigging, and such. The rest of the space has windows and a large sliding door about the size of a double-space garage door. All of my stationary power tools are on heavy roller bases so that they can be moved as needed.
Anytime I'm working, the door is open to the outside, unless it's particularly cold or pouring rain. Anytime I do anything that creates dust, (e.g. table sawing, wood lathe turning, power jointing, thickness planing, sanding) the machine used is rolled at least to the open door, if not onto the concrete pad outside the door, and the fans positioned to create a good breeze exhausting air from the shop to the outdoors. Afterwards, I vacuum or blow off all the dust and shavings from the tool with compressed air and roll it back to its storage spot in the shop. This keeps most all of the dust out of the shop. It just blows away. I live on a farm and don't need to deal with neighbors worrying about where the shavings go.
Similarly, spraying of any volatile materials is always done outdoors, or in front of the open large barn door, with fans to move the air from inside to outside. I do spray solvent-based coatings from full-size commercial-type Binks sprayguns, as well as HVLP spray equipment. I rarely spray any coating from a "rattle can," due to their expense and often poor quality results. (One can't condition paints or adjust the spray shape and volume with a rattle can.) I do use an artist's airbrush to spray solvent-containing paints in my shop at the bench. I generally run the overhead fan above my main bench, which keeps any fumes away from the area, although the amounts of material coming out of an airbrush are generally so small as to not be any major consideration. I also use exhaust fans to vent the entire area when working with acetone for cleaning jobs and such.
I wouldn't necessarily advise these techniques for those who work at their dining room tables, however. The famous yacht designer, L. Francis Herreshoff, had his metal lathe set up in his dining room, but he was a life-long bachelor, and that may explain why. I should disclose that over a lifetime, I've acquired professional experience working in a furniture factory, a machine shop, on commercial painting jobs, and several commercial boatyards. I've seen a couple of guys lose fingers in table saws, another send himself to the ER in an ambulance sanding antifouling paint off of a boat bottom without wearing a particulate mask, and I once carelessly put a heavy-duty grinder into my own kneecap, a result of fatigue and a moment's inattention while grinding rust off an iron keel. On balance, I've seen a lot more Darwin Award entries in commercial settings by professionals than ever by do-it-yourself-ers, but that's probably because there's a lot more opportunities to do stupid stuff when one is on the job working all day every day. I am pretty well familiar with OSHA regulations and I consider myself a very careful worker in any hazardous activity. That said, I am aware every time I turn on a power tool that I am risking serious injury, which is probably why I've still got all my fingers. Also, I don't do that for a living, so my odds are better on that basis alone.
I'd never discourage anyone from using what they believe to be the safest way to do anything and I sure won't accept any liability for anybody else getting hurt doing it the way I do, but I will say that I've never found the need for exhausting spray boxes or booths at all when using ordinary paints and varnishes. That would, I'm sure, not be the case if I were shooting car finishes on a production basis or lacquer finishes in a furniture factory paint shop, and there's no way I'd ever spray any LPU coating, even outdoors. without a good mask and separate breathing air source. Neither would I want to spend a working lifetime in a furniture factory with clouds of fine dust hanging in the air without wearing a good particle mask. With a small DIY shop and relatively occasional exposure, minimized by blowing it all out the door, I've never felt the need to invest in ambient air dust filters.
When airbrushing models and I am concerned about overspray making a mess, I will take a cardboard box and use it as a "backstop," just as the exhausting spray boxes are used, and simply throw out the cardboard box when I'm through with it. (Some care occasionally does have to be taken to avoid "back spray" from sprayed material swirling around in the box, though.) Although I've seen workable homemade spray boxes that use standard furnace filters to separate particulate and ordinary shop vacuums for exhausting the vapors out the back, I've always preferred good ambient ventilation over vacuums... blowing rather than sucking... because my major concern has always been combustion risks much more than inhalation risks. I prefer to have good air blowing the bad stuff away from me and into the great outdoors. Both dust and volatile fumes can fairly easily "go boom" once you suck them into a hose.
In all of these things, one must exercise good judgment in balancing all the risk factors, realizing that there is a big difference between occasional exposure and frequent, long-term, exposure to toxic materials of various types as addressed by OSHA regulations. It's always a good idea to study the Materials Safety Data Sheet ("MSDS") on any new product used in the shop and follow all safety instructions. If you want to spend hundreds, if not thousands, of dollars on dedicated plumbed shop dust collection systems and vacuum spray boxes and booths in a hobby workshop, knock yourself out. You might do well, however, to remember that a lot of the stuff probably sitting under the sink in your kitchen right now which, if you don't use it safely, will kill you quicker than most anything you'll ever encounter building ship models. The best safety device of all is an properly engaged human brain.
- Landlubber Mike, Canute, thibaultron and 1 other
-
4
-
Hey, those were the days, weren't they. You need to read on to understand how they managed to get away with spraying lacquer and venting the fumes with a vacuum cleaner, or turning on a lathe wearing a tie and long sleeves. (It seems everybody wore a tie and long sleeves, even factory workers, in those old photos... it was a sign of social standing, actually. If you didn't wear a white shirt and tie to work in the early 1900's, you couldn't afford to be buying Popular Mechnics, dontchaknow?) About five pages down, you'll see the answer, "Smoking Camels Calms Your Nerves!" I guess it was not smoking that turned Americans into a bunch of pansies afraid of getting hurt doing anything.
Darwin Award contestants who spray volatile solvents indoors and operate lathes and other stationary power tools wearing jewelry, ties, long sleeves and hair and the likedeserve the prizes they win. It's just a natural part of the evolutionary process. It's God's way of culling the really dumb ones.
- Roger Pellett, Canute and thibaultron
-
3
-
"Scratch built" can broadly mean "not assembled from a kit." However, the designation takes on a more specific meaning and importance when models are entered in judged competitions or classified and cataloged by museum curators, appraisers, and auction houses. Such classifications and categories vary, depending upon whoever is doing the classification, but one generally recognized classification system in the United States is the one developed by the The Mariner's Museum Model Ship Craftsman Competition and by Mystic Seaport Museum (Mystic, CT, USA) as prepared by R. Michael Wall in 1980. This category system is used to classify quality models for sale in galleries and auction houses and in museum catalogs, as well as in judged competitions:
CATEGORIES OF SHIP MODELS
CLASS A: SCRATCH-BUILT MODEL: Model built entirely from scratch materials by the builder with no commercially fabricated parts except cordage, chain and belaying pins.
CLASS B: MODIFIED SCRATCH-BUILT MODEL: Model built from scratch, but supplemented by the use of
some commercially fabricated accessories.
CLASS C: MODIFIED KIT MODEL: Model built from materials provided in commercial kit, supplemented by
other commercially fabricated parts or by scratch-built parts.
CLASS D: KIT MODEL: Model built entirely from materials provided in commercial kits.
SPECIAL CLASS: SUB CATEGORIES: Model built and/or displayed in any of the following methods:
Antique Waterline Cross Section Cut-away Exposed Interior Sailing Half Hull Power
Rare Materials Diorama Mechanized Builder’s Extreme Miniature Ship in a Bottle
Shadowbox Americana Folk Art Decorative Production Pond Model Other
These categories and standards of building techniques and materials requirements can be found in Ship Model Classification Guidelines published by Mystic Seaport and which can be found at http://www.shipmodel.com/pdfs/ship-model-classification-guidelines-1980.pdf
In terms of hobby modeling, by which I mean building models for pleasure and satisfaction, no rules at all need apply. "If it feels good, do it!" On the other hand, if you are interested in producing models that will be equal to those seen in international competition and major maritime museums, an accomplishment that takes decades to achieve, these are the classifications and quality standards that one must meet.
That said, one of the biggest challenges in the scratch building modeling game today is sourcing some of the old materials which are no longer in production like they once were, such as linen thread, solvent based paints, and some of the exotic stuff like now-endangered wood species (e.g. real ebony, boxwood, and rosewood) and ivory. New materials are available, often they are synthetics, and we don't know how long some of these will last, especially the new plastics, resins, and adhesives. How far one wants to go to ensure "archival quality" is, I suppose, a matter of how long they hope their model will last to be appreciated by future generations.
I would urge anyone who is interested in scratch building, and particularly anyone who wants to by-pass kit assembling at the beginning and start straightaway with scratch building, to start building a research library on the subject and study the recognized "Bibles," most of which, fortunately, are still in print. Some good ones are the books by Charles Davis, Harold Underhill, Gerald Wingrove, and C. Nepean Longridge. These are now perhaps somewhat dated, but they cover the basics well. Just as a musician must first master his instrument before embarking on jazz improvisation, so also the ship modeler has to develop the foundational skills of the craft. Many of us, and certainly the best modelers, began long before the internet provided us with an explosion of information and research opportunities. I envy those entering the ship modeling hobby today who have resources like this forum which should accelerate their learning curves exponentially. Read, watch, ask, and learn! We're happy to have you!
- paulsutcliffe and allanyed
-
2
-
On 2/21/2015 at 4:42 PM, dgbot said:
Our safety inspector made an inspection of our plant and when She saw us using the stuff to clean and prep material for laminating She had a fit.
I would have been one of her targets, no doubt. I've used a lot of it over the years, but somewhere along the line I started using white vinegar to wash my hands after getting epoxy all over them instead of using the acetone I had customarily used before. It wasn't a safety issue. The white vinegar was cheaper than the acetone was all. I survived without any ill effects, or so it seems. All things in moderation, though. Lots of ventilation. No solvent-, oil-, or linseed oil-soaked rags left in the shop. Ever.
- thibaultron and mtaylor
-
2
-
Welfalk, thanks for the information! That's good to know.
- thibaultron and mtaylor
-
2
-
8 hours ago, MESSIS said:
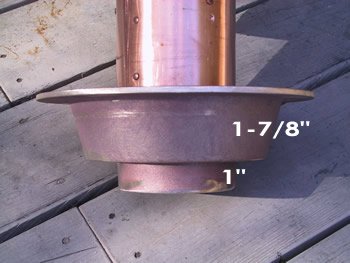
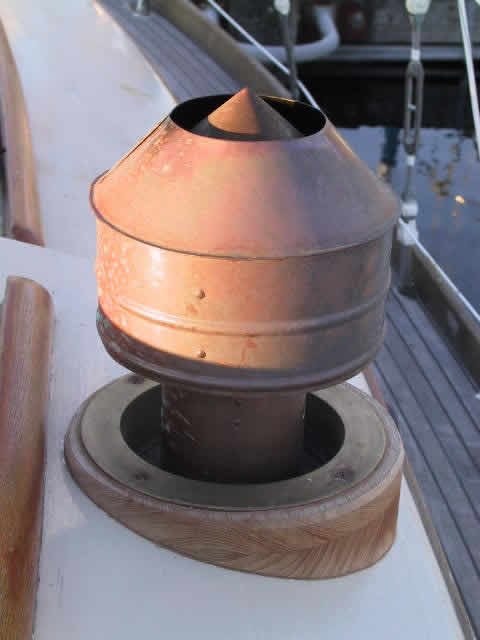
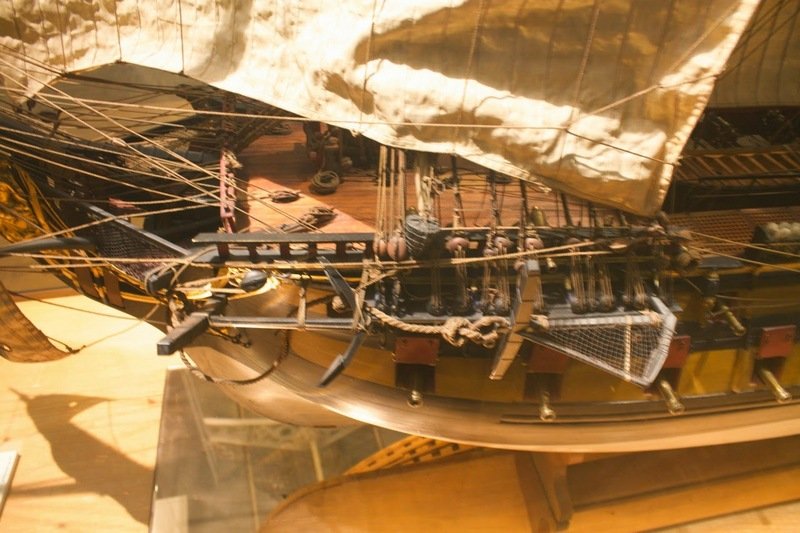
Ps small additional question... if I may, why using cooper instead of iron on larger models. Was it because copper exchanges heat with environment faster than iron?Because no way that would have been cheaper.
Wait a minute while the stagehands get me back in this harness thing here...
Well, this is a guess, really, but the answer would depend upon the period, I'd expect. Back then, the sheet copper would be used for larger stovepipe heat sinks like the one shown on the large vessel above (which is of a type I've never seen before) because copper would have been far easier to work into shape with the corners sealed with lead solder. Welding wasn't really common until WWII with iron plate being welded before then. Until the Bessemer process came along in the second half of the 19th Century, iron and steel were relatively expensive to manufacture. Copper was much less expensive in those times than it is now, relatively speaking. Iron would have been much heavier than copper and prone to rust. More than anything else, the prices of these metals are subject to the laws of supply and demand. While Bessemer's steel-making process dramatically lowered the cost of manufacturing steel from iron, a metal that is easily mined in many places, the cost of copper, a metal more rare than iron, increased far more than iron and steel when electricity came into common use and created a vastly increased new demand for copper, one that has not let up even to the present time.
-
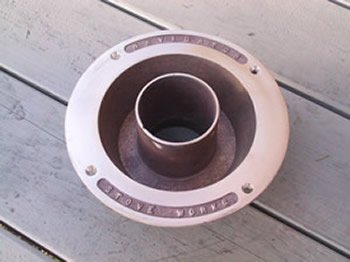
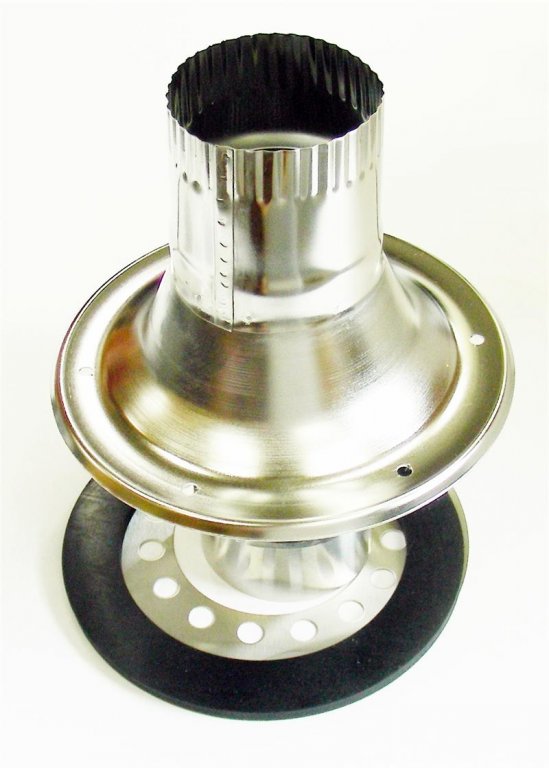
The use of a "water iron" or "deck iron" has been standard wherever a stovepipe passes through a deck, most likely for as long as stovepipes have been passing through decks. The one pictured above is large and the basin around the flues would have likely been made of copper. On smaller stovepipes, the water iron is simply a cast iron ring fit around the pipe and set in the deck which has a depression around it to hold water. The mass of the iron ring and the water it holds serve to dissipate the heat from the pipe. They do often have to be tended to refresh the water to provide sufficient cooling and are somewhat impractical if the vessel is sailing at any appreciable degree of heel which causes the water to slosh out. They are a standard fitting on wooden vessels with stoves burning solid fuels and still manufactured today.
-
2 hours ago, uss frolick said:
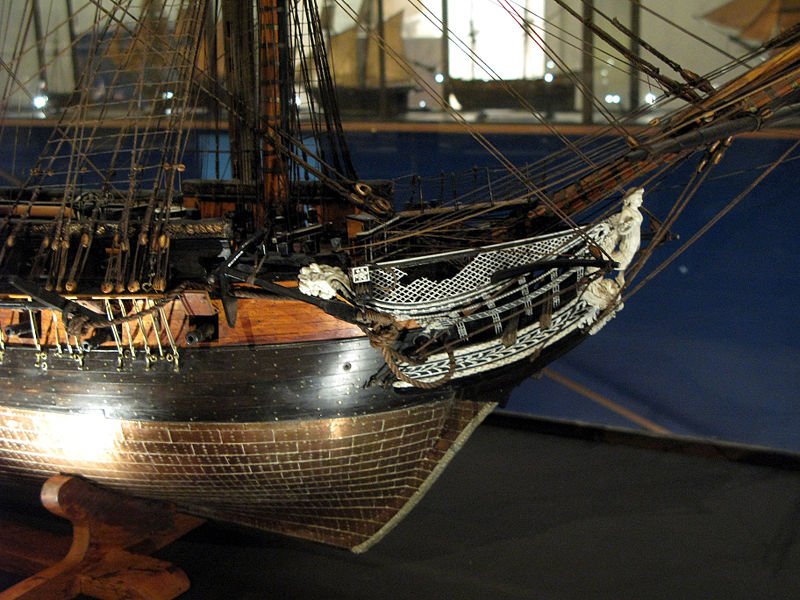
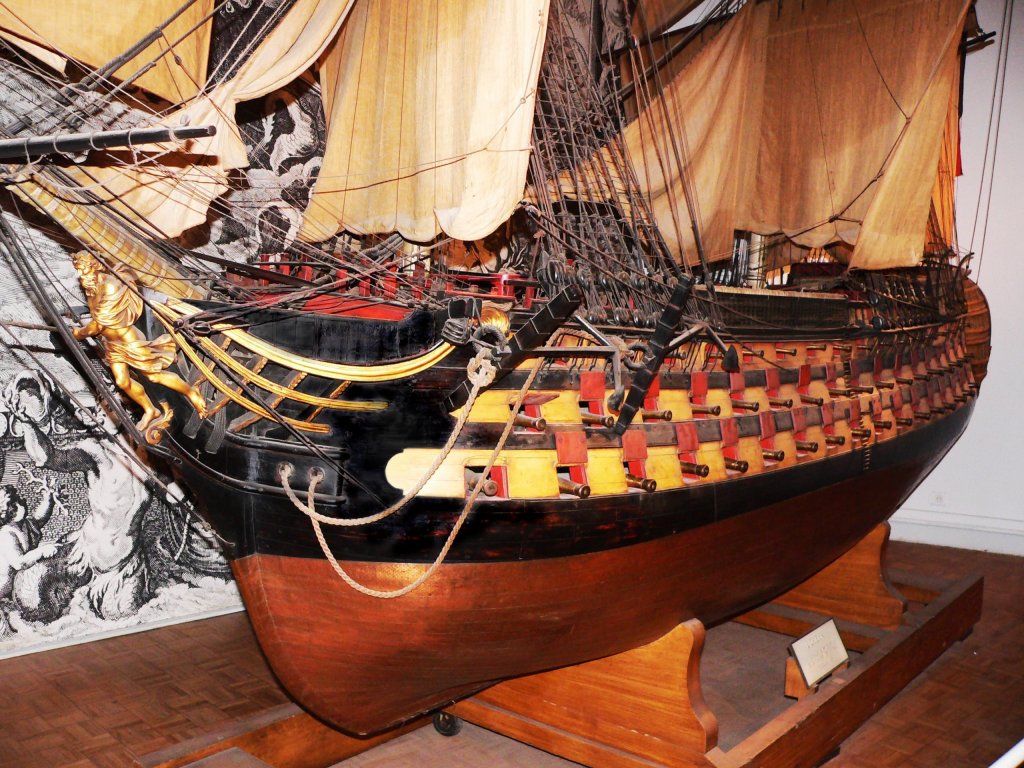
What was the purpose of the netting on the anchor on Bob's third picture, I wonder?
Good question! I wondered the same myself. I've never seen that before. It appears to be attached between the stock and outboard fluke of the aftermost anchor.
The only guess I could come up with, and it's purely a guess, would be that it prevented the sounding lead line from fouling on the outboard anchor arm and provided a place for the leadsman to stand when casting and recovering it. Soundings were customarily taken from the forward chains and required the leadsman to be positioned as directly above the lead on the bottom as possible when the sounding was taken. The lead line would be cast well forward as the ship was moving forward. Depending upon the speed of the ship (which should have been slow if in water so thin that soundings were necessary) and the depth of the water, throwing a heavy lead far enough forward would require a pretty good swing to ensure the lead hit bottom before the leadsman came directly above the lead. Thus, with the lead on the bottom directly below the leadsman, an accurate sounding would be possible with the line running perpendicular to the bottom. (If the leadline were at an angle when the sounding was taken, the sounding would necessarily be "long," which would decidedly not be a good thing in water shallow enough to require soundings to be taken!) The lead would then be hauled back up for the next cast, but the ship would be moving continuously, such that the leadline tends to trail aft as it's recovered. With the aftermost anchor's arm sticking out, the fluke arm would prevent the leadsman's swinging the lead enough to throw it far enough forward and when recovering the lead, the line would trail aft and foul in the crotch of the fluke arm. That netting would permit the leadsman to position himself far enough outboard to clear the anchor fluke for swinging and recovering the lead and permit the leadsman access to a perpendicular drop for reading the line.
That's just a complete guess, though, based on my experience taking soundings with a leadline.
What a ship of the line would be doing taking soundings at battle stations with all of her guns run out is another question entirely!
-
8 hours ago, Thistle17 said:
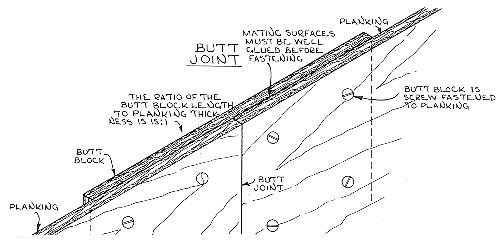
I have been frustrated by certain planks not "laying down" to my satisfaction and then having to rationalize that I will sand down the offending neighbor to achieve a more acceptable plank to plank surface conformity. This has been especially so when laying down a short plank that ends on an intermediate bulkhead next to it's neighbor that has spanned several bulkheads. There is a natural bend or contour to the latter. While the short plank tends to be more or less flat across its terminating bulkheads. One is left to sand the area until surface conformity is achieved. Even pre-bending the short plank may not achieve desired results.
What you are describing is the inability of the short plank to form a fair curve with the plank forward or aft of it. In small boat construction, planks are not "butted" to one another at the frames, but rather a "butt block" is used. This is a piece of wood as thick as the plank and fastened to the inboard side of the two butted planks and the plank above and below the butt. In this fashion, the run of planking bends as one plank and the resulting curve is fair. It's pretty much impossible to pull the butt end of a plank to form a fair curve by simply fastening it to a frame in small boat or model construction.
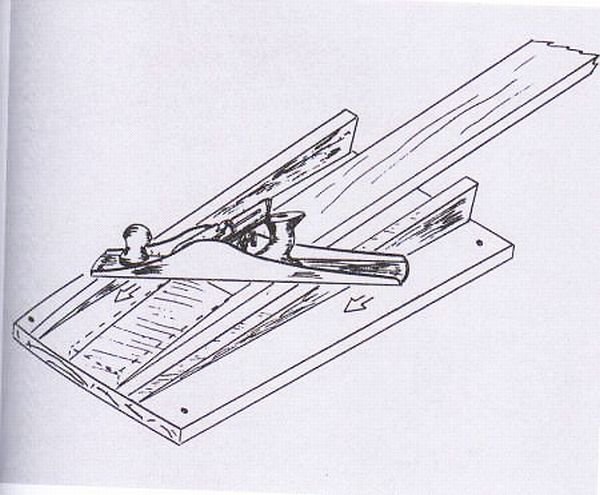
Another solution now made possible by modern adhesive technology is to scarf planks at the butts, thereby eliminating the need for often-troublesome caulking at the butts in full-sized practice. A plane scarf is made joining the two lengths of plank stock and the whole plank then got out of the stock as if it were one longer piece of stock. Epoxy adhesive is used to join the scarf ends, but wood glue would be fine for modeling. The scarf ratio is usually eight to twelve to one (the length of the scarf cut to the thickness of the plank.) The stock can be scarfed at an angle if need be to accommodate a long bend, or simply straight to produce a longer straight piece of stock. While experienced boatbuilders can simply stack two pieces of planking stock one on top of the other with their overlapping ends separated by the length of the scarf desired and cut the scarfs "freehand" with a plane or slick, a jig is easily made to do the job accurately for those of us with less skill.
A scarfed plank should bend fair no differently than an unscarfed one. If one wishes to depict the plank butt on a scarfed plank model, that is easily done by scribing a "faux butt" wherever one wants it,.
-
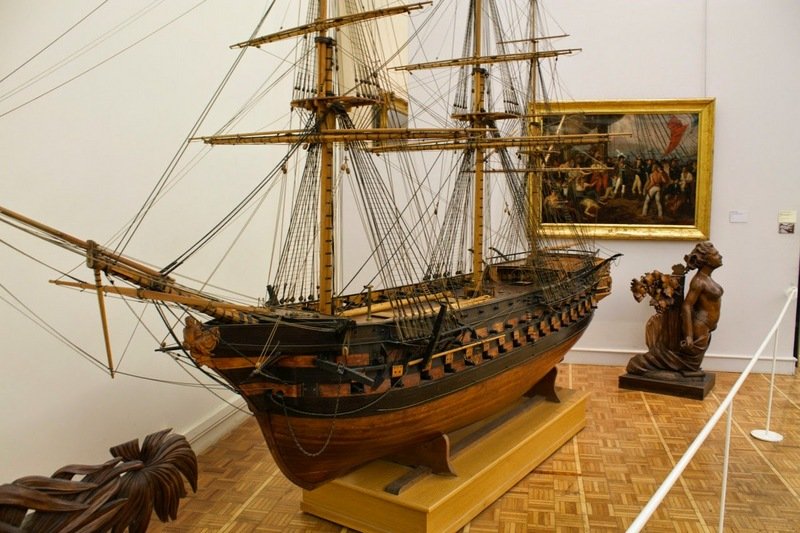
I can't speak with specific authority to period French standing rigging, but I expect it would have had to be tarred. Otherwise, it wouldn't have lasted when exposed to the elements nor had the strength properties desired. "Stockholm tar" (pine tar) was a valued essential naval store for all nations during the age of sail, France included. Pine tar is naturally blackish brown in color. Newly tarred cordage will appear lighter, the shade depending upon the color of the tar and the color of the cordage, but with exposure and additional maintenance coats will darken considerably. From a "scale viewing distance," it will appear black or very, very dark brown. Additionally, "lamp black" (carbon) was often added to the pine tar to inhibit UV degradation and, thinned with turpentine, to make black paint, as seen on many period hulls.
For these reasons, standing rigging appears blackish brown or black from a distance, while running rigging was lighter, depending upon the fiber used to make it. Hemp was a frequent cordage material. It is medium to darker brown.
Below are some a contemporary models in the Musee National de la Marine in Paris. It appears that they depict a range of colors from medium browns through black colored rigging. The standing rigging appears predominantly darker blackish brown or black, as would be expected for tarred cordage, while the more flexible cordage, the running rigging and anchor cable, are more brown. (The colors can be "off" due to variables in the lighting and photography, of course.)
You wouldn't go wrong with either very dark brown or black for standing rigging, I don't think.
- Richard Griffith and mtaylor
-
2
-
12 hours ago, vaddoc said:
I used to use shellac, but really this stuff works so much better, at least for me.
Dries in 15 min and then can be sanded leaving a very smooth surface. I first sand to 400 grit, then apply two coats lightly sanding in between. Never goes bad on the shelf. Might be the same as the Delta sealer mentioned above
I would not expect shellac to do well applied to acrylics. Alcohol is the carrier base for the shellac solids and it will thin most acrylics, possibly soften them if applied after they dry ("cure,") or "bead up" on the surface. The above product is apparently primarily intended for sealing painted acrylic surfaces and not surprisingly works better than shellac. My reference to using shellac was for sealing bare wood before painting. Some recommend sealing acrylic paints with a clear sealer compatible with acrylics. My preference is to avoid that if at all possible. The clear sealer adds another layer, which can reduce the crispness of detail and affect the way the underlying color reflects light to one degree or another. Such clear sealer topcoating isn't required with oil-based paints.
The uninitiated should be aware that there is a world of difference between acrylic coatings and oil-based coatings and they are... well.... "like oil and water." They don't mix well. When dry, acrylic can be applied over oil-based paint, but oil-based paint generally does not do well applied over dried acrylic, for example.
The best way to avoid problems for "learning" painters is to stick with a single "system." Use the same brand of products and make sure they are compatible. (Some brands make incompatible products for different applications.) Follow the directions on the containers. That said, this is by far the more expensive way to go, but that's the downside of it. Any "model" paint, particularly the acrylics, is outrageously expensive to begin with. Probably 95% of the cost is packaging, marketing, and profit, while 5% is "paint."
Regrettably, "VOC regulations" have restricted the use of oil-based coatings in recent times. Evaporating solvents have a negative effect on air quality and contribute to climate change. The extent to which the use of oil-based paints used for modeling degrade the environment is perhaps up for debate, but the fact is we now find it difficult to source the old painting materials in many regions. (Paint companies seem to favor discontinuing traditional paints not only because the environmental regulations affecting their production seem to be fewer and because the water-based paints don't last anywhere near a long which means they sell a lot more of them.) Great improvements in "eco-friendly" coatings have been made in recent times, but the fact remains that the "green stuff" is simply not anywhere near as good as the traditional materials. (An oil-based house paint job will last twenty years. A water-based house paint job will last probably less than ten years, and who knows what the actual "carbon footprint" of the synthetic paints really is, compared to that of the old turpentine and linseed oil "plant-based" paints. Oil-based automotive coatings never turned cloudy and flaked off like the modern water-based "clear coated" auto paints now do.) Some oil-based specialty coatings are still available in "VOC restricted" areas, usually packaged in smaller quantities. Considerable savings in cost and higher quality finishes can be achieved by using these products in modeling. Quality finely ground high-pigment artists' oil paints and "One Shot" brand sign painters' paint serve well for modeling, but the user will have to learn how to condition them for use and mix their own colors. Anyone unfamiliar with mixing colors and using paints and other coatings should spend some time googling YouTube videos or finding an experienced artist or fine-finish painter to tutor them.
All in all, the one thing that really must be done is to test each coating for "applicability" (how well does it flow and "lay down," compatibility with surfaces and adjacently applied coatings, and color and gloss level when dry before applying it to a model into which many hours of work has been put. We don't get much more than one chance to get it right. Stripping a failed coating off of a delicate model is to be avoided at all costs.
-
Call me old fashioned, but I use shellac for priming all bare wood. It is dirt-cheap and about as water-impermeable as anything and very easy to use and clean up. It seals the wood pores and inhibits moisture absorption and movement of the wood to some extent. (It's soluble in, and easily cleans up with, alcohol and the shellac used on the artifacts found in King Tut's tomb has held up very well.) I then use a "sanding base coat" before final sanding and prep. The sanding base coat is designed to fill fine defects and to sand easily without clogging the sandpaper. It is not a water-based paint, but perhaps somebody's made one by now that I don't know about. (I use Interlux sanding base coat, available at marine chandleries.) Water-based paints can be tricky when sanding. They've improved dramatically in recent decades from the days when "latex paint" actually contained latex, but if you think about how well a pencil eraser or the rubber sole of a tennis shoe would sand... well, you get the idea. Like most "geezers," I lament the demise of the old solvent-based coatings, supposedly due to "environmental concerns." We learned to love their aromas and appreciate the results when they were used correctly. I wonder what the 300 year old Admiralty Board models we see in museums would look like today if they were painted with acrylics. None of us will be around to ever know for sure.
- grsjax, Canute and EricWilliamMarshall
-
3

Hull weathering/texturing techniques: barnacles
in Painting, finishing and weathering products and techniques
Posted
That looks more like really, really big shipworms than it does barnacles.
These are barnacles. Shelled sea creatures that are shaped like volcanoes.
This is shipworm damage from the outside. (A type of clam, burrow into the wood beneath the surface, like termites.)
This is a boat bottom in need of a cleaning and anti-fouling repainting with barnacles or mussels growing on it. The green seaweed and algae growth isn't too bad because it's been running at speed through the water regularly.
And this is a boat bottom that has been sitting still in a berth for quite some time.
You might consider looking at model railroading scenery catalogs like MicroMark to see what's available in terms of "greenery." Beyond that, it's just a matter of how creative you want to get. You might want to consider, though, that most bare mahogany is usually too coarse-grained to be suitable for modeling work (although some high-priced species are not so much so,) and no boat with a mahogany hull would ever go without paint or varnish, and particularly so below the waterline. The mahoganies don't weather well if left bare.