md1400cs
-
Posts
2,862 -
Joined
-
Last visited
Content Type
Profiles
Forums
Gallery
Events
Everything posted by md1400cs
-
 Frank, Thanks as usual your posts are so nice. Michael PS: So we're both heating up after our west coast freeze of well,,,,,,+40º last week (:-) supposed to be 75º in my neck of the woods on Tuesday. Hmmm may have my first outdoor cigar of the year (Admiral does not tolerate them indoors)--don't blame her. Though I very infrequently enjoy one in any case.
 -
Absolute perfection in this art form. Gorgeous !! Michael
-
Hi Mates, Buck, Lawrence, Roger, Edwin, George, as well as the like clicks, and to those just passing through (:-) Thanks soooo much for your really "over the top" kind remarks-so encouraging BUT I must say that this part of the build, the false carriages idea, are a result of seeing Frank's (fmodajr) beautiful work on his Vasa. He, wisely installed these very early in his build, and those pics. kept gnawing at me. I knew that I needed to do something about those "missing" details. So Frank -- thanks !!! As they say copying someone else's work is the best form of flattery. Regards, MIchael
-
John, Gorgeous!! Well done. A real beauty. Michael
-
Frank, Nice detail work on your platforms, they will look great once installed. Michael
-
Andre, Yes, those anchors look great.... MIchael
-
Joachim, Juergen, Steven, Vivian, Thanks for your kind remarks. Always much appreciated Michael
-
Buck, Your level of miniature details are well "outa sight" Michael
- 515 replies
-
- 2
-

-
- artesania latina
- whaleboat
- (and 1 more)
-
ROYAL CAROLINE 1749 by Doris - 1:40 - CARD
md1400cs replied to DORIS's topic in - Build logs for subjects built 1501 - 1750
Doris, Good luck with your new career in 2015. Also, your flag waves in the air so realistically, I so visualize the wind-----another talented achievement, Will you ever stop surprising (:-) Please don't. Regards, Michael- 883 replies
-
- 2
-
-
- royal caroline
- ship of the line
- (and 1 more)
-
Nigel, Oh my! all of the previous remarks are mine as well all in CAPITAL letters. Your work just keeps getting better and better, hard to believe possible!! Cheers, MIchael
-
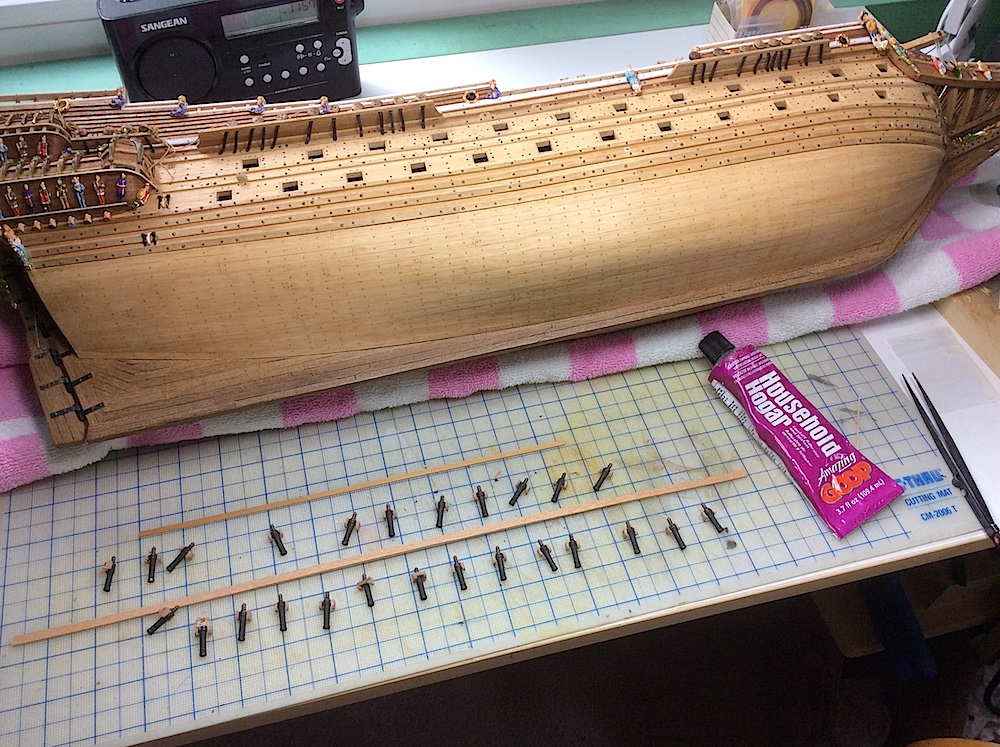
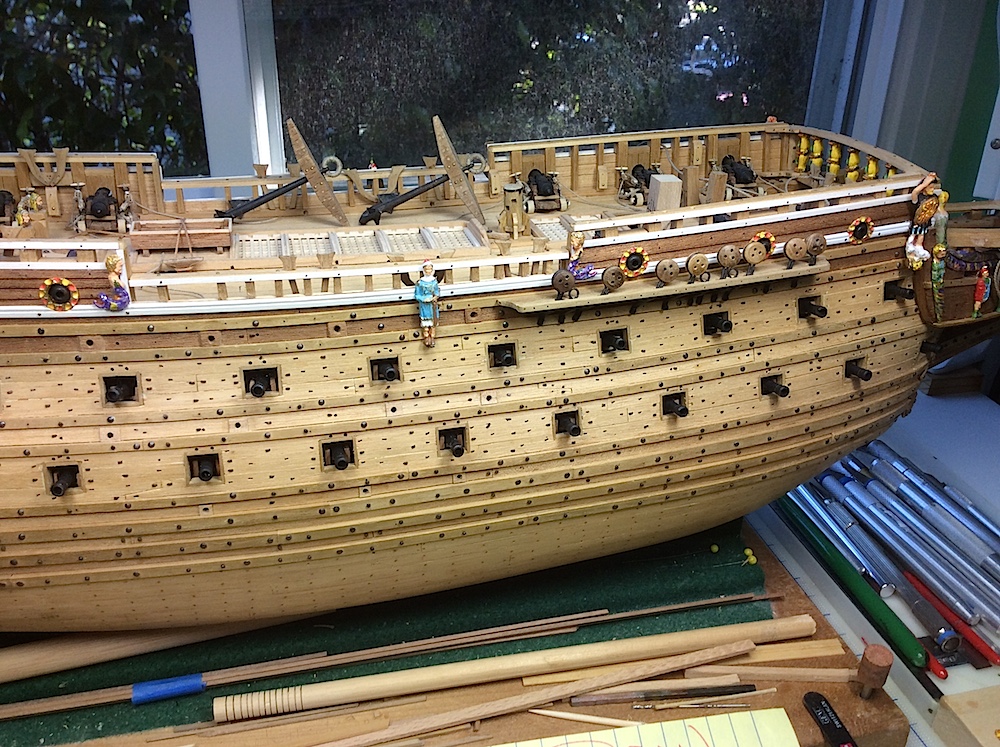
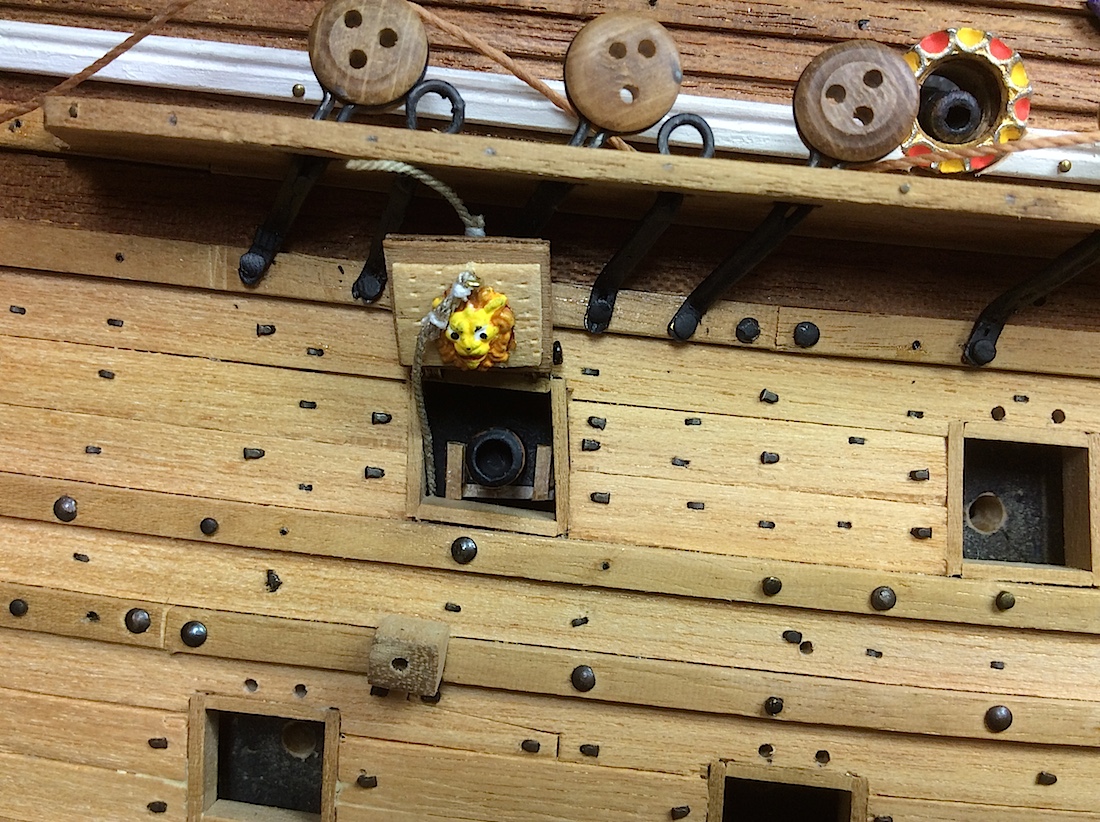
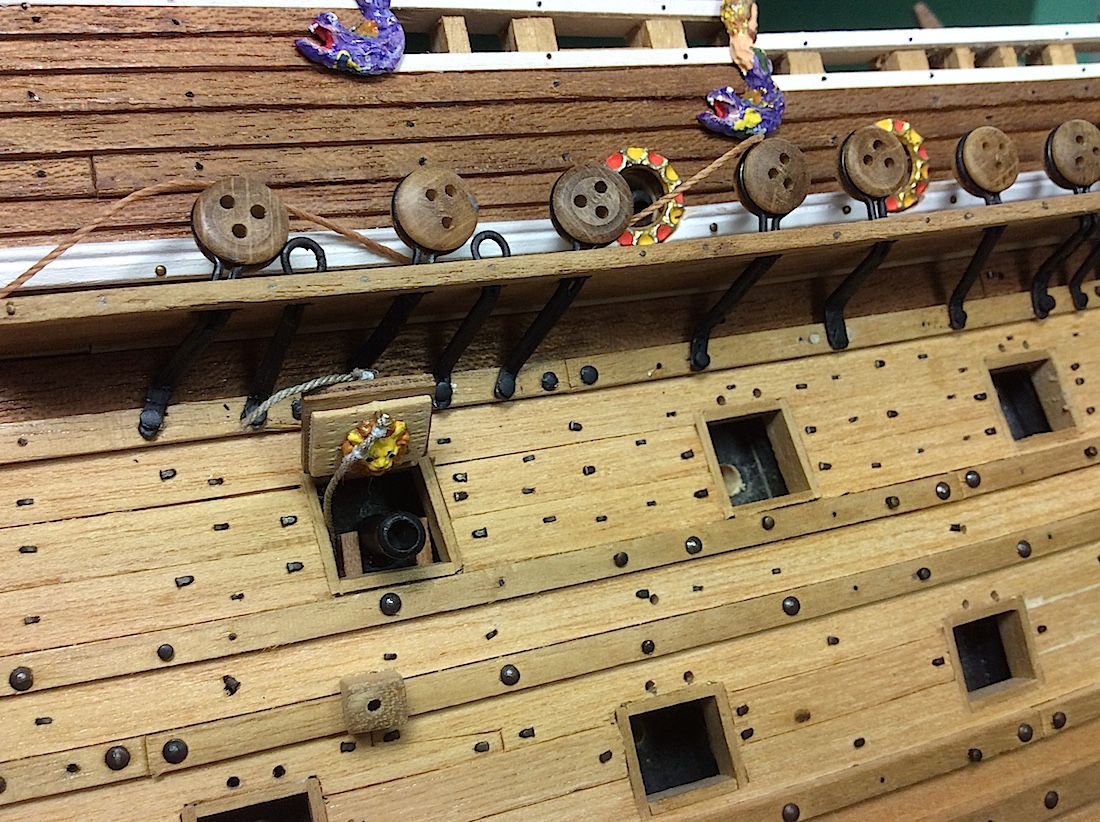
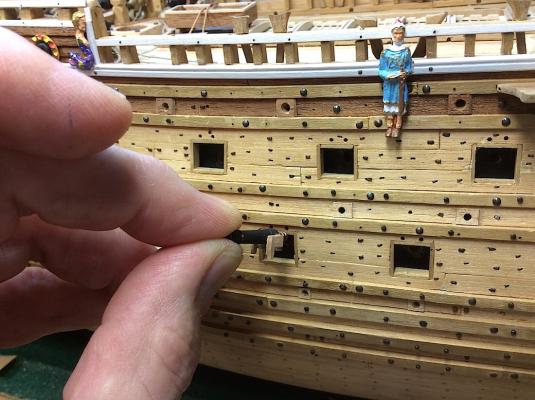
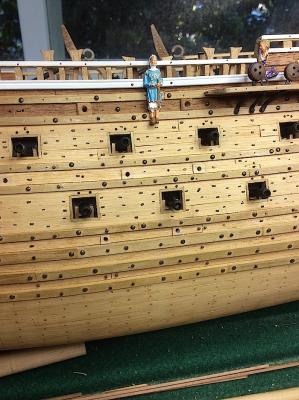
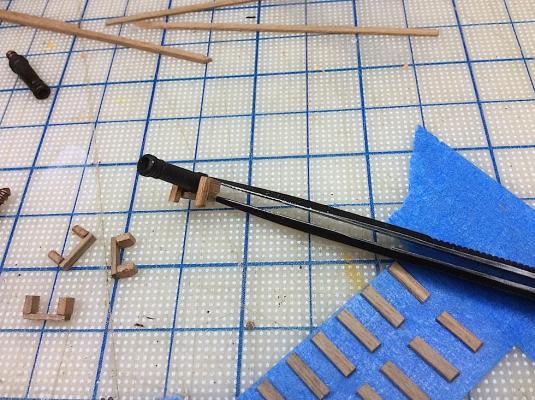
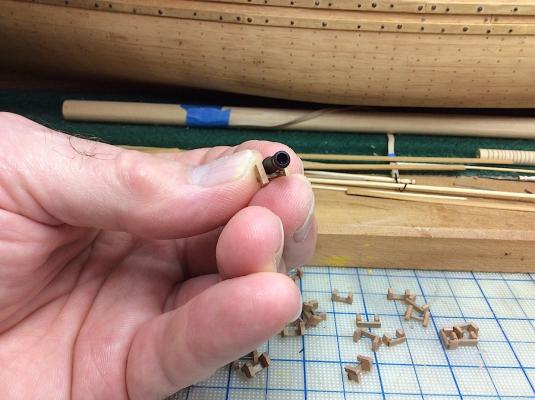
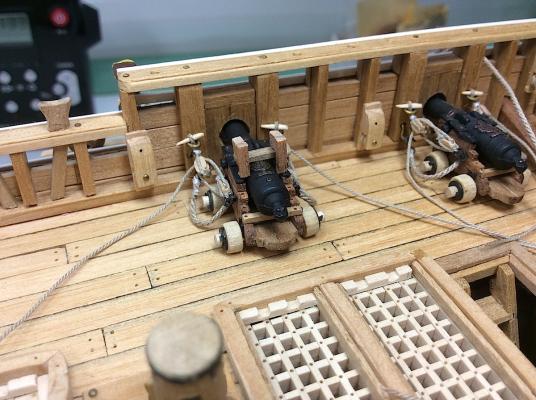
Hi Mates, Minor update, completed building the false carriages, and began installing them along with their cannons. I needed to adjust the size of each dummy carriage in order to allow entry and proper positioning within the hull frame insert. As I’ve noted each gun port is somewhat different in size. Hence you see them on that pic pic. in their proper order for installation after adjusting their relative sizes. I also learned (for future builds) that I will pre-drill the dummy cannon holes into the false inside framing BEFORE installing and gluing these on the inside of the hull. Turns out that some of my post-hole drilling was not well centered for some of the dummy cannons, had to go back in and adjust many of the holes. AND one of my framing bits fell away (too much pressure with the drill) Grrrrrr. I rattled the ship sideways and the piece sort-of re-appeared near its proper place. After much finagling, tweezers and gluing it managed to kind of be usable again. But for that dummy cannon I had to use a lot of wood extensions to create proper spacing coming through the port. Hmmmm Now onto the covers. Thanks for your likes, comments or just looking in. Cheers, Michael


-
Clipper, Good luck !! You will symbolically be following in the footsteps of the original's resurrection (:-) Given that the hull planking is the first set is an Ace in the hole starting point. Hopefully all of the plastic parts are still around. PS: You may want to build it keeping the very aged look? Cheers, Michael
-
Joachim, Thank you for your kind words. You have always been so supportive. I appreciate that you are following this build, Thank You... PS: I also wish you a happy new year..Looking forward to updates of your Excellent AV Regards, MIchael
-
Theo, Your work is such a pleasure to follow. Your oars and barrels are works of art. That small launch is just as great. Cheers, Enjoy your N Year's Eve !! MIchael
-
Roger, Thank You, enjoy your holiday as well. Cheers, Michael
-
Frank, Nice update. Your platforms are superb. One question, what did you use for those nails? I may follow your lead, and not re-build the Corel's weak platforms from scratch (as I had planned), you really captured the look. Enjoy your holiday, We're off to San Francisco to spend time with our son, his wife, and her wonderful family (;-).... Michael
-
Bruce, Yes, your build is looking to be an excellent project. Very nice start. Michael
-
reklein, What you are saying IS so true. We lost power for about 1/2 an hour on our block this morning, my wife and I were besides ourselves, she could't dry her hair the garage door would not open, I had no internet, tried to read the morning paper without artificial light - OMG. This planet's human survival would under no circumstances survive today without electricity. The addiction is absolute... PS: Thanks for dropping in much appreciated. Michael
-
Mates, Thanks for your nice thoughts. Always nice to receive. Buck, steal as much as you like, I have certainly stolen many ideas following other builds here at MSW. appreciate the compliment GMT, you were the catalyst for me building weather deck carriages piece by piece after seeing those on your Trinidad SO beautiful--thanks FrankM you are the one that made me decide to "fix" those missing gun deck carriages. Brilliant idea on your part, excellent foresight that I missed. Your Vasa is also pleasure to follow. All-in-all; JPett, Nigel (of course), Frank (almost neighbors aren't we) , and all of you kind members looking in, thanks for following along, helps to make our hobby more social. Let's face it most of us work alone in our shipyards with hardly a visitor, apart from a voice from somewhere across the house saying "dinner is ready" (:-) So our internet communications, and friendships help to keep us connected. Its a nice perk of our hobby.... OK time for my morning laté Cheers, MIchael
-
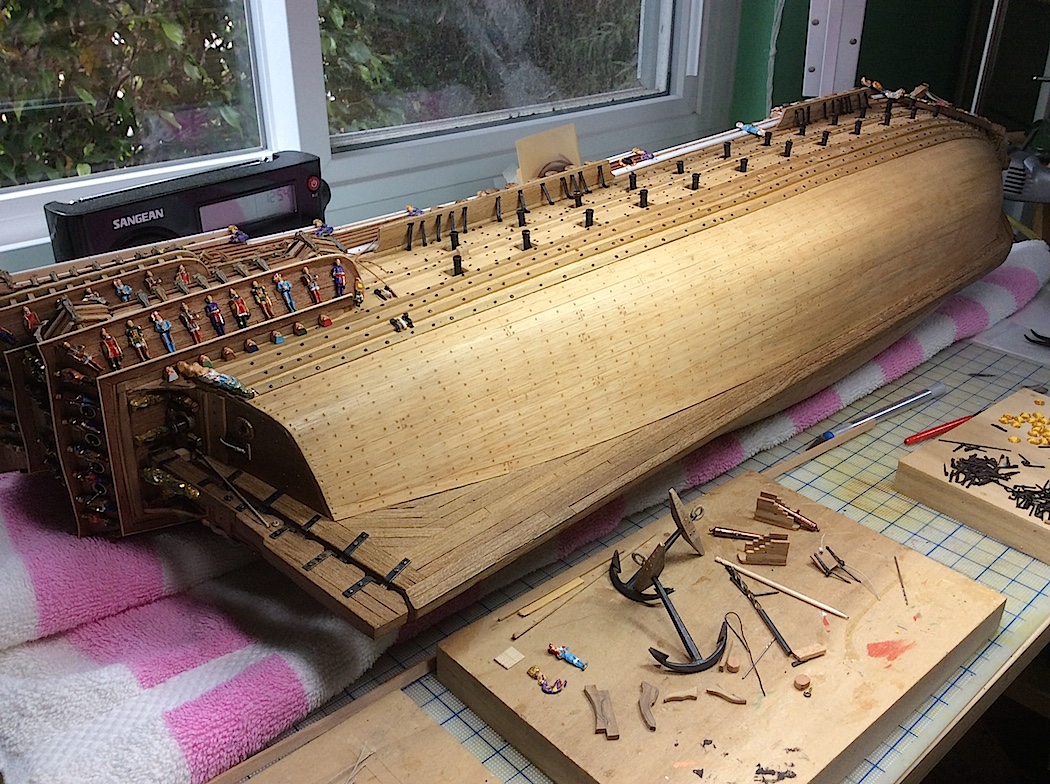
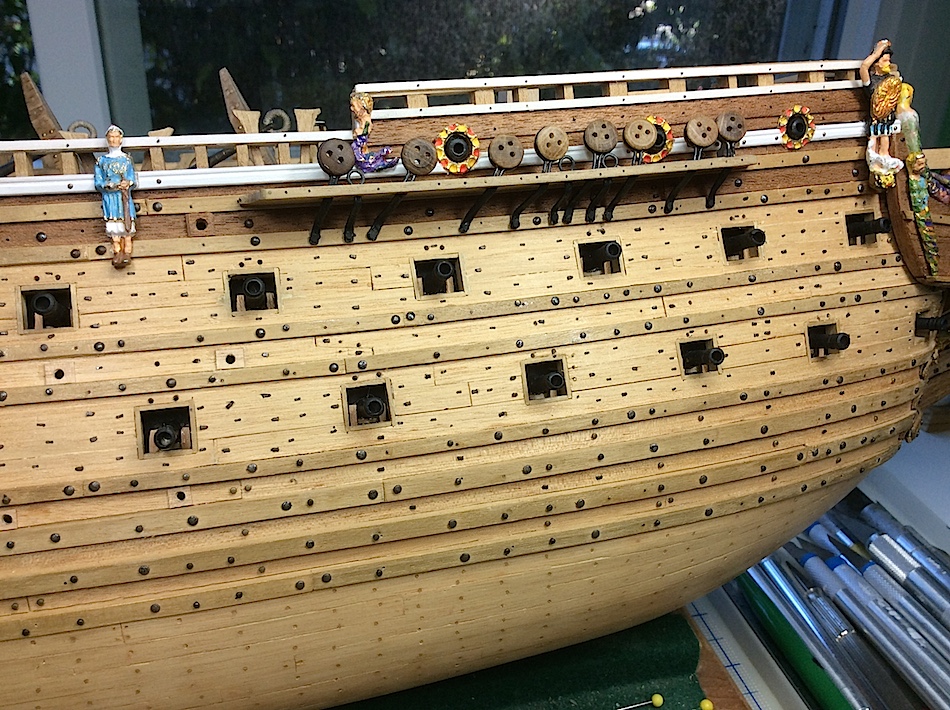
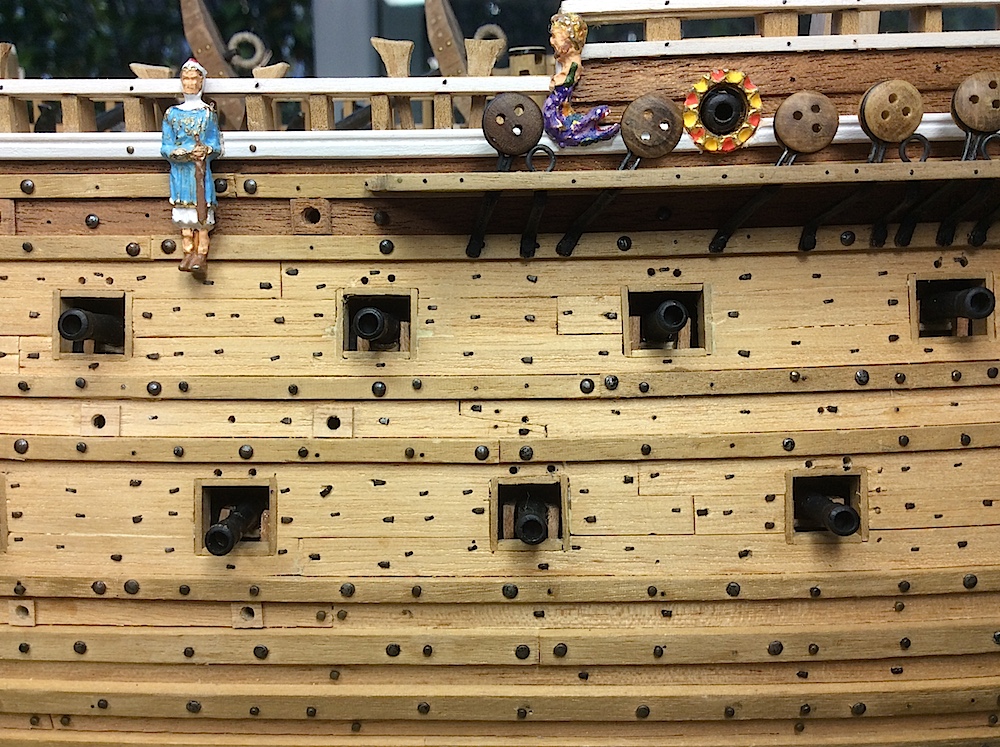
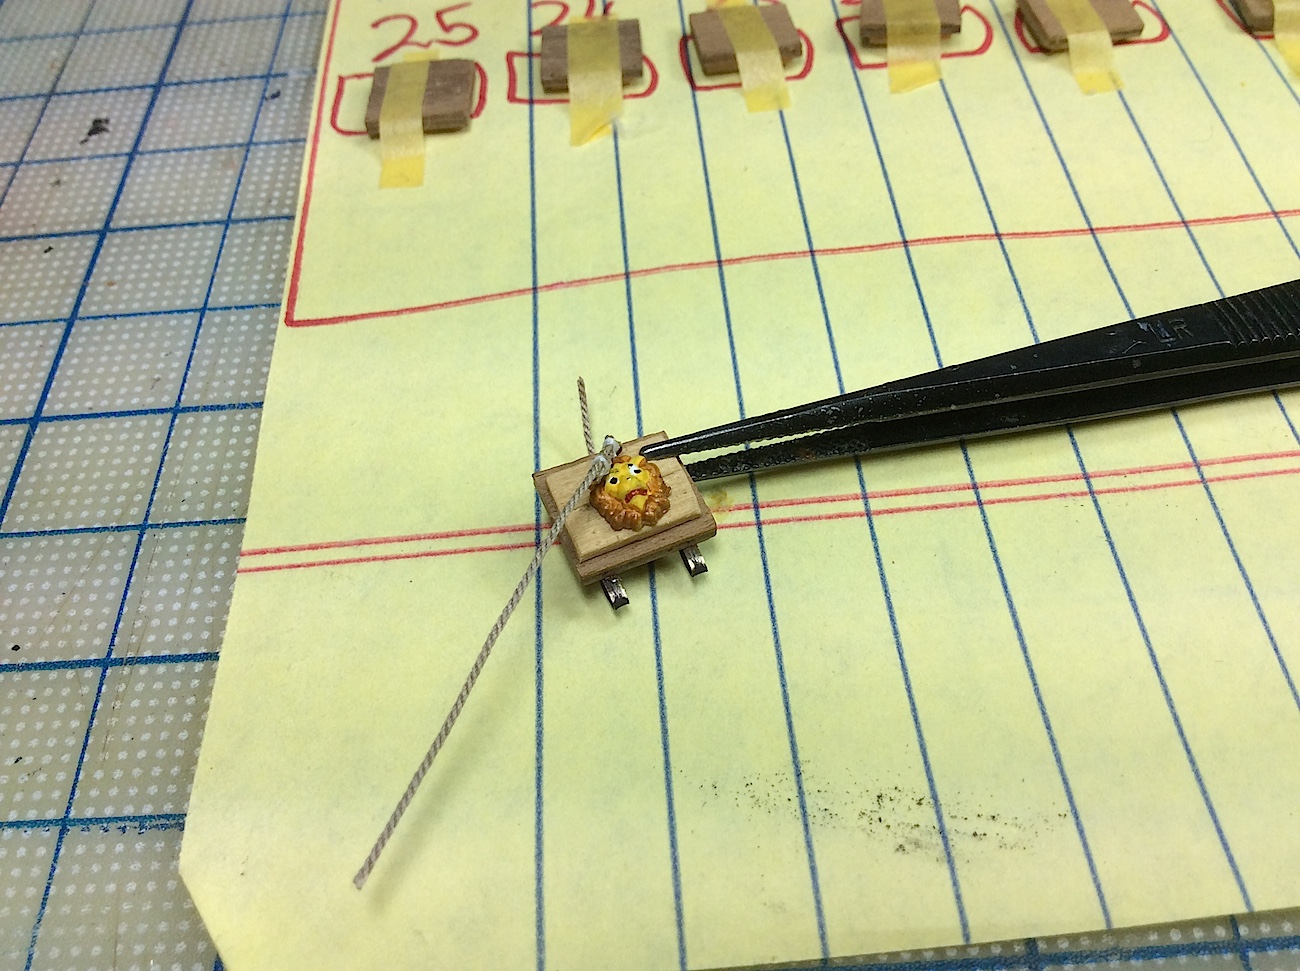
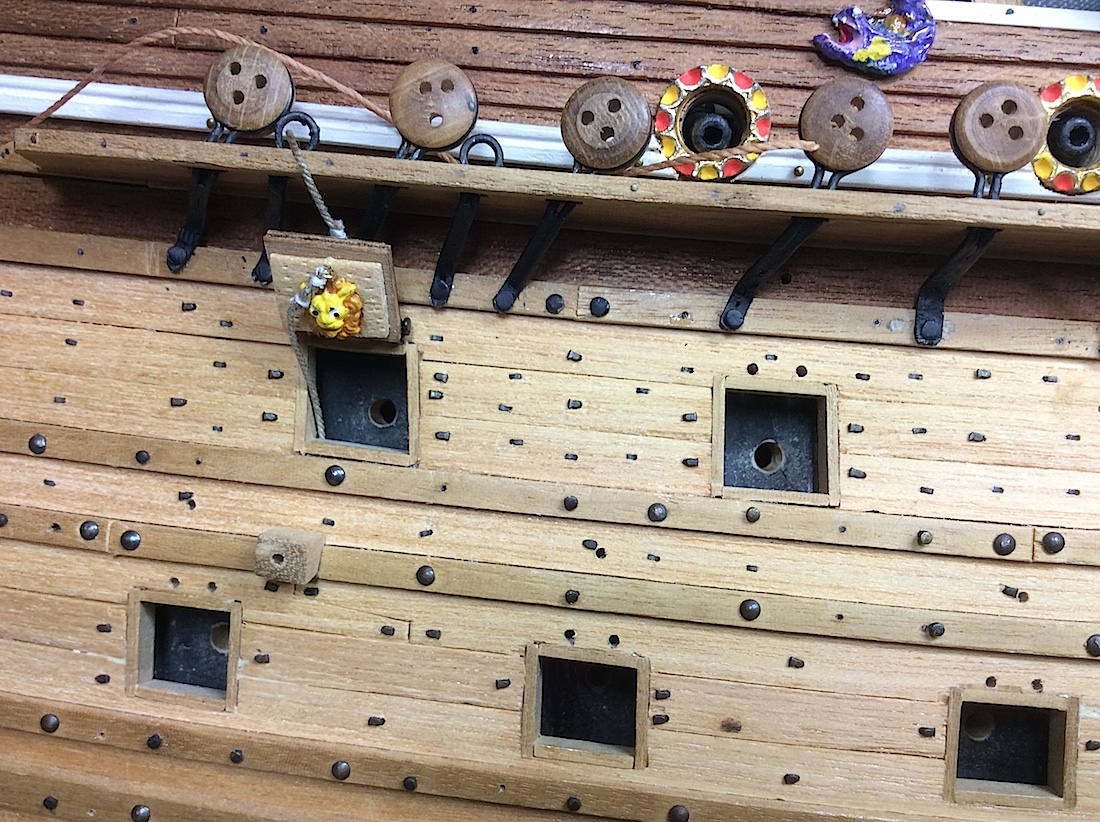
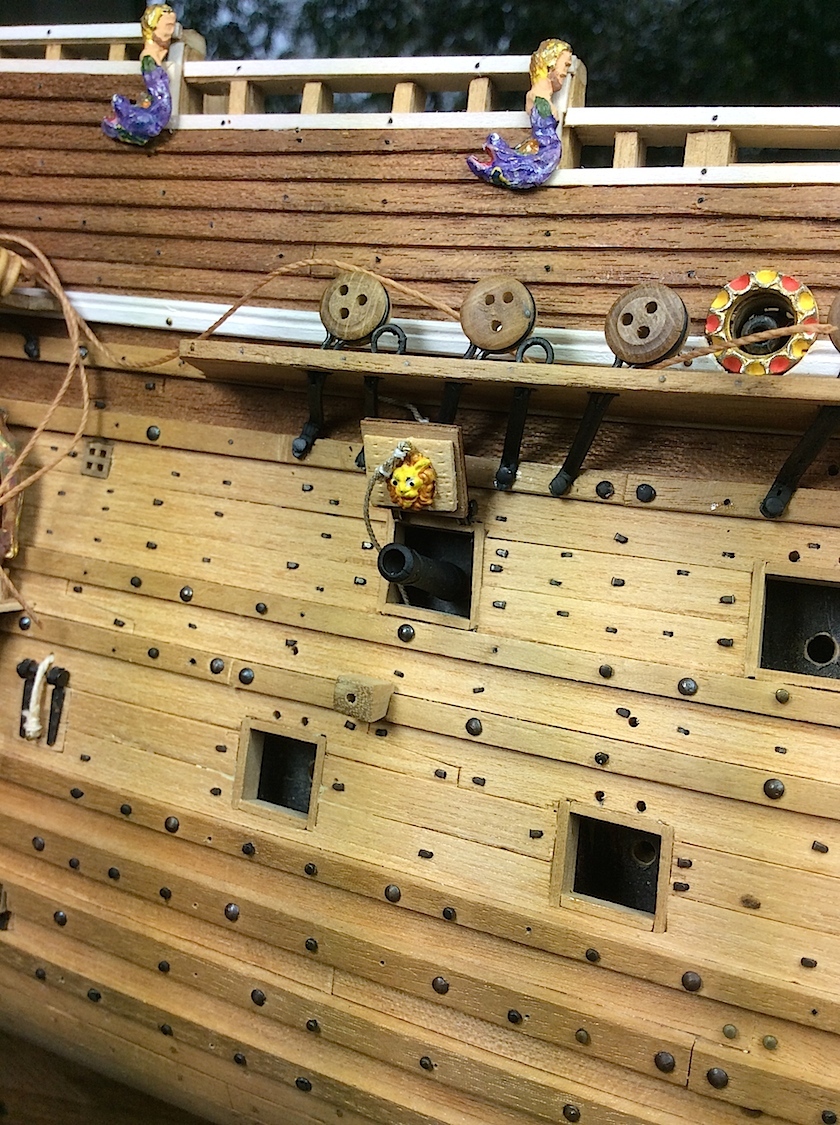
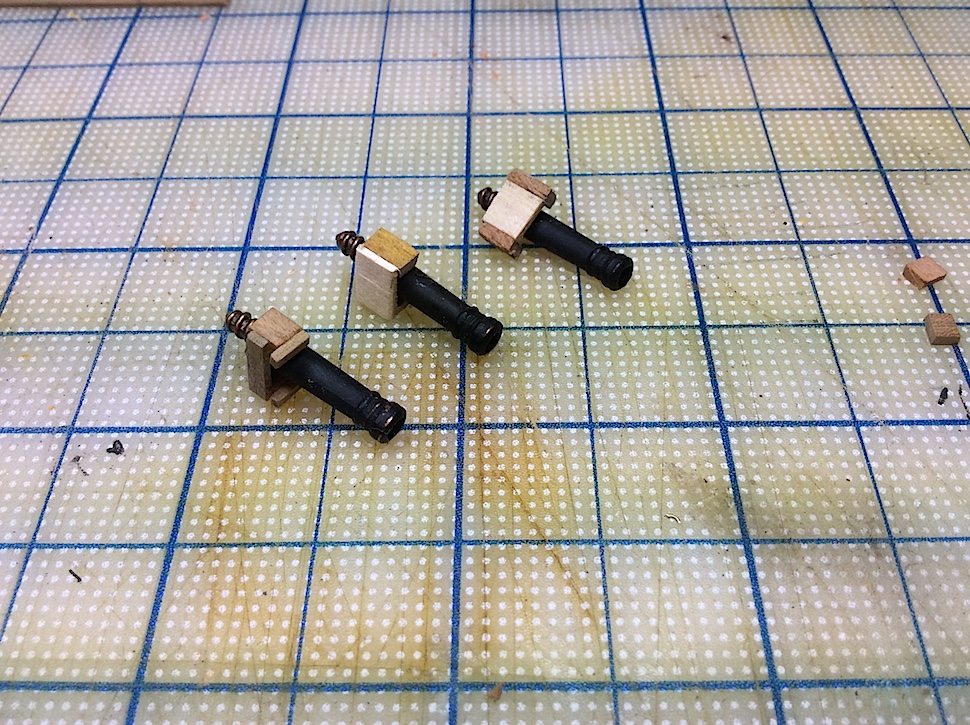
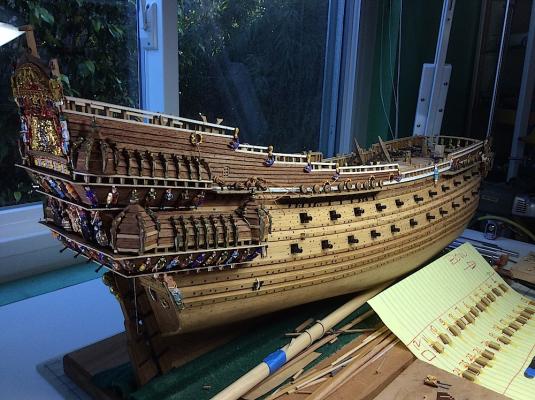
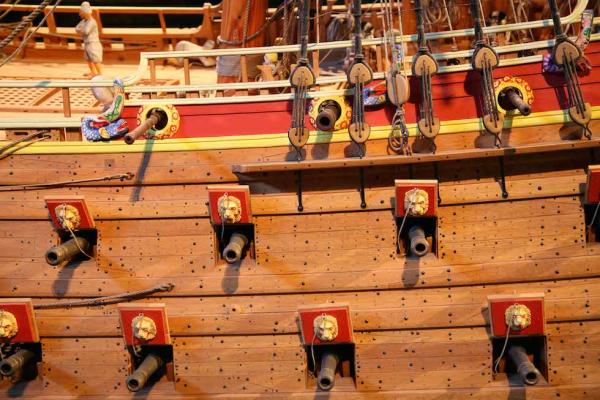
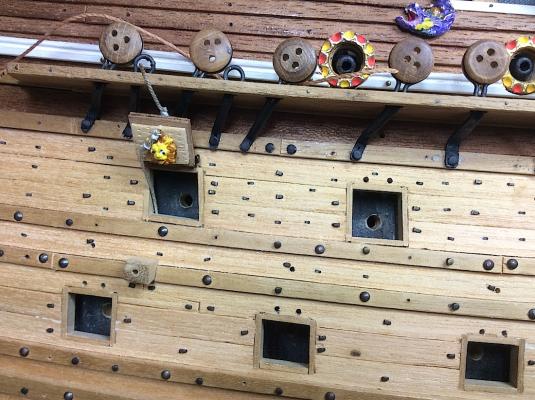
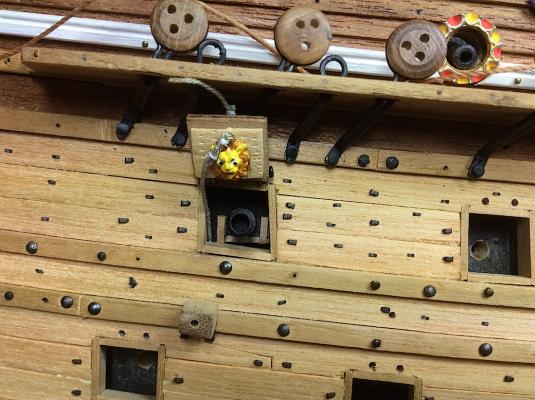
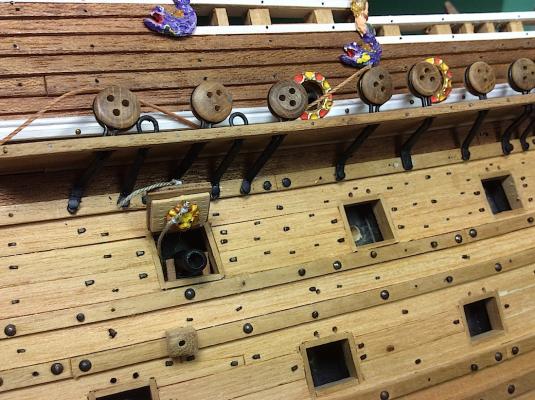
Hi Mates, Thanks for your nice comments, likes and just looking in- still and always much appreciated. Continuing with the cannon door assemblies and dummy cannon installations it struck me that I really wanted to also add upper and lower “carriages” look. I looked at the positioned (but not yet fixed into place) first door, and its cannon - wanted to do something about the missing carriages (pic 3). So now I needed to simulate these bits. I played around with some ideas (pic 4), the first two carriages, left to right, did not drop down enough into the dummy opening (pic 5). Added a longer leading edge vertical strip, looked better (pics 6 & 7) ------------------------- I was going to use the Proxxon MF70 and cut a groove into a long piece of timber, but I still would have had the leading edge visual problem, and I imagined that if I tried cutting tiny little slivers of “U” shaped wood, I would loose most to breakage. My fear of the unknown J So the pics were my solution. Made also sure that the wood framings were of the same diameter as the weather deck installs (pic 9) I’m comfortable with this. These will get “lost” when one looks at the finished ship, but for me it adds a level of detail to the dummy openings that seem to work. Labor intensive, for sure. Each dummy has 5 pieces X 50 Hmmm that’s another 250 questionable parts added to this kit. Having fun-no rush on my part… PS: You might note pics 2,5 & 8 (carriage bit in place) the very tip of the pull open rope for the door is a bit darker colored. That is GS Hypo at work. Thumb and forefingers bit of glue makes the rope tips hard and straight- so easy to push into its hole after positioning the doors. Here I actually thought ahead, must be some foresight going on (;-) Regards, Michael


-
Nigel, Great thread, Nice links to the Russian site. Dr Mike is well, amazing. So many amazing builders, one of whom (along with other champions) has a build log here at MSW-- Scratch build section -Alexandru HMS Victory, beyond astonishing. I'm sure that most of your reading this thread are familiar with his work/art. Regards, Michael
-
Frank, Nice update, just catching up. Good work on your part. As we know Corel really "missed the boat" on this part of the kit; very weak. Billings got that part so "right" Hmmm Nice fix on your part. Cheers, Michael
-
Let's talk 3D printers.
md1400cs replied to Keith_W's topic in Modeling tools and Workshop Equipment
Mark, Thanks..... -
Let's talk 3D printers.
md1400cs replied to Keith_W's topic in Modeling tools and Workshop Equipment
In two years they will be MUCH better and MUCH cheaper http://www.amazon.com/dp/B00NA00MWS?ref=x_disp_44_96_1_3 It will be interesting to see how some of our members apply this to part of their builds Cheers, MIchael PS this might also fit under Nautical General Discussion ?!