overdale
-
Posts
354 -
Joined
-
Last visited
Content Type
Profiles
Forums
Gallery
Events
Everything posted by overdale
-
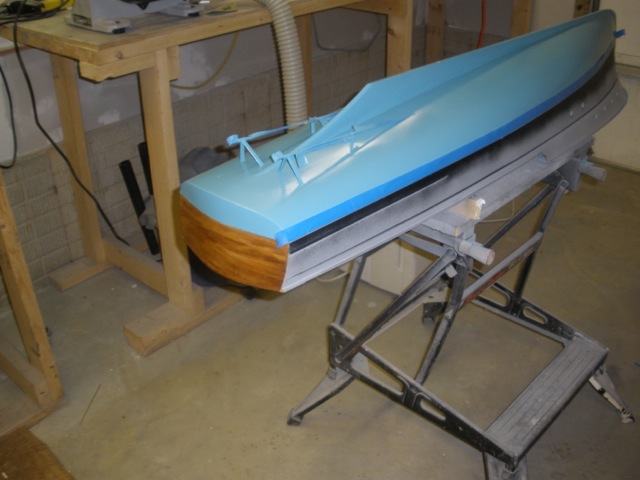
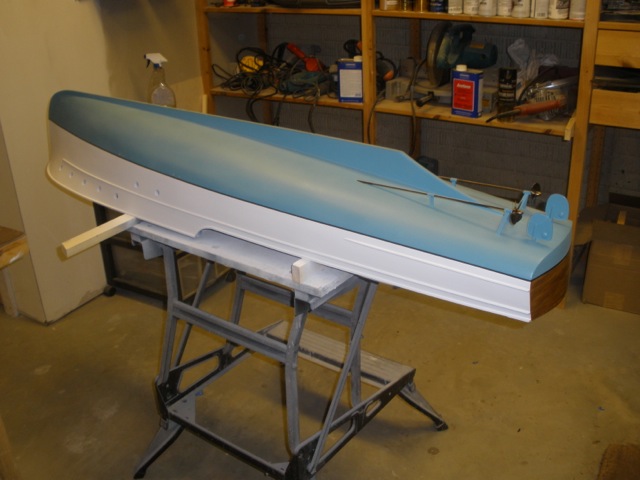
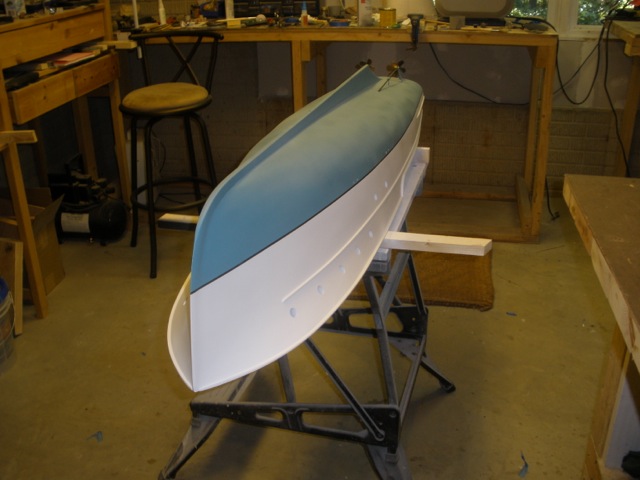
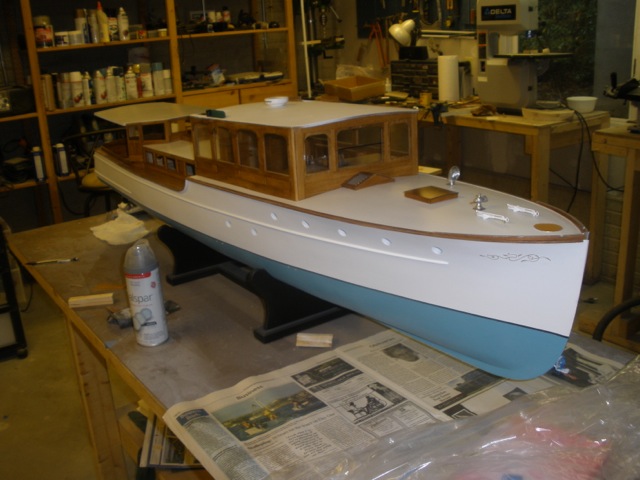
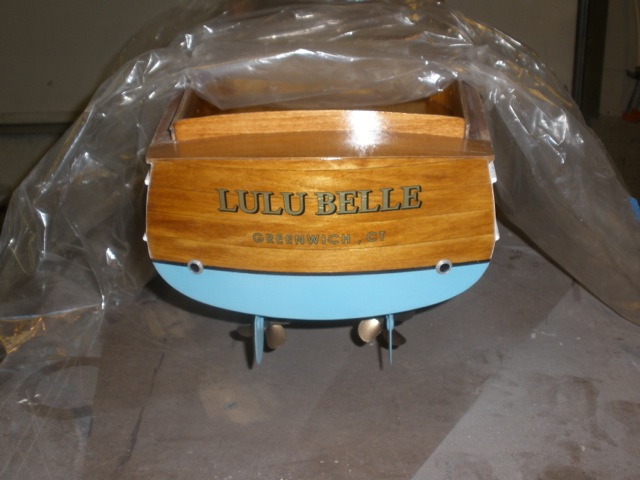
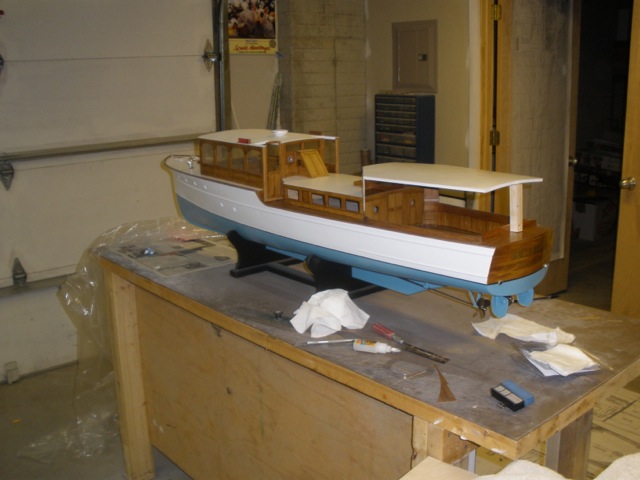
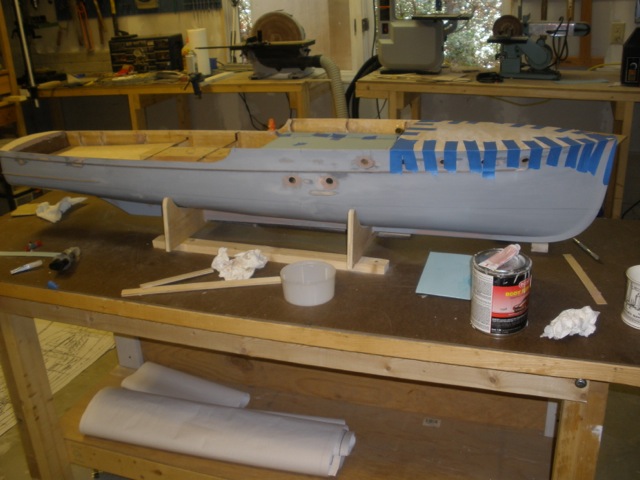
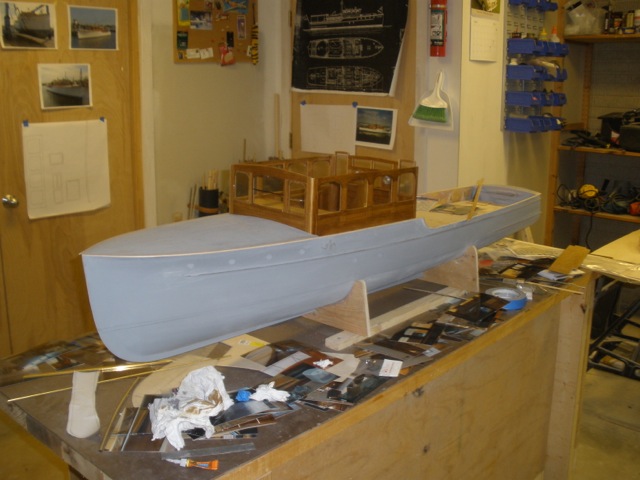
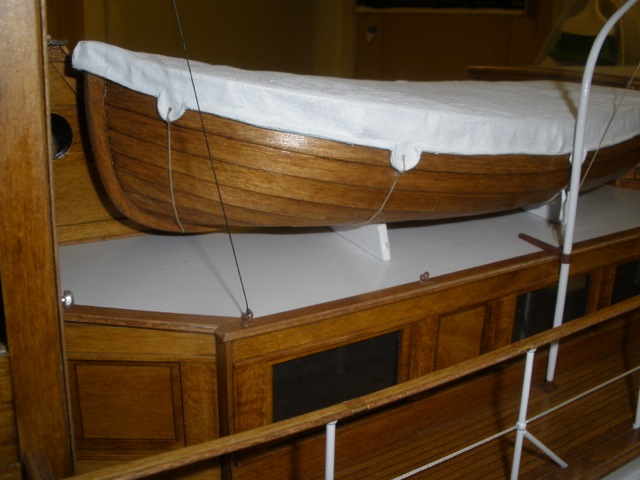
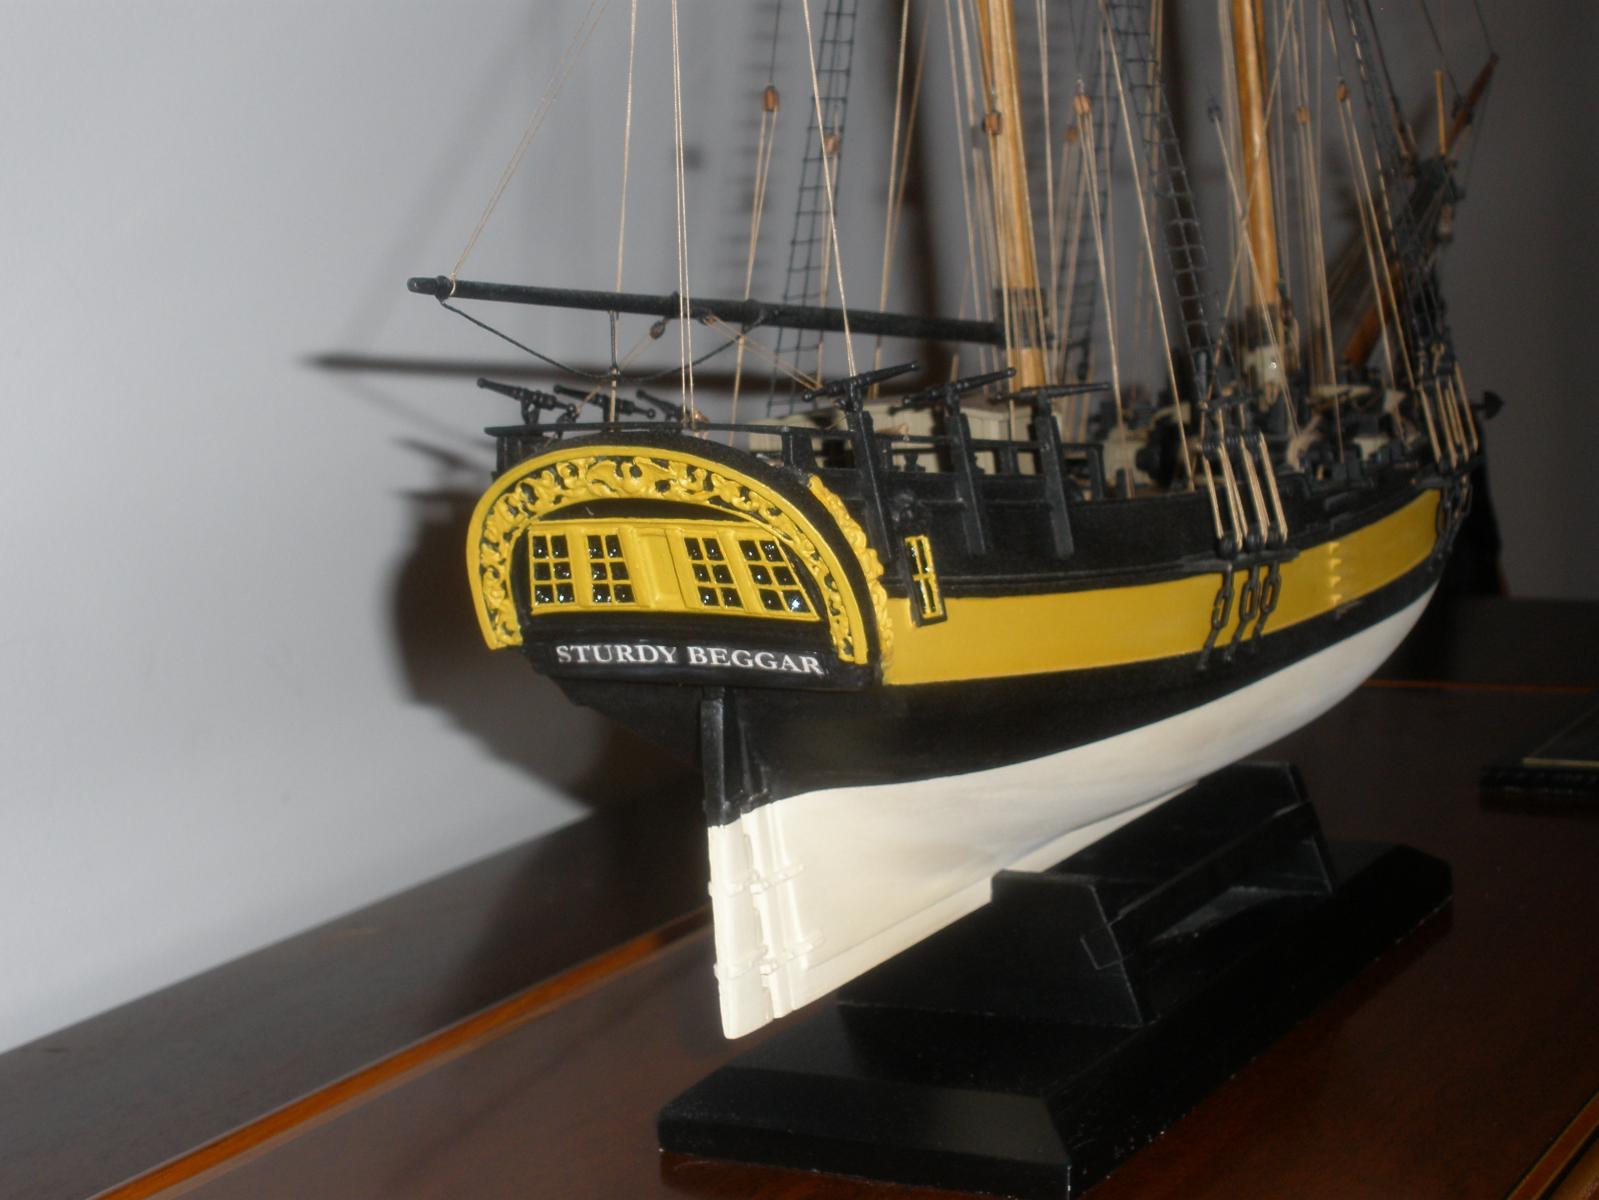
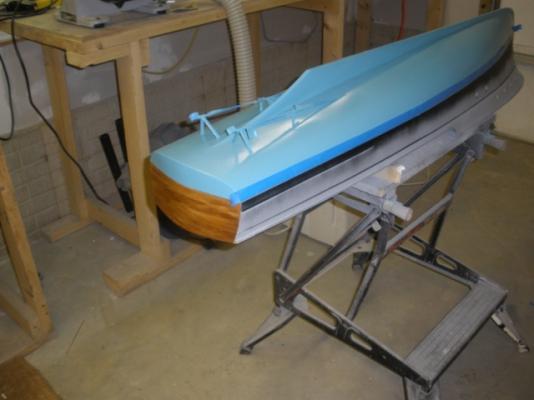
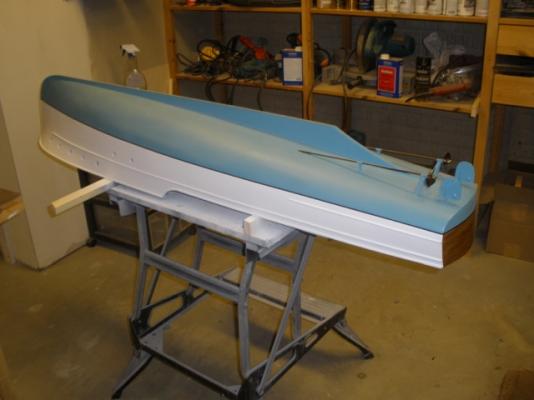
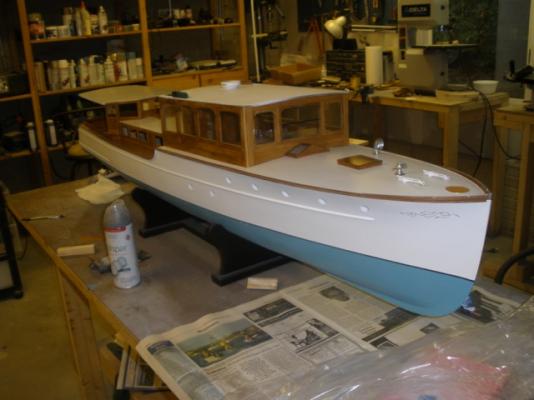
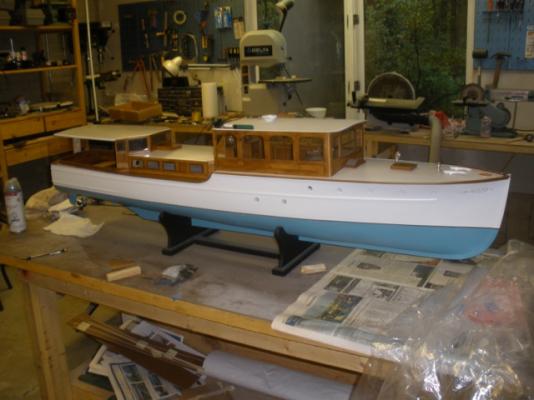
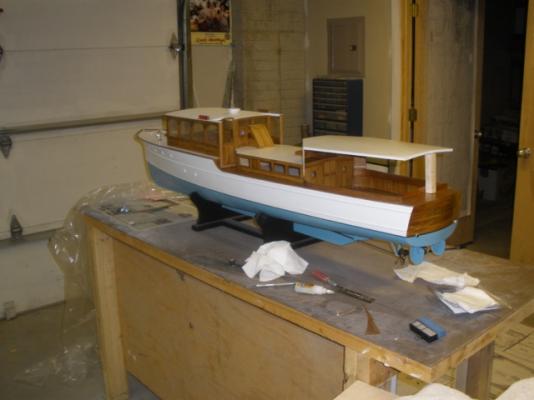
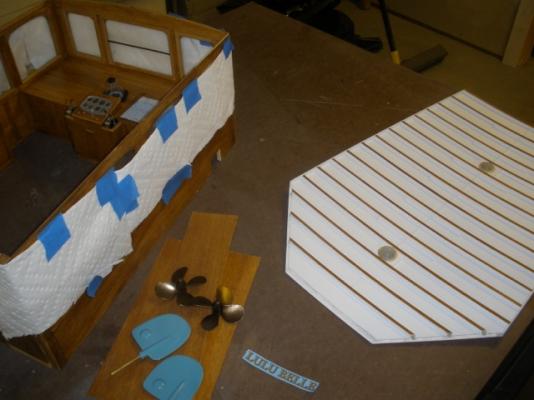
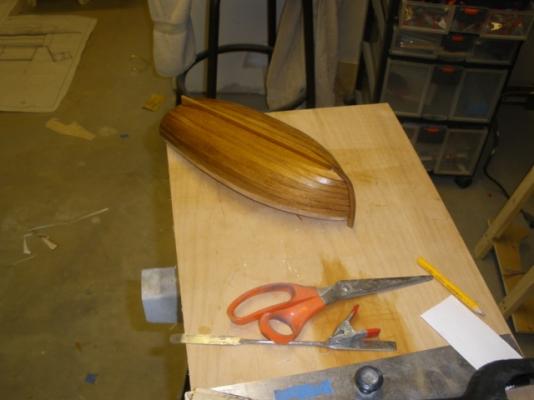
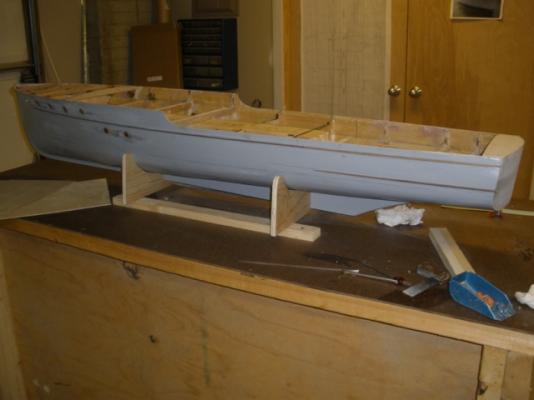
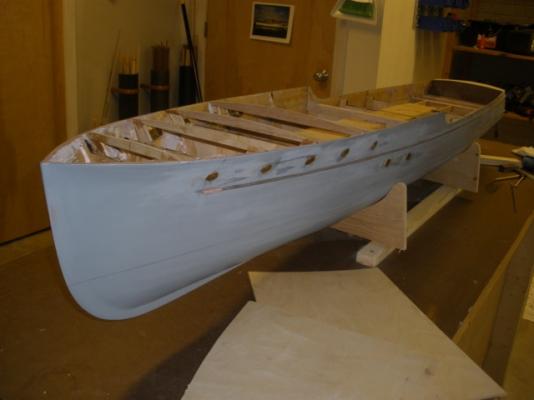
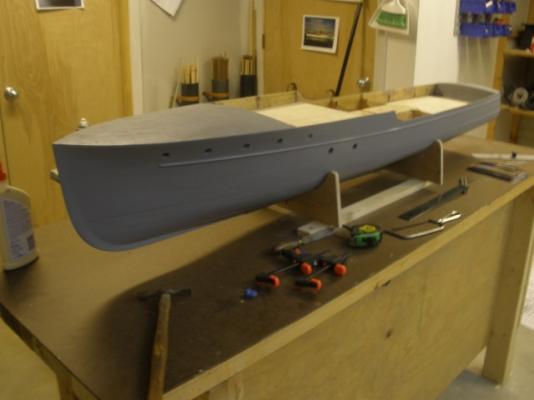
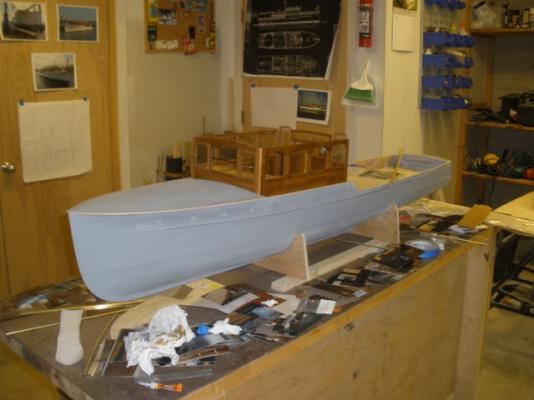
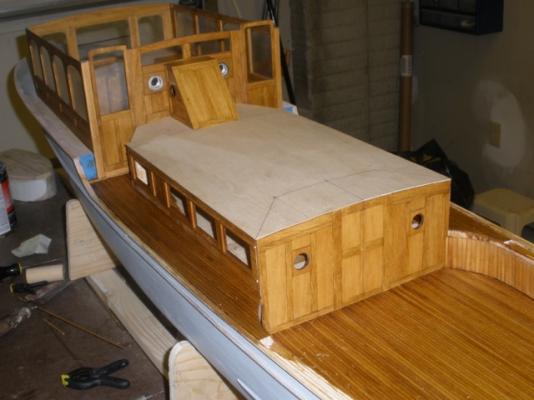
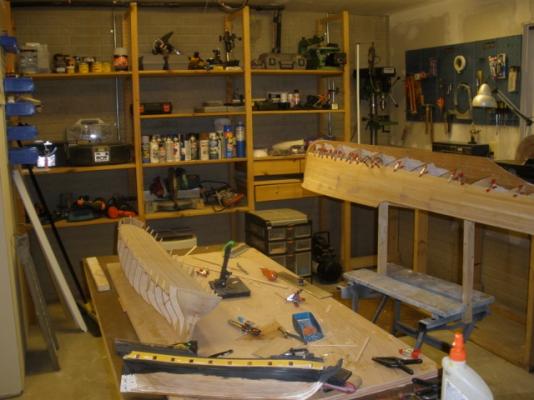
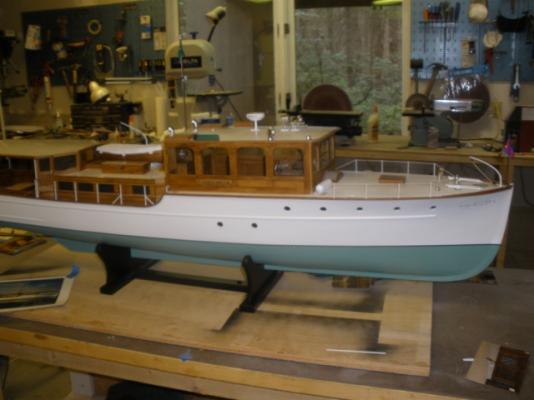
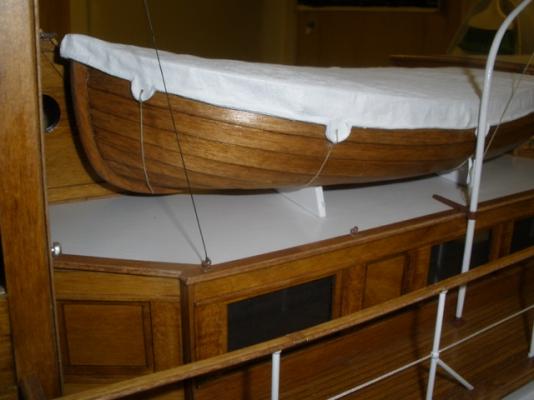
 Part 3. As the superstructure grew it was time to paint the hull before anything was fixed permanently. Several rub downs with wet and dry, a wipe over with a tack cloth, and then I painted the waterline area satin black. I marked out the waterline with the usual 'block at the right hight with a pencil stuck to the top of it' method and then masked off the waterline with masking tape of the correct thickness. I sprayed below the waterline the same shade of blue as the anti fouling paint on the original vessel matched from a paint catalog. The topside hull was then sprayed white in several coats using Valspar acrylic spray cans. When the hull was dry, I peeled off the waterline tape leaving a nice neat black waterline. (Much later in the build when all the superstructure was on, I got a call from the client telling me they had repainted below the waterline with a green anti fouling paint and would I mind repainting the model to match.? I almost fainted at the news, but it actually went pretty smoothly and I was a lot more worried than I needed to be. Things that seem impossible often go smoothly. It's the simplest things that can sometimes give the most trouble! I moved on to the stern which was varnished teak on the original and had a set of name decals for the various areas of the boat made up. Josh Mumia at Bedlam creations is the guy I use and he is amazing. I just have to give him a photo of what I want and the sizes, and he can match any kind of lettering in any color. After that, I added some more details to the wheel house and built the roof and the prop shafts and rudders. Finally I built the Dinghy. As this was going to have a canvas cover over it like the original, there was no point in building an interior. I carved the hull from a laminated block of Basswood and shaped it by hand. I added the keel and then marked out the positions of the clinkered planks. The planking went smoothly and started on the rear deck and roof structure. (continued)
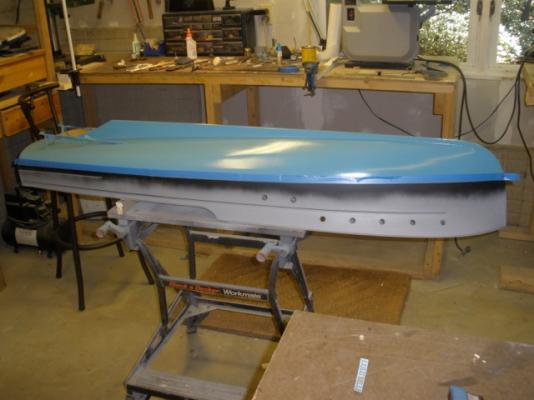


- 18 replies
-
- 15
-

-
- lullubelle
- yacht
- (and 1 more)
-
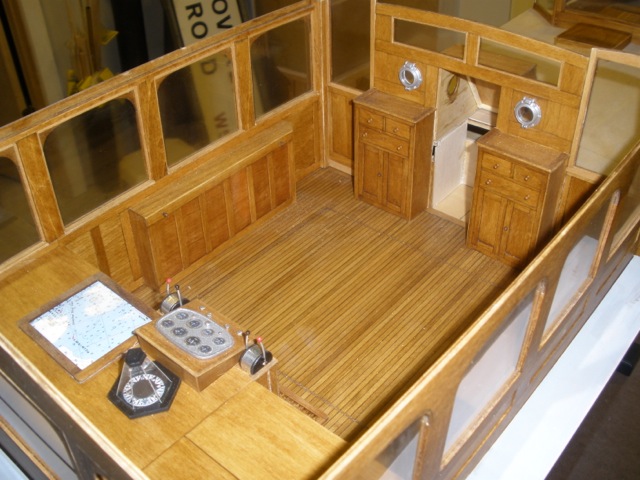
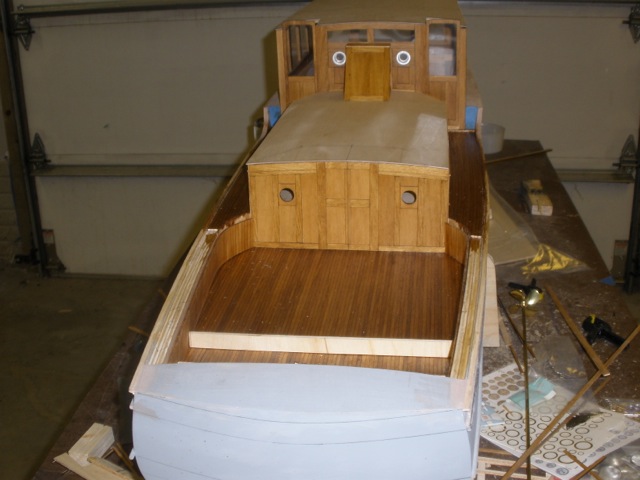
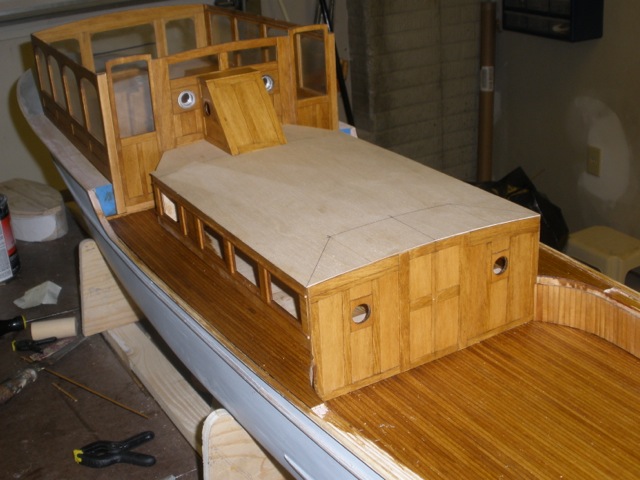
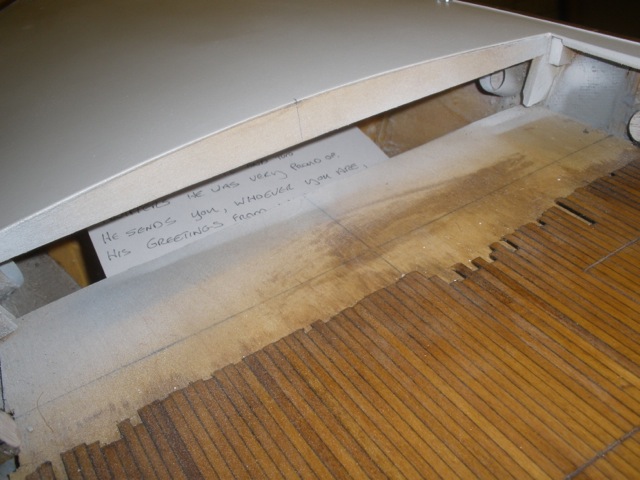
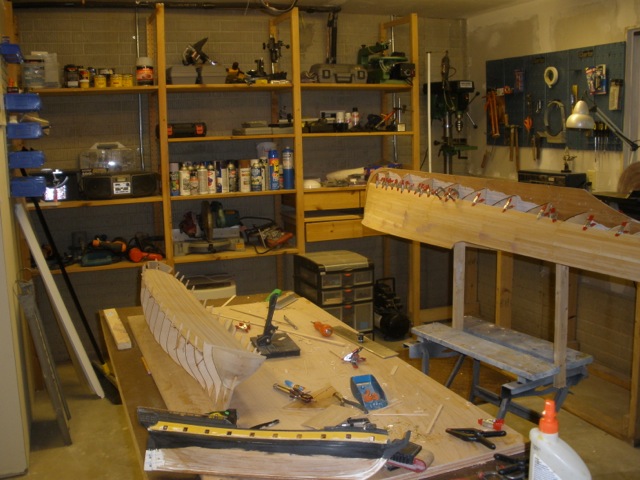
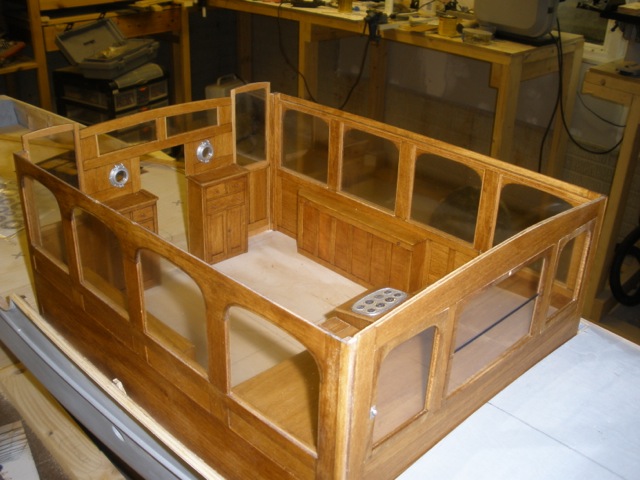
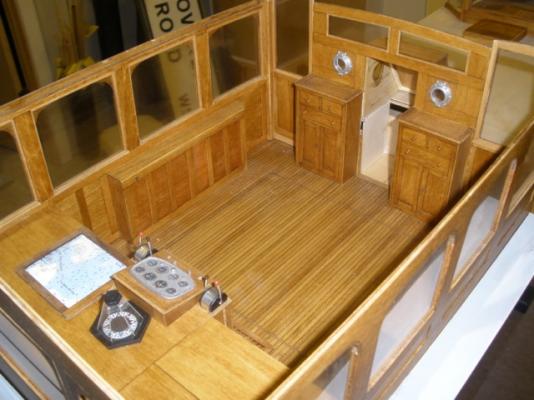
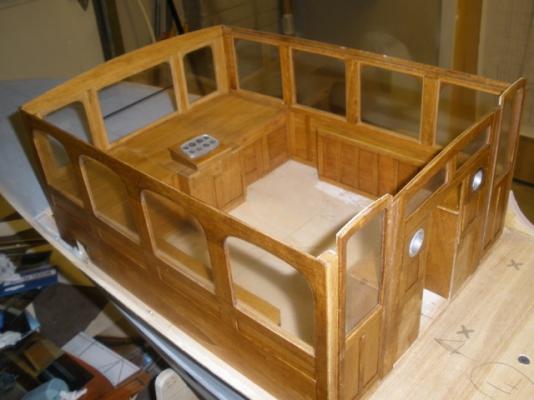
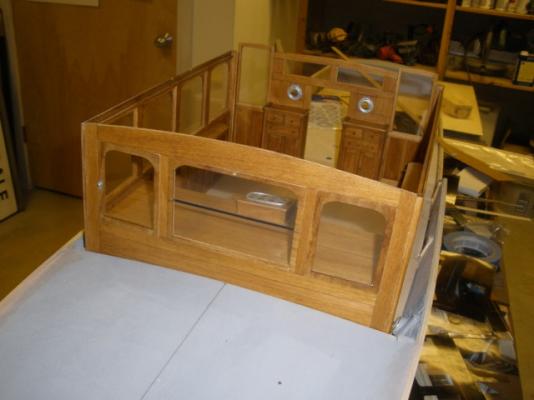
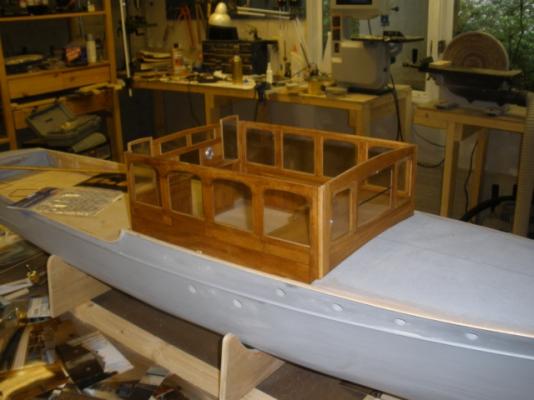
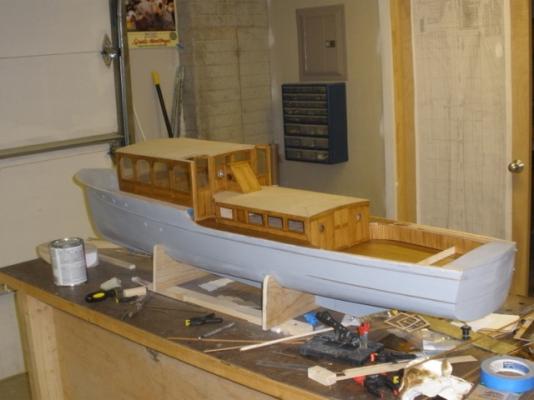
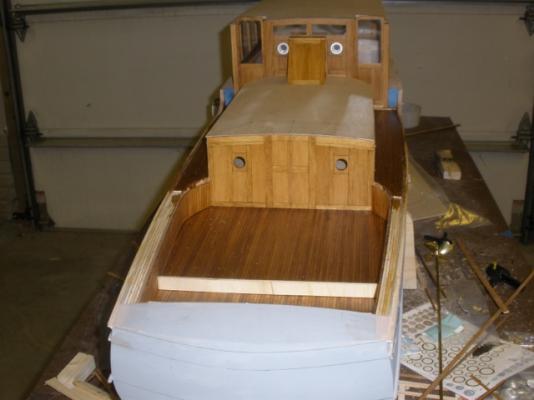
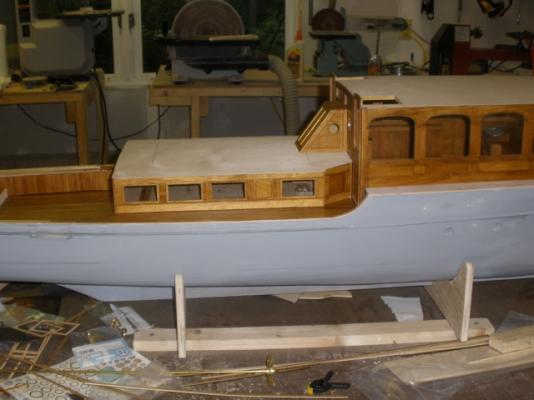
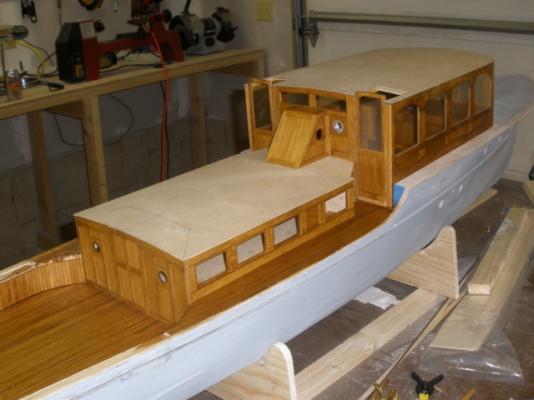
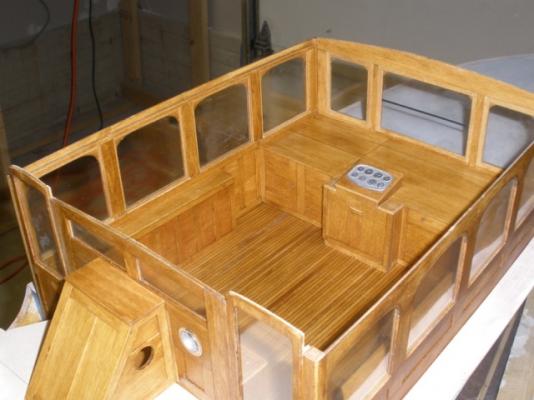
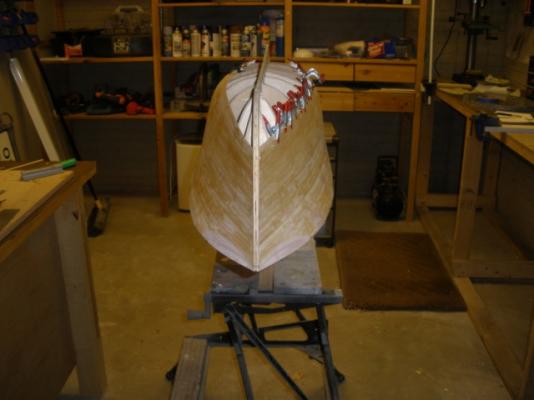
Part 2. After I got the decks fitted, I installed the port holes in the sides of the boat. I drilled the openings with progressively larger drill bits and finally lined the hole with brass tube of the correct diameter. I did this because the glass on the boat is recessed and not flush to the hull sides. As the lower deck interior wouldn't be visible, I used acrylic rods about an inch long for the porthole glass and painted the ends black. This allowed a certain amount of light to bleed into the porthole through the sides of the rod but the black paint on the end didn't allow the viewer to see into the cabin. Finally, I sprayed the hull with primer Next, I started work on the deck structures. The wheel house windows are very large and every detail of the interior is visible. There are a couple of fold-up bunks, chests of drawers, chart table instrument panel and throttles etc. even some 1920's light fittings that had to be copied from photographs. This came as a welcome break from all the planking and sanding and I soon had all four sides laid out and framed then joined together at the corners. The superstructure wood was Basswood, carefully selected for grain that looked like scale Teak. I spent quite a long time mixing oil paint and penetrating wood dyes together to get a good match for the existing teak on the actual vessel. Then I stained all the basswood sheets in one session before I cut them so I could mix the sheets together as I used them ensuring the different grain patterns were evenly distributed and I didn't wind up with one wall of the deckhouse darker than all the other three. I built all the furniture separately and added it to the interior walls of the wheel house bit by bit. The drawer handles being particularly difficult to turn due to their tiny size. I built the rear deck house and then began dry fitting all the pieces in order to see if I was at least somewhere near the mark..! It all seemed to fit so I began building the instrument panel the throttles and planked the interior deck of the wheel house. At this point I was nearly ready to fit the wheel house permanently and I decided to include my customary greeting card to any model maker in the future that finds himself below decks in the forward cabin! I usually write a little about myself and family, what day it is, what's happening in the world and a wish for them to have as pleasant a time fixing it as I had building it..!


- 18 replies
-
- 12
-
-
- lullubelle
- yacht
- (and 1 more)
-
Build log duly started. I'll add to it over the next few days.
- 120 replies
-
- 1
-
-
- mystic
- motor yacht
- (and 2 more)
-
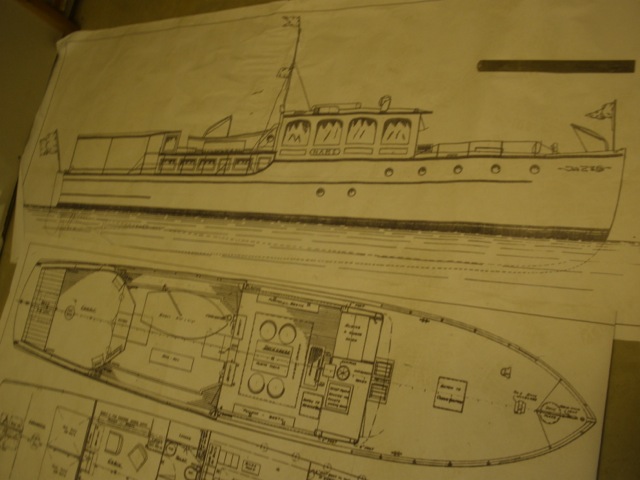
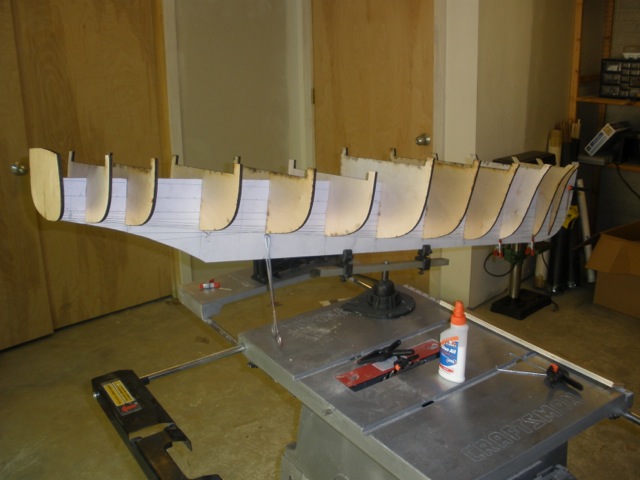
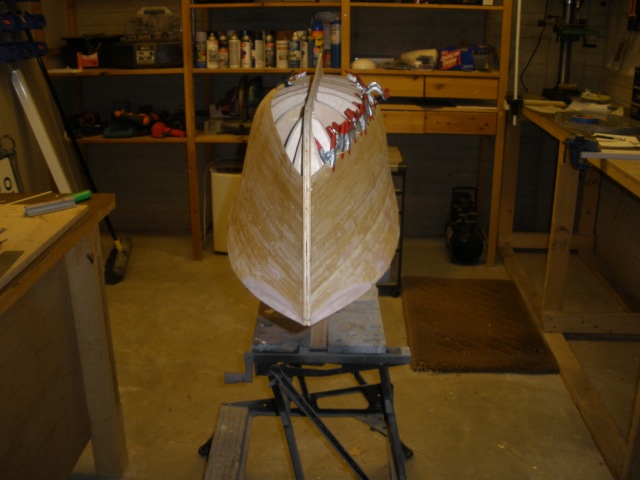
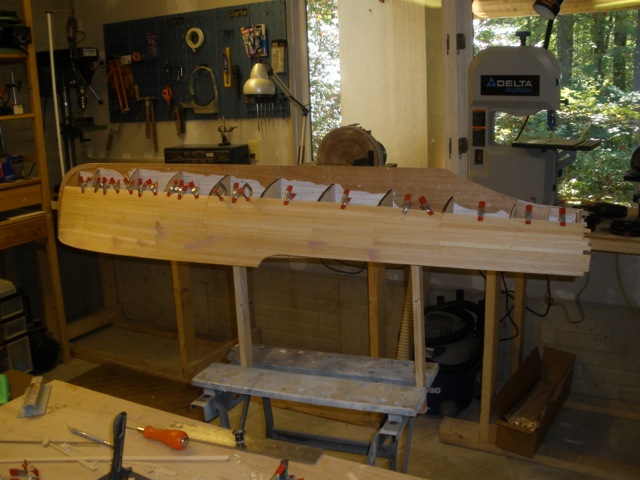
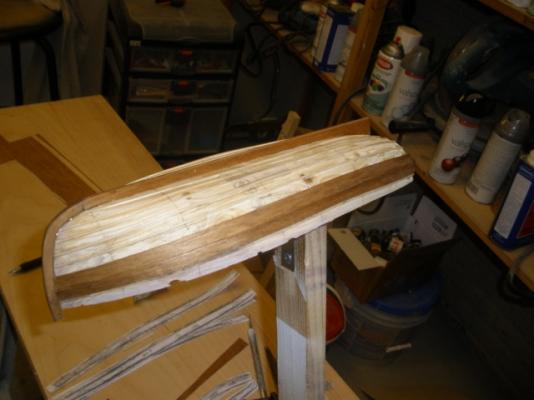
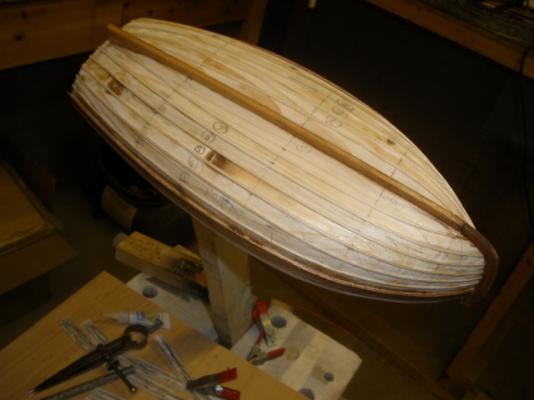
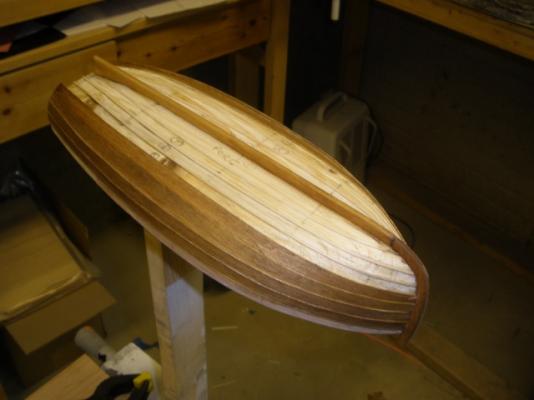
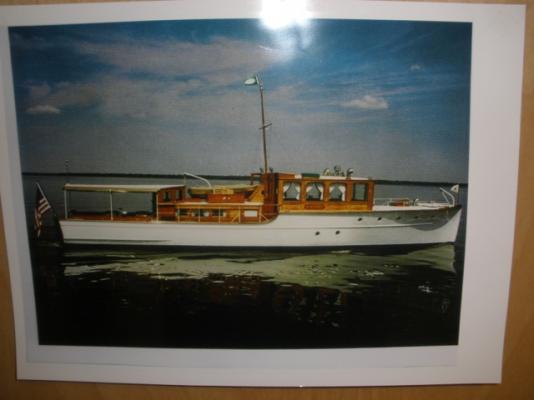
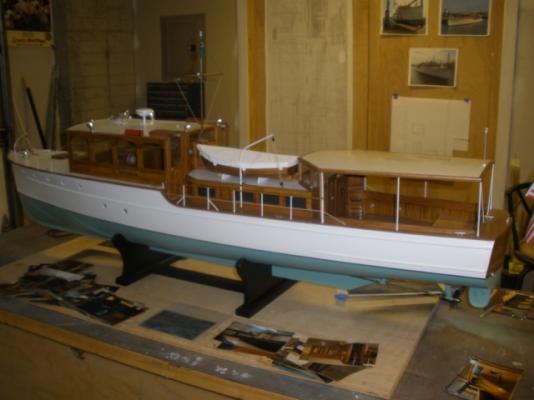
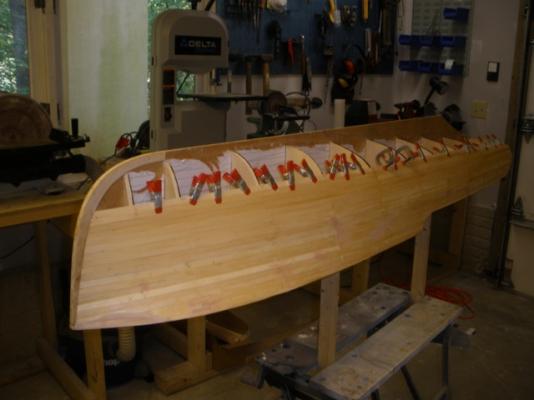
A couple of years ago, I was asked to build a 1/12 scale model of a 1929 'Consolidated' cruiser by the owner of the original vessel. He had invested over a million dollars in it's restoration and wanted a large model of it for his home. Not having much experience with 'doll house' scale I was more than a little anxious! The model would be five feet long and at that scale pretty much every feature on the real boat would have to be shown. My client insisted the interior furniture would have proper drawers, there would be exact replicas of the light fixtures, instruments, doorknobs etc. He even specified which navigational chart he wanted shown on the chart table..! It was a large project which took me about a year starting with a complete photo survey and a visit to Mystic Seaport museum who hold the Consolidated shipyard plan archive. Unfortunately a large part of the archive isn't catalogued yet and the researcher couldnt guarantee when they would turn up the hull lines I was looking for right away. I sent her and her colleague two large boxes of Nantucket chocolates and I had the plans in a week along with a little note that said "we work twice as fast for chocolate"..! A couple of days studying the lines, and I was ready to start. I had the plans enlarged to 1/12 size and stuck the bulkheads to a keel. I added large wooden blocks between the bulkheads to ensure there would be as little twisting of the keel as possible and the bulkheads would stay rigid with such a long keel. I planked the hull in basswood using planks of the same scale size as the original. When that was done I cut away the bulkheads where the lower deck and interior were to fit. and then fibreglassed the entire interior to ensure there would also be no movement of the planking over time. Finally, I added the fore deck formers and cut the deck from 1.5mm plywood. (To be continued)


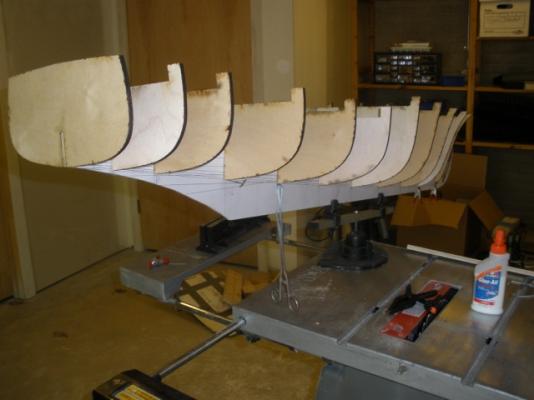


- 18 replies
-
- 7
-
-
- lullubelle
- yacht
- (and 1 more)
-
They are indeed very elegant aren't they. I built a very large model (5 feet long) for the owner of a classic motor cruiser the 'Lulubelle' a couple of years ago. The original was built by Consolidated shipyards in New York in the late 20's. Here are a few photos. And for those who want to see a slide show of the whole construction process. Here's a link. http://www.photoshow.com/watch/TU7vB9FI Congratulations to Omega on your really excellent model. I could never hope to work at such a small scale. "God bless your eyes" as my dear old grandad used to say..!


- 120 replies
-
- 5
-
-
- mystic
- motor yacht
- (and 2 more)
-
Essex - Process and corrections to the new Model Expo Kit
overdale replied to samueljr's topic in Wood ship model kits
Just how bad is it Terry. I'm about to start on the old kit and I'm wondering now whether to just build a hull from the Takajian drawings. -
Essex - Process and corrections to the new Model Expo Kit
overdale replied to samueljr's topic in Wood ship model kits
I tried to get in touch with Sam a few weeks back but got no reply. I hope all is well.. -
automotive pin stripe sticker
overdale replied to leroy's topic in Painting, finishing and weathering products and techniques
I generally paint the waterline color onto the hull first in a broad area either side of the waterline area, then lay the correct width of masking tape where I want the waterline to be. I spray the bottom color, then I mask that off leaving the waterline tape in place and masking on top of it. After that I just spray the topside color. Remove all the masking and you'll have a perfect hull and waterline without worrying about the pin striping tape peeling away at some inconvenient point in the future or having to build up a large layer of paint to camouflage the thickness. -
Ian, if the stern of your model is black, then you could look at printing the lettering out on your computer. You choose the font you like, size etc. then type it onto a page from notepad or similar program. Then in the 'tools' heading you can reverse the color so it's white lettering on black, define a 1/4" boundary round your lettering so the whole page isn't printed out in black and you can print and cut it out. I have used yellow lettering as well with this technique and it works very well especially after a coat or two of matt varnish when it's in place. Dan.
-
Color me 'in' too Sam..
-
what is the ideal modelling table?
overdale replied to AON's topic in Modeling tools and Workshop Equipment
One item I can't do without is a slab of granite from a refurbished kitchen. It's a piece about 20 inches square and I use it for smaller glueing operations and assembly work where I want to be sure what I'm working on is absolutely flat. It does get covered in glue now and again but as it's granite it's simple to scrape off everything with an old chisel and start again. Check with worktop supplier/installers they often have offcuts lying around that they want to get rid of. -
Lovely work Danny. Always a pleasure to drop in and look at your progress.
-
Keith, I'm open to correction, but 'Tallow' is much more cream than white. As for the bulkhead red, take a look at some 18th century models for the shade that you like best. I don't think there is a definitive shade of red but generally I go with what I see on contemporary models. The red that seems to work best (for me) is a darker, crimson 'blood' red. I think it looks more natural as the paint in the 1700's didn't have anything like the range of pigments modern paints have today and were based on natural pigments like iron oxide etc. Dan.
-
There are commercially made inexpensive patinating solutions for copper available. They are used by people who make stained glass lampshades. (Which is what the copper tape is actually for) I used one on a brass statue of a fish in my garden and it turned it a fabulous green/brown overnight. If you look up 'patinating solution' on Amazon you'll find them, but here's a link.
-
Exactly what I was talking about. Thanks for posting that Fam. I shall make further enquiries..! Dan.
-
Display case wood
overdale replied to Senior ole salt's topic in Painting, finishing and weathering products and techniques
"Now I'm going to figure a way to soot up the furled sail, like smoke from the try works got on it." Get yourself a black pastel crayon and a piece of fine glass paper. Rub the pastel against the glass paper over the furled sail about six inches above the sail and allow the dust to drop onto it, enough that it's just noticeable, not too much. Then get a soft brush and rub it gently all over the sail to smudge the black out . It looks just like soot. -
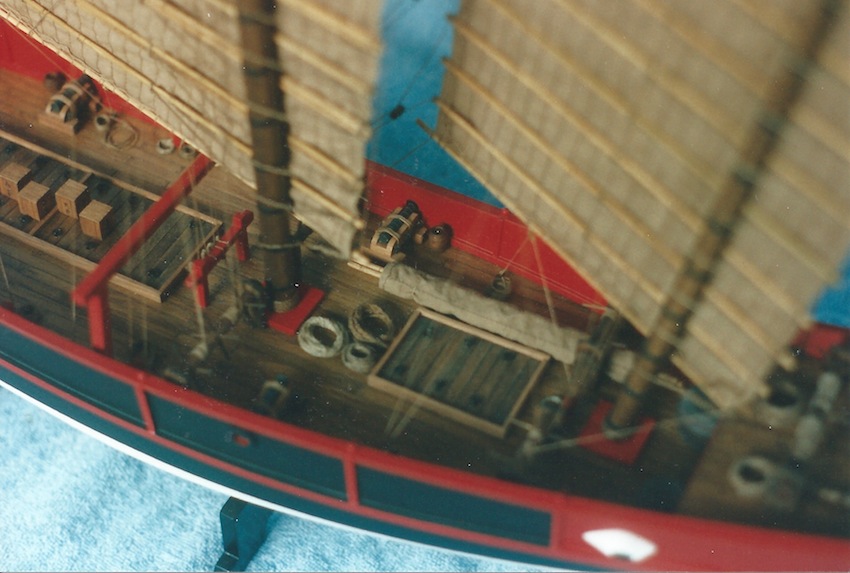
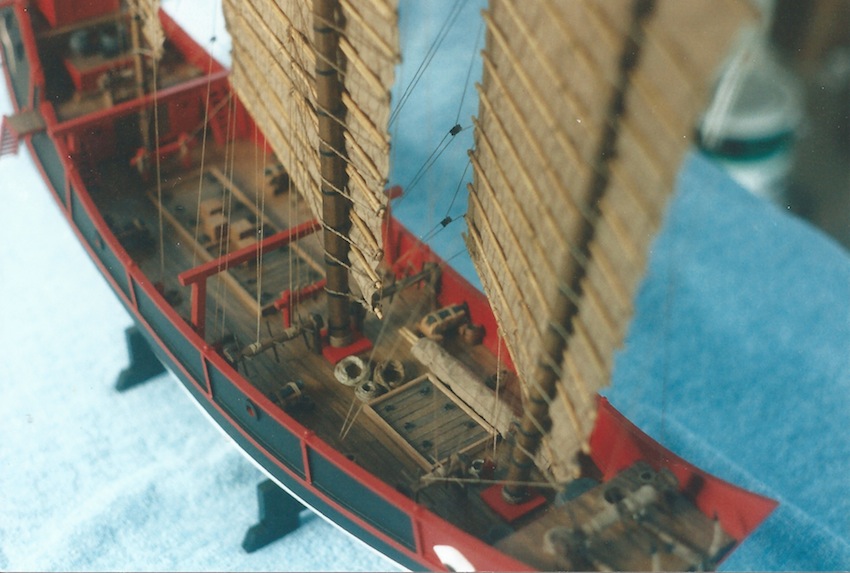
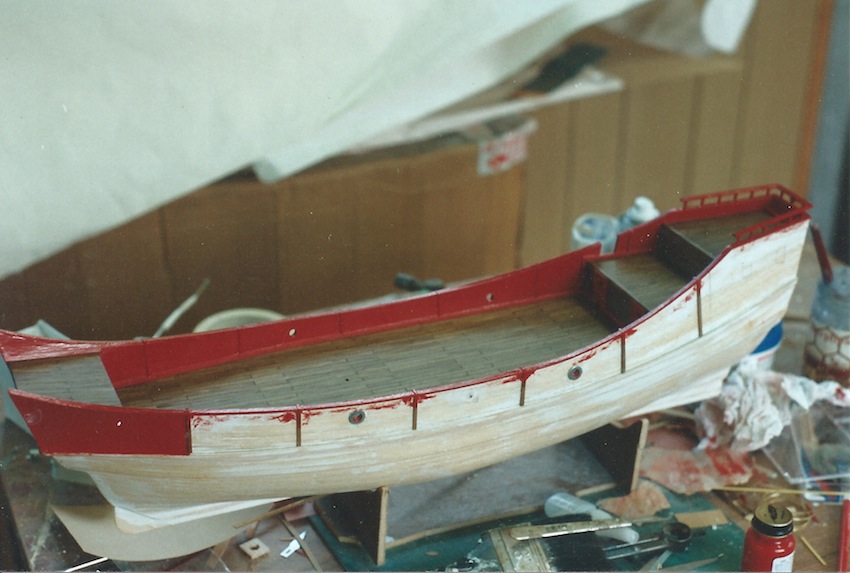
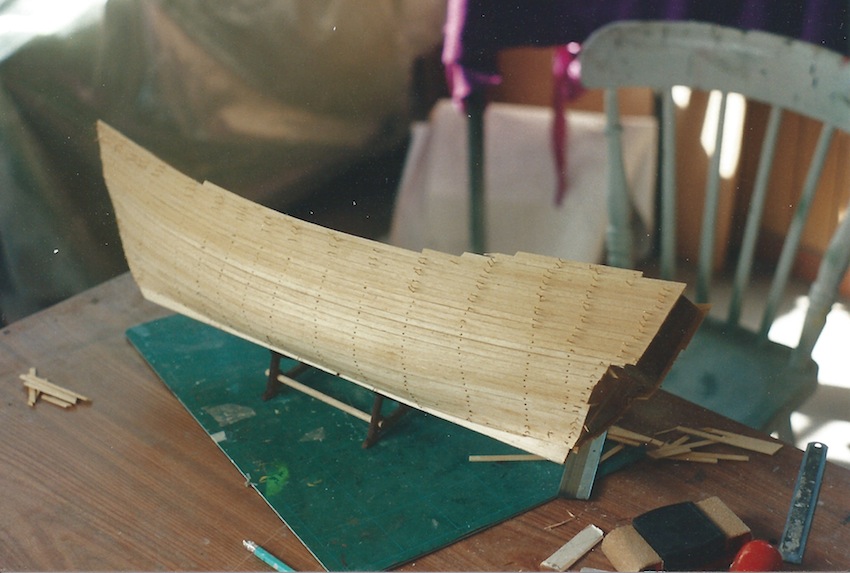
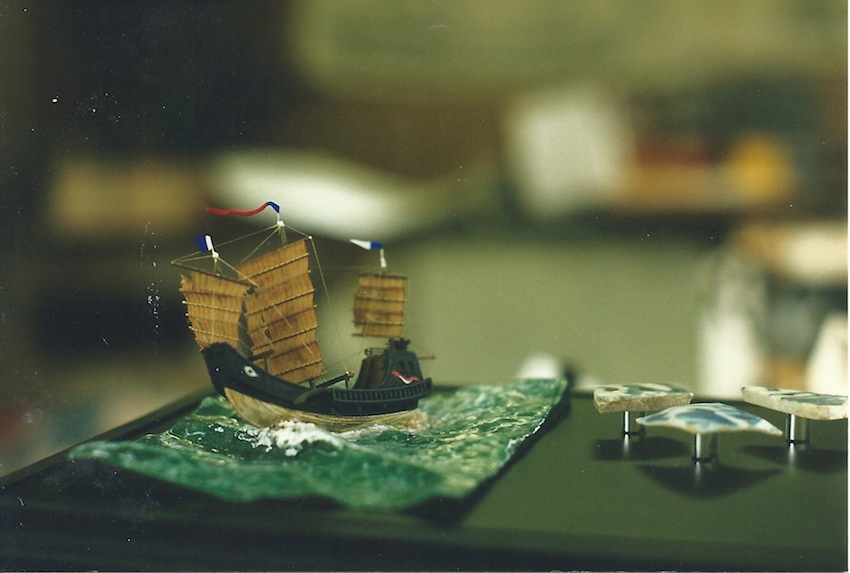
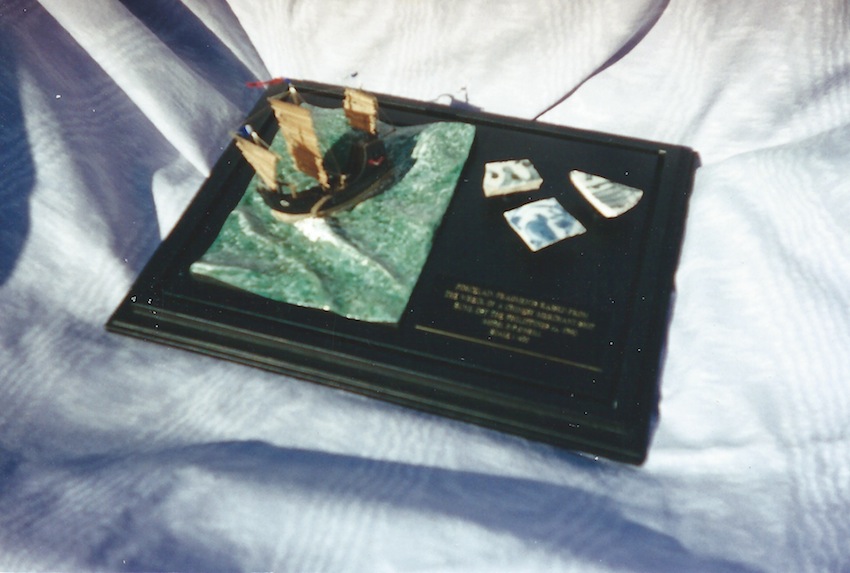
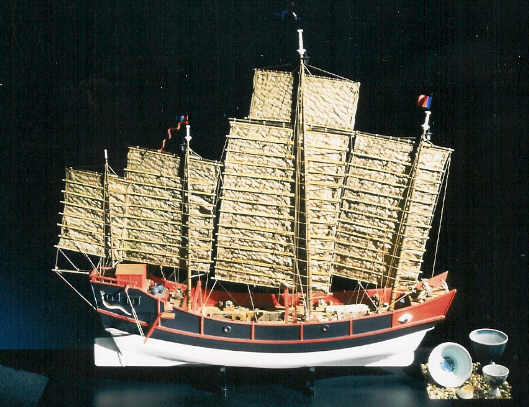
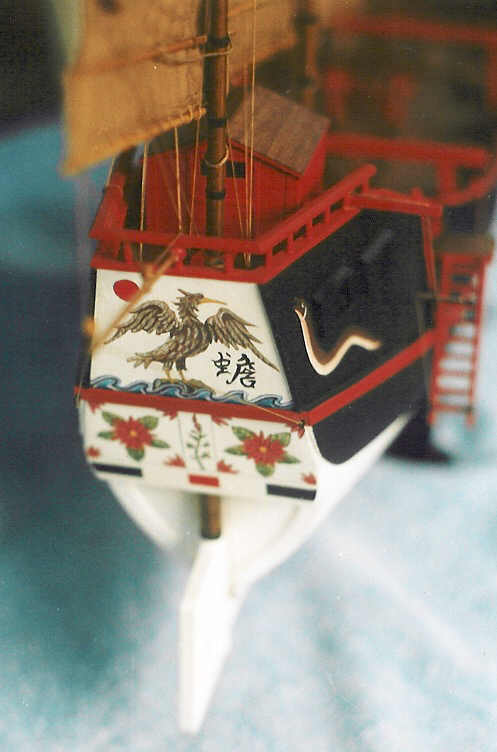
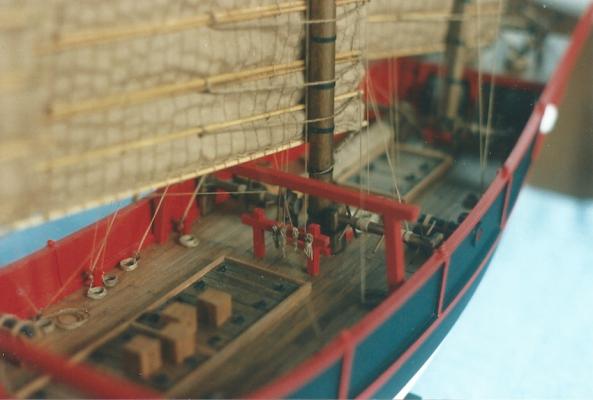
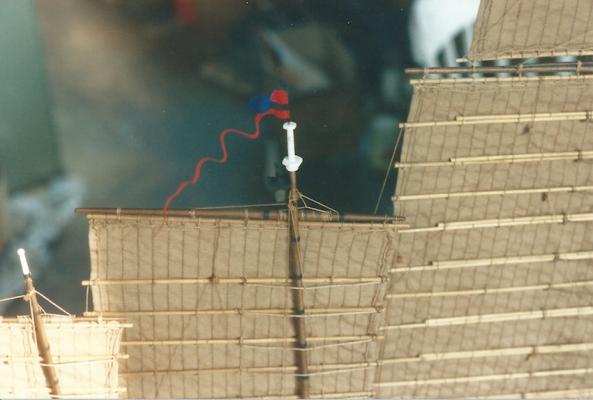
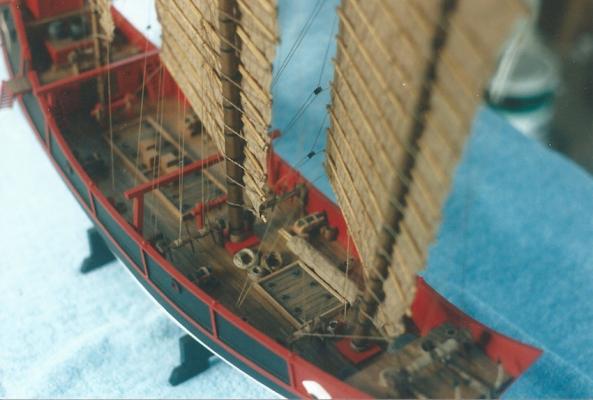
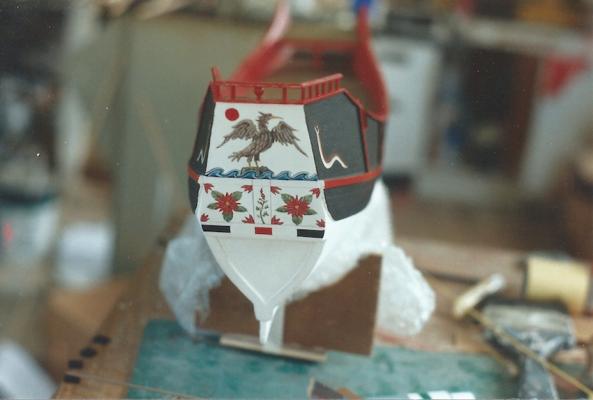
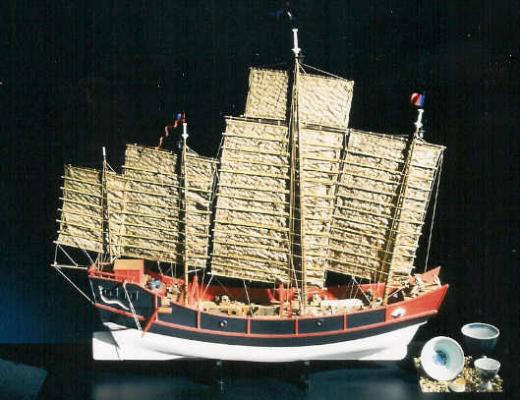
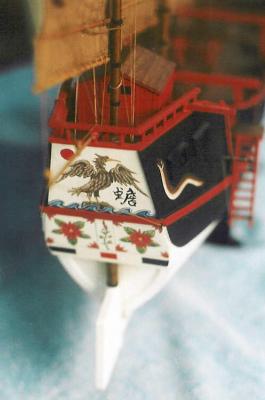
Vivian, here are a few more photos of the junk as requested. It's about 20% larger than the AL red dragon kit. The last two are of another model of a similar junk set in a storm. It was an inch and a half long. The rigging was stretched contact adhesive, the sails were paper and the sea was clay. The porcelain fragments next to the sea are Ming dynasty, recovered from the wreck of a junk that sank in the China Sea. Hope the pictures are of use, any questions please feel free to ask.. Kind regards, Dan.


- 188 replies
-
- 8
-
-
- latin caravel
- artesania latina
- (and 1 more)
-
Hi Vivian, I built a Ming Dynasty junk some years ago. As there weren't many drawings of Junk hull shapes around, I based the hull on the plan from the Amati Red Dragon kit. I enlarged the lines to give me the hull shape at 1/48 and built it on bulkheads as per the kit but everything else was scratch built. After the Caravel, I'm sure you won't have any trouble building it, but if you need any advice about deck fittings traditional colors and designs, or how to make the sails don't hesitate to ask. Kind regards, Dan.
- 188 replies
-
- 5
-
-
- latin caravel
- artesania latina
- (and 1 more)
-
Display case wood
overdale replied to Senior ole salt's topic in Painting, finishing and weathering products and techniques
Sos, I generally use a bowl of strong tea from a couple teabags to dip the sail material in. As the stain comes from Tannin in the tea, a natural dye, I find it looks the most realistic. You can experiment with some scrap cloth to determine how long to leave the sail soaking to get the amount of color you like. If you go too far on the actual sail, then just wash it out with detergent and start again. -
What can you tell me about this ship?
overdale replied to damoncoker's topic in Wood ship model kits
Damon, it looks like it might be a kit from a company called Deans Marine. Check their website and see. If it is one of their models then spare parts can be obtained. Good luck, Dan. -
That's a really good result Nils. The slightly irregular nail patterns and the thinness of the tape make it look very realistic. I have a project that will suit perfectly. Where did you get the pouncewheel from?
-
I think there was a foremast. It's possible those frames were a 'knockdown' construction, perhaps used to get extra sleeping/storage space when covered with canvas. I don't know if you've seen the model in the UK Science museum (attached below). I remember seeing it as a child..! I think that looks about right. There are four masts on the book cover illustration one too many in my view. Steven, I do have some old faded single sheet drawings of basic lines for several different cogs. I'll see if I can find them. Dan.
-
"I think that every model you see from this era is based on 'guess work', but it is educated guess work by interpreting the sources used. Hell, no one really knows and debate still rages about what the Mary Rose really looked like at the time of her capsizing, and that's over a millennium and a half after the Roman Quinquireme" Nice work Chris. It's amazing to think that a huge entity like the Roman Empire, in existence for centuries has such little reference to it's ships, the things that generated and maintained virtually all it's wealth. I have had similar problems trying to find information on roman merchant vessels. There seems to be only one accepted image of a commercial ship which has a large swan attached to the stern. While I'm sure such vessels did exist, I'm also pretty sure that not every merchant ship had a swan for a stern but that's all we have. Very frustrating. I wonder if Amati might be persuaded to remedy that situation with a roman merchant vessel subject? You would be just the man to deliver it. Dan.
-
I just posted this on Vivian's caravel log but I thought it might be useful to you too as a rigging reference..? Dan.