mtaylor
-
Posts
26,273 -
Joined
-
Last visited
Content Type
Profiles
Forums
Gallery
Events
Everything posted by mtaylor
-
Great handle. Welcome to MSW.
-
I shall join in the toasting... will brandy work as it's all I have right now?
-
They did do models of various sizes but i think there was a full size one built and still floating around somewhere. I vaguely remember reading something about this some time ago.
-
Hi Tony. Welcome to MSW. You might try contacting Constructo and see if they can help with the instructions. They have a website: http://www.constructo.es but it looks like you'll have to use Google Translate for it.
-
Thanks for the download, Alan. I'm looking forward to reading it as I'm a "fan" of the Billy Ruffian.
-
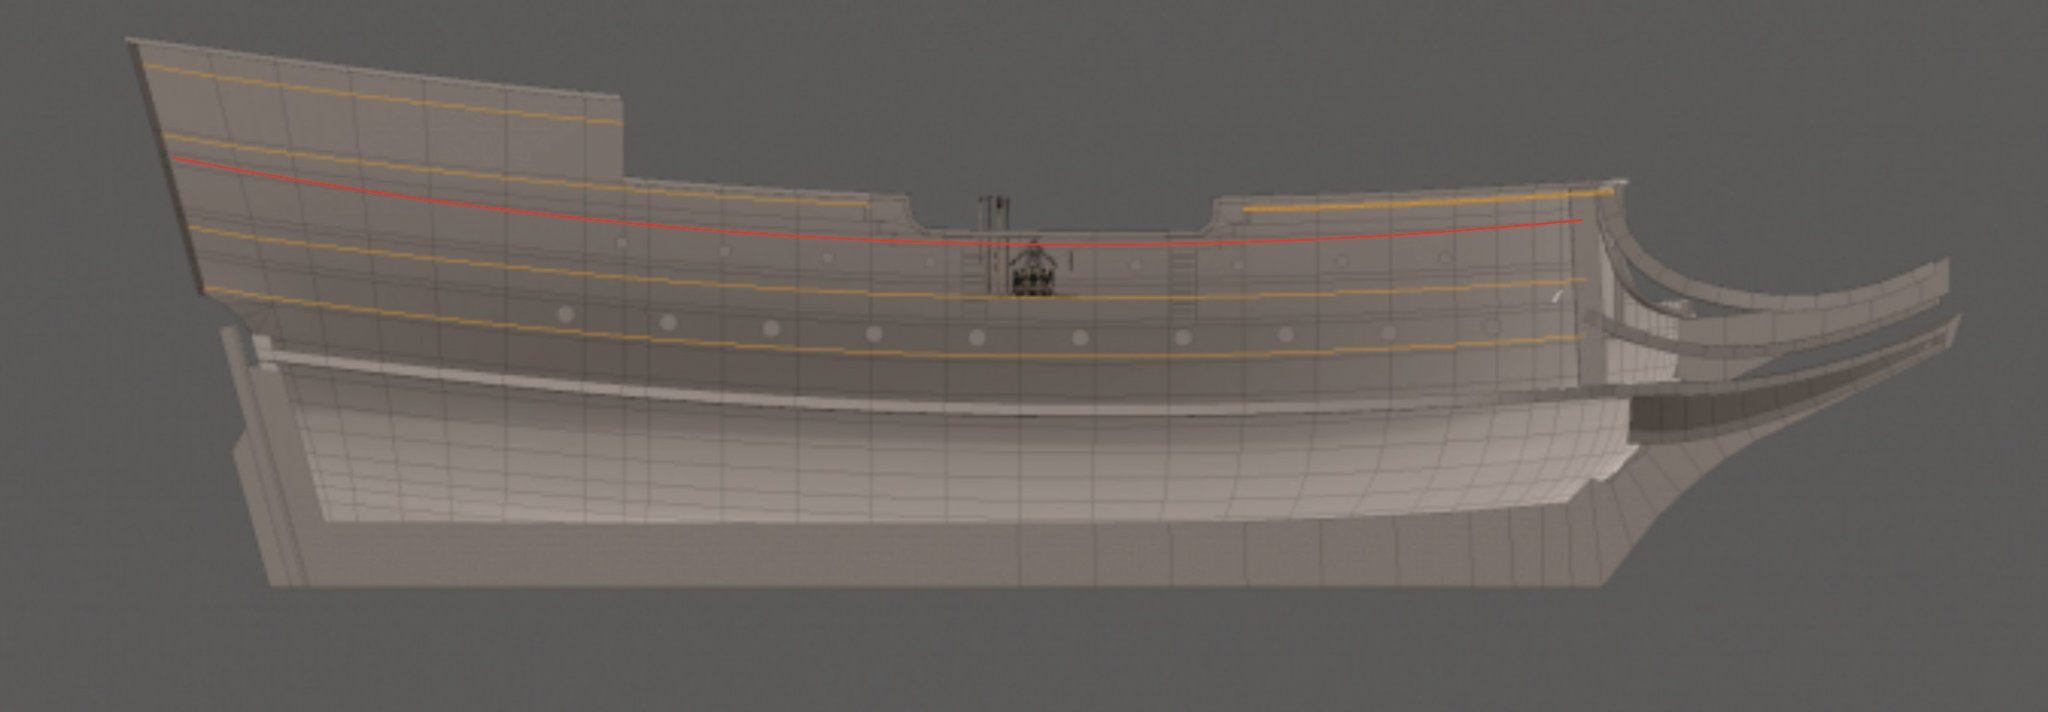
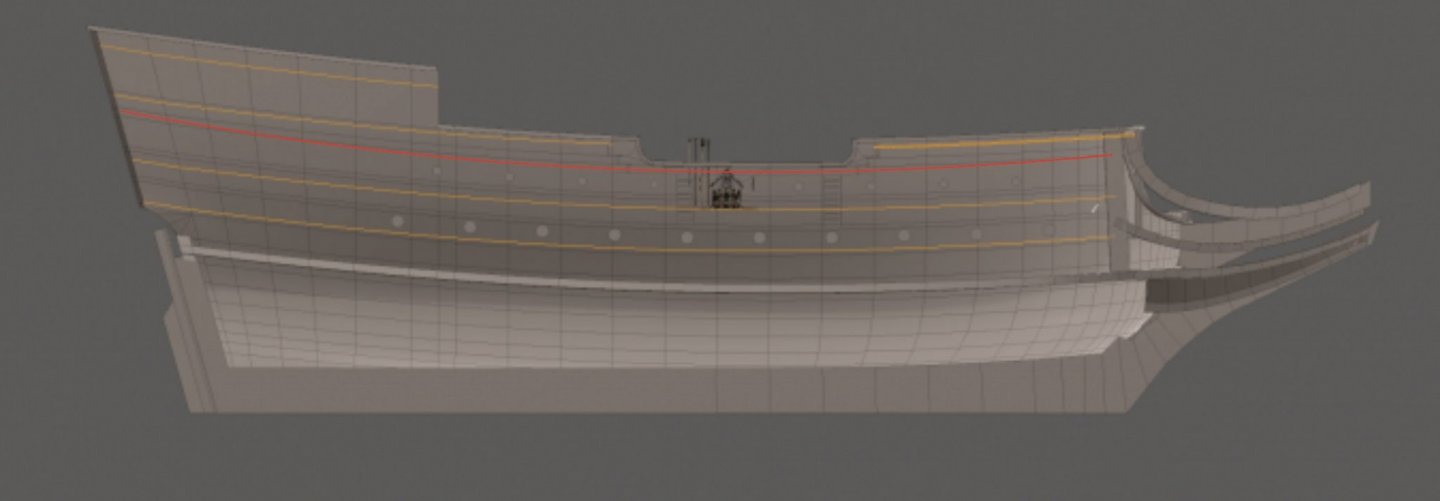
From here, it looks like you have your decks right as to locations with respect to the gun ports. As for the stern... The galleries (on the side) could be an issue but since this is a fictitious, they're probably not where they should be... as on a real ship. BTW, I believe one deck is too high... see my drawing below. I think the red line is where it should be. The upper one on the stern seems hight also. See if that helps with the galleries.
-
Ah.. fun days then, Claire. We usually spent more time chasing the rockets and looking for them than launching them. We had to stop though as were flying from the University which was in the landing pattern for Wright-Patterson AFB. We got a visit one Sunday from the AP's one Sunday who suggested we find a "different place".
-
I'm sorry to see this go. Lou had a good idea that's very doable. But sometimes, starting over is best as we apply what we've learned. I hope you'll do a log for Emma.
-
Cutty Sark by NenadM
mtaylor replied to NenadM's topic in - Build logs for subjects built 1851 - 1900
That looks lovely and a wonderful place for quiet and thinking.- 4,152 replies
-
- 2
-

-
- cutty sark
- tehnodidakta
- (and 1 more)
-
I quite agree with Alan. I feel that MSW is a replacement of sorts for the "apprenticeship" . We may not have a master sitting across the room, but they are here and big help at acquiring skills.
-
I too did the Estes rocket thing back in the day. One was the Mercury but the beast was Saturn V. Lost the Saturn V when one of the motors (it had 5 as I recall) blew up on launch. Irritated me but it wasn't uncommon as some their motors did blow like a fire cracker.
-
Welcome to MSW, Nazir. I would suggest you go here: https://modelshipworld.com/topic/17023-quick-find-indexes-to-build-logs-for-kits/ Click on "Wooden Ships" and download the index of all kit builds. You'll find Albatross has quite a few. They can help you get started as you'll see what's involved and where any problem areas are.
-
Lots of ways to do this. I just pull the line through a block of beewax and burnish in with my fingers. I have also used a mix of 50/50 white glue and water. I'm certain there's more ways.
-
Stunning work, Danny. I can't imagine trying to put all those small fiddly parts together.
-
Welcome to MSW, André. Looking forward to seeing your log.
-
Looks fantastic. I hope you put a copy of the wiring diagram either inside the connector box or under the stand. I would shudder to think about repairs.
-
I merged your two topics for the log into one. Please just go to the bottom of the page and add as you need instead of starting a new topic. Thanks.
-
Congratulations on a beautiful model, Hellmuht.
-
You're probably right on that deck. The 3rd and 4th photos down with the Daughtless (that is a good photo)... is that the Gambler Bay or a different ship?
- 49 replies
-
- 2
-
-
- gambier bay
- hasegawa
- (and 1 more)
-
Looks good, Alex. On the deck... that looks like deck from the few color photos of various carriers when new. As it aged (pretty quick with sun, water, scrub downs and operations, it faded and acquired some grunge including skid marks. There are colored pics out there on the web of carriers's decks of that era. I guess it depends on the look that you want. Right now everything looks fresh and new.
- 49 replies
-
- 2
-
-
- gambier bay
- hasegawa
- (and 1 more)
-
Greetings from Tacoma. Have I taken too big a bite?
mtaylor replied to Paul Gardner's topic in New member Introductions
Welcome to MSW, Paul. I suggest taking Toni's advice and getting the hull planking kit. You'll learn a lot and pretty quickly since it's not a full hull. There's a link to the project in her signature. -
Best tool for Cutting Windows for gunports
mtaylor replied to michael101's topic in Modeling tools and Workshop Equipment
That works very well to know when to stop filing. -
Best tool for Cutting Windows for gunports
mtaylor replied to michael101's topic in Modeling tools and Workshop Equipment
What a lot of do is drill small holes well inside the line for the port opening. Then use either an X-acto knife or the micro saw. Finish it up with files or sanding sticks.