HOLIDAY DONATION DRIVE - SUPPORT MSW - DO YOUR PART TO KEEP THIS GREAT FORUM GOING! (Only 51 donations so far out of 49,000 members - C'mon guys!)
×


mtaylor
-
Posts
26,273 -
Joined
-
Last visited
Content Type
Profiles
Forums
Gallery
Events
Everything posted by mtaylor
-
F-86F-30 Sabre by Egilman - Kinetic - 1/32nd scale
mtaylor replied to Egilman's topic in Non-ship/categorised builds
Looks good from here also, Egilman. I would have the urge to print on out at an even larger size just "because". The important thing is that you be happy with the print outs. Yes, I'm in awe. -
Old NRG Article on Deck Plank Spacing
mtaylor replied to mikiek's topic in NAUTICAL RESEARCH GUILD - News & Information
If you'll click on the file name in markjay's post, Deck Planking.pdf, it will automagically download the file to your device. -
Welcome to MSW, Neil. Beautiful work on the models.
-
For this beast, rigging guns would indeed be painful.
-
Lovely work going on there. I haven't seen many Spanish frigates (scratch or otherwise) here so I'll follow along. I'd like to suggest you do an introductory post in the New Members area.
-
Looks good and that's great to hear about the fit. One question... with the beams in place, will they block installing some of the gun? I'm assuming there's no gun rigging on this deck.
-
The shrouds are coming along very well and looking great.
- 476 replies
-
- 2
-

-

-
- sphinx
- vanguard models
- (and 1 more)
-
La Palme by Tobias - 1:36 - POF
mtaylor replied to Tobias's topic in - Build logs for subjects built 1501 - 1750
You're off to a great start, Tobias. -
I'd go for the hidden method. The reason is one wire with DC and multiple LED's will create a problem as the further down the line of lites, the dimmer they will be due to the voltage drop of the LEDs. The catch is, that I know it happens with light bulbs but not sure about LED's as it depends on voltage, current draw, and amount of resistance in each LED. I'd test it first and make sure it'll work. If you see dimming at the far end of the line, maybe you can use double strand but I doubt there's any thin enough.
- 454 replies
-
- 1
-
-
- Union Steamship Company
- Stepcraft 840
- (and 3 more)
-
Ah... got it. I think you'll be happier doing the way you're now doing it. Less chance of pulling the masts out of line.
-
Thanks for clarifying that. I guess I got a bit confused somewhere.
- 476 replies
-
- 1
-
-
- sphinx
- vanguard models
- (and 1 more)
-
Thanks for the likes and comments. Still making progress. I'm using a method similar to Moonbug's (quote below). However I've modified it a bit. I put the wheel on the round toothpick with a touch of Elmer's Glue-All (the white one). For sanding, I used a sanding stick (the foam filled fingernail files). I then chucked it into a WeCheer mini power tool and spun it up at the absolute lowest speed to light sand. When I"m happy with the char removal, I just drop the toothpick and wheel into some alcohol to dissolve the glue. This lets me reuse the toothpicks also. As for the rounding of the axles, I'm just using a mini file as with the larger files I feel they would overwhelm, hide the work area, and generally be a nuisance. These fiddly bits really just need a light touch and a couple strokes to round off. I got the idea for the toothpicks from you. Thanks. But, I did modify it a bit... see my response above. Lots of ways to skin that cat. . Nope. The original plan was to not do much painting of the hull. So I probably won't do much more painting at all. I don't have an airbrush and the paint hides the details. The only reason I painted as much on the hull as did was necessity brought on by some outside issues... mostly battle damage from a young visitor.
- 505 replies
-
- 7
-
-
-
- vanguard models
- Sphinx
- (and 1 more)
-
I think the second go is much better. I am surprised though, that you're doing one side first and then the other side. Seems that this might cause some unwanted "tilt" in the mast.
- 476 replies
-
- 1
-
-
- sphinx
- vanguard models
- (and 1 more)
-
Beautiful work, Yves. I would daresay that your log will be the instructions for those who follow. I do like your concept of not being a slave to finishing that which won't be seen also.
-
Do they make Frenchies also?
-
Thanks. I am giving thought to 74 or maybe a razee. I'm not minding this. I just wish my new glasses were here and I could work longer. I'm keeping that as an option just in case. Once they have all the their wheels I'll put them into position and if needed, adjust accordingly.
- 505 replies
-
- 8
-
-
- vanguard models
- Sphinx
- (and 1 more)
-
Still slogging away at the coal face, so to speak. Waiting for the new glasses but still working. Currently I'm at the gun building stage. Work maybe 15 minutes then back off and rest the eyes for a bit. Definitely some fiddly bits. Anyway, below is a photo. I have one finished and ready to go as it was my test. I'm now doing a production line.... assemble gun and carriage, next shape axes, install the cross bar and eyebots and finally the wheels. So, currently shaping the axles at this point. As this point, I'm unsure if the quion will be needed as my first one looks good in all ports without it.
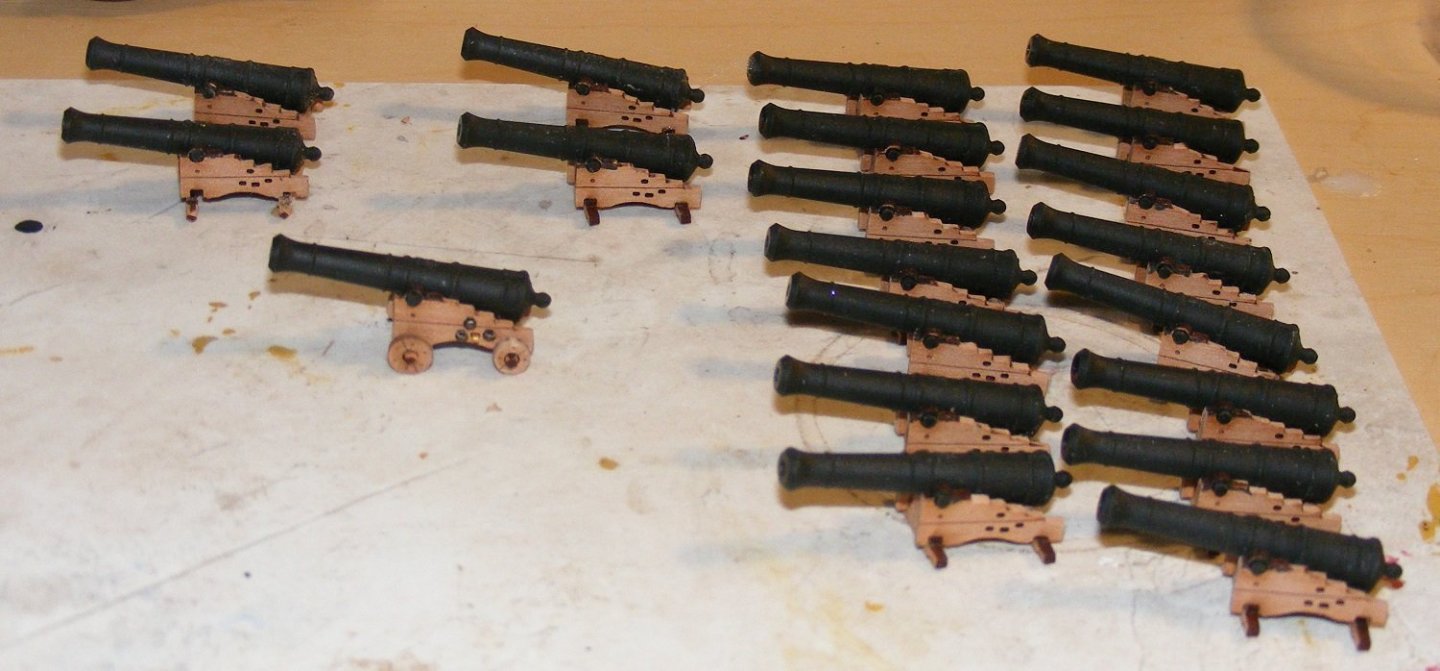
- 505 replies
-
- 22
-
-

-
- vanguard models
- Sphinx
- (and 1 more)
-
What a great weekend you had with memory to last a lifetime. Thanks for sharing it with us. At some point soon, I hope the government will provide funding for projects such as this. It's a part of who we are and how we got to where we are today.
-
Were there two anchors?
-
I'm not sure you'll get an answer back as Rolfg was last on last July. I do hope he sees it or gets a notification of your posts and can return.
-
Thanks Keith. I haven't totally lost my marbles yet.
-
Didn't many of the bowsprit stays have a zig-zag pattern to running of what's being called "ratlines"? It would be one line run back and forth from the tip of the bowsprit to the hull. I don't remember it's just on few ships (types and countries) or just done during a timeframe in history.