
MORE HANDBOOKS ARE ON THEIR WAY! We will let you know when they get here.
×


Beef Wellington
-
Posts
2,249 -
Joined
-
Last visited
Content Type
Profiles
Forums
Gallery
Events
Everything posted by Beef Wellington
-
Spyglass - you are of course correct, over to you. A Merry Christmas to all!
-
 Stergios, I think you want the chesstree to extend between the wale and the capping rail to be authentic. There is a hole for a piece of rigging that goes through the top of it, and you should check to make sure that this hole is clear of the channel to avoid problems later. My initial quick thought would be to suggest filing down the end of the channel a little so you can accommodate the chesstree between the channel and the sweep port.
 -
Ok, here's my next one...name has been obscured. Don't think this should be too tricky, but hey, its Christmas!

-
George W. Wells?
-
Sjors - I seem to have had an "attack of the fuzzies" recently , I'm going to try a tip that Arthur used with liquid shoe polish, seems there are plenty of options also with the clear acrylic sealer and diluted PVA glue. Just need to figure out what works best for me in different situations.
-
Fascinating build Colin
-
Jim - I have no idea what the size is (not marked anywhere) but its definitely finer than the 0.1mm line supplied in the kit (which I think is of questionable accuracy). I went to a local craft store and simply bought a whole bunch of threads to see what seemed to work best (the one used is labeled "polyester-glace finish cotton" if that means anything). Its made by Coats and Clark - others probably have suggestions on the best stuff to use but I didn't want to obsess over it. As for the machine, seams to be a necessity to do any serving - even with it, practice and experimentation is the order of the day and I suspect its a skill that requires many years to perfect (if ever) so decided you need to start somewhere. Its also a considerable time suck
-
Andy, Sjors and the 'likes' - thanks as always for the ideas and the support Nigel - nice to have you stop by! Jim - I got the serving machine from Alexey through this site. Bottom line, I splurged not really knowing much about what I wanted or what was needed. http://modelshipworld.com/index.php?/topic/1594-serving-machine-20-not-just-serves-ropes/#entry33197. Seems to work well. I'm sure it would be possible to make your own as many others have done but I really want to spend as much free time as I can on the build rather than the tools!
-
Can't wait to see how the 2mm blocks look Stergios. Where did you finally get them from? Good luck with the weaponry!
-
Bob - that looks great and you look to have some very nice lines on your hull. I've noticed that the copper plates can highlight slight imperfections but looks like you've got it just right. Keel looks good as well, you should be very happy.
-
The Norrskar?
-
Very slow progress of late, combination of not much time, waiting for some supplies (cleats and 3mm double blocks for under the tops) and general busyness. Worked on completing some of the pendants. Seems these should have been split and then served around the mast, I cheated and simply attached some line on the other side and seized to the main pendant - these are totally cosmetic so should not be an issue. Given that these will probably be hidden by the shrouds this may have been a waste of time, but I'm finding that practice is not a bad thing to build confidence. I believe that one of the main purpose for these was to tension the shrouds. Although when served the line tends to be quite stiff, I'm not sure how to keep the pendants hanging realistically, I think the best bet will be to simply wait for the shrouds and these will naturally push these down. Haven't done any touch up on these. The Burton pendant on the mizzen
- 800 replies
-
- 4
-

-
- snake
- caldercraft
- (and 1 more)
-
Bob - just sharing my (limited) experience. The I opted to just use copper paint on the interior surfaces, it really is not visible at all but may be slight different on larger ship. The Admiralty paint have flakes of copper in them so they should supposedly oxidize along with the regular plates.
-
I couldn't force myself to hit the 'like' button on those photos Jim, but looks like you have everything in hand.
- 412 replies
-
- 3
-
-
- snake
- caldercraft
- (and 1 more)
-
Great news - I hope you are going to have some 'before and after' photos Best of luck.
- 412 replies
-
- 2
-
-
- snake
- caldercraft
- (and 1 more)
-
Jim - so sorry to hear of the devastation! We call all imagine how that must feel, but glad that you feel it can be resurrected. The copper plates should be easy to address with some copper cleaner/polish although try to look beyond the initial shiny results as they will dull back down with time. I'm guessing that this is also a side benfit of painting the ship, repairs are easier to complete. Your decision to take step back is probably a wise one! I did have a slight issue myself some months ago where one of my channels was mysteriously broken (although no-one would admit to it, I strongly suspect one of the resident hobbits), but the repair was not too noticeable after a fresh coat of paint. All the best.
- 412 replies
-
- 1
-
-
- snake
- caldercraft
- (and 1 more)
-
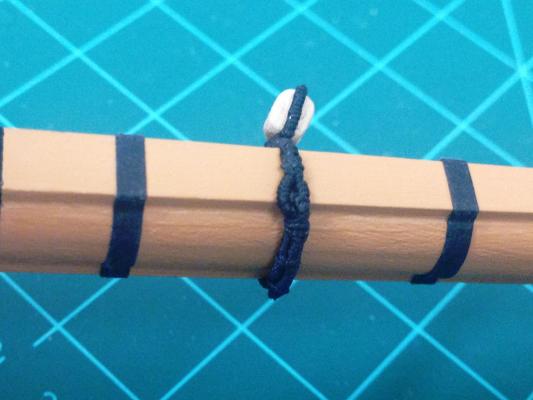
That rigging looks great Mobbsie, appreciate the really clear photos that show off your great work. Love the mouse as well, I'll send you a PM because I'd like to shamelessly copy as well!
- 1,279 replies
-
- 1
-
-
- agamemnon
- caldercraft
- (and 1 more)
-
Don't know how you find the time Richard, like many have commented will be nice to see this rare build unfold. The kit looks to be of high quality and I'm sure you'll do her proud. Are you planning to use the decks as supplied, or use traditional planking following the marked template?
- 55 replies
-
- 1
-
-
- mercury
- victory models
- (and 1 more)
-
John, adding voice to the chorus of "well dones", looks very realistic! What did you make the tubs and flues out of? Looks like you've filled in the gaps between the bricks with something that looks really good, what is it?
- 2,250 replies
-
- 1
-
-
- model shipways
- Charles W Morgan
- (and 1 more)
-
The coppering looks fantastic, I really like the Amati copper plates and you've done a really accurate job with them. Well done. Have you considered putting a false keel under the copper, that would also help keep the bottom of the hull looking neat?
-
Hi Jim, feel bad raising a ratline point just as you're wrapping up with them but wanted to tap into your fresh experience. Looking at lots of pictures of ratlines, they seem to be made with quite thin line, possibly smaller than the 0.25mm the instructions indicate. I was mulling over using some thinner stuff (not quite sure what yet), from your experience do you think that would make doing these any less challenging? I imagine the thicker line would make keeping the shrouds straight much more challenging - any recommendations. Also, as I continue to mull over the rigging plans I noticed a mistake in the plans that will impact your before me. The standing and running jeer blocks for the main yard (Sheet 5) are reversed with the L and M references reversed. The inset picture correctly shows the double jeer block at the top but the mis-labeling of the blocks is consistent.
-
Happy anniversary Jim!
-
Thanks so much B.E. - I was afraid you were going to say that ! I sense some pendants in my future and some rework/additions on the top blocks.
-
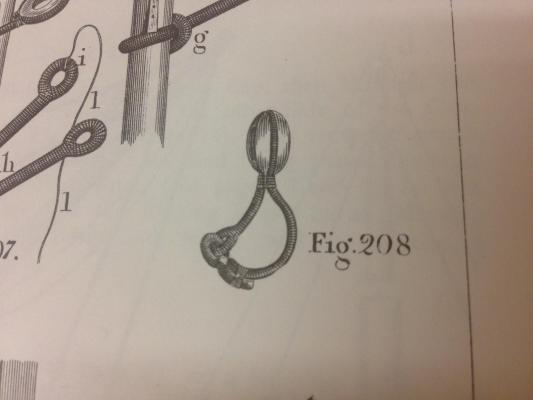
The book is "The Young Sea Officer's Sheet Anchor" by Darcy Lever. I find it useful in conjunction with Petersson's rigging book because it has really good illustrations of each of the major components and shows how different blocks, for example were attached. Its also great because its essentially a manual to illustrate how a real ship would be rigged in step by step order - the text can be a little tough to follow though in places.
-
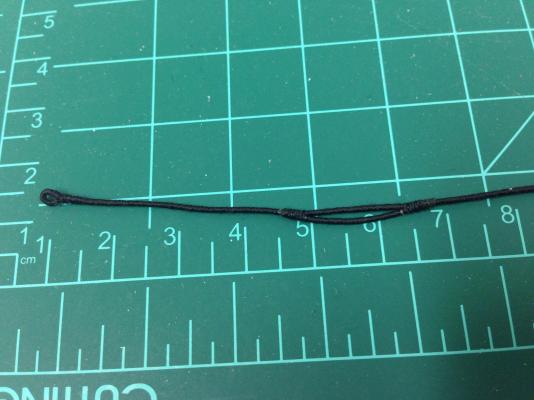
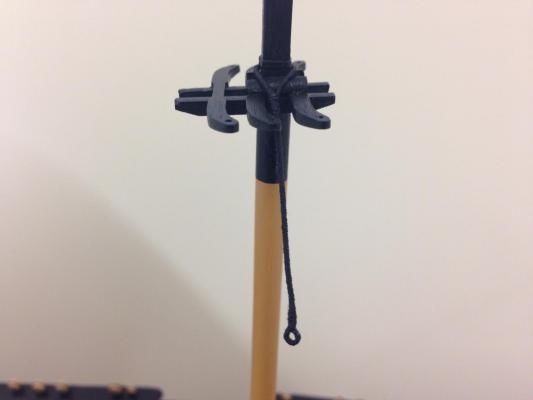
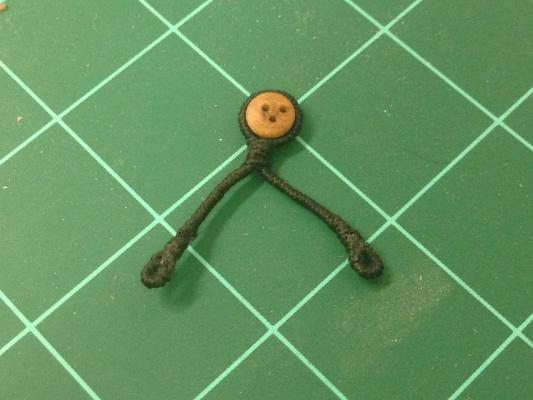
I need to ask some questions, sorry for length and diversity. In my previous post I'd fitted the blocks for the spritsail topsail brace, which are the only blocks called for in the instructions/plans. Looking over Petersson it seems that there should be quite a few more, specifically for the buntlines and leechlines. My conundrum - do the plans overlook these or is there some reason why these would not be present on a smaller ship like Snake (seems unlikely)? As I'm probably not going to put sails on this one, is there justification for leaving these off, I'd like to avoid the rework if possible. I note that Petersson references Burton Pendants on each mast, again these are not mentioned in the kit instructions. Would these also need to be added for basic accuracy? I've seen it recommended that masts should not be glued in place as the shrouds will keep them position, but not quite sure why gluing is a bad idea. I have quite a bit of side to side movement on the foremast because of the way the hole in the deck ended up. Couple of update pics on blocks to go into . I seem to be becoming a little obsessed with the rigging which I need to stop if I want to finish this! Blocks rigged for the main topmast stay and preventer stay. I served the stropping for the preventer stay (per Lever) which was a pretty time consuming and very fiddly exercise but I was pleased with the result in the end. Will need to go through this a few more times for the main stay and preventer stay. Also made up the mizzen deadeye for the mainmast. Preventer stay Mizzen stay deadeye per Lever
- 800 replies
-
- 7
-
-
- snake
- caldercraft
- (and 1 more)


