


BANYAN
-
Posts
5,534 -
Joined
-
Last visited
7 Followers


Recent Profile Visitors
7,156 profile views


-
 Scottish Guy reacted to a post in a topic:
How to make flat rope coils?
Scottish Guy reacted to a post in a topic:
How to make flat rope coils?
-
Scottish Guy reacted to a post in a topic:
How to make flat rope coils?
-
Bob Cleek reacted to a post in a topic:
How to make flat rope coils?
-
BANYAN reacted to a post in a topic:
SMS WESPE 1876 by wefalck – 1/160 scale - Armoured Gunboat (1876) of the Imperial German Navy as first commissioned
-
BANYAN reacted to a post in a topic:
Mary Rose by Baker - scale 1/50 - "Your Noblest Shippe"
-
BANYAN reacted to a post in a topic:
Steamboats and other rivercraft - general discussion
-
Knocklouder reacted to a post in a topic:
How to make flat rope coils?
-
Keith Black reacted to a post in a topic:
How to make flat rope coils?
-
barkeater reacted to a post in a topic:
How to make flat rope coils?
-
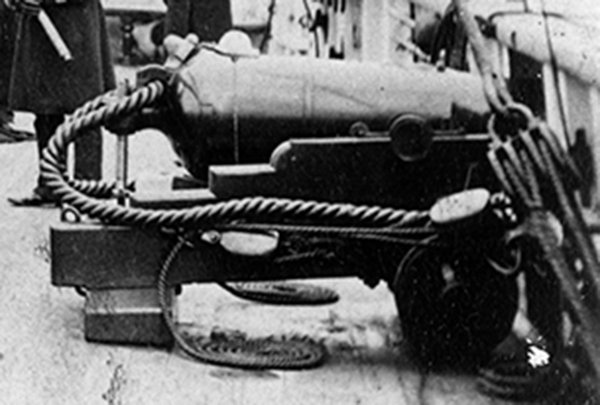
Hi Bob, agree your reasoning WRT using such coils. These coils may have been a bit more commonly used than perhaps thought. Further to Bob's comments, even in this day and age (well when I was in the service at least) where synthetic cordage is commonly used (and more prone to the effects of UV), these decorative coils were in common use for rope whenever the ship was in harbour/at the buoy or at anchor. When underway 'proper' working coils were always used. These coils are also evident in images of HMCSS Victoria (1855). It appears this may have been the general practice in RN ships (or military type ships) back then also, as can be seen in the following photograph (c.1858) of the gun tackle working parts being cheesed (or more correctly - Flemish coiled). The vessel was in harbour (moored) at the time. However, I must offer a point of difference in opinion WRT to how they were unwound. When reforming the coils, or taking the coil in hand, we would 'unwind' it from out to in by grasping the rope/line near the block or securing device, then walking the line out. This was the opposite to the way it was made up, which minimised the risk or tendency of the rope to kink, and allowed the rope to unwind with its lay. That said, other Services/ships may have done it differently. cheers Pat
-
mtaylor reacted to a post in a topic:
How to make flat rope coils?
-
PvG Aussie reacted to a post in a topic:
How to make flat rope coils?
-
BANYAN reacted to a post in a topic:
Beavers Prize 1777 by Mike Y - 1:48 - POF - Hahn style
-
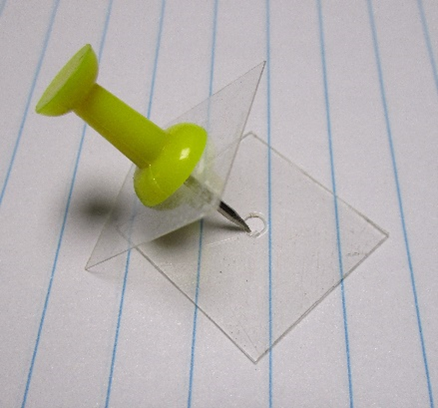
Hi Vossey, I will try to describe the technique I use for 'cheesing' the tail ends of tackles. Not my original idea, but it works well for me. First soak your rope/thread, cut to an appropriate size (if doing separate) in a diluted solution of PVS/water ( I use about a 60 water/40 PVA). If using the actual tail end of the tackle, this still works but just soak the required length of the tail (working end of the falls) I use two small squares (or round) of clear plastic (from shirt boxes or the like). I punch a pin (usually a tack with raised plastic head) through both (See Photo). Separate the two leaving the upper plastic square/round on the pin, and put the outer/tail end of the rope/thread through the centre hole of the bottom square with about 1 to 2mm protruding to the bottom side. Put the pin back into this such that it holds the end and makes a sandwich with the thread between both plastic squares. Now rotate either the assembly or wind the thread around the centre pin to start making a flat cheesed coil to the desired diameter. Allow the finished coil to dry before removing; the plastic does not let them stick too much but still take some care when separating the coil from the plastic. These 'jigs' are so easy and cheap to make you can dispose and remake as required, especially when the centre holes become too large from wear/use. Just one way to do it. cheers Pat
-
BANYAN reacted to a post in a topic:
Micro-Mark Desktop Dust Collection System
-
BANYAN reacted to a post in a topic:
Sloop Speedwell 1752 by Chuck - Ketch Rigged Sloop - POF - prototype build
-
BANYAN reacted to a post in a topic:
Sloop Speedwell 1752 by Chuck - Ketch Rigged Sloop - POF - prototype build
-
BANYAN reacted to a post in a topic:
Trireme Olympias by Richard Braithwaite
-
BANYAN reacted to a post in a topic:
Bending hard brass.
-
BANYAN reacted to a post in a topic:
Mary Rose by Baker - scale 1/50 - "Your Noblest Shippe"
-
 Great way to rekindle those memories Mark; good luck with this project. cheers Pat
- 4 replies
-
- 3
-
-
- half hull
- half hull planking project
- (and 1 more)
-
What a great result Eberhard; thanks for stepping us through the process. It looks very effective/realistic, especially at that scale. cheers Pat
-
A stunning build Richard; an exemplar of how to build such a model. I have very much enjoyed this build log so far. cheers Pat
-
You continue to show us just what is possible with your metal smithing Keith; impressive results. cheers Pat
-
That is some 'plodding along' Ian, looks great. cheers Pat
- 502 replies
-
- 4
-

-
-
- Quadrireme
- radio
- (and 1 more)
-
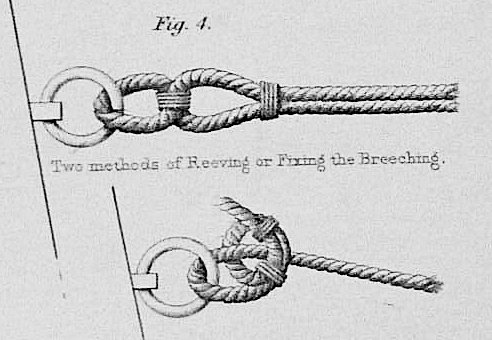
Agree, the following is from Capt. Boxer's (RN) 'Diagrams of Guns' (1853) which still shows the use of bending the breeching rope to rings in the mid-19th century. cheers Pat
-
Great to see this update Jason; your build continues to impress. cheers Pat
-
Great diorama Greg; have to agree that wake looks really convincing. cheers Pat
- 47 replies
-
- 1
-
-
- Zumwalt
- Snowman Model
- (and 2 more)
-
Nice work Jerry, looks great. I like the printed 'races'/tracks. cheers Pat
- 524 replies
-
- 2
-
-
- sloop of war
- constellation
- (and 9 more)
-
Hi Ian, I cannot recall where now, but I managed to buy just a few sheets from an online supplier. If I find some time, I will dive into my records to see if I can find the supplier - but I am not hopeful. cheers Pat
- 502 replies
-
- 3
-
-
- Quadrireme
- radio
- (and 1 more)
-
Ian would not a self-made decal work to maintain the uniformity of the eyes. The decals, once applied, can be sealed with a spray-on or brushed varnish /clear coat for protection. I have had success printing my own decals for small toys etc that I make for the grandkids. The decal paper is relatively cheap and readily available online. I printed mine using a laser jet printer, but I think there are decal papers for other types of printers also. That said, hand painted adds a sense of realism. cheers Pat
- 502 replies
-
- 4
-
-
- Quadrireme
- radio
- (and 1 more)